ACCORD Database Version User Manual
|
|
|
- Stephanie Payne
- 6 years ago
- Views:
Transcription

1 ACCORD Database Version User Manual 1
2 TABLE OF CONTENTS ACCORD DATABASE 1 User Manual 1 1 INTRODUCTION Audience 5 2. GETTING STARTED 2.1 Technical requirements Internet Connection Browsers PC Setup 2.2 User Roles/Permission 2.3 Chemotherapy Prescribing 3. QUERYING 3.1 MS Access set up - Linking ACCORD data to MS Access 3.2 Schema 4 ADMINISTRATION 4.1 User Management 4.2 Generating and Changing Passwords 4.3 Modifying Drop Down Boxes 4.4 Standards for Drop Down Boxes 5 DATA ENTRY 5.1 Patient Records 5.2 Data Entry Standards 6 CLINIC LISTS 6.1 How to run a clinic list 6.2 Clinic list columns defined 6.3 Open a return patient 6.4 How are the lists generated? 7 GENERAL INFORMATION 7.1 Session Time Out 7.2 Logging Off APPENDIX A A 1 - COLORECTAL 17 A1.1 Preoperative Data 17 A1.2 Operation Report 17 A1.3 Surgery Outcomes 17 A1.4 Adjuvant Therapy 18 A1.5 Pathology 18 A1.6 Routine Follow Up 18 A1.7 Recurrence Summary 19 A1.8 Minimum Dataset 20 A-2 CENTRAL NERVOUS SYSTEM (CNS) A2.1 Preoperative A2.2 Operation Report A2.3 Surgery Outcomes and Pathology
3 A2.4 Adjuvant Therapy 21 A2.5 Routine Follow-up 21 A2.6 Treatments at time of Recurrence/Progression. 21 A-3 HEAD AND NECK A3.1 Preoperative Details A3.2. Adding and Event A3.3. Adding a Biopsy (within an event) A3.4. Adding Surgery Details (within an event) A3.5. Adding Pathology Details (within an event, within a surgery) A3.6. Adding Recurrence/metastases Summary (within an event) A3.7. Other Treatment for Primary Tumour A3.8. Speech and Nutrition A3.9. Follow-up A-4 BONE AND SOFT TISSUE A4.1 General Information A4.2 First consultation A4.3 Further consultation A4.4 Diagnosis A4.5 Occurrences A4.6 Treatments A4.7 Treatment Groups A4.8 Reconstructions A4.9 Followup A-5 RENAL A5.1 General Information A5.2 Initial diagnosis A5.3 Initial investigations and staging A5.4 Status at registration A5.5 Surgery and pathology A5.6 Surgery outcomes A5.7 Other treatment primary A5.8 Clinical trial A5.9 Recurrence / progression A5.10 Follow-up A-6 PROSTATE A6.1 General Information A6.2 Presentation A6.3 Medication summary A6.4 Surgery, outcomes and pathology A6.5 Radiotherapy and endocrine therapy A-7 CHRONIC LYMPHOCYTIC LEUKAEMIA (CLL) A7.1 General Information A7.2 Registration: Clinical A7.3 Registration: Investigations A7.4 Past treatment A7.5 Treatment / Follow-up APPENDIX B Part 1 - QUERYING ACCORD USING ACCESS - SETUP Part 2 - LINKING TO THE ACCORD TABLES
4 APPENDIX C SCHEMAS 63 Colorectal Schema Head & Neck Schema Central Nervous System Schema Bone and Soft Tissue Schema Bone and Soft Tissue Schema Renal Schema
5 PREFACE This software users manual describes how to use the ACCORD Database Version INTRODUCTION The Australian Comprehensive Cancer Outcomes and Research Database (ACCORD) is a reliable, easily accessible dataset on all cancer patients treated at contributing hospital sites. It has been developed for hospitals that require a simple data collection and entry system, and allows clinicians to analyse the clinical and demographic characteristics of cancer patients. ACCORD is a web based system which allows users to enter data from any hospital networked computer, thus can be used in clinics. The ACCORD system allows you to enter, edit and review a patients cancer episode. To query the data use MS Access for identified data or BioGrid (SAS software) for de-identified data (see The information in this manual is presented to assist health care professionals caring for cancer patients with collecting and accessing the data entered into ACCORD. The manual was written, reviewed and edited by Project Officers, Data Managers and Software Developers working in colorectal cancer settings, and has been reviewed by Oncologists and Surgeons. Feedback, positive or critical, from users of the manual is welcomed. Please your comments to enquiries@biogrid.org.au 1.1 Audience This document is intended for users who have no previous experience with the ACCORD Database. It should give the reader a basic understanding of the following concepts: What the ACCORD Database is How to enter data How to manage user access How to edit user-managed drop down lists How to access information from the ACCORD Database 5
6 2. GETTING STARTED The following subsections describe the recommended system requirements and user configurations necessary for your organisation to utilise the ACCORD database. 2.1 Technical requirements For detailed technical requirements, refer to the technical user manual (in installation CD) or see your IT department Internet Connection 56Kbps or higher Browsers ACCORD uses CSS (style sheets) to display the database s web interface. Older and experimental browsers that do not handle CSS correctly will have display problems. ACCORD is tested with these browsers: Mozilla Firefox or higher (recommended) Internet Explorer v6 or higher Safari (commonly used on Apple Macintosh) V3.2 or higher PC Setup Processing speed of 500Mhz or higher Monitor resolution set at 1024x768 or higher Windows 98SE/ME/2000/XP 128MB of RAM for Windows 98SE/ME; 256MB of RAM for Windows 2000/XP 6
7 2.2 User Roles/Permission The following is a list of user types and the roles they are assigned to. Administrator: These users create and manage ACCORD database user accounts. They are also responsible for maintaining user-controlled field lists to ensure standardisation across ACCORD sites. Data Manager: These users can add, edit and view information held on the ACCORD database for the cancer stream(s) they are authorised to manage. These users can allocate data entry rights to other users (for their cancer streams) and can also run clinic lists to identify returning patients. Read only: This is the default user setting. These users can view information held on the ACCORD database for the cancer stream(s) specified. These users can also run clinic lists to identify returning patients. These users can not edit or add data. Data entry: These users can add, edit and view information held on the ACCORD database for the cancer stream(s) specified. These users can also run clinic lists to identify returning patients. This user type is managed by individual cancer stream data manager(s). Surgeon: These users have the same privileges as Data Entry users, but can only view their own patients. This user type, is available upon request. Oncologist: These users can add, edit and view information held on the ACCORD database for the cancer stream(s) specified. These users can also write chemotherapy prescriptions for patients using the ACCORD Chemotherapy Prescribing module. This user type is managed by individual cancer stream data manager(s). 2.3 Chemotherapy Prescribing The Chemotherapy Prescribing module was developed to enables clinicians to prescribe therapy and record important data that can be used for further research purposes. The chemotherapy dosages are calculated according to standardised protocols using calculated Body Surface Area (BSA). Regimens are dosed using actual or ideal BSA depending on clinician preference. The prescriptions are computer generated (.pdf file), in a clear format designed in conjunction with pharmacy and oncology nursing input. Please refer to the separate Chemotherapy Prescribing user manual for further information. 7
8 3. QUERYING ACCORD does not have an inbuilt querying tool. To query your data, you can use MS Access (identified patient data), BioGrid tools (de-identified patient data) or any other querying tool which can link to SQL tables. 3.1 MS Access set up - Linking ACCORD data to MS Access To use ACCORD data in MS Access, you will need to make an Open Database Connectivity (ODBC) link between your PC and the server that ACCORD data is stored on. You only need to do this once per PC per user. After you have made the ODBC link, you can then link Access to the ACCORD tables you require. Refer to appendix B on how to link to ACCORD in MS Access. If you are unsure of any steps in this process please contact your IT department for help. Please note: Some tables in Accord are system or reference tables, which do not need to be linked into Access for querying (see the schema in appendix C for the relevant tables to link). 3.2 Schema Tables with names which end with the word View have been set up to show you the text entry in a field rather than the background reference number. Use these tables where they exist The data you see in Access is read-only. Changes made to the data in Access do not change the data in ACCORD. The Schema shows you how to build the relationships in MS Access and other querying tools that enable the querying of fields from different tables within the ACCORD database. Refer to appendix C for a diagram of the relationships. 8
9 4 ADMINISTRATION An Accord Administrators is appointed at each site and assigned an administrator logon that enables them to add new users, generate passwords and modify drop down boxes. Administrators at each site should maintain contact with administrators at other sites to ensure consistency in drop down box additions, particularly within tumour groups. 4.1 User Management When logged in as an Administrator, the User Management screen will be displayed. The following subsections describe the functions available on this screen User Types Administrator: The administrator can create new users and edit value lists (drop down box content). The administrator logon does not manage patient data. It is recommended that the administrator(s) at each site coordinate with each other and other sites to standardise the value lists so when data is combined there are standards. It is the administrator s role to allocate Data Manager rights to the appropriate users, when the administrator creates a new user they have read-only rights. Only the data manager for each tumour stream can allocate data entry rights to a user. Data Manager: A data manager is the key person involved in collecting, managing and maintaining the database for a particular tumour stream. A data manager can add new users and allow users the ability to be a data entry user (add, edit and delete data). They can also allocate a user to be an oncologist (write chemotherapy prescriptions). They have data entry and oncologist user rights. Read-Only: When the administrator or data manager creates a new user, they are automatically allocated read-only rights to all tumour streams. To gain data-entry or oncologist rights the tumour stream data manager needs to allocate that right (per tumour stream). The user can view all data but not edit, delete or add data and can run clinic lists. Data Entry: A user allocated data entry rights can add, edit and delete patient s information. Access is granted per tumour stream by the tumour streams data manager. Users can also run clinic lists. Oncologist: A user allocated oncologist rights can add, edit, delete patient data and prescribe chemotherapy. Access is granted per tumour stream by the tumour streams data manager. Surgeon: This user is only on Accord versions when requested, it has been developed for a centralised database model and is not used at individual hospitals. Users are allocated as a surgeon can only see their own data when they are entered as the consultant or assistant surgeon for that patient. They can also add new patients Adding New User Administrators and data managers can add new users. Go to the Manage User Access tab at the top of your screen. Click the New User button at bottom of the list of users Enter username this can be selected by the user (usually surname + first initial e.g. John Smith would have the username smithj) Enter Last Name (can only use alphabetic characters) Enter First Name (can only use alphabetic characters) Enter Password (may use lower and upper case alphabetic characters and numeric characters please note that the password is case sensitive) 9
 then select the tumour stream(s) they manage. Leave blank if they are not a data manager.")
10 If user is to be allocated an Administrator role, tick Is Administrator box (note: they will need to allocated a separate logon for accessing to the patient data). If the user is a Data Manager (see definition above) then select the tumour stream(s) they manage. Leave blank if they are not a data manager. If a data manager is creating a new user, you can then give permission for the user to have data entry or Oncologist access to the tumour streams they manage. See definitions above. Click on the Save button to add New User Viewing or Editing User Details Users are listed in the Manage User Access area in alphabetical order by username. Open a user s profile by clicking the Open link adjacent to their username or their name if you are logged in as a data manger. Make changes to the user s profile if necessary. Eg data manager users can allow users to be data entry or Oncology users. If any changes are made, click the Save link below the user s details. Otherwise, click the Cancel link Deleting a User Note: Only the administrator can delete users. Click the Delete link adjacent to the user s username on the User Management screen OR Open the user s profile as described in and click the Delete link below the user s details A message will appear asking; Are you sure you want to delete this user? select OK or Cancel 4.2 Generating and Changing Passwords Your ACCORD administrator will generate and give new users a username and password to gain access to the system. The new user should change his or her password when first using the database. To change the password, click Settings from Main Menu at top of the screen. Enter Current password 10
11 Enter New password Retype New password to confirm Click on Change password button 4.3 Modifying Drop Down Boxes Only administrators can modify drop down selections. Click Control Data Lists from Main Menu To view or modify the data in drop down boxes, click on the + symbol next to the appropriate form name in the left side column. This will expand the list to display all drop down box data lists for the form. Select the relevant data list from the newly displayed options To add data, type into the blank boxes at bottom of the data list. Name refers to the text which will appear in the drop down box on the data entry screen. Value refers to the data which will be stored in the Accord table. Click on Add to save new data to the list This will now appear as a selection in the drop down box on the data entry screen. Note: you can not delete selections from drop down boxes so ensure you have entered the correct details before saving. 4.4 Standards for Drop Down Boxes Additions to Data Lists can only be made by an Administrator Additions should only be made after liaising with other Accord Administrators or tumour groups for consistency across sites. Please consult with relevant clinicians or committees before adding new selections. 11
12 5 DATA ENTRY 5.1 Patient Records To access the system, enter your username and password and press the Enter key or click on Login. The Search screen will be displayed. Any field in the search screen can be used to search for a patient. Click the mouse in the particular search field you choose. eg Last Name, UR number, Universal ID etc. You may use a combination of search fields Searching Patient Record Enter the patient information in the relevant search field and click Search or press the Enter key to check if patient is already entered. Search Outcomes: o o o o If only 1 record found, this will display the Patient Details screen for that patient. If 2 or more records are found, select the correct record from the patient list by clicking on Universal ID. If incorrect patient, click Search from Main Menu at top of screen to return to Search screen. If no match, a No records found! message is displayed at bottom of search box. Click Clear Search to try again or add as New Patient Adding New Patient Record To enter new record click New Patient from Main Menu to display the blank Patient Details screen. (This screen is the same for each Tumour Type) Patient Details If ACCORD is linked to your Patient Information System Enter the patient s UR number Select the Campus The patient demographics will be auto-populated Check if the name and details are correct If ACCORD is not linked to your Patient Information System, follow the instructions below Enter patient details 12
13 The mandatory fields are: Last Name First Name can just enter first initial DOB must be dd/mm/yyyy Sex Use the Tab key to move through the fields Use mouse to make selection from drop down boxes or type in first letter of entry. eg Y for Yes or N for No, M for Male or F for Female Please ensure the patient details are entered exactly the same as they are recorded in your hospital s patient management system. Update Patient Status field: Alive patient is alive with no recurrence or metastases Dead patient deceased also complete death date and cause of death using drop down box. New primary patient diagnosed with new primary cancer Recurrence patient diagnosed with recurrence Stage IV patient has metastatic disease Click on Save (or tab to Save and press Enter key) to add New Patient. To add a tumour episode, select the New Episode link as shown below. 13
14 Adding a tumour episode After you select New Episode select the tumour type, as shown below (1). Enter the Episode details and press Save (2) The screens for that tumour stream will appear in the left (3), just select the relevant screen you would like to enter data in. General Information Each patient can have more than one episode of cancer, episodes can be seen on the navigation tree on the left of screen and are identified by tumour type and diagnosis date. Date of Diagnosis is a mandatory field at a particular point for each tumour stream. Some fields may be hidden if a previous selection indicates that it is not applicable. The Comments box allows free text. Any information relevant to this patient s episode can be added here. If all fields are entered, use the Mouse to click the Complete radio button at the bottom-right of the screen to indicate that the form is complete. Most tumour streams will highlight incomplete forms in red on the left hand navigation tree. Save saves the data and remains on the current screen, Save and Next will to move to the next form Viewing/Editing an existing Record To edit or view an existing record, search patient as per After opening the patient s record, select appropriate data entry screen from the Navigation Tree in the left side column Browse onscreen form and make changes or additions to the data by clicking mouse in relevant field. Press the Save or Update button at the bottom of the screen to save any changes Deleting an existing Patient or Episode Deleting a patient: To delete an existing record, search patient as per After opening the patient s record, in the patient details screen, click on Delete at bottom of screen A pop-up message will appear asking: 14
15 Are you sure you want to delete this patient? All data about this patient will be gone Click the OK or Cancel button on the message Deleting an episode: To delete an existing episode (not the Patient Details or other tumour types), select the episode you want to delete (tumour type and data of diagnosis in the navigation tree). Click on Delete at bottom of screen A pop-up message will appear asking: Are you sure you want to delete this entire Episode? Click the OK or Cancel button on the message 5.2 Data Entry Standards Blank Fields Only leave fields blank if the data is still being followed up Not Applicable Use N/A in a field when you have tried to find the data, but it cannot be found in the medical records or at consultant s private rooms (if applicable), or where the field is not applicable to this patient Complete and Incomplete Radio Button A completion status indicator is available on some screens. Users can use this field to determine whether they want to include incomplete data in their queries. To use this field correctly: o Select Complete when all fields have been filled, including N/A (where applicable). o Select Incomplete if fields are still blank. This indicates that the data is either being followed up or patient still receiving treatment and so data is periodically updated. o Incomplete forms are highlighted in red on the left hand screen navigation (for most tumour streams) Data field definitions Some fields throughout ACCORD have a? symbol on the field label. To view the definition(s) of these fields just click on the?. The definition will appear in a pop up box, if this does not occur try unblocking popups in your web browser or holding down the Ctrl key when you click the?. A full data dictionary is available for each tumour module. You can download them at 6 CLINIC LISTS 6.1 How to run a clinic list From main menu at top of screen select Clinic Lists. Select your campus name from the Campus drop-down list. The drop down list of Clinics for that Campus will be displayed. Select required clinic and click on Patient List. Use your web browser s Page Setup feature to set list as a Landscape or Portrait document for printing Click on Print button at top of screen (right hand corner) 15
 Last Name First Name DOB Appointment Date check if correct clinic Appointment Time 6.")
16 6.2 Clinic list columns defined Patient List is displayed with: Universal ID Accord ID or N/A if not entered on database Status N = new patient, R = returning (returning to clinic and in ACCORD), O = old (returning to clinic but not in ACCORD) Last Name First Name DOB Appointment Date check if correct clinic Appointment Time 6.3 Open a return patient Click on the universal ID to go to the patient record for data entry. 6.4 How are the lists generated? Clinic lists are generated by your facility s Hospital Management System To add a clinic to ACCORD, please contact your IT department See the ACCORD installation manual for details on how to set up the clinic list function. 7 GENERAL INFORMATION 7.1 Session Time Out If the database is open and not used for 30 minutes, the session is timed out. 7.2 Logging Off Click on Logout from Main Menu at top of screen The logout page displays a message to close the browser. There is also a facility to Click here to login again. This will take you back to the Accord Welcome and Login screen. 16
. A1.")
17 Appendix A This appendix should be read in conjunction with the main body of the user manual to gain the most understanding of how to utilise this database. A 1 - COLORECTAL A1.1 Preoperative Data Complete as many fields as you can. Some fields will display further drop down boxes if yes is selected. Click on Save or Save and Next (to move to the next form). A1.2 Operation Report Click on Add New to add tumour site details. If more than one tumour, click on Add New again after saving first tumour site (see diagram below). Note Anastomosis method and type are located at bottom of Tumour Site data form Date of Diagnosis is automatically populated from the Preoperative screen. To enter more than one metastatic site in the Tumour Staging section, hold down the Ctrl key and click the appropriate sites from the list using the mouse. If Bowel Management is not applicable (only applicable for Rectal and Lower Colon tumours), click tick box to the right of the Bowel Management field label. This will automatically answer all related fields N/A. If all fields are entered, use the Mouse to click that the form is complete. Click on Save or Save and Next (to move to the next form). A1.3 Surgery Outcomes If fields are completed with Yes, drop down boxes are displayed. All fields should be completed. If the Other field in the Surgical Complications and Medical Complications sections is answered Yes, the Type field is displayed. Make a selection from the drop down list. 17
 data. To select more than one Regimen, hold down the Ctrl key and click the appropriate regimens from the list using the mouse. A1.")
18 A1.4 Adjuvant Therapy If treatment is not offered, select reason. If treatment is offered and accepted, the adjuvant chemotherapy and adjuvant radiotherapy forms are displayed. Enter either the Preop or Postop (or both) data. To select more than one Regimen, hold down the Ctrl key and click the appropriate regimens from the list using the mouse. A1.5 Pathology For the Pathology form to be displayed the tumour site details must be entered (see Operation report). Complete pathology data for each tumour site. If M stage is entered as 1, then ACPS will default to Stage D. Radial margin will only be displayed if tumour site is Rectal or Rectosigmoid. Pathologic response will only be displayed if Rectal or Rectosigmoid site. If entering data for multiple tumours, click Save and Next after entering first tumour site details to display next tumour site (see below). A1.6 Routine Follow Up To enter new Follow Up visit click on Add New to display the form. Date of Visit mandatory. Evidence of Recurrence should be completed Yes or No. Enter follow up test results, if not performed then enter N/A. Click on Save 18
19 A1.7 Recurrence Summary Recurrence details are entered either at time of diagnosis if patient is Stage IV disease or at anytime a patient is diagnosed with a recurrence. There can be multiple episodes of recurrence. Recurrence To add a new recurrence click New Form under Recurrence Summary on the left navigation menu. Details on the sites of Loco/regional recurrence and Distant Metastases sections are shown if Yes is selected for the Loco/regional recurrence or Distant Metsastases fields. Under Distant Metastases there is an Other field. If Yes selected, please specify. Under Method of Detection there is an Other field. If Yes selected, please specify. If Treatment Planned answered Yes, a Treatment Type list is displayed. To select more than one treatment type, hold down the Ctrl key and click the appropriate treatments from the list using the mouse. eg Chemotherapy & Radiotherapy If Treatment Planned answered No, select from the list of Reasons. To select more than one reason, hold down the Ctrl key and click the appropriate reasons from the list using the mouse. If all fields are complete, click on Complete Click Save Treatment Given To enter Treatment details, click on Add New in the Treatment Given section. Complete details of 1 st line treatment from data collection form. To enter additional treatments (2 nd line, 3 rd line etc), click on Add New. Each line of treatment will be saved and listed separately. Click on Open to view or edit details. Surgical Resection To enter Surgical Resection details click on Add New. To select more than one Resection site, hold down the Ctrl key and click the appropriate sites from the list using the mouse. 19

20 A1.8 Minimum Dataset If your site chooses to enter the minimum colorectal dataset two screens are available to enter this data, it is a selection of the information that is recorded in the comprehensive dataset and is saved in the same fields/tables. Add a new tumour by selecting Add New under the Tumour Sites heading. Navigate between the two screens by selecting Page 1 or Page 2 as shown below. Save each screen when data entry is completed. 20
21 A-2 CENTRAL NERVOUS SYSTEM (CNS) This appendix should be read in conjunction with the main body of the user manual to gain the most understanding of how to utilise this database. A2.1 Preoperative Selecting Yes for past history questions will reveal further questions. Tumour size allows for two decimal places. Height and weight can be entered as whole numbers only. A2.2 Operation Report Select one or more tumour site, click box to select and un-select. A2.3 Surgery Outcomes and Pathology If heading fields are answered with yes, drop down boxes are displayed. All fields should be completed. If the other field is selected in the surgical and medical complications sections is answered yes the type field is displayed, enter type. A2.4 Adjuvant Therapy If treatment not offered select reason If treatment is offered and accepted, the adjuvant chemotherapy and adjuvant radiotherapy fields are displayed. Enter the Preop or Postop (or both) data. To select more than one drug on the Chemotherapy form, hold down the ctrl. Key and select the appropriate drugs from the list. A2.5 Routine Follow-up To enter new Follow Up visit click on Add New to display the form. Date of Visit is mandatory. Evidence of Recurrence and following fields should be completed Yes or No. Add any relevant comments and click save. A2.6 Treatments at time of Recurrence/Progression. Recurrence details are entered either at time of diagnosis if patient is Stage IV disease or at anytime a patient is diagnosed with a recurrence. There can be multiple episodes of recurrence. For new Recurrence/Progression select New Form under Treatment at time of Recurrence/Progression on the navigation tree. Date Detected is a required field. Enter method for initial detection. If other is selected specify type. Treatment Planned If no treatment is planned, reason should be given. If treatment is planned, enter type(s) of proposed treatment. If other is selected, specify type. 21

22 Treatment Given When New Treatment is given, select Add New Number of Line of Chemotherapy is a required field (including N/A). To select more than one regimen hold down ctrl. Key and select appropriate regimens from list. If Surgery is performed, select Add New Surgery Date is a required field. Select type of surgery performed an press Add. 22

23 A-3 HEAD AND NECK This appendix should be read in conjunction with the main body of the user manual to gain the most understanding of how to utilise this database. Remember to save each page after entering data and to save edits. A3.1 Preoperative Details This section is intended to collect data when the patient first presents and is diagnosed with a H&N cancer. This section is completed once for each primary episode. Presentation is a mandatory field. For Primary Tumour Site, Select site then specify location(s). Selections made will appear in Selections Made box beneath. Press close when selections completed. To remove a site, un-tick the box. If yes is selected for Gross Nodal Involvement select site(s) involved. Planned Initial Treatment is a required field. A3.2. Adding and Event Each event and it s related information can be recorded, events are described as: o Primary o Residual tumour o Recurrence o Metastases To add a new event click on the New Event under Event in the left hand tree, see picture below. 23
 associated with this event A3.")
24 You must enter the date of the event and the type of event, then press save. You will then be able to enter details of biopsies, surgery, pathology, recurrence summary (if applicable) associated with this event A3.3. Adding a Biopsy (within an event) Select new biopsy or edit existing biopsy by selecting the edit link next to the selected biopsy date. Once you have entered an event you will be to enter one or more biopsies associated with that event. Click on the new biopsy button. Enter data and press save biopsy button. Multiple biopsies can be entered per event then edited or deleted. A3.4. Adding Surgery Details (within an event) Select new surgery or edit existing surgery by selecting the edit link next to the selected surgery date. If Yes is selected for Prior Treatment, enter details. When selecting Operative Procedure(s), select the procedure type first, then the subtypes will appear on the right, tick the appropriate type(s). Selections will appear beneath under the selections made heading. To remove a procedure; un-tick the selection. When selecting Reconstruction Techniques follow above process. Multiple surgeries can be entered per event, then edited or deleted by selecting the link next to the surgery. Enter the Pathology details if available (see A3.5) 24

25 A3.5. Adding Pathology Details (within an event, within a surgery) To enter the pathology, select the edit link next to the surgical procedure date which the pathology belongs to (in the event). Scroll down to the bottom of the surgical details and tick the Pathology check box to view the pathology fields. Enter data and press the save or update surgery button. A3.6. Adding Recurrence/metastases Summary (within an event) This section will only appear in events recurrence or metastases. Select new recurrence summary or edit existing summary by selecting the edit link next to the selected recurrence summary date. If sites of nodal recurrence/progression is yes then tick the appropriate sites. If a treatment plan has been decided, select yes and indicate the use of each treatment. A3.7. Other Treatment for Primary Tumour This section records the chemotherapy and radiotherapy treatment for the primary tumour. If radiotherapy is given, select yes and complete the fields. If chemotherapy is given, select yes and complete the fields. A3.8. Speech and Nutrition To add the initial assessment information select the Initial Assessment button and complete the fields. This can only be completed once. The date of initial assessment is compulsory. To add further reviews, select the Add review button. Multiple reviews can be entered. A3.9. Follow-up Select the New Follow-up button at each visit to add the visit data. The date of follow-up is compulsory. 25
26 A-4 BONE AND SOFT TISSUE A4.1 General Information Adding data Click the required page title on the navigation menu eg First consultation. Enter data into as many fields as possible. Editing/updating data Click the required page title on the navigation menu eg Diagnosis. Enter or change data as required. Saving data Click the Save button to save the data or click the Save and Next button to save the data and open the next form. A4.2 First consultation This form captures information regarding the patient s first consultation at a clinic of your sarcoma service. The date of the consultation (First clinic consult) must be recorded. If you select Yes for any of the Surgery, Chemotherapy or Radiotherapy fields, additional fields will be displayed for the recording of the patient s count of the relevant treatment types. If you select Yes for the Other cancers (if yes, specify types) field, a list of cancer types will be displayed. If you select Yes for Genetic syndromes, a list of genetic syndromes will be displayed. If you select Yes for any of the fields within the Symptom history section, the Duration of symptoms field will be displayed. If you select Yes for the Prior to first consult at this sarcoma service clinic field, Procedure performed fields for the various imaging procedures will be displayed. If you select Yes for a Procedure performed field, the associated Evidence of disease field will be displayed. A4.3 Further consultation This form captures information regarding the imaging procedures performed on or after the date of the patient s first consultation at a clinic of this sarcoma service. If you select Yes for On of after day of first consult at this sarcoma service clinic field, Procedure performed fields for the various imaging procedures will be displayed. If you select Yes for a Procedure performed field, the associated Evidence of disease field will be displayed. A4.4 Diagnosis This form captures information regarding the patient s diagnosis of a malignant or benign disease of the bone or soft tissue. The date of diagnosis that was recorded on the Episode form is shown on this form. You must select a value from the WHO classification drop-down list. 26

27 To narrow the list of values shown in the WHO classification drop-down list, type a keyword into the field marked Filter and then use the drop-down list (see figure below). o Example 1: To restrict the list to diseases of the bone, type bone. o Example 2: To restrict the list to osteosarcomas, type osteosarcoma. o You may remove your filter by clicking the Clear button. If you select a value from the WHO classification drop-down list that does not appear under the word Benign, the Fill for malignancies only section will be displayed. A4.5 Occurrences This form captures information regarding the occurrences of the diagnosis of bone or soft disease (i.e. benign lesion, primary malignancy, metastasis, local recurrence). Multiple occurrences may be recorded. A summary of the patient s occurrences will be displayed once data has been saved. Occurrence details This section allows you to record the characteristics (i.e. stage, grade, invasion etc.) of an occurrence. Multiple sets of this information may be recorded for each occurrence (e.g. you may wish to record information that was obtained from pre-treatment imaging and also information that was obtained from resection pathology). A summary of the occurrence detail records for an occurrence will be displayed on that occurrence s form once data has been saved. Adding Occurrence data Click the Occurrences item on the navigation menu. Click the New occurrence button. Enter data into as many fields as possible. Save the data or add occurrence details and then save. 27


28 Occurrence details From an open occurrence form, click the New occurrence detail button. Enter data into as many fields as possible. Click the Add occurrence detail button to temporarily save the data. The data will be permanently saved when you save the occurrence form data. Edit Occurrence details Click the Occurrences item on the navigation menu. Click the Edit link located to the right of the relevant occurrence listing. Click the Edit link located to the right of the relevant occurrence details listing. Add or change data as required. Click the Update occurrence button to temporarily save the data. The data will be permanently saved when you save the occurrence form data. Special notes If you select Metastasis for the Occurrence type field, the Extent of disease field will be displayed. If you select Primary malignancy for the Occurrence type field when Primary has been selected for the Basis of diagnosis field (Diagnosis form), the Date of diagnosis field will be populated by the system. If you select Benign lesion for the Occurrence type field, the Date of diagnosis field will be populated by the system. If you select Benign lesion, Primary malignancy or Local recurrence for the Occurrence type field, you will be able to select from a list of sites of either bone or soft tissue. Whether the list contains sites of bone or soft tissue is determined by the selection for the WHO classification field. If you select Metastasis for the Occurrence type field, you will be able select from sites of the bone, soft tissue and other locations. If you select No for the Treatment planned field, a list of reasons for why treatment was not planned for that occurrence will be displayed. If you select Yes for the Initial diagnostic biopsy field, a section will open for recording information about the initial diagnostic biopsy. o If you select Yes for the Earlier non-diagnostic biopsies field, a list of biopsy types will be displayed. Occurrence details o o The Procedure/exam date and Information source fields must be completed. If you select Resection for the Information source field, the Resection details section will be displayed. If you select After chemo/rt for the Information timing field, the Post-treatment necrosis field will be displayed. If you select Yes for the Post-treatment necrosis field, a field will display for recording the percentage of post-treatment necrosis. 28

29 A4.6 Treatments This form captures information regarding the treatments provided to the patient for his diagnosis of bone or soft tissue disease. It may be used to record information regarding treatments delivered at any point in time and by any provider. Multiple treatments may be recorded. A summary of the patient s treatments will be displayed once data has been saved. You will have access to this form once an occurrence record has been saved. The system will only allow occurrences with a Yes value for the Treatment planned field (Occurrences form) to have treatment data recorded. Adding data Click the Treatments item on the navigation menu. You will be presented with a list of the occurrences that have been saved. Click the checkbox adjacent to each occurrence that is related to this treatment (e.g. if the treatment is a course of chemotherapy that has been given to treat the primary malignancy and a metastasis, click the checkboxes adjacent to the primary malignancy occurrence and the metastasis occurrence). Select a value from the Treatment type field. A section related to the selected treatment type will be displayed. Enter data for as many fields as possible and save the data. Adding surgery details for a surgical procedure From an open surgical procedure form, click the radio button next to the appropriate surgery or click the radio button next to New surgery. 29

30 Assigning neo-adjuvant and adjuvant therapies to their surgery Neoadjuvant or adjuvant treatments must be assigned to a surgery. Assignments are made from the summary section of the Treatment form. Click the Assign surgery link that is located on the listing for the relevant treatment. This will open a list of saved surgeries. Click the radio button adjacent to the appropriate surgery and then click the Confirm button. You may undo incorrect assignments by clicking the Unassign link that is located on the listing for the relevant treatment. 30

31 Assigning concurrent chemotherapy and radiotherapy treatment relationships Chemotherapy or radiotherapy treatments that are given as concurrent therapy must be assigned to each other. A treatment may have a concurrent assignment with more than one treatment. Assignments are made from the summary section of the Treatment form. Click the Assign concurrent therapy link that is located on the listing for the relevant treatment. This will open a list of saved treatments that have the same Timing value (i.e. either neoadjuvant, adjuvant or N/A). Click the radio button adjacent to the appropriate treatment and then click the Confirm button. You may undo incorrect assignments by clicking the Unassign link that is located on the listing for the relevant treatment. Editing/updating data Click the Treatments item on the navigation menu. Click the Edit link located on the relevant treatment listing. Add or change data as required. Click the Update treatment button to save the data. 31
32 Special notes Chemotherapy o The Start date, Timing and Intent fields must be completed. o If you select Neoadjuvant or N/A for the Timing field, the Best response field will be displayed. o If you select N/A for the Timing field, the Intent field will be populated with the value Palliative. o If you select Palliative for the Intent field, the Line field will be displayed. o The Line field must be completed when it is displayed. o You will be able to enter a line number for the first course of palliative intent chemotherapy recorded. The Line field will be populated by the system for subsequent palliative course entries. o If you select Toxicity for the Reason for stopping field, the Complications field will be populated with the value Yes. o If you select Death for the Reason for stopping field, fields related to the death of the patient will be displayed. Of these fields, Death date must be recorded. o If you select Yes for the Complications field, a list of complications will be displayed. Radiotherapy o The Start date, Timing and Intent fields must be completed. o If you select N/A for the Timing field, the Intent field will be populated with the value Palliative. o If you select Death for the Reason for stopping field, fields related to the death of the patient will be displayed. Of these fields, Death date must be recorded. Surgical procedure o The Procedure field must be completed. o You must add or select related surgery data before saving (see 5.2.2). o If you select No for the Margins involved field, the Min. clearance (mm) field will be displayed. o Surgery The Date field must be completed. If you select Yes for the Post-operative complications field, the Nerve palsy present, the Blood loss present and the Other complications fields will be displayed. If you select Yes for the Nerve palsy present field, the Expected and Sites fields will be displayed. If you select Yes for the Blood loss present field, the Units field will be displayed. If you select Yes for the Other complications field, a list of complications will be displayed. A4.7 Treatment Groups This page does not capture information. It provides a summary of the treatments that have been saved. Treatments groups listed within boxes. Assignments (see 4.6) are represented by the grouping of multiple treatments into a single box. These boxes will have a heading that describes the assignment(s) (see figure below). 32

33 A4.8 Reconstructions This form captures information about the reconstructions and prostheses provided to the patient in relation to surgical procedures. Multiple reconstruction/prostheses may be recorded. A summary of the patient s reconstructions/prostheses will be displayed once data has been saved. Adding data Click the Reconstructions item on the navigation menu. Click the New Reconstruction/Prosthesis button. You will be presented with a list of surgical procedures that have been performed on the patient. Click the checkbox adjacent to each surgical procedure that is related to this reconstruction/prosthesis. Select the type of reconstruction/prosthesis from the drop-down list and save the data. Editing/updating data Click the Reconstructions item on the navigation menu. Click the Edit link that is located on the top-right-hand corner of the reconstruction/prosthesis box. Add or change data as required and save the data. Special notes If you attempt to save a combination of reconstruction/prosthesis and procedure(s) that has already been saved, the system will ask you to confirm whether the entry represents a further reconstruction/prosthesis of the same type for the selected procedure(s). A4.9 Followup This form captures information about the patient s disease status at post-treatment follow-up occasions. Multiple follow-up occasions may be recorded. A summary of the patient s follow-up occasions will be displayed once data has been saved. Adding data Click the Followup item on the navigation menu. Click the Add new button. Enter data for as many fields as possible and save the data. Editing/updating data Click the Followup item on the navigation menu. Click the Open link that is located on the right-hand side of the follow-up occasion listing. 33
34 Add or change data as required and save the data. Special notes The Follow-up date field must be completed. If you select Alive Distant disease, Alive Local and distant disease or Alive Local disease for the Status field, you will be prompted to complete an occurrence record(s). If you select Dead for the Status field, fields related to the death of the patient will be displayed. Of these fields, Death date must be recorded. You will not be able to add further follow-up records after saving this record. 34

35 A-5 RENAL A5.1 General Information Adding data Click the required page title on the navigation menu eg Initial diagnosis. Enter data into as many fields as possible. Editing/updating data Click the required page title on the navigation menu eg Status at Registration. Enter or change data as required. Some pages have multiple events, select the edit button next to the event to open the page to edit. Saving data Click the Save button to save the data or click the Save and Next button to save the data and open the next form. Please ensure you save your data or it will be lost. Incomplete form flags Incomplete forms are flaged as red by displaying the form name in red coloured font on the navigation menu. At the bottom of each form there is a forms status radio button, which defaults to incomplete. If you have completed all possible fields on the page change the flag to complete; the form name in the navigation bar will change to black. See picture below. Date accuracy indicators Most date fields in the module are accompanied by a Date accuracy indicator field. These fields allow the accuracy of entered dates to be recorded. Values in these fields take a DMY format. The letter D in this format represents the day component of the date, the M represents the month component and the Y represents the year component. Each component of the value can be filled by the letter A, E or U. The letter A stands for accurate, E stands for estimated and U stands for unknown. Example: 35
36 Value: Meaning: AAE The day and month are accurate, but the year is estimated. A list of each value and its meaning can be viewed by clicking the? link adjacent to the Date accuracy indicator field. This will open a pop-up window. A5.2 Initial diagnosis This form captures information regarding the patient s diagnosis, cancer history, comorbidities and the clinical features of his/her disease. The date of diagnosis that was recorded on the Episode form is shown on this form. If you select Transplant for the Further specification field, the Organ origin field will be displayed for recording specifics. If you select Yes for the History of other cancer(s) field, a list of tumour sites will be displayed for recording specifics. If you select Yes for the Family history of renal cancer (1 st degree relatives) field, fields for recording which family members have had specific types of renal cancer will be displayed. If you select Yes for the History of smoking field, the Packet years and Is the patient a current smoker fields will be displayed for recording specifics. If you select Yes for the Other comorbidities field, a list of comorbidities will be displayed for recording specifics. If you select Yes for the Other illness field, a list of illnesses will be displayed for recording specifics. If you select Yes for the Autoimmune disorders field, a list of autoimmune disorders will be displayed for recording specifics. A5.3 Initial investigations and staging This form captures information regarding the diagnostic imaging and laboratory tests performed the time of initial diagnosis (if known). The clinical tumour stage is also recorded on this form. This form is designed ensure details of the initial diagnosis is captured, regardless of when the initial diagnosis was discovered ie two years ago vs this week. The Status at registration form captures the details of disease at the current point in time. If you select Yes for the Preoperative lab tests field, fields related to specific laboratory tests will be displayed for recording specifics. If you select Normal or Abnormal for the Corrected serum calcium field, the Result field will be displayed for recording the result. If you select 1 Distant metastasis for the M stage field, a list of metastasis sites will be displayed for recording specifics. Staging definitions may be viewed by clicking a? link. Once clicked, a pop-up window will open. A5.4 Status at registration This form captures information regarding the patient s disease status, body measurements and consent for tissue banking at the time of hospital registration. The patient s management plan is also recorded on this form. The Assessment date field must be completed. If you select No for the Disease recurrence since primary diagnosis and treatment field, the Staging unchanged since diagnosis checkbox will be displayed. If you tick the Staging unchanged since diagnosis checkbox, the system will copy your staging selections from the Investigations and staging at time of initial diagnosis (if known) form. 36
37 If you select Yes for the Disease present field, a list of disease sites will be displayed for recording specifics. Staging definitions may be viewed by clicking a? link. Once clicked, a pop-up window will open. A5.5 Surgery and pathology This form captures information regarding the surgeries the patient underwent for his/her primary renal cancer and the pathological findings of those surgeries. Multiple surgeries may be recorded. A summary of the patient s surgeries will be displayed once data have been saved. Adding data Click the New surgery button and enter data into as many fields as possible. Save the data or add a pathology record and then save. To add a new Pathology; at the bottom of the surgery form, click the New pathology button. Enter data into as many fields as possible and click the Add pathology button to save the pathology data. The data will be permanently saved when you save the surgery form data. Editing data To edit the surgery data click the Edit link on the right located on the relevant surgery listing. To edit pathology, open relevant surgery and click the Edit link located on the right of the pathology listing. Enter or change data as required. Click the Update pathology button to temporarily save the data. The data will be permanently saved when you click the Update surgery button. Surgery section The Laterality and Date of surgery fields must be completed. If you select Partial from the Method field (Actual surgery section), the Partial nephrectomy details section will be displayed. This section will allow you to record details of the partial nephrectomy. If you select Yes for the IVC explored field, the Tumour involvement field will be displayed. If you select Yes for the Tumour involvement field, a list of involvement levels will be displayed for recording specifics. Pathology section The Laterality field must be completed. If you select No for the Limited to kidney field, a list of other involved sites will be displayed for recording specifics. If you select Yes for the Molecular markers done field, the Primary and secondary RCC and Types field will be displayed for recording specifics. If you select Multiple for chromophobe Ca. from the Types list, the Karyotype result for Multiple for chromophobe Ca. field will be displayed. If you select 1 Distant metastasis for the M stage field, a list of metastasis sites will be displayed for recording specifics. Auto-population of the T-stage field occurs if all fields in the Involvement and Further Details sections are completed. If these are not completed the stage can be manually selected Staging definitions may be viewed by clicking a? link. Once clicked, a pop-up window will open. 37
38 A5.6 Surgery outcomes This form captures information regarding the outcomes and complications related to the patient s surgery for primary renal cancer. Each surgery has a separate outcomes record. A summary of records will be displayed once surgery data have been saved. Adding/editing outcome data The Surgery Outcomes item will only appear in the navigation tree after a surgery has been recorded (see 5.5). If surgeries have been entered a list of the surgeries will be available to select from. Click the Add outcome to add new data or the Edit outcome link to edit exiting data, on the right for the relevant surgery listing. The Date of admission field must be completed. If you select Yes for the General complications field, a list of complications will be displayed for recording specifics. If you select Haemorrhage from the list of general complications, the Haemorrhage transfused field will be displayed. If you select Yes for the Other intraoperative complications field, a list of complications will be displayed for recording specifics. If you select Yes for the Urinary system complications field, a list of complications will be displayed for recording specifics. If you select Acute renal impairment from the list of urinary system complications, the ARI requiring dialysis field will be displayed. If you select Yes for the Gastrointestinal complications field, a list of complications will be displayed for recording specifics. If you select Yes for the Respiratory complications field, a list of complications will be displayed for recording specifics. If you select Yes for the Cardiovascular complications field, a list of complications will be displayed for recording specifics. If you select Arterial embolus from the list of cardiovascular complications, the Arterial embolus site field will be displayed. If you select Yes for the In-patient death field, the Date of death and Cause of death fields will be displayed for recording specifics. The Date of death field must be completed if displayed. If you select Due to cancer for the Cause of death field, the Death due to field will be displayed for recording the specific cancer. The Death due to field must be completed if displayed. If you select Other cause, cancer present for the Cause of death field, the Cancer present field will be displayed for recording the specific cancer(s). A5.7 Other treatment primary Systemic therapy section This form captures information regarding systemic therapies provided to the patient for the management of the primary renal cancer. Multiple systemic therapies may be recorded. A summary of the patient s systemic therapies for primary renal cancer will be displayed once data have been saved. To add a new systemic therapy, click the New Systemic Therapy button, a form will appear for you to complete. To edit an existing treatment click the edit link for the relevant treatment. A new systemic therapy can not be entered if there is an ongoing treatment in progress ie a stop date must be entered before a new treatment can be added. The Intent and Timing fields must be completed. If you select Palliative for the Intent field, the Line field will be displayed. 38
39 The Line field must be completed if displayed. You are able to enter a line for the first palliative record. The system will automatically populate the Line field for subsequent palliative records. If you select Single for the Therapy field, a list of systemic therapy agents will be displayed. You will be able to select one agent from this list. If you select Combined for the Therapy field, a list of systemic therapy agents will be displayed. You will be able to select multiple agents from the list. If you select Yes for the Is part of clinical trial field, a list of clinical trials entered on the Clinical Trial form will be displayed for recording the specific trial. Radiotherapy section This form captures information regarding radiotherapy treatments provided to the patient for the management of his/her primary renal cancer. Multiple radiotherapy treatments may be recorded. A summary of the patient s radiotherapy treatments for primary renal cancer will be displayed once data have been saved. To add a new radiotherapy, click the New Radiotherapy button, a form will appear for you to complete. To edit an existing treatment click the edit link for the relevant treatment. The Start date, Intent and Timing fields must be completed. If you select Yes for the Is part of clinical trial field, a list of clinical trials entered on the Clinical Trial form will be displayed for recording the specific trial. A5.8 Clinical trial This form captures information regarding the clinical trials in which the patient participated. To add a clinical trial for the patient, click the New clinical trial button. The Start date field must be completed. A5.9 Recurrence / progression This form captures information regarding the nature and treatment of the patient s recurrent or progressive disease. Multiple occurrences of recurrent or progressive disease may be recorded. A summary of the patient s disease recurrences or progressions will be displayed once data have been saved. Add a new recurrence by selecting the New disease recurrence / progression button, to edit a recurrence select the edit link next to the appropriate recurrence. There are three forms which will appear if you select (tick box) the treatment as a part of the management plan: o Systemic therapy - captures information regarding the systemic therapies provided to the patient for the management of his/her recurrent or progressive disease. See A5.7 for details on this section. o Radiotherapy sub-form - captures information regarding the radiotherapy treatments provided to the patient for the management of his/her recurrent or progressive disease. See A5.7 for details on this section. o Surgery sub-form - captures information regarding the surgical interventions the patient underwent for the management of his/her recurrent or progressive disease. 39
40 A5.10 Follow-up This form captures information regarding the patient s disease status and recent therapeutic interventions at the time of a follow-up encounter. Click the New follow-up button to add a new follow up visit. To edit a follow-up visit click the Edit link that is located on the relevant visit. The Follow-up date field must be completed. If you select Yes for the Therapeutic interventions since last visit field, additional fields will be displayed for recording the specific treatments which have been given. If you select Yes for Radiotherapy, the Ongoing field will be displayed. If you select Yes for Systemic therapy, the Ongoing field will be displayed. If you select Yes for Clinical trial, the Ongoing field will be displayed. If you select Deceased for the Uro-oncology clinic discharge status, additional fields will be displayed for recording the specifics of the patient s death. The Death date field must be completed if displayed. If you select Due to cancer for the Cause of death field, the Death due to field will be displayed for recording the specific cancer. The Death due to field must be completed if displayed. If you select Other cause, cancer present for the Cause of death field, the Cancer present field will be displayed for recording the specific cancer(s). Pop up boxes will indicate if further data is required to be entered on other forms. 40
41 A-6 PROSTATE A6.1 General Information This section of the ACCORD user manual should be read in conjunction with the main body of the manual, particularly the Data Entry section. Adding/Editing data Click the required page title on the navigation menu eg Initial diagnosis. Enter data into as many fields as possible. Click the Save to save the data and remain on the same screen or Save and Next button to save the data and go to the next screen. To edit/update the data make the required changes and save the data as described above. Complete Form Flags The module flags incomplete forms by displaying the form name in red coloured font on the navigation menu. Flags remain red until the user indicates the form status, at the bottom of each page, is complete. A6.2 Presentation This form captures presentation visit information regarding the patient s symptoms, prior diagnostic and therapeutic procedures, social history, family history of cancer, clinical examination, and diagnostic histology. The patient s management plan is also recorded. The PSA date field must be completed. You may manually enter a value into the SHIM field or use the module s inbuilt calculator. To open the calculator, click the Calculate link located next to the field. This will open a pop-up window. Record a response to each of the questions and then click the Done button. The pop-window will close and a value will be recorded in the SHIM field. You may manually enter a value into the IPSS field or use the module s inbuilt calculator. To open the calculator, click the Calculate link located next to the field. This will open a pop-up window. Record a response to each of the questions and then click the Done button. The pop-window will close and a value will be recorded in the IPSS field. If you select Yes for the Prior histology performed field, a section will be displayed for recording specifics. The third Gleason field records the Gleason score. The value for this field is automatically calculated from the recorded Gleason grades. If you select Yes for the Prior prostate procedure(s) performed field, a list of procedures will be displayed for recording specifics. If you select Yes for the History of prior pelvic radiotherapy field, a list of pelvic sites will be displayed for recording specifics. If you select Current or Past for the Cigarettes field, the Packet years field will be displayed for recording specifics. If you select Yes for the Prostate cancer field, fields will be displayed for recording the number of relatives diagnosed with prostate cancer. If you select Yes for the Family history of breast or ovarian cancer field, fields will be displayed for recording the number of relatives diagnosed with these cancers. If you select Yes for the Other cancer(s)-primary relatives only field, a list of cancer sites will be displayed for recording specifics. If you select Yes for any of the Performed fields, the associated Distant disease field will be displayed for recording the investigation s result. If you select Cassettes or Cores from the Pathology report describes field, fields will be displayed for recording the number of cassettes or cores taken and positive. The third of the Gleason (highest) fields records the Gleason score. The value for this field is automatically calculated from the recorded Gleason grades. 41
42 If you select Yes for the Initial intervention(s) planned? field, a section will be displayed for recording specifics. If you select Yes for the Surgery field, fields will be displayed for recording the planned surgery date and whether the patient is a potential tissue bank donor. You may obtain the value definitions for a staging field by clicking the? link adjacent to the field. This will open a pop-up window which describes the definitions. A6.3 Medication summary This form captures information regarding the medications the patient is taking at the time of his presentation visit. The form has two sections. The first section records a summary of the patient s medications and the detail medications section captures more detailed information about each medication including the dose, frequency and duration. Entering data into the detailed information section is optional. Select the drug classes of the medication the patient is taking. o If you tick the Lipid lowering agent, Anti-coagulation or Analgesia checkboxes, additional checkboxes will be displayed for recording the specific details. If entering the details of drugs click the New medication button Enter data into as many fields as possible. o The Name field must be completed. o The Frequency and Dose items are both composed of a number and a unit field. If these items are used, both fields belonging to the item must be completed Click the Add medication button to temporarily save the data. Press the Save button at the bottom of the screen to save all data. To edit the details of a saved drug, click the edit link to the right of the drug entry. A6.4 Surgery, outcomes and pathology This form captures information regarding the patient s surgery for primary prostate cancer, the outcomes of his surgery and the pathologist s findings. Multiple surgeries may be recorded. A summary of the patient s surgeries for primary prostate cancer will be displayed once data have been saved. The Date field must be completed. If you select Yes for the Nerve sparing field, additional fields will be displayed for recording specifics. If you select Yes for the Transfused field, a field will be displayed for recording the number of units transfused. If you select Yes for the In-dwelling catheter field, additional fields will be displayed for recording specifics. You may view value definitions for the Clavien grade field by clicking the? link located next to the field. This will open a pop-up window which describes the definitions. If you select Yes for the Surgical complications field, a section will be displayed for recording specifics. Surgical complications section o If you select Yes for the Urine leak field, the Persisted for field will be displayed for recording specifics. o If you select Yes for the Wound infection field, the Persisted for field will be displayed for recording specifics. 42
43 o If you select Yes for the Bowel complication field, a list of complications will be displayed for recording the specific complication. o If you select Yes for the Other field, a list of complications will be displayed for recording the specific complication(s). If you select Yes for the Medical complications field, a list of complications will be displayed for recording the specific complication(s). If you select Other from the list of medical complications, a list of complications will be displayed for recording the specific complication(s). If you select Yes for the Return to theatre field, additional fields will be displayed for recording specifics, you must complete the Date field in the Return to theatre section. If you select Yes for the In-patient death field, fields related to the patient s death will be displayed for record specifics, you must complete the Death date field. If you select Due to cancer for the Cause of death field, the Death due to field will be displayed for recording the specific cancer, the Death due to field must be completed. If you select Other cause, cancer present for the Cause of death field, the Cancer present field will be displayed for recording the specific cancer(s). If you record a non-zero number in the Number positive field, a list of lymph node sites will be displayed for recording specifics. If you select Negative for the Margins field, the Minimum distance clear field will be displayed for recording specifics. If you select Positive for the Margins field, additional fields will be displayed for recording the regions involved by cancer. If you select Yes for the Tissue banking sample(s) field, a list of sample types will be displayed for recording specifics. A6.5 Radiotherapy and endocrine therapy This form captures information about the radiotherapy and castration treatments for the treatment of his primary prostate cancer. All data in the Radiotherapy and Endocrine therapy section will be permanently saved when you click the Save button at the bottom of the main form. Radiotherapy If the patient has undergone radiotherapy, select Yes in the Radiotherapy to Prostate field. You can then add treatments for EBRT or Brachytherapy. EBRT This section captures information regarding the external beam radiotherapy treatments given to the patient for the treatment of his primary prostate cancer. Select the New EBRT button to add a treatment. Multiple EBRT treatments may be recorded. A summary of the patient s EBRT treatments for his primary prostate cancer will be displayed once data have been saved. Brachytherapy This section captures information regarding the brachytherapy treatments for primary prostate cancer. Select the New Brachytherapy button to add a treatment. Multiple brachytherapy treatments may be recorded. A summary of the patient s brachytherapy treatments for his primary prostate cancer will be displayed once data have been saved. The Date of implant field must be completed. If you select HDR for the Dose rate field, the Isotope and Fractions fields will be displayed for recording specifics. If you select LDR for the Dose rate field, the Isotope field will be displayed for recording specifics. 43
44 To select multiple Adverse effects, hold down the Ctrl key and select all that apply. Androgen Deprivation (AD) This section captures information regarding the medical and surgical castration treatments of primary prostate cancer. Indicate if the patient has received AD by selecting the appropriate radio button. If AD Provided is Yes, then you have the options of selecting if the patient had Surgical or Medical Castration. If Medical Castration is Yes, then select the New Medical Castration Treatment button to add a treatment, multiple treatment may be recorded. The start date is compulsory and is used to differentiate between treatments. A summary of the patient s medical castration treatments for his primary prostate cancer will be displayed once data have been saved. If you select Yes for the Adverse Event on Rx field, a list of adverse events will be displayed for recording specifics. If you select No for the Completed therapy field, the Not completed due to adverse effects field will be displayed for recording specifics A6.6 Routine follow-up post initial management This section captures follow-up visit information regarding the patient s disease status, genitourinary system functionality and treatments. Multiple follow-up visits may be recorded. A summary of the patient s follow-up visits will be displayed once data have been saved. Click the New followup button. The Visit date field must be completed. You may manually enter a value into the IPSS field or use the module s inbuilt calculator. To open the calculator, click the Calculate link located next to the field. This will open a pop-up window. Record a response to each of the questions and then click the Done button. The pop-window will close and a value will be recorded in the IPSS field. If you select Yes for the Continence pad worn field, a field will be displayed for recording the number of pads the patient wears per day. You may manually enter a value into the SHIM without erectile aid field or use the module s inbuilt calculator. To open the calculator, click the Calculate link located next to the field. This will open a pop-up window. Record a response to each of the questions and then click the Done button. The pop-window will close and a value will be recorded in the SHIM without erectile aid field. If you select Yes for the Erectile aid used field, the SHIM with erectile aid and Aid fields will be displayed for recording specifics. You may manually enter a value into the SHIM with erectile aid field or use the module s inbuilt calculator. To open the calculator, click the Calculate link located next to the field. This will open a pop-up window. Record a response to each of the questions and then click the Done button. The pop-window will close and a value will be recorded in the SHIM with erectile aid field. A6.7 Recurrent or metastatic non castrate resistant disease This section captures information regarding the diagnosis, sites and treatment of the patient s recurrent or metastatic non-castrate resistant disease. 44
45 Multiple instances of recurrent or metastatic non-castrate resistant disease may be recorded. A summary of these instances will be displayed once data have been saved. When new data is entered or an episode of recurrence or metastatic non castrate resistance disease is updated, ensure you save (or update if editing) the data with the button at the bottom of the screen. The screen will close and summary displayed once saved. Detailed screens to enter specific treatment data will appear once selected in the treatments offered section. To edit existing records, click Edit link at the right of the instance of recurrent or metastatic non-castrate resistant disease required. The Date of Dx of recurrence field must be completed. If you select Yes for the Loco-regional disease field, a list of sites will be displayed for recording specifics. If you select Yes for the Distant metastases field, a list of sites will be displayed for recording specifics. If you select No for the Androgen ablation offered field, a list of reasons will be displayed for recording the reason. If you select Yes for Androgen ablation offered, the Patient accepted field will be displayed for recording whether or not the patient accepted the treatment offer. If you select Yes for the Patient accepted field, additional fields will be displayed for recording the types of treatment given and the reason for the treatment(s). If you select Yes for the Medical castration field, a button for adding records to the hormone therapy sub-form will be displayed. If you tick the Bisphosphonates checkbox, a button for adding records to the bisphosphonate therapy sub-form will be displayed. If you tick the Radiotherapy to mets checkbox, a button for adding records to the radiotherapy sub-form will be displayed. If you tick the Isotope therapy checkbox, a button for adding records to the isotope therapy sub-form will be displayed. If you tick the Surgery for mets checkbox, a button for adding records to the surgical resection of metastases sub-form will be displayed. Hormone therapy This section captures information regarding the hormone therapy treatments given to the patient for the treatment of his recurrent or metastatic non-castrate resistant disease. Multiple hormone therapy treatments may be recorded. A summary of the patient s hormone therapy treatments for his recurrent or metastatic non-castrate resistant disease will be displayed once data have been saved. Prerequisite: Yes must be selected for the Androgen ablation offered, Patient accepted and Medical castration fields under Initial treatment plan at Dx of recurrent/metastatic disease heading. Click the New hormone therapy button and enter data into as many fields as possible. Click the Add hormone therapy button to temporarily save the data. The data will be permanently saved when you save the main form data. The Line field is automatically completed by the system. The Start date field must be completed. If you select Death for the Reason for stopping field, additional fields will be displayed for recording specifics about the patient s death. If displayed, the Death date field must be completed. If you select Due to cancer for the Cause of death field, the Death due to field will be displayed for recording the specific cancer. The Death due to field must be completed. 45
46 If you select Other cause, cancer present for the Cause of death field, the Cancer present field will be displayed for recording the specific cancer(s). To edit existing entries, select the Edit link to the right of the hormone therapy summary. Bisphosphonate therapy This sub-form captures information regarding the bisphosphonate therapy treatments given to the patient for the treatment of his recurrent or metastatic non-castrate resistant disease. Prerequisite: The Bisphosphonates checkbox in the treatment offered section must be ticked for the sub-form to be displayed. From the main form, click the New bisphosphonate therapy button and enter data into as many fields as possible. Click the Add bisphosphonate therapy button to temporarily save the data. The data will be permanently saved when you save the main form data. The Start date field must be completed. If you select Death for the Reason for stopping field, additional fields will be displayed for recording specifics about the patient s death. If displayed, the Death date field must be completed. If you select Due to cancer for the Cause of death field, the Death due to field will be displayed for recording the specific cancer.the Death due to field must be completed. If you select Other cause, cancer present for the Cause of death field, the Cancer present field will be displayed for recording the specific cancer(s). Radiotherapy This sub-form captures information regarding the radiotherapy treatments provided to the patient for the management of his recurrent or metastatic non-castrate resistant disease. Multiple radiotherapy treatments may be recorded. A summary of the patient s radiotherapy treatments for his recurrent or metastatic non-castrate resistant disease will be displayed once data have been saved. Prerequisite: The Radiotherapy to mets checkbox on the main form must be ticked for the sub-form to be displayed. From the main form, click the New radiotherapy button and enter data into as many fields as possible. The Start date field must be completed Click the Add radiotherapy button to temporarily save the data. The data will be permanently saved when you save the main form data. Isotope therapy This sub-form captures information regarding the isotope therapy treatments provided to the patient for the management of his recurrent or metastatic non-castrate resistant disease. Multiple isotope therapy treatments may be recorded. A summary of the patient s isotope therapy treatments for his recurrent or metastatic non-castrate resistant disease will be displayed once data have been saved. Prerequisite: The Isotope therapy checkbox on the main form must be ticked for the sub-form to be displayed. 46
47 From the main form, click the New isotope therapy button and enter data into as many fields as possible. The Start date field must be completed. Click the Add isotope therapy button to temporarily save the data. The data will be permanently saved when you save the main form data. Surgical resection of metastases This sub-form captures information regarding the surgical resections of metastatic noncastrate resistant disease underwent by the patient. Multiple surgical resections may be recorded. A summary of the patient s surgical resections for his metastatic non-castrate resistant disease will be displayed once data have been saved. Prerequisite: The Surgery for mets checkbox on the main form must be ticked for the subform to be displayed. From the main form, click the New surgical resection of metastases button and enter data into as many fields as possible. The Date field must be completed Click the Add resection button to temporarily save the data. The data will be permanently saved when you save the main form data. A6.8 Treatment of metastatic or recurrent disease chemotherapy This section captures information regarding the diagnosis, sites and treatment of the patient s recurrent or metastatic castrate resistant disease. Multiple instances of recurrent or metastatic castrate resistant may be recorded. A summary of these instances will be displayed once data have been saved. The Date of castrate resistant disease field must be completed. If you select Yes for the Loco-regional disease field, a list of sites will be displayed for recording specifics. If you select Yes for the Distant metastases field, a list of sites will be displayed for recording specifics. If you select No for the Chemotherapy offered field, a list of reasons will be displayed for recording the reason. If you select Yes for the Chemotherapy offered field, the Patient accepted field will be displayed for recording whether or not the patient accepted the treatment offer. If you select Yes for the Patient accepted field, the Primary reason for commencing chemotherapy field and a button for adding records to the chemotherapy sub-form will be displayed. If you tick the Bisphosphonates checkbox, a button for adding records to the bisphosphonate therapy sub-form will be displayed. If you tick the Radiotherapy to mets checkbox, a button for adding records to the radiotherapy sub-form will be displayed. If you tick the Isotope therapy checkbox, a button for adding records to the isotope therapy sub-form will be displayed. If you tick the Surgery for mets checkbox, a button for adding records to the surgical resection of metastases sub-form will be displayed. 47
48 Chemotherapy This sub-form captures information regarding the chemotherapy treatments given to the patient for the treatment of his recurrent or metastatic castrate resistant disease. Multiple chemotherapy treatments may be recorded. A summary of the patient s chemotherapy treatments for his recurrent or metastatic castrate resistant disease will be displayed once data have been saved. Prerequisite: Yes must be selected for the Chemotherapy offered and Patient accepted fields on the main form. From the main form, click the New chemotherapy button. Enter data into as many fields as possible. Click the Add chemotherapy button to temporarily save the data. The data will be permanently saved when you save the main form data. To Edit data, click the Edit link located on the relevant disease listing. Click the Edit link located on the relevant chemotherapy listing, enter or change data as required. Click the Update chemotherapy button to temporarily save the data. Click the Update treatment of metastatic or recurrent disease chemotherapy button to permanently save the data. The Line field is automatically completed by the system. The Date field must be completed. If you make a selection from the Regimen field, the Subsequent dose reduction section will be displayed for recording which (if any) agents were dose reduced during treatment. The agents you select from the Regimen field will be displayed in the Subsequent dose reduction section. If you tick an agent checkbox in the Subsequent dose reduction section, the associated Reason for reduction field will be displayed for recording the reason for the dose reduction. If you select Death from the Reason for stopping field, additional fields will be displayed for recording specifics about the patient s death. If displayed, the Death date field must be completed. If you select Due to cancer for the Cause of death field, the Death due to field will be displayed for recording the specific cancer. The Death due to field must be completed. If you select Other cause, cancer present for the Cause of death field, the Cancer present field will be displayed for recording the specific cancer(s). Bisphosphonate therapy This sub-form captures information regarding the bisphosphonate therapy treatments given to the patient for the treatment of his recurrent or metastatic castrate resistant disease. Prerequisite: The Bisphosphonates checkbox on the main form must be ticked for the subform to be displayed. From the main form, click the New bisphosphonate therapy button. Enter data into as many fields as possible. Click the Add bisphosphonate therapy button to temporarily save the data. The data will be permanently saved when you save the main form data. 48
49 The Start date field must be completed. If you select Death from the Reason for stopping field, additional fields will be displayed for recording specifics about the patient s death. If displayed, the Death date field must be completed. If you select Due to cancer for the Cause of death field, the Death due to field will be displayed for recording the specific cancer. The Death due to field must be completed. If you select Other cause, cancer present for the Cause of death field, the Cancer present field will be displayed for recording the specific cancer(s). Radiotherapy This sub-form captures information regarding the radiotherapy treatments provided to the patient for the management of his recurrent or metastatic castrate resistant disease. Multiple radiotherapy treatments may be recorded. A summary of the patient s radiotherapy treatments for his recurrent or metastatic castrate resistant disease will be displayed once data have been saved. Prerequisite: The Radiotherapy to mets checkbox on the main form must be ticked for the sub-form to be displayed. From the main form, click the New radiotherapy button. Enter data into as many fields as possible. The Start date field must be completed. Click the Add radiotherapy button to temporarily save the data. The data will be permanently saved when you save the main form data. Isotope therapy This sub-form captures information regarding the isotope therapy treatments provided to the patient for the management of his recurrent or metastatic castrate resistant disease. Multiple isotope therapy treatments may be recorded. A summary of the patient s isotope therapy treatments for his recurrent or metastatic castrate resistant disease will be displayed once data have been saved. Prerequisite: The Isotope therapy checkbox on the main form must be ticked for the sub-form to be displayed. From the main form, click the New isotope therapy button. Enter data into as many fields as possible. The Start date field must be completed. Click the Add isotope therapy button to temporarily save the data. The data will be permanently saved when you save the main form data Surgical resection of metastases This sub-form captures information regarding the surgical resections of metastatic castrate resistant disease underwent by the patient. Multiple surgical resections may be recorded. A summary of the patient s surgical resections for metastatic castrate resistant disease will be displayed once data have been saved. Prerequisite: The Surgery for mets checkbox on the main form must be ticked for the sub-form to be displayed. From the main form, click the New surgical resection of metastases button. 49
50 Enter data into as many fields as possible. The Date field must be completed Click the Add resection button to temporarily save the data. The data will be permanently saved when you save the main form data 50
51 A-7 CHRONIC LYMPHOCYTIC LEUKAEMIA (CLL) A7.1 General Information This section of the ACCORD user manual should be read in conjunction with the main body of the manual, particularly the Data Entry section. Adding/Editing data Click the required page title on the navigation menu eg Clinical. Enter data into as many fields as possible. Click the Save to save the data and remain on the same screen or Save and Next button to save the data and go to the next screen. To edit/update the data make the required changes and save the data as described above. Complete Form Flags The module flags incomplete forms by displaying the form name in red coloured font on the navigation menu. Flags remain red until the user indicates the form status, at the bottom of each page, is complete. A7.2 Registration: Clinical This form captures the patient s registration information. Fields cover personal and family medical history, comorbidities, symptoms, previous treatments, and lymphatic measurements. Blood parameter, symptom and staging information related to the patient s original presentation is also recorded. The original presentation may or may not be the patients first visit to a specialist. The Registration date field must be completed. If you select Yes for the History of benign blood disease field, additional fields will be displayed for recording specifics. If you select Yes for the Other (History of benign blood disease) field, a free-text field will be displayed for recording the specific condition. If you select Yes for the Family history of blood cancer field, a list of blood cancers will be displayed for recording specifics. If you select Yes for the Other cancers field, the New other cancer button will be displayed. To add details of a prior cancer diagnosis: o Click the New other cancer button. o Enter data into as many fields as possible. o Click the Add cancer button. o Additional prior cancer diagnoses may be recorded by repeating the above steps. If you select Current or Past for the History of smoking field, the Packet years field will be displayed for recording further details. If you select Yes for the History of alcohol use field, the Drinks per week field will be displayed for recording further details. Cumulative Illness Rating Scale (CIRS) section: o A pop-up window, which lists definitions for the body system ratings, may be viewed by clicking the? link. o The Total field is automatically calculated by system. o o The database treats blank body system rating fields as missing data. If you click the Set all blank fields to 0 link, the system will enter 0 into each blank body system rating field. If you select Yes for the Symptoms (Original presentation) field, additional fields will be displayed for recording specifics. A pop-up window, which lists value definitions for the ECOG field (Registration visit section), may be viewed by clicking the? link. 51
52 If you select Yes for the Symptoms (Registration visit) field, a list of symptoms will be displayed for recording specifics. If you select Yes for the Previous transfusions field, the Units field will be displayed for recording specifics. If you select Yes for the Major infections in past 12 months field, additional fields will be displayed for recording specifics. If you select Yes for the Other(s) (Major infections in past 12 months) field, a free-text field will be displayed for recording the specific infection(s). A7.3 Registration: Investigations This form captures information about the investigations which the patient underwent at registration. Fields cover blood tests, biopsies and imaging. The final conclusions about the patient s diagnosis are also recorded. If you select Abnormal for the SPEP field, additional fields will be displayed for recording specifics. If you select BM or PB for a Sample (Prognostic markers) field, additional fields will be displayed for recording additional details about the specific marker. If you select Yes for the Bone marrow biopsy performed field, the New bone marrow biopsy button will be displayed. To add details of a bone marrow biopsy: o Click the New bone marrow biopsy button. o Enter data into as many fields as possible. o Click the Add bone marrow biopsy button. o Additional bone marrow biopsies may be recorded by repeating the above steps. If you select Yes for the Other biopsy performed field, the New other biopsy button will be displayed. To add details of an other (i.e. non-bone marrow) biopsy: o Click the New other biopsy button. o Enter data into as many fields as possible. o Click the Add other biopsy button. o Additional other biopsies may be recorded by repeating the above steps. If you select Yes for a Performed (Imaging) field, additional fields will be displayed for recording details about the specific imaging procedure. If you select Yes for the Autoimmune complications field, a field will be displayed for recording the specific complication. If you select Yes for the Other complications field, a free-text field will be displayed for recording the specific complication. A7.4 Past treatment This form maintains a summary of treatments which the patient has previously undergone for the management of his or her chronic lymphocytic leukaemia. In the past treatment summary section select if the patient has had chemotherapy, radiotherapy and splenectomy as a part of their treatment before being seen at this institution. If you select Yes for any of the past treatments a button will appear so you can add the details of past treatment(s). The details of each section are below. To edit existing past treatments click Edit on the right of the record you wish to edit.. Chemotherapy This sub-form captures information about the prior chemotherapy treatments which had been given to the patient for the management of chronic lymphocytic leukaemia. Multiple prior chemotherapy treatments may be recorded. A summary of the patient s prior chemotherapy treatments will be displayed once data have been saved. 52
53 Prerequisite: Yes must be selected for the Chemotherapy field in the treatment summary section. Click the New chemotherapy button. The Start date field must be completed. More than one chemotherapy agent may be selected by holding down the Ctrl keyboard key while clicking the agent values. If you select Yes for the Infection field, additional fields will be displayed for recording specifics. If you select Yes for the Autoimmune complication field, an additional field will be displayed for recording the specific complication. If you select Yes for the Response field, additional fields will be displayed for recording specifics. Splenectomy This sub-form captures information about the patient s prior splenectomy. Prerequisite: Yes must be selected for the Splenectomy field on the main form. Click the New splenectomy button to add details. The Date field must be completed. Radiotherapy This sub-form captures information about the prior radiotherapy treatments which had been given to the patient for the management of chronic lymphocytic leukaemia. Multiple prior radiotherapy treatments may be recorded. A summary of the patient s prior radiotherapy treatments will be displayed once data have been saved. Prerequisite: Yes must be selected for the Radiotherapy field on the main form. Click the New radiotherapy button to add details. The Start date field must be completed. A7.5 Treatment / Follow-up This form captures information about the patient s hospital visits for treatment or follow-up visits. General health measures, blood test results, lymphatic measurements, treatment details, complications and disease response data are collected by the form. Follow-up visits, Splenectomy, first course of a chemotherapy or radiotherapy regimen Click the New Followup / Treatment button Enter data into as many fields as possible and save the data. Subsequent courses of a chemotherapy or radiotherapy regimen Click the Continue therapy link located to the right next to the relevant regimen listing, DO NOT ADD A NEW FOLLOW UP/TREATMENT. Enter data into as many fields as possible and save the data. Recording post-treatment data (end treatment) for a chemotherapy or radiotherapy regimen Click the End therapy link located to the right of the relevant regimen listing. 53
54 Enter the response data at the end of treatment. Click the Update button. To edit existing visit or treatment click Edit on the right of the record you wish to edit. The Visit / Treatment date and Treatment fields must be completed. A pop-up window, which lists value definitions for the ECOG field, may be viewed by clicking the? (first section of form) link. If you select Yes for the Infection(s) since last visit field, an additional field will be displayed for recording further details. If you select Watch for the Treatment field, an additional field will be displayed for recording whether the patient s cancer has progressed. The Disease has progressed since the last encounter field must be completed if it is displayed. If you select Treat for the Treatment field, the Treatment details section will be displayed for recording details about a chemotherapy, splenectomy or radiotherapy treatment. The Treatment type field must be completed if it is displayed. Additional fields relevant to a particular type of treatment will be displayed once you have made a selection for the Treatment type field. Chemotherapy: o The Agents field must be completed. o More than one chemotherapy agent may be selected by holding down the Ctrl keyboard key while clicking the agent values. o o The Course number field is automatically completed by the system. Items related to the last course of a regimen: The Date (of last confirmed test result) field must be completed. If you select Yes for the Other complications field, a free-text field will be displayed for recording the specific complication. If you select No for the Planned treatment completed field, a list of reasons for non-completion will be displayed for recording further details. More than one reason for non-completion may be selected by holding down the Ctrl keyboard key while clicking the reason values. Splenectomy o The Date (of last confirmed test result) field must be completed. Radiotherapy o The Radiotherapy site field must be completed. o More than one radiotherapy site may be selected by holding down the Ctrl keyboard key while clicking the site values. o The Course number field is automatically completed by the system. o The Date (of last confirmed test result) field must be completed if it is displayed. o Items related to the last course of a regimen: The Date (of last confirmed test result) field must be completed. 54

55 Appendix B Part 1 - QUERYING ACCORD USING ACCESS - SETUP You will need to perform this set up procedure only once per PC. This procedure sets up the link between the ACCORD tables and your PC. 1. Open a new blank MS Access file. 2. Click File and go to Get external data section and select Link tables 3. It will open a dialogue box requesting to link a database 4. Go to the files of type displayed at the bottom of the text box and scroll to the bottom. 5. Select ODBC Database (). Select the Machine Data Source, the window shown below should appear (the data sources will differ). 6. Click the New button on the right. 7. Select the User Data Source then select Next 8. Scroll down and select SQL Server as shown below. 55


56 9. Select the Next and then Finish button. 10. Enter the Name and Description of the database as shown below. Select the Server ACCORD has been installed from the Server pull down box. Press Next button. Note: You will need to ask your IT department the name of the server ACCORD is installed on. NAME OF SERVER. 56
 and select Next Note: Please keep this password in a safe place to")
57 11. Choose 2 nd radio button With SQL Server authentication using a login ID and password entered by the user. Enter the login ID: and password: as issued by your IT department (or ask the Administrator) and select Next Note: Please keep this password in a safe place to protect against unauthorized use of the database. 57


58 11. Ensure the default database is correct, ask your administrator or IT department. 12. Then press Next. 13. Then press the Finish button on the next screen. 14. Once you press the Finish button. The below window will appear, press Test Data Source button. 58

59 15. The result should be as below: 16. You have now linked your PC to the ACCORD database tables. 17. To view the ACCORD tables in Access and run queries and reports, please go to Part 2 of this appendix. 59

60 Part 2 - LINKING TO THE ACCORD TABLES You will need to perform this procedure for each Access database you link to ACCORD. 1. Open MS Access 2. Create a new blank database and name and save it as you like. 3. Select File, Get external data then Link Tables from the menu bar. 4. At the bottom of the Link box select ODBC Databases from the Files of type pull down box. 5. A window will appear, select the Machine Data Source tab at the top. 6. Select the ACCORD database from the list and press OK (or whatever you named the ACCORD database link in the previous section). 7. Enter the password: (provided by your Administrator or IT department) and press OK. 8. Select the tables you would like to link (you can use the select all button or hold down ctrl to select individual tables). All tumour types use the Patients and Episode tables. The specific tumour type tables are differentiated by a prefix: a. Colorectal: CC b. Head and Neck: HN c. Central Nervous System: BC d. Bone and Soft Tissue: BST 60


61 9. The selected tables will then appear in your Access database and be ready to use as below. The world symbol indicates the tables are linked. 61
62 10. Before querying the data you will need to join the tables, go to the tools tab and click on relationship. 11. Please follow the schema provided in Appendix C to join the tables together. 12. Refer to MS Access user manuals on how to query and report using Access. 62

63 Colorectal Schema Appendix C Schemas 63

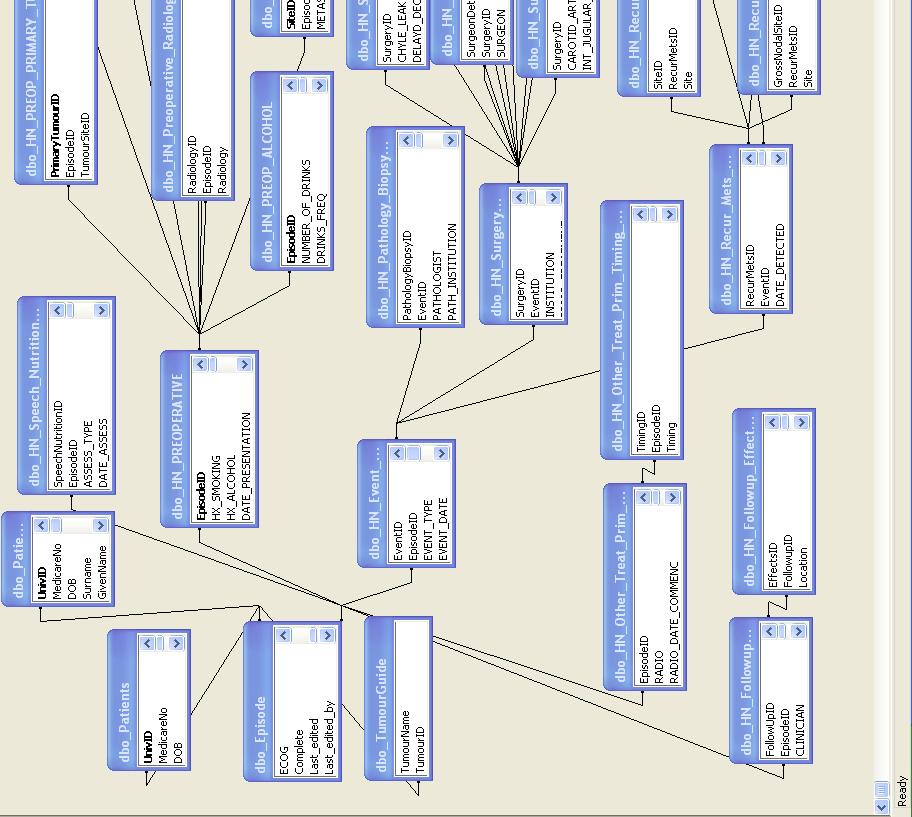
64 Head & Neck Schema 64

65 Central Nervous System Schema 65

66 Bone and Soft Tissue Schema 66

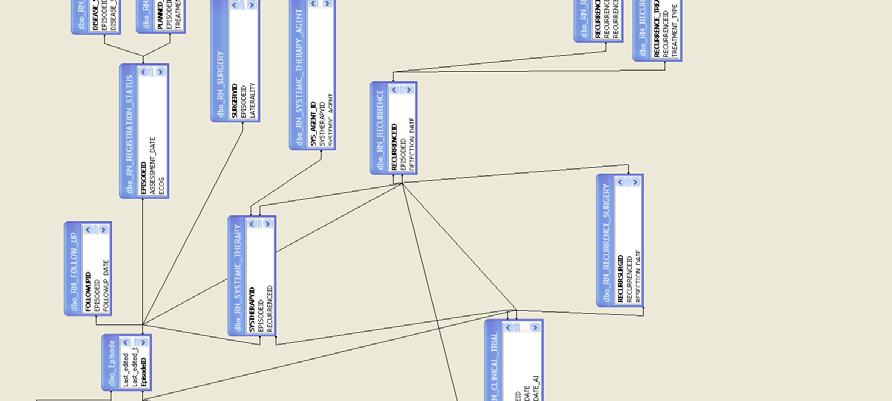
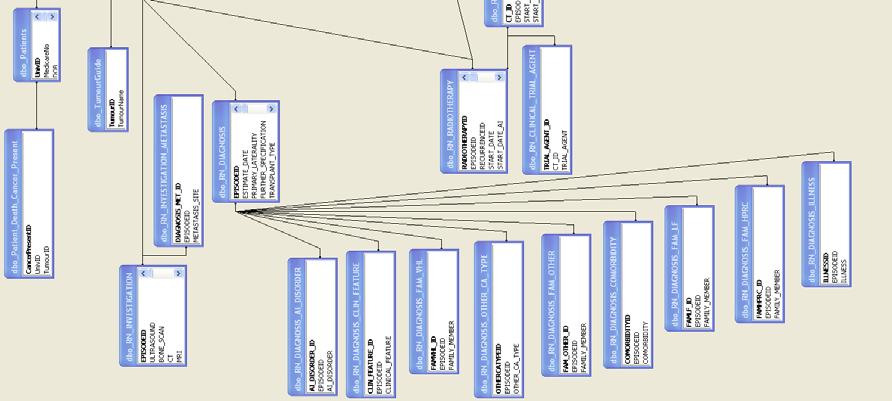
67 Renal Schema 67
11. NATIONAL DAFNE CLINICAL AND RESEARCH DATABASE
 11. NATIONAL DAFNE CLINICAL AND RESEARCH DATABASE The National DAFNE Clinical and Research database was set up as part of the DAFNE QA programme (refer to section 12) to facilitate Audit and was updated
BlueBayCT - Warfarin User Guide
 BlueBayCT - Warfarin User Guide December 2012 Help Desk 0845 5211241 Contents Getting Started... 1 Before you start... 1 About this guide... 1 Conventions... 1 Notes... 1 Warfarin Management... 2 New INR/Warfarin
OneTouch Reveal Web Application. User Manual for Healthcare Professionals Instructions for Use
 OneTouch Reveal Web Application User Manual for Healthcare Professionals Instructions for Use Contents 2 Contents Chapter 1: Introduction...4 Product Overview...4 Intended Use...4 System Requirements...
The Hospital Anxiety and Depression Scale Guidance and Information
 The Hospital Anxiety and Depression Scale Guidance and Information About Testwise Testwise is the powerful online testing platform developed by GL Assessment to host its digital tests. Many of GL Assessment
RESULTS REPORTING MANUAL. Hospital Births Newborn Screening Program June 2016
 RESULTS REPORTING MANUAL Hospital Births Newborn Screening Program June 2016 CONTENTS GETTING STARTED... 1 Summary... 1 Logging In... 1 Access For New Hires... 2 Reporting Parental Refusals... 3 Adding
ProScript User Guide. Pharmacy Access Medicines Manager
 User Guide Pharmacy Access Medicines Manager Version 3.0.0 Release Date 01/03/2014 Last Reviewed 11/04/2014 Author Rx Systems Service Desk (T): 01923 474 600 Service Desk (E): servicedesk@rxsystems.co.uk
LiteLink mini USB. Diatransfer 2
 THE ART OF MEDICAL DIAGNOSTICS LiteLink mini USB Wireless Data Download Device Diatransfer 2 Diabetes Data Management Software User manual Table of Contents 1 Introduction... 3 2 Overview of operating
OneTouch Reveal Web Application. User Manual for Patients Instructions for Use
 OneTouch Reveal Web Application User Manual for Patients Instructions for Use Contents 2 Contents Chapter 1: Introduction...3 Product Overview...3 Intended Use...3 System Requirements... 3 Technical Support...3
Clay Tablet Connector for hybris. User Guide. Version 1.5.0
 Clay Tablet Connector for hybris User Guide Version 1.5.0 August 4, 2016 Copyright Copyright 2005-2016 Clay Tablet Technologies Inc. All rights reserved. All rights reserved. This document and its content
MNSCREEN TRAINING MANUAL Hospital Births Newborn Screening Program October 2015
 MNSCREEN TRAINING MANUAL Hospital Births Newborn Screening Program October 2015 CONTENTS PART 1: GETTING STARTED... 2 Logging In... 2 Access for New Hires... 2 Reporting Refusals... 3 Adding Patient Records...
Instructor Guide to EHR Go
 Instructor Guide to EHR Go Introduction... 1 Quick Facts... 1 Creating your Account... 1 Logging in to EHR Go... 5 Adding Faculty Users to EHR Go... 6 Adding Student Users to EHR Go... 8 Library... 9 Patients
Click on the Case Entry tab and the Procedure Menu will display. To add new procedures, click on Add.
 Click on the Case Entry tab and the Procedure Menu will display. To add new procedures, click on Add. After you click on the Add link, the Procedure Entry page will display. If you are a resident your
Sleep Apnea Therapy Software Clinician Manual
 Sleep Apnea Therapy Software Clinician Manual Page ii Sleep Apnea Therapy Software Clinician Manual Notices Revised Notice Trademark Copyright Sleep Apnea Therapy Software Clinician Manual 103391 Rev A
Student Orientation 2010, Centricity Enterprise EMR Training, and netlearning.parkview.com Instructions for Nursing Students
 Updated 11/29/2011 Welcome to Parkview Health. We are glad you are coming to learn with us, and we thank you in advance for your participation in providing the best care for the patients in our region.
TMWSuite. DAT Interactive interface
 TMWSuite DAT Interactive interface DAT Interactive interface Using the DAT Interactive interface Using the DAT Interactive interface... 1 Setting up the system to use the DAT Interactive interface... 1
User Instruction Guide
 User Instruction Guide Table of Contents Logging In and Logging Out of MMSx 1 Creating a TPN (Terminal Profile Number) 2 Single Merchant 2 From Navigation Bar 2 From Home Page Link 4 Multiple Merchants
Student Guide to EHR Go
 Student Guide to EHR Go I. Introduction... 1 II. Quick Facts... 1 III. Creating your Account... 1 IV. Applying Your Subscription... 4 V. Logging in to EHR Go... 7 VI. Library... 8 VII. Receiving Assignments
The Clinical Information Data Entry Screen is the main screen in the DQCMS application.
 DATA ENTRY Clinical Information The Clinical Information Data Entry Screen is the main screen in the DQCMS application. To enter data, a patient must first be selected from the Patient pull-down list.
Medtech Training Guide
 Medtech Training Guide Clinical Audit Tool Copyright Medtech Limited Page 1 of 80 Clinical Audit Tool v4.0 Contents Chapter 1: Getting Started... 3 Logging In... 3 Logging Out... 3 Setting the Preliminary
Florida Standards Assessments
 Florida Standards Assessments Assessment Viewing Application User Guide 2017 2018 Updated February 9, 2018 Prepared by the American Institutes for Research Florida Department of Education, 2018 Descriptions
Warfarin Help Documentation
 Warfarin Help Documentation Table Of Contents Warfarin Management... 1 iii Warfarin Management Warfarin Management The Warfarin Management module is a powerful tool for monitoring INR results and advising
Entering HIV Testing Data into EvaluationWeb
 Entering HIV Testing Data into EvaluationWeb User Guide Luther Consulting, LLC July, 2014/v2.2 All rights reserved. Table of Contents Introduction... 3 Accessing the CTR Form... 4 Overview of the CTR Form...
MYFITNESSPAL: SETTING UP AN ACCOUNT
 MYFITNESSPAL: SETTING UP AN ACCOUNT MYFITNESSPAL: SETTING UP AN ACCOUNT METHOD 1: FROM THE WEBSITE Setting up a MyFitnessPal account is a simple process. You can do it either from the website on your Mac
BORN Ontario: NSO DERF Training Guide FEBRUARY 2012
 BORN Ontario: NSO DERF Training Guide FEBRUARY 2012 NSO DERF Encounter NSO sends newborn screening records to the BORN Information System (BIS) regularly throughout each day. When a risk letter is printed,
Lionbridge Connector for Hybris. User Guide
 Lionbridge Connector for Hybris User Guide Version 2.1.0 November 24, 2017 Copyright Copyright 2017 Lionbridge Technologies, Inc. All rights reserved. Published in the USA. March, 2016. Lionbridge and
Module 3: Pathway and Drug Development
 Module 3: Pathway and Drug Development Table of Contents 1.1 Getting Started... 6 1.2 Identifying a Dasatinib sensitive cancer signature... 7 1.2.1 Identifying and validating a Dasatinib Signature... 7
Table of Contents. Contour Diabetes App User Guide
 Table of Contents Introduction... 3 About the CONTOUR Diabetes App... 3 System and Device Requirements... 3 Intended Use... 3 Getting Started... 3 Downloading CONTOUR... 3 Apple... 3 Android... 4 Quick
mehealth for ADHD Parent Manual
 mehealth for ADHD adhd.mehealthom.com mehealth for ADHD Parent Manual al Version 1.0 Revised 11/05/2008 mehealth for ADHD is a team-oriented approach where parents and teachers assist healthcare providers
BREEAM In-Use International 2015 Client User Guide
 BREEAM In-Use International 2015 Client User Guide BREEAM In-Use International 2015 - Client User Guide V1.3.1 1 Contents Contents... 2 Log In and Registration... 3 Accessing the Online Tool... 3 Registration
MEAT CONTENT CALCULATION
 MEAT CONTENT CALCULATION Introduction Amendments to the European Labelling Directive have resulted in the need to harmonise the definition of meat across Europe. This new definition attempts to ensure
Making a Room Reservation with Service Requests in Virtual EMS
 Making a Room Reservation with Service Requests in Virtual EMS Step 1: Pull up Virtual EMS by navigating from any browser to schedule.ucdenver.edu/virtualems. Step 2: Navigate to My Account>>Log In>>Enter
UWA ERA Publications Collection 2011
 UWA ERA Publications Collection 2011 Overview of the collection process Introduction to Minerva Research Assessment Unit September 2011 In this seminar Why we collect ERA publications data See UWA Publications
Diabetes Management Software V1.3 USER S MANUAL
 Diabetes Management Software V1.3 Manufacturer: BIONIME CORPORATION No. 100, Sec. 2, Daqing St., South Dist., Taichung City 40242, Taiwan http: //www.bionime.com E-mail: info@bionime.com Made in Taiwan
Corporate Online. Using Term Deposits
 Corporate Online. Using Term Deposits About this Guide About Corporate Online Westpac Corporate Online is an internet-based electronic platform, providing a single point of entry to a suite of online transactional
Chronic Pain Management Workflow Getting Started: Wrenching In Assessments into Favorites (do once!)
") Chronic Pain Management Workflow Getting Started: Wrenching In Assessments into Favorites (do once!) 1. Click More Activities to star flowsheets into your chunky button screen. 3. Use the search function
Chronic Pain Management Workflow Getting Started: Wrenching In Assessments into Favorites (do once!) 1. Click More Activities to star flowsheets into your chunky button screen. 3. Use the search function
DTSS Online Application Suite User Manual. Version 1.2
 DTSS Online Application Suite User Manual Version 1.2 Contents Dental Application Suite... 3 How to install your Sha2 Certificate using Internet Explorer... 3 Claiming... 5 Dental Claim Entry... 5 A1 Dental
Contour Diabetes app User Guide
 Contour Diabetes app User Guide Contents iii Contents Chapter 1: Introduction...5 About the CONTOUR DIABETES app...6 System and Device Requirements...6 Intended Use...6 Chapter 2: Getting Started...7
Medtech32 Diabetes Get Checked II Advanced Form Release Notes
 Medtech32 Diabetes Get Checked II Advanced Form Release Notes These Release Notes contain important information for all Medtech32 Users. Please ensure that they are circulated amongst all your staff. We
Data Management System (DMS) User Guide
 User Guide") Data Management System (DMS) User Guide Eversense and the Eversense logo are trademarks of Senseonics, Incorporated. Other brands and their products are trademarks or registered trademarks of their respective
Data Management System (DMS) User Guide Eversense and the Eversense logo are trademarks of Senseonics, Incorporated. Other brands and their products are trademarks or registered trademarks of their respective
RenalSmart (diabetic) Instruction Manual
 Instruction Manual") RenalSmart (diabetic) Instruction Manual Stepwise Approach Access to Application Patient details Dietary management: Food Options Dietary mangement: Consultation Dietary mangement: Previous consultation
RenalSmart (diabetic) Instruction Manual Stepwise Approach Access to Application Patient details Dietary management: Food Options Dietary mangement: Consultation Dietary mangement: Previous consultation
Download CoCASA Software Application
 Comprehensive Clinic Assessment Software Application (CoCASA) 7.0 Instructions Guide for Immunization Service Contractors February 6, 2012 The Comprehensive Clinic Assessment Software Application (CoCASA)
LibreHealth EHR Student Exercises
 LibreHealth EHR Student Exercises 1. Exercises with Test Patients created by students a. Create a new Encounter using the Bronchitis form (template) i. While your patient s chart is open, go to either
Chapter 9. Tests, Procedures, and Diagnosis Codes The McGraw-Hill Companies, Inc. All rights reserved.
 Chapter 9 Tests, Procedures, and Diagnosis Codes Chapter 9 Content: Overview Ordering A Test SpringLabsTM & Reference Lab Results Managing and Charting Tests Creating A New Test Documenting and Activating
myphonak app User Guide
 myphonak app User Guide Getting started myphonak is an app developed by Sonova, the world leader in hearing solutions based in Zurich, Switzerland. Read the user instructions thoroughly in order to benefit
Managing Immunizations
 Managing Immunizations In this chapter: Viewing Immunization Information Entering Immunizations Editing Immunizations Entering a Lead Test Action Editing a Lead Test Action Entering Opt-Out Immunizations
Audit Firm Administrator steps to follow
 Contents Audit Firm Administrator steps to follow... 3 What to know before you start... 3 Understanding CaseWare Cloud in a nutshell... 3 How to do the once off set up for the Audit Firm or Organisation...
Dementia Direct Enhanced Service
 Vision 3 Dementia Direct Enhanced Service England Outcomes Manager Copyright INPS Ltd 2015 The Bread Factory, 1A Broughton Street, Battersea, London, SW8 3QJ T: +44 (0) 207 501700 F:+44 (0) 207 5017100
INSTRUCTOR WALKTHROUGH
 INSTRUCTOR WALKTHROUGH In order to use ProctorU Auto, you will need the Google Chrome Extension. Click this link to install the extension in your Google Chrome web browser. https://chrome.google.com/webstore/detail/proctoru/goobgennebinldhonaajgafidboenlkl
MyDispense OTC exercise Guide
 MyDispense OTC exercise Guide Version 5.0 Page 1 of 23 Page 2 of 23 Table of Contents What is MyDispense?... 4 Who is this guide for?... 4 How should I use this guide?... 4 OTC exercises explained... 4
Proteome Discoverer Version 1.3
 Xcalibur Proteome Discoverer Version 1.3 Installation Guide XCALI-97359 Revision A May 2011 2011 Thermo Fisher Scientific Inc. All rights reserved. Xcalibur is a registered trademark of Thermo Fisher Scientific
DPV. Ramona Ranz, Andreas Hungele, Prof. Reinhard Holl
 DPV Ramona Ranz, Andreas Hungele, Prof. Reinhard Holl Contents Possible use of DPV Languages Patient data Search for patients Patient s info Save data Mandatory fields Diabetes subtypes ICD 10 Fuzzy date
Getting Started.
 Getting Started www.scientificbraintrainingpro.com Summary 1. First steps... 2 2. Log in... 2 3. Create an account for a patient... 3 4. Access an exercise with this patient... 4 5. Viewing the results
Reporting Nonviable MDH Vaccine to MIIC
 Reporting Nonviable MDH Vaccine to MIIC This guide describes how to use the Minnesota Immunization Information Connection (MIIC) to report nonviable vaccine for the Minnesota Vaccines for Children (MnVFC)
Consob Net Short Positions ( NSP ) Notification System. User Manual
 Notification System. User Manual") Consob Net Short Positions ( NSP ) Notification System User Manual Contents 1. Registration of a new user... 2 2. Lost password regeneration... 3 3. Changing user details... 3 4. NSP management overview...
Consob Net Short Positions ( NSP ) Notification System User Manual Contents 1. Registration of a new user... 2 2. Lost password regeneration... 3 3. Changing user details... 3 4. NSP management overview...
To begin using the Nutrients feature, visibility of the Modules must be turned on by a MICROS Account Manager.
 Nutrients A feature has been introduced that will manage Nutrient information for Items and Recipes in myinventory. This feature will benefit Organizations that are required to disclose Nutritional information
STOP Program Online Portal Training Manual
 STOP Program Online Portal Training Manual STOP Portal Training Manual for Practitioners Table of Contents 1.0 Login and Password.... 2 2.0 Home Screen/Dashboard......5 3.0 Enrolling a New Client.. 6 Registering
Appendix B. Nodulus Observer XT Instructional Guide. 1. Setting up your project p. 2. a. Observation p. 2. b. Subjects, behaviors and coding p.
 1 Appendix B Nodulus Observer XT Instructional Guide Sections: 1. Setting up your project p. 2 a. Observation p. 2 b. Subjects, behaviors and coding p. 3 c. Independent variables p. 4 2. Carry out an observation
Data Management System (DMS) User Guide
 User Guide") Data Management System (DMS) User Guide Eversense and the Eversense logo are trademarks of Senseonics, Incorporated. Other brands and their products are trademarks or registered trademarks of their respective
Data Management System (DMS) User Guide Eversense and the Eversense logo are trademarks of Senseonics, Incorporated. Other brands and their products are trademarks or registered trademarks of their respective
Unit 1: Introduction to the Operating System, Computer Systems, and Networks 1.1 Define terminology Prepare a list of terms with definitions
 AR Computer Applications I Correlated to Benchmark Microsoft Office 2010 (492490) Unit 1: Introduction to the Operating System, Computer Systems, and Networks 1.1 Define terminology 1.1.1 Prepare a list
Data Management, Data Management PLUS User Guide
 Data Management, Data Management PLUS User Guide Table of Contents Introduction 3 SHOEBOX Data Management and Data Management PLUS (DM+) for Individual Users 4 Portal Login 4 Working With Your Data 5 Manually
PedCath IMPACT User s Guide
 PedCath IMPACT User s Guide Contents Overview... 3 IMPACT Overview... 3 PedCath IMPACT Registry Module... 3 More on Work Flow... 4 Case Complete Checkoff... 4 PedCath Cath Report/IMPACT Shared Data...
HOW TO USE THE BENCHMARK CALENDAR SYSTEM
 HOW TO USE THE BENCHMARK CALENDAR SYSTEM 1. Go to Website http://doris.clk.co.st-johns.fl.us/benchmarkweb 2. You can use Firefox or Internet Explorer 11 to login to Benchmark. Compatibility mode is no
USER GUIDE: NEW CIR APP. Technician User Guide
 USER GUIDE: NEW CIR APP. Technician User Guide 0 Table of Contents 1 A New CIR User Interface Why?... 3 2 How to get started?... 3 3 Navigating the new CIR app. user interface... 6 3.1 Introduction...
Cerner COMPASS ICD-10 Transition Guide
 Cerner COMPASS ICD-10 Transition Guide Dx Assistant Purpose: To educate Seton clinicians regarding workflow changes within Cerner COMPASS subsequent to ICD-10 transition. Scope: Basic modules and functionality
Diabetes Management App. Instruction Manual
 Diabetes Management App Instruction Manual Accu-Chek Connect Diabetes Management App Overview The Accu-Chek Connect diabetes management app (hereafter referred to as the app) is designed to help you: Transfer
User Manual. RaySafe i2 dose viewer
 User Manual RaySafe i2 dose viewer 2012.03 Unfors RaySafe 5001048-A All rights are reserved. Reproduction or transmission in whole or in part, in any form or by any means, electronic, mechanical or otherwise,
Documenting Patient Immunization. New Brunswick 2018/19
 Documenting Patient Immunization New Brunswick 2018/19 Table of Contents Documenting Patient Immunization New Brunswick...3 Immunization Module Features...4 Configuration...5 Marketing Message Setup...6
East Stroudsburg University Athletic Training Medical Forms Information and Directions
 East Stroudsburg University Athletic Training Medical Forms Information and Directions 2013 2014 All student athletes must complete all medical information forms on the ATS Webportal by July 27 th, 2013.
Marathon ehealth Portal User Guide
 Marathon ehealth Portal User Guide Contents Page 2 Page 3 Getting Started Home Page 4 My Health Record Goals 20 Winooski Falls Way, Suite 400 Summary Winooski, VT 05404 History p 802-857-0400 Screening
Anticoagulation Manager - Getting Started
 Vision 3 Anticoagulation Manager - Getting Started Copyright INPS Ltd 2014 The Bread Factory, 1A Broughton Street, Battersea, London, SW8 3QJ T: +44 (0) 207 501700 F:+44 (0) 207 5017100 W: www.inps.co.uk
Content Part 2 Users manual... 4
 Content Part 2 Users manual... 4 Introduction. What is Kleos... 4 Case management... 5 Identity management... 9 Document management... 11 Document generation... 15 e-mail management... 15 Installation
PQRS 2014 Submission through the Surgeon Specific Registry
 PQRS 2014 Submission through the Surgeon Specific Registry Continuous Quality Improvement Division of Research and Optimal Patient Care American College of Surgeons About the SSR What is the SSR? The American
Iris Web-Based Interface User Manual. 1. Introduction Indications for Use
 IRIS USER MANUAL Iris Web-Based Interface User Manual Manual Information Date of release: June 28, 2014 Revision number: 1.0 Reference software version: 1.0 Service provider: 1 Table of Contents Intelligent
smk72+ Handbook Prof. Dr. Andreas Frey Dr. Lars Balzer Stephan Spuhler smk72+ Handbook Page 1
 smk72+ Handbook Prof. Dr. Andreas Frey Dr. Lars Balzer Stephan Spuhler Email: support@kompetenzscreening.de Page 1 Table of Contents HOME... 3 BASIC INFORMATION ON LOGGING IN... 4 LOGIN PROCESS FOR PARTICIPANTS...
POLARPERSONALTRAINER.COM HELP
 POLARPERSONALTRAINER.COM HELP CONTENTS Contents 2 Introduction 9 Registration and Login 10 Data Transfer 11 Training Data / Activity data 11 Training Programs 11 Strength Training Exercises 11 Data Transfer
Table of Contents Morning Set-up (GSI equipment, only)... 2 Opening AudBase... 3 Choosing a patient... 3 Performing Pure-Tone Air & Bone
... 2 Opening AudBase... 3 Choosing a patient... 3 Performing Pure-Tone Air & Bone") AudBase Guidebook Table of Contents Morning Set-up (GSI equipment, only)... 2 Opening AudBase... 3 Choosing a patient... 3 Performing Pure-Tone Air & Bone Conduction... 6 Testing using a GSI-61 Audiometer:...
AudBase Guidebook Table of Contents Morning Set-up (GSI equipment, only)... 2 Opening AudBase... 3 Choosing a patient... 3 Performing Pure-Tone Air & Bone Conduction... 6 Testing using a GSI-61 Audiometer:...
The Student Experience: Taking an Assessment in CFS
 The Student Experience: Taking an Assessment in CFS Students will be entering the responses to multiple choice questions Benchmark questions into CFS. There are small variations between Math and Science
Care Pathways User Guide
 Care Pathways User Guide For questions about McKesson Clinical Tools, email us at msh.providers@mckesson.com. Care Pathways User Guide Table of Contents Introduction to Care Pathways... 3 Launching Care
AudioConsole. User Guide. Doc. No EN/01 Part No EN
 AudioConsole Doc. No. 7-50-2180-EN/01 Part No. 7-50-21800-EN Copyright notice [2003], 2018 Inmedico A/S. All rights reserved. Oscilla is aregistered trademark of Inmedico A/S in the U.S.A. and/or other
POPULATION TRACKER MIDS USER GUIDE
 POPULATION TRACKER MIDS USER GUIDE December 2018 IFU-0003 14 TABLE OF CONTENTS TABLE OF CONTENTS... 1 Intended Use... 1 Warnings... 1 Contraindications... 1 Compatible Browsers... 2 Treatment Plan Templates
COMPLETING ONLINE EHS COURSES
 COMPLETING ONLINE EHS COURSES This document explains how to enroll in and complete online Environmental Health & Safety (EHS) courses in Quercus. Before you begin, you will need a UTORid (obtained from
Data Management System (DMS) User Guide
 User Guide") Data Management System (DMS) User Guide Eversense and the Eversense logo are trademarks of Senseonics, Incorporated. Other brands and their products are trademarks or registered trademarks of their respective
Data Management System (DMS) User Guide Eversense and the Eversense logo are trademarks of Senseonics, Incorporated. Other brands and their products are trademarks or registered trademarks of their respective
Creating YouTube Captioning
 Creating YouTube Captioning Created June, 2017 Upload your video to YouTube Access Video Manager Go to Creator Studio by clicking the option from your account icon located in the topright corner of the
Documenting Patient Immunization. Ontario 2018/19
 Documenting Patient Immunization Ontario 2018/19 Table of Contents Documenting Patient Immunization Ontario...3 Immunization Module Features...4 Configuration...5 Marketing Message Setup...6 Paper Mode...9
How Immunisations work in Best Practice?
 How Immunisations work in Best Practice? There are a number of areas in Best Practice related to Immunisations:- Recording and updating Immunisation records Searching and Printing Immunisations List Printing
Quick Start Guide for the CPI Web Training Modules and Assessment FOR NEW USERS
 FOR NEW USERS Access to PT and PTA CPI Web will only be provided if you complete the training session and complete the PT and PTA CPI/WEB Assessment (CPI Assessment). You will only have to complete the
Sleep Apnea Therapy Software User Manual
 Sleep Apnea Therapy Software User Manual Page ii Notices Revised Notice Trademark Copyright 103392 Rev B Published February 8, 2013 and supersedes all previous versions. The information contained in this
Ascribe Rx Online Resource Center User Guide
 Ascribe Rx Online Resource Center User Guide Contents Introduction... 1... 1 Wildcard functionality... 2 Canister Reports... 3 Canister aging... 3 Canister issues... 3 Current inventory... 4 Dispense Reports...
My Fitness Pal Health & Fitness Tracker A User s Guide
 My Fitness Pal Health & Fitness Tracker A User s Guide By: Angela McCall Introduction My Fitness Pal is an online diet, health, and fitness tracker that allows you to track your nutrition and fitness goals
Table of Contents Index Next. See inside for a complete description of program functions >> Link to the Table of Contents >> Link to the Index
 OneTouch Diabetes Management Software User Manual Next User Manual See inside for a complete description of program functions >> Link to the Table of Contents >> Link to the Index Information in this document
Automated process to create snapshot reports based on the 2016 Murray Community-based Groups Capacity Survey: User Guide Report No.
 research for a sustainable future Automated process to create snapshot reports based on the 2016 Murray Community-based Groups Capacity Survey: User Guide Report No. 116 Steven Vella Gail Fuller Michael
MY FITNESS PAL USER GUIDE
 MY FITNESS PAL USER GUIDE DIET PROFILE To help personalize your fitness goals, enter the following: Current weight Goal weight Height Gender Date of birth You also enter your normal daily activity options
EDUCATIONAL TECHNOLOGY MAKING AUDIO AND VIDEO ACCESSIBLE
 EDUCATIONAL TECHNOLOGY MAKING AUDIO AND VIDEO ACCESSIBLE Videos integrated in courses must be accessible by all users. An accessible video includes captions, that is a transcript of the audio description
Cancer Decision Support Tool Walk through user guide
 These screenshots show exactly how a GP should use the CDS tool, covering the three ways in which it works, and how to log in to the software. Logging into the software It s really easy to log into the
PCS CLINICAL AUDIT TOOL USER GUIDE
 PCS CLINICAL AUDIT TOOL USER GUIDE PEN COMPUTER SYSTEMS PTY LTD Version 2-3 DOCUMENT IDENTIFIER: Clinical Audit Tool User Guide Document Version Release Date Created/Modified By Revision 0-1 26/02/2007
EasyComp. The TPN Compatibility Software. Clinical Nutrition
 EasyComp The TPN Compatibility Software Clinical Nutrition Content 1. General Information 5 1.1 What is EasyComp? 4 1.2 Features and functions of EasyComp 5 1.3 IT requirements 5 t2. Starting EasyComp
CHRONIC CARE REPORTS. V 9.0, October eclinicalworks, All rights reserved
 CHRONIC CARE REPORTS V 9.0, October 2011 eclinicalworks, 2011. All rights reserved CONTENTS ABOUT THIS GUIDE 3 Product Documentation 3 Finding the Documents 3 Webinars 3 eclinicalworks Newsletter 4 Getting
OECD QSAR Toolbox v.4.2. An example illustrating RAAF scenario 6 and related assessment elements
 OECD QSAR Toolbox v.4.2 An example illustrating RAAF scenario 6 and related assessment elements Outlook Background Objectives Specific Aims Read Across Assessment Framework (RAAF) The exercise Workflow
Therapy Management Software for Diabetes
 TM CareLink TM ipro Therapy Management Software for Diabetes User Guide 6026112-015_a REF MMT-7340 2017 Medtronic MiniMed, Inc. All rights reserved. ipro and CareLink are registered trademarks of Medtronic