Home Hemodialysis Patient Workbook
|
|
|
- Stewart Parks
- 6 years ago
- Views:
Transcription
1 Home Hemodialysis Patient Workbook Name: Home Hemodialysis Educator: Home Hemodialysis Educator Phone Number: Training Location:
2 Introduction This manual was created by the BC Renal Agency and the BC Home Hemodialysis Educators group, to help guide you through home hemodialysis (HHD). It will explain the basics related to your care including target weight and fluid calculations, vascular access care, medication, lab values, healthy eating, dialysis-related complications and being prepared for emergencies. This manual is to be used as a workbook, along with specific information related to the operation of the dialysis equipment. You will most likely receive 2 or 3 manuals during your training. Because there is a lot to keep track of before and during your training, each chapter will have an area for you to keep notes. This will be your personal workbook, so please feel free to make notes as you are learning. The training program is a step-by-step program tailored for you and your learning needs. Discuss with your educator your learning style and how you best learn new concepts. Your care partner is invited to learn alongside with you. Please know that we are here to help. This booklet was developed to answer some of your questions, but feel free to approach any member of the team for more information. While learning home hemodialysis, you might hear or read some words or phrases that you do not know. At the end of this booklet, there is a glossary. This will help you learn new medical-related words that may be new to you. This is a safe environment where all questions are welcomed. Your nurse will be by your side throughout the learning process, to help you feel confident with this new concept. Please feel free to ask as many questions that you may need to feel comfortable.
3 Table of Contents 1. How Does Hemodialysis Work? Physical Assessment Your Vascular Access Taking Care of Your Fistula/ Graft (Handout) How to Self-Needle Your Hemodialysis Catheter Safety Devices Blood Work Getting to Know Your Kidney Bloodwork (Handout) Dialysis Medications Giving Yourself Medications Troubleshooting Guide Medical Emergencies Handling Waste Disposal of Hemodialysis Waste (Handout) Healthy Eating for Home Hemodialysis Tips for People with Nausea (Handout) Tips for People with Poor Appetite (Handout) Taste Changes (Handout) Tips to Increase Calories (Handout) High Calorie Kidney-Friendly Snack Ideas (Handout) Disaster Preparedness Planning for Disaster (Handout) Emergency Information (Form) Your Medical Condition and History (Form) Medication List (Form) Hemodialysis Information (Form) Glossary These images are used in this workbook: CV conventional NX NxStage Your training nurse will discuss the image that applies to your home hemodialysis training. the northern way of caring
 to remove waste and excess water.")
4 Module 1 How Does Hemodialysis Work? The hemodialysis process is a medical procedure where blood is artificially cleaned. This involves your blood passing through a dialyzer (an artificial kidney) to remove waste and excess water. The dialyzer uses tiny hollow filters that look like microscopic straws called a semipermeable membrane. As blood moves through these tubes it comes into contact with a solution called dialysate, a liquid made from water, an acid solution and a bicarbonate or lactate solution. The dialysate liquid is circulated around the outside of the hollow fibers providing a pathway to remove toxins. Making tea offers an everyday example of diffusion. Putting a tea bag into hot water causes the bag to act like a semi-permeable membrane. The tea leaves are too big to leave the bag, but the flavour and colour of the tea can still pass through the membrane into the water, and vice versa, the water is able to pass into the bag. During hemodialysis, large molecules such as blood cells and protein are kept inside the membrane but smaller molecules such as urea and creatinine (and other biological wastes) pass through the small holes of the dialyzer s filters into the dialysate solution. Two normally functioning kidneys filter about 180 litres of blood a day, removing about two litres of waste and extra water. Your body produces hundreds of different waste molecules every second. Some of these molecules become waste products such as creatinine and urea, which are the result of the normal breakdown of muscle and food (known as metabolism). 1
5 Dialysis replaces many of the functions that your kidneys are no longer able to do: Removes salt and water (helps to regulate your blood pressure) Cleans the blood by removing wastes (e.g. urea, creatinine) Correct high or imbalanced levels of potassium, chloride, sodium etc. in the blood Regulates electrolytes and minerals (e.g. calcium) However, dialysis is unable to: Produce hormones such as Erythropoietin (which helps regulate red blood cells) and Renin (which helps regulates blood pressure) How do you know if you are getting enough dialysis? You have now read how dialysis works to get rid of waste products and extra fluid from your system. You should also understand that the more dialysis treatment you get, the better you will feel, as you will have a reduced amount of waste products and excess fluid in your body. A few signs (symptoms) of not getting enough dialysis are: Weakness and tiredness Poor appetite Feeling sick to your stomach Trouble getting a good sleep Itchy skin Metallic taste in your mouth Difficulty concentrating Reduced interest in sex Difficulty breathing, especially when exercising or laying down flat Swelling in your hands and feet Poor blood pressure control 2
6 Not getting enough dialysis can be extremely serious. It is important to pay attention to these symptoms and act on them quickly. Talk to your nurse or doctor as soon as possible before your symptoms get worse. If you have any of the above symptoms please notify your health care team. To feel your best, remember to: Dialyze all the days you re supposed to Dialyze for your full treatment time Follow your diet and fluid restrictions Take your medications regularly Take care of your vascular access and monitor your arterial and venous pressures during treatment 3
7 Notes- How Does Hemodialysis Work? 4
8 Module 2 Physical Assessment Before you begin your dialysis treatment you will be instructed to do a self-assessment. Your assessment will be recorded on your run log before each dialysis. This will help your care team assess your health status. A self-assessment includes: Weight Blood pressure (BP) Temperature Weight There are 3 types of weights to be aware of for dialysis: Body weight Fluid weight Goal weight Body weight Your body weight consists of solid things in your body such as bones, muscles and fat. Body weight is what increases when you eat too much or decreases when you eat too little. Your body weight should stay about the same every day, unless you start eating more or less than usual. Important tip to remember: Your body weight shouldn t change much from day to day. 5

9 Fluid weight Fluid weight is the part of your body that is liquid. Your body tissues and blood contain fluid. For people with kidney disease, fluid weight will increase as you drink more, for example. If you drink 1 liter of water, you will gain 1 kg of fluid. If you do not urinate, the fluid will stay in your body and you may start to notice swelling in some places. 1 litre of fluid = 1 kilogram (kg) of fluid Check for signs of swelling or edema Swelling or edema means you have too much fluid in your body. If excess fluid builds up in your blood steam it may leak into your tissues which causes swelling (edema). Look for signs of swelling around your ankles, fingers and eyes. Are your shoes and socks tight? Do you see dents or finger marks in your skin when you push on your ankles? You will be given guidelines on how much fluid you can have. Your fluid limit depends on how much urine your kidneys are still making and if edema or excess fluid weight is a problem for you. You will get used to recognizing when you need to drink more or less. Your nurse and dietitian will help you learn how much fluid you may drink. 6

10 What is Goal Weight? Goal weight is similar to body weight. This is the weight at which you feel well, with no shortness of breath or swelling in the ankles, and your blood pressure is within your normal range. This is the weight you should be at the end of dialysis. To determine the amount of fluid to remove on dialysis, your home hemodialysis team will determine a goal weight that is right for you. Your goal weight usually remains the same every day, but may need to be adjusted if you gain or lose body weight. My Goal Weight is: lbs kgs Determining the fluid weight to be removed on dialysis Pre-weight (today s scale reading): Goal weight: Subtract the two weights = This is the fluid weight. 7

11 If you are planning to drink on dialysis, you will need to enter the fluid amount into the final number. Examples: 1 cup of coffee is 200 mls or 0.2 of a litre 1 bottle of water is approximately 300mls or 0.3 of a litre 1 can of soda is 355mls or 400mls or 0.4 of a litre 1 litre of fluid = 1 kilogram (kg) of fluid Final Fluid Calculation: Pre-dialysis weight (scale weight) Goal weight - Subtract the two weights = Add the fluid you will drink + Add rinse back + Amount to remove on dialysis = Here is an example: Today s pre-dialysis weight 65.5 kg Goal weight kg Subtract the two weights = 2.0 kg Add drinks kg Add rinse back kg Amount to remove on dialysis = 2.5 litres èthis is the number you will put into your machine for fluid removal. 8
12 What does it mean when you are above your goal weight? This may be a sign that you have too much fluid in your body. This is called fluid overload and may be a result of: Increased fluid Increased salt intake (salt makes you retain fluid) Incorrect calculations when removing fluid on dialysis How will you notice if you have too much fluid in your body? You will notice: An increase in your weight Higher than normal blood pressure Swelling in your ankles, hands or face, shortness of breath. What if I lose weight? If you lose weight it may be because you are losing muscle or fat weight. You may need to adjust your goal weight, as you have lost true body weight. You may start to collect fluid in your body if you have lost weight but not adjusted your goal weight. When you know you have too much fluid in your body, follow these steps: Lower your goal weight by 0.5 kg Decrease your fluid and salt intake Consult your dialysis nurse or dietitian for guidance as needed What if I gain weight? If you gain weight it may be because you are eating more or building muscle. You have gained true body weight. You may have low blood pressure and feel unwell at the end of dialysis if you continue using your previous goal weight without making adjustments. 9
13 When you know you have gained weight follow these steps: Increase goal weight by 0.5kg Evaluate your food intake and caloric needs Consult with your dialysis nurse or dietician for guidance Blood pressure Blood pressure is an important tool to help determine if you have too much or too little fluid in your body. Imagine a water pipe with little stream flowing through it and the pressure of the pipe is low. If there was a sudden gush of fluid into the pipe, and the pipe fills up, the water would have nowhere to go and the water pressure in the pipe would increase. This same thing happens in your blood vessels when you have too much fluid in your blood. As the fluid builds up in your vessels, so does the pressure, as in high blood pressure or hypertension. If there was too little water flowing through the same pipe, there would be a low water pressure or a trickle of water. This same thing happens in your blood vessels when you have too little fluid in your blood. If your blood pressure is low, you may be dehydrated. This is known as low blood pressure or hypotension. Temperature A temperature above normal is a sign of infection. It is important to track your temperature before and after dialysis and anytime you feel warm, chills or you think you may have a fever. Temperature is an important tool to help you determine if you have an infection starting. If this occurs while you are dialyzing, you must call your nurse immediately as this could indicate a serious blood infection. 10

14 What temperature indicates a fever? Look at the photo below. The green section indicates normal body temperature. Normal Temperature = 36 to 37.5 o C If your temperature is higher than 37.5 o C, please call your nurse immediately. Sometimes a fever is masked by drinking cold beverages, eating ice, or taking certain medications such as acetaminophen (Tylenol and others), ibuprofen (Advil, Motrin) and aspirin. Please be aware of this when checking your temperature. Even if the temperature reading is within the normal range, you may feel general malaise (feeling unwell, flu like symptoms). If you feel that you may have a fever, take a look at your vascular access. Your fistula or catheter may be red or irritated. Your nurse may ask you to go to the closest emergency for further assessment. 11
15 Notes- Physical Assessment 12

16 Module 3 Your Vascular Access What is a vascular access? A vascular access is a way for the health care team to access your bloodstream over and over again. Each time you have a hemodialysis treatment this access is used and is connected by a tube to a dialysis machine. One tube takes the blood to the dialysis machine to be cleaned. Another tube returns the clean blood to your body. This process of taking blood to and from your body to the dialysis machine is repeated many times during a dialysis run. There are three types of vascular access: A fistula A graft A catheter Understanding, and knowing how to look after your vascular access is important to the long-term success of your hemodialysis treatments and overall health. Fistula What is a fistula? A fistula is a type of vascular access that uses your own arteries and veins. A surgeon makes small incisions and then works 13
17 underneath the skin to join an artery to a vein. The blood flow in your arteries is strong, and joining the artery and vein together causes a strong blood flow. You can picture it like two rivers merging together. This new vein/artery is called a fistula. Because of the strong turbulent blood flow the fistula gets larger. Once your fistula has healed, two needles will be inserted into the large area for dialysis your fistula. What can I expect from my surgery? In many situations the surgery required for creating a fistula is done as a day procedure. This means you don t spend a night in the hospital. Usually the surgeon will create the fistula in the forearm of your non-dominant arm. This is the arm that you use the least, so if you are right-handed the fistula is usually created in your left arm. However everyone is different, there are times when the location of a fistula will be in a different place than described here. Why is a fistula the best access? A fistula is the preferred vascular access for dialysis. Fistulas are made of your own tissue, so they have lower rates of infection, and they do not clot as easily as other types of vascular access. How long does it take before I can use my fistula? It takes at least 6 8 weeks for a fistula to heal and grow in size before it can be used for dialysis. You may be asked to do some simple exercises like squeezing a ball to help your fistula mature as quickly as possible. Ensure sutures and/or staples are kept intact for days. After this time a nurse will remove them for you. 14

18 Graft What is a graft? A graft is a type of vascular access that is a piece of flexible tubing that is placed under your skin and stitched to your artery to connect it to a vein. The two needles used for dialysis are inserted through your skin and into this tubing. This type of surgery can be done as a day procedure, which means you don t have to spend a night in hospital. The decision whether you should have a graft, instead of a fistula, is made by your surgeon and your nephrologist. Grafts are usually placed in the forearm of your non-dominant arm. This is the arm that you use the least, so if you are right-handed the graft is usually in your left arm. Because every patient is different, there are times when a graft will be located in a different place than described here. Grafts can either be straight or looped. Your surgeon makes this decision. Unlike a fistula, grafts do not need extra time to mature and can be used very quickly after surgery often within two or three weeks. Ensure sutures and/or staples are kept intact for days. After this time a nurse will remove them for you. 15
19 Taking Care of your Vascular Access Care of Your Fistula or Graft GO! CAUTION! Check for a thrill at least once every day. Before dialysis: Wash your hands and your access with warm water and antibacterial soap. After dialysis: Hold your own needle sites wearing gloves for minutes. Avoid wrapping tape all around your access arm. Take the gauze off 4 6 hours after your dialysis treatment. If your fistula or graft starts to bleed after dialysis, apply pressure. If the bleeding does not stop, keep applying pressure and go to emergency. Do NOT allow anyone to take a blood pressure, put an IV, or draw blood on your access arm. Avoid scratching or picking scabs on your access arm. Avoid things that might reduce the blood flow or damage your access. STOP! Call your kidney doctor (nephrologist) or dialysis unit if. You can t feel a thrill. There is new redness, warmth, swelling, or pain in your access arm or oozing from your access. You are feverish, and have any of the above symptoms. For more information, including a series of patient teaching pamphlets on vascular access, go to the BC Renal Agency website: bcrenalagency.ca Updated Fall 2012; reviewed and approved Fall

20 What is a hemodialysis catheter? A hemodialysis catheter is a soft hollow tube that can be placed within a large vein inside your neck or in your chest. To insert the catheter, a doctor uses a local anesthetic and makes a small incision, or opening, in your skin over the vein. The catheter is then threaded into the vein, and the doctor attaches the catheter to your skin with stitches, to hold it in place. The two short arms of the catheter sit outside the chest. The outside catheter arms (lumens) connect to the dialysis tubing red for the arterial blood line that takes the blood out and blue for the venous blood line that returns the clean blood back to you. After about 6-8 weeks your skin will grow around the catheter at the exit site and the sutures can be removed by a nurse. How do I keep my catheter healthy? 1. Keep your catheter dressing dry. For bathing, take a sponge bath rather than a shower. If your dressing gets wet, take the wet covering off and apply a new dressing. Do not soak in a hot tub or go swimming. 2. Check your catheter exit site for any signs of infection. If you notice any redness, pain, swelling or drainage OR if you have a fever or chills, go straight to your nearest hospital emergency department. 3. Do not remove the sutures that keep the catheter in place. If you notice that the sutures are wearing thin, contact your 17
21 nurse, tape the catheter in place and go to the nearest hospital. If your catheter falls out, apply firm pressure to it with clean gauze, call 911 and go to your nearest hospital emergency department. 4. Your catheter should never be used for anything other than hemodialysis. 5. Do not allow any health professionals, other than a trained dialysis nurse, to access this line. 6. Avoid tugging on the outside lumens of the catheter as this can cause skin irritation that may lead to infection. The dressing will help to reduce accidental tugging on the catheter. 7. When you no longer need your hemodialysis catheter, it will be removed by a doctor. A dressing is then applied and should be left on for 48 hours so the opening in your skin will heal. When should I call my home dialysis team? There is any redness, warmth or pain along the catheter. There is any oozing or drainage from your exit site. You have noticeable swelling or itching around your catheter or neck. You are feverish, and have any of the above symptoms. You notice the part of your catheter outside your skin seems to be getting longer. Your catheter is accidentally pulled and there is bleeding around the exit site. 18
22 Notes- Your Vascular Access 19
23 Module 4 How to Self-Needle Self-needling your fistula or graft There are two different techniques to needle (cannulate) your fistula or graft: rope ladder technique and buttonhole technique. Before you start learning about self-cannulation, discuss with your nurse the best method for you and your vascular access. Rope ladder technique (for fistulas and grafts) The rope ladder technique rotates needle sites for each dialysis treatment. The rope ladder technique must ALWAYS be used when needling a graft. Important tips to remember: Clean, clean, clean. Protect yourself from infection. Wash your hands and access limb. Use the proper technique every time you insert your needles. Choose your sites carefully. Choose the straightest points possible. Remember that needles are not curved, even though your fistula might be. Your training nurse will help you find appropriate sites. Bruises and swelling can happen if the needle pierces through the underside of the vessel (fistula/graft). To avoid this, plan ahead. Look, Listen and Feel your fistula/graft every time. Draw a path where the needle is to go if you need to. Fistulas have a tendency to move, so make sure you know where you are going with your needle. If the needle has gone through the wall of the fistula/graft and you feel pain, take the needle out and try again in a different spot. Report redness, pain, swelling or fever to your nurse. If you think your fistula is infected, go to the closest emergency room. 20
24 Rope Ladder Technique Supplies: Clean drape or towel Disinfectant wipes Gauze, 4x4 inch and 2x2 inch 21-gauge needle and 10ml syringe for heparin Heparin 1:1000 units Tape (1 in and ½ in) 2 fistula needles Tourniquet Gloves (have your helper use them) 2 (10 ml) syringes If instructed by your educator to prime needles: 2 pre-filled normal saline syringes 1. Check your access for signs of infection (redness, swelling, tenderness or drainage). 2. Check your access is working by feeling the thrill (pulsation or vibration) and listening for a bruit ( whoosing sound) using a stethoscope. 3. Wash your hands and fistula arm with warm water and antibacterial soap for a full minute. 4. Prepare your needling surface and assemble your supplies on your drape or towel. 5. Prepare needles, syringes, heparin, and tape. 21
25 6. Cleanse each needle site with a disinfectant wipe - using up and down and side-to-side motions (waffle motion). Allow to air dry. 7. Apply tourniquet 4 inches higher than your venous (top) needle site. 8. If helper available, ask to put on clean gloves. 9. Insert arterial needle: a) Remove cap and hold needle by the plastic wings with the opening (bevel) facing up. b) Pull back on the skin with light pressure below where you will be placing the needle. c) Insert needle using a 25 degree angle. Flatten angle once you see blood pulsing (flashback). Slowly advance needle almost to the end in the same direction as the fistula. If you have trouble advancing the needle, STOP and call for help. d) Check the flow of blood by pulling up and down on the syringe. Syringe should be in an upright position. e) Place folded gauze under the needle if required. f) Tape needle securely. g) Clamp needle. Remove the old syringe with blood. Loosen tourniquet. 9a 9c Bevel Cannula 22
26 h) Attach a 10 cc pre-filled syringe and instill saline. i) Clamp needle. j) Tighten tourniquet. 10. Repeat step 12, a to i, to insert the venous (top) needle. 11. Remove tourniquet. 12. Give yourself the initial heparin dose by replacing the empty syringe with the heparin-filled syringe. Check your flows as you draw up the blood into the syringe and mix it with heparin. Return blood and heparin and close clamp or as instructed by your educator. 13. Recheck flow in needles using syringe. 14. Clamp needles and connect to bloodlines (machine). 15. Open needle clamps and start dialysis. 9h 10 23
. Needle tips need to be at least 1 inch apart.")
27 Buttonhole Technique (fistula only) Important points to remember: Think about a buttonhole track like an earring hole. Your nurse will choose your buttonhole sites carefully. The straightest part of your fistula will be used. The arterial needle needs to be put at least 2 inches above the fistula incision (anastomosis). Needle tips need to be at least 1 inch apart. Use the same hole, the same angle and the same direction each time you needle your fistula. Always use a tourniquet. Clean, clean, clean make sure you clean your sites before and after removing the scabs. Use sharp needles to form the track. It usually takes 8 to 18 times to form a track. Once the track is formed, needle the track using blunt buttonhole (dull) needles. Never use sharp needles. Report redness, pain, swelling or fever to your nurse. If you think your fistula is infected, go to the nearest emergency department. 24
28 Buttonhole Technique Supplies: Clean drape or towel Disinfectant wipes Gauze, 4x4 inch and 2x2 inch 21-gauge needle and 10ml syringe for heparin Heparin Tape (1 in and ½ in) 2 blunt buttonhole fistula needles Tourniquet 2 red blunt fill needles Gloves (have your helper use them) If instructed by your educator to prime needles: 2 pre-filled normal saline syringes 1. Check your access for signs of infection (redness, swelling, tenderness or drainage). 2. Check that your access is working by feeling the thrill (pulsation or vibration) and listening for a bruit ( whoosing sound) using a stethoscope. 3. Wash your hands and fistula arm with warm water and antibacterial soap for a full minute. 4. Prepare your needling surface and assemble your supplies on your drape or towel. 5. Prepare needles, syringes, tape, gauzes, heparin, and anything you may need for needling. 25
. 9.")
29 6. Cleanse each needle site with a disinfectant wipe - using up and down and side to side motions (waffle motion). Allow to air dry. 7. Wipe each scab with a disinfectant wipe (one per scab). 8. Gently lift each scab off with a disinfectant wipe or a red blunt fill needle if scab doesn t come off easily (one wipe or needle per scab). 9. Cleanse each needle site again with a disinfectant swab (one per site). 10. Apply tourniquet 4 inches higher than your venous (top) needle site. 11. If helper available, ask to put on clean gloves. 12. Insert arterial needle: a) Remove cap and hold needle by the plastic wings with the opening (bevel) facing up. b) Pull back on the skin with light pressure below where you will be placing the needle. c) Insert needle using a 25 degree angle. Flatten angle once you see blood pulsing (flashback). Slowly advance needle almost to the end in the same direction as the fistula. If you have trouble advancing the needle, STOP and call for help. 12a 12c Bevel Cannula 26
 Clamp needle. Remove the old syringe with blood. Loosen tourniquet. h) Attach a 10 cc pre-filled syringe and instill saline. i) Clamp needle. j) Tighten tourniquet. 13.")

30 d) Check the flow of blood by pulling up and down on the attached syringe. Your nurse will show you how to do this. e) Place folded gauze under the needle if required. f) Tape needle securely. g) Clamp needle. Remove the old syringe with blood. Loosen tourniquet. h) Attach a 10 cc pre-filled syringe and instill saline. i) Clamp needle. j) Tighten tourniquet. 13. Repeat step 12, a to i to insert the venous (top) needle. 14. Remove tourniquet. 15. Give yourself the initial heparin dose by replacing the empty syringe with the heparin-filled syringe. Check your flows as you draw up the blood into the syringe and mix it with heparin. Return blood and heparin and close clamp. 16. Re-check flow in needles using syringe. 17. Clamp needles and connect to bloodlines (machine). 18. Open needle clamps and start dialysis. 12h 13 27
31 Removing Needles- for both rope ladder and buttonhole technique Supplies: Clean drape or towel Gauze, 2-4 (2x2 inch and 4x4 inch) Sharps bin Antimicrobial gauze OR 2 sterile swab tip applicators and mupricin cream (if using buttonhole technique) Tape (1 in and ½ in) Gloves (have your helper use them) 1. Return blood as per machine manual. 2. Check standing and sitting blood pressure. 3. Wash your hands with anti-bacterial soap or hand sanitizer. 4. Prepare supplies, open gauze, prepare tape and/or band aids. 5. Clamp both needles. Place a drape or pad under arm. 6. If helper available, ask to put on clean gloves. 7. Carefully remove tape or hold needle while helper or staff removes tape. Place gauze over the needle site without applying pressure. 8. Remove needles one at a time by holding the needle tubing with your fistula hand and placing gauze over the puncture site with your other hand. Pull needle out slowly at the same angle as the track. 9. After the needle is out, hold your needle sites using gentle pressure for 10 minutes. Press at the needle site and just 28
32 above. If the needle site is still bleeding after 10 minutes, reapply pressure for another 5 minutes. 10. For Buttonhole Cannulation When the bleeding stops: Apply antimicrobial gauze and tape in place; OR Use a sterile swab tip applicator and apply Mupirocin cream about the size of a pea to each site (one applicator per site). Make sure the tube of the cream does not contact the skin. Cover the sites with a sterile gauze and tape in place. Remove the gauze after 4-6 hours. If Mupirocin cream applied, wipe away excess cream. 11. For Rope Ladder Cannulation When bleeding stops: Apply gauze and tape in place. Remove gauze after 4-6 hours. In the event of an emergency, you will need to have your emergency bleeding supplies close and within reach. If in the event your fistula, or graft starts to bleed after you have finished dialysis, please follow the instructions on the following page. You can download this sheet (and many other handouts) at Click: Health Info èmanaging My Care è Vascular Access è Fistulas & Grafts. 29

, friend(s) or neighbor(s) know. 2.")
33 VASCULAR ACCESS PATIENT TEACHING TOOL Bleeding Fistula or Graft: WHAT TO DO It is very rare for your fistula or graft to bleed after you leave the dialysis unit. This brochure tells you what to do if it does happen. What supplies do I need in case my needle sites bleed at home? Gauze pads Tape Gloves Tourniquet (e.g., belt, tie, blood pressure cuff required only if bleeding profusely or squirting). Keep these supplies in your emergency kit. What do I do if my fistula or graft starts to bleed after I leave the dialysis unit? 1. Call for help! Let your family member(s), friend(s) or neighbor(s) know. 2. Get emergency kit, put on gloves and open gauze. If you do not have gauze handy, use an absorbent cloth, tissues or paper towel. 3. Press firmly for minutes, and refrain from peeking under your fingers. 4. Make sure you press the bleeding needle hole with two fingers to put pressure on both the site where the needle enters the skin and the site where it enters the fistula/graft. 5. If the bleeding stops, apply a band aid (and let your nurse know on your next run). 6. If the bleeding doesn t stop after 15 minutes, call Elevate the fistula/graft arm. 8. If bleeding a lot or squirting, apply a tourniquet (belt, tie, BP cuff etc) tightly around your upper arm while waiting for the ambulance. The information in this pamphlet is provided for educational/information purposes, and to support discussion with your health care team about your medical condition and treatment. It does not constitute medical advice and should not substitute for advice given by your physician or other qualified health care professional. This brochure can be downloaded from the BC Renal Agency website: BC Renal Agency Burrard Street Vancouver, BC V6Z 2H3 Phone: bcpra@bcpra.ca Web: BCRenalAgency.ca Youtube.com/BCRenalAgency 30
34 Notes- How to Self-Needle 31

35 Module 5 Your Diaylsis Catheter Important Tips for a Healthy Catheter Think clean. We cannot emphasize this enough. Protect yourself from infection. Wash your hands and use good technique every time you use your catheter. Never touch the ends of the catheter. The catheter tip sits inside your heart. Bacteria (germs) that touch the end of the catheter or TEGO connector can travel right to your heart. If you accidentally touch one of the open catheter lines or if you find that your catheter TEGO connector cap has fallen off or is damaged, soak the end of the line with disinfectant wipe for 1 minute. Attach a new TEGO Connector cap. Call your nurse if the TEGO connector cap is missing. Infections that are caught early are more easily treated. Take your temperature regularly. Call your nurse or doctor immediately and go to the hospital emergency room if your temperature is 37.5 o C or higher or if you have rigors [uncontrollable shaking] and chills. Do not soak in a tub or go swimming with your catheter. Read Showering with a Hemodialysis Catheter at www. bcrenalagency.ca. Click: Health Info èmanaging My Care è Vascular Access è Catheter. 32
36 1. Watch for air Always close your catheter clamps. Make sure they are closed every time you change your TEGO connector caps, connect a syringe, or attach a bloodline. Keep syringes upright when you check your flows so that air bubbles get trapped in the top of the syringe. 2. Changing your dressing Change your dressing days per week (talk to your nurse). Many people change their catheter dressing after bathing. Try to keep your dressing dry. If it gets wet, change it. Use a mirror when changing your dressing. If you notice pain or redness around the catheter or any drainage, call your nurse. 3. Blood flow changes Changes in your catheter blood flow and changes to usual arterial/venous pressure readings can mean there is either a clot forming in your catheter or a fibrin sheath may be growing around the tip of your catheter. You may need to change your TEGO connector cap. If this happens, tell your nurse. A medication CATHFLO can be injected into your catheter line to safely dissolve the clot or fibrin sheath. 4. Only use your catheter for dialysis. You catheter should never be used for anything other than hemodialysis. 33
37 How to change your catheter TEGO connector caps Important points to remember: TEGO connectors are changed weekly. You may need to change them more frequently if you notice a clot in the end or the blood is not moving well. If the TEGO Connector cap becomes loose or falls off, make sure the catheter remains clamped. You are at risk for infection and air entering your bloodstream, and need urgent care. Call your nurse and go to your hospital emergency room. TEGO connector cap 34
38 Supplies: 2 clean drapes Disinfecting wipes (several) TEGO connector caps 2 gauze packages (4x4 s) Tape (1 inch) 2-20 ml pre filled saline syringes or 4-10mL pre filled saline syringes 1 bottle of heparin 1000 units/ml 21 gauge needle One 10ml syringe 2 plastic clamps Small garbage bag Table mirror with a stand Face mask Hand sanitizer Optional Supplies Blood detector (enuresis alarm) if you will be sleeping while on dialysis. Gloves Instructions 1. Wash your hands for a full minute. 2. Remove gauze dressing from catheter lines. 3. Sanitize hands and put on mask. 4. Prepare your supplies on a clean drape. 5. Carefully peel open TEGO connector cap package. Leave blue cap on the TEGO connector cap. 6. Tape or clamp second clean drape to your shirt under the catheter lines. 35

39 7. Using a disinfecting wipe, cleanse each TEGO connector cap using friction scrub for 30 seconds. Be sure to scrub around the TEGO/Catheter connection. Use new wipes for each TEGO connector cap. 8. Remove the 4 x 4 gauze and place catheter lines on a sterile 4 x 4 gauze. 9. Air-dry the catheter lines for 1 minute. 10. Ensure the catheter clamps are closed. Carefully remove old TEGO Connector from arterial limb and discard. Scrub the sides (threads) and end of the hub thoroughly with friction, making sure to remove any residue (e.g., blood) for 30 seconds. Discard wipe. Do not touch open ends with your hands. 11. Remove protective blue end from new TEGO connector cap. Attach male luer end of TEGO connector to the arterial limb of the catheter. Leave catheter clamped and move to venous limb of catheter. A Luer Lock is a screw connection on a syringe or TEGO Connector Cap that creates a leak-free seal. Male Luer end of TEGO Connector Cap 12. Carefully remove old TEGO connector from venous limb and discard. Scrub the sides (threads) and end of the hub thoroughly with friction, making sure to remove any residue (e.g., blood) for 30 seconds. Discard wipe. Do not touch open ends with your hands. 13. Remove protective blue end from new TEGO connector cap. Attach male luer of TEGO connector to the venous limb of the catheter. Leave both clamps closed. 36
40 Starting dialysis using a catheter Have machine set up and ready to go BEFORE you open up your catheter. 1. Wash hands. 2. Prepare your supplies on one of your drapes. Draw up your initial dose of heparin using a 21 gauge needle, a 10mL syringe and an alcohol swab. 3. Remove old gauze covering the catheter (never use scissors as this may accidently slice the catheter). 4. Cleanse hands using hand sanitizer. Let air dry. 5. Ensure clamps are closed. 6. Hub-scrub the arterial lumen TEGO connector with a disinfectant wipe. Scrub the sides (threads) and ends of the hub thoroughly with friction for 30 seconds, making sure to remove any dry blood. Discard wipe. 7. Attach an empty 10 ml syringe to arterial lumen TEGO. 8. Open arterial lumen clamp and withdraw locking solution, blood and/or clots (total 5 ml). Close clamp. Discard syringe. 9. Assess catheter function by attaching a new 10 ml syringe to the arterial lumen TEGO connector and aspirate 3 5 ml of blood to check the flow of the lumen 3 times to evaluate lumen flow. Clamp arterial lumen. 10. Repeat steps 1-5 using the venous lumen. Pre-dialysis blood work can be drawn at this time. 11. Attach a 20 ml (or 10 ml) prefilled normal saline syringe to the arterial lumen TEGO connector. Flush lumen using a forceful flush method. Repeat if using 10 ml syringe. Clamp lumen. (Total: 20 ml per lumen). 37
41 12. Repeat step 7 for the venous lumen TEGO connector. 13. Replace the 20mL syringe on the venous line with the heparin loading dose syringe. Push heparin in and pull back and forth on syringe plunger 3 times. Close clamp on the lines. Connect bloodlines and initiate dialysis: 14. Remove syringe from the arterial line TEGO connector and discard. Ensure there is no air in the arterial blood line. Connect the arterial blood line to the arterial TEGO connector without touching the ends. Ensure connections are tight. 15. Remove syringe from the venous line TEGO connector and discard. Ensure there is no air in the venous blood line. Connect the venous blood line to the venous line TEGO connector without touching the ends. Ensure connections are tight. End of dialysis using a catheter See your machine flip chart or manual for rinseback procedure. Follow these instructions only after your blood has been returned. Supplies: 2 clean drapes Disinfecting wipes (several) 2 gauze packages (4x4 s) 2-20 ml pre filled saline syringes 2-5mL pre filled Sodium Citrate Syringes 1. Use hand sanitizer to cleanse hands. 2. Prepare your supplies on your drape. a) Prepare your sodium citrate 4% syringes. Using the 38
42 plunger, expel excess sodium citrate. You need in each syringe. b) Open disinfecting wipe packages. ml 3. Clip drape to your shirt under your catheter lines using two clamps or tape. 4. Give back your blood and take sitting and standing blood pressures (see your machine training manual or flipchart). 5. Cleanse hands again to prepare for take-off. 6. Scrub the arterial and venous TEGO connectors with a disinfecting wipe. Scrub the sides, and connector, thoroughly with friction, making sure to remove any residue (e.g., blood) for 30 seconds. Discard wipe. Place lines on a dry 4 x 4-inch gauze. Allow lines to dry for one minute. 7. Check that both catheter and bloodlines are clamped. 8. Carefully separate arterial bloodline from arterial line TEGO connector. 9. Wipe the TEGO connector cap end with a disinfecting wipe without touching the cleaned end; attach a 20mL prefilled saline syringe. 10. Open the arterial line clamp and push through saline. 11. Remove empty syringe and replace with pre-prepared sodium citrate 4% syringe. Open clamp on arterial line and insert sodium citrate 4%. Clamp arterial line. Important to note: My catheter lines contain A: V: of sodium citrate 4%. 12. Repeat above steps with the venous catheter line. 39
 Open your disinfecting wipes or sticks.")
43 Changing your dialysis catheter dressing Supplies: 2 clean drapes Disinfecting wipes or sticks (several) 1 tape (1 inch) 2 plastic clamps Small garbage bag Face mask Hand sanitizer Dressing- discuss with your nurse the best dressing for you. Dialysis catheter dressing 1. Wash your hands for a full minute. 2. Prepare your supplies. a) Open your disinfecting wipes or sticks. b) Open your dressing and place on the drape. Do not remove protective seal. c) Clip the second drape onto your shirt (if doing dressing change while clothed). d) Put on your mask. 3. Remove old dressing. Look for any changes in your skin condition. Is it red? Is there drainage? Is there pain? Report anything unusual to your nurse. 4. Cleanse hands using hand sanitizer 5. Clean site using disinfecting wipes or sticks. Clean from using a waffle motion. Discard wipe and repeat this step. 6. Allow to air dry. (30 seconds-1 minute) 7. Attach new dressing. Peel off backing and attach to skin overlapping about two inches of the catheter under the dressing. Avoid touching the middle part of the dressing. 40
44 Notes- Your Dialysis Catheter 41

45 Module 6 Safety Devices What is an enuresis alarm and how is it used? The enuresis alarm is a moisture detector and is designed to wake you if blood is leaking from your fistula, graft or catheter. Supplies: Enuresis alarm Two 2 x 2 gauze Burnnet dressing Tape Procedure 1. Test the enuresis alarm with a wet finger or alcohol swab to ensure that it is working. You will know if it is working if the alarm sounds. If you do not hear an alarm, the battery needs replacing. 2. Disconnect the wire from the battery to stop the alarm noise. 3. Reconnect the wire to battery once probe is dry. 4. Cover the probes with 2 x 2 gauze and tape the gauze into place. 5. After inserting and taping your fistula needle, tape the enuresis alarm probe under your venous needle. Make sure the probe is taped to the needle tubing in case the needle falls out. 6. Secure the alarm to your skin using tape and a mesh dressing. 7. If you dialyze with a catheter, tape the enuresis alarm probe under your venous return bloodline where the bloodline joins your catheter and TEGO connector. 42

46 What is a water detector and how is it used? Water detectors are used to detect water leaks around the dialysis machine and around the water outlets for the machine. A water detector will also detect a blood leak from the dialyzer. Always sit a water detector directly beneath your dialyzer. The water detector needs to be placed with the metal probes flat on the floor. Lay your water detector face up. Once water or blood hits the metal probes, an electrical current will cause the alarm to sound. Important point to remember: As with battery-powered smoke detectors in homes, the battery in your water detector needs to be tested on a regular basis. 43
47 Notes- Safety Devices 44
48 Module 7 Your Blood Work Every month you will need to collect a sample of your blood just before you start dialysis, and depending on your doctor s recommendation, at the end of your dialysis treatment. You will collect all your blood samples at home and take them to your local laboratory for testing. You will be taught how to spin your blood in a centrifuge, and how to store your blood in the fridge overnight, until you can deliver it to your local laboratory. You will find a helpful handout called Getting to Know your Kidney Blood Work at the end of this module. How to draw blood before starting dialysis (fistula or graft) Supplies: 1. Vacutainer sleeve/adaptor blue one (slip tip type) 2. Blood tubes (Ask your nurse what tubes are required) 3. Labels, which include: Your name PHN (care card number) Your date of birth The date and time your blood was drawn Pre-dialysis blood sample Steps for drawing blood- fistula and graft 1. Insert fistula needles using the procedure you were taught. Do not heparinize or flush your needles until after blood is collected. Make sure your needle is clamped. 45

49 2. Remove the syringe on the end of the needle. 3. Connect the vacutainer adaptor (blue) to the vacutainer sleeve. 4. Attach the vacutainer adaptor and sleeve to the fistula needle you are collecting blood from. 5. Unclamp the needle. 6. Attach blood tubes one at a time to vacutainer sleeve/ adaptor. Collect blood until the blood tube stops filling. Clamp the fistula needle once you have finished filling all blood tubes. 7. Gently rock tubes back and forth, 2 3 times. 8. Continue with your regular dialysis hook up procedure. 9. Let blood tubes stand upright for 30 minutes, until the blood has clotted in the tubes. 10. Spin the blood tubes in the centrifuge as instructed. Ask your nurse which tubes need to go in the centrifuge. If you have an odd number of blood tubes, you will need a balance tube. See photo in centrifuge section. 11. Store your blood tubes in a refrigerator until you can deliver them to the lab. Ask your nurse about how much time you have before you must get your blood samples to the lab. 3 Vacutainer adapter Vacutainer sleeve 46
50 Steps for drawing blood- Catheter Supplies: 1. Vacutainer sleeve/adaptor luer lock 2. Blood tubes (Ask your nurse what tubes are required) 3. Labels, which include: Your name PHN (care card number) Your date of birth The date and time your blood was drawn Pre-dialysis blood sample 1. Clean the end of the arterial catheter lumen. Withdraw as instructed by educator. 2. Attach an empty 10mL syringe to catheter TEGO connector cap and withdraw a full 10mL of blood from catheter line that you will collect blood samples from. 3. Remove the blood filled syringe (discard in sharps bin) and attach the sterile vacutainer sleeve/adaptor to the catheter TEGO connector cap. 4. Unclamp the catheter line. 5. Attach blood tubes one at a time to the vacutainer sleeve/ adaptor. Collect blood until the blood tube stops filling. Clamp the catheter line when you have finished collecting all blood tubes. Remove the sleeve adaptor and attach a prefilled saline syringe. Flush lines with saline. 6. Gently rock tubes back and forth, 2-3 times. 7. Continue with dialysis hook up procedure. 47
51 8. Let the blood tubes stand upright for 30 minutes, until the blood has clotted in the tubes. 9. Spin the blood tubes in the centrifuge as instructed. Ask your nurse which tubes need to go in the centrifuge. You will need a balance tube if you have an odd number of blood tubes. See photo in centrifuge section. 10. Store your blood tubes in a refrigerator until you can deliver them to the lab. Ask your nurse about how much time you have before you must get your blood samples to the lab. How to draw blood after dialysis Supplies: 1. Vacutainer sleeve/adaptor green needle type 2. Blood tubes (Ask your nurse what tubes are required) 3. Labels, which include: Your name PHN (care card number) Your date of birth The date and time your blood was drawn Pre-dialysis blood sample Steps for drawing blood 1. Once dialysis treatment is complete and before you return your blood, slow your blood pump speed to 100mL/min. DO NOT turn off the blood pump. 2. Connect the vacutainer adaptor to the vacutainer sleeve. 48
52 3. Swab the arterial port on the arterial bloodline with alcohol swab. 4. Poke the arterial port with the needle end of the vacutainer sleeve. 5. Attach blood tube to vacutainer adaptor inside vacutainer sleeve. Collect blood until the blood tube stops filling. 6. Remove blood tube and gently rock tube back and forth, 2 3 times. 7. Continue with dialysis rinseback. 8. Let the blood tube stand upright for 30 minutes, until the blood is clotted in the tube. 9. Spin the blood tubes in the centrifuge as instructed. You will need a balance tube if the number of tubes is uneven. 10. Store your blood tubes in a refrigerator until you can deliver them to the lab. Ask your nurse about how much time you have before you must get your blood samples to the lab. How to use the centrifuge Supplies: Centrifuge (within reach if you do not have a helper) Blood collecting tubes Tubes with water for balancing your blood tubes Spinning your blood samples 1. Place centrifuge on a flat, level surface making sure the suction cups have good contact. Plug into power outlet. 49
53 2. Press Open to allow opening of lid. 3. Ensure that tube holders are placed in the six holes in the rotor. 4. Each tube must be placed with a tube opposite so that they are balanced while spinning. If necessary, use a tube filled with water to achieve balance. 5. Close the latch on the lid. 6. Press Start. 7. If excessive vibration or noise occurs, stop the centrifuge by pressing Emergency Stop. Then, recheck the loading pattern to ensure it is balanced and restart. 8. Wait until rotor stops spinning. 9. Press Open and open the lid. 10. Store your blood sample tubes upright in your refrigerator until it can be delivered to the lab
54 Getting to know your kidney blood work (For patients on home hemodialysis) Note: Recommended ranges for dialysis patients may change over time based on new research findings. Test Approximate Normal Values for those on home hemodialysis CBC and Iron Studies What is it? Hemoglobin (Hgb) Between Part of the red blood cells that carry oxygen Levels are kept slightly lower for patients on dialysis to prevent clots in vascular access or the machine White Blood Count (WBC) 4-10 giga/l A high WBC could mean you have an infection Platelet Count giga/l Determines if your blood is clotting properly Iron Saturation (TSat) Greater than 0.20 Measures the amount of iron you have available to make new red blood cells If low, you may need iron supplements or IV iron Ferritin ug/l A form of stored iron Electrolytes Sodium (Na+) mmol/l Mineral that helps balance water in your body Important in blood pressure control and fluid balance A high sodium level could indicate dehydration A low sodium level could indicate fluid overload or overhydration Potassium (K+) mmol/l Mineral found in most foods You may need diet changes or more dialysis to keep levels safe High potassium could stop your muscles from working properly. Your arms and legs may feel heavy and you may get tingling in your fingers and toes. ***A dangerously high potassium could cause the heart muscle to beat abnormally and in some cases could cause the heart to stop (cardiac arrest) Bicarbonate (HCO3) mmol/l A low HCO3 means your blood has too much acid A high HCO3 means your blood is more alkaline The doctor may adjust your HCO3 level on your machine to help regulate this. continued... BC Renal Agency Suite Burrard St. Vancouver, BC V6Z 2H BCRenalAgency.ca October
55 Getting to Know Your Kidney Bloodwork (for patients on home hemodialysis) Bone Health Calcium (Ca2+) mmol/L Mineral found in food, such as dairy products, nuts and chocolate Helps keep bones healthy You may need medication to help maintain normal levels Dialysis patients may have a low calcium level due to poor absorption from the gut. This causes the body to steal calcium from the bones causing them to become weak and brittle Phosphate (PO4) 0.8 to 1.5mmol/L Mineral found in foods such as dairy products You may need diet changes or medication to help maintain normal levels Patients who dialyze for extended hours (such as nocturnal dialysis patients who dialyze five or six times a week) may have a phosphorus level so low that extra phosphate will need to be added to their dialysis bath. Intact Parathyroid Hormone (ipth) For dialysis patients mmols/l Hormone that helps to balance calcium and phosphorus ipth is released into your bloodstream when the level of calcium in your blood is too low and/or the phosphorus level is too high. ipth tells your bones to give up their calcium, which leads to a weakening of the bones Following your renal diet, taking your phosphate binders and Vitamin D supplements as prescribed and getting adequate dialysis will all help to keep your calcium, phosphorus and parathyroid hormone levels in balance Other Blood Tests Creatinine umol/l Waste made by muscle activity Urea Less than 9 lmmol/l Glucose or Random Blood Sugar (nonfasting) Hemoglobin A1C (HgbA1C) Waste made by the body 3.8-7mmol/L This is a measure of the sugar in your blood. Levels may vary for patients who have diabetes Less than 7.0 Measures your blood sugars over the past three months Albumin g/l An important protein to determine how well you are eating Protein is an important part of growth and tissue repair Magnesium mmol/L High magnesium levels can cause neurological problems and abnormal heart beats continued... BC Renal Agency Suite Burrard St. Vancouver, BC V6Z 2H BCRenalAgency.ca October
56 Getting to Know Your Kidney Bloodwork (for patients on home hemodialysis) Lipids Cholesterol Triglycerides Cholesterol HDL Ratio LDL Cholesterol <5.0 mmol/l <1.7mmol/L Less than <2.0 mmol/l High levels of cholesterol and triglycerides can increase your risk of heart disease Liver Function Tests Aspartate transaminase (AST) Alkaline phosphate (Alk Phos) Less than 35u/L Determines if you have a healthy liver u/L This level may be high if you have bone disease (see calcium, phosphorus and parathyroid hormone levels discussed above) Hepatitis Screening Hepatitis BsAg, Hepatitis BsAb, Anti HBc and HCV This screen is done once a year to test for Hepatitis B and C viruses. You can catch these viruses if you come into close contact with the blood or body fluids of an infected person. Transplant Blood Work Cytotoxic Antibodies Patients who are on the active kidney transplant waiting list must collect blood antibody levels at the beginning of every month within the first 7 days of the month. BC Renal Agency Suite Burrard St. Vancouver, BC V6Z 2H BCRenalAgency.ca October
57 Notes- Your Blood Work 54
58 Module 8 Dialysis Medications Medications, together with dialysis, diet and fluid control, can help keep you healthy when you have kidney failure. Medications are prescribed according to your needs. Your pharmacist and nurse will teach you how to take your medications so that you receive the most benefit. It is very important to take your medications as prescribed and to alert your team promptly if you experience any unexpected side effects. If you have been prescribed a medication by someone outside of your kidney healthcare team, it is important to consult with your home dialysis team before taking this medication. Also, consult your team before taking any overthe-counter medications, herbal remedies, alternative medicines or dietary supplements. Things to remember about your medications Tell your pharmacist and healthcare team if you have any known drug allergies. Make a list of your medications and carry it with you at all times If you visit more than one doctor, make sure you give each of them a list of your current medications every time you see them. Check that you receive the medication that your doctor has prescribed. Talk with your pharmacist for additional information about your medications and how to take them properly. Check expiry dates. Do not use expired medication. We recommend that you bring your medications for every clinic visit. Do not change pill bottles. 55
59 Some medications that many people with kidney failure require include: Vitamins and minerals Your body needs vitamins to work well, but sometimes the body does not produce vitamins on its own. Ideally, you should get all the vitamins you need from the food you eat. However, people with kidney disease may have slightly different vitamin needs as some of their vitamins are being washed away during dialysis, while other vitamins can build up. The vitamin tablets that are ordered by your nephrologist, or dietitian, are designed for people on dialysis. They have just enough of the right vitamins to keep you healthy. Consult with your health care team before taking any additional vitamins, minerals or herbal remedies. Kidney multivitamins Two common multivitamins for kidney patients are replavite and renavite. These multivitamins contain the right combination of vitamins for your needs. Always take your multivitamins after hemodialysis. Water soluble vitamins are washed out by the hemodialysis treatment. Vitamin D (analogues) Your health care team may decide that you need a special form of vitamin D called calcitriol or alpha calcidol (One-Alpha ). Vitamin D helps regulate the parathyroid hormone (PTH) which is 56
60 a hormone that regulates calcium and phosphorous levels in your blood and bones. Sometimes, the parathyroid hormone (PTH) gets carried away in people with kidney disease and starts to produce too much PTH, resulting in weakening of the bones, and may cause hardening of the arteries. Vitamin D will help keep your PTH levels down. Things to know about vitamins Take your prescribed vitamin supplements after dialysis. If you are on extended dialysis you may need more vitamins. Consult your dietitian for more information. Do not take over-the-counter vitamin D without first consulting your doctor. Iron The human body needs iron to make healthy red blood cells. Most dialysis patients will need to take additional iron. Your nephrologist will prescribe a dosage and type that will meet your needs. Oral Iron: It is usually recommended that you take iron between meals, but if it upsets your stomach try taking it with a small meal or snack just before bedtime. It is VERY IMPORTANT that you don t take iron at the same time as you take calcium. Also, avoid taking any oral iron with tea or coffee. Iron Sucrose (Venofer ) or sodium ferric gluconate complex (Ferrlecit ): Many dialysis patients need iron quickly. Your home team may decide you need to take IV (intravenous) iron. The iron is put directly into your blood stream, and your body can absorb it much faster than iron taken orally. If you require IV iron, your training nurse will show you how this should be done during dialysis. 57
61 Erythropoietin-EPO (EPREX and ARANESP ) Healthy kidneys produce a hormone that tells your bone marrow to make new red blood cells. This hormone is erythropoietin, or EPO. Weak or failing kidneys often don t make enough EPO to keep your blood count normal, resulting in not enough red blood cells. This is called anemia. Many kidney patients need to take a medication that replaces the normal erythropoietin production. With this medication, your red blood cell production increases and you will have more energy. EPO is important because it: Increases red blood cell production Increases hemoglobin Improves energy EPO must be taken by injection there is no pill. You may be taught to inject EPO subcutaneously (SQ) or intravenously (IV) while on dialysis. Adjusting your EPO dose Your blood will need to be checked regularly to be sure that your hemoglobin is within a safe range. At the same time your iron levels will also be watched these two medications work together to make red blood cells. Once your doctor is satisfied with your hemoglobin and iron numbers, they will tell you how much Eprex / Aranesp and iron you need. These numbers tend to go up and down, so this will be talked about during every clinic visit. 58
62 Things to remember about EPREX and ARANESP Always keep EPREX and ARANESP in the refrigerator. EPREX and Aranesp come in pre-filled syringes. When traveling, bring a cold pack for the trip and put your EPREX, or ARANESP, in a refrigerator as soon as possible Keep these medications away from direct light. Do not shake. Do not use the medication if it is expired, cloudy, discoloured, or if it has been previously frozen or left out of the fridge. Blood pressure medications Blood pressure, or antihypertensive medications, help reduce high blood pressure. Some medications relax the blood vessels, some block the chemicals that cause blood vessels to tighten and others help to get rid of excess fluid from the blood. Your doctor will prescribe the most appropriate medication for you. You will find that your medications, and doses, may change over time. Many people take more than one medication to help control blood pressure, so be sure to follow the directions given by your doctor and health care team. Symptoms to be aware of when on blood pressure medications Dizziness: Check your blood pressure and report to your nurse if you feel dizzy. Your B/P should be close to: Cough: Some medications may cause a dry cough. If this occurs, tell your nurse or doctor about it. 59
63 Low heart rate: Some B/P medications reduce your heart rate. If your heart rate falls under 50 beats per minute, tell your doctor or nurse. Anticoagulants heparin Heparin belongs to a group of drugs known as anticoagulant. Other anticoagulants include warfarin, Coumadin, Plavix and entericcoated aspirin. These drugs prevent blood from clotting, but are used for different medical conditions. During hemodialysis, your blood passes though many different tubes and filters which creates many opportunities for clots to form. Heparin is used for preventing blood from clotting during dialysis. The goal for heparin is to use just the right amount. Too much heparin may mean you re more prone to bleeding. Too little heparin may result in your blood clotting during dialysis. Things to remember about heparin If you will be having a medical procedure, surgery, or dental appointment, notify your health care team to determine if you need to adjust your heparin dose before or after your procedure. Report to your nurse, or doctor, if you notice that you are bruising easily. If you have any pain, take acetaminophen or Tylenol. Avoid pain killers like ibuprofen and aspirin because they also prevent blood from clotting. Signs of too much heparin Deep bruising right after a dialysis treatment. It takes longer than 15 minutes to stop bleeding from your needle sites after treatment. Unusual bleeding, such as nosebleeds or bleeding gums. 60
64 Signs of too little heparin Dialyzer is clotted after dialysis. Blood clots are noticed in the venous drip chamber. Your dialyzer is rated as a 2 or higher. Thrombolytic Medications (t-pa or Cathflo ) Blood clots, or fibrin sheath formation, inside or around the tip of the hemodialysis catheter, are a major cause of catheter problems. Clots slow or prevent blood flow during dialysis. Thrombolytics dissolve blood clots and fibrin. Refer to t-pa protocol for further instructions. Antibiotics Antibiotics are medications that help fight infections caused by bacteria. Bacteria can enter your body through your vascular access, or any other sites such as a wound. Chest infections and urinary tract infections (UTIs) are other common sites where infection can occur. There are many different kinds of antibiotics and each type is designed to kill a different kind of bacteria. To know exactly the type of bacteria growing in your body, a sample from the infected area needs to be taken and sent to the laboratory. Things you should know about antibiotics: You should always take the full treatment. Don t stop when you start feeling better. Stopping antibiotics early may result in the creating super bacteria, which are resistant to antibiotics. In other words, the antibiotics will not work against the super bacteria, causing it to be more difficult to find an antibiotic that will work. 61
65 If you experience any severe side effects like a rash, swelling around the face or shortness of breath, stop taking the antibiotic, call 911 and go to your nearest hospital immediately. Let your kidney health care team know if you are taking antibiotics that have been ordered from another doctor, including your family doctor or a specialist. Some oral antibiotics can cause nausea. Talk to your pharmacist for suggestions about the best time to take oral antibiotics. Notify your health care team if you develop diarrhea from your antibiotics. Phosphorus binders When your kidneys are working well, extra phosphorus is removed from your blood and flushed away in your urine. When kidneys fail, calcium and phosphorus levels become out of balance. As phosphorus levels rise in your blood from the foods you eat, your body will attempt to compensate by producing parathyroid hormone. The parathyroid will try to regulate the balance by pulling calcium from the bones. Over time this will make your bones become brittle and the stolen bone calcium can start to show up in places like your joints, blood vessels and your heart. To prevent this process you may be told to take phosphorus binders. Phosphorus binders (also called phosphate binders or just binders ) work by binding or attaching to phosphorus in your food, so that it can be eliminated through your bowel. There are many different types of phosphorus binders, including calcium carbonate, calcium acetate, sevelamer and lanthanum carbonate. Your doctor will prescribe the one that is best for you. 62
66 Things you should know about phosphorus binders: Phosphorus binders work only if you take them at the beginning of your meals. Phosphorus binders are tailored to your needs based on your blood results. Talk to your doctor or dietitian regularly about your particular dietary needs. Pain medication Different pain medications may be prescribed for various types of pain and each medication will affect people differently. Many types of pain medication are filtered through the kidneys; therefore people with kidney disease will need special consideration. If you are given a prescription for a pain medication from a doctor other than your nephrologist, be sure to consult your kidney health care team before taking it. However, if you require ongoing medical treatment for pain, your nephrologist may ask your family doctor to supervise your pain medications. 63
67 Notes- Dialysis Medications 64
68 Module 9 Giving Yourself Medications This section will discuss how to give medications while on dialysis. EPREX or ARANESP 1. Prepare you medication Check medication (Right drug, right dose, expiry date) 2. Injecting Medication If you are injecting the medication into the blood line: a) Look for medication port b) Swab medication port c) Remove cap if your machine has a cap d) Inject the medication slowly over 3 seconds 3. Record your medication dose and date on your run log or calendar. Important to note: What medication are you receiving? Dose of medication: 65
69 Giving yourself iron Supplies: 2 alcohol swabs 1-10ml syringe 1-21 gauge needle IV medication infusion line Y connector 100ml normal saline mini bag Prescribed IV Iron IV medication label Important to note: I use iron. I use vials. My dose is. 1. Check iron (right drug, right dose, expiry date). 2. Draw up medication into syringe. 3. Swab medication port on saline bag. 4. Inject medication. 5. Invert the medication bag (turn upside down) and withdraw air. 6. Close medication infusion line roller clamp. 7. Spike medication line into normal saline mini bag. 8. Attach medication line to one side of the Y connector. 9. Squeeze chamber until half full. 10. Open roller clamp (slowly) until medication is at the end of the Y connector tail. 66
70 11. Close roller clamp and the clamp on the Y connector. 12. Attach medication label to mini bag. Attach to Y connector, IV line and medication mini bag to the machine prior to dialysis. 1. Stop pump. 2. Clamp saline infusion line and arterial infusion line clamp if it is not already clamped. 3. Carefully separate the saline infusion line and attach it to the free side of the Y connector. 4. Attach tail end of the Y connector to the saline infusion port. 5. Keep medication line closed until you are on dialysis. Once on dialysis (and first checks have been completed): 1. Open clamp on saline infusion port and the clamp on the Y connector attached to the medication bag. 2. Slowly open roller clamp on the medication infusion line. 3. Allow iron infusion to run at one drop per second. Give slowly over the first hour of dialysis. 4. Close medication roller clamp when iron infusion is completed and clamp the Y connector it is attached to. 5. Open saline infusion line clamp briefly to rinse out the Y connector and arterial infusion port. 6. Clamp saline infusion line and saline infusion port. 7. Record iron on your medication log or calendar. 67
. 2. Draw up medication into syringe. 3. Swab medication port on saline bag. 4. Inject medication. 5.")
71 Giving yourself antibiotics Supplies: 2 alcohol swabs 1-10ml syringe 1-21 gauge needle IV medication infusion line Y connector 100ml normal saline mini bag Prescribed antibiotics IV medication label 1. Check antibiotics (right drug, right dose, expiry date). 2. Draw up medication into syringe. 3. Swab medication port on saline bag. 4. Inject medication. 5. Invert the medication bag (turn upside down) and withdraw air. 6. Close medication infusion line roller clamp. 7. Spike medication line into normal saline mini bag. 8. Attach medication line to one side of the Y connector. 9. Squeeze chamber until half full. 10. Open roller clamp (slowly) until medication is at the end of the Y connector tail. 11. Close roller clamp and the clamp on the Y connector. 12. Attach medication label to mini bag. 68
72 CV Adding phosphate to an acid jug 1. Prepare medication. Check medication (right drug, right dose, expiry date). Unscrew tip. Measure prescribed amount into medication cup. 2. Add to dialysate jug. Pour into full jug. Re-cap and shake. 3. Connect jug to machine and proceed with dialysis set-up. Important to note: I add ml to my acid jug. Phosphate enema is used as a phosphorus additive for dialysis. Once opened the phosphate enema can be used for several treatments. Ensure you start with a full jug of dialysate. Mix thoroughly to avoid conductivity alarms. Please refer to machine flip chart on page. 69
73 CV Adding calcium to an acid jug (for conventional machines) 1. Prepare medication. Check medication (right drug, right dose, expiry date). Open package. Measure prescribed amount into medication cup. 2. Add to dialysate jug. Pour into full jug. Re-cap and shake. 3. Connect jug to machine and proceed with dialysis set-up. Important to note: I add ml to my acid jug. Ensure you start with a full jug of dialysate. Mix thoroughly to avoid conductivity alarms. Please refer to machine flip chart on page. 70
74 Notes- Giving Yourself Medications 71
75 Module 10 Troubleshooting Guide Your safety and wellbeing are our priority. Issues can occur during your treatment and it is important that you recognize the symptoms. This guide will teach you how to react and know when to contact your home dialysis team. Hypotension (low blood pressure) Problem: Low blood pressure on or off dialysis. Cause: Fluid has been removed too quickly You may have gained weight and your target weight needs to be increased Symptoms: Headache Dizziness Feeling light headed Blurred vision Cramping Feeling warm Abdominal discomfort Yawning, sleepiness Nausea Vomiting Loss of concentration Restless Blood flow problems while on the dialysis machine (low arterial pressure alarms) 72
76 Solution: 1. Stop fluid removal. 2. Lie back or at least try to get your feet up 3. Check BP. Important to note: On my machine to STOP fluid removal press:. If you are feeling comfortable and your BP has improved, increase your hourly UF back to desired amount, however, you may want to consider decreasing your UF target. Reminder: UF Target is the amount of fluid your machine is taking off during dialysis. 73
77 If your BP is below 100mmHg or if your symptoms are severe: 1. Give yourself approximately 200mls of normal saline via the saline infusion line. 2. Turn blood flow down to 200mls/min. 3. Open clamps on saline line and saline infusion port. 4. Close (Red) arterial clamp on bloodline. 5. Once saline has been administered, re-open (Red) arterial line clamp and close both saline line clamp and the infusion port clamp. 6. Recheck BP, if BP remains low and/or you are still feeling unwell, administer another 200ml normal saline as per above step. If your BP still does not improve: If you continue to feel unwell and your BP has not improved, discontinue dialysis and return your blood. If your symptoms are severe after discontinuing dialysis, consider going to the hospital, or call for an ambulance. If your BP improves: If your BP improves and you feel better after giving yourself saline, consider decreasing the total fluid removal or decrease the UF rate to a minimum of 0.1 L/hour for remainder of run. This will allow for little or no further fluid removal during treatment. Questions to consider: 1. Review Target Weight calculation to ensure you have made no mistakes. 74
78 2. Re-check setting of Total UF volume-did you set the machine incorrectly? 3. Is your appetite okay? Are you gaining true weight? 4. Are you constipated? Is some weight gain from stool in the bowel? Important to note: Consider increasing your target weight for future runs. Talk to your educator for direction if you are unsure. Clotted dialysis access needle Problem: No flow or poor flow from your access needle. Cause: If you have trouble placing your needle, a blood clot may form in the needle. Solution: 1. Try to clear the blood clot from the needle by pulling back on the syringe plunger. 2. Clamp off your needle and add a new 10mL syringe. 3. Look for blood clots in your first syringe by squirting the blood onto a gauze pad. 4. Never push blood into your body that might be clotted. 5. If you are able to remove the clot, flush your needle in and 75
79 out, then add 10mL pre-filled saline syringe to the needle, and instill saline to prevent needle from clotting. 6. If you are not able to fix the needle, remove and place a new wet needle (a needle primed to the tip with saline). Clotted fistula or graft Problem: You are unable to feel a thrill, or a buzz, over your graft or fistula, and you cannot hear a bruit. Cause: Wearing tight fitting clothing, jewelry, carrying purses, or grocery bags over your graft or fistula arm might reduce the blood flow in your access. Taking blood work or blood pressure readings on your fistula or graft arm. Coming off dialysis underweight (too dry) Low blood pressure. Removing fluid too quickly. Solution: 1. Call your nurse or kidney doctor right away. 2. You will be asked to go to the emergency room as soon as possible to avoid delays in de-clotting. Bleeding around the needle entry point Problem: Fresh blood is oozing from your needle entry site and will not stop. Cause: Using the same needle site over and over will weaken a graft. 76
80 Using sharp needles in a well formed fistula buttonhole site can make too large of a hole in the vessel wall, causing blood to leak out. Solution: 1. Lower the blood pump speed to 200mL/min. 2. Place a 2x2 gauze pad under the leaking needle. 3. Place a 2x2 gauze pad over the leaking needle and press very lightly for five minutes. 4. If the blood loss does not stop or slow down, you will have to end your treatment, or circle the blood to fix the needle. Trouble placing your needles Problem: Pain and swelling, or a lump at needle site when placing needles. Cause: Needle infiltration. This means the needle has accidentally poked through the wall of your fistula or graft. This is called a blown needle. Blood leaking into the area around your fistula or graft, causes swelling and pressure, which is painful. You cannot use this needle site for dialysis until the area has healed. Solution: 1. Take out the needle and apply gauze pad to stop the bleeding. 2. Place a small ice pack over the swollen area to help reduce any swelling and bruising. 3. Wait for the bleeding to stop. 77
81 4. If you have a spare buttonhole site, use this site and rest the blown site until the swelling and bruising is gone. 5. If you do not have a spare buttonhole you may be able to place a new needle just above, or to the side of your buttonhole tunnel. 6. Patients with a graft, and those patients who do not use the buttonhole technique, will need to find a new site away from the blown site. 7. If you are not able to place another needle, or feel comfortable doing so, you can delay your treatment until the next day. However, you should first consider the following: Is it safe to miss this run? When did you last dialyze? If you are not sure what to do, call your nurse for assistance. Needle problems while on hemodialysis Problem: Pain and swelling, or a lump, near the needle site during the run. Cause: Your needle tip has accidentally poked through the wall of your fistula, or graft, when you moved your arm. Blood is now leaking under your skin into the area around your fistula or graft. Solution: 1. Return your blood using the good needle. (As described on the next page) 78
82 CV Returning your blood when the venous return needle has blown 1. Stop the blood pump. 2. Place clean drape under your access limb. 3. Close the clamp on both your arterial and venous bloodlines and on both needles. 4. Close the clamp on the infusion line and add a safety clamp (scissor clamp) to the infusion line. Carefully disconnect the clamped saline infusion line and add a sterile recirculation connector to the end of your saline infusion line. 5. Disconnect your arterial bloodline from your arterial needle. 6. Attach your arterial bloodline to the saline infusion line using the recirculation connector. 7. Disconnect your venous bloodline from your blown venous needle. 8. Attach the venous bloodline to your good arterial needle. 9. Open the clamp on the saline infusion line (roller clamp). 10. Open the clamps on the arterial and venous bloodlines and the arterial needle. 11. Set the blood pump speed to 150mL/min. 12. Turn on the blood pump and return your blood through the arterial needle. 13. Once you have safely returned the blood, take out the blown needle and apply gauze. 14. Place a small ice pack over the swollen area to help reduce any swelling or bruising. 15. Wait for the bleeding to stop. 79
83 16. Take out the second needle as usual. 17. Plan to rest your fistula or graft for one day. NX Returning your blood when the venous return needle has blown 1. Stop the blood pump. 2. Place a clean drape under your access limb. 3. Close the clamps on both the arterial and venous bloodlines and both needles. 4. Carefully disconnect the arterial line and attach it to the red Y saline spike. 5. Carefully disconnect the venous line and attach it to the arterial needle. 6. Open the clamps on the arterial and venous bloodlines and at the arterial needle. 7. Open the clamp at the red Y saline spike. 8. Set the blood pump speed to 150mL/min. 9. Turn on the blood pump and return your blood through the arterial needle. 10. Once you have safely returned the blood, take out the blown needle and apply gauze. 11. Place a small ice pack over the swollen area to help reduce any swelling or bruising. 12. Wait for the bleeding to stop. 13. Take out the second needle as usual. 14. Plan to rest your fistula, or graft, for one day. 80
84 Important to remember: Let your nurse know if you are unable to return your blood. Losing a circuit of blood will lower your hemoglobin for a few weeks and may make you feel weak, or more tired, than usual. CV Returning your blood when the arterial needle has blown 1. Stop the blood pump. 2. Place clean drape under your vascular access arm. 3. Close the clamp on both your arterial needle and arterial blood bloodline. 4. Add a safety clamp to the saline infusion port (scissor clamp). Carefully disconnect the clamped saline infusion line and add a sterile recirculation connector to the end of your saline infusion line. 5. Disconnect your arterial bloodline from your arterial needle. 6. Attach your arterial bloodline to the saline infusion line using the recirculation connector. 7. Open the clamp on the saline infusion line (roller clamp). 8. Open the clamps on the arterial bloodline and the venous needle. 9. Set the blood pump speed to 150mL/min. 10. Turn on the blood pump and return your blood through the venous needle. 11. Once you have safely returned the blood, take out the blown needle and apply gauze. 81
85 12. Place a small ice pack over the swollen area to help reduce any swelling or bruising. 13. Wait for the bleeding to stop. 14. Take out the second needle as usual. 15. Plan to rest your fistula or graft for one day. NX Returning your blood when the arterial needle has blown 1. Stop the blood pump. 2. Place clean drape under your vascular access arm. 3. Close the clamp on both your arterial and venous bloodlines, and on both needles. 4. Carefully disconnect the arterial line and attach it to the red Y side of the saline bag spike. 5. Open the clamps on the arterial and venous bloodlines and the venous needle. 6. Open the arterial (red) Y spike on the saline bag. 7. Set the blood pump speed to 150mL/min. 8. Turn on the blood pump and return your blood through the venous needle. 9. Once you have safely returned the blood, take out the blown needle and apply gauze. 10. Place a small ice pack over the swollen area to help reduce any swelling or bruising. 11. Wait for the bleeding to stop. 12. Take out the second needle as usual. 13. Plan to rest your fistula or graft for one day. 82
86 Unusual bleeding at the end of a run Important to remember: Let your nurse know if you are unable to return your blood. Losing a circuit of blood will lower your hemoglobin for a few weeks and may make you feel weak, or more tired, than usual. Problem: It is taking too long for the needle sites to stop bleeding (more than 15 minutes). Cause: You may be using too much heparin. You may be taking off your dressings too soon, or too roughly, which can remove your scab and cause bleeding to start again. You may have a narrowing (stenosis) in your fistula, or graft, which causes increased pressure inside your access. Solution: 1. Try using less heparin. Call your nurse to discuss lowering your running dose. 2. Leave your dressings on for four hours, or overnight, before carefully removing them. 3. Always track your venous and arterial pressure readings at 200mL/min at the beginning of your run. 83
87 Important to remember: If the venous pressure (VP) has become higher or if the arterial pressure (AP) has become more positive, let your nurse know. You may need a fistulagram to check for a narrowing or stenosis. Poor flow from a catheter Problem: Poor blood flow from the catheter at hook up or during treatment. Cause: A blood clot of fibrin sheath may have formed, creating a flap over the tip of the catheter. The catheter may have moved slightly. Solution: 1. Try coughing deeply. This causes increased pressure in your chest cavity and might help to shift the flap at the tip of the catheter. 2. Try changing your position. Move from side to side. Lower your head. 3. If you have a good flow from only one port, use this as your arterial outflow. You may be able to return through the other port. This may mean you have to run with your lines in reverse position. 4. Call your nurse or kidney doctor. You may need to instill a medication called t-pa/cathflo into your catheter. t-pa/cathflo helps to dissolve blood clots and fibrin sheaths. 84
88 Clotted catheter Problem: You cannot remove the block (sodium citrate or heparin) from one or both limbs of your catheter. Cause: Your catheter might be clotted or it might have moved slightly. Solution: 1. Try coughing deeply. This causes increased pressure in your chest cavity and might help to dislodge a blood clot at the tip of the catheter. 2. Try changing your position. Move from side to side. Lower your head. 3. Call your nurse or kidney doctor. You may need to instill a medication called t-pa/cathflo into your catheter. t-pa/cathflo helps to dissolve blood clots and fibrin sheaths. 4. If t-pa does not help, the doctor will order a linogram or line change. Circulating your blood while on hemodialysis If you have needle problems, or if you have excess air in the blood circuit, you may need to circulate your blood (keep your blood moving in the machine). Your blood can safely circulate for up to 20 minutes. This will give you time to safely remove any air, or remove and replace a blown, clotted or leaking needle. 85
89 Important to remember: Always have two 10 or 20mL prefilled saline syringes, and a sterile recirculation connector, ready on the top of your machine, in case you need to circulate your blood while on hemodialysis. CV How to circulate your blood in the machine 1. Place clean drape under your access. 2. Stop blood pump. 3. Clamp the arterial and venous blood lines. 4. Clamp the arterial and venous access lines. 5. Carefully separate the arterial bloodline from the arterial access line and attach a 10mL or 20 ml prefilled saline syringe to the arterial access line. 6. Carefully separate the venous bloodline from the venous access line and attach a 10mL or 20 ml prefilled saline syringe to the venous access line. 7. Attach the arterial and venous bloodline to the each end of the sterile recirculation connector Open clamps on bloodlines. 9. Open saline line and saline infusion clamp. 10. Lower blood flow rate to 100mL/min 11. Restart blood pump. Recirculation connector 12. Put machine in Minimum UF. 86
90 NX How to circulate your blood in the machine 1. Place clean drape under your access. 2. Stop blood pump. 3. Clamp the arterial and venous blood lines. 4. Clamp the arterial and venous access lines. 5. Carefully separate the arterial bloodline from the arterial access line and attach a 10mL or 20 ml prefilled saline syringe to the arterial access line. 6. Carefully separate the venous bloodline from the venous access line and attach a 10mL or 20 ml prefilled saline syringe to the venous access line. 7. Attach the arterial and venous bloodline to the each end coloured end of the saline Y spike. 8. Open clamps on the arterial and venous bloodlines and the clamps on the saline Y spike. 9. Lower blood flow rate to 100mL/min. 10. Restart blood pump. 11. Put machine in Minimum UF. 87
91 Notes- Troubleshooting Guide 88
92 Module 11 Medical Emergencies Medical emergencies are events that require immediate medical attention. You may be asked to go to the emergency department for further assessment. Fever and chills while on hemodialysis A very small rise in your body temperature (above normal) is usually a sign of infection. Normal body temperature is degrees Celsius or degrees Fahrenheit. In many cases, your dialysis access will be the site of the infection. Infection can also be caused by contaminated water, or dialysate, or by improper technique when setting up your machine. If you have a fever or suspect your dialysis access might be infected, call your dialysis nurse or doctor before starting dialysis. If you do have an infection, you may experience some or all of the following symptoms: A chill after you start dialysis, which may cause you to start shaking uncontrollably (rigors) A higher than normal temperature (fever) An unusually low blood pressure Headache Aching muscles Nausea and vomiting If you experience some, or all, of these symptoms, take the following actions: 1. Come off dialysis as you may start to feel too unwell to 89
93 manage your dialysis safely. 2. Check your dialysis access for signs of infection, e.g. redness, heat, pain, swelling or drainage. 3. Take your temperature. 4. Check for other signs of infection, e.g. coughing up thick coloured sputum or pain when passing urine. 5. Call your training nurse or physician for advice. 6. Be prepared to go immediately to your local training site or emergency room. If you feel very unwell and cannot contact your dialysis team, go to your nearest hospital emergency room. Important to remember: Take all your medications, or a list, with you to the hospital. See page 123 for a copy you can print and fill out. Chest pain Possible causes of chest pain: Fluid overload Going below your goal weight Low hemoglobin (anemia) Not enough oxygen to heart Heart disease Hemolysis Dialyzer reaction (allergic reaction to your dialyzer) Air in your bloodstream 90
94 Symptoms: Pain or tightness in chest, back, arms or jaw Difficulty breathing; shortness of breath Anxiety Weakness Severe indigestion Sweating What to do if you are not on dialysis: 1. Call Bring your medications or medication list with you to the ER. What to do if you are on dialysis: 1. Remain calm, but act immediately. 2. Call Return blood if no air in blood. 4. Lower head. 5. Take blood pressure if your B/P is low, give 200mL extra saline. Repeat three times as needed. 6. If you have been prescribed nitroglycerin, take one pill/spray every 5 minutes for up to 3 doses. 7. Wait for paramedics to arrive before removing dialysis needles. Important to remember: Take all your medications, or a list, with you to the hospital. See page 123 for a copy you can print and fill out. 91
95 Hemolysis Hemolysis is the word used to describe the lysis (break up) of red blood cells resulting in the release of potassium from inside the cells into your bloodstream. Possible causes of hemolysis: Your dialysis fluid temperature is too hot. Your dialysis fluid is too diluted. Chemical disinfectant has not been properly rinsed from the machine. Your blood pump is damaged and pinching the bloodline. Your bloodline is kinked during the dialysis run. Important to remember: Always check your lines for any kinking in particular after flipping your dialyzer during priming. Symptoms: Your blood may appear transparent and cherry soda red in colour. You may experience any of the following symptoms and these can occur several hours after your dialysis: Sudden onset of shortness of breath Sudden onset of chest pain Severe lower back pain Nausea and Vomiting Diarrhea 92
96 What do I do if I suspect hemolysis? 1. Stop blood pump immediately. 2. DO NOT RETURN ANY OF YOUR BLOOD. 3. If you have chest pain, or shortness of breath, dial 911 for an ambulance to take you to the ER. 4. Call your nurse or doctor on call immediately. CV NX Save your dialysis bloodlines, dialysate jug and bicart and bring to the hospital with you for inspection. Save your blood cartridge and Dialysate Sak and bring to the hospital with you for inspection. 93
97 Notes- Medical Emergencies 94
98 Module 12 Handling Hemodialysis Waste Why worry about medical waste? Every year many people are seriously injured from contact with improperly discarded needles, and medical waste, in household garbage. Garbage disposal people are most at risk, but small children, pets and family members can also suffer harm from improperly discarded waste products. Proper storage and disposal of waste will protect members of your household and the general public from accidental injury. What you can do to make your medical waste safe After each dialysis, your educator will show you how to make your used dialysis tubing safe for handling. If your tubing and dialyzer are clotted, remove them from the machine and place them in the bio-hazard container you were given. Sharps (needles and other sharp objects) and medication vials should be placed in a sealable, hard plastic container. Syringes filled with blood can also be disposed in the sharps container you were given. Store all medical waste in a child-proof/animal-proof container. If you store your waste outside, please make sure the container is tightly secured. Use sturdy garbage bags as some garbage bags break easily. This can attract animals and put the garbage disposal people at risk. 95
99 How to dispose of your sharps You will be given a sharps/biohazard container. The container is a hard, re-sealable plastic container that is puncture resistant. This is the recommended safe storage unit for your used needles and syringes. The following items are considered sharps: Needles Medication vials or ampoules Vacutainer needles (both green and blue) IV spikes (i.e. saline IV lines) Important to remember: NEVER PLACE MEDICAL WASTE OR CONTAINERS OF MEDICAL WASTE IN RECYCLING BINS. The syringe and needle should be thrown away as one unit. Do not attempt to remove, bend, break or re-cap a needle. If you use a needle to withdraw medication or saline, it still must be placed in the sharps container. Once the sharps container is full, bring it to your monthly clinic and your patient educator will dispose of it safely. Make sure the lid is on tight and wipe the outside of the container clean of all blood. This will help protect staff. What you can recycle The following items can generally be placed in your recycling bin: Plastic bags Paper from packaging (e.g. gauze packages, backing of packages) Cardboard packaging from syringes, gauze, etc. Cardboard boxes For some machines acid and bicarbonate containers (well rinsed) Please check with your municipality for what materials it accepts for recycling. 96


 and attach venous blood")


100 CV Disposal of Hemodialysis Waste 1. Disconnect from dialysis. Hold AVF sites or cap catheter lines. Used dialysis tubing and dialyzers can be thrown out with your household garbage but only after you make it safe for collection. Follow these steps after every treatment. 2. Place arterial blood line into one cup of acid (K bath) and attach venous blood line to waste bag. 3. Allow arterial blood line to take up the acid. When all acid has been taken up, keep the pump running and allow air to be sucked into the circuit. When the AIR DETECT 4. alarm sounds the pump will stop. Press priming twice and then restart the pump. 5. Allow lines to completely empty into waste bag (at least 2 minutes) and then stop the blood pump. Drain the dialysate out 6. of the dialyzer. Drain waste bag into 7. toilet. 8. Put used lines and dialyzer into doublebagged, heavy duty black garbage bags. 9. Store in an area away from domestic animals or wildlife and dispose with household garbage in a sealable container. It is never okay to 10. put needles in the garbage. Always use your sharps container. You can download this sheet at Click: Health Info èmanaging My Care è Home Hemodialysis è Resources for Current Patients èpatient Tools 97
101 Notes- Handling Hemodialysis Waste 98

102 Module 13 Healthy Eating for Home Hemodialysis Your diet will depend on the amount of dialysis that you do. As you dialyze more, you may be able to eat some foods that you have been limiting in your diet. Your dietitian can help you plan a diet specific to your health needs and your frequency of dialysis. Warning to all kidney patients: AVOID STAR FRUIT (CARAMBOLA) AND STAR FRUIT JUICE. They can be poisonous to kidney patients. DO NOT EAT OR DRINK! Please discuss details with your dietitian. Tips for success Maintain good nutrition You may notice an improvement in your appetite with more dialysis. Enjoy a variety of foods at each meal. Eat at least three balanced meals daily. A well-balanced meal includes protein, starch, fruit and vegetables. Include healthy snacks if needed. 99
103 Eat enough protein to meet your needs Increased dialysis causes more protein to be removed from your blood. Protein foods include dairy products, beef, chicken, turkey, fish, seafood, eggs, tofu and soy products. You will be given guidelines on how much protein to eat each day. Understand how your blood tests relate to your diet and dialysis Know your potassium and phosphorus levels. It is important to keep your blood levels within a safe range. Your dietitian can provide you with potassium and phosphorus food lists. Phosphorus Depending on your blood phosphorus level you may need to continue to limit phosphorus in your diet. Take your phosphate binders as prescribed. If you are doing more dialysis your binders may be decreased or even discontinued. If your phosphorus levels are low you will be encouraged to eat some higher phosphorus foods including dairy products, nuts, seeds, bran, dried peas and beans. If your phosphorus levels remain low you may be asked to add a phosphate supplement to your dialysate bath. Potassium Depending on your blood potassium levels you may still need to limit your intake of higher potassium foods. If your blood potassium levels are low you will be able to eat a wider variety of fruits, vegetables and other high potassium foods. 100
104 Important to remember: If you cannot dialyze for more than two days in a row, you must limit high potassium foods until you return to your regular dialysis schedule. Remember that many high phosphorus foods are also high in potassium. Eat more fresh foods and less canned or processed foods Processed foods contain more salt. Limit your intake of salty foods such as canned soups, ham, bacon, fast foods, soy sauce, pickles and salty snacks such as potato chips and pretzels. Avoid using the saltshaker at the table and use less salt in cooking. Use unsalted spices, herbs and seasoning blends. Use vinegar and lemon juice instead of salt. Monitor your fluid intake to control fluid build-up between your dialysis treatments The amount of fluid you can drink is based on your weight, urine output, blood pressure and fluid removal during dialysis. With more dialysis you may be able to increase your fluid intake. Choose healthy fats and limit your intake of saturated and trans fats Eat fish 2 3 times a week. Choose non-hydrogenated margarine (soft tub) in place of butter. Use healthier fats such as canola or olive oils. Eat less packaged foods such as crackers and cookies. Bake, barbeque, broil, poach or steam your foods instead of frying. 101
105 Ask your dietitian for more information on heart healthy eating. Take your vitamins as prescribed There is an increased loss of vitamins as you dialyze more. Take your prescribed renal supplement after dialysis. You may be advised to increase your dose of vitamins. Tell your dietitian or doctor of any other vitamin, mineral or herbal supplement you are using. Maintain a healthy weight Monitor your weight and try to keep it within a healthy range. If you are concerned about weight gain or loss, talk to your dietitian. Choose a physical activity you enjoy and keep moving Maintaining an active lifestyle can help improve your energy level. Start slowly and work towards minutes of physical activity such as walking, swimming, or bike riding, 5 7 times a week. If you have diabetes, aim for good blood sugar control Do glucometer testing on a regular schedule as recommended by your doctor and record your blood sugar readings. Discuss your HbA1c target with your home hemodialysis team. Eat meals and snacks at regular times. 102


106 Tips For People with Nausea Eat in a quiet place away from strong smells. Open a window. Avoid spicy and fatty foods, as well as foods with a strong smell. Choose plain foods like toast, bagels, crackers and rice. Choose cool or room temperature foods (such as boiled eggs, cheese, or meat sandwiches); do not leave food out of the fridge for more than 2 hours. Try candied ginger, ginger cookies, ginger tea or ginger ale. When you do not have nausea eat! Allow someone else to do the cooking. Do not lie down right after your meal. Take good care of your mouth and teeth. Talk to your kidney doctor about medication to decrease nausea. 103
107 Tips For People with Poor Appetite Eat small high calorie meals and snacks, every 2-3 hours. Set an alarm to remind you to have a meal and/or snack. Eat larger portions when your appetite is better. Eat with family or friends. Do not drink liquids with meals; they can fill you up quickly. Ask your dietitian about using a nutrition supplement. Talk to your doctor, nurse or dietitian if you often have constipation 104

108 Taste Changes Brush your teeth and tongue more than usual. Use plastic utensils to help reduce metallic taste. Rinse your mouth often: before and after meals, with fluids such as tap water, club soda, or mineral water. Serve food cold or at room temperature; do not leave food out of the fridge for more than 2 hours. Try applesauce, mint jelly, red pepper jelly or cranberry sauce with meat or poultry. If food tastes too salty, try adding sugar or honey. Use salt-free seasonings to add flavor to food. Talk to your dietitian for ideas. Contact your dentist or doctor if you have a moldy or rotten mouth taste. Ask your kidney doctor about trying a zinc supplement. 105
109 Tips to Increase Calories Add soft margarine, healthy oil or butter to hot cereal, toast, cooked vegetables, rice, and pasta. Use larger amounts of full-fat salad dressing and mayonnaise on salads and in sandwiches. Add full-fat sour cream to salad dressings, pasta and vegetables and use it as a dip for fruit and vegetables. Try whipping cream as a topping on cake, fruit and gelatin desserts. CREAM Use cream instead of milk on cereal and in recipes. Add full fat, pasteurized cheeses like Havarti, cheddar or cream cheese to pasta, rice, cooked vegetables and bread products. Add honey, sugar or syrup to hot drinks, cereal, pancakes and waffles. Spread jam, jelly, marmalade or honey on toast, bagels, muffins, rolls and crackers. If you have diabetes, speak to your dietitian about adding sugars. Ask your dietitian about using a nutrition supplement. 106

110 High Calorie Kidney-Friendly Meal and Snack Ideas Bagels Bread Croissants English muffins served with: butter soft margarine cream cheese jam jelly or honey Quick plain oats or cream of wheat prepared with: cream or unenriched rice milk and added dried cranberries or frozen blueberries Scrambled eggs Omelettes French toast Pancakes Rice Krispies Squares Sandwiches grilled cheese tuna egg salad chicken salad Pasta or rice casseroles made using: left-over cooked chicken low-sodium canned tuna or salmon Hot or cold cooked pasta with: meat or chicken drizzled with olive oil and seasoned with fresh or dried herbs Homemade snack mix made from: Kellogg s Crispix Quaker Corn Bran Post Original Spoon Size Shredded Wheat dried cranberries and pineapple Loaves lemon zucchini sour cream pineapple cherry Muffins berry apple oatmeal lemon cherry cranberry pineapple Cookies arrowroot digestives oatmeal social teas Yeast donuts glazed crullers apple fritters Cake pound angel lemon spice jelly roll Pie apple cherry blueberry cranberry lemon meringue Consider using a meal delivery program. Ask your dietitian for ideas. 107
111 Notes- Healthy Eating for Home Hemodialysis 108
112 Module 14 Disaster Preparedness For the purpose of this workbook, a disaster is a major event that directly affects your dialysis care. Disasters generally strike quickly and without warning, so being prepared to deal with such events is vital for minimizing their impact. Hemodialysis requires a reliable supply of power and water, which makes people on dialysis particularly vulnerable to disasters. In a serious disaster situation, power and water services could be unavailable for several days. Telephone service may also be cut and roads and bridges could be impassable. At the hospital, emergency rooms could be overcrowded to deal with seriously injured victims. This section provides helpful ideas for people on independent dialysis about how to manage through the first few critical days following a disaster, until normal conditions can be restored. Additional information can be found in the Individual & Neighbourhood All Hazard Emergency Preparedness Workbook available from the BC Provincial Emergency Program. You can find this at: èpublic Safety and Emergency Services è Emergency Preparedness, Response & Recovery At the end of this module, there are various forms which should be filled out now (and updated regularly), then safely stored in your emergency kit. 109
113 Tips for surviving a disaster 1. Stay at home following a disaster event unless you are seriously hurt. 2. If possible, contact your nurse if you have lost power and are unable to dialyze. 3. Begin a survival diet. 4. Wait at home for instructions and details about hemodialysis on TV, radio, personal messenger or phone. 5. If you must go to an emergency shelter, tell the person in charge about your special needs. 6. Patients must take as much responsibility as possible for organizing their own transportation, keeping in contact with the Home Hemodialysis Program and making themselves available to come in to a centre for dialysis at any time day or night. 7. Be prepared to be evacuated and/or transported by other means than an ambulance, e.g. military vehicles, volunteers, or air evacuation. Bring your medications with you. 8. Keep an extra pair of glasses with your emergency supplies. 9. Notify the Home Hemodialysis Program of any address and telephone changes. 10. In the event that you are not affected by a disaster that has happened somewhere else in your region, you may be contacted by the Home Hemodialysis Program to assist other patients. 110
114 Medical Alert Why should you wear a medical alert identifier? If you are injured or unable to communicate, medical workers need to know quickly that you are a person on dialysis. How does it work? Your medical alert is worn as a bracelet or necklace and bears an internationally recognized symbol. If needed, medical professionals can access your computerized medical data within seconds. This vital data can be sent anywhere in the world to help medical personnel to provide proper diagnosis and care. Prompt treatment could save your life. Helpful Tips A medical alert bracelet should not be worn on the same arm as your fistula. During a trauma, it could impede the flow if it is pulled up the arm. Usually your medical alert is custom engraved with your primary medical conditions, personal ID number and a 24-hour hotline number. Important to note: My Medical Alert Personal I.D. Number is:. The 24-hour hotline number is:. Out of province contact (check point for other family members): 111
115 How to stop dialysis in an emergency When you first start home dialysis, your educator will show you what to do in an emergency. Important to remember: Always keep your emergency take-off kit near your dialysis machine. Your kit should contain: 4 clamps, scissors, sterile gauze, tape and two 10mL pre-filled saline syringes. If a disaster occurs during a dialysis treatment, follow the directions for emergency take off: 1. Stop the blood pump. 2. Clamp access and blood lines. 3. Open take off kit. 4. Place two extra clamps on each bloodline. 5. If you are unable to disconnect your access from the bloodlines, cut between the two clamps. DO NOT CUT THE ACCESS LINES. 6. Leave access needles in place until you get to a safe location. 7. Take emergency kit with you. 112
116 Care of your access during an emergency Under no circumstances should any medical personnel not familiar with your dialysis status, place, or inject anything into your vascular access. Emergency disconnect cards In the unlikely event that you are unresponsive and unable to take yourself off dialysis, an ambulance may be called. Please have the emergency disconnect card on the machine, to help paramedics remove you safely and quickly. The cards are on the next page for your reference. You can download and print your own copy at: è Health Info è Managing my Care è Home Hemodialysis è Patient Tools 113
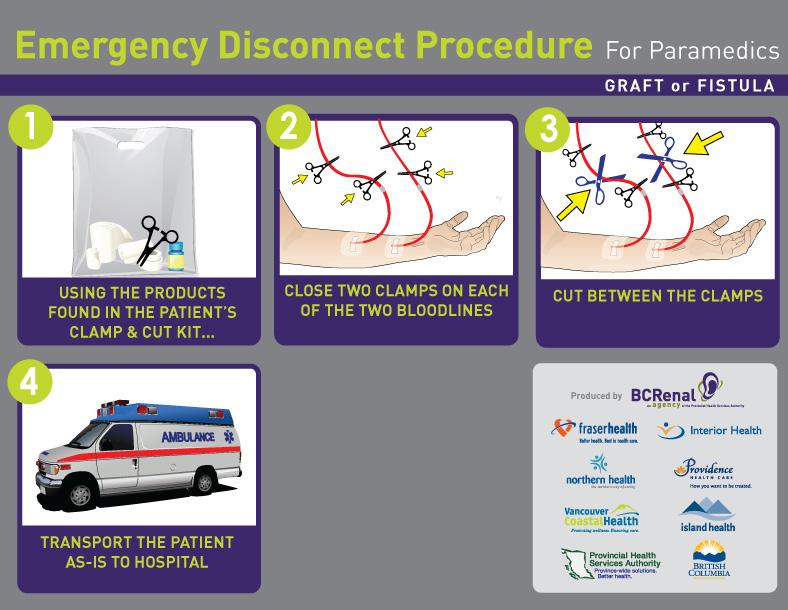
117 Fistula/Graft Catheter 114
118 Water disinfection Water may be disinfected with 5.25% sodium hypochlorite solution (household chlorine bleach). Important to remember: Do not use solutions in which there are active ingredients other than hypochlorite. Steps: 1. Strain water through a clean cloth or handkerchief to remove any sediment, floating matter or glass. 2. Add bleach using the following proportions: One drop =.05mL 1 tsp. = 5mL (Use an eye dropper to measure the bleach) For Clear Water One litre- add 2 drops Four litres- add 8 drops 20 litres- add ½ teaspoon For Cloudy Water One litre- add 4 drops Four litres- add 16 drops 20 litres- add 1 teaspoon (5mL) 3. Mix water and hypochlorite thoroughly by stirring or shaking in a container. Let stand for 30 minutes before using. A slight chlorine odour should be detectable in the water. If not, repeat the dosage and let stand for an additional 15 minutes. Water may also be purified by bringing it to a rapid boil for 5 minutes. Due to its chemical content, swimming pool or spa water should not be used as a primary source of drinking water. 115
119 Emergency diet plan This information will help you to plan for an emergency when dialysis may not be available (for example, following a snowstorm, earthquake, flood or hurricane). You will need to limit your potassium, fluid, protein and salt more than usual until you have dialysis again. Remember, when a disaster strikes, you may have to wait several days for your next dialysis. Being prepared could save your life. When planning for a disaster or emergency event, follow these guidelines: Keep at least a three-day supply of the survival diet in a backpack. You must be ready to move to a shelter if necessary or to travel elsewhere for dialysis. Choose non-perishable foods. You may not have electricity, water or cooking equipment, so plan meals that do not need to be cooked. Canned foods such as beef stew, macaroni and cheese do not need preparation and can be eaten cold. If you are being evacuated and have time, add some butter or margarine to your pack for extra calories. Remember foods lower in salt will make you less thirsty. If power goes out, food in your fridge will keep for one to three days if the fridge is only opened briefly. 116
120 Daily survival diet Breakfast 1/2 cup canned fruit, drained 1/2 cup cold cereal (shredded wheat, puffed wheat or puffed rice) 5 low-salt crackers and 2 tbsp jelly 1/2 cup Rice Dream Mid-Morning Snack Hard candy Lunch 15 low-salt crackers 6 tbsp jelly 1/2 cup canned fruit, drained 1/2 cup juice Hard candy Important to remember: If you are hungry, you can eat an additional 10 low-salt crackers and 6 cookies each day. You can also eat 2 tbsp peanut butter. Mid-Afternoon Snack 4 cookies 1/2 cup canned fruit, drained Evening 1 cup canned stew or macaroni and cheese 10 low-salt crackers 4 tbsp jelly 1/2 cup canned fruit, drained 1/2 cup juice 117
121 Supplies for three-day survival diet Keep these supplies in your Survival Diet pack. Foods 12 4 oz cans of fruit (applesauce, pears, peaches, pineapple only) 1 package of (3) shredded wheat biscuits or 2 cups of puffed rice or puffed wheat 6 4 oz boxes of juice (apple or cranberry) 1 box low-salt crackers 1 box low-salt cookies 2 bottles jelly 2 bags hard candy (barley sugar, humbugs, peppermints, hard fruit candies) 3 8 oz cans of stew or macaroni and cheese 1 small jar of peanut butter (optional) Substitution list Foods on the survival diet may be replaced with items listed below if you have access to them. 1 cup canned entree: 2 3 oz meat + 1/2 cup noodles or rice 2 eggs + 1 slice white bread 5 unsalted crackers or 1 slice white bread 4 slices white melba toast 2 graham crackers 1/2 cup fruit or small apple 1/2 cup canned or frozen berries 1/2 cup reconstituted evaporated milk = 1/2 cup fresh milk or cream 118
122 Equipment 1 can opener (small, hand operated) 1 sharp pen knife 1 small piece of aluminum foil 1 container with lid Ziploc bags Paper towels Disposable plates, bowls and plastic knives, forks and spoons Waterproof matches and candles Flashlight and battery-operated radio Copy of Survival Diet information 119
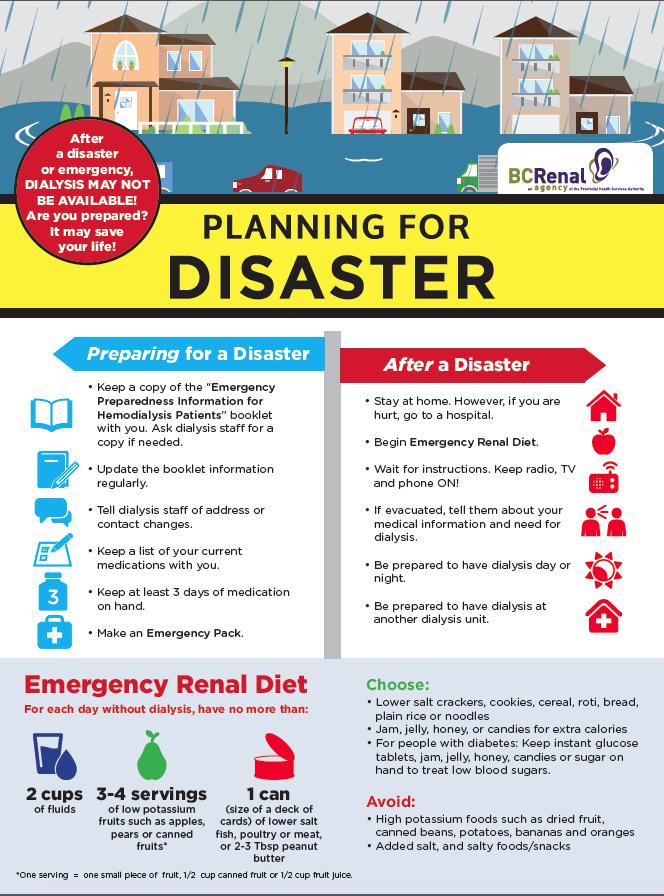
123 120
Module 7 Your Blood Work
 Module 7 Your Blood Work Every month you will need to collect a sample of your blood just before you start dialysis, and depending on your doctor s recommendation, at the end of your dialysis treatment.
Module 10 Troubleshooting Guide
 Module 10 Troubleshooting Guide Your safety and wellbeing are our priority. Issues can occur during your treatment and it is important that you recognize the symptoms. This guide will teach you how to
Treatment Options Not Not access
 Treatment Options Treatment options for Chronic Kidney Disease (CKD) CKD is a permanent condition. Treatment will: Help the patient feel better Not cure the disease Not make the kidneys start working again
UW MEDICINE PATIENT EDUCATION. Hemodialysis. A treatment option for kidney disease. Treatment Options for Kidney Disease
 UW MEDICINE PATIENT EDUCATION Hemodialysis A treatment option for kidney disease Class Goals 1. Understand the purpose and care of blood access. 2. Understand the purpose and basic principles of hemodialysis.
Graft for Hemodialysis
 St. Joseph s Healthcare Hamilton Kidney and Urinary Program Graft for Hemodialysis What is a graft? A graft is a man-made tube that joins an artery and a vein in your arm. The graft is called an access.
Table of Contents. Dialysis Port Care Chemotherapy Port Care G-Tube Care Colostomy Bags Wound Dressings
 Table of Contents Dialysis Port Care Chemotherapy Port Care G-Tube Care Colostomy Bags Wound Dressings Dialysis Port Care Know What Type of Vascular Access You Have. Fistula: An artery in your forearm
Fistula for Hemodialysis
 St. Joseph s Healthcare Hamilton Kidney and Urinary Program Fistula for Hemodialysis What is a fistula? A fistula is the joining of an artery and a vein by a surgeon. The fistula is called an access. It
Drainage Frequency: PATIENT GUIDE. Dressing Frequency: Every Drainage Weekly Drainage. Physician Contact Information. Dr. Phone:
 Drainage Frequency: PATIENT GUIDE Dressing Frequency: Every Drainage Weekly Drainage Physician Contact Information Dr. Phone: CHEST DRAINAGE Pleural Space Insertion Site Cuff Exit Site Catheter Valve Connector
Central Venous Catheter Care and Maintenance (includes catheter troubleshooting guide)
") Central Venous Catheter Care and Maintenance (includes catheter troubleshooting guide) A Guide for Patients in the Home Phone Number: Nurse/Contact: Central Venous Catheters This manual is a guide for
Central Venous Catheter Care and Maintenance (includes catheter troubleshooting guide) A Guide for Patients in the Home Phone Number: Nurse/Contact: Central Venous Catheters This manual is a guide for
Central venous access devices for children with lysosomal storage disorders
 Great Ormond Street Hospital for Children NHS Foundation Trust: Information for Families Central venous access devices for children with lysosomal storage disorders This information explains about central
Education for Self Administration of Intravenous Therapy HOME IV THERAPY PICC. Portacath
 HOME IV THERAPY PICC Portacath Who To contact Cardio-Respiratory Integrated Specialist Services (CRISS) Office hours 0800 1630 hours Ph: 364 0167 Weekends and after hours, phone Christchurch Hospital operator
CARE OF A TUNNELED CATHETER (HICKMAN & BROVIAC ) with a Needleless Connector (MicroClave Clear)
 with a Needleless Connector (MicroClave Clear)") CARE OF A TUNNELED CATHETER (HICKMAN & BROVIAC ) with a Needleless Connector (MicroClave Clear) Table of Contents Part 1 Learning about the Catheter...2 Part 2 Caring for Your Child s Catheter...3 A. Preventing
CARE OF A TUNNELED CATHETER (HICKMAN & BROVIAC ) with a Needleless Connector (MicroClave Clear) Table of Contents Part 1 Learning about the Catheter...2 Part 2 Caring for Your Child s Catheter...3 A. Preventing
BUTTONHOLE CANNULATION
 BUTTONHOLE CANNULATION What is a Buttonhole? Technique in which an AV fistula is cannulated in the exact same spot, at the same angle and at the same depth of penetration every time. Benefits Reduction
WHAT DO I NEED TO KNOW ABOUT MY VASCULAR ACCESS? FISTULA/GRAFT
 WHAT DO I NEED TO KNOW ABOUT MY VASCULAR ACCESS? FISTULA/GRAFT WHY DO I NEED VASCULAR ACCESS? For dialysis to work properly we need to create a way to take blood from your body, pass it through the dialyzer,
Going home after an AV Fistula or AV Graft
 Going home after an AV Fistula or AV Graft TGH Information for patients and families During your hospital stay, your surgeon created an: AV Fistula AV Graft Read this booklet to learn: how to care for
The arteriovenous fistula for haemodialysis
 The arteriovenous fistula for haemodialysis Department of Renal Medicine Patient Information Leaflet Introduction The information contained in this booklet is for: Patients waiting to go on the haemodialysis
Home Care for Your Nephrostomy Catheter - The James
 PATIENT EDUCATION patienteducation.osumc.edu Home Care for Your Nephrostomy Catheter - The James This handout tells you how to care for your nephrostomy catheter. If you have any questions about this information,
How to Set Up and Infuse Your TPN
 Page 1 of 10 How to Set Up and Infuse Your TPN Important: Do not change any of the supplies listed here. Keep supplies away from children. Only your home care nurse or persons trained by Fairview Home
A step-by-step preparation guide
 A step-by-step preparation guide For needle and needle-free systems This guide provides detailed instructions on the reconstitution, dilution, and storage of VELETRI. It is intended to be used after your
If viewing a printed copy of this policy, please note it could be expired. Got to to view current policies.
 If viewing a printed copy of this policy, please note it could be expired. Got to www.fairview.org/fhipolicies to view current policies. Department Policy Code: D: PC-5555 Entity: Fairview Pharmacy Services
It is important to learn all you can about your access so you can take better care of yourself.
 PEP CONNECT PEP Talk Outline Topic Vascular Access P A T I E N T E D U C A T I O N P R O G R A M An adequate permanent vascular access is the key to living long and well on dialysis. There are three kinds
The temporary haemodialysis catheter
 The temporary haemodialysis catheter Department of Renal Medicine Patient Information Leaflet Introduction The information in this booklet is for: People have renal failure and who require urgent haemodialysis.
Caring for Your Peripherally Inserted Central Catheter (PICC)
") PATIENT & CAREGIVER EDUCATON Caring for Your Peripherally Inserted Central Catheter (PICC) This information will help you care for your peripherally inserted central catheter (PICC) at home. A PICC is
PATIENT & CAREGIVER EDUCATON Caring for Your Peripherally Inserted Central Catheter (PICC) This information will help you care for your peripherally inserted central catheter (PICC) at home. A PICC is
PROVINCIAL STANDARDS & GUIDELINES
 PROVINCIAL STANDARDS & GUIDELINES CARE OF NEEDLING SITES POST-HEMODIALYSIS FOR FISTULAS & GRAFTS (HEMOSTASIS) Updated July 2015 Approved by the BCPRA Hemodialysis Committee Table of Contents 1.0 Practice
ATI Skills Modules Checklist for Central Venous Access Devices
 For faculty use only Educator s name Score Date ATI Skills Modules Checklist for Central Venous Access Devices Student s name Date Verify order Patient record Assess for procedure need Identify, gather,
Understanding your HICKMAN CATHETER
 Understanding your HICKMAN CATHETER Patient Information What is the purpose of this information sheet? This information sheet has been written by patients, members of the public and health professionals.
Patient Information Publications Warren Grant Magnuson Clinical Center National Institutes of Health
 Warren Grant Magnuson Clinical Center National Institutes of Health What is a subcutaneous injection? A subcutaneous injection is given in the fatty layer of tissue just under the skin. A subcutaneous
What is a catheter? What do I need to learn about catheter care?
 Catheter care What is a catheter? A catheter is a tube that drains urine from your child s body. The catheter is connected to tubing and a bag to collect the urine. Catheters come in different sizes and
Peripherally Inserted Central Catheter (PICC) Booklet
 Booklet") Aintree University Hospital FT PICC Booklet: a real world example This local booklet is an example used in the NICE medical technology guidance adoption support resource for SecurAcath for securing percutaneous
Aintree University Hospital FT PICC Booklet: a real world example This local booklet is an example used in the NICE medical technology guidance adoption support resource for SecurAcath for securing percutaneous
BLEEDING EMERGENCY. Always apply pressure directly over the bleeding site with your thumb or use an inverted bottle top to localise the pressure
 Bleeding between dialysis sessions is very rare and there are almost always warning signs before this happens. Warning signs include:- Infection of the fistula Bulging area, usually with shiny skin and
Suprapubic and Mitrofanoff Catheter Care
 Urinary catheters are tubes that drain urine from your child s bladder. There are many different types of urinary catheters. Your nurse will teach you how to care for these catheters. Here is information
UW MEDICINE PATIENT EDUCATION. Peritoneal Dialysis. A treatment option for kidney disease. There are 2 types of PD: continuous ambulatory
 UW MEDICINE PATIENT EDUCATION Peritoneal Dialysis A treatment option for kidney disease Class Goals 1. Understand the purpose and basic principles of continuous ambulatory peritoneal dialysis (CAPD). 2.
Haemodialysis access with an arteriovenous fistula
 Haemodialysis access with an arteriovenous fistula NHS Logo here Health & care information you can trust The Information Standard Certified Member Working together for better patient information If you
Home Health Foundation, Inc. To create more permanent IV access for patients undergoing long term IV therapy.
 PROCEDURE ORIGINAL DATE: 06/99 Revised Date: 09/02 Home Health Foundation, Inc. SUBJECT: PURPOSE: MIDLINE CATHETER INSERTION To create more permanent IV access for patients undergoing long term IV therapy.
CARE OF YOUR FISTULA
 CARE OF YOUR FISTULA 1 . What is a fistula? An arteriovenous fistula, or AVF, is a vessel that is formed by joining a vein to an artery in your arm during an operation to form an accessible blood vessel
A step-by-step preparation guide
 A step-by-step preparation guide This guide provides detailed instruction on the reconstitution, dilution, and storage of Veletri (epoprostenol) for Injection. It is intended to be used after your healthcare
Going Home with Your Peripheral Nerve Catheter and Pain Relief Pump
 Northwestern Memorial Hospital Patient Education CARE AND TREATMENT If you have any questions about the pain relief pump, please call the Anesthesia Pain Service. Going Home with Your Peripheral Nerve
Grey Bruce Health Network EVIDENCE-BASED CARE PROGRAM PATIENT EDUCATION BOOKLET TURP (TRANS URETHRAL RESECTION OF THE PROSTATE) PATHWAY
 PATHWAY") Grey Bruce Health Network EVIDENCE-BASED CARE PROGRAM PATIENT EDUCATION BOOKLET TURP (TRANS URETHRAL RESECTION OF THE PROSTATE) PATHWAY Introduction: Prostate or bladder surgery requires special care.
Grey Bruce Health Network EVIDENCE-BASED CARE PROGRAM PATIENT EDUCATION BOOKLET TURP (TRANS URETHRAL RESECTION OF THE PROSTATE) PATHWAY Introduction: Prostate or bladder surgery requires special care.
About your tunnelled dialysis catheter. Information for patients Sheffield Kidney Institute (Renal Unit)
") About your tunnelled dialysis catheter Information for patients Sheffield Kidney Institute (Renal Unit) You will have discussed with your doctor that your kidney condition means that you need to have regular
About your tunnelled dialysis catheter Information for patients Sheffield Kidney Institute (Renal Unit) You will have discussed with your doctor that your kidney condition means that you need to have regular
DRAFT. Caring for Your Central Venous Catheter. For adult patients. Contents
 UW MEDICINE PATIENT EDUCATION Caring for Your Central Venous Catheter For adult patients Contents Page What is a central venous catheter?... 2 What can I expect when the catheter is placed?... 2 How is
MANITOBA RENAL PROGRAM
 SUBJECT Venipuncture of Arteriovenous Fistula/Graft MANITOBA RENAL PROGRAM SECTION CODE 30.30.01 30.30 Vascular Access AUTHORIZATION Professional Advisory Committee, Manitoba Renal Program Nursing Practice
MANITOBA RENAL PROGRAM
 SUBJECT Venipuncture of Arteriovenous Fistula/Graft MANITOBA RENAL PROGRAM SECTION CODE 30.20.01 30.20 Vascular Access AUTHORIZATION Professional Advisory Committee, Manitoba Renal Program Nursing Practice
GASTRECTOMY. Date of Surgery. Please bring this booklet the day of your surgery. QHC#34
 GASTRECTOMY Date of Surgery Please bring this booklet the day of your surgery. QHC#34 What is a Gastrectomy? A Gastrectomy is the surgical removal of all or part of the stomach. The stomach is the digestion
For the Patient: Ponatinib Other names: ICLUSIG
 For the Patient: Other names: ICLUSIG (poe na' ti nib) is a drug that is used to treat some types of cancer. It is a tablet that you take by mouth. The tablet contains lactose. Tell your doctor if you
Standard Operating Procedure for cannulation
 Standard Operating Procedure for cannulation Effective date: 26.07.2017 Review due date: 31.03.2019 Original Author Name: Richard Metcalfe Position: PhD Student Date: 05.12.2012 Reviewer Name: Pippa Heath
Hemodialysis Catheter What is Hemodialysis Catheter?
 Hemodialysis Catheter What is Hemodialysis Catheter? Hemodialysis is a treatment to replace the function of your kidneys when they are failed. In the process of hemodialysis, your own blood will be drawn
Instructions for Use Enbrel (en-brel) (etanercept) for injection, for subcutaneous use Multiple-dose Vial
 (etanercept) for injection, for subcutaneous use Multiple-dose Vial") Instructions for Use Enbrel (en-brel) (etanercept) for injection, for subcutaneous use Multiple-dose Vial How do I prepare and give an injection with Enbrel multiple-dose vial? A multiple-dose vial contains
Instructions for Use Enbrel (en-brel) (etanercept) for injection, for subcutaneous use Multiple-dose Vial How do I prepare and give an injection with Enbrel multiple-dose vial? A multiple-dose vial contains
STEP-BY-STEP GUIDE TO SELF-INFUSION. Subcutaneous Administration of GAMMAGARD LIQUID
 STEP-BY-STEP GUIDE TO SELF-INFUSION Subcutaneous Administration of GAMMAGARD LIQUID This handy guide will help you manage your subcutaneous administration of GAMMAGARD LIQUID. If you have questions on
For the Patient: Trastuzumab emtansine Other names: KADCYLA
 For the Patient: Trastuzumab emtansine Other names: KADCYLA Trastuzumab emtansine (tras tooz' ue mab em tan' seen) is a drug that is used to treat some types of cancer. Trastuzumab emtansine is a clear
Ileal Conduit Diversion Surgery
 Here are some words and pictures to help you understand this surgery: Bladder: the bladder stores urine that is made by the kidneys Bowels: the bowels are the parts of the body that digest food and fluids.
St George Hospital Renal Department Internal Only
 RENAL VASCULAR ACCESS CANNULATION POLICY AND PROCEDURE SUMMARY: A functioning arteriovenous fistula (AVF) or arteriovenous graft (AVG) is paramount in the maintenance of regular and optimal haemodialysis
Nephrostomy Tube Care
 Nephrostomy Tube Care CEAC 0585 January 2012 Problems to report to the doctor If your nephrostomy tube falls out, call your urologist or go to a hospital Emergency Department immediately to have the tube
For the Patient: Paclitaxel Other names: TAXOL
 For the Patient: Paclitaxel Other names: TAXOL Paclitaxel (pak'' li tax' el) is a drug that is used to treat many types of cancer. It is a clear liquid that is injected into a vein. Tell your doctor if
Patient/Carer instructions for the administration of Subcutaneous Cytarabine
 Patient/Carer instructions for the administration of Subcutaneous Cytarabine This document covers the following information: What cytarabine is What subcutaneous means What happens if you decide to inject
Giving Medicine by Subcutaneous Injection
 Giving Medicine by Subcutaneous Injection A subcutaneous injection, also called a sub Q or SQ shot, is one that is given into the layers of skin and fat on top of the muscle. Follow these steps for giving
Sorafenib (so-ra-fe-nib) is a drug that is used to treat many types of cancer. It is a tablet that you take by mouth.
 is a drug that is used to treat many types of cancer. It is a tablet that you take by mouth.") For the Patient: Other names: Sorafenib NEXAVAR Sorafenib (so-ra-fe-nib) is a drug that is used to treat many types of cancer. It is a tablet that you take by mouth. A blood test may be taken before each
For the Patient: Other names: Sorafenib NEXAVAR Sorafenib (so-ra-fe-nib) is a drug that is used to treat many types of cancer. It is a tablet that you take by mouth. A blood test may be taken before each
MICAFUNGIN MIXING
 1 1-800-862-2731 MICAFUNGIN MIXING Drug Name: MICAFUNGIN Volume and Rate: over 1 hour Schedule: KEY POINTS: FLUSHING: Saline Micafungin Saline Heparin 1. Always wash your hands with an antibacterial soap
How to Use ENBREL : Vial Adapter Method
 How to Use ENBREL : Vial Adapter Method SETTING UP FOR AN INJECTION Select a clean, well-lit, flat working surface, such as a table. Take the ENBREL dose tray out of the refrigerator and place it on your
For the Patient: Fludarabine injection Other names: FLUDARA
 For the Patient: Fludarabine injection Other names: FLUDARA Fludarabine (floo-dare-a-been) is a drug that is used to treat many types of cancer. It is a clear liquid that is injected into a vein. Tell
Getting Knowledge About Kidney Disease
 Last Reviewed Getting Knowledge About Kidney Disease Have you been told that you have late stage kidney disease? Choose Your Lifestyle On Dialysis There are two kinds of dialysis. Dialysis can be done
Post Operative Instructions
 Mary A. Stanley, MD, FACS Breast Surgery Activity: Post Operative Instructions Gradually increase your activity the following day. You may drive as long as you are not taking narcotic pain medicine. It
Spine Surgery Discharge Instructions
 Spine Surgery Discharge Instructions Your sutures or staples need to stay in place for at least 10 days after surgery. To have them removed you can: Call your surgeon s office (the number is on your discharge
Instructions For Use PRALUENT (PRAHL-u-ent) (alirocumab) Injection, for Subcutaneous Injection Single-Dose Pre-Filled Syringe (75 mg/ml)
 (alirocumab) Injection, for Subcutaneous Injection Single-Dose Pre-Filled Syringe (75 mg/ml)") Instructions For Use PRALUENT (PRAHL-u-ent) (alirocumab) Injection, for Subcutaneous Injection Single-Dose Pre-Filled Syringe (75 mg/ml) Important Information The device is a single-dose pre-filled syringe.
Instructions For Use PRALUENT (PRAHL-u-ent) (alirocumab) Injection, for Subcutaneous Injection Single-Dose Pre-Filled Syringe (75 mg/ml) Important Information The device is a single-dose pre-filled syringe.
IV Catheter Placement
 Year Group: BVSc3 + Document number: CSL_A06 Equipment for this station: Equipment list: IV catheter model, with giving set and red fluid bag IV catheter Bung or T-port Tape two strips cut to size before
Managing your suprapubic catheter
 Managing your suprapubic catheter What you need to know The information contained in this booklet is intended to assist you in understanding your proposed surgery. Not all of the content will apply to
BayCuff : Self-infusion training made simple
 BayCuff : Self-infusion training made simple Contents Introduction to the program Introduction to the program 3 Features of BayCuff 4 Self-infusion training with BayCuff 5 Welcome to the BayCuff self-infusion
Caring for Your Drainage Gastrostomy Tube
 PATIENT & CAREGIVER EDUCATION Caring for Your Drainage Gastrostomy Tube This information will help you care for your drainag e g astrostomy tube (g-tube). About Your Drainage G-Tube A drainage g-tube is
SCIG INFUSIONS A PRACTICAL GUIDE FOR PATIENTS
 PRIMARY IMMUNODEFICIENCIES SCIG INFUSIONS: A PRACTICAL GUIDE FOR PATIENTS SCIG INFUSIONS A PRACTICAL GUIDE FOR PATIENTS 1 PRIMARY IMMUNODEFICIENCIES ABBREVIATIONS IG IVIG PID SCIG Immunoglobulin Intravenous
Instructions for Use Enbrel (en-brel) (etanercept) injection, for subcutaneous use Single-dose Prefilled Syringe
 (etanercept) injection, for subcutaneous use Single-dose Prefilled Syringe") Instructions for Use Enbrel (en-brel) (etanercept) injection, for subcutaneous use Single-dose Prefilled Syringe How do I prepare and give an injection with Enbrel Single-dose Prefilled Syringe? There
Instructions for Use Enbrel (en-brel) (etanercept) injection, for subcutaneous use Single-dose Prefilled Syringe How do I prepare and give an injection with Enbrel Single-dose Prefilled Syringe? There
Arteriovenous (AV) fistulae for haemodialysis
 fistulae for haemodialysis") Great Ormond Street Hospital for Children NHS Foundation Trust: Information for Families Arteriovenous (AV) fistulae for haemodialysis This information sheet explains about the arterio-venous fistula method
Great Ormond Street Hospital for Children NHS Foundation Trust: Information for Families Arteriovenous (AV) fistulae for haemodialysis This information sheet explains about the arterio-venous fistula method
What is a Leaderflex catheter?
 Leaderf lex How to care for your catheter patient gu ide www.vygon.co.uk vygon@vygon.co.uk This booklet will give you information about the care your catheter and things to look out for. For any other
T-Tube, Hemovac, and J. Pratt Drain Care
 Patient & Family Guide 2017 T-Tube, Hemovac, and J. Pratt Drain Care www.nshealth.ca T-Tube, Hemovac, and J. Pratt Drain Care Care at home This pamphlet will help you with your drain care at home. Most
Instructions for Use. For use with. 10 mg vial
 Instructions for Use For use with 10 mg vial Table of Contents Parts of the ZOMA-Jet 10... 1 Supplies you will need to mix a ZOMACTON 10 mg Vial... 2 Mix a ZOMACTON 10 mg vial... 3 Reset the ZOMA-Jet 10...
INSTRUCTIONS FOR PREPARING AND GIVING AN INJECTION OF ENBREL POWDER
 INSTRUCTIONS FOR PREPARING AND GIVING AN INJECTION OF ENBREL POWDER Introduction The following instructions explain how to prepare and inject Enbrel powder for injection. Please read the instructions carefully
MANITOBA RENAL PROGRAM
 MANITOBA RENAL PROGRAM SUBJECT Use of Closed Needleless Access Device with Hemodialysis Central Venous Catheters (CVC) SECTION CODE 30.20.04 30.20 Vascular Access AUTHORIZATION Professional Advisory Committee,
YOUR PATH TO RECOVERY AFTER SHOULDER REPLACEMENT
 YOUR PATH TO RECOVERY AFTER SHOULDER REPLACEMENT Revised 11/2015 Day of Surgery: # 0 After Surgery Day: # 1 Precautions DO NOT actively move your shoulder, lift, carry, reach, bear weight, or reach behind
Information and instruction for Home Helps caring for clients with indwelling urinary catheters
 Information and instruction for Home Helps caring for clients with indwelling urinary catheters This leaflet provides you with information and instructions on caring for clients who have an indwelling
Your Kidney Health. Your Choices. Chronic Kidney Disease
 Your Kidney Health Your Choices Your doctor may have told you that you have chronic kidney disease (CKD or advanced kidney disease; or, you may be in kidney failure, and may have to make a decision about
HOW TO USE... 5mg. Pocket Guide
 HOW TO USE... Pocket Guide 4 ZOMACTON [somatropin (rdna origin)] for Injection Supplies ZOMACTON 5 mg (powder) Preparation syringe Syringe and injection needle Diluent (liquid) Diluent (liquid) contains
This information will help you care for your tracheostomy while you re in the hospital and at home.
 PATIENT & CAREGIVER EDUCATION Caring for Your Tracheostomy This information will help you care for your tracheostomy while you re in the hospital and at home. Your Trachea Your trachea (windpipe) is part
EVOGAM. Information for patients Evogam 2014 NZ Patient Brochure Update v11
 EVOGAM Information for patients 11881 Evogam 2014 NZ Patient Brochure Update v11 Information for patients and caregivers about EVOGAM This booklet is designed to help you follow the training you will have
Dr. Nuelle Knee Replacement: Discharge Care Instructions
 Dr. Nuelle Knee Replacement: Discharge Care Instructions Your Recovery Thank you for allowing us to help you with your knee replacement surgery. We hope that you had a good stay with us. These discharge
Successful IV Starts Revised February 2014
 Successful IV Starts Revised February 2014 Why Intravenous Therapy? Used for access to the body s circulation Indications: Administer fluids, blood, medications, and nutrition Obtain laboratory specimens
Hemodialysis. If you have any questions or concerns, please ask your healthcare provider. Patient Education. Kidney Function
 Northwestern Memorial Hospital Patient Education CARE AND TREATMENT If you have any questions or concerns, please ask your healthcare provider. Hemodialysis The kidneys play an important role in helping
Kidney Disease Treatment Options
 Page 1 Fact sheet The kidneys play a number of important roles in your body such as: extracting excess water to make urine (wee) controlling your blood pressure filtering waste products and toxins from
How to Care for a Foley Catheter After Surgery
 Form: D-3251 How to Care for a Foley Catheter After Surgery For patients going home from the Day Surgery Unit at Toronto Western Hospital Read this brochure to learn about: How to take care of the Foley
INTRODUCTION TO HAEMODIALYSIS
 INTRODUCTION TO HAEMODIALYSIS Why do I need dialysis? What is dialysis? How does haemodialysis work? Where will I have my treatment? Will dialysis cure my kidney failure? Will dialysis keep me well? I
Instructions for Use. Welcome!
 Instructions for Use Welcome! The AMJEVITA SureClick autoinjector is a single-use prefilled autoinjector. Consult your doctor if you have any questions about your dose. Your doctor has prescribed AMJEVITA
UW MEDICINE PATIENT EDUCATION. What to expect and how to prepare DRAFT. What are liposuction and fat grafting? How do I prepare?
 UW MEDICINE PATIENT EDUCATION Liposuction and Fat Grafting for Breast Reconstruction What to expect and how to prepare This handout explains liposuction and fat grafting when used in breast reconstruction.
CARING FOR YOUR CATHETER AT HOME
 CARING FOR YOUR CATHETER AT HOME After surgery (radical prostatectomy) for prostate cancer you will have a urinary catheter for a short period of time and will need to go home with the catheter still in
INSTRUCTIONS FOR USE HUMIRA 40 MG/0.8 ML, 20 MG/0.4 ML AND 10 MG/0.2 ML SINGLE-USE PREFILLED SYRINGE
 INSTRUCTIONS FOR USE HUMIRA (Hu-MARE-ah) (adalimumab) 40 MG/0.8 ML, 20 MG/0.4 ML AND 10 MG/0.2 ML SINGLE-USE PREFILLED SYRINGE Do not try to inject HUMIRA yourself until you have been shown the right way
PLEASE READ THIS USER MANUAL BEFORE USE
 USER MANUAL Humalog 200 units/ml KwikPen, solution for injection in a pre-filled pen insulin lispro PLEASE READ THIS USER MANUAL BEFORE USE USE ONLY IN THIS PEN, OR SEVERE OVERDOSE CAN RESULT Read the
Cardiac Catheterization Lab Procedures
 Patient Education Cardiac Catheterization Lab Procedures This handout describes how cardiac catheterization works. It also explains how to prepare for your procedure and the self-care needed after you
Patient & Family Guide. Bowel Surgery.
 Patient & Family Guide 2016 Bowel Surgery www.nshealth.ca Bowel Surgery This pamphlet will answer some of your questions about your stay in hospital and care at home. We hope this information will help
Gastrostomy Tube for Decompression
 Gastrostomy Tube for Decompression What is a Gastrostomy? A gastrostomy (g-tube) is a procedure that creates a small opening in your outer abdomen into the stomach. A thin tube is placed through this hole.
Understanding Your Hemodialysis Access Options UNDERSTANDING YOUR HOME HEMODIALYSIS OPTIONS
 Understanding Your Hemodialysis Access Options UNDERSTANDING YOUR HOME HEMODIALYSIS OPTIONS UNDERSTANDING YOUR HOME HEMODIALYSIS OPTIONS HOW DO THE KIDNEYS FUNCTION? Most people are born with two kidneys.
INSTRUCTIONS FOR USE TYMLOS (tim lows ) (abaloparatide) injection, for subcutaneous use
 (abaloparatide) injection, for subcutaneous use") INSTRUCTIONS FOR USE TYMLOS (tim lows ) (abaloparatide) injection, for subcutaneous use Instructions for Use Read and follow this Instructions for Use so that you inject TYMLOS pen the right way. Call
INSTRUCTIONS FOR USE TYMLOS (tim lows ) (abaloparatide) injection, for subcutaneous use Instructions for Use Read and follow this Instructions for Use so that you inject TYMLOS pen the right way. Call
Cardiac Catheterization Lab Procedures
 Patient Education Cardiac Catheterization Lab Procedures This booklet describes cardiac catheterization. It also details how to prepare for the procedure and the care needed after it is done. Before You
WHAT DO I NEED TO KNOW ABOUT MY VASCULAR ACCESS? CATHETER
 WHAT DO I NEED TO KNOW ABOUT MY VASCULAR ACCESS? CATHETER WHY DO I NEED VASCULAR ACCESS? For dialysis to work properly we need to create a way to take blood from your body, pass it through the dialyzer,
Dr. Nuelle Total/Partial Hip Replacement: Discharge Care Instructions
 Dr. Nuelle Total/Partial Hip Replacement: Discharge Care Instructions Your Recovery Thank you for allowing us to help you with your hip replacement surgery. We hope that you had a good stay with us. These