Recumbent Bike Owner s Manual
|
|
|
- Esmond Hensley
- 6 years ago
- Views:
Transcription

 Fax: 949-206-0013")

1 BH FITNESS SK-9900 Recumbent Bike Owner s Manual BH FITNESS Ellipse, Foothill Ranch, CA Phone: , (USA only), (USA & Canada) Fax: fitness@bhnorthamerica.com Web: and Issued: April 15, 2008 (v1)
2 TABLE OF CONTENTS IMPORTANT SAFETY INFORMATION... 2 ASSEMBLY GUIDE... 3 CONSOLE OPERATION Electronic Monitor Illustrations Electronic Monitor Display & Keypad Starting the Unit Personalizing the Electronic Monitor PROGRAM MODE (P0 P13) P0 MANUAL P1 P P9 USER P10 MALE P11 FEMALE P12 HEART P13 WATT RATE Symbols and their Meanings Program Profiles WARRANTY This manual is compatible with software versions 2.0 and 2.1. Page 1
3 IMPORTANT SAFETY INFORMATION Caution: Consult your doctor before beginning to use the exercise machine. This advice is especially important for those over 35 or suffering from health problems. Read all of the instructions before using any exercise equipment. PRECAUTIONS This exercise machine has been designed and constructed to provide maximum safety. Nevertheless, certain precautions should be taken when using exercise equipment. Read the whole manual before assembling and using the exercise machine. The following safety precautions should also be observed: 1. Users should pass a full medical examination before they embark upon any type of exercise program. 2. If you experience dizziness, nausea, chest pains or any other symptom, STOP the exercise. SEEK MEDICAL ATTENTION IMMEDIATELY. 3. Do warm up stretching exercises before using the equipment. 4. For safety, maintain a minimum clearance around the equipment. Maintain 18 inches on the front and each side plus 24 inches at the rear of the equipment. 5. The weight of the user must not exceed 330 pounds (150 kg). The height must not exceed 6 ft., 10 in. (2.1 m). 6. To guarantee the safety of the user and that of the equipment, the user should read through the entire manually carefully before assembling and/or using the equipment. 7. Keep children away from this equipment at all times, it is not a toy. DO NOT leave them unsupervised in the room where it is kept. A child can become curious which can often lead to a hazardous situation and behavior resulting in an accident. 8. The equipment can only be used by one person at a time. 9. Use the equipment on a level, solid surface. DO NOT use the exercise machine outdoors or close to water. 10. Keep your hands well away from any of the moving parts. 11. Wear clothing suitable for doing exercise. Do not use baggy clothing that might get caught up in the exercise equipment. Always wear running shoes or trainers when using the exercise equipment. Make sure all shoe laces/cords are tied correctly. 12. This equipment must only be used for the purposes described in this manual. DO NOT use accessories that are not recommended by the manufacturer. 13. Do not place sharp objects near the exercise equipment. 14. Disabled people should not use the exercise equipment without the assistance of a qualified person or a doctor. 15. Do not use the exercise equipment if it is not working correctly. SAVE THESE INSTRUCTIONS FOR FUTURE USE. Page 2
4 ASSEMBLY GUIDE Figure 1 A) Main post. B) Main body. C) Front trim cover. a) Combination Spanner (wrench) D) Top trim cover. b) Star driver spanner (wrench) E) Backrest c) Allen key 5 mm. F) Flat washer M-10 Quantity 4 d) Allen key 8 mm. G) Grower washer M-10 Quantity 4 H) Allen screw M-10x25 Quantity 4 M) Bottle holder I) Screw M-4x25 Quantity 1 N) Adapter 15Volt, 1 Amp. J) Allen Screw M-5x15 Quantity 2 K) Screw M-8x15 Quantity 4 L) Grower washer M-8 Quantity 4 LL) Flat washer M-8 Quantity 4 Page 3
5 ASSEMBLY GUIDE Figure 2 Figure 3 Not included on this model Page 4
6 ASSEMBLY GUIDE Figure 4 Figure 5 3 Page 5


7 ASSEMBLY GUIDE Figure 6 Figure 7 Figure 8 Figure 9 Install (N) 15V Adapter here Page 6
8 ASSEMBLY GUIDE IMPORTANT: The exercise machine is heavy. At least two people are required to ensure the safety of those that are unpacking, installing and moving the equipment. NOTE: For safety, maintain a minimum clearance around the equipment. Maintain 18 inches on the front and each side plus 24 inches at the rear of the unit. NOTE: Position on a level floor near a V electrical outlet. 1. ASSEMBLY INSTRUCTIONS Figure 1. Take the unit out of the box and place it on the floor as shown in Figure 1. Verify that the parts are undamaged and quantities are correct. 2. ATTACH THE MAIN POST Figure 2. Take the post (A) and bring it up to the boss on the main body (B). Connect the terminals (O), sticking out of the bottom of post (A), with terminal (P) coming up out of the top of the tube on the main body (B). Connect the terminals (R), sticking out of the bottom of post (A), with terminal (S) coming up out of the top of the tube on the main body (B). Slip the main post (A) over the boss on the main body (B), making sure not to damage any of the cables. Figure 2A. Loosely fasten using flat washers (F), Grower spring washers (G) and screws (H). Do not fully tightening. Check that the cables are connected correctly by spinning the pedals until the monitor starts to operate. Once the monitor operates, tighten the screws securely. 3. INSTALL THE BACKREST Figure 2. Insert the backrest (E) into the tube on the seat. Fasten using flat washers (LL), grower washers (L) and screws (K). 4. FIT THE FRONT TRIM COVER Figure 3. Fit the front trim cover (C) by sliding it onto the side tubes. Install and tighten screw (I) to secure the cover. Page 7
9 ASSEMBLY GUIDE 5. FIT THE TOP TRIM COVER AND BOTTLE HOLDER Figure 4. Position the cover (D) so as to avoid hitting the Monitor. Move the cover (D) in the direction of arrows (1), (2) and (3). Position the cover (D) over the side tubes of the main body (B). Secure using screws (J). Figure 4A. Remove the screws from the main post (B). Position the bottle holder (M) and secure it by using the screws previously removed. 6. ADJUST THE SEAT Figure 5. The seat position can be slid forwards or backwards by pressing lever (U) upwards. Lever (U) is on the lower right side of the seat. Release the lever to lock the seat into a position. 7. VIEW PULSE SENSOR Figure 8. View the pulse sensors (Y) located on the handlebar. The users pulse rate is measured by placing both hands on pulse sensors (Y). 8. LEVELING NOTE: For safety, maintain a minimum clearance around the equipment. Maintain 18 inches on the front and each side plus 24 inches at the rear of the unit. Figure 6. Once the unit has been placed into its final position, make sure that it sits flat on the floor and that it is level. Screw the adjustable support blocks (R) up or down to level the unit. 9. MOVEMENT & STORAGE Figure 7. The unit is equipped with wheels (W) making it easier to move about. The two wheels at the front of the unit make it easy to store the unit away. 10. CHARGE THE BATTERY Figure 9. Connect the DC terminal end of the 15V, 1 amp adapter (N) to the connector. Connect the plug end of the AC/DC adapter (N) into a V outlet. NOTE: This unit is equipped with a generator (dynamo) that converts the mechanical rotation (produced by the exercising user) into current (electrical energy) to power the electronic monitor and brake controller. Page 8
10 ASSEMBLY GUIDE This unit also includes a set of batteries that store enough energy to keep the electronic monitor operating for 60 seconds after mechanical rotation from the exercising user has stopped. If the battery runs down, it can be recharged by using the 15V Adapter (N) that is supplied with the unit. BH RESERVES THE RIGHT TO MODIFY THE SPECIFICATIONS OF ITS PRODUCTS WITHOUT PRIOR NOTICE Page 9

11 Figure 10 Page 10

12 Figure 11 speed rpm time distance calories watts pulse Figure 12 Page 11
13 GENERAL INSTRUCTIONS This exercise unit is equipped with a generator (dynamo). The generator uses of the energy produced by the user (while exercising) to power the electronic monitor and the brake controller. This exercise unit also includes a set of batteries that store enough energy to keep the electronic monitor operating for 60 seconds after the exercise has finished. Should the battery run down because of an operational fault, it can be recharged by using the 15V adapter that is supplied with the exercise unit. To switch the monitor on, begin exercising. ATTENTION: Plug one end of the 15V adapter into the unit per Figure 9 and the other end into an appropriate outlet. The electronic monitor is designed to be easy and intuitive to use. The messages that appear on the bottom screen (B) will guide the user throughout the whole exercise. Nevertheless, we recommend that the gym instructor reads through this section carefully to become fully familiar with the electronic monitor in order to show the user how to operate it correctly. IMPORTANT: TO ENSURE THAT THE BATTERIES OPERATE CORRECTLY AND LAST LONGER, RECHARGE THEM USING THE 15V ADAPTER (N) SUPPLIED WITH THE UNIT. Page 12
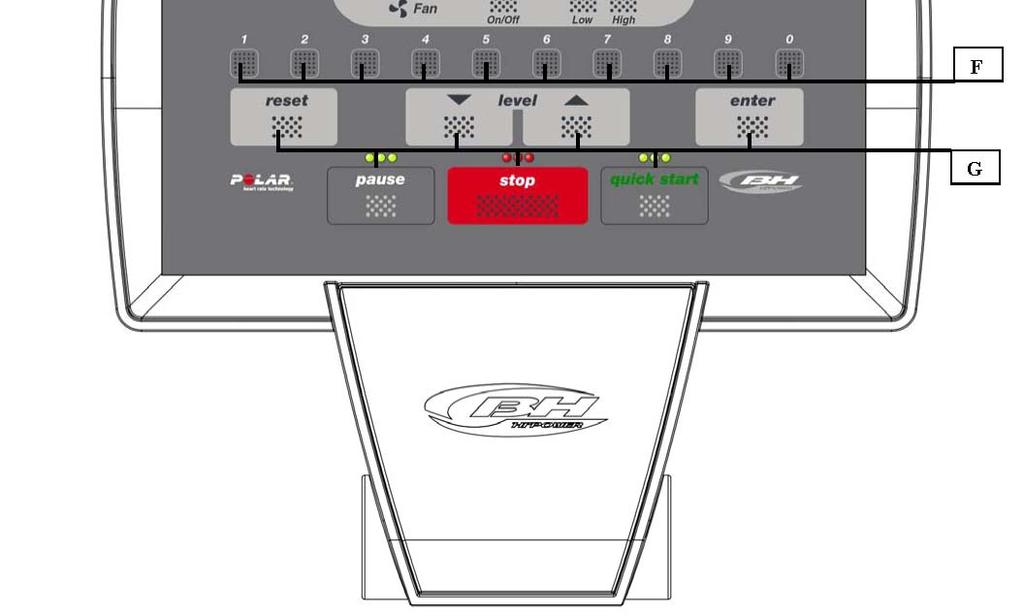
14 ELEMENTS OF THE ELECTRONIC MONITOR (Figure 10) The electronic monitor is made up of two distinct areas: The top area, Figure 11 (A B C) for the DISPLAY The bottom area, Figure 12 (E F G) for the KEYPAD DISPLAY This area is comprised of two screens. (A) The top LED array displays real-time exertion levels being produced during the selected program. (B) Bottom alphanumeric screen, which guides the user selection options and exercise. The top screen (A) displays the various pre-programmed exercise profiles (programs) that can be selected and, during exercise, current exertion levels. The bottom alphanumeric screen (B) is used to guide the user when selecting the exercise to do, as well as displaying information about the exercise both during and after the session. The LED indicators (C) located below the alphanumeric screen give a simultaneous readout of SPEED, RPM; TIME, DISTANCE; CALORIES, WATTS; PULSE and indicate which information is being displayed throughout the exercise. The data that are displayed on the LEDs (C) during exercise are as follows: SPEED: This shows an estimated value of the linear velocity at which a bicycle will travel based on the user s pedaling rate. RPM: This shows the total number of pedals during the exercise. It indicates the number of full turns that the crank has made. TIME: This shows the time that has elapsed since you started the exercise or, if a time limit has been established, the amount of time left before the exercise finishes. The time is displayed in minutes and seconds (mm:ss). DISTANCE: This shows the distance that you have travelled since beginning the exercise. The distance is calculated by using the estimated linear speed. CALORIES: This shows the estimated number of calories that have been burned off up until now. This calculation is based on the energy being produced and the weight and age values provided by the user. Page 13
15 WATTS: This shows the amount of energy currently being produced during the exercise. This calculation is based on the exertion level at which the user is working and the pedaling rate. The information is displayed in Watts. PULSE: This shows the user s heart rate recorded through the handlebar pulse sensors or a telemetric chest belt such as the POLAR T41 transmitter. KEYPAD The function of each key is listed below. See Figure 12. The electronic monitor includes an easy-to-use keypad. This keypad consists of Fan keys ( E ), numeric keys ( F ) and function keys ( G ). Fan keys ( E ) Off / On; Low (minimum speed); High (maximum speed). Numeric keys (F) - (1-0) are used to enter the data requested by the monitor. Function keys ( G ) - reset; level ; level ; enter ; pause ; stop ; quick / start - are used to select a particular exercise, enter requested data, control exercise exertion levels and to finish the exercise. RESET - Reset key. This is used to erase the data that have been entered into the monitor when selecting a program. LEVEL - Key for decreasing exertion level. When pressed during exercise, this key will decrease the exertion level by one machine setting. During the selection of pre-programmed profiles, it is used to move on to the next profile screen. LEVEL -Key for increasing exertion levels. When pressed during exercise, this key will increase the exertion level by one machine setting. During the selection of pre-programmed profiles, it is used to move back to the previous profile screen. ENTER - Selection and validation key. This is used during pre-programmed profile selection to select a profile, confirm data that have been entered and to start the exercise. It is also used during user profile programming to confirm the exertion level settings for each minute. PAUSE - Pause key. If this is pressed during a session, the exercise is interrupted and the exercise timekeeper (clock) is halted. To restart the exercise timekeeper (clock) press the pause key again or continue exercising. Pause will only last for 45 seconds, then the exercise will stop and the monitor will exit the exercise. If, the STOP key is pressed, in pause mode, then the exercise will finish. Page 14
16 STOP - Stop key. If this is pressed during the session, the exercise will be taken as finished and exertion settings will drop to minimum level. A summary of all the exercise data will be displayed and it will then return to the start screen. Hold the STOP key down for 3 seconds in Start/Ready mode, and the monitor screen will change to black with a beep. The ON personalized power option may be changed to OFF. QUICK / START - Quick start key. When this key is pressed, provided that the LED on the key is flashing, exercise will begin in manual mode. Page 15
17 OPERATING INSTRUCTIONS STARTING THE UNIT To turn on the monitor, plug the unit in or pedal the unit. Plug the 15V adapter (N) that is supplied with the unit into a wall outlet, and select the ON option in the personalized settings (step 4 POWER). Or pedal (spin) the crank at 45 rpm. As soon as it reaches 45 rpm the monitor will come on and remain on for 60 seconds so that it can be programmed. Once the monitor is on it will display the profile and the letter M for manual on the LED array ( A ) Figure 11, and the WELCOME TO HI POWER message on the bottom alphanumeric screen ( B ). You can start the program in manual mode by pressing the QUICK / START key and by pressing the level keys you can increase or decrease the exertion levels. STARTING THE FAN The monitor on this machine is fitted with an air vent (D), Figure 10, through which a FAN provides two air speeds, LOW and HIGH. To switch the fan on while exercising press the ON / OFF key on the keypad, Figure 12, and the fan will start. Whenever the monitor is switched to PAUSE the fan will switch off. SLEEP MODE If the 15V adapter (N) is connected to the unit then the console will not switch over to sleep mode when the POWER option under personalization mode is switched ON. If the 15V adapter (N) is not connected, the console will switch over to sleep mode even when the POWER option is switched ON. This mode is activated if an RPM signal is not received within 45 seconds when in stand-by mode. Windows are not displayed while in this mode. You have to step on the footplate to produce a signal and reopen the display window. Page 16
18 PERSONALIZING THE ELECTRONIC MONITOR Follow the steps below to access the monitor s personalization mode: Press and hold the RESET key and the 0 key at the same time until FACTORY SETTINGS appears on the alphanumeric screen (B), Figure 10. In general use these rules when personalizing the monitor: The word that is flashing can be revised. Pressing the ENTER key moves the flashing to a different word. Pressing the LEVEL key displays the choices. NOTE: If you wish to exit the personalization mode, press the STOP key and the manual program will be displayed on the LED array (A). 1. CHANGING UNITS (Mile or km) Once the words FACTORY SETTINGS appear on the alphanumeric screen (B), Figure 10, press the ENTER key and the word UNITS will flash. Press the ENTER key and the word ENGLISH or METRIC starts flashing. Select the unit of distance by using the LEVEL keys, (ENGLISH / Miles - METRIC / Km.). Press the ENTER key and the word UNITS will start flashing again. Press the LEVEL key to edit the WHEELSIZE Distance per Revolution. If you wish to exit the personalization mode, press the STOP key and the manual program will be displayed on the LED array (A). 2. CHANGING WHEELSIZE (DISTANCE PER REVOLUTION) WHEELSIZE will be flashing. Press the ENTER key and a figure between 0 and 80 will start flashing. Select the value 80 using the LEVEL keys. Press the ENTER key and the word WHEELSIZE will start flashing again. Press the LEVEL key to edit the LANGUAGE. If you wish to exit the personalization mode press the STOP key. Page 17
19 3. CHANGING LANGUAGE LANGUAGE" will be flashing. Press the ENTER key and the current language will start flashing. Select your language using the LEVEL keys and then press ENTER. The word LANGUAGE will start flashing again. Press the LEVEL key to edit the POWER setting. If you wish to exit the personalization mode press the STOP key. 4. SELF OR ELECTRICALLY POWERED The ON option is used to keep the monitor on at all times. Power ON mode only works while the 15V Adapter (N) is connected. If the monitor is in POWER ON mode and the STOP key is pressed then the monitor changes to a dark screen within three (3) seconds or the unit exits the test. The ON personalized power option may be changed to OFF. With the OFF option, the machine is self powered, which means that the monitor will come on as soon as you start exercising. With the OFF option selected the monitor will switch itself off 45 seconds after you have finished exercising. POWER will be flashing. Press the ENTER key and the word ON or OFF will start flashing. Select the option that is flashing by using the LEVEL keys. When you have selected an option, press the ENTER key to confirm and the word "POWER" will start flashing again. Once you have selected this option, press the ENTER key and the word POWER will start flashing. Use the LEVEL key to edit the SWR time. If you wish to exit the personalization mode press the STOP key. Page 18
20 5. STEADY WATT RATE TIME SWR time" will be flashing. Press the ENTER key and a value between 20 and 60 seconds will start flashing. Select the flashing value using the LEVEL keys and then press ENTER to confirm. The word SWR time will start flashing again. Press the LEVEL key to edit the SPR time". If you wish to exit the personalization mode press the STOP key. 6. STEADY PULSE RATE TIME The value (in seconds) entered into the SPR TIME tells the software how often to check the users heart beats per minute (BPM) during the P12 Heart Rate Program. The software will increase or decrease the resistance to control the heart BPM. SPR time" will be flashing. Press the ENTER key and a value between 20 and 60 seconds will start flashing. Select the flashing value using the LEVEL keys and then press ENTER to confirm. The word SPR time will start flashing again. Press the LEVEL key to edit the Max Manual" Exercise Time. If you wish to exit the personalization mode press the STOP key. 7. MAX. EXERCISE TIME MANUAL T" will be flashing. Press the ENTER key and a figure 0 or between 10 and 60 minutes will start flashing. If 0 is selected the exercise time is unlimited. Select the flashing value using the LEVEL keys and then press ENTER to confirm. The word MANUAL T will start flashing again. Use the LEVEL key to edit the Welcome Message. If you wish to exit the personalization mode press the STOP key. Page 19
21 8. CHANGING THE WELCOME MESSAGE For software version 2.0 the welcome message cannot be changed. Use the LEVEL key to edit the Sounds setting. If you wish to exit the personalization mode press the STOP key. For software version 2.1 or higher: TEXT will be flashing. Press the ENTER key and the word ON or OFF will start flashing. Select the option that is flashing by using the LEVEL keys. Choosing the ON option allows you to change the monitor s welcome message. Once the ON option has been selected, press the ENTER key and a flashing cursor will appear on the alphanumeric screen (B). Use the LEVEL keys to enter a welcome message letter by letter. Once you have finished entering the message, press the ENTER key for a few seconds and the word TEXT will start flashing. Use the LEVEL key to edit the Sounds setting. If you wish to exit the personalization mode press the STOP key. 9. CHANGING THE SOUND It is suggested to leave SOUNDS in the ON position. The beep sounds can notify the user as some things change. SOUNDS" will be flashing. Press the ENTER key and the word ON or OFF will start flashing. Select the ON flashing value using the LEVEL keys and then press ENTER to confirm. The word SOUNDS will start flashing again. Press the STOP key to exit the personalization mode and the manual program will be displayed on the LED array (A). Page 20
22 PERSONALIZED SETTINGS PANEL SETTING Unit Wheelsize Language Power SWR time SPR time Manual T CONSOLE OPERATION DESCRIPTION Change speed unit from km/h to mph. Select 80 on this model. Define the language in which messages are displayed on the monitor. Options: Spanish, Portuguese, English, French, German, Dutch, Italian. Defines the method of operating the machine, between self-powered or connected to the wall outlet. If the ON mode is selected, the machine has to be plugged into the wall outlet. To switch off the monitor in ON mode, hold the STOP key down for 4 seconds. Options: OFF (Battery operated) ON (AC wall outlet operated) IMPORTANT: With the ON option the machine has to be plugged into the wall outlet, otherwise the batteries will run down and may be rendered useless. Establishes the frequency at which the program calculates the WATTS created by the user and compares it to the target WATT value. The exertion level will be increased or decreased automatically. Options: Value in seconds (minimum 20, maximum 60) Establishes the calculation rate for the constant heart rate program. Options: Value in seconds (minimum 20, maximum 60) Establishes a maximum time limit for the Manual Run exercise. Options: 0 (No maximum time limit established) Exercise time limit values in minutes (maximum 60) Text Text cannot be changed on Software version 2.0. Software version 2.1 Options: OFF (The welcome message is displayed by default) ON (Allows the welcome message to be edited) to personalize the welcome message. Sounds Enables or disables sounds (beeps) emitted by the monitor. Options: ON (Enabled) OFF (Disabled) Page 21
23 PROGRAM MODE The monitor has: 1 MANUAL profile program; 8 pre-programmed PROGRAM profiles; a user programmable profile (USER) as well as a male TEST, female TEST, steady pulse rate (HRC) and distance programs. The pre-programmed program graphs are shown on page 33. P0 MANUAL MODE Once the monitor is on it will display the profile and the letter M for manual on the LED array (A) Figure 11, and the WELCOME TO HI POWER message on the bottom alphanumeric screen (B) Figure 11. You can start the program in manual mode by pressing the QUICK / START key. The flashing top LED array (A), Figure 11, will indicate the exertion level being produced during exercise. By pressing the level keys you can increase or decrease the exertion levels between twenty different settings. Every 10 seconds the alphanumeric screen (B), Figure 11, will switch between displayed readings for values relating to: MILES PER HOUR (MLH); TIME; CALORIES; PULSE RATE and in the second sequence: RPM; DISTANCE; WATT and PULSE RATE. The monitor will calculate the average exercise values after the exercise program is finished or interrupted by pressing the STOP key. These values will be displayed twice every five seconds on the bottom alphanumeric screen (B), Figure 11. The average values for EXERCISE TIME HHMMSS; DISTANCE COVERED ML; AVERAGE SPEED MLH; CALORIES BURNT KCAL will be displayed. If the keys are not touched and exercise does not occur while the average values are being displayed, then the M will appear on the top LED array. Page 22
24 P1 - P8 GRAPHIC PROGRAMS The pre-programmed program graphs are shown on page 33. With the monitor switched on, the top LED array (A), Figure 11, will display the profile and the letter M for manual. The LEVEL keys are used to display and select one of these eight graphic profiles. Once a specific profile has been selected press the ENTER key. The top LED array (A) will ask for an age value (between 10 and 99), select your age by using the number keys (F), Figure 12, and press ENTER. It will now ask for your weight (between 70 and 440 lbs or between 30 and 199 kg), select your weight by using the number keys (F), Figure 12, press ENTER. It will now ask for an exercise time limit (between 10 and 60 minutes), select the time by using the number keys (F), Figure 12, press ENTER and this will begin your exercise session. There are four different difficulty levels (L1 L4) within each pre-programmed profile, to select any of these just press the LEVEL keys during the exercise. The monitor will calculate the average exercise values after the exercise program is finished or interrupted by pressing the STOP key. These values will be displayed twice every five seconds on the bottom alphanumeric screen (B), Figure 11. The average values for EXERCISE TIME HHMMSS; DISTANCE COVERED ML; AVERAGE SPEED MLH; CALORIES BURNT KCAL will be displayed. If the keys are not touched and exercise does not occur while the average values are being displayed, then the M will appear on the top LED array. Page 23
25 P9 USER PROGRAM (The pre-programmed program graphs are shown on page 33) With the monitor switched on, the top LED array (A), Figure 11, will display the profile and the letter M for manual. Use the LEVEL keys to display the various pre-programmed profiles. Once program 9 ( USER ) has been selected, press the ENTER key. The top LED array (A), Figure 11, will ask for an age value (between 10 and 99). Select your age by using the number keys (F), Figure 12, (If the value entered exceeds these limits it will display the closest acceptable value). Press ENTER. It will now ask for your weight (between 70 and 440 pounds or between 30 and 199 kg), select your weight by using the number keys (F), Figure 12, press ENTER. It will now ask for an exercise time limit (between 10 and 60 minutes), select the time by using the number keys (F), and press ENTER. Now press the RESET key and you can begin to design a personalized exercise profile on the LED array (A). The profile to be designed is subdivided into 21 steps. The first three steps are for warm-up purposes and only reach a limited value of four in order to prevent possible injuries. The rest of the 21 steps reach maximum. There are 21 vertical columns of red lights on the top LED display, Figure 11 display area (A). Each vertical column represents one step. To select the difficulty level of each step: Press the LEVEL keys to increase/decrease the difficulty level (number of vertical lights) in one step (column). Press the ENTER key. Do again until you have completed the graph for your own personal program. To undo an entered step, press the RESET key and do the above steps again. Next press the ENTER key and begin exercising with your custom designed program. As each step is completed a beep will sound and the light on the lowest red LED dot will move to the right. Time will display as test minutes remaining. The monitor will calculate the average exercise values after the exercise program is finished or interrupted by pressing the STOP key. These values will be displayed twice every five seconds on the bottom alphanumeric screen (B), Figure 11. The average values for EXERCISE TIME; DISTANCE COVERED ML; AVERAGE SPEED MLH; CALORIES BURNT KCAL will be displayed. If the keys are not touched and exercise does not occur while the average values are being displayed, then the M will appear on the top LED array. Page 24
26 P10 MALE P11 FEMALE TEST PROGRAMS The pre-programmed program graphs are shown on page 33. For safety reasons it is better to exercise at below 85% of the maximum heart rate. To prevent injuries, do a brief warm-up session before doing this test. Both hands must be on the pulse sensors, located on the handlebars, during this test. Before beginning the test, calculate your maximum heart rate. The maximum number of heartbeats that a person must not exceed is referred to as the maximum heart rate and this value drops with age. A simple formula to calculate this is to subtract your age, in years, from the number 220. To ensure that you are exercising correctly, try to keep between 65% and 85% of your maximum heart rate value. The aim of this test is to assess the user s level of fitness by maintaining a pedaling speed of between 70 to 80 revolutions per minute (rpm) for 5 minutes. The difference between the Male and Female programs is in the Watts. The value for the Male test is set at 150 W whereas the Female test is set at 100 W. With the monitor switched on, the top LED array ( A ), Figure 11, will display the profile and the letter M for manual. The LEVEL keys are used to display the various pre-programmed profiles. Once the Male TEST or Female TEST has been selected, press the ENTER key. Next, the bottom alphanumeric screen ( B ), (Figure 11), will ask for an age value (between 10 and 99). Select your age by using the number keys (F), Figure 12, press ENTER. Place your hands on the pulse sensors (handgrip) located on the handlebar or wear a telemetric chest band such as the POLAR T41 transmitter. Begin the TEST at a pedaling rate of between 70 to 80 RPM, pedaling for 5 minutes. As long as you stay within the 70 to 80 RPM limit the monitor will display OK however if you go above or drop below this RPM then the monitor will display the RPM or RPM prompt. At the end of the 5 minute test you will be awarded a score between 1 (very poor) and 5 (excellent). A 0 score may also appear, which means that the test was not done correctly (the 75 rpm pedaling rate was not maintained or the heart rate measurement sensor was not used correctly). Page 25
27 The monitor will calculate the average exercise values after the exercise program is finished or interrupted by pressing the STOP key. These values will be displayed twice every five seconds on the bottom alphanumeric screen (B), Figure 11. The average values for EXERCISE TIME HHMMSS; DISTANCE COVERED ML; AVERAGE SPEED MLH; CALORIES BURNT KCAL will be displayed. If the keys are not touched and exercise does not occur while the average values are being displayed, then the M will appear on the top LED array. Page 26
28 P-12 CONSTANT HEART RATE PROGRAM The pre-programmed program graphs are shown on page 33. For safety reasons the user must exercise at below 85% of the maximum heart rate. To prevent injuries, do a brief warm-up session before doing this test. The pulse rate must be measured by a telemetric chest band such as the Polar T41 transmitter. If the heart rate is not measured, then the heart symbol and a question mark? appear on the screen. If the unit continues not to receive any heart rate information, then the program will be cancelled and another program will have to be selected. Before beginning the test, calculate your maximum heart rate. The maximum number of heartbeats that a person must not exceed is referred to as the maximum heart rate and this value drops with age. A simple formula to calculate this is to subtract your age, in years, from the number 220. To ensure that you are exercising correctly, try to keep between 65% and 85% of your maximum heart rate value. For example, the maximum heart rate that a 30 year old user must not exceed is: = 190 heart beats per minute (BPM). 190 x 0.65 = 123 heart beats per minute. 190 x 0.85 = 161 heart beats per minute. So the heart rate exercise range for a 30 year old is between 123 and 161 BPM. This program allows the user to enter a value for the heart rate (between 65% and 85% of the maximum heart rate) and the machine will automatically adjust exertion levels to ensure that the user maintains the selected heart rate value. The value (in seconds) entered into the (Personalizing the Electronic Monitor) SPR TIME tells the software how often to calculate the users heart beats per minute (BPM) during this test. The software will increase or decrease the resistance to control the heart BPM. With the monitor switched on, the top LED array ( A ), Figure 11, will display the profile and the letter M for manual. Use the LEVEL keys to select the (P12 HEART) program. Press the ENTER key. Page 27
29 The LED window will display INTRODUCE PULSE RATE SETTING <40-220>. Press the number keys to enter a value between 65% and 85% of the maximum heart rate (see formula above). The LED window will show PULSE RATE = xxx and the entered value will flash. If the entered number is not within these limits it will display a larger or smaller number. Press ENTER to confirm. The LED window will show INTRODUCE EXERCISE TIME. The dot matrix display will prompt? 10. Press the number keys to modify and enter a number (between 10 and 60). If the number is beyond these limits it will display the default time setting. Press ENTER to confirm. You can now start the program. After specifying the last setting, all of the values are stored together. The exertion level is 1 and moves to the next line every minute. If the speed (RPM) is too slow, the dot matrix display will show "RPM " and switch to PAUSE mode after 15 seconds. Begin the exercise at a pedaling rate of between 70 to 80 RPM. Should you go above or drop below this RPM then the top LED array ( A ), Figure 11, will display the "RPM " or "RPM " prompt. This program uses a preset exertion level during the first three minutes in order to prevent any type of injury. After the third minute, the computer will automatically adjust the exertion setting to keep the pulse rate at the previously programmed value. The monitor will calculate the average exercise values after the exercise program is finished or interrupted by pressing the STOP key. These values will be displayed twice every five seconds on the bottom alphanumeric screen (B), Figure 11. The average values for EXERCISE TIME HHMMSS; DISTANCE COVERED ML; AVERAGE SPEED MLH; CALORIES BURNT KCAL will be displayed. If the keys are not touched and exercise does not occur while the average values are being displayed, then the M will appear on the top LED array. AUTOMATIC EXERTION SETTING At the beginning of the exercise the machine sets the exertion level to minimum, i.e. 50W, until the first pulse reading is taken. Page 28
30 Once the pulse rate is established the program calculates the user s heart rate every X seconds (this period is set between 20 to 60 seconds within the SPR program). The exertion setting based on pulse rate is explained in the following steps. 1. TARGET HEART RATE greater than ACTUAL HEART RATE: When the difference between the TARGET HEART RATE and the ACTUAL HEART RATE is equal to or greater than 15 rpm, the AUTOMATIC EXERTION CONTROL will start increasing in steps of 20 Watts. When the difference is less than 15 rpm the setting will change in steps of 10 Watts until both heart rates match. 2. ACTUAL HEART RATE greater than TARGET HEART RATE: When the difference between the ACTUAL HEART RATE and the TARGET HEART RATE is equal to or greater than 15 rpm, the AUTOMATIC EXERTION CONTROL will start decreasing in steps of 20 Watts. When the difference is less than 15 rpm the setting will change in steps of 10 Watts until both heart rates match. When the difference between the ACTUAL HEART RATE and the TARGET HEART RATE is equal to or greater than 30 rpm, the bottom alphanumeric screen (B) will display the message DECREASE EXERTION OF EXERCISE. YOUR PULSE RATE IS TOO HIGH and the machine s automatic control will drop the exertion level to minimum (50 W). If no heart rate is detected during the exercise, the? (Heart symbol and a question mark) will appear flashing. If this situation continues for more than 60 seconds the machine will go back to manual mode. Page 29
31 P-13 STEADY WATT RATE (The pre-programmed program graphs are shown on page 33) This program allows the user to select the power level (watts) at which to exercise. The user must output power to oppose the resistance of the exercise unit and to develop speed. The unit automatically regulates the exertion level to ensure that the user always develops the same power output, independently of the pedaling rate. This program uses a preset exertion level during the first forty seconds in order to prevent any type of injury. After the fortieth second the unit controls the exertion settings based upon the users pedaling rate. During the exercise, the programmed WATT rate can be varied at any time by using the LEVEL and LEVEL keys. This does not affect the time settings. The programmed watt rate will be shown flashing on the display. With the monitor switched on, the top LED array ( A ), Figure 11, will display the profile and the letter M for manual. Use the LEVEL keys to display the various pre-programmed profiles. Once the WATT program has been selected, press the ENTER key. The message INTRODUCE WATT SETTINGS <25 400> will appear on the bottom alphanumeric screen B. Use the number keys Figure 12, (F) to enter the WATTS value to exercise at. Press ENTER. To enter the exercise time the LED window will state INTRODUCE EXERCISE TIME. The dot matrix display will prompt? 10. Press the number keys to enter a two digit number between 10 and 60. If the number is beyond these limits it will display the default time setting. Enter a value and press ENTER. Press ENTER to store all the values. The exertion level is 1 and moves to the next line every minute. If the speed (RPM) is too slow, the dot matrix display shows RPM and switches to PAUSE mode after 15 seconds. The program will calculate the WATT value output of the user based upon the time (between 20 and 60 seconds) entered into the personalization mode SWR time program. The monitor will calculate the average exercise values after the exercise program is finished or interrupted by pressing the STOP key. These values will be displayed twice every five seconds on the bottom alphanumeric screen (B), Figure 11. The average values for EXERCISE TIME; DISTANCE COVERED ML; AVERAGE SPEED MLH; CALORIES BURNT KCAL will be displayed. If the keys are not touched and exercise does not occur while the average values are being displayed, then the M will appear on the top LED array. Page 30
32 SYMBOLS AND THEIR MEANINGS A series of symbols or words may appear on the screen, meaning the following: Heart symbol and a question mark (?): The console did not receive the heart rate. Hold onto the handlebars or wear a telemetric chest band such as POLAR T41 Transmitter. The chest band must be worn during test P12, Constant Heart Rate Program. 0 This symbol appears in the male and female tests, it means that you have not done the test correctly. You have failed to maintain a speed of rpm or your pulse was not recorded. Hold onto the pulse sensors located on the handlebars or wear a telemetric chest band such as POLAR T41 Transmitter. Spanner (wrench) symbol: Mechanical fault. Switch the machine off for 2 minutes and then switch it back on again. The machine has an automatic fault correction system, but if the problem persists, then contacts the technical service center. Page 31
33 TABLE OF DISPLAYED PHRASES 1. WELCOME TO HI POWER CONSOLE OPERATION 2. PRESS THE ARROWS TO SELECT PROFILE 3. PRESS QUICK/START TO BEGIN 4. PRESS ENTER TO BEGIN PROFILE 5. ERROR 6. CONSULT TECHNICAL SERVICE 7. INTRODUCE YOUR AGE <10-99> 8. INTRODUCE YOUR WEIGHT <30-199> KG INTRODUCE YOUR WEIGHT <70-440> LB 9. INTRODUCE EXERCISE TIME <10-60> MINUTES 10. INTRODUCE WATT SETTING <25-400> WATTS= 11. AGE= 12. INTRODUCE PULSE RATE SETTING <40-220> 13. PULSE RATE= 14. PRESS PAUSE TO CONTINUE THE EXERCISE. PRESS STOP TO FINISH 15. EXERCISE TIME= 16. DISTANCE COVERED= 17. AVERAGE SPEED= 18. CALORIES BURNT= 19. PRESS ENTER TO ACCEPT THE STORED PROFILE. PRESS RESET TO MODIFY THE PROFILE. USE THE ARROWS TO SELECT THE EXERTION LEVELS FOR THE ACTIVE 20. COLUMN. PRESS ENTER TO MOVE TO THE NEXT COLUMN. PRESS RESET TO RETURN TO MANUAL MODE 21. DECREASE EXERTION OF EXERCISE. YOUR PULSE RATE IS TOO HIGH 22. THE RESULT OF THE TEST IS= BH RESERVES THE RIGHT TO MODIFY THE SPECIFICATIONS OF ITS PRODUCTS WITHOUT PRIOR NOTICE Page 32


34 PROGRAM PROFILES P-0 P-1 P-2 P-3 P-4 P-5 P-6 P-7 P-8 P-9 P-10 P-11 P-12 P-13 Page 33
35 WARRANTY USA Warranty Warranties may vary in other countries. See your local BH Fitness Dealer. BH FITNESS extends the following exclusive, limited warranty, which shall apply only to the use of the device in the home, or commercial facilities. Any other use of the device shall void this warranty. FRAME Lifetime (Home Warranty), 7 Years (Light/Full Commercial Warranty) BH Fitness warrants the Frame against defects in workmanship and materials for Lifetime from the date of original purchase, so long as it remains in the possession of the original owner for home use. BH Fitness warrants the Frame against defects in workmanship and materials for seven years from the date of original purchase, so long as it remains in the possession of the original owner for light/full commercial use. PARTS 10 Years (Home Warranty), 3 Years (Light/Full Commercial Warranty) BH Fitness warrants all original parts against defects in workmanship and materials for a period of ten years from the date of original purchase, so long as the device remains in the possession of the original owner for home use. BH Fitness warrants all original parts against defects in workmanship and materials for a period of three years from the date of original purchase, so long as the device remains in the possession of the original owner for light/full commercial use. LABOR 2 Years (Home Warranty), 1 Year (Light/Full Commercial Warranty) BH Fitness shall cover the labor cost for the repair of the device for a period of two years from the date of original purchase, so long as the device remains in the possession of the original owner for home use. BH Fitness shall cover the labor cost for the repair of the device for a period of one year from the date of original purchase, so long as the device remains in the possession of the original owner for light/full commercial use. EXCLUSIVE REMEDY The exclusive remedy for any of the above warranties shall be repair or replacement of defective parts, or the supply of labor to cure any defect, provided that labor shall be limited as detailed above. All labor shall be supplied by the local retailer and the product must be located within the retailer s service area. Products located outside the retailer s service area will not be covered by the labor warranty. EXCLUSIONS AND LIMITATIONS This warranty applies only to the original owner and is not transferable. This warranty is expressly limited to the repair or replacement of a defective Frame or defective part and is the sole remedy of the warranty. The warranty does not cover normal wear and tear. BH FITNESS expressly disclaims all other warranties, express or implied, including but not limited to all warranties of fitness for a particular purpose or of merchantability. This warranty gives you specific legal rights and your rights may vary from state to state. WARRANTY REGISTRATION Your warranty card must be completed and sent to BH FITNESS before a warranty claim can be processed. Page 34
BH FITNESS SK-9000 BIKE
 BH FITNESS SK-9000 BIKE Owner s Manual BH FITNESS 20155 Ellipse, Foothill Ranch, CA 92610 Phone: 949-206-0330, 866-325-2339 (USA & Canada) Fax: 949-206-0013 Email: fitness@bhnorthamerica.com Web: www.bhnorthamerica.com
IC031 Magnetic Belt Drive Performance Indoor Cycle Bike
 IC031 Magnetic Belt Drive Performance Indoor Cycle Bike USER MANUAL IMPORTANT: Read all instructions carefully before using this product. Retain owner s manual for future reference. For customer service,
HealthCare International, Inc.
 Owner s Manual V.2 HealthCare International, Inc. 1 Table of Contents Safety Precautions... 3 Warranty Information... 4 Assembly Instructions... 5 Quick Tips... 8 AC Adaptor:... 8 Levelers:... 8 Seat Adjustments:...
TORNADO AIR BIKE SF-B2706 USER MANUAL
 TORNADO AIR BIKE SF-B2706 USER MANUAL IMPORTANT! Read all instructions carefully before using this product. Retain owner s manual for future reference. For customer service, please contact: support@sunnyhealthfitness.com
HealthCare International, Inc. PO Box 1509, Langley, WA P: (360) or (800)
 or (800)") Owner s Manual V2.2 HealthCare International, Inc. PO Box 1509, Langley, WA 98260 www.hcifitness.com sales@hcifitness.com P: (360) 321-7090 or (800) 398-9121 1 Table of Contents Safety Precautions... 3
Owner s Manual V2.2 HealthCare International, Inc. PO Box 1509, Langley, WA 98260 www.hcifitness.com sales@hcifitness.com P: (360) 321-7090 or (800) 398-9121 1 Table of Contents Safety Precautions... 3
BH Fitness T4 / T6 SPORT Treadmill Owner s Manual
 BH Fitness T4 / T6 SPORT Treadmill Owner s Manual BEFORE YOU BEGIN It is very important to become familiar with the frequently used components of your treadmill. Computer Console Circuit Breaker ON/OFF
USER MANUAL EN. IN 5559 Elliptical Trainer insportline Cruzz
 USER MANUAL EN IN 5559 Elliptical Trainer insportline Cruzz SAFETY INSTRUCTIONS To ensure the best safety of the exerciser, regularly check it on damages and worn parts. If you pass on this exerciser to
SP850 OWNER S MANUAL
 SP850 OWNER S MANUAL Product may vary slightly from the item pictured due to model upgrades Read all instructions carefully before using this product. Retain this owner s manual for future reference. NOTE:
BH Fitness T8 SPORT Treadmill Owner s Manual
 BH Fitness T8 SPORT Treadmill Owner s Manual BEFORE YOU BEGIN It is very important to become familiar with the frequently used components of your treadmill. User Safety: SECTION 1 IMPORTANT SAFETY INSTRUCTIONS
MARCY Foldable Bike NS-652. Model NS-652. Retain This Manual for Reference OWNER'S MANUAL IMPEX INC.
 NOTE: Please read all instructions carefully before using this product Table of Contents Safety Notice Hardware Pack Assembly Instruction Parts List MARCY Foldable Bike NS-652 Warranty Ordering Parts Model
Aerobic Lateral Trainer
 Aerobic Lateral Trainer Assembly Manual HLT2500 IMPORTANT SAFETY INFORMATION READ ALL INSTRUCTIONS BEFORE USING THIS OWNER S MANUAL CONTAINS ASSEMBLY, OPERATION, MAINTENANCE AND SAFETY INFORMATION. IN
CIRCUIT ZONE ELLIPTICAL
 CIRCUIT ZONE ELLIPTICAL SF-E386 USER MANUAL IMPORTANT! Please retain owner s manual for maintenance and adjustment instructions. Your satisfaction is very important to us, PLEASE DO NOT RETURN UNTIL YOU
MAGNETIC ELLIPTICAL TRAINER SF-E3608 USER MANUAL
 MAGNETIC ELLIPTICAL TRAINER SF-E3608 USER MANUAL WARNING! Your elliptical trainer is not designed for reverse pedaling. Failure to comply with this warning may result in permanent damage to your new equipment.
SU UPRIGHT OWNER S MANUAL PLEASE CAREFULLY READ THIS ENTIRE MANUAL BEFORE OPERATING YOUR UPRIGHT!
 SU135-40 UPRIGHT OWNER S MANUAL PLEASE CAREFULLY READ THIS ENTIRE MANUAL BEFORE OPERATING YOUR UPRIGHT! Safety Hints WARNING - Read all instructions before using this appliance. Do not operate upright
SUNNY MAGNETIC EXERCISE BIKE
 SUNNY MAGNETIC EXERCISE BIKE SF-B910 IMPORTANT! Please read the manual carefully before assembling and using the bike. For Customer Service, please contact: support@sunnyhealthfitness.com IMPORTANT SAFETY
HIIT AiRBIKE AT-1000B
 HIIT AiRBIKE AT-1000B V2.2 AirTEK Fitness www.airtekfitness.com PO Box 1509 Langley WA, 98260 (360) 321-7090 or (800) 398-9121 TABLE OF CONTENTS SAFETY FIRST... 3 WARRANTY INFORMATION... 4 ASSEMBLY NOTE...
MARCY Magnetic-Resistance Upright Bike
 NOTE: Please read all instructions carefully before using this product Table of Contents Safety Notice Hardware Pack Assembly Instruction Parts List Warranty MARCY Magnetic-Resistance Upright Bike ME-708
TABLE OF CONTENTS. 2.0 USING MANAGER PREFERENCE 2.1 Using manager preference mode 2.2 Selecting US or metric 2.3 Using CSafe
 E L L I P T I C A L T O T A L B O D O W N E R S M A N U A L TABLE OF CONTENTS 1.0 IMPORTANT SAFET INSTRUCTIONS Read and save these instructions Setting up the Elliptical total body 1.1 Installation requirements
Illustrations 2 BIKE R 70
 English BIKE R 70 Illustrations 2 BIKE R 70 5 16 15 11 12 3 2 1 14 6 4 7 8 9 10 13 A 13 BIKE R 70 3 B 4 BIKE R 70 17 (4x) 18 (4x) 19 (4x) 20 (4x) M8*55 D8*19 M8 M8*16 21 (4x) 22 (1x) 23 (1x) 24 (5x) D8*19
MAGNETIC ELLIPTICAL TRAINER SF-E3608 USER MANUAL
 MAGNETIC ELLIPTICAL TRAINER SF-E3608 USER MANUAL WARNING! Your elliptical trainer is not designed for reverse pedaling. Failure to comply with this warning may result in permanent damage to your new equipment.
CONTENTS. page 2. page 2. page 3. page 4. page 5-7. page page 12 PRECAUTIONS OPERATING INSTRUCTION EXPLODED DRAWING PARTS LIST
 CONTENTS PRECAUTIONS OPERATING INSTRUCTION EXPLODED DRAWING PARTS LIST ASSEMBLY INSTRUCTIONS MONITOR INSTRUCTION MANUAL WARRANTY INFORMATION page 2 page 2 page 3 page 4 page 5-7 page 8-11 page 12 1 PRECAUTIONS
SP450 OWNER S MANUAL
 OWNER S MANUAL Product may vary slightly from the item pictured due to model upgrades Read all instructions carefully before using this product. Retain this owner s manual for future reference. NOTE: This
- 1 - INSTRUCTION MANUAL
 - 1 - INSTRUCTION MANUAL SAFETY PRECAUTIONS Before You Begin This exercise equipment was designed and built for optimum safety. However, certain precautions apply whenever you operate a piece of exercise
PINK FOLDING RECUMBENT BIKE
 PINK FOLDING RECUMBENT BIKE SF-RB1117 USER MANUAL Read this manual carefully before using this product. Retain owner s manual for future reference. For Customer Service, please contact: support@sunnyhealthfitness.com
SPG-200 SPIN BIKE OWNER S MANUAL
 SPIN BIKE OWNER S MANUAL Product may vary slightly from the item pictured due to model upgrades Read all instructions carefully before using this product. Retain this owner s manual for future reference.
LC 850 RB. User Product Manual LifeCore LC-850 Recumbent. Customer Service Toll Fee (888)
") LC 850 RB User Product Manual LifeCore LC-850 Recumbent Customer Service Toll Fee (888) 815 5559 Service@lifecorefitness.com www.lifecorefitness.com LifeCore Fitness Inc. 2575 Pioneer Avenue, Suite 101,
LC 850 RB User Product Manual LifeCore LC-850 Recumbent Customer Service Toll Fee (888) 815 5559 Service@lifecorefitness.com www.lifecorefitness.com LifeCore Fitness Inc. 2575 Pioneer Avenue, Suite 101,
SP-870 OWNER S MANUAL
 SP-870 OWNER S MANUAL Product may vary slightly from the item pictured due to model upgrades Read all instructions carefully before using this product. Retain this owner s manual for future reference.
IMPORTANT: Please read all instructions carefully before using this
 IMPORTANT: Please read all instructions carefully before using this product. Retain this manual for future reference. CONTENTS IMPORTANT SAFETY NOTICE page 2 EXPLOADED DIAGRAM page 3 PARTS LIST page 4
Upper sensor wire. Lower Sensor wire. U shape slider
 1. It is important to read this entire manual before assembling and using the equipment. Safe and effective use can only be achieved if the equipment is assembled, maintained and used properly. It is your
Monitor Instructions for Models: CHB-R6 CHB-UV6
 Monitor Instructions for Models: CHB-R6 CHB-UV6 Power supply: output DC 9v/ 1000mA transformer adaptor TABLE OF CONTENTS Function Buttons ----------------------------------------------------------------------------
SP-300 OWNER S MANUAL
 OWNER S MANUAL Product may vary slightly from the item pictured due to model upgrades Read all instructions carefully before using this product. Retain this owner s manual for future reference. NOTE: This
Important Safety Information
 Important Safety Information We thank you for choosing our product. To ensure your safety and health, please use this equipment correctly. Please read the information below carefully before using this
english 11 deutsch 28 nederlands 47 français 65 español 83 italiano 101 svensk 119 suomi 136 BE5
 english 11 deutsch 28 nederlands 47 français 65 español 83 italiano 101 svensk 119 suomi 136 BE5 Illustrations EN 2 BE5 13 10 14 8 9 4 6 7 5 3 12 11 2 1 A 11 BE5 3 B 4 BE5 15 (4x) 16 (4x) 17 (4x) 18 (6x)
SP-720 OWNER S MANUAL
 OWNER S MANUAL Product may vary slightly from the item pictured due to model upgrades Read all instructions carefully before using this product. Retain this owner s manual for future reference. NOTE: This
PaceMaster Gold XSC OWNER S MANUAL
 PaceMaster Gold XSC OWNER S MANUAL Aerobics Inc., 34 Fairfield Place West Caldwell, NJ 07006, (973) 276-9700 www.pacemaster.com Part # GOLD XSC Rev. 11/13/2007 1 TABLE OF CONTENTS INTRODUCTION 3 IMPORTANT
AIR WALKER TRAINER USER MANUAL SF-E902
 AIR WALKER TRAINER USER MANUAL SF-E902 IMPORTANT: Read all of the instructions carefully before using this product. Retain the owner s manual for future reference. For customer service, please contact:
TWIST STEPPER NO. 045
 TWIST STEPPER NO. 045 IMPORTANT: Read all instructions carefully before using this product. Retain owner s manual for future reference. For customer service, please contact: support@sunnyhealthfitness.com
MAGNETIC EXERCISE BIKE CF 1560
 MAGNETIC EXERCISE BIKE CF 560 Important Safety Information Please keep this manual in a safe place for reference.. It is important to read this entire manual before assembling and using the equipment.
MARCY Magnetic-Resistance Recumbent Bike
 NOTE: Please read all instructions carefully before using this product Table of Contents Safety Notice Hardware Pack Assembly Instruction Parts List Warranty MARCY Magnetic-Resistance Recumbent Bike ME-709
Illustrations 2 CROSS F 50
 English CROSS F 50 Illustrations EN 2 CROSS F 50 4 5 3 8 3 4 5 9 2 7 1 1 6 6 6 A CROSS F 50 3 B 4 CROSS F 50 10 (4x) 11 (14x) 12 (10x) 13 (6x) 14 (6x) M8*55 D8*19 M8 M8*55 M8 16 (12x) 17 (6x) 18 (12x)
R25 Recumbent Bike ASSEMBLY & PARTS MANUAL
 V2 R25 Recumbent Bike ASSEMBLY & PARTS MANUAL MA902 Recreation Supply Inc. Model No. R25 V2 P.O. BOX 181 BODYCRAFT is a division of Recreation Supply Sunbury, OH 43074 www.bodycraft.com 800-990-5556 info@bodycraft.com
TR1120 OWNER S MANUAL
 TR1120 OWNER S MANUAL IMPORTANT: For maximum effectiveness and safety, please read this owner s manual before using your BodyCraft treadmill. Retain this owner s manual for future reference. 1. It is the
OWNER S MANUAL. BODYCRAFT 7699 Green Meadows Dr., Lewis Center, Ohio Tel:
 OWNER S MANUAL BODYCRAFT 7699 Green Meadows Dr., Lewis Center, Ohio 43035 Tel: 800.990.5556 1 www.bodycraft.com SAFETY INSTRUCTION WARNING: To reduce the risk of serious injury, read the following safety
Evolve 3 & 5 Service Manual
 Evolve 3 & 5 Service Manual 1 Product Browse 2 Contents CHAPTER 1: SERIAL NUMBER LOCATION... 5 CHAPTER 2: CONSOLE INSTRUCTIONS 2.1 Console Overview... 6 2.1.1 Evolve 3 Console Overview... 6 2.1.2 Evolve
841T. Adventure4 Adventure5 TREADMILL OWNER S MANUAL
 841T Adventure4 Adventure5 TREADMILL OWNER S MANUAL Read the treadmill guide before using this owner s manual. ASSEMBLY WARNING There are several areas during the assembly process that special attention
RXT-1000 OWNER S MANUAL. Healthcare International, Inc. PO Box 1509, Langley, WA p
 RXT-1000 OWNER S MANUAL Healthcare International, Inc. PO Box 1509, Langley, WA 98260 www.hcifitness.com p.360.321.7090-1 - SAFETY PRECAUTIONS This exercise equipment was designed and built for optimum
Table of Contents. Product Safety Part Drawing & Contents Hardware & Tools Assembly Adjustment
 Ver.1 Table of Contents Product Safety.. 01. Part Drawing & Contents..... 02. Hardware & Tools.. 03. Assembly... 04. Adjustment... 10. Trouble Shooting & Maintenance.. 11. Computer... 12. Warm Up... 19.
Owners manual. HTR 1.0 Exercise Bike. T +31 (0) E W ENG. Fitness Benelux
 E W ENG. Fitness Benelux") HTR 1.0 Exercise Bike Owners manual Fitness Benelux Uw partner in fitness T +31 (0)74-7600219 E service@fitnessbenelux.nl W www.fitnessbenelux.nl INDEX Safety instruction 3 Assembly instruction 4-9 Exploded
HTR 1.0 Exercise Bike Owners manual Fitness Benelux Uw partner in fitness T +31 (0)74-7600219 E service@fitnessbenelux.nl W www.fitnessbenelux.nl INDEX Safety instruction 3 Assembly instruction 4-9 Exploded
Adventure 3 Plus Service Manual
 Adventure 3 Plus Service Manual 1 TABLE OF CONTENTS CHAPTER 1: SERIAL NUMBER LOCATION...3 CHAPTER 2: PREVENTATIVE MAINTENANCE 2.1 Preventative Maintenance. 4 2.2 Tension and Centering the Running Belt....6
NS-1104U MAGNETIC-RESISTANCE UPRIGHT BIKE. Model NS-1104U. Retain This Manual for Reference OWNER'S MANUAL
 NOTE: Please read all instructions carefully before using this product Table of Contents Safety Notice Hardware Pack MAGNETIC-RESISTANCE UPRIGHT BIKE NS-1104U Assembly Instruction Parts List Warranty Ordering
T320X T460X T460XC OWNER S MANUAL TREADMILLS. Part no: R0: T460x illustrated
 T320X T460X T460XC TREADMILLS OWNER S MANUAL Part no: 691009 R0:10-2007 T460x illustrated BODYGUARD FITNESS, division of Procycle CANADA 9095, 25 th Avenue, Saint-Georges (Québec) Canada G6A 1A1 The name
DELUXE CLUB REVOLUTION CYCLE
 NOTE: Please read all instructions carefully before using this product Table of Contents Safety Notice Hardware Pack DELUXE CLUB REVOLUTION CYCLE NSP-122 Assembly Instruction Parts List Warranty Ordering
SPORTSART C521M BI-DIRECTIONAL BIKE
 2011.12 C521M BIKE SPORTSART C521M BI-DIRECTIONAL BIKE TABLE OF CONTENTS 1. INTRODUCTION... 2. IMPORTANT SAFETY PRECAUTIONS... 3. LIST OF PARTS... 1 2 6 4. ASSEMBLING THE PRODUCT STEP 0 Separate the Product
USER MANUAL EN IN 6447 Climber For Home Use insportline SM-3276
 USER MANUAL EN IN 6447 Climber For Home Use insportline SM-3276 Product May Vary Slightly From Picture MADE IN TAIWAN CONTENTS SAFETY INSTRUCTION... 3 ASSEMBLY PARTS... 4 HARDWARE IDENTIFICATION CHART...
Nord.cTracICA.Cr USER'S MANUAL A CAUTION QUESTIONS? .. Visit our website'at. new products, prizes, fitness tips, and much more!
 Nord.cTracICA.Cr Model No. NTCW90907.1 Serial No. Write the serial number in the space above for reference. _ USER'S MANUAL Serial Number Decal (under frame) QUESTIONS? As a manufacturer, we are committed
Sunny Magnetic Exercise SF-B910
 Sunny Magnetic Exercise SF-B910 Bike IMPORTANT: PLEASE READ THIS MANUAL CAREFULLY BEFORE USING THE BIKE For Customer Service, please contact: support@sunnyhealthfitness.com Important Safety Information
USER MANUAL - EN. IN 5729 Exercise Bike insportline Xbike
 USER MANUAL - EN IN 579 Exercise Bike insportline Xbike CONTENT IMPORTANT SAFETY PRECAUTIONS... 3 CHECK LIST (CONTACT PACKAGE)... 4 VIEW... 6 ASSEMBLY INSTRUCTION... 6 EXPLODED VIEW... 0 PARTS LIST...
TWISTING STAIR STEPPER WITH BANDS NO. 068 USER MANUAL
 TWISTING STAIR STEPPER WITH BANDS NO. 068 USER MANUAL IMPORTANT: Read all instructions carefully before using this product. Retain owner s manual for future reference. For customer service, please contact:
Adventure 4 Plus Service Manual
 Adventure 4 Plus Service Manual 1 TABLE OF CONTENTS CHAPTER 1: SERIAL NUMBER LOCATION...3 CHAPTER 2: PREVENTATIVE MAINTENANCE 2.1 Preventative Maintenance. 4 2.2 Tension and Centering the Running Belt....6
Important Safety Information
 Folding X Bike Important Safety Information PLEASE KEEP THIS MANUAL IN A SAFE PLACE FOR REFERENCE. It is important to read this entire manual before assembling and using the Confidence Folding X Bike.
CONTENTS. Before you start
 Exercise bike B309 Important safety information It is most important that this instruction book should be retained with the machine for future reference. These warnings have been provided in the interest
CROSS TRAINING MAGNETIC TREADMILL
 CROSS TRAINING MAGNETIC TREADMILL SF-T7615 USER MANUAL IMPORTANT : Read all instructions carefully before using this product. Retain this manual for future reference. For customer service, contact support@sunnyhealthfitness.com
Illustrations 2 ROW 30
 English ROW 30 Illustrations 2 ROW 30 3 9 6 10 1 2 5 8 4 7 2 1 7 A B ROW 30 3 11 (2x) 12 (2x) 13 (2x) 14 (2x) 15 (8x) M8 16 (2x) M8*65 D8.5*16 D6.5*16 17 (2x) 18 (2x) 19 (2x) 20 (2x) 21 (4x) 22 (4x) M10*50
MARCY Foldable Bike NS-753. Model NS-753. Retain This Manual for Reference OWNER'S MANUAL IMPEX INC.
 NOTE: Please read all instructions carefully before using this product Table of Contents Safety Notice Hardware Pack Assembly Instruction Parts List Warranty MARCY Foldable Bike NS-753 Ordering Parts Model
A 12 RB 4.0 3
 RB 4.0 English 11 2 RB 4.0 4 5 13 10 2 1 4 6 7 3 11 9 8 15 14 11 A 12 RB 4.0 3 B 4 RB 4.0 16 (2x) 17 (12x) 18 (12x) 19 (12x) 20 (4x) M5*12 M8*16*2.0 M8 M8*20 M5*12 21 (2x) 22 (4x) 23 (4x) 24 (8x) 25 (8x)
IMPORTANT: Please read all instructions carefully before using this
 IMPORTANT: Please read all instructions carefully before using this product. Retain this manual for future reference. CONTENTS IMPORTANT SAFETY NOTICE page 2 EXPLOADED DIAGRAM page 3 PARTS LIST page 4
User manual-en. IN 896 Up right bike insportline SEG 7020
 User manual-en IN 896 Up right bike insportline SEG 7020 Version VIII Exercise can present a health risk. Consult a physician before beginning any exercise program with this equipment. If you feel faint
HRM Triax 15 is engineered to provide quick, one-touch access to a variety of critical information during training and in competition.
 1 Information is power. HRM Triax 15 is engineered to provide quick, one-touch access to a variety of critical information during training and in competition. Used properly this heart rate monitor will
Magnetic-Resistance Recumbent Bike NS-40502R. Model NS-40502R. Retain This Manual for Reference ASSEMBLY & OWNER'S MANUAL
 NOTE: Please read all instructions carefully before using this product Table of Contents Safety Notice Hardware Pack Magnetic-Resistance Recumbent Bike NS-40502R Assembly Instruction Parts List Warranty
Manual. HTR 2.0 Ergometer Hometrainer. T +31 (0) e w
 e w") HTR 2.0 Ergometer Hometrainer Manual For questions or missing parts please contact Fitness Benelux: Fitness Benelux Uw partner in fitness twekkelerweg 263 7553 lz Hengelo the netherlands T +31 (0)74-7600219
HTR 2.0 Ergometer Hometrainer Manual For questions or missing parts please contact Fitness Benelux: Fitness Benelux Uw partner in fitness twekkelerweg 263 7553 lz Hengelo the netherlands T +31 (0)74-7600219
Computer T4.2 IWM. COMPUTER MANUAL Reebok T
 Computer T4.2 IWM COMPUTER MANUAL Reebok T4.5-20110111 DISPLAY GB GB Buttons and Functions START Press to start exercise at an initial speed of 0.5 mph / 0.8 km/h. STOP Press to stop exercise during workout.
FS1.5 ELLIPTICAL OWNER S MANUAL PLEASE CAREFULLY READ THIS ENTIRE MANUAL BEFORE OPERATING YOUR NEW ELLIPTICAL
 FS1.5 ELLIPTICAL OWNER S MANUAL PLEASE CAREFULLY READ THIS ENTIRE MANUAL BEFORE OPERATING YOUR NEW ELLIPTICAL Congratulations On Your New Elliptical and Welcome to the XTERRA Fitness Family! Thank you
FITNESS. FB150 Folding Bike OWNER S MANUAL PLEASE CAREFULLY READ THIS ENTIRE MANUAL BEFORE OPERATING YOUR NEW FOLDING BIKE
 FITNESS OWNER S MANUAL PLEASE CAREFULLY READ THIS ENTIRE MANUAL BEFORE OPERATING YOUR NEW FOLDING BIKE Congratulations On Your New Folding Bike and Welcome to the XTERRA Fitness Family! Thank you for your
6.0R OWNER S MANUAL CAUTION! QUESTIONS? Call Our Toll Free Keys Fitness Helpline
 6.0R OWNER S MANUAL QUESTIONS? Call Our Toll Free Keys Fitness Helpline 1-888-340-0482 CAUTION! Please read the precautions and instructions in this manual before using this equipment. Please save this
IMPORTANT SAFETY NOTICE:
 Dear Customer, Please read this instruction very carefully before using this item. You will find important information regarding safety of your magnetic bike. IMPORTANT SAFETY NOTICE: Note the following
Foldable Bike With Table
 NOTE: Please read all instructions carefully before using this product Table of Contents Safety Notice Hardware Pack Foldable Bike With Table NS-755 Assembly Instruction Parts List Warranty Ordering Parts
Motorised Treadmill Model No: JI1625
 BODYWORX Motorised Treadmill Model No: JI1625 Retain this owner s manual for future reference Read and follow all instructions in this owner s manual Version A 1 TABLE OF CONTENTS OVERVIEW DRAWING 2 ASSEMBLY
HRM Triax 100 is engineered to provide quick, one-touch access to a variety of critical information during training and in competition.
 1 Information is power. HRM Triax 100 is engineered to provide quick, one-touch access to a variety of critical information during training and in competition. Used properly this heart rate monitor will
Electric Mini Exercise Bike
 Electric Mini Exercise Bike INTRODUCTION Please make sure you have read and understood these instructions, before assembling and using this Min-Exercise Bike BEFORE USE Carefully remove all packaging.
TWISTING STAIR STEPPER WITH BANDS
 TWISTING STAIR STEPPER WITH BANDS NO. 068 USER MANUAL IMPORTANT! Please retain owner s manual for maintenance and adjustment instructions. Your satisfaction is very important to us, PLEASE DO NOT RETURN
RC-81 OWNER S MANUAL
 OWNER S MANUAL Product may vary slightly from the item pictured due to model upgrades Read all instructions carefully before using this product. Retain this owner s manual for future reference. NOTE: This
RC-300 OWNER S MANUAL
 RC-300 OWNER S MANUAL Product may vary slightly from the item pictured due to model upgrades Read all instructions carefully before using this product. Retain this owner s manual for future reference.
MARCY Magnetic-Resistance Upright Bike/Hand Pulse
 NOTE: Please read all instructions carefully before using this product Table of Contents Safety Notice Hardware Pack Assembly Instruction Parts List MARCY Magnetic-Resistance Upright Bike/Hand Pulse NS-908UP
User s Product Manual
 User s Product Manual LifeCore LC-950UBs Upright Bike Introduction Congratulations on your purchase of the 950UBs Upright Bike. This product has been designed and manufactured to meet the needs and requirements
FITNESS ERG500 ROWER OWNER S MANUAL PLEASE CAREFULLY READ THIS ENTIRE MANUAL BEFORE OPERATING YOUR NEW ROWER
 FITNESS ERG500 ROWER OWNER S MANUAL PLEASE CAREFULLY READ THIS ENTIRE MANUAL BEFORE OPERATING YOUR NEW ROWER Congratulations On Your New Rower and Welcome to the XTERRA Fitness Family! Thank you for your
Owner s Manual. Model# IMPORTANT: Read all instructions carefully before using this product. Retain this owner s manual for future reference.
 Swing Stepper Owner s Manual Model#91306 IMPORTANT: Read all instructions carefully before using this product. Retain this owner s manual for future reference. The specifications of this product may vary
Treadmill Owner s Manual Bladez DX7T-ME
 Treadmill Owner s Manual Bladez DX7T-ME BH North America Corporation 2055 Ellipse Foothill Ranch, CA 9260 Phone: 949-206-0330 Fax: 949-206-003 Email: 0 Hfitness@bhnorthamerica.com INTRODUCTION: Congratulations
Casall EB200 Bike 91001
 Casall EB200 Bike 91001 Important: Please locate your serial number and record in the box below for service support purposes. Serial number here: EB200 NO:J-1 Aorra Nut for M8 Bolt(4) No:J-6 Spring Washer
Exercise Bike MODEL LZ100 INSTRUCTION MANUAL
 Exercise Bike MODEL LZ100 INSTRUCTION MANUAL WARNING: Cycle should always be placed on a level surface for use Please read these instructions carefully and keep for future reference FOR DOMESTIC INDOOR
EXCITE, ENGAGING CARDIO ADVANCED LED DISPLAY RUN User manual
 EXCITE, ENGAGING CARDIO ADVANCED LED DISPLAY RUN 1000 User manual Contents Description of the control panel...3 Function keys...4 Manual control keys...5 Profile LEDs...7 Heart rate LEDs...8 The number
R3 & C3 Exercise Bikes Owners Manual Version 1.3
 R3 & C3 Exercise Bikes Owners Manual Version 1.3 page Welcome to LifeSpan............................ 1 Specifications................................. 3 Limited Home Use Warranty.......................
The specifications of this product may vary from this photo and are subject to change without notice. For Customer Service, please contact:
 Elliptical Bike SF-E1114 The specifications of this product may vary from this photo and are subject to change without notice. For Customer Service, please contact: support@sunnyhealthfitness.com. Important
MARCY DIAMOND ELITE UTILITY BENCH MD-440. Model MD-440. Retain This Manual for Reference OWNER'S MANUAL
 NOTE: Please read all instructions carefully before using this product Table of Contents Safety Notice Hardware Identifier MARCY DIAMOND ELITE UTILITY BENCH MD-440 Assembly Instruction Parts List Warranty
CR 6.0. English 10 Deutsch 29 Nederlands 48 Français 67
 CR 6.0 English 10 Deutsch 29 Nederlands 48 Français 67 2 CR 6.0 8 5 3 4 3 4 6 9 1 2 10 A 6 7 CR 6.0 8 4 1 3 6 6 9 B 10 2 CR 6.0 11 (2x) 12 (12x) 13 (12x) 14 (8x) 15 (2x) 16 (4x) M5*12 M8*16* M8 M8*20 M5*15
HealthCare International, Inc. PO Box 1509, Langley, WA P: (360) or (800)
 or (800)") Owner s Manual V.2.2 HealthCare International, Inc. PO Box 1509, Langley, WA 98260 www.hcifitness.com sales@hcifitness.com P: (360) 321-7090 or (800) 398-9121 Table of Contents Safety Precautions... 2
Owner s Manual V.2.2 HealthCare International, Inc. PO Box 1509, Langley, WA 98260 www.hcifitness.com sales@hcifitness.com P: (360) 321-7090 or (800) 398-9121 Table of Contents Safety Precautions... 2
5.2 UPRIGHT OWNER S MANUAL
 5.2 UPRIGHT OWNER S MANUAL QUESTIONS? Call Our Toll Free Keys Fitness Helpline 1-888-340-0482 CAUTION! Please read the precautions and instructions in this manual before using this equipment. Please save
BIKE EXERCISER User s Manual
 Model No. 831.21813.2 Serial No. Write the serial number in the space above for reference. BIKE EXERCISER User s Manual Serial Number Decal (under frame) Assembly Operation Maintenance Part List and Drawing
USERʼS MANUAL QUESTIONS? Visit our website CAUTION. Model No. PFIVEX Serial No.
 Model No. PFIVEX58.0 Serial No. USERʼS MANUAL Write the serial number in the space above for reference. QUESTIONS? If you have questions, or if there are missing parts, please contact us: UK Call: 08457
Computer- und Trainingsanleitung SM
 SM 9150-75 Computer- und Trainingsanleitung SM 9150-75 2-21 22-41 42-61 62-81 82-101 D F NL E Training and operating instructions Contents Safety information 22 Brief description 23 Functional area and
OWNER S MANUAL MODEL: ACH0011
 OWNER S MANUAL MODEL: ACH0011 Table of Contents Page Exploded View Part List Important Safety Information Before You Start Assembly Instruction 3 4 5 6 7 Console 11 Monitoring Heartrate 12 Warranty / Service