Lose The Back Pain Self-Assessment Workbook
|
|
|
- Hester Townsend
- 6 years ago
- Views:
Transcription
1 Lose The Back Pain Self-Assessment Workbook
2
3 Self-Assessment Workbook Customer Information: Name : Phone Number: Best time to call / time zone: How To Use This Workbook In order to make this system as easy to use as possible and to ensure you get the best possible results, we ve created this workbook to help you document your findings and keep track of your progress. This workbook is broken down into 3 sections: Section 1 Self-Assessment Worksheet In this first section you are going to document your findings after performing the physical assessments, add your visual assessment photographs and identify which dysfunctions you have. Section 2 - Progress Checklist and Pain Scales In this section you ll use two tools to monitor your progress as you implement the various steps and strategies in this program. One is the Progress Checklist on which you ll check off and date when you complete each step and the other is the Pain Scales Chart, which you ll use to document your pain levels. Section 3 - Back Pain History Questionnaire In this section you ll answer a few questions about your condition and pain. This information is necessary only if you plan to utilize our personal support and we highly recommend you do, as you will likely have questions along the way. Helpful tips to completing the Self-Assessment worksheet! We recommend you use this workbook to document your results and findings while performing the Self- Assessments. As you complete each assessment, be sure to answer yes or no to each question. The more times you answer YES to the questions for a particular dysfunction the more likely it is that you have that dysfunction. In order to get the most out of this system you will need to do both the Visual Assessments and the Physical Assessments, they are both equally as important and when use together they offer a very compelling look at the root cause of your problem. Please refer to the Lose the Back Pain FAQ s if you have any questions along the way 1
4 Lose The Back Pain After completing the Self-Assessments for this dysfunction please indicate if you feel you have this dysfunction or not or are not sure. If you are sure you have this dysfunction please begin the corrective exercise for this dysfunction. Use the illustrations to help you with the assessments. Forward Tipped Pelvis Dysfunction: YES NO Not Sure 1. Visual Assessments - using both a Mirror and your Self-Photos (Both Side view Photos) Do you see a downward sloping of the waistline? q YES q NO Do you see excessive curvature in the lower back? q YES q NO Do you see a forward leaning from your ankles up? q YES q NO 2. Physical Assessments Testing both Strength and Flexibility Hip Flexor Flexibility Test Was it difficult attempting to achieve the position demonstrated? q YES q NO Do you feel tightness, pain or restriction in the upper thigh? q YES q NO Did you feel an increase in the restriction as you leaned inward? q YES q NO Did you feel the restriction on both sides? q YES q NO Lower Back Flexibility Test Was it difficult attempting to achieve the position demonstrated? q YES q NO Do you feel tightness, pain or restriction in the lower back? q YES q NO Quadriceps Flexibility Test Was it difficult attempting to grab your foot? q YES q NO Was it difficult pulling your foot in towards your buttocks? q YES q NO Was it difficult attempting to keep your knee pointing straight down? q YES q NO Did you feel even more restriction when tipping your pelvis backwards? q YES q NO Did you feel the restriction on both sides? q YES q NO Lower Abdominal Strength Test Was it difficult attempting to bring your knees to your chest? q YES q NO Was it difficult attempting to lower your knee back to the ground? q YES q NO Did you feel pain in the lower back when doing this motion? q YES q NO Did you feel any arching on the lower back when doing this motion? q YES q NO Glute Strength Test Was it difficult attempting the get your hips off the ground? q YES q NO Was it difficult attempting to get your hip and trunk in a straight line? q YES q NO Was it difficult attempting to lift one leg off the ground? q YES q NO NOTE: The FTP is the most common dysfunction and is often times associated with a High Hip and Forward Head and Shoulder dysfunction. Your observations: 2

5 Self-Assessment Workbook 3
6 Lose The Back Pain After completing the Self-Assessments for this dysfunction please indicate if you feel you have this dysfunction or not or are not sure. If you are sure you have this dysfunction please begin the corrective exercise for this dysfunction. Use the illustrations to help you with the assessments. High Hip Dysfunction: YES NO Not Sure 1. Visual Assessments - using both a Mirror and your Self-Photos (Front and Rear Photos) Which side of your pelvis is higher? q Right q Left Which side appears to have a lower shoulder? Should be HH side q Right q Left Which side appears to show that the fingers are longer? Should be HH side q Right q Left Do you see a larger skin crease in the lower back on your HH side? q YES q NO Do you see the arm on the HH side to be closer to the side of your body? q YES q NO 2. Physical Assessments Testing both Strength and Flexibility Inner Thigh Flexibility Test Was it difficult attempting to achieve the position demonstrated? q YES q NO Did you feel a difference in the restriction between the two sides? q YES q NO Which side did you feel the restriction on more? Should be HH side q Right q Left QL Flexibility Test Was it difficult attempting to achieve the position demonstrated? q YES q NO Did you feel a difference in the restriction between the two sides? q YES q NO Which side did you feel the restriction on more? Should be HH side q Right q Left Forward Bend Test Was it difficult attempting to achieve the position demonstrated? q YES q NO Did your thumbs fall in to the notch? q YES q NO After attempting the position and than standing up which hip was higher? q Right q Left Did you take a photo or have someone else help? Which side was higher? q Right q Left NOTE: If you can not see the High Hip, feeling for the differences in pain, tightness or restriction between the two sides of your body, during each of the physical assessments will be one of the best ways to pin point which side the High Hip is on. Your observations: 4

7 Self-Assessment Workbook 5
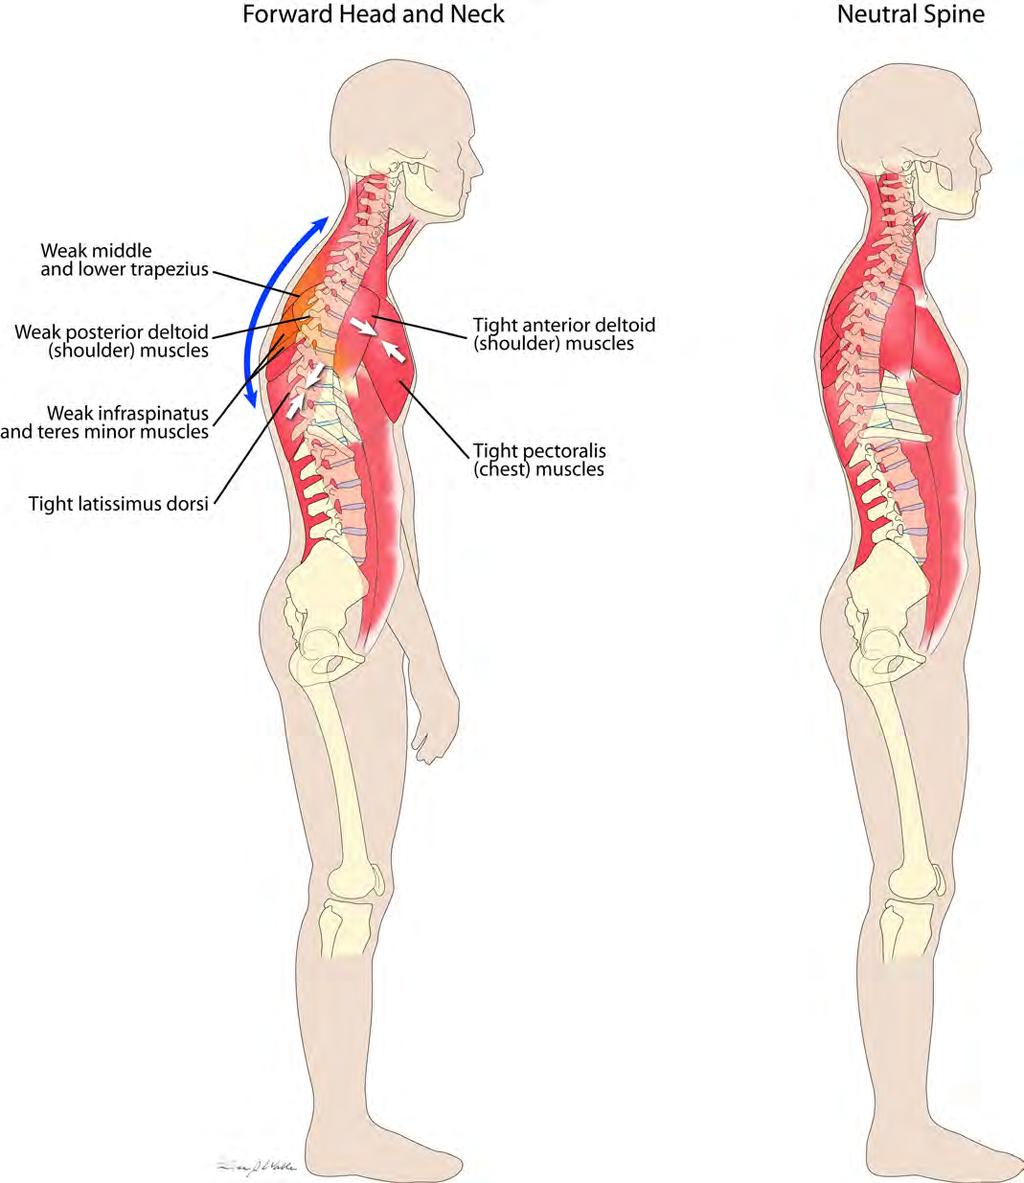
8 Lose The Back Pain After completing the Self-Assessments for this dysfunction please indicate if you feel you have this dysfunction or not or are not sure. If you are sure you have this dysfunction please begin the corrective exercise for this dysfunction. Use the illustrations to help you with the assessments. Forward Head + Shoulders Dysfunction: YES NO Not Sure 1. Visual Assessments - using your Self-Photos (Front and Side Photos) Is your head pushed forward? q YES q NO Are your ears forward of your shoulders? q YES q NO Do your shoulders look rounded? q YES q NO Do your shoulders look rotated inward? q YES q NO 2. Physical Assessments Testing both Strength and Flexibility Chest Flexibility Test Was it difficult attempting to achieve the position demonstrated? q YES q NO Do you feel tightness, pain or restriction in the chest and shoulder? q YES q NO When in the position did you feel like you achieved only minimal rotation? q YES q NO Did both sides feel equally restricted? q YES q NO Upper Back Strength Test Was it difficult attempting to achieve the position demonstrated? q YES q NO Was it difficult to get 2-3 inches off the floor? q YES q NO Was it difficult to hold that position? q YES q NO While attempting to achieve this position was there any discomfort? q YES q NO Lower Trap Strength Test Was it difficult attempting to achieve the position demonstrated? q YES q NO Was it difficult to get 2-3 inches off the floor? q YES q NO Was it difficult to hold that position? q YES q NO While attempting to achieve this position was there any discomfort? q YES q NO NOTE: Most people have a Forward Head and Shoulder to some degree, if you cannot identify it now please note that it is developing as you sit and stair at you computer monitor day after day-year after year. Your observations: 6
9 Self-Assessment Workbook 7
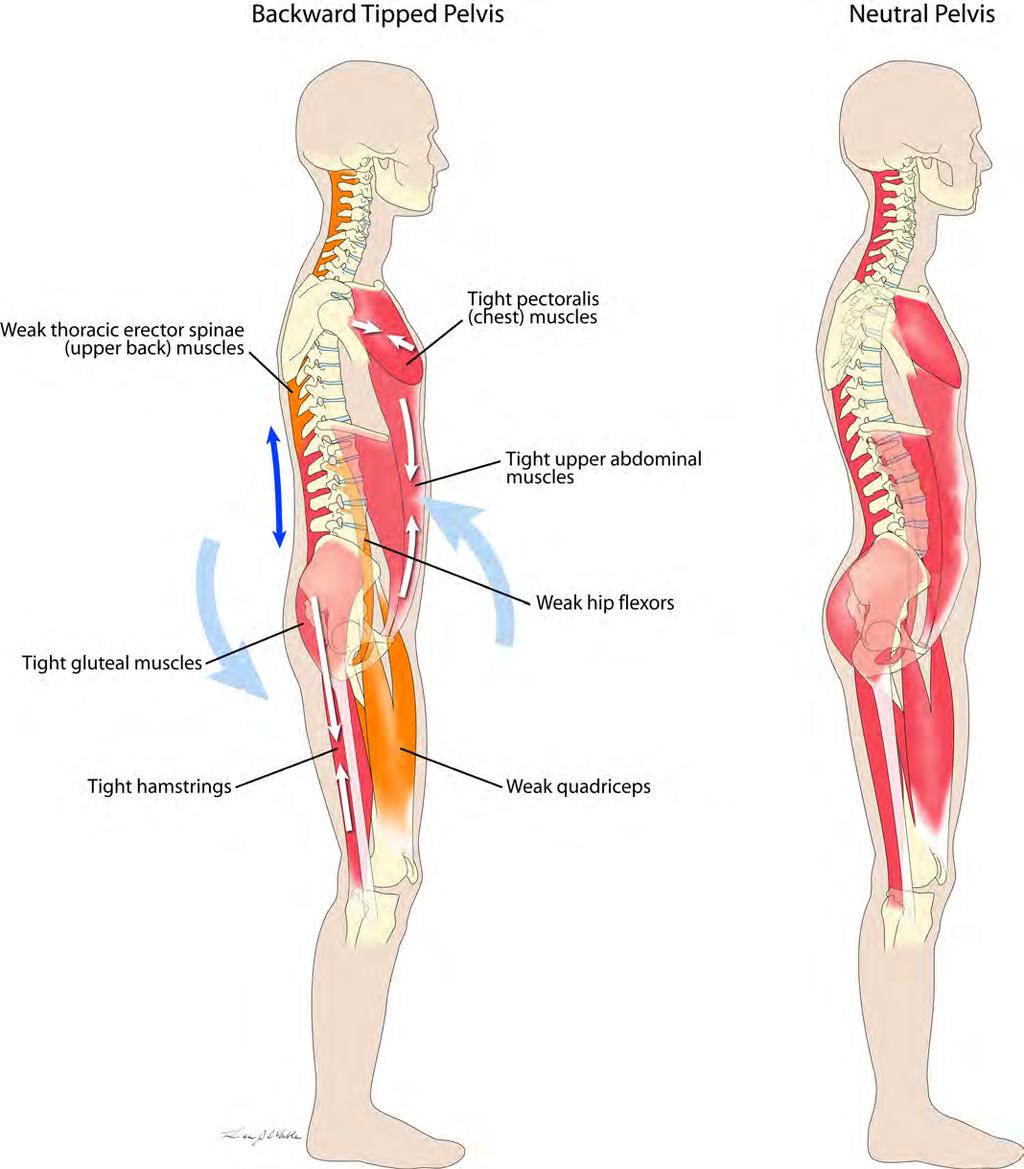
10 Lose The Back Pain After completing the Self-Assessments for this dysfunction please indicate if you feel you have this dysfunction or not or are not sure. If you are sure you have this dysfunction please begin the corrective exercise for this dysfunction. Use the illustrations to help you with the assessments. Backward Tipped Pelvis Dysfunction: YES NO Not Sure 1. Visual Assessments - using your Self-Photos (Both side view Photos) Do you see a backward tipping of the pelvis or waistline? q YES q NO Do you see a flattening or lack of curvature in the lower spine? q YES q NO Do you see a backward leaning from the knee to the mid back area? q YES q NO 2. Physical Assessments Testing both Strength and Flexibility Flat Back Test Do you feel as if your lower back was totally flat to the floor? q YES q NO The flatter your back the more likely you have BTP Was there a lack arching or space between your back and the floor? q YES q NO The more arching and space you have the less likely you have BTP Were you unable to put some or most of your hand under your back? q YES q NO The more of your hand you can put under your back the less likely you have a BTP Glute Flexibility Test Was it difficult attempting to put the foot on to the knee? q YES q NO The easier it was for you to put your foot on your knee the less likely you have a BTP Was it difficult attempting to reach through and pull the knee to chest? q YES q NO The more you were able to pull your knees to your chest the less likely you have a BTP NOTE: Please, note that you cannot have both a Forward Tipped and a Backward Tipped Pelvis. The BTP is the least common Dysfunction and is mostly found in the older population. Tight Glutes alone do not mean that you have a BTP. Please do you best to rule out a Forward Tipped Pelvis before confirming a BTP dysfunction. Please listen to FAQ 15# before confirming BTP... Your observations: 8
11 Self-Assessment Workbook 9
12 Lose The Back Pain Visual Assessment Photos Photo taking tips: Stand barefoot on a hard surface with arms relaxed by your side Please wear shorts. If male without a shirt or in a jog bra or tank top if female. This allows both you and us to get the most accurate assessment. Use a plain wall as a background and ensure room is well lit and/or use a flash Turn camera to take a full length, vertical photo - hold as level as possible Ensure you get your complete body (showing head to toe) in every photo Attach Right Side Photo Here Attach Left Side Photo Here 10
13 Self-Assessment Workbook Attach Front Photo Here Attach Rear Photo Here NOTE: Refer to the Visual Assessment and Sample Photo section of your reference manual, to learn how you will use these photos to help identify the physical dysfunctions you have. If you request personal support we will need to see both your Self Assessment Worksheet and your Visual Assessment Photos. By ing your info to or by mailing them to address below. Once we ve received your information we will contact you as quickly as possible to answer any questions you have and give you specific recommendations and guidance. The Healthy Back Institute 431 Pine Street - Suite 312, Burlington, VT USA For Office Use Only Reviewed By: Date: 11
14 Lose The Back Pain Progress Checklist Use the chart below as you move thru the steps in the system to keep track of your progress. Plus, we also want to issue you a challenge Can you complete and implement all of the steps below in the first 14 days or less? We know you can and we also know that the sooner you get started and complete the steps below the sooner you ll get relief. Steps to Complete 1. Read the Welcome Letter Date Completed 2. Listen to Audio CD #1: How To Use The System 3. Watch DVD #1 Perform the self assessments Take your visual assessment photos Complete your Back Pain History Questionnaire Complete your Self-Assessment Worksheet Identify and confirm all Physical Dysfunctions 4. Watch DVD #2 Begin the corrective exercises and stretches for the dysfunctions you ve identified 5. Listen to Audio CD #2: Pain Reduction Strategies Experiment with various strategies to find the ones that work best for you 6. Listen to Audio CD #3: Condition Specific Recommendations Explore the recommendations that are relevant to your condition(s) 7. Read the Reference Manual 12
15 Self-Assessment Workbook Pain Scales Chart Please use the scales below to rate and monitor your pain level as you move through this program. Before Starting - Please mark the on the pain scale where you feel your pain is before starting. Little or no pain Moderate Pain Severe Pain Week 1 - Please mark the on the pain scale where you feel your pain is now. Little or no pain Moderate Pain Severe Pain Week 2 - Please mark the pain scale where you feel your pain is now. Little or no pain Moderate Pain Severe Pain Month 1 - Pease mark on the pain scale where you feel you pain is now. Little or no pain Moderate Pain Severe Pain Month 2 - Pease mark on the pain scale where you feel you pain is now. Little or no pain Moderate Pain Severe Pain Month 3 - Pease mark on the pain scale where you feel you pain is now. Little or no pain Moderate Pain Severe Pain Month 6 - Pease mark on the pain scale where you feel you pain is now. Little or no pain Moderate Pain Severe Pain
16 Lose The Back Pain Back Pain History Questionnaire 1. What condition have you been diagnosed with, if any? 1. How long have you been suffering from this condition? 2. Have you seen a healthcare professional for this condition? If so, which type(s): q General Physician q Physical Therapist q Chiropractor q Orthopedic Surgeon q Massage Therapist q Acupuncturist q Other Please specify 3. Which treatments have you already tried? q Anti Inflammatory Medications q Muscle Relaxants q Traction q Cortisone Injections q Ultrasound q Electrical Stimulation q Trigger Point Therapy / Injections q Surgery 4. Please tell us where your pain is located? And if it moves or travels down your leg? 6. When do you feel your pain? (ex. All day, only in the morning, etc) 14
Stretching. Knees: Rotate your knees in a circle, keeping them together and bending down slightly.
 Stretching Stretching the Major Muscle Groups Static Stretches Hamstrings: Hang down and try to reach your toes; don t push it. Keep legs and back straight. Just go down to a comfortable level for your
Osteoporosis Exercise:
 Osteoporosis Exercise: Balance, Posture and Functional Exercises Osteoporosis Exercise: Weight-Bearing and Muscle Strengthening Exercises Introduction You can help improve and maintain your balance, posture
Knee Exercises. Having strong, flexible muscles is the best way to keep knees healthy and prevent further injury.
 Knee Exercises If my knee hurts, why exercise? Having strong, flexible muscles is the best way to keep knees healthy and prevent further injury. Strength Strengthening the muscles that support your knee
Low Back Pain Home Exercises
 Low Back Pain Home Exercises General Instructions The low back exercise program is a series of stretching exercises and strengthening exercises prescribed by your physician for your medical condition.
Low Back Program Exercises
 Low Back Program Exercises Exercise 1: Knee to Chest Starting Position: Lie on your back on a table or firm surface. Action: Clasp your hands behind the thigh and pull it towards your chest. Keep the opposite
General Principles of Stretching. To be effective, stretching must be done slowly, gently and frequently.
 General Principles of Stretching To be effective, stretching must be done slowly, gently and frequently. Slowly means that while the exercise is being done the muscle being stretched must be moved slowly
EXERCISE INSTRUCTIONS
 EXERCISE INSTRUCTIONS A/ Strength A01 SQUAT Stand on the Power-Plate with feet shoulder width apart. Keeping the back straight and knees slightly bent, gently squeeze the leg muscles. You should feel tension
Cobra Abdominal Stretch / Old Horse Stretch. 1 sets 30 secs. A perfect stretch to follow, the cobra. Keep your legs nice and flat on the floor.
 Full Body Cool Down Abs, Arms, Back, Legs My favorite cool down of all is the full body cool down. Take care of your body, and your body will take care of you. Spend 12 minutes bring yourself back to a
Important Safety Instructions 1-2. Maintenance 3. Features 4. Assembly Parts List 5. Assembly Instructions 6-9. Console Operation 10
 Important Safety Instructions 1-2 Maintenance 3 Features 4 Assembly Parts List 5 Assembly Instructions 6-9 Console Operation 10 Moving Machine 12 Exercise Instructions 13-18 Exploded Drawing 19 Parts List
Low Back Pain Exercise Guide
 Low Back Pain Exercise Guide Regular exercise is an important adjunct to your treatment that can help restore the strength of your back and allow for a gradual return to your everyday activities. Your
Stretching - At the Workstation Why is stretching important?
 Stretching - At the Workstation Why is stretching important? No matter how well a workstation is designed, problems may arise if attention is not paid to the way the work is done. Working at a computer
Quads (medicine ball)
") Saggital Front Reach Saggital Front Reach 1) Start position: Stand with feet hip width apart. Hold medicine ball or dumbbell at waist. 2) Step forward 2-3 feet with the heel striking first and lean torso
Saggital Front Reach Saggital Front Reach 1) Start position: Stand with feet hip width apart. Hold medicine ball or dumbbell at waist. 2) Step forward 2-3 feet with the heel striking first and lean torso
KILLER #8. Workout Summary REALITY FITNESS THE WORKOUTS KILLER #8 1. Don t forget to warm up and cool down! Take a 1 minute break in between each set.
 KILLER #8 Workout Summary Don t forget to warm up and cool down! Take a 1 minute break in between each set. SERIES ONE Complete 3 sets of series one and then 3 sets of series two. EXERCISE 1 - Alternating
ESI Wellness Program The BioSynchronistics Design. Industrial Stretching Guide
 ESI Wellness Program The BioSynchronistics Design Industrial Stretching Guide ESI Wellness The BioSynchronistics Design Industrial Stretching Basics Stretch 2-4 times/day Hold each Stretch for 5 seconds
1 - Calf Raise Reps Sets Duration Freq
 1 - Calf Raise Reps Sets Duration Freq. 2-3 2-4 x day Stand on a flat surface (or with your heel over the edge of a step if advised by your physiotherapist) and hold onto the wall or a stable object. Raise
Home Exercise Program for Knee Conditioning
 Prepared for: Prepared by: Instructions: Home Exercise Program for Knee Conditioning Before beginning the conditioning program, warm up the muscles by riding a stationary bicycle or jogging for 10 minutes.
Tuning in Before beginning Kundalini Yoga practice, always "tune in" by chanting the ADI MANTRA. Click here for full details
 KUNDALINI YOGA SPINAL KRIYA To Begin Sit quietly and be with your breath. Consciously slow down the breath and breathe from the belly. Be with the sensations in your body. Tune into your own rhythm. Allow
FOR THE SERVICE MEMBER: Rx3 REHABILITATION PROGRAM
 CREATED BY THE HUMAN PERFORMANCE RESOURCE CENTER / HPRC-ONLINE.ORG / FROM THE CONSORTIUM FOR HEALTH AND MILITARY PERFORMANCE HUMAN PERFORMANCE RESOURCE CENTER Injury/Condition: Injury/Condition: What is
Knee Conditioning Program
 Knee Conditioning Program Purpose of Program After an injury or surgery, an exercise conditioning program will help you return to daily activities and enjoy a more active, healthy lifestyle. Following
 www.fitnessfirst-usa.com Chest Fly Shoulders, elbows and wrists aligned in same plane with elbows at 90 degrees Feet should be staggered, and body leaning slightly forward for leverage Step far enough
Chapter 9: Exercise Instructions
 RESOURCES RESEARCHERS / MEDICAL HOW TO HELP SPONSORS GEHRIG CONNECTION MEDIA TELETHON MDA.ORG search our site Go MDA/ALS Newsmagazine Current Issue Home> Publications >Everyday Life With ALS: A Practical
Knee Conditioning Program
 Prepared for: Prepared by: Purpose of Program After an injury or surgery, an exercise conditioning program will help you return to daily activities and enjoy a more active, healthy lifestyle. Following
MEEHAN CHIROPRACTIC AND SPORTS REHAB
 1 WARNING DISCLAIMER!" This report is for information purposes only.!" This report is not intended to diagnose the cause of back pain and you should consult with your doctor when you are suffering from
Spine Conditioning Program Purpose of Program
 Prepared for: Prepared by: Purpose of Program After an injury or surgery, an exercise conditioning program will help you return to daily activities and enjoy a more active, healthy lifestyle. Following
Resistance Training Program
 Name: Resistance Training Program How to do Resistance Training: Warm up for 5 minutes before resistance training e.g., walk or cycle slowly o Avoid stretching before resistance training Do all exercises
Home Workout with Household Items
 Home Workout Home Workout with Household Items Introduction This home routine is created for women and men to workout while they are at home. It incorporates the use of household items to imitate weights
Physiotherapy. Hip Conditioning Program
 Physiotherapy This is a general hip conditioning program designed to provide you with a wide variety of exercises and strategies to manage your symptoms. Improved hip strength, flexibility and stability
Core and Flexibility Workout
 43 Thames Street, St Albans, Christchurch 8013 Phone: (03) 356 1353. Website: philip-bayliss.com Core and Flexibility Workout This workout focuses on strengthening the core with challenging exercises that
STRETCHES.
 STRETCHES I have put this document together for you to learn and understand the important stretches that you should be doing regularly as part of your fitness programme so I hope it helps you. Hold each
It is recommended that a person break for 5-10 minutes for every hour spent at a workstation.
 Office Stretches Why is stretching important? No matter how well a workstation is designed, problems may arise if attention is not paid to the way the work is done. Working at a computer often involves
STRETCHING EXERCISES Stretching exercises help loosen tight muscles.
 STRETCHING EXERCISES Stretching exercises help loosen tight muscles. Technique: Frequency: Stretch immediately after a game or workout. Stretch gently and hold for 20 seconds without bouncing (unless otherwise
All About Stretching Going for the 3 Increases: Increase in Health, Increase in Happiness & Increase in Energy
 All About Stretching Going for the 3 Increases: Increase in Health, Increase in Happiness & Increase in Energy Strategies for Success in Health Management By: James J. Messina, Ph.D. Benefits of regular
TRAINING EQUIPMENT: The equipment used in these Regeneration sessions may include: Foam Roller Trigger Point Ball Stretch Strap
 WORK + REST = SUCCESS TOTAL BODY ACHES AND PAINS FLEXIBILITY The Regeneration sessions will help you balance the work you put into your training sessions with movements designed to help your body recover
Lumbar/Core Strength and Stability Exercises
 Athletic Medicine Lumbar/Core Strength and Stability Exercises Introduction Low back pain can be the result of many different things. Pain can be triggered by some combination of overuse, muscle strain,
GENERAL EXERCISES YOGA BMW MANUFACTURING CO. PZ-AM-G-US I July 2017
 GENERAL EXERCISES YOGA BMW MANUFACTURING CO. PZ-AM-G-US I July 2017 Disclosure: The exercises, stretches, and mobilizations provided in this presentation are for educational purposes only are not to be
Rehabilitation 2. The Exercises
 Rehabilitation 2 This is the next level from rehabilitation 1. You should have spent time mastering the previous exercises and be ready to move on. If you are unsure about any of the previous exercises
Static Flexibility/Stretching
 Static Flexibility/Stretching Points of Emphasis Always stretch before and after workouts. Stretching post-exercise will prevent soreness and accelerate recovery. Always perform a general warm-up prior
Davis and Derosa. El Segundo, California
 Notes: Stop any exercise if it increases your pain or symptom! 1- Stretching global flexion - / Get on your hands and knees (four point position) with your knees directly under your hips and your hands
FLOOR EXERCISES for. strengthening your hip and knee INTERMEDIATE LEVEL
 FLOOR EXERCISES for strengthening your hip and knee INTERMEDIATE LEVEL THIGH STRENGTHENING 3 HIP STRENGTHENING ON YOUR SIDE 5 HIP STRENGTHENING ON YOUR BACK 8 ALL 4 S WITH LEG LIFT 10 When you have pain
Cybex Weight Machine Manual
 Cybex Weight Machine Manual Note: Machine adjustments are indicated by a yellow knob or lever. Feel free to ask our staff for guidance. Lower Body Leg Press - Adjust the back rest to a comfortable position.
LEG EXERCISES FOR FITNES
 LEG EXERCISES FOR FITNES Dr.Maninder Ahuja We need our leg muscles all the times, while doing our routine chores of life and this can t be done without strong leg muscles.walking is a good exercise but
EXERCISE AND CYSTIC FIBROSIS: MY EXERCISE RECORD
 EXERCISE AND CYSTIC FIBROSIS: MY EXERCISE RECORD My exercise goals Name What is my target heart rate? What is the maximum heart rate I should not exceed? What is my target rating of perceived exertion?
Core Stability Dome. Workouts combine cardio, strength training, balance and flexibility
 Core Stability Dome Workouts combine cardio, strength training, balance and flexibility Specifically designed to integrate balance into every aspect of fitness training. This dynamic training device adds
Trochanteric Bursitis: Exercises
 Trochanteric Bursitis: Exercises Your Kaiser Permanente Care Instructions Here are some examples of typical rehabilitation exercises for your condition. Start each exercise slowly. Ease off the exercise
Warm Up, Cool Down and Be Flexible
 Warm Up, Cool Down and Be Flexible An effective fitness program is more than aerobic training and strength building. To really reap the benefits of exercise, you need to add flexibility and balance training
YOUR FREE COMPREHENSIVE GUIDE TO HELP RELIEVE LOWER BACK PAIN NATURALLY
 YOUR FREE COMPREHENSIVE GUIDE TO HELP RELIEVE LOWER BACK PAIN NATURALLY By: helpwithsciatica HTTPS://HELPWITHSCIATICA.COM Table of contents 1 Introduction 2 Exercise: Extensions 3 Exercise: Curl-Ups 4
Resistance Training Program
 Name: Resistance Training Program How to do Resistance Training: Warm up for 5 minutes before resistance training e.g., walk or cycle slowly o Avoid stretching before resistance training Do all exercises
Ankle Program Range of Motion Exercises Stretches:
 Ankle Program Range of Motion Exercises Due to injury, immobilization or a combination of both your ankle has become stiff. These exercises are designed to help regain the motion and strength lost. You
Simple Strength, Balance and Flexibility Exercises to Do at Home
 Simple Strength, Balance and Flexibility Exercises to Do at Home For someone with medical problems, or who has been inactive and wants to exercise vigorously, always check with a doctor before beginning
Dynamic Flexibility All exercises should be done smoothly while taking care to maintain good posture and good technique.
 Dynamic Flexibility All exercises should be done smoothly while taking care to maintain good posture and good technique. Lying on back: Hip Crossover: Arms out in T position, feet flat on the floor, knees
RUNNING GUIDE. Technique & Stretching
 RUNNING GUIDE Technique & Stretching TECHNIQUE PERFECT POSTURE Good running posture is very important in helping you to maintain good form for the whole run and therefore adding to efficient running style,
Seated Exercises Information for Patients
 Seated Exercises Information for Patients 1 Seated Exercise These exercises are designed to allow you to exercise and keep your joints moving and strong whilst you maybe using a wheelchair. They can all
FEEL GOOD GLOW Low intensity workout
 Welcome to the low intensity workout, Feel good glow. If this is your first time doing one of our workouts, we recommend you check out the introductory video at www.healthier.qld.gov.au to get more information
Edema Exercises. To Improve Drainage
 Edema Exercises To Improve Drainage You will improve your lymph flow by doing a few exercises each day. These exercises are an important part of your home program. They may help you get stronger, too.
Snow Angels on Foam Roll
 Thoracic Mobilization on Foam Roll Lie on your back with a foam roller positioned horizontally across your mid back, and arms crossed in front of your body. Bend your knees so your feet are resting flat
Do the same as above, but turn your head TOWARDS the side that you re holding on to the chair.
 Stretch 4-6 times per day and hold each stretch for a minimum of 30 seconds. Perform the stretch gently without bouncing. Discuss any problems with your Chiropractor. Sit upright with your head and shoulder
Walking/Running Stretch Routine
 Walking/Running Stretch Routine Quadriceps Stretch With left hand grasp your right ankle, gently pull heel toward buttocks until stretch is felt. Repeat on opposite side. Walking/Running Stretch Routine
EXERCISES TO IMPROVE FUNCTIONAL STABILITY FOR PADDLERS
 EXERCISES TO IMPROVE FUNCTIONAL STABILITY FOR PADDLERS BCU in partnership with Joanne Elphinston Useful Tips for the Exercises Ensure you have the correct size of swiss ball inflated to the right pressure.
EXERCISE AND CYSTIC FIBROSIS: MY EXERCISE RECORD
 EXERCISE AND CYSTIC FIBROSIS: MY EXERCISE RECORD My exercise goals Name What is my target heart rate? What is the maximum heart rate I should not exceed? What is my target rating of perceived exertion?
STEP IT UP Moderate intensity workout
 Welcome to the moderate intensity workout. If this is your first time doing one of our workouts, we recommend you check out the introductory video at www.healthier.qld.gov.au to get more information about
Preparing for ORPAT. Major areas of fitness: 1. Flexibility 2. Cardiopulmonary Endurance 3. Muscular Strength 4. Muscular Endurance
 Preparing for ORPAT This guide is a resource for those individuals preparing for the Oregon Physical Ability Test (ORPAT). Individuals should consult with a medical or health professional before beginning
FAB55 EXERCISES, 5 WEEKS, 5 MINUTES A DAY
 BANDED SIDE STEP Strengthening Hip Complex Starting Position: Start in a standing position with the strength mini-band placed around your ankles. Your knees, hips and toes should be in-line with each other.
Prater Chiropractic Wellness Center 903 W. South St. Kalamazoo, MI PH: (269)
") Purpose of Program After an injury or surgery, an exercise conditioning program will help you return to daily activities and enjoy a more active, healthy lifestyle. Following a well-structured conditioning
Purpose of Program After an injury or surgery, an exercise conditioning program will help you return to daily activities and enjoy a more active, healthy lifestyle. Following a well-structured conditioning
Stretching Exercises for the Lower Body
 Stretching Exercises for the Lower Body Leg Muscles The leg has many muscles that allow us to walk, jump, run, and move. The main muscle groups are: Remember to: Warm-up your muscles first before stretching
Batman Workout by CrazyFitKids.com
 Batman Workout by CrazyFitKids.com View online Abs, Chest, Legs Visit: for the latest Superhero Fit T-shirts!! --- To reduce the risk of injury, before beginning this or any exercise program, please consult
Lesson Sixteen Flexibility and Muscular Strength
 Lesson Sixteen Flexibility and Muscular Strength Objectives After participating in this lesson students will: Be familiar with why we stretch. Develop a stretching routine to do as a pre-activity before
Session 3 or 6: Being Active: A Way of Life.
 Session 3 or 6: Being Active: A Way of Life. You can find the time to be active. Set aside one block of time every day to be active. When can you set aside 20 to 30 minutes to do an activity you like?
Presuming all the above symptoms are not present, pain is more likely to be mechanical and caused by a sprain, strain or poor posture.
 Page 1 of 8 View this article online at: patient.info/health/back-pain-exercises Back Pain Exercises Back pain is very common but in most cases is not caused by a serious problem. Most cases of back pain
Exercise Report For: Augusta James
 Exercise Report For: Optimizing Sport Performance Provided By: Greg Redman BScPT, BScKin, Wave Physiotherapy Phone: 250-763-9283 Fax:, www.wavephysio.ca Page: 1 Stretch hip flexor kneel w/ball Stretch
Copyright Cardiff University
 This exercise programme has been developed by physiotherapists specifically for people with movement disorders. Exercise is not without its risks and this or any other exercise programme has potential
RECOMMENDED STRETCHES
 RECOMMENDED STRETCHES Stretching prescribed below is always best done either after a session while your muscles are warm or after a short warm up such as 5mins of running, skipping, cycling, rowing etc.
Part A: Running. Max 5 mins. Slow run forwards 5m and return x 2. Hip out x 2. Hip in x 2. Heel Flicks x 2
 Part A: Running. Max 5 mins. Slow run forwards 5m and return x 2 Jog straight to the 20m line. Make sure you keep your upper body straight. Your hip, knee and foot are aligned. Do not let your knee buckle
Strength & Conditioning for Cyclists
 Part 1: Pre-Ride/Pre-Workout Body Prep Myofascial Release For each exercise: Perform 1-3 repetitions, 45-60 seconds/exercise per side Plantar fascia release with ball Stand up and step on a hard ball with
Sportlyzer s Core Exercises
 Sportlyzer s Core Exercises Core training exercises are as important part of your training schedule as your endurance training. You need it to support your everyday running and improve your racing results.
*glutes *hip flexors/psoas *ITT
 Standing Quad Stretch ) Stand and grasp right ankle with same hand, use a wall or chair to maintain 2 balance with left hand. Maintain an upright position in the torso hip stretches *glutes *hip flexors/psoas
Fitness Assessment Instructions
 Fitness Assessment Instructions Read through the directions before completing each Fitness Assessment. Remember to print off your assignment sheet so you can record your scores. You will be transferring
Day 1 Day 2 Day 3 Day 4 Day 5 Day 6 Day 7 Workout 1 Workout 2 Workout 1 Workout 2 Rest Workout 1 Rest
 60 Day Workout Plan 1 Workout Schedule Day 1 Day 2 Day 3 Day 4 Day 5 Day 6 Day 7 Workout 1 Workout 2 Workout 1 Workout 2 Rest Workout 1 Rest Summary of workouts Workout 1 Workout 2 1. Cardiovascular-Walking/Jogging
Wellness 360 Online Nutrition Counseling* Session 6: Being Active A Way of Life
 Wellness 360 Online Nutrition Counseling* Session 6: Being Active A Way of Life. powered by WELLSTAR 360 Session 6: Overview Be Active It s Your Choice! This session focuses on how to become more physically
Low Back Pain Exercise Guide
 Page 1 of 7 Copyright 2007 American Academy of Orthopaedic Surgeons Low Back Pain Exercise Guide Regular exercises to restore the strength of your back and a gradual return to everyday activities are important
Racquet Sports Training Program
 Racquet Sports Training Program Always consult your physician before beginning any exercise program. The information and advice published or made available through the Orthopaedic and Neurosurgery Specialists,
Exercises to Strengthen Your Back
 Exercises to Strengthen Your Back Your 15 Minute Workout By doing your 15 minute workout 3-5 times per week, you can condition the muscles and joints that support your back and keep it in healthy balance
Supplemental Digital Content 1. Stretch instructions and photo
 Supplemental Digital Content 1. Stretch instructions and photo A. Calves 1. Assume push-up position, keeping knees and elbows straight. 2. Allow one knee to drop by rolling onto ball of foot. 3. Gently
Quads (machines) Cable Lunge
 Cable Lunge") Cable Lunge Cable Lunge 1) Stand with feet hip width apart and a cable attached around your waist. Take left leg and step back approximately 2 feet standing on the ball of the foot. 2) Start position:
Cable Lunge Cable Lunge 1) Stand with feet hip width apart and a cable attached around your waist. Take left leg and step back approximately 2 feet standing on the ball of the foot. 2) Start position:
Simple Strength, Balance and Flexibility Exercises to Do at Home
 Simple Strength, Balance and Flexibility Exercises to Do at Home For someone with medical problems, or who has been inactive and wants to exercise vigorously, always check with a doctor before beginning
Stretch Packet. Stretch Packet
 Stretch Packet Stretch Packet Stretching is a form of physical exercise in which a specific muscle or tendon is deliberately flexed or stretched in order to improve the muscle's felt elasticity and achieve
Knee Pain Exercises. Instructions for personalized exercise routine:
 Knee Pain Exercises MATHEW LEFKOWITZ, MD PAIN MANAGEMENT 185 Montague Street, 6th floor / Brooklyn, NY 11201 Tel: 718-625-4244 / Fax: 718-625-4247 mathewlefkowitz@gmail.com Instructions for personalized
Purdue Lesson Plan Form
 Purdue Lesson Plan Form Teachers Name: Stacy Hall Resource: http://stewart.gardencity.k12.ny.us/copy%20of%20gym/fitnessgramexplained.htm Unit: Fitness Testing Skill taught: Push-Ups, Curl-Ups, Flexibility
15 Minute Desk Workout
 15 Minute Desk Workout Wall Squats Lean your back against a sturdy wall, with your feet planted 1-2 feet in front of you. Bend the knees to squat down and straighten them to push back up. Keep the abs
STRETCHING Stretch Express)
") STRETCHING Stretching is a highly important part of all exercise programs, yet much neglected by most people. Why? Because we all want to be leaner, fitter and stronger and by the time we have done the
STRETCHING Stretching is a highly important part of all exercise programs, yet much neglected by most people. Why? Because we all want to be leaner, fitter and stronger and by the time we have done the
Seniors Helping Seniors Stretch Routine TRAINING PEER LEADERS TO SUPPORT SENIORS HEALTH AND WELLNESS
 Seniors Helping Seniors Stretch Routine TRAINING PEER LEADERS TO SUPPORT SENIORS HEALTH AND WELLNESS 2018 - BACK STRETCHES Back Extensions Hold for about 10 seconds Back Flexion Back Rotation, each side
Exercises for Older Adults
 Main Menu Future Residents Exercises for Older Adults Staying fit and healthy is essential at any age. But as we get older, it s especially important to continue exercising. Not only does regular exercise
Post Lung Transplant Exercises
 Post Lung Transplant Exercises Post Lung Transplant Physical activity improves our strength and stamina, maintains optimal functioning of our major organs and increases our vitality, energy and overall
Correcting Forward Pelvis (Bubble Butt)
") Correcting Forward Pelvis (Bubble Butt) Forward Pelvis - Ab Strengthening: Knee Ups Start: Lay flat on the floor with knees bent and arms at side. Finish: Pull knees up to stomach as far as you can. Duration:
Correcting Forward Pelvis (Bubble Butt) Forward Pelvis - Ab Strengthening: Knee Ups Start: Lay flat on the floor with knees bent and arms at side. Finish: Pull knees up to stomach as far as you can. Duration:
UPPER BODY STANDING 12. March in place (hand to opposite knee) For more intensity raise arms above head if your balance is GOOD. 13.
 For more intensity raise arms above head if your balance is GOOD. 13.") LOW IMPACT EXERCISES SITTING 1. Breathe 2. Half circles with head 3. Neck movements (Chin to chest, ear to shoulder) 4. Neck Stretch Sitting in your chair, reach down and grab the side of the chair with
LOW IMPACT EXERCISES SITTING 1. Breathe 2. Half circles with head 3. Neck movements (Chin to chest, ear to shoulder) 4. Neck Stretch Sitting in your chair, reach down and grab the side of the chair with
1. Abs Triangle of Control Muscle: Upper abdominals Resistance: Body weight Body Connection: Legs
 Program C1 Chest and Shoulders 1. Abs Muscle: Upper abdominals Resistance: Body weight Lie flat with legs hooked through upper bench, adjusted so that the knees and hips are at 90 degrees. Extend arms
Cross Country Dry land training. Exercises and Stretches
 Cross Country Dry land training Exercises and Stretches Warm-Up: 1. Run two laps around the gym: run normally then run backwards 2. Line up at side of the room: gallop straight across one way, back facing
Bench Press (free weights) Pullover (dumbbell) Prone-grip pull-up (tower/assisted platform
 Pullover (dumbbell) Prone-grip pull-up (tower/assisted platform") When exercising always incorporate a warm-up for at least 5 minutes. Typically a warm-up should be a whole body exercise i.e. jumping jacks, jogging, calisthenics, etc The repetitions represent how much
When exercising always incorporate a warm-up for at least 5 minutes. Typically a warm-up should be a whole body exercise i.e. jumping jacks, jogging, calisthenics, etc The repetitions represent how much
Cape Cod Ski Club. * Use this exercise program at your own risk. Seek medical guidance before beginning this or any other exercise program.
 Cape Cod Ski Club * Use this exercise program at your own risk. Seek medical guidance before beginning this or any other exercise program. Cape Cod Ski Club - Strength Standing Wall Sit This exercise strengthens
Stretches & Poses After You Wake Up. Dynamic Stretching Before Workout / Activity. Post Workout Stretches
 /? 2 K T Stretches & Poses After You Wake Up Performing these stretches and yoga poses as soon as you wake up is recommended if you want to relieve tension, aches, improve flexibility and mobility, avoid
ESSENTIAL STRETCHES FOR SWIMMERS
 ESSENTIAL STRETCHES FOR SWIMMERS Clare Kersley BSc (Hons) Ost Osteopath & Sports Massage Therapist Notes 1. Stretches should form the 4th part of all your swimming training sessions: Page 1 of 13 Warm