personal trainer Forerunner owner s manual
|
|
|
- Johnathan Brown
- 6 years ago
- Views:
Transcription


1 personal trainer Forerunner 301 owner s manual
2 Copyright 2004 Garmin Ltd. or its subsidiaries. Garmin International, Inc East 151st Street Olathe, Kansas 66062, U.S.A. Tel. 913/ or 800/ Fax 913/ Garmin (Europe) Ltd. Unit 5, The Quadrangle Abbey Park Industrial Estate Romsey, SO51 9DL, U.K. Tel. 44/ Fax 44/ Garmin Corporation No. 68, Jangshu 2nd Road Shijr, Taipei County, Taiwan Tel. 886/ Fax 886/ All rights reserved. Except as expressly provided herein, no part of this manual may be reproduced, copied, transmitted, disseminated, downloaded or stored in any storage medium, for any purpose without the express prior written consent of Garmin. Garmin hereby grants permission to download a single copy of this manual onto a hard drive or other electronic storage medium to be viewed and to print one copy of this manual or of any revision hereto, provided that such electronic or printed copy of this manual must contain the complete text of this copyright notice and provided further that any unauthorized commercial distribution of this manual or any revision hereto is strictly prohibited. Information in this document is subject to change without notice. Garmin reserves the right to change or improve its products and to make changes in the content without obligation to notify any person or organization of such changes or improvements. Visit the Garmin Web site ( for current updates and supplemental information concerning the use and operation of this and other Garmin products. Garmin is a registered trademark and Forerunner, Auto Lap, Auto Pause, Virtual Partner, AutoLearn, and Garmin Training Center are trademarks of Garmin Ltd. or its subsidiaries and may not be used without the express permission of Garmin. December 2004 Part Number Rev. C Printed in Taiwan
3 INTRODUCTION INTRODUCTION Thank you for choosing the Garmin Forerunner 301 personal trainer! Once you begin training with the heart rate monitor, building simple and advanced workouts, and tracking your workout history, the Forerunner 301 will soon become your indispensable training partner. To get the most out of your new Forerunner, please review the Quick Start Guide and this Owner s Manual. Consult the following sections to find valuable information: Getting Started Charge your Forerunner, learn to position and use the heart rate monitor, and set up the Forerunner for your first workout. Workouts Learn to create and customize workouts on your Forerunner, from simple timed training to advanced interval workouts. Navigation Learn to use the navigating features of your Forerunner, including how to view the Map mode, save locations, create routes, and find your way home. Appendix Review cleaning instructions and information about Garmin Training Center, the heart rate monitor, and heart rate zones. Be sure to read the Safety Information in this section to learn how to use your Forerunner 301 and the heart rate monitor safely and responsibly. Index Contains a comprehensive index by subject. Always consult your physician before you begin or modify any exercise program. Forerunner 301 Owner s Manual i
4 INTRODUCTION > TABLE OF CONTENTS Introduction...i Getting Started...1 Charge the Battery... 1 Position the Heart Rate Monitor... 2 Position the Forerunner... 3 Acquire Satellite Signals... 4 Main Modes... 5 Buttons... 6 Set Your Time Zone and User Profile 7 Choose Your Sport... 8 Workouts...9 Basic Workouts... 9 Using Time and Distance Alerts.. 9 Using Pace/Speed Alerts Using Heart Rate Alerts Setting Auto Pause Setting Auto Lap Working Out with Virtual Partner 14 Interval Workouts Advanced Workouts Creating Workouts Starting Workouts ii Editing Workouts Viewing Workout History...23 Navigating with Forerunner Navigating with the Map Marking and Finding Locations Navigating Back to Start Navigating with Routes Viewing GPS Information About GPS Customizing the Forerunner.. 35 Changing General Settings Changing Sport Settings Setting Up Custom Pages Setting Speed Zones Setting Heart Rate Zones About AutoLearn Using AutoLearn Setting HR Zones Manually Appendix...44 Training with Heart Rate Zones Heart Rate Monitor Information Garmin Training Center Cleaning the Forerunner Storage Water Immersion Specifications Product Registration Safety Information FCC Compliance CE Compliance Software License Agreement Limited Warranty Index...59 Forerunner 301 Owner s Manual

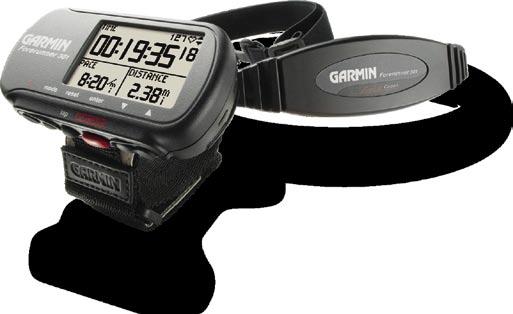
5 GETTING STARTED > CHARGE THE BATTERY GETTING STARTED Follow the instructions in this section to set up and begin using your new Forerunner 301. Charge the Battery The Forerunner 301 is powered by a built-in lithium-ion battery that you can recharge with the A/C Charger included in the product box. You can also charge the Forerunner with the USB cable and your personal computer. Charge the Forerunner 301 for three hours before you begin using it. Be sure the USB port, weather cap, and surrounding area are thoroughly dry before charging or connecting to a personal computer to prevent corrosion. To charge the Forerunner: 1. Turn the Forerunner over and pull back the weather cap from the USB port on the back of the unit. 2. Locate the A/C Charger included in the product box. Plug the mini USB end of the charger into the USB port on the Forerunner. Then plug the A/C charger into a standard wall outlet. NOTE: The unit will not charge outside the temperature range of 0 C 50 C (32 F 122 F). Back View (without strap) Access USB port here (hidden by weather cap) Serial Number Speaker Forerunner 301 Owner s Manual 1
6 Coded GETTING STARTED > POSITION THE HEART RATE MONITOR Position the Heart Rate Monitor Wear the heart rate (HR) monitor directly on your skin, just below the breastplate. It should be snug enough to stay in place during your workout. When positioned correctly, the heart rate monitor automatically transmits your heart rate to the Forerunner 301. Your heart rate appears next to a heart icon in Timer mode on the Forerunner (see p. 5). To begin displaying your heart rate on the Forerunner, you must turn on the Forerunner and bring it within range of the heart rate monitor. The Forerunner must be within cm (35 43 in.) of the heart rate monitor to receive your heart rate. Be sure to stand at least six feet away from other heart rate monitors while the Forerunner is trying to pair with your heart rate monitor and begin receiving heart rate data. Once the Forerunner pairs with your heart rate monitor, you can go near other heart rate monitors without fear of interference. For more information on pairing, interference, and troubleshooting, see Heart Rate Monitor Information in the Appendix. To position the heart rate monitor: 1. Push one tab on the elastic strap through the slot in the heart rate monitor. 2. Wet both sensors on the back of the heart rate monitor to create a strong connection between your pulse and the transmitter. Sensors 3. Attach the strap to the other side of the heart rate monitor around your chest. 2 Forerunner 301 Owner s Manual
7 GETTING STARTED > POSITION THE FORERUNNER NOTE: If you have trouble with erratic heart rate readings (bikers especially), position the transmitter on your back instead of your chest, or try applying electrode gel. 4. Tighten or loosen the strap as necessary so that it fits snugly against your body. Position the Forerunner For best results, wear the Forerunner 301 on your wrist as you would wear a watch, with the face oriented toward the sky. This position allows the GPS antenna to acquire satellite information quickly and easily. Do not adjust the Forerunner too tightly around your wrist, as it may cut off blood circulation. If needed, add the extension strap to the Forerunner s wrist strap. To add the extension strap: 1. Slide the end of the existing strap through the connector on the extension. 2. Place the Forerunner on your wrist or arm. 3. Slide the end of the extension through the connector on the Forerunner. 4. Adjust to fit comfortably and secure the strap using the Velcro. Forerunner 301 Owner s Manual 3

8 GETTING STARTED > ACQUIRE SATELLITE SIGNALS Acquire Satellite Signals Before you begin using the Forerunner 301, you must acquire GPS satellite signals. The first time you turn on the Forerunner, you may need to wait as long as 15 minutes to acquire signals; after that, the Forerunner should acquire signals quickly each time you use it. To acquire satellite signals, go outdoors away from tall buildings and trees, which may obstruct signal reception, and position the Forerunner with its face toward the sky. To acquire satellite signals: 1. Go outdoors to an open area. Then press and hold the Power button to turn on your Forerunner 301. The Welcome Page 2. Wait while the Forerunner searches for satellite signals. As the unit acquires signals, the bar fills from left to right and the Satellite icon flashes. When the Forerunner has acquired enough satellite signals, the bar fills completely and disappears, and the Satellite icon stops flashing. Satellite icon bar Once you are outdoors and have acquired satellite signals, you are ready to begin your workout. Refer to the next section, Workouts, to take advantage of the Forerunner s training features. NOTE: You can turn off the GPS receiver and use the Forerunner indoors. See Changing General Settings in the Customizing section. 4 Forerunner 301 Owner s Manual
9 GETTING STARTED > MAIN MODES Main Modes Press the mode button to switch between Timer mode and Menu mode. From Timer mode, press the and arrows to access data pages: the Lap page, Heart Rate page, and Custom page. Current date and time Timer Mode Forerunner Icons Menu Mode Battery icon changes to show it is charging. Timer icon appears when timer starts. Satellite icon flashes when acquiring satellite signals. Heart Rate icon is solid when receiving data. Lap Page Heart Rate Page Custom Page The Heart Rate page appears when you are wearing the heart rate monitor and receiving heart rate data. Your heart rate appears next to the solid heart icon in Timer mode. The Forerunner 301 also displays your heart rate on the Heart Rate page along with your average heart rate and heart rate zone, which can help you determine the intensity of your workout. For more information on heart rate zones, see Training with Heart Rate Zones in the Appendix. Forerunner 301 Owner s Manual 5

10 GETTING STARTED > BUTTONS Buttons 1 Power Press and hold to turn unit on/off. Press to turn backlight on/off. Press Power while pressing and holding the reset button to reset the unit if it freezes. 2 mode Press to switch between Timer and Menu modes. Press and hold to change sports. Press to acknowledge messages. 3 reset/lap Press and hold to reset the timer. Press to create new lap when timer is started or stopped. 4 enter/start/stop Press to select options. Press to start/stop the timer. 5 up/down Press to highlight options. Press to scroll through data pages. Front View Press and hold mode to change to a different sport Press and hold reset to reset the timer. Press start/stop to control the timer. 6 Forerunner 301 Owner s Manual
11 GETTING STARTED > SET YOUR TIME ZONE AND USER PROFILE Set Your Time Zone and User Profile The Forerunner receives accurate time information from GPS satellites; however, you must enter your time zone to display the correct local time. The Forerunner 301 also uses information that you enter about yourself to calculate calorie consumption. Set your time zone and user profile before you begin workouts to ensure the Forerunner is recording accurate workout data. To set your time zone: 1. Press mode to access Menu mode. Then press to highlight Settings and press enter. 2. Highlight General and press enter. 3. Highlight Set Time and press enter. 4. Highlight the Time Zone field and press enter. Select the correct time zone from the menu and press enter. If your time zone does not appear in the menu, select Other and then enter the appropriate UTC offset. 5. Press mode repeatedly to exit. To set your user profile: 1. Follow Steps 1 and 2 of the previous procedure. Then highlight Set User Profile and press enter. 2. Highlight the Gender field and press enter. Select your gender from the menu that appears and press enter. 3. Continue to press the and arrows and enter to change the Date of Birth and Weight fields. When you are finished, press mode repeatedly to exit. Enter your gender, date of birth, and weight. Forerunner 301 Owner s Manual 7
12 GETTING STARTED > CHOOSE YOUR SPORT Choose Your Sport You can use the Forerunner to train for three different sports: Running, Biking, and Other, which can include almost any type of sport. When you choose a sport, the Forerunner automatically changes the way it calculates calories and displays speed (changes from pace for Running to speed for Biking and Other). The Forerunner also organizes workout data by sport; for more information, see Viewing Workout History. To change your sport: 1. Press and hold mode until the Change Sport menu appears. 2. Press or to highlight Running, Biking, or Other. Then press enter. Changing to a different sport. NOTE: For information on changing other settings, such as sounds, units of measure, or language, see Changing General Settings in the Customizing section. 8 Forerunner 301 Owner s Manual
13 WORKOUTS > BASIC WORKOUTS WORKOUTS The Forerunner 301 offers a wide variety of training features that can help you train at any level you choose. Use your Forerunner to set goals and alerts, train with your Virtual Partner, program interval workouts from simple to advanced, and record every workout for later review. Basic Workouts Use alerts to train toward certain time, distance, pace/speed, or heart rate goals. You can also pause or lap the timer automatically with Auto Pause and Auto Lap to make your workout flow smoothly. NOTE: Alerts, Auto Pause, and Auto Lap settings are sport-specific: when you change sport modes, you can set new values for alerts, pauses, and laps. Using Time and Distance Alerts Time and distance alerts are useful for long workouts when you want to train for a certain amount of time or distance. When you reach your goal, the Forerunner beeps and displays an on-screen message. To set a time or distance alert: 1. Press mode to access Menu mode. Then highlight Training Assistant and press enter. 2. Highlight Alerts and press enter. Then highlight Time/Dist Alert and press enter. 3. Highlight the Time Alert field or Distance Alert field and press enter. Then select Once or Repeat to set the alert one time or repeatedly. Setting a distance alert to repeat once. Forerunner 301 Owner s Manual 9
14 WORKOUTS > BASIC WORKOUTS 4. Highlight the Alert At field and press enter. Select a preset distance or time from the menu or select Custom and press enter. 5. If you selected Custom, enter a time or distance using the and arrows and enter. Then select OK. Select a distance from the menu, or select Custom and enter a distance manually. The pace/speed alert takes advantage of Speed Zones, which are ranges of pace/speed that you can store in the Forerunner for each sport. For more information, or to set your Speed Zones, see Setting Speed Zones in the Customizing section. To set a pace/speed alert: 1. Press mode to access Menu mode. Then highlight Training Assistant and press enter. 2. Select Alerts. Then select Pace (Speed) Alert. 3. Highlight the Zone field and press enter. Select a Speed Zone from the menu, or select Custom to specify your own alert values. 6. Press mode repeatedly to exit. Using Pace/Speed Alerts Pace/Speed alerts notify you if you exceed or drop below a certain pace/speed setting. (In Running mode, it s a Pace alert; in Biking and Other mode, it s a Speed alert.) 4. Highlight the Fast Pace Alert field (Fast Speed Alert) and press enter. Select On and press enter. 10 Forerunner 301 Owner s Manual
15 WORKOUTS > BASIC WORKOUTS 5. If you selected Custom in Step 3, highlight the Alert At field and enter a fast pace or speed using the and arrows and enter. Entering a custom pace. 6. Repeat Steps 4 and 5 for Slow Pace Alert (Slow Speed Alert). 7. Press mode repeatedly to exit. Using Heart Rate Alerts Similar to Pace/Speed alerts, the Heart Rate alert notifies you if your heart rate exceeds or drops below a specific number of beats per minute (bpm). Heart Rate alerts can also notify you if your heart rate exceeds or drops below a certain heart rate zone a range of beats per minute. The five commonly-accepted heart rate zones can help you determine the intensity of your workout. For more information, or to set your heart rate zones, see Setting Heart Rate Zones in the Customizing section and Training with Heart Rate Zones in the Appendix. To set a heart rate alert: 1. Press mode to access Menu mode. Then highlight Training Assistant and press enter. 2. Select Alerts. Then select Heart Rate Alert. Forerunner 301 Owner s Manual 11
16 WORKOUTS > BASIC WORKOUTS 3. Press enter to open the Intensity Level menu. Select a heart rate zone, or select Custom to specify your own alert values. 4. Highlight Min HR Alert and press enter. Then select On and press enter. 5. If you selected Custom in Step 3, select the Alert At field. Then use the and arrows and enter to set a minimum heart rate. When you turn on Auto Pause, the Forerunner tracks and displays any paused time as Rest Time on a new data page, the Rest page. This page becomes part of the data page loop. To view the Timer page and the Rest page in Timer mode, press the and arrows. NOTE: When entering custom heart rate values, you must set your minimum and maximum alerts at least five bpm apart. 6. Repeat Steps 4 and 5 for Max HR Alert. 7. Press mode repeatedly to exit. Setting Auto Pause You can set the Forerunner 301 to pause the timer automatically during your workout when your pace/speed drops below a certain value. This setting is especially helpful if your course includes stop lights or other places where you need to slow down or stop. When Auto Pause is enabled, the Timer page displays data for when the timer is started. The Rest page displays data for when the timer is paused. When the Forerunner pauses the timer, the Timer icon on the Timer page flashes to indicate that the timer has stopped. 12 Forerunner 301 Owner s Manual
17 WORKOUTS > BASIC WORKOUTS To set Auto Pause: 1. Press mode to access Menu mode. Then highlight Training Assistant and press enter. 2. Highlight Auto Pause/Lap and press enter. 3. Press enter to open the Auto Timer Pause menu. Then select On and press enter. 4. Select the Pause When field and choose Stopped or Custom. 5. If you selected Custom, enter a pace/speed to trigger the automatic pause. 6. Press mode repeatedly to exit. Setting Auto Lap You can set the Forerunner 301 to lap automatically after you travel a certain distance. This setting is helpful for comparing your performance over different parts of a workout (each mile or kilometer, for example). 2. Highlight Auto Pause/Lap and press enter. 3. Highlight the Auto Lap Trigger field and press enter. Then select On and press enter. 4. Select the Lap Distance field and select a distance from the menu or select Custom. 5. If you selected Custom, enter a distance to trigger the automatic lap. 6. Press mode repeatedly to exit. To set Auto Lap: 1. Press mode to access Menu mode. Then highlight Training Assistant and press enter. Forerunner 301 Owner s Manual 13
18 WORKOUTS > VIRTUAL PARTNER Working Out with Virtual Partner Meet your Virtual Partner, a unique tool designed help you meet your training goals. Simply enter the distance, time, or pace/speed at which you want to complete a workout. Virtual Partner runs alongside of you, graphically displaying your goal pace/speed compared to your current pace/speed. To complete your workout and meet your goal, you must stay ahead of the Virtual Partner. Make sure you stay ahead of your Virtual Partner. Your Virtual Partner You Once you begin your workout, press the and arrows to view more Virtual Partner data. Press mode to view Timer mode, and then press the and arrows to view the data pages, including the Heart Rate page. NOTE: Alerts, Auto Pause, and Auto Lap still function when you train with Virtual Partner. To set up a workout by distance & time: 1. Press mode to access Menu mode. Then highlight Training Assistant and press enter. 2. Highlight Virtual Partner and press enter. Then highlight Set Distance & Time and press enter. 3. Press enter to select the Distance field. Select a distance from the menu that appears, or select Custom to enter your own distance value. 4. Highlight the Time field and press enter. Select a time from the menu that appears, or select Custom to enter your own time value (hr, min, sec). Choosing a distance and time. 14 Forerunner 301 Owner s Manual
19 WORKOUTS > VIRTUAL PARTNER 5. Check the Pace (Speed) field to ensure that the calculated pace (speed) (based on your distance and time inputs) seems reasonable. If not, make changes to the Distance and Time fields. Then highlight Done and press enter. To set up a workout by time & pace/speed: 1. Press mode to access Menu mode. Then highlight Training Assistant and press enter. 2. Highlight Virtual Partner and press enter. Then highlight Set Time & Pace (Speed) and press enter. 3. Highlight the Time field and press enter. Select a time from the menu that appears, or select Custom to enter your own time value. 4. Enter a pace/speed in the Pace (Speed) field. 5. Check the Distance field to ensure that the calculated distance seems reasonable. Then highlight Done and press enter. To set up a workout by distance & pace/speed: 1. Press mode to access Menu mode. Then highlight Training Assistant and press enter. 2. Highlight Virtual Partner and press enter. Then highlight Set Distance & Pace (Speed) and press enter. 3. Highlight the Distance field and press enter. Select a distance from the menu that appears, or select Custom to enter your own distance value. 4. Enter a pace/speed in the Pace/Speed field. 5. Check the Time field to ensure that the calculated time seems reasonable. Then highlight Done and press enter. To end a workout early: 1. Press mode to access Menu mode. Then highlight Training Assistant and press enter. 2. Highlight End Partner Run and press enter. Forerunner 301 Owner s Manual 15
20 WORKOUTS > INTERVAL WORKOUTS Interval Workouts You can create simple interval workouts according to the following criteria: Train for a certain distance and rest for a certain amount of time. Train for a certain distance and rest for a certain distance. Train for a certain amount of time and rest for a certain amount of time. Train for a certain amount of time and rest for a certain distance. To create and save more advanced workouts involving varied distances, rest times, and repeats, refer to the next section, Advanced Workouts. To create an interval workout: 1. Press mode to access Menu mode. Then highlight Training Assistant and press enter. 2. Highlight Interval Workout and press enter. 3. Select an option from the Interval Workout page according to how you want to set up intervals. 4. Enter distance or time values into the appropriate fields. 5. Highlight the Reps field and select the number of times you want to repeat each interval. 6. Highlight Done and press enter. Select a workout option from the Interval Workout menu. 16 Forerunner 301 Owner s Manual
21 WORKOUTS > INTERVAL WORKOUTS Data for the Interval workout appears on the Lap page in Timer mode. Once you begin your workout, press the and arrows to view other data pages in Timer mode. An audible alarm sounds when you reach a rest lap, and a banner appears, counting down the rest time or distance until a new interval lap begins. During the rest lap, another audible alarm sounds when you are within 5 seconds or 20 meters (~ 65 feet) of resuming your workout. When you complete all steps in your interval workout, a banner appears. To end an interval workout manually: 1. Press mode to access Menu mode. Then highlight Training Assistant and press enter. 2. Highlight End Intervals and press enter. Press mode once to hide the rest banner. To view the rest banner again, press mode until it appears. NOTE: Auto Pause, Auto Lap, and Alerts do not function when you are doing an interval workout. Forerunner 301 Owner s Manual 17
22 WORKOUTS > ADVANCED WORKOUTS Advanced Workouts Your Forerunner 301 allows you to create and save advanced workouts that include goals for each workout step and varied distances, times, and rest laps. Once you create and save a workout, you can use the Garmin Training Center software to schedule the workout for a particular day. Scheduling allows you save setup time by planning workouts in advance and storing them on your Forerunner. For more information about installing Training Center, see the Appendix. Creating Workouts We recommend that you use the Training Center software to create workouts and transfer them to your Forerunner 301. However, you can create and save an advanced workout directly on your Forerunner if you wish. Note that you cannot use the Forerunner to schedule workouts; you must use Training Center. To create an advanced workout using the Forerunner: 1. Press mode to access Menu mode. Then highlight Training Assistant and press enter. 2. Highlight Advanced Workout and press enter. Scheduled workouts not loaded. Scheduled workouts loaded. 3. If you have not loaded scheduled workouts from Training Center, press enter to create a new workout. If you have loaded scheduled workouts from Training Center, highlight View All and press enter. Then highlight <Create New> and press enter. 4. Highlight the workout name (Run 000, Bike 000 or Other 000) and press enter to change the name of the workout. 18 Forerunner 301 Owner s Manual
23 WORKOUTS > ADVANCED WORKOUTS NOTE: To create a workout name with spaces, you must select a space from the character menu. 8. Highlight the Target field (your goal during the step) and press enter. Then select a target from the menu. Select None if you do not want to set a target for this step. 9. Below Target, enter a goal speed or heart rate value for this step (if necessary). 5. Highlight 1. Open No Target and press enter. Then select Edit Step and press enter. 6. Highlight the Duration field (how long you want the step to last) and press enter. Then select a duration. If you select Open, you can end the step during your workout by pressing lap. 7. Below Duration, enter the value where you want the step to end. 10. If this is a rest lap, select the Rest Lap field and then select Yes. (Creating Rest laps affects your workout history; see Viewing Workout History. ) 11. Press mode to finish setting up this step. 12. To enter another step, select <Add New Step> and press enter. Then repeat Steps Forerunner 301 Owner s Manual 19
24 WORKOUTS > ADVANCED WORKOUTS 13. To repeat steps, add a new step after existing steps you want to repeat. Select Repeat from the Duration field. From the Back to Step field, select the step you want to return to. Then select a number of repetitions from the Number of Reps field. Repeating steps in a workout. 2. Highlight the workout you want to start and press enter. If you have previously scheduled workouts from Training Center on your Forerunner, highlight one of the four options: Today s Workouts lists the workouts you scheduled for today in Training Center. By Date lists all scheduled workouts by date. Favorites lists all unscheduled workouts. View All lists all workouts. 14. Press mode to exit. Starting Workouts Once you begin an advanced workout, the Forerunner displays each step of the workout, including the name of the step, the goal (if any), and several pages of workout data. 3. Highlight Do Workout and press enter. To start an advanced workout: 1. From Menu mode, select Training Assistant and then Advanced Workout. 20 Forerunner 301 Owner s Manual
25 WORKOUTS > ADVANCED WORKOUTS Once you press start, the name and goal of the first workout step appear. During the workout, press the and arrows to view more data pages. To view the Heart Rate, Lap, and Timer pages, press mode until you see Timer mode. Press mode again to return to the advanced workout pages. Advanced Workouts are sport-specific, which means you create workouts for a specific sport, and you must do them in that sport. For example, if you want to create an advanced workout in the Forerunner for Biking, you must switch to Biking mode. When you create workouts in Training Center, just save the workout in the correct sport folder. The Forerunner automatically switches to the correct sport when you select an advanced workout. For example, if you try to start a Running workout while you are in Biking mode, the Forerunner changes to Running mode automatically. The goal range for pace in this workout is 5:00/mi 5:30/mi. As you approach 5:30/mi, the field fills with black from the bottom to the top. As you approach 5:00/mi, the field fills with black from the top to the bottom. When you are outside of your goal range, the field fills with black completely. Other advanced workout data pages. Forerunner 301 Owner s Manual 21
26 WORKOUTS > ADVANCED WORKOUTS Editing Workouts You can edit workouts within Training Center or directly in the Forerunner. However, if you edit workouts in the Forerunner, your changes may be temporary. Training Center serves as the master list of workouts: if you edit a workout in the Forerunner, the changes will be overwritten the next time you transfer workouts from Training Center. To make a permanent change to a workout, edit the workout in Training Center and then transfer it to your Forerunner. To edit an advanced workout: 1. From Menu mode, select Training Assistant and then Advanced Workout. 2. If you have loaded workouts from Training Center on your Forerunner, highlight View All and press enter. 3. Highlight the workout you want to change and press enter. Then highlight Edit Workout and press enter. 4. Select the step you want to edit and press enter. Then make any necessary changes and press mode. 5. Edit other steps as necessary. Then press mode to exit. To delete an advanced workout: 1. From Menu mode, select Training Assistant and then Advanced Workout. 2. Highlight View All and press enter. 3. Highlight the workout you want to delete and press enter. Then highlight Delete Workout and press enter. 4. Highlight Yes and press enter to delete the workout. 22 Forerunner 301 Owner s Manual
27 HISTORY > VIEWING WORKOUT HISTORY VIEWING WORKOUT HISTORY Your Forerunner 301 automatically saves all workout data (when the timer is started) and can hold up to two years (5000 laps) of data in memory. The Forerunner never erases old workout history, so you will never lose data. Instead, it stops recording history when it becomes full. Load your history into the Training Center software periodically to keep track of all of your workouts. Workout history data includes distance, time, calories, heart rate, and detailed lap information. No data is saved when the timer is stopped. History on the Forerunner is organized by sport. To view history for a certain sport, you must change to that sport mode. You can view the data on your Forerunner or transfer the data to the Training Center software, where you can analyze your workout. 2. Highlight By Day and press enter. 3. Press to scroll through the list of workouts. As you scroll, summary details appear below the workout list for each workout. 4. Highlight a workout and press enter to view all workout details. The Forerunner displays the details of a workout differently, depending on what type of workout you did. Details of a basic workout appear on one summary page. To view lap details, highlight View Laps and press enter. Basic Workout History Highlight each lap to view detailed information at the bottom of the page. To view history by day: 1. Press mode to access Menu mode. Then select Run History (Bike History or Other History). Forerunner 301 Owner s Manual 23
28 HISTORY > VIEWING WORKOUT HISTORY Details of Virtual Partner, Interval, and Advanced workouts appear with tabs, which organize information about the workout into sections. To view information on different tabs, press the and arrows. Interval Workout History From top to bottom, the tabs show workout totals, run and rest totals, and interval workout goals. Virtual Partner Workout History The top tab shows workout totals. The bottom tab shows Virtual Partner results. Advanced Workout History From top to bottom, the tabs show workout totals, run and rest totals, and the advanced workout name. 24 Forerunner 301 Owner s Manual
29 HISTORY > VIEWING WORKOUT HISTORY To view laps on a map: 1. While viewing details for a workout, highlight View Laps and press enter. 2. Highlight a lap in the list and press enter. Then highlight View on Map and press enter. 3. Press the and arrows to zoom in and out on the map. When you are finished viewing the lap, press enter to view the next lap. Press mode to exit. To delete laps from a run: 1. While viewing details for a workout, highlight View Laps and press enter. 2. Highlight the lap you want to delete and press enter. Then highlight Delete Lap and press enter. 3. Highlight Yes and press enter to delete the lap. To delete a workout: 1. While viewing details for a workout, highlight View Laps and press enter. 2. Highlight a lap in the list and press enter. Then highlight Delete Entire Run and press enter. 3. Highlight Yes and press enter to delete the workout. To view history by weeks: 1. Press mode until you see Menu mode. Then highlight History and press enter. 2. Highlight By Week and press enter. 3. Press to scroll through the list of weeks. As you scroll, workout totals for each week appear below the list of workouts. 4. Highlight a week and press enter to view the workouts in that week by day. Forerunner 301 Owner s Manual 25
30 HISTORY > VIEWING WORKOUT HISTORY To view history totals: 1. Press mode to access Menu mode. Then select Run History (Bike History or Other History). 2. Highlight History Totals and press enter. Totals appear for distance, time, and calories for all of your saved workouts. To delete old workout history: 1. Press mode to access Menu mode. Then select Run History (Bike History or Other History). 2. Highlight Delete... and press enter. 3. Select an option to delete old workouts. To delete all workouts, select Delete All. 4. Highlight Yes and press enter to delete the workouts. 3. To view history by weeks, highlight View Weeks and press enter. 26 Forerunner 301 Owner s Manual
31 NAVIGATING > NAVIGATING WITH THE MAP NAVIGATING WITH FORERUNNER Use the GPS navigation features of your Forerunner to view your workout path on a map, save Locations you want to remember, create routes, and find your way home. Be sure to add Map mode, as explained below, so you can take advantage of these navigation features. To add Map mode: 1. Press mode to access Menu mode. Then select Navigation. 2. Highlight Add Map Mode and press enter. Map mode appears. Navigating with the Map After you have added Map mode, press mode to see the three main modes in order: Timer Mode Map Mode Menu Mode Once you start the timer and begin to move, a tiny dotted line appears on the Map, showing you exactly where you have traveled. This dotted line is called a track. At the bottom of the Map, you can view the zoom level, and at the top, you can view the direction you are traveling. To zoom in or out on the Map, press the and arrows. Forerunner 301 Owner s Manual 27
32 NAVIGATING > NAVIGATING WITH THE MAP Direction of travel Zoom scale Lap marker Starting point To remove Map mode: 1. Press mode to access Menu mode. Then select Navigation. 2. Highlight Remove Map Mode and press enter. To change the orientation of the Map: 1. Press mode to access Menu mode. Then select Navigation. 2. Select Orient Map North or Orient Map Ahead. Orient Map North means that North always appears at the top of the Map. Your position on the map is represented by a triangle, which points toward your current direction. The direction arrow at the top of the Map disappears when you are in North orientation. Orient Map Ahead means the direction you are traveling always appears at the top of the Map (Map rotates as you move). Your position on the Map is represented by a person. 28 Forerunner 301 Owner s Manual
33 NAVIGATING > MARKING AND FINDING LOCATIONS Marking and Finding Locations A Location is a point on the Map that you store in memory. If you want to remember landmarks or return to a certain spot, mark a Location there. The Location appears on the Map with a name and symbol. You can find, view, and return to Locations at any time. To mark your Location: 1. Go to a place where you want to mark a Location. 2. Press mode to access Menu mode. Then select Navigation. 3. Highlight Mark Location and press enter. Symbol field Name field 4. Highlight the Name field and use the and arrows and enter to change the name, if you wish. 5. Highlight the Symbol field and use the and arrows and enter to select a new symbol. 6. Highlight OK and press enter. To find and go to a Location: 1. Press mode to access Menu mode. Then select Navigation. 2. Highlight Find Location and press enter. 3. Select an option to list all or list nearest. 4. Use the and arrows to select the appropriate tab according to the first letter or number of the Location name. Press enter to select a tab. 5. Highlight the Location you are searching for and press enter. Forerunner 301 Owner s Manual 29
34 NAVIGATING > MARKING AND FINDING LOCATIONS 6. Highlight GoTo and press enter. A straight line directs you to the Location. NOTE: You can also navigate to a starting point by following your path (not a straight line). See Navigating Back to Start To stop navigating to a Location: 1. Press mode to access Menu mode. Then select Navigation. 2. Highlight Stop GoTo and press enter. 3. Find the Location you want to change (see To find and go to a Location ). Highlight the Location and press enter. 4. Select the name, symbol, elevation, or latitude and longitude and make any necessary changes. To delete a Location: 1. Press mode to access Menu mode. Then select Navigation. 2. Highlight Find Location and press enter. 3. Find the Location you want to delete (see To find and go to a Location ). Highlight the Location and press enter. 4. Highlight Delete and press enter. Then highlight Yes and press enter. To edit a Location: 1. Press mode to access Menu mode. Then select Navigation. 2. Highlight Find Location and press enter. 30 Forerunner 301 Owner s Manual
35 NAVIGATING > NAVIGATING BACK TO START Navigating Back to Start During each workout, the Forerunner 301 creates a tiny dotted line on the Map called a track. Tracks are like tiny footprints that show you exactly where you have traveled. When you want to return to your starting point, the Forerunner takes you back along the exact path you traveled. Back to Start works only if you have an active workout (timer running) or if you have not pressed reset since your last workout. Once you press reset, your tracks are erased from the Map. To navigate back to your starting point: 1. Press mode to access Menu mode. Then select Navigation. 2. Highlight Back to Start and press enter. A line following your path appears on the Map from your current position to your starting position. Forerunner 301 Owner s Manual 31
36 NAVIGATING > NAVIGATING WITH ROUTES Navigating with Routes A route provides straight line directions between two or more points on the Map. After you create Locations, you can use them to build routes involving a few points or many points. Then you can save the routes and use them to navigate at any time. To create a route: 1. Press mode to access Menu mode. Then select Navigation. 2. Highlight Routes and press enter. 3. Highlight <Create New> and press enter. 4. Press enter to add a Location to your route. Then find the Location you want to add using the instructions for finding Locations (see To find and go to a Location ). Highlight the correct Location and press enter. 5. Repeat Step 4 to continue to add Locations to your route. When you are finished adding Locations, highlight Follow and press enter. 6. A menu appears. To follow the route as listed, select the last point in the route from the menu. To invert the route, select the first point in the route from the menu. Your route appears on the Map as a dark line connecting each Location. To find and navigate a route: 1. Press mode to access Menu mode. Then select Navigation. 2. Select Routes. 2. Highlight List All and press enter. 3. Highlight the route you want to follow and press enter. Then highlight Follow and press enter. 32 Forerunner 301 Owner s Manual
37 NAVIGATING > NAVIGATING WITH ROUTES 4. A menu appears. Select the point you want to route to as described in the previous procedure. Your route appears on the Map. To stop navigating a route: 1. Press mode to access Menu mode. Then select Navigation. 2. Highlight Stop GoTo and press enter. To edit a route: 1. Press mode to access Menu mode. Then select Navigation. 2. Select Routes. 3. Select List All and then select the route you want to edit. 4. To insert or delete a Location, highlight a Location and press enter. Then select Insert or Delete. 5. When you are finished making changes, select Follow or press mode to exit. To delete a route: 1. Press mode to access Menu mode. Then select Navigation. 2. Select Routes. 3. Highlight List All and press enter. 4. Highlight the route you want to delete and press enter. Then highlight Delete and press enter. Select Yes to delete the route. To delete all routes: 1. Press mode to access Menu mode. Then select Navigation. 2. Select Routes. 3. Highlight Delete All and press enter. Select Yes to delete all routes. Forerunner 301 Owner s Manual 33
38 NAVIGATING > VIEWING GPS INFORMATION Viewing GPS Information The GPS Information page displays information about the satellite signals the Forerunner 301 is currently receiving. Estimated accuracy Positions of satellites in space Bar showing strength of satellite signal Number of satellite Each GPS satellite in space has a specific number that identifies it. The numbers of several GPS satellites appear on the circular graphic in the middle of the page. Each number corresponds to the current position of that satellite in space. Each highlighted number on the graphic corresponds to a satellite from which the Forerunner is currently receiving signals. The black bars to the right of the graphic represent the strength of each satellite signal received (the number of the satellite appears below each bar). To view the GPS Info page: 1. Press mode to access Menu mode. Then select Navigation. 2. Highlight GPS Info and press enter. The GPS Information page appears. About GPS The Global Positioning System (GPS) is a satellite-based navigation system made up of a network of 24 satellites placed into orbit by the United States Department of Defense. GPS was originally intended for military applications, but in the 1980s, the government made the system available for civilian use. GPS works in any weather conditions, anywhere in the world, 24 hours a day. There are no subscription fees or setup charges to use GPS. For more information, visit 34 Forerunner 301 Owner s Manual
39 CUSTOMIZING > CHANGING GENERAL SETTINGS CUSTOMIZING THE FORERUNNER You can customize both general Forerunner settings and settings that apply to individual sports, such as Custom pages, heart rate zones, and speed zones. Changing General Settings Settings such as time zone, units of measure, backlight, contrast, sounds, and language affect all sport modes in the Forerunner. You can also turn off or reset scanning for heart rate. Change these settings from the General Settings page. To open the General Settings page: 1. Press mode to access Menu mode. Then highlight Settings and press enter. 2. Highlight General and press enter. To change time settings: 1. From the General Settings page, highlight Set Time and press enter. 2. Select a time format and time zone and enable or disable Daylight Saving time. To change units of measure 1. From the General Settings page, highlight Set Units and press enter. 2. Select statute or metric units for distance and speed and select units for heart rate. To change backlight and contrast: 1. From the General Settings page, highlight Set Display and press enter. 2. Select the amount of time the backlight stays on and the amount of screen contrast you want to display. NOTE: Use a low backlight timeout setting to conserve battery power. Select the General Settings page. Forerunner 301 Owner s Manual 35
40 CUSTOMIZING > CHANGING GENERAL SETTINGS To turn on automatic scrolling for data pages: 1. From the General Settings page, select Set Display. 2. Highlight the Data Page field and press enter. Select a speed setting for the automatic scrolling, or select Manual Switch to view these pages with the and arrows only. To lap automatically when you press stop: 1. From the General Settings page, select Set Lap on Stop. 2. Press enter to select the Lap on Stop field. Select Yes to end the current lap each time you press the stop button. NOTE: You can also end a lap manually when the timer is stopped by pressing lap. When you turn on automatic scrolling, the Timer mode data pages (Lap, Heart Rate, Custom, and Timer) display automatically, one after the other, during your workout. To turn off or reset HR monitor scanning: 1. From the General Settings page, select Set Heart Monitor. 2. Press enter to select the Heart Rate Monitor field. Select Off to turn off the monitor. Highlight Restart Scan and press enter to reset heart rate monitor scanning if the Forerunner receives erratic readings. To change sounds: 1. From the General Settings page, select Set System. 2. Press enter to select the Beeper field. Select a sound setting from the menu. To change language (if enabled): 1. From the General Settings page, select Set System. 2. Select a language from the Language menu. 36 Forerunner 301 Owner s Manual
41 CUSTOMIZING > CHANGING SPORT SETTINGS To use the Forerunner indoors: 1. From the General Settings page, select Set System. 2. Highlight the GPS field and press enter. Then select Use Indoors. NOTE: When GPS is set to Use Indoors, speed and distance data are not available. The next time you turn on the Forerunner, it will search for satellite signals again. To restore settings: 1. From the General Settings page, select Restore Settings. 2. Select Yes to restore all settings to their original state. Changing Sport Settings For each sport, you can change speed units and enter extra gear or bike weight, which affects how calories are calculated. You can also set up a Custom page and enter speed zones and heart rate zones for each sport (see the sections that follow for more information). To set extra weight for a sport: 1. Press mode to access Menu mode. Then highlight Settings and press enter. 2. Highlight the sport you are training for and press enter. Then select Set Extra Weight. 3. Press enter to select the Gear/Bike Weight field. Enter the amount of extra weight you are carrying and select OK. To change speed units for a sport: 1. Press mode to access Menu mode. Then highlight Settings and press enter. 2. Highlight the sport you want to change units for and press enter. 3. Highlight Set Speed Units and press enter. 4. Press enter to select the Speed Units field. Then select pace units (min/mile or min/km) or speed units (mph or kmh). Forerunner 301 Owner s Manual 37
42 CUSTOMIZING > CHANGING SPORT SETTINGS Pace smoothing averages your pace over a certain amount of time to avoid errors in GPS position and speed due to varying satellite signal reception. When you turn on or increase pace smoothing, the pace displayed on your Forerunner is steadier (fewer large jumps). To use pace smoothing, you must set your Forerunner to Running mode or set your speed units to Pace, as described previously. NOTE: Pace smoothing affects your displayed pace and the timing of pace alerts and Auto Pause; however, it does not affect the data stored in workout History. 5. Select the amount of pace smoothing you want to use. If the Pace Smoothing field does not appear, change the speed units to pace. 6. Press mode repeatedly to exit. To restore sport default settings: 1. Press mode to access Menu mode. Then highlight Settings and press enter. 2. Highlight the sport you want to reset settings for and press enter. 3. Highlight Restore Settings and press enter. 4. Press mode repeatedly to exit. To turn on pace smoothing: 1. Press mode to access Menu mode. Then highlight Settings and press enter. 2. Highlight the sport you want to change units for and press enter. 3. Highlight Set Speed Units and press enter. 4. Highlight the Pace Smoothing field and press enter. 38 Forerunner 301 Owner s Manual
43 CUSTOMIZING > SETTING UP CUSTOM PAGES Setting Up Custom Pages Each sport in your Forerunner 301 has its own Custom page. You can select several types of data to display on this page. When you are training, access the page from the Timer mode by pressing the or arrows. To scroll through the Lap, Heart Rate, Custom, and Timer data pages automatically, see Changing General Settings. To set up a Custom page for a sport: 1. Press mode to access Menu mode. Then highlight Settings and press enter. 2. Highlight the sport you want to set up the Custom page for and press enter. 3. Highlight Set Custom Page and press enter. 4. Press enter to select the Custom 1 field. Select the type of data you want to display in this field. Setting up a custom page. 5. Repeat Step 4 for the Custom 2 and Custom 3 fields. 6. Press mode repeatedly to exit. NOTE: The data fields on each custom page change based on which sport mode you are currently in. For example, Pace appears as a data field option in Running mode but not in Biking mode. Available fields also change based on what units you set for speed (pace or speed) and for heart rate (beats per minute or % max). Forerunner 301 Owner s Manual 39
Edge 205/305. owner s manual
 Edge 205/305 owner s manual Copyright 2005 2006 Garmin Ltd. or its subsidiaries. Garmin International, Inc. 1200 East 151st Street Olathe, Kansas 66062, U.S.A. Tel. 913/397.8200 or 800/800.1020 Fax 913/397.8282
ProSense 307/347/367 Reviewer's Guide
 ProSense 307/347/367 Reviewer's Guide Contents Epson ProSense 307/347/367 GPS Multisport Watch Reviewer's Guide... 5 Using the Watch... 6 Controlling Music Playback... 6 Measuring Workouts... 7 Displayable
HRM Triax 15 is engineered to provide quick, one-touch access to a variety of critical information during training and in competition.
 1 Information is power. HRM Triax 15 is engineered to provide quick, one-touch access to a variety of critical information during training and in competition. Used properly this heart rate monitor will
Using a previously saved session Select a route Route direction and guiding pop-up
 Content A word from the product manager...4 1. Product composition...4 2. Charging the battery...4 3. Switch on and set the product...4 4. Installing the heart rate monitor belt...5 5. Key functions...5
HRM Triax 100 is engineered to provide quick, one-touch access to a variety of critical information during training and in competition.
 1 Information is power. HRM Triax 100 is engineered to provide quick, one-touch access to a variety of critical information during training and in competition. Used properly this heart rate monitor will
User s Manual: How to wear the watch properly in your forearm: HRM Optical Pulse watch. Caution: Important notes: Soleus Pulse Heart Rate Monitor
 User s Manual: Ref: 13192D/ 02W079G078) HRM Optical Pulse watch The Soleus Pulse uses an Electro-optical technology to sense the heart beat. It has two LED beams and electro-optical cell to sense the volume
Monitor Instructions for Models: CHB-R6 CHB-UV6
 Monitor Instructions for Models: CHB-R6 CHB-UV6 Power supply: output DC 9v/ 1000mA transformer adaptor TABLE OF CONTENTS Function Buttons ----------------------------------------------------------------------------
ENG/FRA B ENG RUNNING. User Manual Polar RS200 Polar RS200sd
 17928534.01 ENGFRA B ENG RUNNING User Manual Polar RS200 Polar RS200sd RS200 RS200sd QUICK GUIDE View Quick menu View the date and time of day. View detailed long-term information on your exercises. Change,
USER MANUAL. Polar F11 Fitness Heart Rate Monitor BUTTONS
 BUTTONS 17925802.00 ENG/FRA A ENG USER MANUAL Polar F11 Fitness Heart Rate Monitor Light Back Press OK to enter the menu. Press the / buttons to move forward in the menus. Press and hold the Back button
COROS APEX Watch User Manual
 COROS APEX Watch User Manual Last edit on 12/27/2018 Home Page Default page can be customized with different watch face options. Information displayed on the home page includes but not limited to current
OARTEC TRAINING MONITOR OTM-2
 OARTEC TRAINING MONITOR OTM-2 OPERATION MANUAL Introduction Thankyou for purchasing the Oartec DX with our new training monitor, the OTM-2. The OTM-2 has a number of advanced features including automatic
Evolve 3 & 5 Service Manual
 Evolve 3 & 5 Service Manual 1 Product Browse 2 Contents CHAPTER 1: SERIAL NUMBER LOCATION... 5 CHAPTER 2: CONSOLE INSTRUCTIONS 2.1 Console Overview... 6 2.1.1 Evolve 3 Console Overview... 6 2.1.2 Evolve
RELEASED. Clearing your active insulin
 To clear all your settings: 1. Make sure the pump is not connected to your body. 2. Go to the Manage Settings screen. Menu > Utilities > Manage Settings 3. Simultaneously press and hold and until the Manage
Sleep Apnea Therapy Software Clinician Manual
 Sleep Apnea Therapy Software Clinician Manual Page ii Sleep Apnea Therapy Software Clinician Manual Notices Revised Notice Trademark Copyright Sleep Apnea Therapy Software Clinician Manual 103391 Rev A
BRITE R450. LightTrak Sensor Time/Date. Goal Progress Bar Activity Value Activity Type Notification Alert. Quick Start Guide
 BRITE R450 LightTrak Sensor Time/Date Goal Progress Bar Activity Value Activity Type Notification Alert Quick Start Guide Welcome to LifeTrak. Let s take a quick tour of the basic features. To turn on
S610. Quick Guide. OwnIndex to reliably predict your VO 2max. OwnCal the most accurate calorie consumption calculation
 OwnIndex to reliably predict your VO 2max Quick Guide OwnCal the most accurate calorie consumption calculation Signal/Light Up move onward increase the selected value OwnCode locks out possible interference
User Manual D _R0_125/09/2009
 Pulse watch with integrated calorie counter User Manual D40400-08-01-02_R0_125/09/2009 Please read this manual thoroughly before first using this device HMM Diagnostics GmbH D-69221 Dossenheim, Germany
Energy Fitness Tracker. User Manual EFT 1
 Energy Fitness Tracker User Manual EFT 1 Content Explanation of Symbols on the App Fat Burning Zone Cleaning Introduction Parts LED Indicactor Power Button Sensor USB Socket (Under Waterproof Cover) USB
HealthCare International, Inc. PO Box 1509, Langley, WA P: (360) or (800)
 or (800)") Owner s Manual V2.2 HealthCare International, Inc. PO Box 1509, Langley, WA 98260 www.hcifitness.com sales@hcifitness.com P: (360) 321-7090 or (800) 398-9121 1 Table of Contents Safety Precautions... 3
Owner s Manual V2.2 HealthCare International, Inc. PO Box 1509, Langley, WA 98260 www.hcifitness.com sales@hcifitness.com P: (360) 321-7090 or (800) 398-9121 1 Table of Contents Safety Precautions... 3
Computer T4.2 IWM. COMPUTER MANUAL Reebok T
 Computer T4.2 IWM COMPUTER MANUAL Reebok T4.5-20110111 DISPLAY GB GB Buttons and Functions START Press to start exercise at an initial speed of 0.5 mph / 0.8 km/h. STOP Press to stop exercise during workout.
T320X T460X T460XC OWNER S MANUAL TREADMILLS. Part no: R0: T460x illustrated
 T320X T460X T460XC TREADMILLS OWNER S MANUAL Part no: 691009 R0:10-2007 T460x illustrated BODYGUARD FITNESS, division of Procycle CANADA 9095, 25 th Avenue, Saint-Georges (Québec) Canada G6A 1A1 The name
STRAPLESS HEART RATE MONITOR Model: SE138
 STRAPLESS HEART RATE MONITOR Model: SE138 CONTTS USER MANUAL Introduction... 2 Control Buttons...2 LCD...2 Getting Started...3 Activate Watch (First Time Use Only)...3 Set Time and User Data...3 Battery
HealthCare International, Inc.
 Owner s Manual V.2 HealthCare International, Inc. 1 Table of Contents Safety Precautions... 3 Warranty Information... 4 Assembly Instructions... 5 Quick Tips... 8 AC Adaptor:... 8 Levelers:... 8 Seat Adjustments:...
Contour Diabetes app User Guide
 Contour Diabetes app User Guide Contents iii Contents Chapter 1: Introduction...5 About the CONTOUR DIABETES app...6 System and Device Requirements...6 Intended Use...6 Chapter 2: Getting Started...7
Timex. Ironman SLEEK 250-LAP FULL USER GUIDE
 Timex Ironman SLEEK 250-LAP FULL USER GUIDE Timex Ironman SLEEK 250-LAP User Manual INTRODUCING YOUR SLEEK 250-LAP The SLEEK 250-LAP is easy to use. With TapScreen technology, take laps/splits manually
SU UPRIGHT OWNER S MANUAL PLEASE CAREFULLY READ THIS ENTIRE MANUAL BEFORE OPERATING YOUR UPRIGHT!
 SU135-40 UPRIGHT OWNER S MANUAL PLEASE CAREFULLY READ THIS ENTIRE MANUAL BEFORE OPERATING YOUR UPRIGHT! Safety Hints WARNING - Read all instructions before using this appliance. Do not operate upright
Adventure 3 Plus Service Manual
 Adventure 3 Plus Service Manual 1 TABLE OF CONTENTS CHAPTER 1: SERIAL NUMBER LOCATION...3 CHAPTER 2: PREVENTATIVE MAINTENANCE 2.1 Preventative Maintenance. 4 2.2 Tension and Centering the Running Belt....6
TORNADO AIR BIKE SF-B2706 USER MANUAL
 TORNADO AIR BIKE SF-B2706 USER MANUAL IMPORTANT! Read all instructions carefully before using this product. Retain owner s manual for future reference. For customer service, please contact: support@sunnyhealthfitness.com
Table of Contents. Introduction...4. Features...4. Getting Started...5. Basic Operation...6. Navigating the Watch...6. Icon Descriptions...
 Table of Contents Introduction...4 Features...4 Getting Started...5 Charging the Run Trainer 2.0 GPS...5 Basic Operation...6 Navigating the Watch...6 Icon Descriptions...7 First-Time Setup...7 Connecting
CONSOLE GUIDE & SET-UP INSTRUCTIONS STANDARD CONSOLE
 CONSOLE GUIDE & SET-UP INSTRUCTIONS STANDARD CONSOLE ii TABLE OF CONTENTS Standard Console Guide ZR7000 / ZR8000 Console Features... 1 Dynamic Display (LCD)... 2 Keypad Buttons... 4 User (Club) Settings...
IC031 Magnetic Belt Drive Performance Indoor Cycle Bike
 IC031 Magnetic Belt Drive Performance Indoor Cycle Bike USER MANUAL IMPORTANT: Read all instructions carefully before using this product. Retain owner s manual for future reference. For customer service,
Quick Guide S410 /S210 HEART RATE MONITOR. Displays your heart rate as bpm and % of HR max, average heart rate and exercise duration
 COMPLETE HR Displays your heart rate as bpm and % of HR max, average heart rate and exercise duration Allows you to set 5 exercise sets for interval training with HR target zones and recovery calculation.
Software Version 2.0. User s Guide
 Software Version 2.0 User s Guide Table of Contents Contents Contents Important Information About Your FreeStyle Auto-Assist Software...1 Intended Use...1 System Requirements...1 Connecting to your Abbott
CONTENTS GETTING STARTED... 4 CHEST TRANSMITTER... 6 OPERATING INSTRUCTIONS TROUBLESHOOTING SPECIFICATIONS WARRANTY...
 2 CONTENTS 3 Your hrm[triax inspire watch is engineered to provide quick, onetouch access to critical training information. Used properly, this heart rate monitor will help you train more effectively by
Nord.cTracICA.Cr USER'S MANUAL A CAUTION QUESTIONS? .. Visit our website'at. new products, prizes, fitness tips, and much more!
 Nord.cTracICA.Cr Model No. NTCW90907.1 Serial No. Write the serial number in the space above for reference. _ USER'S MANUAL Serial Number Decal (under frame) QUESTIONS? As a manufacturer, we are committed
RELEASED. first steps. Icon Icon name What it means
 Icon Icon name What it means Connection The connection icon appears green when the Sensor feature is on and your transmitter is successfully communicating with your pump. The connection icon appears gray
Accelerator Pulse. Owner's Manual
 Accelerator Pulse Owner's Manual Accelerator PULSE OWNER'S Manual Table of Content Introduction pg. 3 Buttons pg. 3 Chest strap pg. 4 Menu System pg. 4 Major Functions Modes: pg. 4 Home Time Display pg.
User Guide for Lifegear RUNNER App
 User Guide for Lifegear RUNNER App http://www.lifegear.com.tw Contents LifeGear RUNNER App Installation 2 Connect Your Mobile Device to the Specific Bluetooth Fitness Equipment 4 Entering Your Profile
TREADMILL. Vision Fitness Classic Console TF40
 TREADMILL Vision Fitness Classic Console TF40 CLASSIC CONSOLE OPERATION A) LARGE LED DISPLAY WINDOW - displays workout time B) ALPHANUMERIC DISPLAY WINDOW displays incline, distance, speed, calories, pace,
Polar Coach Polar Coach
 GBR Polar Coach Polar Coach HEART RATE MONITOR USER S MANUAL POLAR COACH WRIST RECEIVER RESET SET/START/ STOP STORE/LAP/ RECOVERY SELECT SIGNAL/LIGHT MONITOR SYMBOLS A flashing heart indicates ongoing
USING THE MINIMED 670G SYSTEM. Instructions for the Experienced MiniMed 630G System User
 USING THE MINIMED 670G SYSTEM Instructions for the Experienced MiniMed 630G System User This is a supplemental guide. For complete instructions and safety information, please see your MiniMed 670G System
TruLink Hearing Control App User Guide
 TruLink Hearing Control App User Guide TruLink Hearing Control App User Guide GET CONNECTED In order to use the TruLink Hearing Control app, you must first pair your hearing aids with your ios device.
COMPUTER INSTRUCTIONS
 COMPUTER INSTRUCTIONS COMPUTER INSTRUCTIONS MODEL NUMBER: 9.35 2 A B M N C C D E F G H I J K L Calories/Calories Per Hour A B Time/Distance Preset Programs C D Motion Control Incline UP/DOWN E F Enter
S810. Quick Guide. OwnIndex to reliably predict your VO 2max. OwnCal the most accurate calorie consumption calculation
 Covers_S810_GBR_A.fh8 8/3/01 14:06 Page 1 C M Y CM MY CY CMY K OwnIndex to reliably predict your VO 2max Quick Guide OwnCal the most accurate calorie consumption calculation OwnCode locks out possible
How to install the Wahoo RPM Cadence on your bike: How to install the Wahoo RPM Cadence using the Shoe Clip Mount:
 Setup This setup guide is intended to assist with installing your Wahoo RPM Cadence sensor on your bike or shoe and pairing to the Wahoo Fitness app. How to install the Wahoo RPM Cadence on your bike:
Sleep Apnea Therapy Software User Manual
 Sleep Apnea Therapy Software User Manual Page ii Notices Revised Notice Trademark Copyright 103392 Rev B Published February 8, 2013 and supersedes all previous versions. The information contained in this
CONSOLE GUIDE & SET-UP INSTRUCTIONS STANDARD CONSOLE
 Time Calories Distance Pace Length Height HR% HR Level GET STARTED IN 5 SIMPLE STEPS 1 HOP FROM SIDE TO SIDE 2 START WITH SHORT STRIDES 3 KICK YOUR HEELS TO YOUR GLUTES 4 SLOWLY EXTEND YOUR STRIDE 5 MOVE
Diabetes Management App. Instruction Manual
 Diabetes Management App Instruction Manual Accu-Chek Connect Diabetes Management App Overview The Accu-Chek Connect diabetes management app (hereafter referred to as the app) is designed to help you: Transfer
A86995 Date: 08/12/2010
 A86995 Date: 08/12/2010 www.aussiefitsport.com.au WARRANTY Customer Satisfaction is our Guarantee Aussie Fit Sport Science has been developing and marketing unique and innovative fitness/exercise products
Connectivity guide for. BeMore app
 Connectivity guide for BeMore app Compatible AGXR aids These AGXR aids work with the BeMore app. If you re in doubt, please ask your hearing care professional. Table of contents Introduction to AGXR hearing
Adventure 4 Plus Service Manual
 Adventure 4 Plus Service Manual 1 TABLE OF CONTENTS CHAPTER 1: SERIAL NUMBER LOCATION...3 CHAPTER 2: PREVENTATIVE MAINTENANCE 2.1 Preventative Maintenance. 4 2.2 Tension and Centering the Running Belt....6
Connectivity guide for ReSound Smart 3D app
 Connectivity guide for ReSound Smart 3D app Table of contents Introduction to ReSound Smart Hearing Aids... 3 Mobile Devices that Work with ReSound Smart Hearing Aids... 3 Connectivity and ReSound Smart
Mini UPS and Power Sensor. Power Output Cord. Power Input Port. Switch Port
 AVTECH Mini UPS and Power Sensor AVTECH s Mini UPS and Power Sensor (MUPS) monitors the on/off state of a power source, such as main power, a UPS, surge protector or standard wall outlet, and also provides
Epilepsy Sensor Transmitter
 Epilepsy Sensor Transmitter Installation Guide t: 01977 661234 f: 01977 660562 e: enquiries@tunstall.com w: uk.tunstall.com Version: V0.1 (421V0R1.18) Contents 1. Features and Introduction... 3 Your Epilepsy
Demo Mode. Once you have taken the time to navigate your RPM 2 app in "Demo mode" you should be ready to pair, connect, and try your inserts.
 Demo Mode RPM 2 is supported with a "demonstration (Demo) mode" that easily allows you to navigate the app. Demo mode is intended for navigation purposes only. Data in Demo mode are simply random data
User Manual Verizon Wireless. All Rights Reserved. verizonwireless.com OM2260VW
 User Manual 2010 Verizon Wireless. All Rights Reserved. verizonwireless.com OM2260VW Home Phone Connect Welcome to Verizon Wireless Thank you for choosing Verizon Wireless Home Phone Connect. You re now
Table of Contents. Contour Diabetes App User Guide
 Table of Contents Introduction... 3 About the CONTOUR Diabetes App... 3 System and Device Requirements... 3 Intended Use... 3 Getting Started... 3 Downloading CONTOUR... 3 Apple... 3 Android... 4 Quick
PilotOne II. User Guide
 PilotOne II User Guide Contents 1. Welcome 4 2. Description 5 3. Using Phonak PilotOne II 6 3.1 Inserting a new battery 6 3.2 Switching On / Off 7 3.3 Holding correctly 7 3.4 Changing hearing aid volume
BH Fitness T4 / T6 SPORT Treadmill Owner s Manual
 BH Fitness T4 / T6 SPORT Treadmill Owner s Manual BEFORE YOU BEGIN It is very important to become familiar with the frequently used components of your treadmill. Computer Console Circuit Breaker ON/OFF
TomTom GPS Watch User Manual 2.0
 TomTom GPS Watch User Manual 2.0 Contents Welcome 5 What's new 6 What's new in this release... 6 Your watch 8 About your watch... 8 Wearing your watch... 9 Cleaning your watch... 9 The heart rate sensor...
TABLE OF CONTENTS. Introduction Features Charging the Run Trainer 2.0 GPS Basic Operation Icon Descriptions...
 TABLE OF CONTENTS Introduction... 4 Features... 4 Charging the Run Trainer 2.0 GPS... 5 Basic Operation... 6 Icon Descriptions... 7 First-Time Setup... 7 Setting up the Optional Heart Rate Sensor... 8
OTM1 OARTEC SLIDER USER MANUAL Software Version 2.11
 OTM1 OARTEC SLIDER USER MANUAL Software Version 2.11 Contents Features Getting Started Technical Functions Software Updates Training Modes Just Row Mode Time and Distance Workouts Interval Workouts Time
510Ic Owner s Manual CONSOLE OVERVIEW & GENERAL NOTES CONSOLE KEYPAD FUNTION
 CONSOLE OVERVIEW & GENERAL NOTES A primary feature of the 510Ic is the ability to control and monitor the user s workout program via the brilliant LCD console. At any time, the user may view their speed,
Laerdal-SonoSim Procedure Trainer
 EN Laerdal-SonoSim Procedure Trainer User Guide www.laerdal.com Intended Use The Laerdal-SonoSim Procedure Trainer allows learners the ability to perform ultrasound guidance with real-patient data on multiple
Contents 2. Polar M430 User Manual 11. Introduction 11. Take full advantage of your M Get started 12. Setting up your M430 12
 USER MANUAL CONTENTS Contents 2 Polar M430 User Manual 11 Introduction 11 Take full advantage of your M430 11 Get started 12 Setting up your M430 12 Choose one option for setup 12 Option A: Set up with
User Manual. RaySafe i2 dose viewer
 User Manual RaySafe i2 dose viewer 2012.03 Unfors RaySafe 5001048-A All rights are reserved. Reproduction or transmission in whole or in part, in any form or by any means, electronic, mechanical or otherwise,
USING THE MINIMED 670G SYSTEM
 USING THE MINIMED 670G SYSTEM Instructions for the Experienced MiniMed 630G System User USING THE MINIMED 670G SYSTEM: INSTRUCTIONS FOR THE EXPERIENCED USER Checklist for starting on your MiniMed 670G
MAGNETIC ELLIPTICAL TRAINER SF-E3608 USER MANUAL
 MAGNETIC ELLIPTICAL TRAINER SF-E3608 USER MANUAL WARNING! Your elliptical trainer is not designed for reverse pedaling. Failure to comply with this warning may result in permanent damage to your new equipment.
TWISTING STAIR STEPPER WITH BANDS NO. 068 USER MANUAL
 TWISTING STAIR STEPPER WITH BANDS NO. 068 USER MANUAL IMPORTANT: Read all instructions carefully before using this product. Retain owner s manual for future reference. For customer service, please contact:
WIRELESS CADENCE METER FOR THE LEMOND REVMASTER 10: INST 85 RPM CADENCE TIME DISTANCE KCAL INST MI 2.0 INSTRUCTION MANUAL
 WIRELESS CADENCE METER FOR THE LEMOND REVMASTER START STOP > > INST 85 RPM 10:30 121 CADENCE TIME DISTANCE KCAL 2.0 INST MI 96 CLR CADENCE HR INSTRUCTION MANUAL 2007 LeMond Fitness All rights reserved
REV G. Chip System and Display Module Operation Manual
 995500 REV G Chip System and Display Module Operation Manual Introduction The Keiser Chip System is an electronic replacement for a hand written exercise card. Workout data is stored in a small electronic
MyRunningApp user guide ver User guide ver MyRunningApp
 User guide ver. 4.1.0 MyRunningApp 1 Index 1. Releases overview...3 2. Introduction...6 3. Getting started...7 4. Workouts...10 5. Automatic lap and manual lap...15 6. Goals...18 7. Indoor mode...20 8.
TruLink Hearing Control App User Guide
 TruLink Hearing Control App User Guide GET CONNECTED In order to use TruLink Hearing Control app, you must first pair your hearing aids with your ios device. IMPORTANT: Before completing the following
EXCITE, ENGAGING CARDIO ADVANCED LED DISPLAY RUN User manual
 EXCITE, ENGAGING CARDIO ADVANCED LED DISPLAY RUN 1000 User manual Contents Description of the control panel...3 Function keys...4 Manual control keys...5 Profile LEDs...7 Heart rate LEDs...8 The number
SMART TRAINER - HEART RATE MONITOR MODEL: SE139
 SMART TRAINER - HEART RATE MONITOR MODEL: SE139 CONTENTS USER MANUAL Introduction... 2 Smart Training Program... 2 Fitness Index... 3 Training Tips... 4 The Receiver Watch... 4 The Heart Rate Chest Belt...
TWISTING STAIR STEPPER WITH BANDS
 TWISTING STAIR STEPPER WITH BANDS NO. 068 USER MANUAL IMPORTANT! Please retain owner s manual for maintenance and adjustment instructions. Your satisfaction is very important to us, PLEASE DO NOT RETURN
KICKR SNAP BIKE TRAINER
 KICKR SNAP BIKE TRAINER DOWNLOAD OUR APP WAHOO FITNESS Wahoo Fitness is a running, cycling and fitness app that harnesses the awesome power of the iphone to transform the way you ride, run and reach your
POLARPERSONALTRAINER.COM HELP
 POLARPERSONALTRAINER.COM HELP CONTENTS Contents 2 Introduction 9 Registration and Login 10 Data Transfer 11 Training Data / Activity data 11 Training Programs 11 Strength Training Exercises 11 Data Transfer
TomTom GPS Watch User Manual 2.0
 TomTom GPS Watch User Manual 2.0 Contents Welcome 5 What's new 6 What's new in this release... 6 Your watch 7 About your watch... 7 Wearing your watch... 7 Cleaning your watch... 8 The heart rate sensor...
Contents 2. Polar M430 User Manual 12. Introduction 12. Take full advantage of your M Get started 13. Setting up your M430 13
 USER MANUAL CONTENTS Contents 2 Polar M430 User Manual 12 Introduction 12 Take full advantage of your M430 12 Get started 13 Setting up your M430 13 Choose one option for setup 13 Option A: Set up with
MAGNETIC ELLIPTICAL TRAINER SF-E3608 USER MANUAL
 MAGNETIC ELLIPTICAL TRAINER SF-E3608 USER MANUAL WARNING! Your elliptical trainer is not designed for reverse pedaling. Failure to comply with this warning may result in permanent damage to your new equipment.
Logic. Owner s Guide. Blood Glucose Monitor
 Owner s Guide Logic Blood Glucose Monitor TM You will notice these symbols on your vials of test strips and control solution as well as the label on the back of your BD Logic TM Blood Glucose Monitor.
Console Features The Console provides information about your workout on the display screens.
 Console Features The Console provides information about your workout on the display screens. Programs Manual 20/10 Interval 30/90 Interval Custom Interval Time Target Heart Rate Zones Calorie Target Kilojoules
Forerunner 645 Music. chemically strengthened glass. stainless steel x 42.5 x 13.5 mm. sunlight-visible, transflective memory-in-pixel (MIP)
") General Lens Material chemically strengthened glass Bezel Material stainless steel Quick Release Bands Strap material yes (20 mm, Industry standard) silicone Physical size 42.5 x 42.5 x 13.5 mm Fits wrists
General Lens Material chemically strengthened glass Bezel Material stainless steel Quick Release Bands Strap material yes (20 mm, Industry standard) silicone Physical size 42.5 x 42.5 x 13.5 mm Fits wrists
RaySafe i3 INSTALLATION & SERVICE MANUAL
 RaySafe i3 INSTALLATION & SERVICE MANUAL 2017.06 Unfors RaySafe 5001104-1.1 All rights are reserved. Reproduction or transmission in whole or in part, in any form or by any means, electronic, mechanical
Share/Follow. User Guide. A feature of Dexcom G5 Mobile CGM System
 Share/Follow User Guide A feature of Dexcom G5 Mobile CGM System IMPORTANT USER INFORMATION Please review your product instructions before using your continuous glucose monitoring system. Contraindications,
Resting and Stress ECG
 Operating Manual Resting and Stress ECG 1 Safety 2 Hardware 3 Software 4 Hygiene Part 3: Operating characteristics: custo diagnostic 5.0 and higher for Windows MSW 0001 DK 1660 Version 002 13/06/2018 2018
Quick guide to connectivity and the ReSound Smart 3D app
 Quick guide to connectivity and the ReSound Smart 3D app 2 Content Compatibility: Hearing aids and mobile devices...4 Get started with your iphone, ipad or ipod touch...6 Pair with your ReSound Smart Hearing
GETTING STARTED WITH MINIMED 670G CONTINUOUS GLUCOSE MONITORING
 GETTING STARTED WITH MINIMED 670G CONTINUOUS GLUCOSE MONITORING Contents Continuous Glucose Monitoring Getting started with continuous glucose monitoring Section 1: Section 2: Section 3: Section 4: Section
TomTom Runner & Multi-Sport Reference Guide
 TomTom Runner & Multi-Sport Reference Guide Contents Welcome 3 Getting started 4 Your watch 5 Using the desk dock... 5 Using the bike mount... 6 Watch status... 7 Activities 9 About activities... 9 Starting
ACCELERATOR OWNER'S MANUAL
 ACCELERATOR OWNER'S MANUAL Accelerator Series Instruction Manual Table of Content Introduction pg. 3 Buttons pg. 3 Major Functions Modes: pg. 4 Menu System pg. 4 Home Time Display pg. 4 Dual Time View
MINIMED 640G SYSTEM^ Getting Started WITH CONTINUOUS GLUCOSE MONITORING
 MINIMED 640G SYSTEM^ Getting Started WITH CONTINUOUS GLUCOSE MONITORING let s get started! Table of Contents Section 1: Continuous Glucose Monitoring System Components... 2 Section 2: Sensor Glucose (SG)
BH Fitness T8 SPORT Treadmill Owner s Manual
 BH Fitness T8 SPORT Treadmill Owner s Manual BEFORE YOU BEGIN It is very important to become familiar with the frequently used components of your treadmill. User Safety: SECTION 1 IMPORTANT SAFETY INSTRUCTIONS
Contents 2. Polar M400 User Manual 11. Introduction 11 M H7 Heart Rate Sensor 12. USB Cable 12. Polar Flow App 12. Polar FlowSync Software 12
 M400 USER MANUAL CONTENTS Contents 2 Polar M400 User Manual 11 Introduction 11 M400 11 H7 Heart Rate Sensor 12 USB Cable 12 Polar Flow App 12 Polar FlowSync Software 12 Polar Flow Web Service 12 Get started
Quick guide to connectivity and the Interton Sound app
 Quick guide to connectivity and the Interton Sound app Content Compatibility: Hearing aids and mobile devices... 4 Get started with your iphone, ipad or ipod touch... 6 Pair with your Interton hearing
Adventure 5 Plus Service Manual
 Adventure 5 Plus Service Manual 1 TABLE OF CONTENTS CHAPTER 1: SERIAL NUMBER LOCATION...3 CHAPTER 2: PREVENTATIVE MAINTENANCE 2.1 Preventative Maintenance. 4 2.2 Tension and Centering the Running Belt....6
FITNESS BIKE. Vision Fitness E3100
 FITNESS BIKE Vision Fitness E3100 E3100 Fitness Bike PROPER SEAT POSITIONING To determine the proper seat position, sit on the seat and position the ball of your foot on the centre of the pedal. Your knee
S720i /S710i HEART RATE MONITOR HEART RATE MONITOR. Displays your heart rate as bpm and % of HR max, average heart rate and exercise duration.
 COMPLETE HR Displays your heart rate as bpm and % of HR max, average heart rate and exercise duration. Quick Guide Allows you to set 5 exercise sets for interval training with HR target zones and recovery
CIRCUIT ZONE ELLIPTICAL
 CIRCUIT ZONE ELLIPTICAL SF-E386 USER MANUAL IMPORTANT! Please retain owner s manual for maintenance and adjustment instructions. Your satisfaction is very important to us, PLEASE DO NOT RETURN UNTIL YOU
Gocap System User s Guide
 Gocap System User s Guide Hello! This User's Guide will help you get started using Gocap. Gocap is an aid to help you in effective management of your diabetes. Before you begin using the Gocap system,