OMT Without An OMT Table. Ann L. Habenicht DO, FAAO, FACOFP, CS AAO Convocation- Student Program March12, 2015
|
|
|
- Amanda Johns
- 6 years ago
- Views:
Transcription
1 OMT Without An OMT Table Ann L. Habenicht DO, FAAO, FACOFP, CS AAO Convocation- Student Program March12, 2015
2 BASIC STUFF WE HAVE TO WADE THROUGH TO MAKE SURE WE RE ALL ON THE SAME PAGE

3 A.T. Still To find health should be the object of the doctor. Anyone can find disease.
4 Barrier Model Anatomic barrier neutral Physiologic barrier


5 Direct vs. Indirect Direct techniques engage the restrictive barrier. Indirect techniques go away from the restrictive barrier.
6 Combined Technique


7 Direct Activating Force vs. Indirect Activating Force - Physician induced - Patient Induced - Inherent Force - Inherent Force
 - Articulatory Treatment")
 Direct -")
 - OCF-Indirect -Balanced")
 -Counterstrain (CS) - Facilitated")
8 Direct vs. Indirect - Soft tissue (ST) - Articulatory Treatment (ART) - Myofascial Release- Direct (D-MFR) - Osteopathy in the Cranial Field (OCF) Direct - Muscle energy (ME or MET) - High-velocity, low amplitude (HVLA) - OCF-Indirect -Balanced Ligamentous Tension (BLT) or Ligamentous Articular Strain (LAS) -Counterstrain (CS) - Facilitated Positional Release (FPR) -Myofascial Release- Indirect (I-MFR) -Still Technique*
9 Fryette s Principles H.H. Fryette proposed these 2 principles of spinal motion Principle I- neutral spinal mechanics Principle II- non-neutral spinal mechanics A third principle is also noted but wasn t an absolute Fryette Principle III- combined motions
10 Fryette s Principles Principle I- neutral mechanics also known as group or Type 1 mechanics when in the neutral position, when sidebending is introduced, rotation occurs to the opposite side or into the produced convexity. Sidebending right Rotation left
11 Fryette s Principles Principle II- non neutral mechanics also known as single segment or Type 2 mechanics when the segment is in flexion or extension, when sidebending is introduced, rotation occurs to the same side or to the produced concavity. Sidebending right Rotation right
12 Fryette s Principles Principle III- combined motion when one motion is introduced, it modifies the other motions. This means that when flexion or extension is introduced, the amount of sidebending and/or rotation is changed. These mechanics are ONLY for T1-L5 C2-C7 follow principle II and III only
13 Fryette s Principles Atypical vertebrae Occiput Atlas Sacrum
14 Vertebral Anatomy Important to understand the plane of the facets in each vertebral area as direct action technique allows for the motion of the joint. To move the joint, you must thrust along the plane of the facets.
15 Vertebral Anatomy Cervicals shingle-like superiorly anteriorly, and inferiorly posteriorly. Thoracics Facet plane coronal posteriorly Lumbars Sagittal Sacroiliac L-shaped with a coronal component
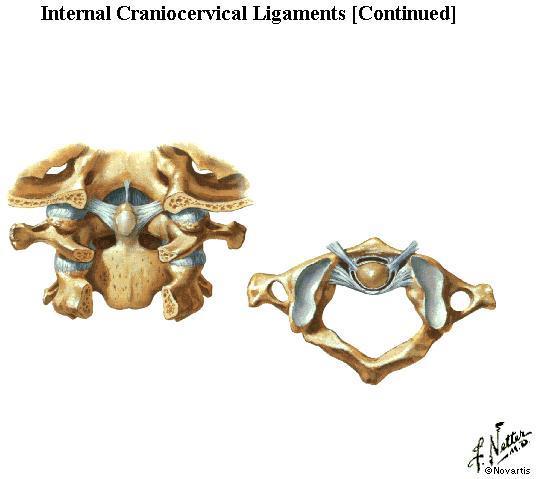
16 Vertebral Anatomy Atypicals OA- occiput on atlas bowl-like introduces combined sidebending and rotation to opposite sides. AA- atlas on axis Movement about the dens- rotational SI- sacroiliac Coronal component- sidebending/rotation to opposite sides No two joints are the same
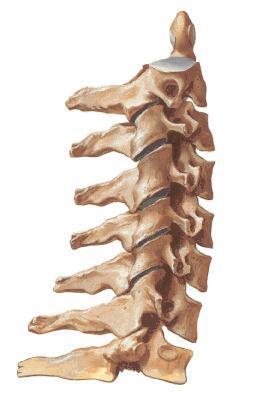
17 Cervicals- shingle-like
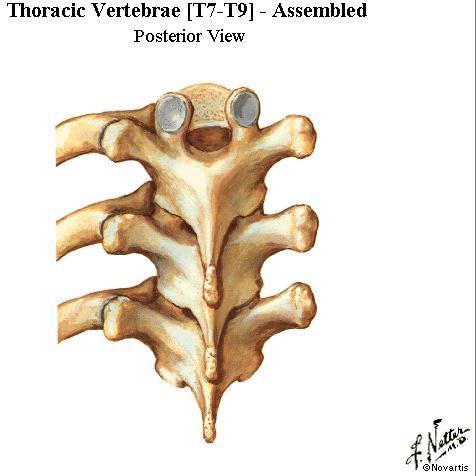
18 Thoracics- coronal

19 Lumbars- sagittal
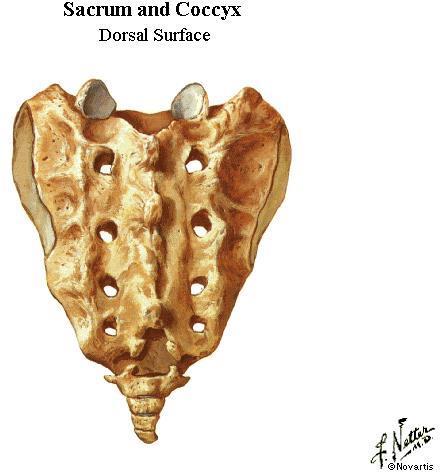
20 Sacroiliac- L-shaped
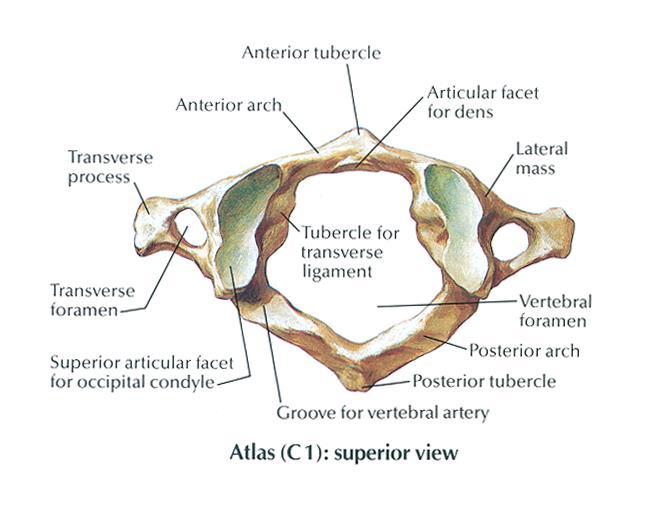
21 OA
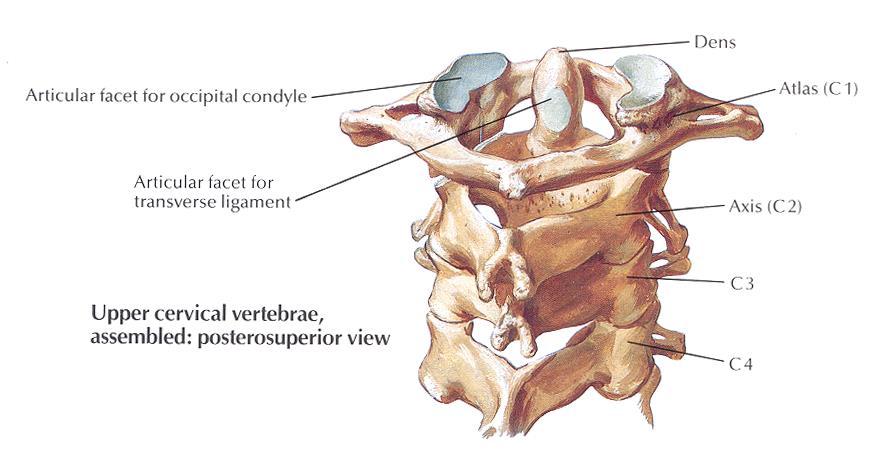
22 AA
23 SI
24 Diagnosis Thoracic Seated Check for rotation, sidebending, flexion/extension- Kappler s Corollary Lumbar Seated or prone Check for rotation, sidebending, flexion/extension Cervical Prone Check for rotation, sidebending, flexion/extension
25 Techniques- Thoracic FPR- patient seated Epigastric Thrust- patient seated Walk Around- patient seated
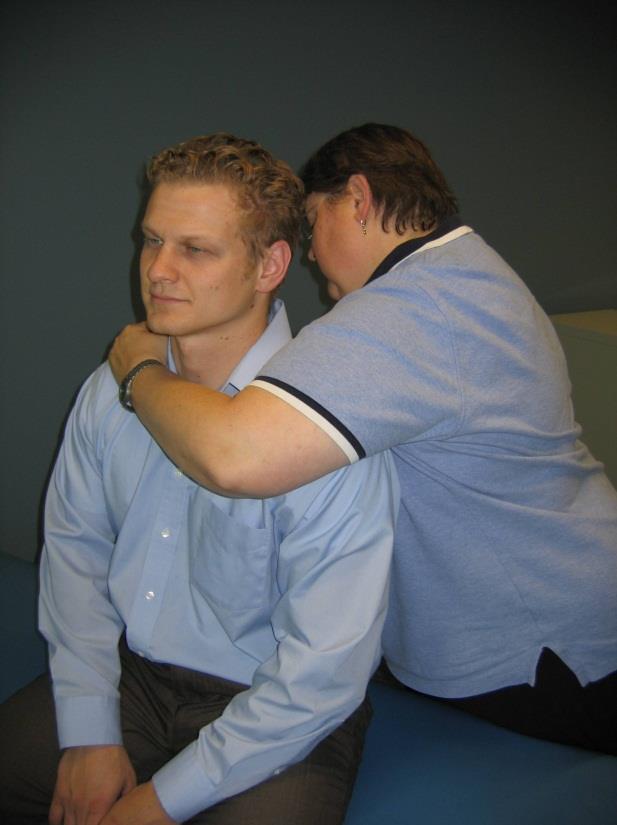
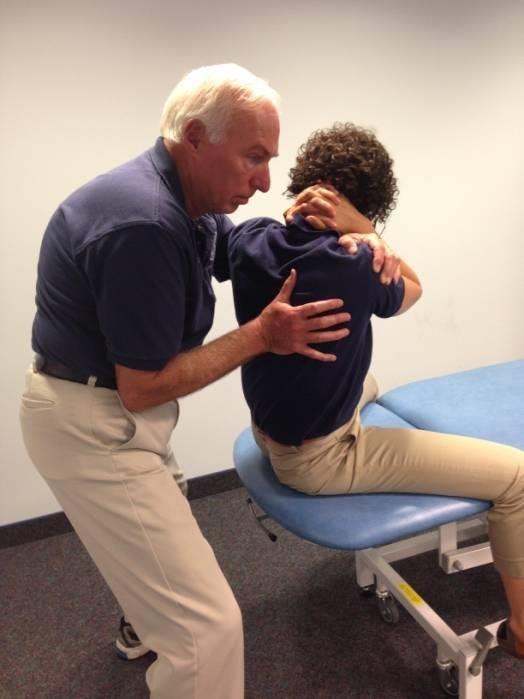
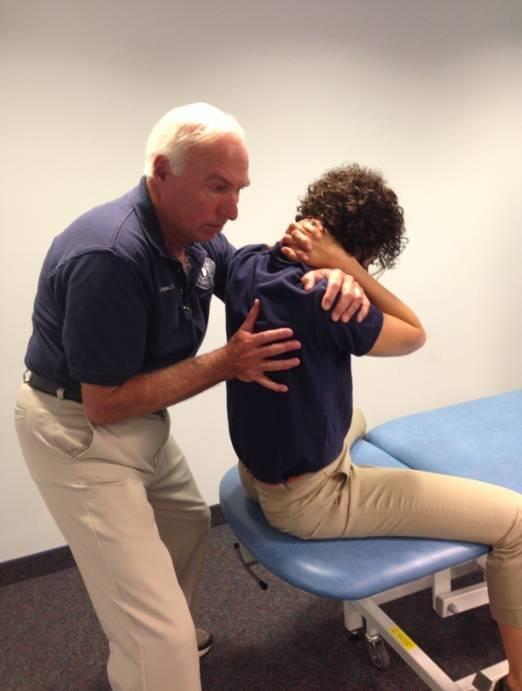
26 STILL TECHNIQUE FOR THORACIC DYSFUNCTIONS Dysfunction: Example: T5 on T6, rotated right and sidebent right, extended. This technique is useful for thoracic somatic dysfunctions. Objective: Improve rotation and sidebending left and flexion of T5 on T6. Discussion: This technique is a gentle thoracic technique that requires precise localization. It may be done with the patient seated on a table or on a chair. Patient Position: Seated. Physician Position: Standing behind the patient to the left.
27 Procedure: Place your left arm across the patient s anterior chest such that your left arm is draped over the patient s left shoulder and your left hand contacts the patient s right shoulder. Place your right sensing finger over the right transverse process of T5. Gently introduce extension, right rotation and right sidebending until all three forces localize at T5 and the pathologic neutral is engaged (absence of tissue tension). A vector force in the shape of a V is now introduced through pressure through the patient s shoulders with your left arm until the vector is localized at T5 right. Now, while maintaining the vector force, quickly flex, sidebend left and rotate left the T5 segment. As the segment T5 on T6 is about to reach the restrictive barrier, the barrier will have melted away. Return the segment back to neutral. Reassess.
28
29 EPIGASTRIC THRUST (HVLA) Dysfunction: T 6 flexed, rotated right, sidebent right. This technique may be used on mid-thoracic dysfunctions. Objective: To restore motion in extension, left sidebending and left rotation. Discussion: The barrier is primarily engaged with lateral translation. Patient Position: Seated. Physician Position: Standing behind the patient
30 Procedure: Instruct the patient to sit comfortably on the table and clasp both hands behind their neck. Fold a small pillow in half, place it in direct contact with T 7 in a horizontal position and hold it there firmly with your epigastrium. Pass your left hand under the patient s left axilla and grasp the back of the patient s left forearm. Pass your right hand under the patient s right axilla and grasp the back of the patient s right forearm. Extend the patient s upper thoracic area down to and including T 6. Keep the patient s upper torso centered over their pelvis during this procedure. Translate the patient s trunk to the right above T 7 to introduce sidebending to the left of T 6 upon T 7 Rotate the upper thoracic area to the left making sure you localize forces down to T 6 upon T 7. The final corrective force is through the pillow/abdomen against the engaged barrier. It is an accentuation of the accumulated motions. Rotation is not a significant component. Reassess
31 Consideration: For extended dysfunctions follow the previous procedure, however, flex the patient forward by having them slump while bringing their shoulders posterior in a translatory movement. The final corrective force is a quick thrust with short forward and lateral motion of the pillow/epigastrium coordinated with an increase in the amount of traction through the patient s axillae.
32
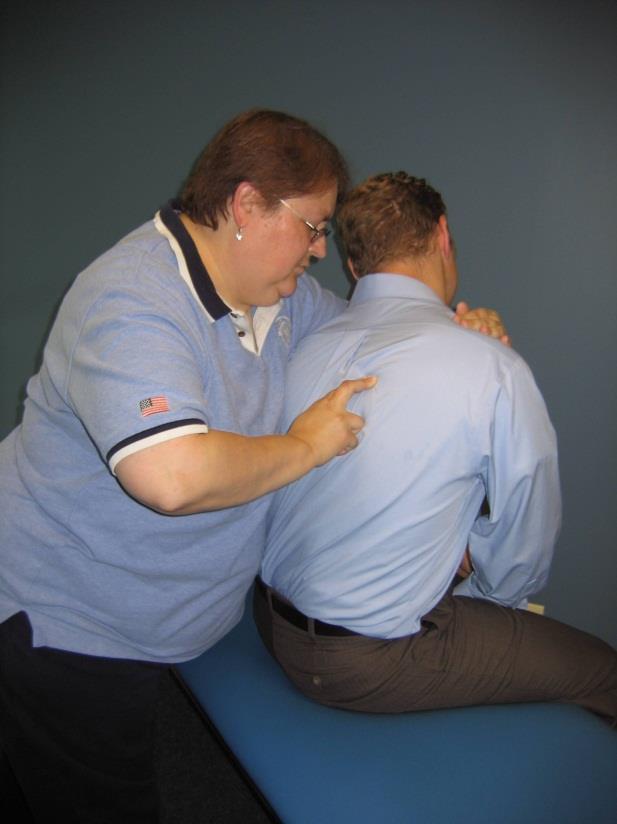
33 HVLA - THORACIC "WALK AROUND" TECHNIQUE Dysfunction: Example: T5 on T6, rotated right and sidebent right, extended. This technique is useful for thoracic somatic dysfunctions. Objective: Improve rotation and sidebending left and flexion of T5 on T6. Discussion: This technique is especially useful for extended dysfunctions in the thoracic area. Localize the barrier through lateral translation. When performing this technique, it is important to keep the patient s ischial tuberosities in contact with the table and when introducing the final corrective force, you must thrust through the barrier and then return the chest cage back to its original position to prevent locking up the ribs. Instructing the patient to turn their head to the side opposite to the dysfunction may enhance results by adding more rotation from above. This technique may also be used to treat Flexed dysfunctions by introducing extension. Physician Position: Standing behind the seated patient. Patient Position: Patient sitting on the side of the table, at the right end, with their back towards the physician. An assistant will stand to the side of the patient s opposite leg to act as a counterforce for the patient. Keep their pelvis close to the edge.
34 Procedure: Instruct the patient to clasp their hands behind their neck. With your left arm, reach beneath the patient's left axillae just below the shoulder, crossing the chest anteriorly. Place your left hand over the patient's right arm, grasping the area of the right humeral head. Instruct the patient to slump forward until gaping (flexion) is palpated between the spinous processes of T5 and T6. Place the heel of your right hand over the right transverse process of T5. Translate the thoracic area across the midline to the right, by applying pressure with your body against the patient's left axillae. This right translation engages the barrier and localizes the left sidebending force to T5 on T6. Keep the patient's shoulders level and ischial tuberosities on the table. Now, rotate the patient to the left, this is accomplished by walking around the end of the table to the right while combining a pull with your left arm. Maintain localization by pressure through your right hand until the barrier is engaged. After the barrier is engaged by lateral translation, rotate T5 left by pushing with your right hand, maintaining the lateral translation right. Your left arm keeps the patient s torso flexed. Do not allow the T5 somatic dysfunction to extend (lose the flexed position) during the corrective force, as this will probably render the technique ineffective. The dominant corrective force in this technique is with the right hand on the posterior transverse process, with a secondary force from above. The final corrective force is a quick increase in left rotation of T5 with an anterolaterally-directed force through the heel of your right hand by shifting your body around to the restrictive barrier. Once you go through the restrictive barrier with your hand, immediately return the thoracic area to the neutral position. Reassess motion.
35 FOR MUSCLE ENERGY MODIFICATION: Follow steps 1-7, then have the patient turn back into your right hand while you maintain the barrier. Have the patient contract for 3-5 seconds, rest and then you take up the slack and reengage the new barrier. Repeat several times.
36
37 Techniques- Ribs FPR -patient prone Still - patient seated - First Rib- patient supine
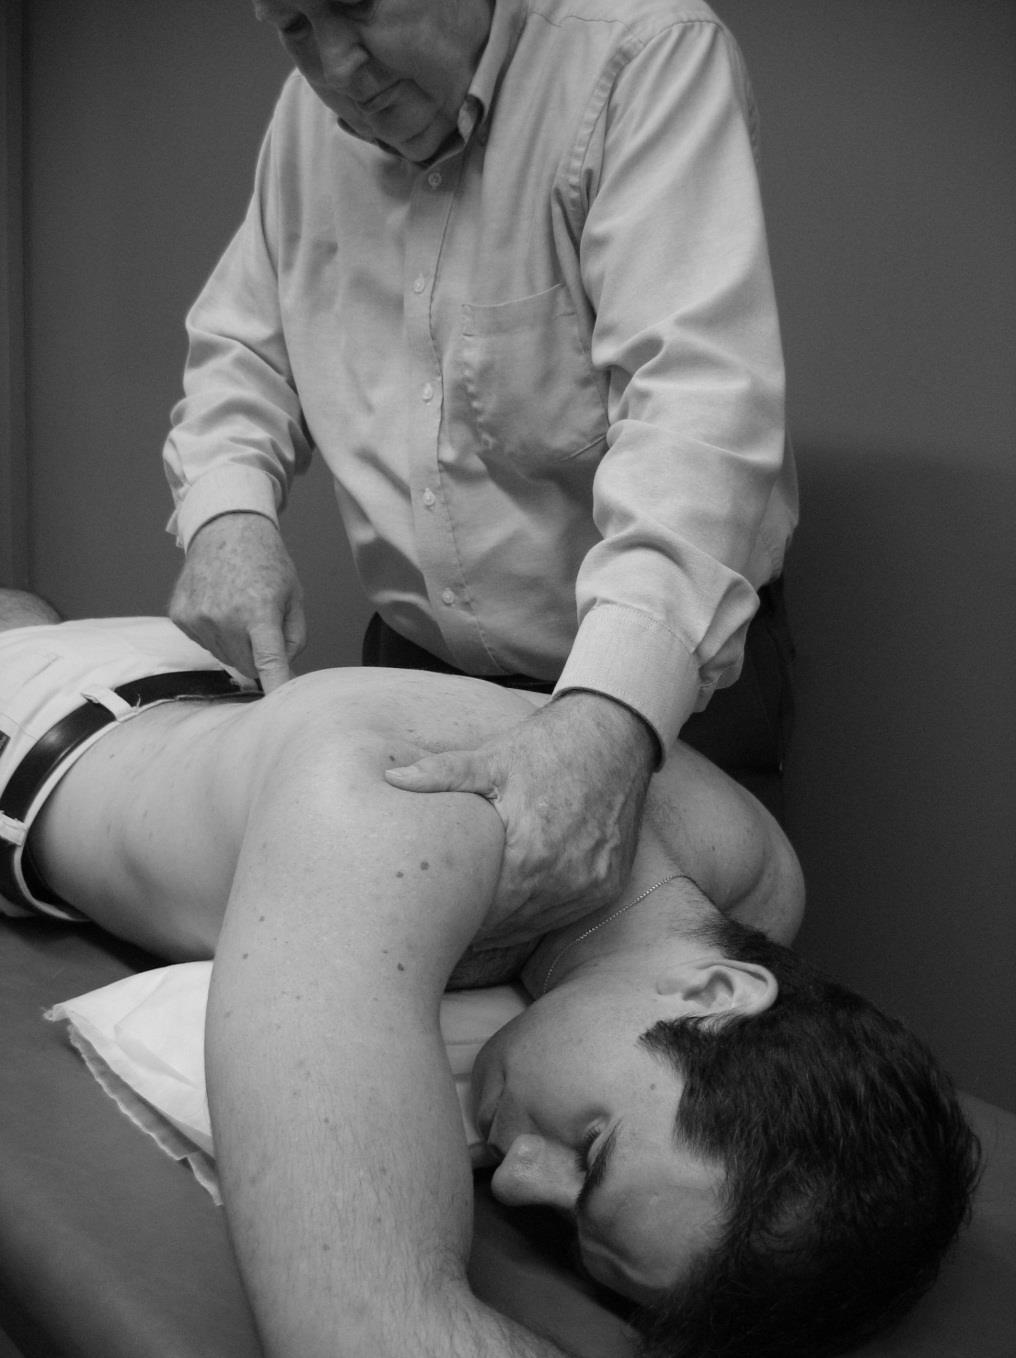
38 FACILITATED POSITIONAL RELEASE FOR RIBS- PATIENT PRONE. Dysfunction: Posterior rib (prominent rib angle) Example: PR3L. Objective: To restore motion to the rib Discussion: This technique is useful in treating dysfunctional ribs with prominent posterior rib angles (anterior rib head). These are structural rib dysfunctions. Patient position: prone, with a pillow under the chest cage to flatten the thoracic AP curve. Physician position: standing on the opposite side of the rib dysfunction.
39 Procedure: The physician places his sensing hand ( right) on the rib angle of PR3L. The physician s left hand contacts the patient s left shoulder, midclavicular area in such a manner as to curl the fingers under the shoulder contacting the anterior clavicular area. A vector force is introduced through the patient s left shoulder with the physician s left hand until localized to the rib. While maintaining the vector force, the physician lifts the shoulder posteriorly until the motion is localized to the rib. The combined motions of compression, extension, sidebending and rotation are introduced with this position. This position is held for 3-5 seconds or until a release is felt. Reassess.
40
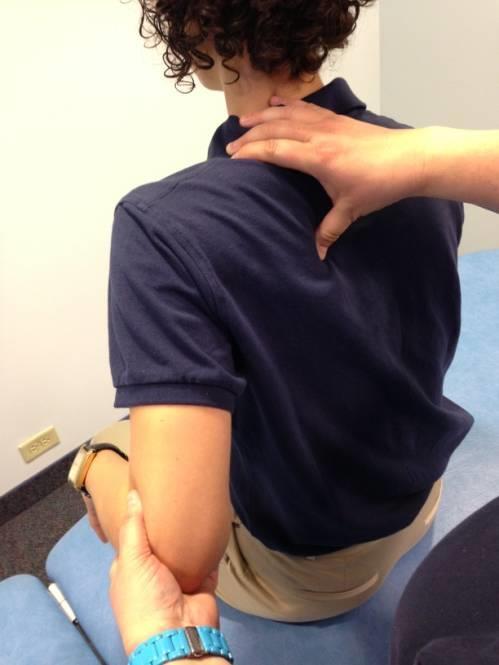
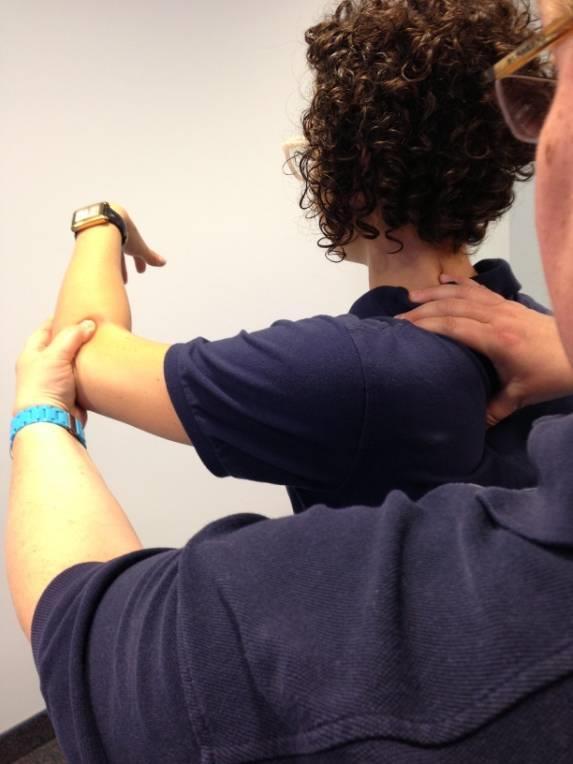
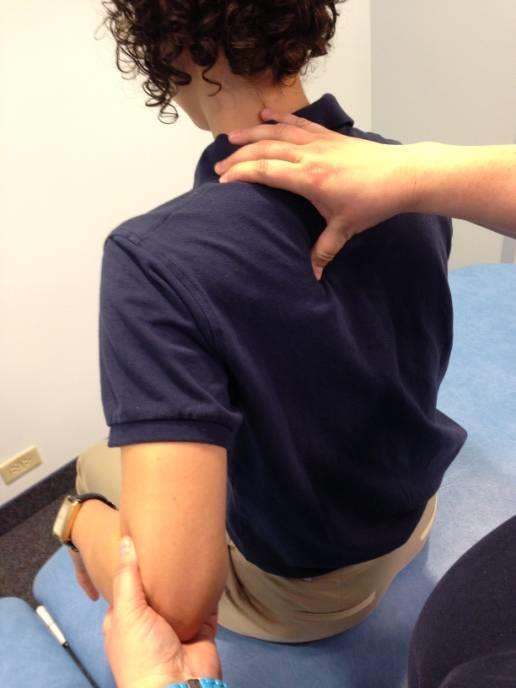
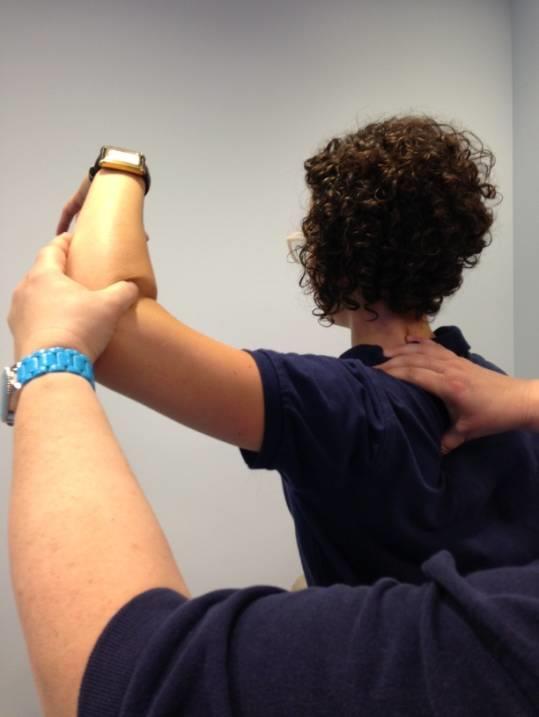
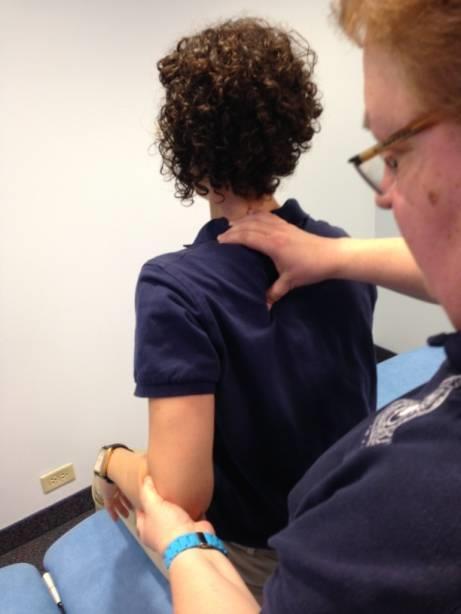
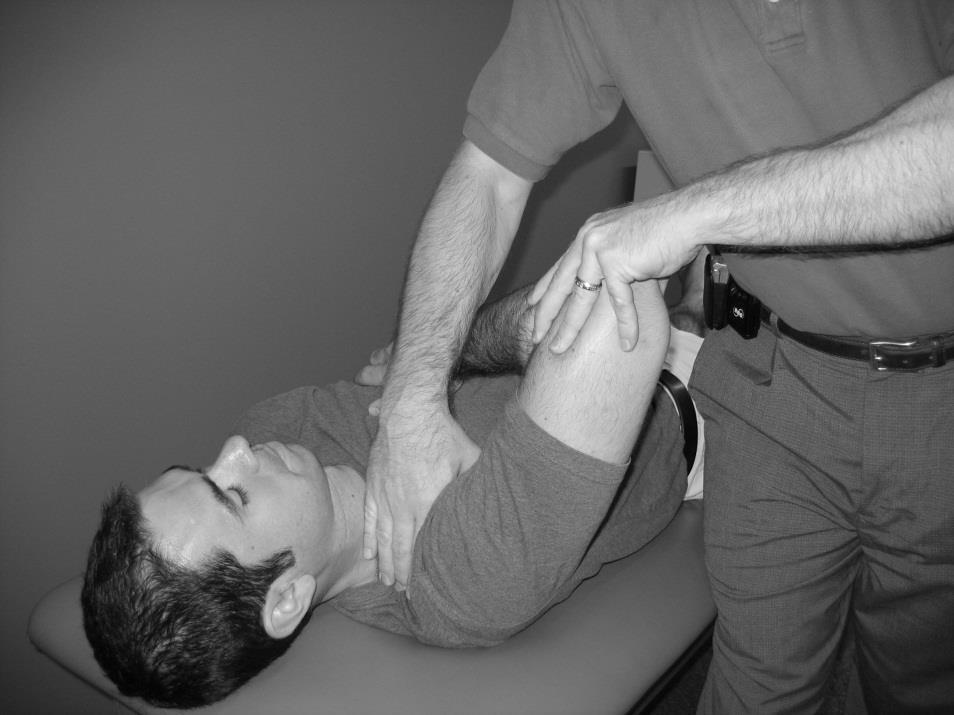
41 STILL TECHNIQUE FOR RIBS- PATIENT SEATED Dysfunction: Posterior rib 3 left (PR3L) Objective: To restore motion of the third rib. Discussion: This technique may be used for a structural posterior rib or a solitary exhaled rib. The technique can also be used for the anterior or inhaled rib with slight modifications. Patient Position: seated Physician Position: standing behind the patient on the side of the affected rib.
42 Procedure: The physician places the fingers or thumb of his right hand on the posterior rib angle. This will be the sensing hand. The physician gently cradles the patient s left arm by holding the elbow in the palm of his left hand. The patient s left arm is then abducted and extended until motion is localized at the R3L rib angle. A compressive force is then applied through the elbow laterally toward the trunk to the rib angle. While maintaining the compression (the steering rod), the physician takes the left shoulder through a smooth arc of motion through abduction, partial flexion and ending in adduction. The vector force is released. Reassess This technique can be modified for the anterior rib. The start position is the same EXCEPT the arm is started in adduction and the shoulder is articulated through partial flexion/abduction and into extension.
43

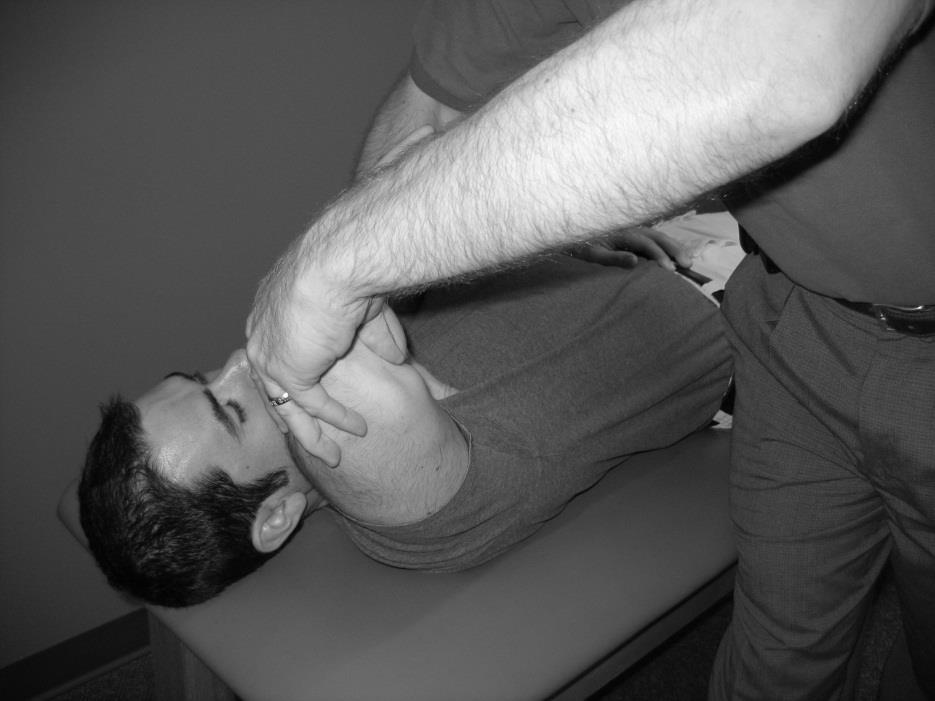
44 Still Technique- First Rib- Patient Supine Dysfunction: First rib posterior (elevated or superior) on the right Objective: Improve motion of the first rib. Discussion: The most common error in this technique is the lost of the vector force throughout the technique. Localization is extremely important. This technique is avoided in the patient with frozen shoulder. Physician Position: Standing beside the table, facing the patient, and on the side of the dysfunction. Patient Position: Lying supine.
45 Procedure: The physician places his right hand over the patient s rib with the fingers on the posterior aspect of the first rib where it articulates at T1. The physician bends the patient s elbow and places his left hand on the patient s flexed elbow. The patient places his right arm across his chest such that the palm of the right hand is in contact with the left shoulder. The physician introduces a compression vector force from the patient s elbow directly into the physician s monitoring fingers. Maintaining this compression, the physician localizes motion to the rib articulation by introducing a slight abduction and internal rotation of the humerus. The patient s right arm should remain under the physician s right forearm. The physician brings the elbow in a backward arc until the patient s arm passes his ear and carries the shoulder outward towards the shoulder and down. The release is typically felt shortly after the arc starts outward. The position is released and the dysfunction reevaluated.
46
47 Techniques-Cervical/Suboccipital Cervicals FPR- patient supine Still- patient seated Suboccipital OA
48 FACILITATED POSITIONAL RELEASE: CERVICAL DYSFUNCTION Dysfunction: Example: C 3 on C 4 flexed (forward bent), rotated right, sidebent right (tissue texture change, motion restriction, and tenderness on the right)- posterior C 3 right. Objective: Improve left rotation, sidebending and extension at C3-4. Discussion: The most common error in this technique is failure to start with the AP curve flattened and failure to maintain compression or distraction to the involved segment. This technique requires localization of motion to the affected segment. Physician Position: Seated at the head of the table. Patient Position: Lying supine.
49 Procedure: The physician places his/her index finger on the posterior component of the dysfunction with the thumb on the other side. The cervical spine is placed in a neutral position such that the cervical lordosis is normalized. Gentle compression is placed into the cervical spine to the dysfunction through the head. The C-spine is then flexed or extended (taken in the direction of free motion) down to the dysfunctioned segment. The physician then introduces sidebending/rotation at the segment by gently translating the segment away from the free motion (translation away causes sidebending in the opposite direction). The release will be felt in 3-5 seconds
50
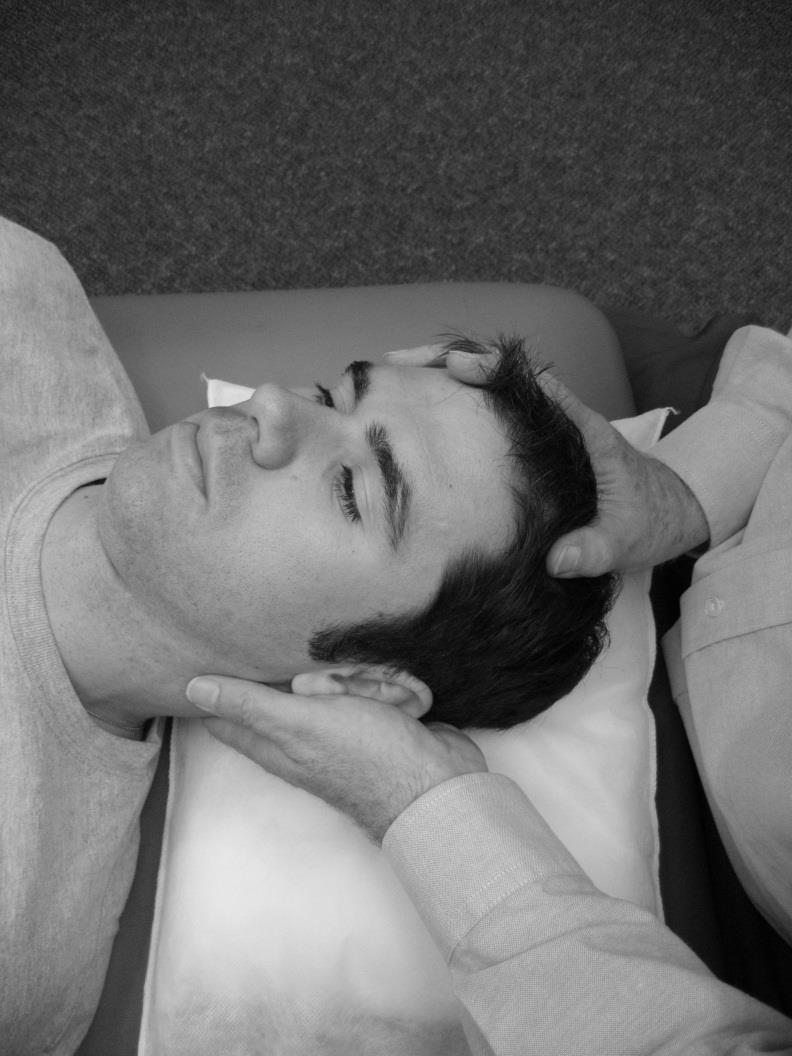
51 STILL TECHNIQUE: CERVICAL DYSFUNCTION Dysfunction: Example: C 3 FRS right. Objective: Improve left rotation, sidebending and extension at C3-4. Discussion: The most common error in this technique is failure to maintain the force vector while restoring the normal range of motion. This technique requires precise localization of motion in the involved tissue. Physician Position: Seated at the head of the table or standing facing the patient. Patient Position: Lying supine or seated, facing the physician.
52 Procedure: The physician s right hand is the sensing hand while the left hand is the operating hand. The physician gently cradles the patient s head and neck in the palm of both hands. Using the pads of the fingers of the sensing hand, the physician contacts the right articular pillar of C3. The physician then uses the left hand to introduce right sidebending/ rotation and flexion to C3 until the sensing hand notes the localization. The physician now introduces a vector force of either distraction of the head and neck with both hands or compression of the head and neck to localize to C3 right. While sensing and maintaining the localization, the head and neck is sidebent/ rotated left and extended with a low to moderate velocity. IT IS IMPORTANT TO MAINTAIN THE VECTOR LOCALIZATION THROUGH THE TECHNIQUE. The release will be felt as the segment is returned to normal motion.
53
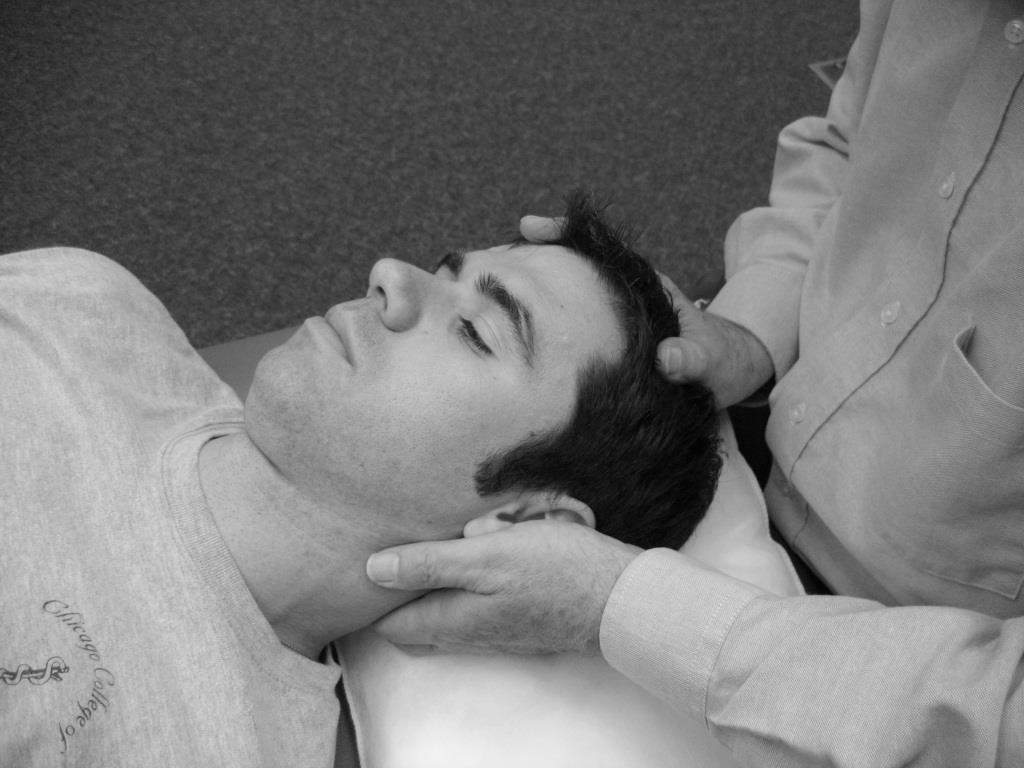
54 STILL - HEAD - POSTERIOR OCCIPUT (OA FLEXED) - PATIENT SEATED Dysfunction: Posterior right occiput. (The occiput is rotated right, sidebent to the left with slight flexion. Tissue texture change will be noted on the right.) Objective: Improve left rotation and right sidebending motion of the OA. Discussion: Occiput on atlas (OA) has a combined, opposite motion- rotates and sidebends opposite. When there is dysfunction, freedom of flexion (with tissue change on the rotational side) or extension (tissue change on the sidebending side) will also be noted. Patient Position: Seated. Physician Position: Standing, facing the patient
55 Procedure: The physician places the pad of his left middle finger on the right posterolateral aspect of the occiput (rotational component). The other fingers wrap around the neck and support the head. This is the sensing hand. The pad of his right middle finger is placed on the left posterolateral aspect of the occiput (sidebending component), with the fingers contouring and supporting head and neck. The right hand now rotates the patient s head to the right and maintains left sidebending until localization is felt and a position of ease is noted. A slight amount of flexion will further improve the position of ease. Using the both hands, the physician places a gentle distraction through the patient s head until localization is noted at the right posterior component. While maintaining the distraction vector force, the head is now gently moved to the left, through neutral and into the restrictive barrier. A release is noted and the head and neck are returned to the neutral position. Reassess.
56
57 Techniques-Lumbar/SI Lumbar-FPR- patient prone SI- FPR- patient prone
58 FACILITATED POSITIONAL RELEASE-LUMBAR Dysfunction: L1 FRS R Objective: To improve motion at L1 Discussion: This technique requires the physician to localize the motion to the pathologic neutral position. Patient position: prone Physician position: standing on the opposite side of the dysfunction.
59 Procedure: The physician contacts the transverse processes of L1 with his thumbs. Rotation is introduced by rotating the transverse processes to the right with the thumbs until the pathological neutral or balanced point is met. The segment is then gently translated to the left until the balance point is met. Since the segment is flexed, flexion is introduced by rolling the thumbs cephalad and anteriorly on the transverse processes of L1 until the balance point is met. The segment is held at the balance point until the release is felt. The segment is then returned to the midline. Reassess.
60
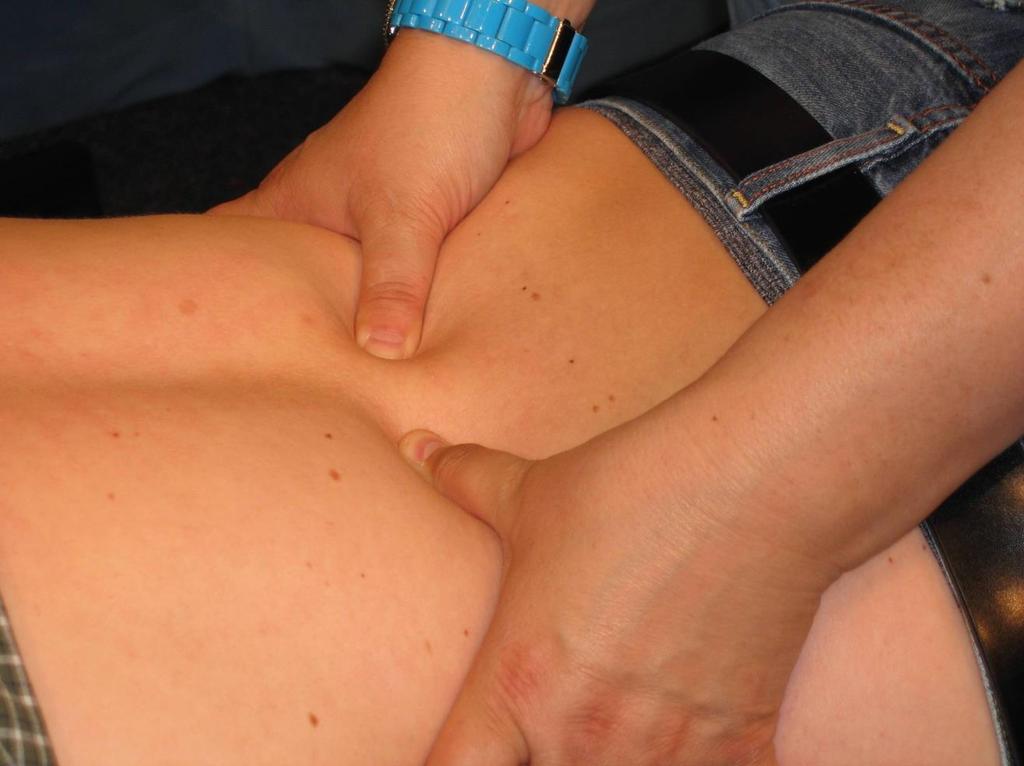
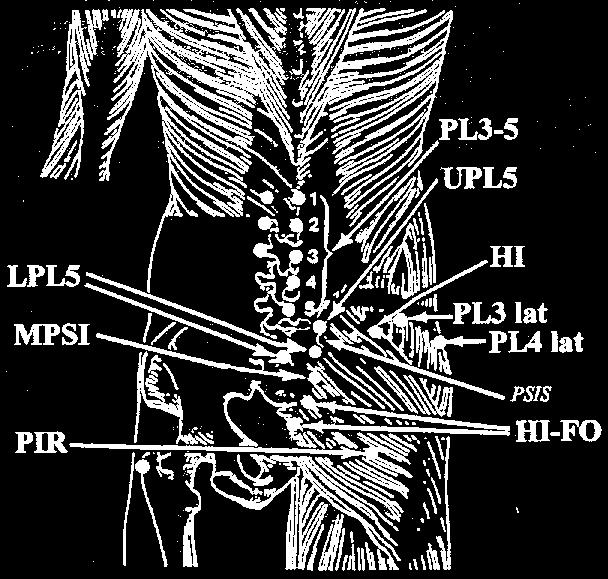
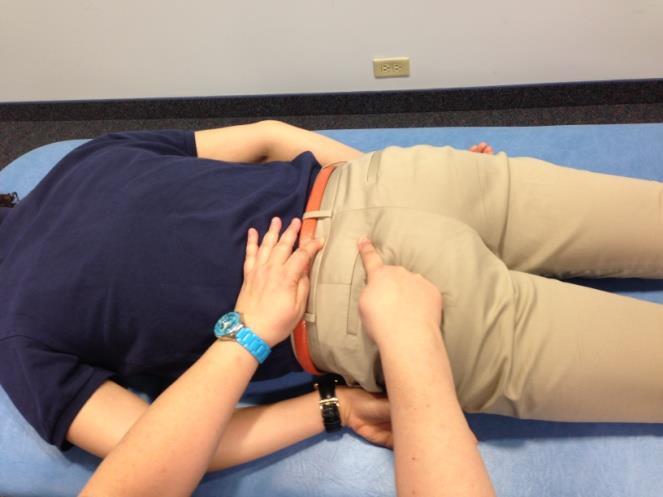
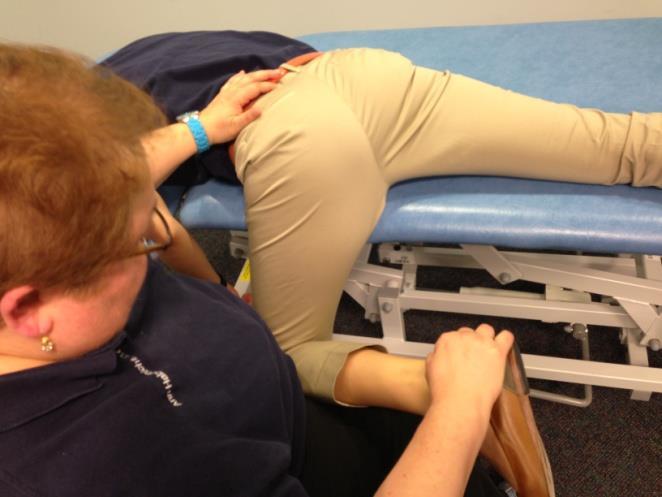
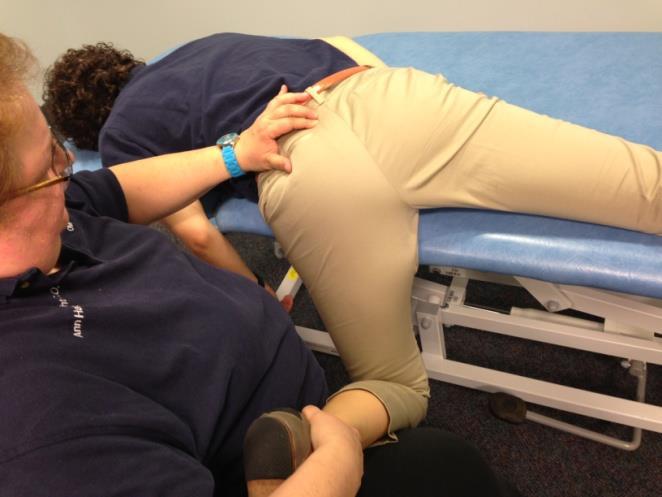
61 FPR FOR SACROILIAC DYSFUNCTION Dysfunction: Tenderness at the upper pole of the sacrum. The area of upper pole L5 (UPL5). This technique can also be modified to treat the lower pole L5 tender point (LPL5). Objective: To relieve pain at the UPL5 tender point (LPL5), thus restoring function. Discussion: This technique can treat the UPL5, LPL5 and piriformis tender points all from the same start position with a few modifications. It is important to remember that the sacral base will move posteriorly when the sacrum is fully backward bent and when the pelvis is fully forward bent. Because of this finding, we are able to treat these posterior tender points by placing the hip and subsequent SI joint into flexion to allow the sacrum to extend. Patient position: prone Physician position: seated at the side of the table on the same side as the dysfunction or standing on the same side of the dysfunction.
62
63 Procedure: Place your cephalad hand on the UPL5 tender point to monitor. Have the prone patient move to the edge of the table such that you will be able to drop their leg off the table. If you are seated, flex the patient s hip and knee to Support the leg with your knees. With your caudad hand on the patient s dropped leg, flex the hip further and then externally rotate the hip until the tender point softens and localization takes place. The tender point should be at 0-3 on the tenderness scale. Now, using your caudad hand, introduce a gentle vector force up the long axis of the femur as the facilitating force. The point should release in 3-5 seconds. Passively return the patient s leg to neutral on the table while still monitoring the tender point. Reassess. For the LPL5 point, internal rotation is often needed. The piriformis tender point often does not require as much hip flexion BUT does require INTERNAL rotation ( the piriformis is a major external rotator of the hip, but there are some internal rotator fibers seen.)
64
65 CODING The following is a list of the CPT procedure codes to be used with OMT. These codes may be used in addition to E&M codes. When the OMT procedure codes are used with an E&M code a - 25 modifier must be attached to the E&M code. 1-2 regions regions regions regions regions The diagnostic codes to be used with the OMT procedure are the 739 series.

66
67 D. O.
OMT Without An OMT Table Workshop. Dennis Dowling, DO FAAO Ann Habenicht, DO FAAO FACOFP
 OMT Without An OMT Table Workshop Dennis Dowling, DO FAAO Ann Habenicht, DO FAAO FACOFP Cervical Somatic Dysfunction (C5 SR RR) - Seated 1. Patient position: seated. 2. Physician position: standing facing
OMT Without The Table Saroj Misra, DO, FACOFP and Marissa Rogers, DO
 OMT Without The Table Saroj Misra, DO, FACOFP and Marissa Rogers, DO Why bother? May not always have the table present Patient may not be able to lay prone or supine Some techniques may be easier to accomplish
DIAGNOSIS ANTERIOR PELVIC ROTATION DIAGNOSIS DIAGNOSIS. Direct techniques to treat sacrum and pelvis somatic dysfunction (HVLA, MET)
") American Academy of Osteopathy Convocation PHYSICIAN STUDENT Thursday, March 18, 2010 Friday, March 19, 2010 2:30 4:00 PM 8:00 9:30 AM 4:30 6:00 PM 10:00 11:30 AM Direct techniques to treat sacrum and
American Academy of Osteopathy Convocation PHYSICIAN STUDENT Thursday, March 18, 2010 Friday, March 19, 2010 2:30 4:00 PM 8:00 9:30 AM 4:30 6:00 PM 10:00 11:30 AM Direct techniques to treat sacrum and
OMT FOR CONCUSSIONS KIMBERLY WOLF, D.O. FEBRUARY 17, 2017
 OMT FOR CONCUSSIONS KIMBERLY WOLF, D.O. FEBRUARY 17, 2017 POTENTIAL SEQUENCE Address lymphatics including all transition zones/diaphragms Address somatic dysfunction in spine Focus on upper cervical spine
The Schiowitz Approach
 The Schiowitz Approach American Academy of Osteopathy Annual Convocation March 23 rd, 2018 2:00-3:30 PM & 4:00 5:30 PM Dennis J. Dowling, D.O., M.A., F.A.A.O. F.P.R. Developed by Stanley Schiowitz, D.O.,
OMT for the child with ENT problems
 SEATED INNOMINATE AND PELVIC BOWL BALANCED LIGAMENTOUS TENSION 1. The physician is seated behind the child with both hands, each contacting an innominate and the sacrum. The fingers contact the ASIS bilaterally
Cervical Spine Exercise and Manual Therapy for the Autonomous Practitioner
 Cervical Spine Exercise and Manual Therapy for the Autonomous Practitioner Eric Chaconas PT, PhD, DPT, FAAOMPT Assistant Professor and Assistant Program Director Doctor of Physical Therapy Program Eric
Authorized Osteopathic Thesaurus December, 2003 Terms
 s 100-199 USE (s) Elevated Rib Inhalation Rib Dysfunction Item number: 100 Broader (s) Related (s) End Feel Tissue Texture Abnormality Movement Barrier Item number: 101 Perceived quality of motion as an
OMT Boot Camp. OMT Applications for Systemic Somatic Dysfunctions of the Spine. Natalie Nevins, DO, MSHPE
 ACOFP 54 th Annual Convention & Scientific Seminars OMT Boot Camp OMT Applications for Systemic Somatic Dysfunctions of the Spine Natalie Nevins, DO, MSHPE Lumbar, Innominate, Sacrum Diagnosis and Treatment
Rotational Forces. : Their impact; our treatments
 Rotational Forces : Their impact; our treatments Lee Stang, LMT, LMBT, BCTMB NCBTMB Provider: 450217-06 bridgestohealthseminars.com bthseminars@gmail.com 860.985.5834 Facebook.com/BridgesToHealthSeminars
OMT for the Pregnant Patient
 OMT for the Pregnant Patient Presented by: Kristie Petree, DO Assistant Professor of Neuromusculoskeletal Medicine and Osteopathic Manipulative Medicine Georgia Campus Philadelphia College of Osteopathic
Lumbar. Physician. Technique: Continue this. back pain is. bent. under the contralatera. Copyright
 Lumbar myofascial releasee Lumbar spine Brief description: Low back pain is a common problem and lumbar myofascial releasee can be useful as part of a comprehensiv ve treatment of low back pain. By usingg
West Virginia Osteopathic Medical Association Annual CME Conference. Josephine Shen, DO, MAOM November 3, 2018
 West Virginia Osteopathic Medical Association Annual CME Conference Josephine Shen, DO, MAOM November 3, 2018 Anterior Cervical Fascia Lift Rib Ligamentous Articular Strain Twelfth Rib/Arcuate Ligament/Diaphragm
VIRGINIA ORTHOPEDIC MANUAL PHYSICAL THERAPY INSTITUTE TECHNIQUE MANUAL
 VIRGINIA ORTHOPEDIC MANUAL PHYSICAL THERAPY INSTITUTE TECHNIQUE MANUAL Lumbar and Thoracic Spine Lumbar AROM Assessment -Patient Positioning: Standing, appropriately undressed so that the lumbar and thoracic
Solving Today s Pain and Injury Puzzle with Erik Dalton An Online Workshop for ABMP Members Session 4 Handout
 Solving Today s Pain and Injury Puzzle with Erik Dalton An Online Workshop for ABMP Members Session 4 Handout Please Note: Erik Dalton teaches his Myoskeletal Alignment Techniques with the expectation
Osteoporosis Protocol
 PRODUCTS HELPING PEOPLE HELP THEMSELVES! Osteoporosis Protocol Rehabilitation using the Resistance Chair General Information Osteoporosis is a condition where bones gradually decrease in mass or density
Possible diagnoses. and extension OA ES L RR. deep. equal. with flexion OA ES R RL. the leftt. equal. deep. equal. equal. for flexion.
 Cervical Diagnosis Occipitoatlantal (OA) joint Possible diagnoses Diagnosis OA FS L RR OA FS R RL OA ES L RR OA ES R RL Sulci findings Left sulcus is shallow and right sulcus is deep Right sulcus is shallow
KELLEY JOY, DO CLINICAL ASSOCIATE PROFESSOR OSTEOPATHIC MANIPULATIVE MEDICINE KCU JOPLIN CAMPUS
 STILL TECHNIQUE FOR COMMON COUNTERSTRAIN TENDER POINTS KELLEY JOY, DO CLINICAL ASSOCIATE PROFESSOR OSTEOPATHIC MANIPULATIVE MEDICINE KCU JOPLIN CAMPUS COUNTERSTRAIN HISTORY Lawrence Larry Jones, DO 1955
Assessment & Treatment of Neck Pain
 PRESENTS Excerpt from Listen To Your Pain Assessment & Treatment of Neck Pain A B E N J A M I N I N S T I T U T E E B O O K www.benbenjamin.com Ben E. Benjamin, Ph.D. 2 THERAPIST/CLIENT MANUAL The Neck
Solving Today s Pain and Injury Puzzle with Erik Dalton An Online Workshop for ABMP Members Session 1 Handout
 Solving Today s Pain and Injury Puzzle with Erik Dalton An Online Workshop for ABMP Members Session 1 Handout Please Note: Erik Dalton teaches his Myoskeletal Alignment Techniques with the expectation
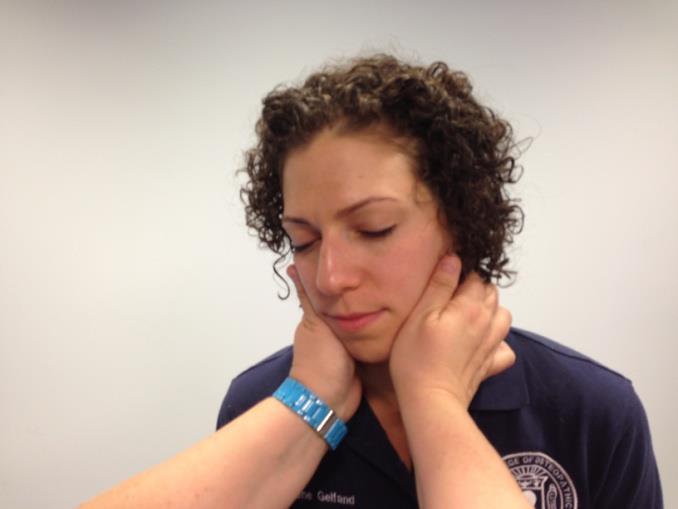
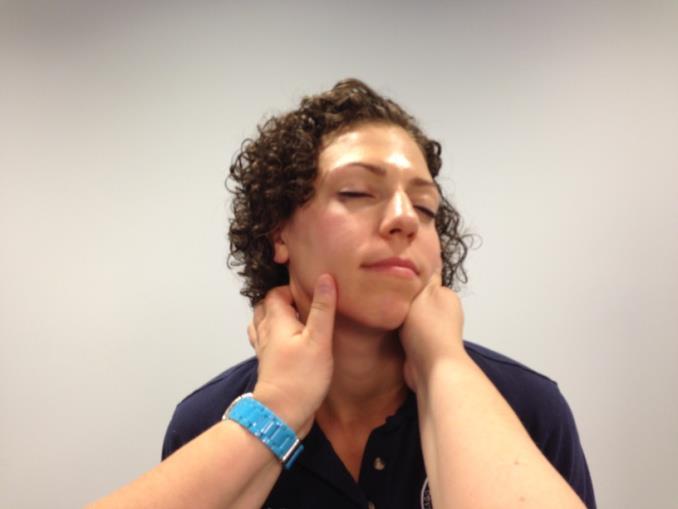
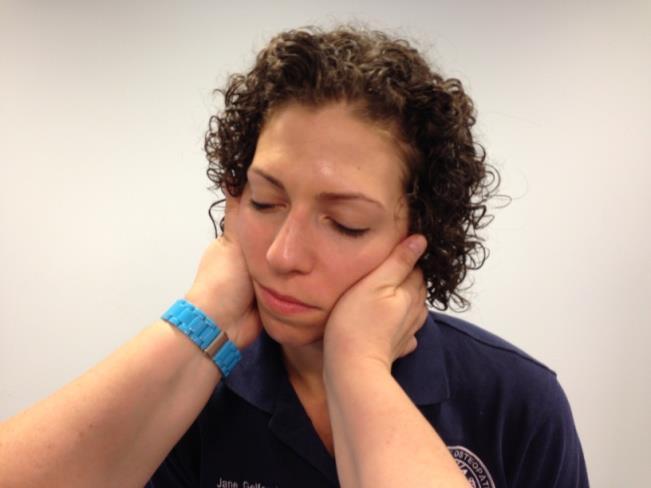
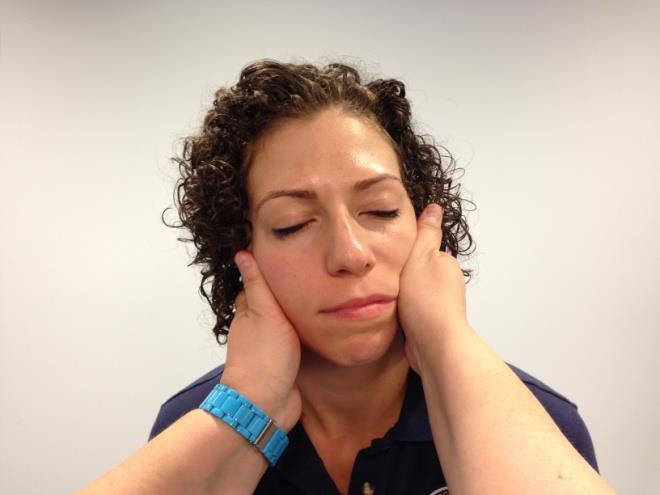
The Seated Nodding Test for O-A Atlas TPs
 Anterior is at the top of the illustrations. Putting the occiput on the atlas would be like closing facing pages of a book. Atlas superior facets converge anteriorly; their surfaces slope superiorly going
Evidence-Based Examination of the Hip Presented by Alexis Wright, PT, PhD, DPT, FAAOMPT Practice Sessions/Skill Check-offs
 Evidence-Based Examination of the Hip Presented by Alexis Wright, PT, PhD, DPT, FAAOMPT Practice Sessions/Skill Check-offs Module Five: Movement Assessment of the Hip (1 hour CEU time) Skilled Process
The Use of Seated Facet Release in Children
 The Use of Seated Facet Release in Children Karen M. Steele, DO, FAAO Professor Emerita, West Virginia School of Osteopathic Medicine Former AAO President Outline of lab Pedigree Basic Principles Diagnosis
Mobility sequencing!
 Mobility sequencing When practicing joint mobility drills we have the opportunity to improve our movement. The muscles associated with the joint being mobilised as well as the joint itself will improve
National Boards Part 4 Technique. Exam Format 5 stations (1 doctor and 1 patient). 2 setups per station (5 minutes) cervical
. 2 setups per station (5 minutes) cervical") 1 National Boards Part 4 Technique Exam Format 5 stations (1 doctor and 1 patient). 2 setups per station (5 minutes) cervical thoracic lumbar pelvic extremity Expect examiner interaction Graded on a Scantron
1 National Boards Part 4 Technique Exam Format 5 stations (1 doctor and 1 patient). 2 setups per station (5 minutes) cervical thoracic lumbar pelvic extremity Expect examiner interaction Graded on a Scantron
Exercises to restore range of movement: Rotation
 Exercises to restore range of movement: Rotation Start position: Sitting upright with your back supported in a chair. Position your head so it is evenly balanced, looking forward. Avoid allowing your head
Foundation Mobility (50 min)
") Foundation Mobility (50 min) Protection (10 min) Exercise Reps Duration (s) Wrist Abduction 12 ea 60 Wrist Adduction 12 ea 60 Wrist Pronation and Supination 10 ea 60 Wrist Pronation and Supination (Reverse
Foundation Mobility (50 min) Protection (10 min) Exercise Reps Duration (s) Wrist Abduction 12 ea 60 Wrist Adduction 12 ea 60 Wrist Pronation and Supination 10 ea 60 Wrist Pronation and Supination (Reverse
Thoracic Home Exercise Program
 Home Exercise Program 1. Bridging Laying on your back, knees bent with feet flat on the floor, arms along side resting on the floor, tighten your abdominals to stabilize your low back. Raise your buttocks
Stretching - At the Workstation Why is stretching important?
 Stretching - At the Workstation Why is stretching important? No matter how well a workstation is designed, problems may arise if attention is not paid to the way the work is done. Working at a computer
The SUPPORT Trial: SUbacromial impingement syndrome and Pain: a randomised controlled trial Of exercise and injection
 The SUPPORT Trial: SUbacromial impingement syndrome and Pain: a randomised controlled trial Of exercise and injection SUPPORT Physiotherapy Intervention Training Manual Authors: Sue Jackson (SJ) Julie
THE OSTEOPATHIC WORKSHOP: NECK PAIN
 THE OSTEOPATHIC WORKSHOP: NECK PAIN Trevine R. Albert, D.O. M.S. Family Medicine Neuromusculoskeletal Medicine PGY-3 2018 FSACOFP Convention DISCLOSURES There are no actual or potential personal, financial
Handling Skills Used in the Management of Adult Hemiplegia: A Lab Manual
 Handling Skills Used in the Management of Adult Hemiplegia: A Lab Manual 2nd Edition Isabelle M. Bohman, M.S., P.T., NDT Coordinator Instructor TM Published by Clinician s View Albuquerque, NM 505-880-0058
What is Kinesiology? Basic Biomechanics. Mechanics
 What is Kinesiology? The study of movement, but this definition is too broad Brings together anatomy, physiology, physics, geometry and relates them to human movement Lippert pg 3 Basic Biomechanics the
Physical Sense Activation Programme
 Flexion extension exercises for neck and upper back Sitting on stool Arms hanging by side Bend neck and upper back Breathe out Extend your neck and upper back Lift chest to ceiling Squeeze shoulder blades
Manual Manipulative Medicine: A Structural Examination for Lower Back Pain. Friday, October 2, :30 AM - 12:00 PM W116.
 Manual Manipulative Medicine: A Structural Examination for Lower Back Pain Friday, October 2, 2015 10:30 AM - 12:00 PM W116. Level: Beginner No Financial Disclosures Amir Mahajer, DO Ronald Tolchin, DO
Low Back Program Exercises
 Low Back Program Exercises Exercise 1: Knee to Chest Starting Position: Lie on your back on a table or firm surface. Action: Clasp your hands behind the thigh and pull it towards your chest. Keep the opposite
Physical Capability Exam Testing Protocol
 Test Duration: ~ min Physical Capability Exam Testing Protocol Pinch Gauge Grip Dynamometer Inclinometer Stop Watch Lift Box Table Weight Plates (5 lbs., lbs., lbs., 50 lbs., 0 lbs.) Physical Capability
WELCOME TO KCUMB-COM ACOP
 WELCOME TO KCUMB-COM ACOP WELCOME TO THE CITY OF FOUNTAINS! Osteopathic Approach to the Pediatric Patient Objectives At the end of the workshop the attendee will be able to: Discuss the musculoskeletal
Do the same as above, but turn your head TOWARDS the side that you re holding on to the chair.
 Stretch 4-6 times per day and hold each stretch for a minimum of 30 seconds. Perform the stretch gently without bouncing. Discuss any problems with your Chiropractor. Sit upright with your head and shoulder
Seated & Standing OMT
 Copyright 2018, Kansas City University of Medicine & Biosciences (KCUMB). This presentation is intended for KCUMB educational use only. No part of this presentation may be distributed or reproduced without
Improving the Functional Strategy of the Volleyball Athlete Ron Hruska, MPA, PT
 Improving the Functional Strategy of the Volleyball Athlete Ron Hruska, MPA, PT PREPARATION PHASE Individual examination, mechanical testing and tri-planar assessment. Frontal Plane Tests: Adduction Lift
Michael L. Kuchera, DO, FAAO March 2014 AAO Convocation. Cervical Fingertip HVLA Workshop Colorado Springs, Colorado
 Cervical Spine HVLA at Your Fingertips Hands-On Workshop Michael L. Kuchera, DO, FAAO, FNAOME Professor & Chairperson, Marian University - College of Osteopathic Medicine Precise Facet Activation at Your
What is the most frequently sprained ligament with inversion ankle sprains? 1/30/2014
 What is the most frequently sprained ligament with inversion ankle sprains? A. Anterior Talofibular B. Anterior Tibiofibular C. Calcaniofibular D. Posterior Talofibular E. Deltoid Lateral ligaments of
Fitball and Pilates Unite Filex 2017
 Fitball and Pilates Unite Filex 2017 Lisa Westlake www.physicalbest.com Pilates, fitball and physiotherapy blend perfectly to fine tune movement and postural awareness and provide a focus on technique,
CERVICAL CENTRALIZATION
 CERVICAL CENTRALIZATION Flex with Rotation Sit up straight. Drop the chin down towards the chest. Glide the neck back. Rotate the head to the. Perform this exercise as needed to decrease pain. Hold seconds
Body Organizations Flashcards
 1. What are the two main regions of the body? 2. What three structures are in the Axial Region? 1. Axial Region (Goes down midline of the body) 2. Appendicular Region (limbs) 3. Axial Region (Goes down
Active-Assisted Stretches
 1 Active-Assisted Stretches Adequate flexibility is fundamental to a functional musculoskeletal system which represents the foundation of movement efficiency. Therefore a commitment toward appropriate
Standing Shoulder Internal Rotation with Anchored Resistance. Shoulder External Rotation Reactive Isometrics
 Standing Shoulder Row with Anchored Resistance Begin standing upright, holding both ends of a resistance band that is anchored in front of you at chest height, with your palms facing inward. Pull your
ESI Wellness Program The BioSynchronistics Design. Industrial Stretching Guide
 ESI Wellness Program The BioSynchronistics Design Industrial Stretching Guide ESI Wellness The BioSynchronistics Design Industrial Stretching Basics Stretch 2-4 times/day Hold each Stretch for 5 seconds
Shoulder Exercises Phase 1 Phase 2
 Shoulder Exercises Phase 1 1. Pendulum exercise Bend over at the waist and let the arm hang down. Using your body to initiate movement, swing the arm gently forward and backward and in a circular motion.
TRAINING THE CORE BEGIN WITH ONE SET OF ALL 17 EXERCISES FOR A TOTAL OF 250 REPS. NEXT, MOVE TO TWO SETS FOR A TOTAL OF 500 REPS.
 TRAINING THE CORE 1. LATERAL SIT UPS.X 20 (10 EACH SIDE) 2. HYPEREXTENSIONS.X 10 3. LEG HUGS...X 15 4. RUSSIAN TWIST X 20 (10 EACH SIDE) 5. HIP CURLS..X 14 (7 EACH LEG) 6. JACK KNIFES..X 10 7. REVERSE
GENERAL EXERCISES SHOULDER BMW MANUFACTURING CO. PZ-AM-G-US I July 2017
 GENERAL EXERCISES SHOULDER BMW MANUFACTURING CO. PZ-AM-G-US I July 2017 Disclosure: The exercises, stretches, and mobilizations provided in this presentation are for educational purposes only are not to
Stability Ball Band & Free Weight Work-out
 Stability Ball Band & Free Weight Work-out High Mountain Personal Training Michael Martin Cell Phone: 970-946-6398 1. Chest Do 2 sets of 1 exercise Or Do 1 set of 2 different exercises Start position End
ELBOW - 1 FLEXION: ROM (Supine / Sitting)
") ELBOW - 1 FLEXION: ROM (Supine / Sitting) Position (A) Patient: Place arm against side of trunk. Helper: Hold elbow to stabilize. (B) - Lift hand toward shoulder, palm up. - Keep wrist straight. Do sessions
ELBOW - 1 FLEXION: ROM (Supine / Sitting) Position (A) Patient: Place arm against side of trunk. Helper: Hold elbow to stabilize. (B) - Lift hand toward shoulder, palm up. - Keep wrist straight. Do sessions
MOTION PALPATION GUIDE
 MOTION PALPATION GUIDE C1 What s happening C1 is moving anterior and superior on the occipital condyles causing a Superior atlas. What you feel - The t.p. s will move, bilaterally in the anterior direction,
32b Passive Stretches: Guided Full Body
 32b Passive Stretches: Guided Full Body 32b Passive Stretches: Guided Full Body! Class Outline" 5 minutes" "Attendance, Breath of Arrival, and Reminders " 10 minutes "Lecture:" 25 minutes "Lecture:" 15
MUSCLE ENERGY FOR CERVICAL SPINE. Dr. Gabrielle Koczab, DO Medical director Bedford Primary Care Core Teaching Faculty UH Regional Hospitals
 MUSCLE ENERGY FOR CERVICAL SPINE Dr. Gabrielle Koczab, DO Medical director Bedford Primary Care Core Teaching Faculty UH Regional Hospitals LEARNING OBJECTIVES 1. List conditions in which muscle energy
30b Passive Stretches:! Technique Demo and Practice - Upper Body
 30b Passive Stretches:! Technique Demo and Practice - Upper Body 30b Passive Stretches:! Technique Demo and Practice - Upper Body! Class Outline" 5 minutes" "Attendance, Breath of Arrival, and Reminders
When Technology Strikes Back!
 When Technology Strikes Back! Suffering from thumb or wrist pain from chronic texting? Many tech-savvy individuals have felt the side-effects of texting, typing, or web browsing. This is the pain you get
Shoulder Arthroscopic Capsular Release Rehabilitation
 Shoulder Arthroscopic Capsular Release Rehabilitation Phase two: 3 to 6 weeks after surgery Goals: 1. Improve range of motion of the shoulder 2. Begin gentle strengthening Activities 1. Sling Your sling
All About Stretching Going for the 3 Increases: Increase in Health, Increase in Happiness & Increase in Energy
 All About Stretching Going for the 3 Increases: Increase in Health, Increase in Happiness & Increase in Energy Strategies for Success in Health Management By: James J. Messina, Ph.D. Benefits of regular
Lumbar Stenosis Rehabilitation Using the Resistance Chair
 PRODUCTS HELPING PEOPLE HELP THEMSELVES! Lumbar Stenosis Rehabilitation Using the Resistance Chair a. Description Lumbar spinal stenosis is a term used to describe a narrowing of the spinal canal. The
Neck Rehabilitation programme for Rugby players.
 Neck Rehabilitation programme for Rugby players. The programme consists of two parts, first the Therapeutic Exercise Programme to improve biomechanical function and secondly the Rehabilitation programme
Types of Body Movements
 Types of Body Movements Bởi: OpenStaxCollege Synovial joints allow the body a tremendous range of movements. Each movement at a synovial joint results from the contraction or relaxation of the muscles
Functional Movement Test. Deep Squat
 Functional Movement Test Put simply, the FMS is a ranking and grading system that documents movement patterns that are key to normal function. By screening these patterns, the FMS readily identifies functional
Monster Walk Stand with your feet slightly closer than shoulder-width apart in an athletic stance. Loop an elastic band around your ankles.
 Off-season Lower-Body Tennis Exercises Research conducted on elite tennis players shows that lower-body strength is the same on both the left and right sides. Therefore, lower-body training for tennis
Terms of Movements by Prof. Dr. Muhammad Imran Qureshi
 Terms of Movements by Prof. Dr. Muhammad Imran Qureshi Three systems of the body work in coordination to perform various movements of the body. These are: A System of Bones (Osteology), A System of Muscles
Snow Angels on Foam Roll
 Thoracic Mobilization on Foam Roll Lie on your back with a foam roller positioned horizontally across your mid back, and arms crossed in front of your body. Bend your knees so your feet are resting flat
YOUR FREE COMPREHENSIVE GUIDE TO HELP RELIEVE LOWER BACK PAIN NATURALLY
 YOUR FREE COMPREHENSIVE GUIDE TO HELP RELIEVE LOWER BACK PAIN NATURALLY By: helpwithsciatica HTTPS://HELPWITHSCIATICA.COM Table of contents 1 Introduction 2 Exercise: Extensions 3 Exercise: Curl-Ups 4
Chiropractic Glossary
 Chiropractic Glossary Anatomy Articulation: A joint formed where two or more bones in the body meet. Your foot bone, for example, forms an articulation with your leg bone. You call that articulation an
GENERAL EXERCISES KNEE BMW MANUFACTURING CO. PZ-AM-G-US I July 2017
 GENERAL EXERCISES KNEE BMW MANUFACTURING CO. PZ-AM-G-US I July 2017 Disclosure: The exercises, stretches, and mobilizations provided in this presentation are for educational purposes only are not to be
the back book Your Guide to a Healthy Back
 the back book Your Guide to a Healthy Back anatomy Your spine s job is to: Support your upper body and neck Increase flexibility of your spine Protect your spinal cord There are 6 primary components of
Treatment of SI dysfunction
 + SIJ dysfunction 84 Treatment of SI dysfunction Move innominant into anterior tilt Decreased pain Perform manipulation for correction of a posterior innominant Increased pain/no change Move innominant
The Language of Anatomy. (Anatomical Terminology)
") The Language of Anatomy (Anatomical Terminology) Terms of Position The anatomical position is a fixed position of the body (cadaver) taken as if the body is standing (erect) looking forward with the upper
The Language of Anatomy (Anatomical Terminology) Terms of Position The anatomical position is a fixed position of the body (cadaver) taken as if the body is standing (erect) looking forward with the upper
WEEKEND 2 Elbow. Elbow Range of Motion Assessment
 Virginia Orthopedic Manual Physical Therapy Institute - 2016 Technique Manual WEEKEND 2 Elbow Elbow Range of Motion Assessment - Patient Positioning: Sitting or supine towards the edge of the bed - Indications:
Low Back Pain Home Exercises
 Low Back Pain Home Exercises General Instructions The low back exercise program is a series of stretching exercises and strengthening exercises prescribed by your physician for your medical condition.
ACTIVE AGING.
 Shoulder Pain Rehabilitation Protocol Rotator Cuff Syndrome Shoulder impingement The Resistance Chair Solution Shoulder Impingement a. Shoulder impingement is one of the most common causes of shoulder
WORLDS GREATEST WARM UP. This is a three-part stretch. Begin. Sets Reps Weight Notes
 BEGINNER WEEK # DAY FULL BODY WORLDS GREATEST WARM UP BW INTERMEDIATE CHAIR SQUAT This is a three-part stretch. Begin Perform sets of 8- of each exercise using No/Light weight. Focus on good form using
The Trunk and Spinal Column Kinesiology Cuneyt Mirzanli Istanbul Gelisim University
 The Trunk and Spinal Column Kinesiology Cuneyt Mirzanli Istanbul Gelisim University The Trunk and Spinal Column Vertebral column 24 articulating vertebrae 31 pairs of spinal nerves Abdominal muscles some
Foundational Spine Exercises
 These exercises should only be used as a starting point to strengthen the muscles that support your back. Your physical therapist will tailor a program that fits your needs and activity level, using exercises
Calisthenic Guidelines
 8 Calisthenics In this chapter you will learn about: Proper form and guidelines for performing calisthenics. Designing a calisthenic exercise program. Abdominal exercise techniques. Calisthenics require
Dynamic slings and optimal 3D function
 Dynamic slings and optimal 3D function Abstract Trish Wisbey-Roth Olympic/Specialist Sports Physiotherapist (FACP), Masters of Sport Physiotherapy (AIS/UC) Active Rehabilitation Consultant Layered over
GOLFERS TEN PROGRAM 1. SELF STRETCHING OF THE SHOULDER CAPSULE
 GOLFERS TEN PROGRAM 1. SELF STRETCHING OF THE SHOULDER CAPSULE POSTERIOR CAPSULAR STRETCH Bring your arm across your chest toward the opposite shoulder. With the opposite arm grasp your arm at your elbow.
Double Knee to Chest. Lying on back with knees slightly bent. Hug both knees to chest
 Double Knee to Chest Lying on back with knees slightly bent Hug both knees to chest Flexion on the Gymnic Ball Lying on stomach over ball Drape body over ball and relax Roll back and forth to stretch out
2. The vertebral arch is composed of pedicles (projecting from the body) and laminae (uniting arch posteriorly).
 and laminae (uniting arch posteriorly).") VERTEBRAL COLUMN 2018zillmusom I. VERTEBRAL COLUMN - functions to support weight of body and protect spinal cord while permitting movements of trunk and providing for muscle attachments. A. Typical vertebra
VERTEBRAL COLUMN 2018zillmusom I. VERTEBRAL COLUMN - functions to support weight of body and protect spinal cord while permitting movements of trunk and providing for muscle attachments. A. Typical vertebra
Phase 1 Initiating Normal Spinal Motion. Activities to Avoid or Minimize. Good choices to make
 Phase 1 Initiating Normal Spinal Motion Activities to Avoid or Minimize 1. Sitting 2. Standing with weight on one foot 3. Reading on back with head flexed forward 4. One sided sports (always practice both
The Golfers Ten Program. 1. Self Stretching of the Shoulder Capsule
 The Golfers Ten Program 1. Self Stretching of the Shoulder Capsule A. Posterior capsular stretch Bring your arm across your chest toward the opposite shoulder. With the opposite arm grasp your arm at your
THROWER S TEN EXERCISE PROGRAM David Andrew Parker, MD
 THROWER S TEN EXERCISE PROGRAM David Andrew Parker, MD The thrower s ten exercise program has been designed to exercise the major muscles necessary to return to throwing. The program s goal is to be an
Information within the handout. Brief Introduction Anatomy & Biomechanics Assessment & Diagnosis Treatment through Muscle Energy
 Manual Medicine Diagnosis and Treatment for Somatic Dysfunction of the Pelvis Through Muscle Energy Greenman s Priciples of Manual Medicine (5 th Ed.)- Lisa DeStefano,DO Speaker disclosure I declare I
PHYSICAL TRAINING INSTRUCTORS MANUAL TABLE OF CONTENT PART 3
 TABLE OF CONTENT PART 3 Exercise No 11: Chest Press... 2 Exercise No 12: Shoulder Press... 3 Exercise No 13: Pull-overs... 5 Exercise No 14: Tricep Extension... 6 informal exercises to develop upper body
Body Bar FLEX. Exercises for the Core and Abdominals. by Gordon L. Brown, Jr. for Body Bar, Inc.
 Body Bar FLEX Exercises for the Core and Abdominals by Gordon L. Brown, Jr. for Body Bar, Inc. 1 Exercises for the Core and Abdominals This presentation features stretching and strengthening exercises
Lisa M. Satalino, PT 415 Pinkster La. Slingerlands, NY lisasatalino.com
 Myofascial Stretching Techniques: Lisa M. Satalino, PT 415 Pinkster La. Slingerlands, NY 12159 518-339-5792 crescentviewpt@yahoo.com lisasatalino.com For each technique, you will bring the tissue to your
Warm-Up and Stretching Exercises
 Warm-Up and Stretching Exercises Most athletes (swimmers included) use a combination of controlled movement exercises and specific joint/muscle stretching to improve performance potential. The proposed
9/26/2012. Osteokinematics (how the bones move) & Arthrokinematics (how the joints move) Planes & Axes. Planes & Axes continued
 & Arthrokinematics (how the joints move) Planes & Axes. Planes & Axes continued") Osteokinematics (how the bones move) & (how the joints move) Planes & Axes Planes of Action = Three fixed lines of reference along which the body is divided. Each plane is at right angles (or perpendicular)
Osteokinematics (how the bones move) & (how the joints move) Planes & Axes Planes of Action = Three fixed lines of reference along which the body is divided. Each plane is at right angles (or perpendicular)
GENERAL EXERCISES MID-BACK BMW MANUFACTURING CO. PZ-AM-G-US I July 2017
 GENERAL EXERCISES MID-BACK BMW MANUFACTURING CO. PZ-AM-G-US I July 2017 Disclosure: The exercises, stretches, and mobilizations provided in this presentation are for educational purposes only are not to
IFAST Assessment. Name: Date: Sport: Review Health Risk Assessment on initial consult form. List Client Goals (what brings you here?
 IFAST Assessment Name: Date: Sport: Review Health Risk Assessment on initial consult form List Client Goals (what brings you here?) Cardiovascular Measurements Blood Pressure Resting Heart Rate Body Composition
PHYSICAL TRAINING INSTRUCTORS MANUAL TABLE OF CONTENT PART 5. Exercise No 31: Reverse Crunch 1. Exercise No 32: Single Hip Flexion 3
 TABLE OF CONTENT PART 5 Exercise No 31: Reverse Crunch 1 Exercise No 32: Single Hip Flexion 3 Exercise No 33: Bicycle Crunch 4 Exercise No 34: Straight Leg U Crunches 5 Exercise No 35: Bent Knee U Crunch
Certified Personal Trainer Re-Certification Manual
 Certified Personal Trainer Re-Certification Manual Section II 1 Anatomy & Physiology Terms Anatomy and physiology are closely related fields of study: anatomy is the study of form, and physiology is the
THROWERS TEN EXERCISE PROGRAM
 THROWERS TEN EXERCISE PROGRAM The Thrower s Ten Program is designed to exercise the major muscles necessary for throwing. The Program s goal is to be an organized and concise exercise program. In addition,