Information resource for the safer management of patients with tracheostomies and laryngectomies
|
|
|
- Clifford Shannon Morrison
- 5 years ago
- Views:
Transcription

1 Information resource for the safer management of patients with tracheostomies and laryngectomies Draft guidance for review November 2010
2 2
3 Introduction This guide is a resource to help promote and facilitate the safe management of tracheostomies and laryngectomies in the hospital environment. This includes specialist areas such as critical care, head & neck units and the wards and outpatient settings. It forms the background to the emergency algorithms, bedside resources and web-based teaching materials that we have assembled over the last 3 years by multi-disciplinary, multi-site collaboration. We have attempted to make the resource a one stop shop covering all aspects of tracheostomy management. By collecting together resources from surgical, anaesthetic, nursing, intensive care and allied health backgrounds, along with guidance from organisations such as the National Patient Safety Agency and the Intensive Care Society, we are putting together the different pieces of the jigsaw that exist when accessing the often excellent individual tracheostomy resources that are available. The result is that this resource is more of a reference than a quick guide. We have split the work into sections relating to basic information, clinically relevant information and a section on infrastructure. The section describing the day to day management of a tracheostomy patient uses work already completed by an expert group assembled by the NPSA and is referenced accordingly. In addition, we are grateful for all of the local Trust guidelines, resources and correspondence that have been made available to this project. We have referenced such resources where possible, however, much of what is contained in this document represents expert opinion and what is considered best practice. Multiple sources have been used in order to inform and establish consensus but the published work available recognises the paucity and lack of evidence to support many of elements of guidance. This guidance is applicable for a novice looking after a patient with a tracheostomy or laryngectomy for the first time through to an airway expert. We have referred to the resources as those applicable for the first responder and the airway expert who would be called to attend as a secondary responder to an incident. The resources should ideally be viewed on-line to take advantage of the hyperlinks to web resources ( Whilst this information has been collected and designed to help in clinical management, the authors do not accept any responsibility for any harm, loss or damage arising from actions or decisions based on the information contained within this publication and associated materials. Ultimate responsibility for the treatment of patients and interpretation of these materials lies with the medical practitioner / user. The opinions expressed are those of the authors. The inclusion in this publication of material relating to a particular product or method does not amount to an endorsement of its value, quality, or manufacturer s claims. 3
4 We are inviting comment on this work from November 2010 for a period of 6 months. Feedback can be ed to comments@tracheostomy.org.uk or sent via the websites of DAS, ICS or via We will review any comments we receive and collate any feedback to make these resources as robust and representative as possible. You are welcome to use and adapt these resources as you wish. Please reference them accordingly. They are not intended to replace existing care pathways in your own institution, but you may wish to include some of the material in your own unit or ward s policies. If you find any part of these resources useful, then we will have succeeded in our aim throughout this project; to help organisations provide better, safer care for this vulnerable group of patients. Brendan McGrath Consultant in Anaesthesia & Intensive Care Medicine University Hospital of South Manchester On behalf of the Working Party of the National Tracheostomy Safety Project 4
5 Contents Executive summary & key recommendations What is a tracheostomy How and why a tracheostomy can be formed Different types of tracheostomy and tubes Emergency management of the patient with a tracheostomy or laryngectomy Management of the day-to-day needs of the patient with a tracheostomy Suggested infrastructure and resources for immediate and ongoing care of the tracheostomy patient. o o o Example care pathway Example policy Risk assessment Competencies for tracheostomy care and management Acknowledgements References 5
6 Executive Summary This section details the main points of this document. Further explanation can be found in the relevant sections. Many of the recommendation originate from the NPSA multiprofessional external reference group comprising representatives from key National Bodies and expert clinicians. Recommendations are also included from Irish and Scottish best practice circulars. Key Issue A patient with a tracheostomy is at risk of death or harm if inappropriate or inadequate care is provided. This patient group requires the tracheostomy tube to be safely inserted, securely positioned and appropriately cared for, to continue to provide the patient with an airway. Failure to do so will lead to a displaced or blocked tube which if not dealt with immediately, may be fatal within minutes. Action 1. Leadership a. Identify a clinical lead to co ordinate the management of patients with tracheostomies. b. Trusts must have a local policy in place with outlines the expected management of patients with a tracheostomy or laryngectomy. 2. Environment a. Identify an appropriate environment for patients with tracheostomies. b. Identify a comprehensive risk assessment of the patient that is agreed locally to determine the dependency of the patient, the level of the observation and visibility required. c. The frequency of risk assessment should be determined by the patient s condition, clinical environment, staffing levels, skills and competence. The risk assessment must be retained in the patient record as appropriate. d. Trusts who are unable to develop systems to reduce risks effectively in all clinical areas should consider identifying designated areas where the risks are reduced. 3. Equipment a. Equipment for the management of the tracheostomy including suction should be kept near the patient at all times. b. Equipment should be checked, as a minimum on a daily basis. c. All tracheostomy tubes used should have a removable inner cannula. Exceptions to this must be clearly documented in the patient s medical record and a date for review determined. d. The inner cannula should be regularly checked and cleaned as this greatly reduces the risk of a blocked tracheostomy tube. e. Emergency equipment must remain immediately available at the bedside and accompany the patient if they leave their base location. 6
7 4. Staffing a. Patients with tracheostomies must be cared for by staff that have been trained and are currently competent in tracheostomy care. b. Staff must be able to access appropriate training and support in order to deliver appropriate care and to be able to identify risk factors and how to initiate management of complications. All training received should be documented. c. Trusts must ensure that training programmes are in accordance with evidence based guidelines on the management of a tracheostomy. d. Tracheostomy training and support is locally coordinated by the clinical lead. e. Staff escorting the patient outside of the clinical area must be competent in dealing with suctioning and how to deal with a tracheostomy emergency. 5. Knowledge a. All staff caring for patient with tracheostomies and laryngectomies must be competent to do so, both in routine care and in the emergency situation. This includes designated wards and clinical areas, and also acute services such as acute medical units and emergency departments who may be expected to see tracheostomy complications. b. Emergency algorithms should be taught, displayed and used to manage tracheostomy or laryngectomy emergencies c. Essential information can be displayed at the bedside to assist in managing an emergency at which the attending staff may not know the history of the patient. 7
8 8
9 What is a tracheostomy Tracheostomies are common procedures in head and neck surgical and in critical care practice, with over 5,000 procedures performed yearly. They are also becoming more commonplace on the general wards of the hospital. This is partly due to pressures on intensive care beds and the increasing drive to de-escalate care quickly, along with increasing numbers of patients benefiting from temporary tracheostomy. These groups include those with chronic respiratory or neurological problems. Increasing numbers of patients with tracheostomies are being cared for on wards outside the specialist ward (typically ENT or Maxillofacial wards, or sometimes neurosurgical or neurology wards) or critical care infrastructure. This has implications for the safety of patients who may be cared for on wards without the necessary competencies and experience to manage this challenging cohort and local measures need to be in place to ensure that safe routine and emergency care can be provided. This guide has evolved to provide information to those caring for patients with temporary or permanent tracheostomies either regularly or occasionally. It aims to provide basic background information and the rationale for tracheostomy care. We have also developed simple emergency guidelines for dealing with tracheostomy emergencies both in critical care and beyond. What problems can occur with tracheostomies? Whilst tracheostomies are increasingly commonplace, patient safety incidents associated with their use are unfortunately also on the increase. Over 1,7000 incidents were reported to the NPSA between 1 st January 2005 and 31 st December 2008, including 32 deaths. We know from research with the NPSA that when a clinical incident occurs relating to a tracheostomy, then the chance of some harm occurring is between 60 and 70%, depending on the location in which that the patient is being cared for [Thomas 2009; McGrath 2010; McGrath 2010]. Incidents can be divided into: Incidents at the time of performing the tracheostomy Blockage or displacement of the tracheostomy after placement Equipment incidents Competency (skills and knowledge) incidents Infrastructure (staffing and location) incidents The majority of these incidents are due to recurring themes and the resources we have developed as part of this project are specifically aimed at addressing these. 9
 and then the open end is stitched onto the front of the neck.")
10 What is a laryngectomy? A laryngectomy is essentially complete surgical removal of the larynx (voice box) which disconnects the upper airway (nose and mouth) from the lungs. The trachea is transected (cut) and then the open end is stitched onto the front of the neck. This is an irreversible operation and once it has been performed, the patient will never be able to breathe or be oxygenated or ventilated through the upper airway again. An animation showing the difference between a tracheostomy and a laryngectomy can be found by clicking here. The figure above shows a laryngectomy on the left and a tracheostomy on the right. The right hand figure still has a potentially patent upper airway. Often tracheostomies are performed because of actual or anticipated difficulty with the upper airway, so patency cannot be guaranteed. What problems can occur with laryngectomies? The laryngectomy patient has had the normal upper airway humidification mechanisms bypassed in the same way that a tracheostomy patient has. They are at risk of blockage of the trachea with secretion or blood. The airway is often more secure than with a temporary tracheostomy as the trachea is stitched onto the front of the neck. It can still become compromised however, particularly within a few days of surgery. Laryngectomy stomas usually don t have a tube inserted into them unless they have just been formed, the patient needs invasive ventilation or requires repeated suctioning. One of the commonest problems with a laryngectomy, particularly in an emergency, is that carers fail to appreciate that the patient has actually has their larynx removed. It can be difficult to tell the difference at the bedside between a laryngectomy and a surgical tracheostomy, particularly close to major surgery. There are many incident reports of patients following a laryngectomy who are mistakenly given oxygen via the face or who have had attempts at managing their upper airway fail because there is no connection between the face and lungs. Likewise, we know of situations where following radical head and neck surgery, carers have failed to manage a patients upper airway after assuming that they had had a laryngectomy when in fact they had not. We have developed colour coded bed head signs and algorithms to immediately distinguish laryngectomies from tracheostomies as recommended by the NPSA and ICS. 10
11 Anatomy of a tracheostomy? A tracheostomy is an artificial opening made into the trachea through the neck. This may be temporary or permanent. A tracheostomy tube is usually inserted, providing a patent opening. The tube enables air flow to enter the trachea and lungs directly, bypassing the nose, pharynx and larynx. Diagram of larynx and trachea illustrating tracheostomy tube insertion sites. Indications for a tracheostomy To secure and clear the airway in upper respiratory tract obstruction (actual or potential). To secure and maintain a safe airway in patients with injuries to the face, head or neck and following certain types of surgery to the head and neck. To facilitate the removal of bronchial secretions where there is poor cough effort with sputum retention. To protect the airway of patients who are at high risk of aspiration, that is patients with incompetent laryngeal and tongue movement on swallowing e.g. neuromuscular disorders, unconsciousness, head injuries, stroke etc. To enable long-term mechanical ventilation of patients, either in an acute ICU setting or sometimes chronically in hospitals or in the community. To facilitate weaning from artificial ventilation in acute respiratory failure and prolonged ventilation. 11
12 Physiological changes with a tracheostomy The upper airway anatomical dead space can be reduced by up to 50%, which can improve ventilation to the lungs. The natural warming, humidification and filtering of air that usually takes place in the upper airway is lost. The patient's ability to speak is removed. The ability to swallow is adversely affected. Sense of taste and smell can be lost. The tracheostomy will generally remain until the indication for insertion has resolved. In some instances however, the tracheostomy will be permanent and these patients will be discharged from critical care to a general medical or surgical ward. Types of tracheostomy Tracheostomy may be temporary or long term/permanent, and may be formed electively or as an emergency procedure. They may also be classified by their method of initial insertion either surgical or percutaneous. Temporary will be formed when patients require long/short term respiratory support or cannot maintain the patency of their own airway. Certain maxillofacial or ENT surgical procedures require a temporary tracheostomy to facilitate the procedure. These tubes will be removed when the patient recovers. Long term/permanent are usually formed due to carcinoma of the nasooropharynx or larynx. Dependent on the stage of the disease either a tracheostomy or a laryngectomy will be performed. These patients are generally cared for in a specialist ward such as maxillofacial or ENT units. Some patients need chronic respiratory support or long term airway protection and this requires a long term/permanent tracheostomy. For example, progressive neurological conditions, insufficient respiratory capacity to breathe without support. 12
13 The anatomical position of a tracheostomy tube Techniques for inserting a tracheostomy There are two main techniques used to perform a tracheostomy: surgical or percutaneous. Surgical tracheostomy This technique is usually carried out in an operating theatre where conditions are sterile and lighting is good. General anaesthesia is generally used however this technique can also be carried out with a local anaesthetic. A surgical opening is made into the trachea into which a tube is placed; this may then be sutured to the skin or secured with cloth ties or a holder. Surgical tracheostomies may be formed as part of ENT or Maxillofacial surgical procedures, usually during face and neck dissections for tumour removal. Importantly, these procedures may involve removal of the larynx which means that there is no connection from the mouth or nose to the trachea. Using the tracheostomy is the only way of ventilating these patients. 13


14 Types of surgical tracheostomy The tissues around the trachea are dissected and then the trachea is entered by making an incision in its anterior wall. This may be one of the following: T-shaped tracheal opening through the membrane between the second and third or third and fourth tracheal rings. With this incision, a silk stay suture can be placed through the tracheal wall on each side and taped to the neck skin on either side. This facilitates tube replacement by pulling the trachea anteriorly and widening the opening should the tube dislodge in the immediate postoperative period. These sutures are removed after the first tracheostomy tube change 5-7 days postoperatively once the newly formed tract from the skin to the trachea becomes more established. U- or H-shaped tracheal opening can be made and the tracheal flaps can be tacked to skin edges with absorbable sutures to create a semi-permanent stoma. Sutures can be placed in each tracheal flap and taped to the chest and neck skin, facilitating replacement of a displaced tube in postoperative care. Pulling on these sutures widens the tracheal opening. Most modern surgical tracheostomies will be of this type with the sutures remaining for approximately 1 week until the tract is formed. Removal of small anterior portions of the tracheal rings can create a more permanent stoma. A different type of surgical tracheostomy is the Björk flap where a ramp of trachea is sutured to the skin which allows easier replacement of tracheostomy tubes. There may be a suture to the skin here too, but this is to hold the ramp in place, rather than to be used to elevate the trachea for a tracheostomy tube change. See the figures below. Above: Different types of tracheal incision. The right-hand figure shows a tracheal flap. Far left figure: Björk Flap with a flap suture to the skin (blue) Right figure: Slit-type tracheostomy with 2 stay sutures (blue) to the skin. These can be used to manipulate the trachea 14

15 Percutaneous tracheostomy This is the most commonly used technique in critical care as it is simple and quick, can be performed at the bedside using anaesthetic sedation and local anaesthetic, and therefore is often the technique of choice in the critically ill. The procedure involves the insertion of a needle through the neck into the trachea followed by a guide-wire through the needle. The needle is removed and the tract made gradually larger by inserting a series of progressively larger dilators over the wire until the stoma is large enough to fit a suitable tube (Seldinger technique). This is then secured by cloth ties or a holder. Click to see videos of a percutaneous tracheostomy insertion: Video 1, Video 2, Video 3. Types of tracheostomy tubes The different types of tubes available can seem confusing. Essentially tubes can be described by the presence or absence of a cuff at the end, by the presence or absence of an inner cannula, or by the presence or absence of a hole or fenestration. Tubes can finally be made of different materials and be different diameters and lengths. Click here to access multimedia explanations of these different types of tubes and cuffs. Cuffed Tubes Cuffed tubes have a soft balloon around the distal end of the tube which inflates to seal the airway. Cuffed tubes are necessary when positive pressure ventilation is required or in situations where airway protection is essential to minimize aspiration of oral or gastric secretions (although all cuffs are not an absolute barrier to secretions). If the tracheostomy tube lumen is occluded when the cuff is inflated, the patient will not be able to breathe. In this situation, it is important to deflate the cuff and call for medical assistance immediately. Cuffed Tube (un-fenestrated) Un-cuffed Tubes Uncuffed tubes do not have a cuff that can be inflated inside the trachea and tend to be used in longer-term patients who require ongoing suction to clear secretions. These tubes will not allow sustained effective positive pressure ventilation as the gas will escape above the tracheostomy tube. It is essential that patients have an effective cough and gag reflex to protect them from aspiration. Un-cuffed tubes are rarely used in acute care. 15

16 Fenestrated Tubes Fenestrated tubes have an opening(s) on the outer cannula, which allows air to pass through the patient's oral/nasal pharynx as well as the tracheal opening. The air movement allows the patient to speak and produces a more effective cough. However, the fenestrations increase the risk of oral or gastric contents entering the lungs. It is therefore essential that patients who are at high risk of aspiration or on positive pressure ventilation do not have a fenestrated tube, unless a non-fenestrated inner cannula is used to block off the fenestrations (see figures below). Suctioning with a fenestrated tube should only be performed with the non-fenestrated inner cannula in situ, to ensure correct guidance of the suction catheter into the trachea. Un-cuffed, fenestrated tube. These tubes allow much more air flow to the pharynx. The fenestration (hole) can be occluded with appropriate inner tube. These tubes are common in patients discharged from critical care. 16

17 Comparing cuffs and fenestrations: The left hand figure above shows a cuffed tracheostomy tube in situ. Airflow should only be through the tube to the lungs, allowing positive pressure ventilation if the tube is correctly sited. Deflating the cuff, or using an un-cuffed tube will allow some airflow through the upper airway as in the centre figure. This can be increased by using a tube with a hole in it called a fenestration, marked at the angle of the tube in the right hand figure above. Some patients benefit from the extra airflow through the larynx, allowing speech. Single Cannula Tubes Single cannula tubes are traditionally the first tube to be sited in a critical care area. The system is less complicated than a double cannula tube and is usually for temporary use only. These tubes can be cuffed or uncuffed. The larger inner diameter of the single cannula tube allows pressure support ventilation when the cuff is inflated to form a seal within the trachea. The Intensive Care Society in their 2008 guidance have recommended that these tubes are not used routinely in critical care owing mainly to concerns about them becoming occluded with secretions, and the difficulty in cleaning this type of tube. Double Cannula Tubes Double cannula tubes have an outer cannula to keep the airway open and an inner cannula which acts as a removable liner to facilitate cleaning of impacted secretions. Some inner cannula are disposable, others must be cleaned and re-inserted. Patients discharged from a critical care area with a tracheostomy should have a double un-cuffed cannula in place. This type of tube is the safest to use outside the critical care environment, although to reduce the incidence of tube occlusion, the inner cannula must be regularly cleaned. Any patient cared for outside a specialist ward or critical care area should have the cuffed un-fenestrated tube changed for a double lumen un-cuffed tube, which may be fenestrated depending on local policy and on patient factors. This allows easy cleaning of the inner tube on the ward and helps prevent blockage of the tracheostomy with secretions. (ICS & NPSA Guidance 2008/9). If an un-cuffed tube becomes blocked, it is more likely that a patient can breathe past the tube via their upper airway, making these tubes inherently safer for nonspecialist locations. 17


18 The inner tube should be removed and cleaned in sterile water every 6-8 hours. A spare inner tube should be kept in a clean container at the patient bedside when not in use. It should be noted that some designs of tracheostomy tube require the inner cannula to be in situ before the tracheostomy can be connected to an anesthetic breathing circuit. It is essential that you understand the equipment being used in your place of work. Videos showing inner tube care can be found here. Tubes with sub-glottic suction As part of a bundle of care, subglottic suction may reduce the incidence of a ventilator associated pneumonia occurring in those patients who require mechanical ventilation via a tracheostomy tube. Tubes are now available from various manufacturers which will allow continuous or intermittent suction from any material that accumulated above the inflated cuff of a tracheostomy tube. Cuffed tracheostomy tubes with a subglottic suction port. 18
19 The figure below shows two types of inner tube included with the un-cuffed tube, along with the blocking tube which can be used for insertion of the tracheostomy only. This blocking tube must be removed once the tracheostomy is sited. Inner tubes. Lower tube has a fenestration Un-cuffed, fenestrated outer tube The upper inner tube has no hole (or fenestration) and so air flow is allowed straight through the tube from one open end to the other. When this is in situ, minimal amounts of air pass through the patient s upper airway. This inner tube should be in place when the patient is suctioned as there is a small risk of a suction catheter passing through the fenestration and damaging the tracheal mucosa. The lower type of inner tube has a fenestration in it, which lines up with the fenestration in the outer tube. Air can then flow through the tube as before, but in addition, some air can flow through the holes and out through the patient s mouth. This air flow to the upper airway allows the patient to talk. If positive pressure needs to be given to the patient to aid ventilation, for example in the event of a cardiac arrest or worsening respiratory function, then the tracheostomy inner tube without the fenestrations should be fitted, this then allows positive pressure airflow to enter the lungs rather than escaping through the mouth. Adjustable Flange Tracheostomy Tubes These tubes are used in patients who have an abnormally large distance from their skin to their trachea, and a standard tube would not fit properly. There are now dedicated kits for inserting these tubes. Standard tubes may not be the correct size for many critical care patients and increasing numbers may require these tubes [Mallick, 2008]. Clinical examination, ultrasound and endoscopic inspection before and after a tracheostomy procedure may help to decide which patients require these types of tubes. 19
 It is essential to review the position of the flange (hence the length of the tube) on a daily basis.")


20 Particular indications for an adjustable flanged tube are: Patients with very large neck girth including the obese Oedema caused burns classically or a capillary leak syndrome (sepsis etc) Actual or anticipated oedema after surgical procedures (including tracheostomy itself) It is essential to review the position of the flange (hence the length of the tube) on a daily basis. If the patient has neck swelling, the as this worsens or resolves, the flange may need adjusting. Adjustable flange tracheostomy tubes are more difficult to use and are associated with additional complications, some of which may be life threatening. Only use an adjustable flange tracheostomy tube when it is essential todo so. Patients within a ward area will not usually have an adjustable flange tubes. Newer adjustable flange tracheostomy tubes can have an inner tube. Mini Tracheostomy A mini tracheostomy involves the insertion of a small 4 mm non-cuffed tracheostomy tube through the cricothyroid membrane. This can be done under local anaesthesia. It is primarily inserted to facilitate the removal of secretions. It does not protect the airway from aspiration and will only provide a route for oxygenation in the emergency situation. Mini Tracheostomy and percutaneous insertion kit 20
21 Choice of tracheostomy tube The Intensive Care Society produced guidance on tracheostomy care in 2008 which included information on the choice of tracheostomy tube. This is summarised below. An important consideration is whether to use a tracheostomy with an inner tube from the time of initial percutaneous tracheostomy which may be done for weaning on the ITU. It is increasingly recognised that tube obstruction can occur in critical care areas as well as on the wards and the ICS recommend that these easily cleanable tubes should be used where possible as standard to reduce the risks of obstruction. The disadvantage is that these tubes have a reduced internal diameter which has implications for gas flow. This has to balanced against the increased risks of tracheostomy tube obstruction with single lumen tubes, and the 3-5 (ideally 7-10) days that a tracheostomy tube should not be changed for after a percutaneous procedure if the patient is to be moved to a non critical care area. Factors influencing temporary tracheostomy tube choice (ICS 2008) Respiratory function Most temporary tracheostomies will be inserted whilst a patient is in an intensive care unit and still requiring some degree of positive pressure ventilation. As a standard, this will require the use of a cuffed tracheostomy tube (although it is recognised that long term mechanical ventilation can be delivered through an uncuffed tube). Abnormal airway anatomy Upper airway endoscopy following percutaneous insertion suggests that a standard tracheostomy tube may be anatomically unsuitable in as many as a third of adult patients. Obese patients may require a tube with an extended proximal length, whilst patients with fixed flexion abnormalities may not easily accommodate tubes with a fixed angulation. Airway pathology Localised airway pathology such as tracheomalacia, granuloma formation etc may on occasion necessitate the use of a tracheostomy tube that has a longer distal length than standard. Compromised airway, protection and weaning problems Many patients can be weaned to decannulation without any need to change to change from the cuffed tracheostomy tube that was initially inserted. In problematic cases however, it may be useful to consider options such as downsizing, to an uncuffed or fenestrated tube, or a tube with the option for sub-glottic aspiration of airway secretions. The introduction of a speaking valve may also aid swallowing and secretion control. Obstructed / absent upper airway Patients with an obstructed or absent upper airway are at particular risk should a tracheostomy become obstructed or misplaced. This has implications for both the choice of tracheostomy tube as well as the method by which the stoma is fashioned. 21
22 Clinical environment Obstruction of a cuffed tracheostomy tube is a potentially life threatening emergency. Wherever possible a dual cannula tube (i.e. a tube with an inner cannula) should be used, particularly for patients in HDU or ward environments who may not have immediate access to clinicians with emergency airway skills. Ward staff can change inner tubes easily and quickly to relieve obstruction with secretions. 22
23 Complications of a tracheostomy Complications can be divided into those associated with insertion of the tracheostomy (surgical or percutaneous) or those which arise following the procedure (usually blocked or displaced tracheostomy tubes). These can be serious and sometimes fatal. These complications are usually grouped as follows: 1. Immediate Complications (peri-operative period) Haemorrhage (usually minor, can be severe if thyroid or blood vessels damaged). Misplacement of tube - within tissues around trachea or to main bronchus. Pneumothorax. Tube occlusion. Surgical emphysema. Loss of the upper airway. 2. Delayed Complications (post-operative period < 7 days) Tube blockage with secretions or blood. May be sudden or gradual. Partial or complete tube displacement. Infection of the stoma site. Infection of the bronchial tree (pneumonia). Ulceration, and/or necrosis of trachea. Mucosal ulceration by tube migration (due to loose tapes or patient intervention). Risk of occlusion of the tracheostomy tube in obese or fatigued patients who have difficulty extending their neck. Tracheo-oesophageal fistula formation. Haemorrhage (local tissue trauma or erosion through blood vessels) 3. Late Complications (late post-operative period >7 days) Granulomata of the trachea may cause respiratory difficulty when the tracheostomy tube is removed. Tracheal dilation, stenosis, persistent sinus or collapse (tracheomalacia) Scar formation-requiring revision. Blocked tubes may occur at any time, especially if secretions become thick, the secretions are not managed appropriately (suction) and humidification is not used. Haemorrhage 23
24 Potential problems post placement Blocked Tracheostomy One role of the upper airway is to moisten and warm inhaled air before it reaches the lungs. Cilia are small hair like protrusions that line the respiratory tract; the function of the cilia is to prevent infection within the respiratory tract by moving mucus and other particles away from the lungs. Inserting a tracheostomy tube bypasses these natural mechanisms, which mean the lungs will receive cool, dry air. Dry air entering the lungs may reduce the motility of the secretions within the lungs and may reduce the function of the cilia. In addition the patient may not be able to cough and/or clear the secretions from their airways through the tracheostomy. This may cause the tracheostomy to become blocked by these thick or dry secretions. Blocked tracheostomy tubes can be minimised by careful humidification, tracheal suction and inner tube care. However it is necessary to keep emergency equipment at hand at all times as a blocked tube may lead to respiratory arrest. Pneumonia A build up of secretions may also lead to consolidation and lung collapse, and this may lead to pneumonia. This can also be minimised by careful humidification, tracheal suction and inner tube care, and may be helped by suctioning above the cuff with specific subglottic suction tubes. Aspiration of gastric contents may also lead to pneumonia. This can occur with patients who are unable to swallow safely. Any patient who you suspect may have aspirated will need to have a SALT (Speech And Language Team) assessment, be kept NBM and referred to a dietician to facilitate NG feeding. Displaced Tracheostomy Tube The tracheostomy tube can be displaced partially or completely and come out of the stoma or out of the trachea into the soft tissue of the neck. If not properly secured, the tube may become displaced by coughing, because of its weight or the weight of attached breathing circuits, or by patient interference. Partial tube displacement is more dangerous as it is not always visibly obvious that the tracheostomy is not patent. In order to keep tracheostomy tubes in position they must be secured carefully and any concerns raised by the patient or nursing staff must be promptly investigated. Haemorrhage It is common for some bleeding to occur after a tracheostomy has been performed. This usually settles with a few days. Bleeding can occasionally be significant or even catastrophic. Bleeding can be from the trachea, stoma or surrounding tissues and can be due to direct trauma of the tissues, puncture or injury to adjacent blood vessels or the tube or cuff eroding into surrounding tissues or vessels over time. Bleeding can also come from the lungs themselves and become evident through tracheal suction. These problems are compounded 24
25 in a patient with a coagulopathy. If a patient with a cuffed tracheostomy in situ starts to bleed, then we would recommend leaving the cuff inflates as this may have a tamponading effect on the bleeding point. Clinical and endoscopic examination is urgently required by someone competent to do so. Tracheostomy Red Flags These signs may be clues that a problem has or is about to occur with a tracheostomy and need to be acted upon. Prompt assessment by a senior clinician is required and a fibre-optic inspect of the position of the tracheostomy tube to confirm correct placement within the trachea is usually indicated. All staff caring for patients with a tracheostomy should be familiar with these warning signs. Red flags include: 1. Airway a. The patient with a cuffed tracheostomy tube suddenly being able to talk (implying gas escaping proximally and the cuff no longer sealing the trachea) b. Frequent requirement for (excessive) inflation of the cuff to prevent air leak c. Pain at the tracheostomy site d. A suction catheter not passing easily into the trachea e. A changing, inadequate or absent capnograph trace 2. Breathing a. Increasing ventilator support or increasing oxygen requirements b. Respiratory distress c. Surgical (subcutaneous) emphysema (gas in the soft tissues) d. The patient complaining that they cannot breathe or have difficulties in breathing e. Suspicion of aspiration (feed aspirated on tracheal toilet suggests that the cuff is not functioning adequately) 3. Circulation or any other general clinical deterioration a. As with all assessments of the acutely unwell patient, an ABCDE assessment includes ensuring that the airway is patent. In this case, this includes assessment of the tracheostomy tube. Local Infection There is a risk of site infection caused by introduction of organisms from the sputum. Careful observation and dressing of the site will reduce this. A stoma should be treated as a surgical wound and cared for appropriately. As the stoma is an open wound opening directly into the respiratory tract there is potential for the lower respiratory tract to become infected. Poor suction technique may also increase the incidence of infection. Tracheal Damage/ Ischaemia Damage to the trachea may be caused by cuff pressure on the mucosa or by poor tracheal suctioning techniques. All tracheostomy tubes now have low pressure cuffs, however over- 25

26 inflation should still be avoided. The pressure in the cuff should be just adequate to prevent air leakage. Altered Body Image This is an important factor as it can have a major psychological impact. If possible the patient should have careful pre-operative explanation. If this is not possible the patient must receive explanation and support post-operatively. Inform the patient that scarring will be minimal when the tracheostomy is removed and the stoma has healed and, that speech will return (as long as the vocal cords remain intact). On average the stoma will close and heal within 4-6 weeks. However this may vary from patient to patient depending on factors affecting wound healing. Communication Patients with a cuffed tracheostomy will be unable to speak; loss of speech whilst the tracheostomy is in place could possibly cause great distress to the patient, even if he/she has warning beforehand. It can cause fear, because of inability to attract attention if needed or depression because of inability to communicate (even with the cuff down). Generally patients who have an un-cuffed tube or the cuff deflated will be able to speak with a speaking valve in place. Communication aids such as pen / paper or picture cards are vital to prevent the patient feeling frightened and isolated. In addition ensure the patient has a nurse call bell at all times. Speaking valves These are one-way valves that fit over the end of the tracheostomy. They allow the patient to breathe in through the tracheostomy, but not out. The air flow has to go up through the larynx and out of the mouth. This can allow the patient to talk, but can be tiring for the patient due to increased resistance to airflow. Click here for an animated presentation showing airflow when speaking valves are used. Because air cannot flow out through the tracheostomy, these valves can be extremely dangerous. Speaking valves should ideally only be used with a fenestrated tube and only when the fenestrated inner cannula is in place. Any cuff must be deflated. It is possible to use speaking valves with a standard tube with the cuff deflated, but this is potentially hazardous and should only be used by staff with the experience and the necessary infrastructure to recognize and immediately manage any resulting complications. Speaking Valve A Passy Muir valve is a common type of speaking valve, seen here fitted to the end of a tracheostomy tube. 26
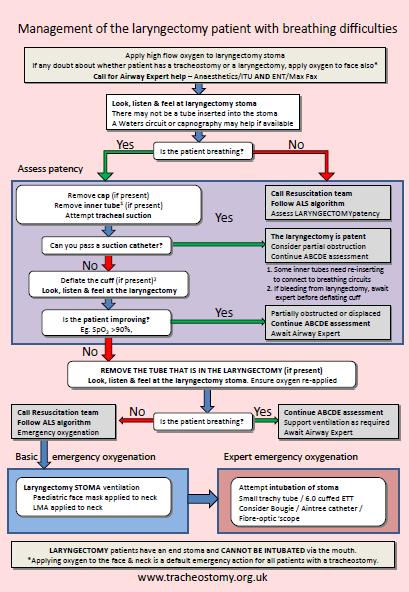
27 Emergency management of the patient with a tracheostomy Tracheostomies are common in ENT and Max Fax surgical procedures and are increasingly used in Critical Care. Tracheostomies are also more frequently seen on general wards. Managing patients with a tracheostomy can be challenging if unfamiliar and disasters can (and do) happen if emergencies occur. Common emergencies after a tracheostomy has been inserted include Obstructed tubes Completely dislodged Partially dislodged Laryngectomy patients can also be very confusing for those unfamiliar with the anatomical steps involved in removing a patient s larynx. It is important to understand the differences between those patients who do and don t have a larynx after a tracheostomy, and this is explained in the next section. We have suggested an algorithm for the emergency management of patients with a tracheostomy who develop breathing difficulties. It is designed to be simple and is aimed at first responders to the patient who may be Medical, Nursing or Allied health staff. We have made recommendations for airway experts (secondary responders) in the following section which should include critical care and anaesthetic doctors who are experienced enough to work at ST 3 level and above. The guideline includes Steps and interventions to maintain oxygenation & ventilation Prepare patient for advanced interventions The guidance is applicable to the patients with A tracheostomy (surgical or percutaneous) Recently decannulated (trachy removed) Laryngectomy Any breathing difficulties There are some more advanced options included for the attending airway expert who will be called early in the management of a tracheostomy patient with breathing difficulties. 27
28 We are grateful for access to the many algorithms and guidance that we have reviewed as part of the development process for these emergency algorithms. Our aim was to produce simple emergency guidance describing what to do in an emergency. This was to be applicable to the inexperienced first responder and also to the airway expert. Most of the steps we have agreed are based on expert opinion, but also on the critical incident reviews that we have performed. They are designed to address the commonest life threatening events in a logical order. Some algorithms have advocated assessing the patency of a tracheostomy by bagging via the tracheostomy tube. We have seen reports of incidents where this has resulted in severe surgical emphysema and a difficult situation has turned into an impossible situation to manage. We agreed that passing a suction catheter is the safest and simplest way of assessing patency of a tube. There is nothing to stop an experienced practitioner gently bagging a patient via a tube if they are competent and confident to do so, but based on the expert opinion and evidence we had access to, this approach cannot be advocated for all. Many of the incidents we reviewed had clearly reached the conclusion that the tracheostomy tube was blocked or displaced. Staff however were reluctant to remove the tube, believing that this would make the patient worse. We have written the algorithms with the intention of empowering staff to remove the tracheostomy tube is it is blocked or displaced. This is far more likely to improve the situation than not. Finally, other algorithms detail the management of a bleeding tracheostomy. We did not find this commonly when reviewing national incidents and so have included a footnote only for the first responder. If there is significant haemorrhage, then an inflated cuff on the tracheostomy tube may tamponade the bleeding. As such, we advocate not deflating the cuff when faced with bleeding from the tracheostomy until either an expert arrives or the patient deteriorates and the tube appears blocked or displaced. Further discussion are found in the advanced algorithm section. Multimedia presentation relating to the process behind the algorithms can be found at 28
29 Symptoms of Respiratory Distress The sort of patients that you will be called to see may show the following signs. Some of these are detectable clinically and others will be noticed by monitors such as pulse oximetry, Capnography and ECG. These may not all be in place in high dependency and ward environments. Apnoea Difficulty in breathing observed or reported Vocalisation (patient talking or whispering) when airflow should not be via the upper airway (cuff up) Increased respiratory rate Increased heart rate Low O 2 saturations Grunting, Snoring, Stridor Whistling noise when breathing or any noisy breathing Cyanosis (pale, blue colour around lips, nail beds, eyes) Restlessness, Confusion, Agitation, Anxiety Blood or blood stained secretions via the tracheostomy Retractions (pulling in of the skin between the ribs, and below the breast bone, above collar bones or in the hollow of the neck) Increased discomfort reported by the patient Cuff requires lots of air to remove air leaks Any of the above clinical concerns should be considered as tracheostomy red flags and an assessment of the tracheostomy should be carried out by someone competent to do so. This is particularly important if the patient has any signs or symptoms suggesting that the tracheostomy may be displaced, usually air leaks, vocalizations or inability to pass a suction catheter. A prompt fibre-optic examination of the tube position is usually required and may allow the clinical situation to be rectified before the tracheostomy becomes completely displaced or blocked. 29

30 Why are there 2 algorithms? This is because of the potential problems posed by patients with a laryngectomy. It should be clear from the bedside, handover and the patient notes that the patient has had a laryngectomy. Suggested signs are included in the appendix to be displayed at the patient bed head to make it clear what type of tracheostomy a patient has and whether they have a laryngectomy or not. Surgical laryngectomy A laryngectomy is the surgical removal of the voice box. In this procedure the larynx is removed and the trachea is sutured to the skin creating a permanent stoma. A total laryngectomy involves the removal of the hyoid, all of the thyroid and cricoid cartilages, and 1 or 2 tracheal rings. The overlying strap muscles are resected and the supraglottic, glottic, and subglottic areas are removed. The resultant cut end of the trachea is then sutured to the skin of the neck creating a permanent stoma. The patient will then breathe through this stoma for the rest of their lives. There is no connection between the oral/nasal passages and the trachea following the procedure. This is obviously vital information as the only way of delivering oxygen (or any other gas) to or from the patient s lungs is via the stoma. Standard oral airway manoeuvres will not work as there is no connection between the mouth, nose or pharynx and the lungs. 30

31 Patent upper airway algorithm (No Laryngectomy) 31
32 Explaining the algorithm patent upper airway It is important to note that these patients may still have had a surgically performed tracheostomy, but they still have their larynx intact. They may have had their tracheostomy performed percutaneously it doesn t matter. The important thing is that there is still a larynx and so a potentially patent upper airway to use in an emergency. There are videos and presentations detailing the assessment and immediate management described her available by clicking here. The initial response is firstly to apply 100% O 2 to BOTH the face and the tracheostomy stoma. This guidance is the same for those patients with and without a laryngectomy to standardize the approach. Laryngectomy patients will get no benefit from facial oxygen, but it will do no harm. First responders to an emergency situation may not understand this however and there is a greater risk of NOT applying facial oxygen to a patient in whom it may be critical. You will need 2 oxygen supplies one for the facemask and one for the tracheostomy. This may need the use of an appropriate cylinder, perhaps on the emergency or resuscitation trolley in ward environments. Also within the initial response is a call for help to Anaesthetics or Critical care AND to ENT or Max Fax surgical teams as appropriate. The Crash or cardiac arrest teams may also be required, but they might not have the relevant skills regarding tracheostomy management. A fibreoptic scope should also be requested urgently. Quite who is called will depend on the patient location and local arrangements, but it is important to summon expert help urgently. Who to call should be decided when the tracheostomy is performed, the patient is admitted to hospital, moved to a different location or the patient has a change in clinical condition. This information should be clearly displayed on the bed head sign so that in an emergency, it is clear who should be called and how. This may be a generic instruction for all patients, or specific for an individual, depending on the clinical circumstances. The next step is to make some assessment of the patency of the tracheostomy. The majority of patients with tracheostomies will have a potentially patent and useable upper airway and there is often some airflow past a tracheostomy, even with the tracheostomy tube still in place or partially displaced. This may be detected as Vocalisation Misting on a face mask Feeling breath By using Capnography (CO 2 detection, usually in Critical Care) Airflow may be detected at the mouth or at the tracheostomy stoma. As per standard ALS guidelines, Look, listen and feel for evidence of breathing at the mouth and stoma. If you are experienced in using a Waters anaesthetic breathing circuit, attaching this to the tracheostomy tube and looking for evidence that the bag is moving gives a visual clue to the presence or absence of breathing. This does of course require a spontaneously breathing patient, and the bag may not move if there is no respiratory effort at this stage. We are going on the assess the patency of the tracheostomy here though and will assess breathing more formally later in the algorithm. 32

33 In order to give ourselves the best chance of detecting the movement of air via the tracheostomy if there is any present, we advocate leaving the cuff inflated at this point, if there is one present on the tube. This step is to aid in the assessment of the patency of the tracheostomy tube. We will deflate the cuff shortly if the trachy tube is not patent, as an inflated cuff may cause further problems if the tube is partially displaced (see section and figure later). In Critical Care areas, the use of Capnography can prove essential in deciding whether a tracheostomy tube is patent or not. A consistent Capnography trace can only come from the lungs, implying at least partially correct placement of the tracheostomy tube, and subsequent patency. Evidence would suggest that this is the most useful monitor when it comes to deciding if a tube has become displaced. A partially displaced tube is more than twice as likely to cause patient harm than a visibly obviously displaced tube, as the diagnosis may not be as apparent. Example of a capnograph trace If the patient is connected to a closed suction system or similar breathing circuit, then it is usually a good idea to remove it from the tracheostomy at this point before connecting your rescue breathing system (eg Waters circuit, see figure below). This removes any doubts about the patency of this system which may itself have become blocked. Attempting vigorous ventilation at this point via the tracheostomy can lead to serious harm to the patient and cannot be recommended as a routine method of establishing patency. There have been reports of partially displaced tubes being ventilated and this has caused significant and even fatal subcutaneous emphysema. If there is no spontaneous breathing detected via the tracheostomy, we must assess whether it is patent. This is best answered initially by whether you can pass a suction catheter? A suction catheter should pass easily if the tube is in the trachea. If it does pass, then you may need to perform suction of blood or sputum which may relieve the problem. It is important to know how long your suction catheters are and how much dead space you need to negotiate before entering the tracheostomy tube. This will depend on the type of breathing circuit attached to the tracheostomy. The figure below demonstrates that with a closed suction system attached and with the tracheostomy in various misplaced positions, it is still possible to insert a suction catheter to about 17cms. Only easy passage of a catheter beyond 17cms should be used to confirm patency of the tube. As stated above, the simplest way of making you assessment is to remove all connections to the tracheostomy tube at this 33


34 point. This also removes any doubts about the patency of any connecting breathing circuits or problems with a ventilator, if being used. There is a small chance that the suction catheter passes but not into the airway. The catheter has passed into the soft tissues and this is called a false passage. You will reassess the breathing at this point and there will be no improvement in ventilation or evidence of spontaneous tracheostomy breathing. In this case proceed down the algorithm as suction has not improved the situation. The next step is to deflate the cuff again if present. This is because we have now established that the suction catheter will not pass through the tube, meaning that it is either blocked or displaced. As can be seen from the figure below, an inflated cuff in the trachea may impede attempts to oxygenate from above. The cuff was inflated to give us the best chance of assessing the patency of the tracheostomy, but we have completed that step now. A partially displaced tube at this point is the most dangerous situation. It may not be visibly obvious and leaving the tube in situ, particularly with a cuff inflated may be making the situation worse. Another important point here is to check if a double cannula tracheostomy is being used. If so, remove and clean the inner tube which may be causing the obstruction. Some designs of tracheostomy tube require the inner tube to be in place to allow connection to a breathing circuit. The tracheo-twist tubes are an example of such tubes (Figure to the right). Either a spare inner tube or the 34

35 cleaned one you have just removed must be re-inserted for these tubes. As with any intervention, if you have done something, you need to assess whether it has helped. Returning and reassessing breathing is mandatory at this point if an intervention has been carried out. Tracheo-twist tube is shown below. This inner tube needs to be inserted to allow connection of a suitable breathing circuit to the tracheostomy. Removing the tracheostomy If none of the measures performed already cause the tube to become patent, it is either Totally blocked Totally displaced Partially displaced The tracheostomy tube MUST be removed at this point if the patient is continuing to deteriorate. This may seem like a drastic step but as described above, it is currently offering no assistance and may be making the situation worse. There have been incidents described where the rescuers have continued to fruitlessly work on the tracheostomy when it is clearly not going to help and neglected other basic life-saving maneuvers. The priorities are safe management of the airway and adequate oxygenation. If an airway expert is present AND safe, adequate oxygenation is occurring via the facial route, then the expert may choose to attempt to manipulate the tracheostomy perhaps using a fibre-optic scope or similar adjunct (see below). This may be particularly relevant for a patient with a known difficult airway or tracheostomy. We have not recommended this for first responders at this stage. Videos showing removal of a tracheostomy tube are available by clicking here. 35


36 What to do now you have removed the tracheostomy tube Firstly you should assess if your intervention has helped by assessing for spontaneous ventilation at the stoma and the mouth. Removing the displaced or blocked trachy may be all that is required to allow the patient to breathe spontaneously. Re-apply oxygen. If the patient is oxygenating well, await expert help. If removal does not improve the situation, cover the stoma with some sterile gauze or similar to minimize air leaks and then proceed to manage the airway just like any other compromised airway. This will depend on your skills and experience, but the important step is to oxygenate the patient. It doesn t matter if you can t re-intubate them if they are safely oxygenating whilst expert help arrives. Standard oral airway maneuvers may include the use of a head tilt and chin lift, a jaw thrust or use of adjuncts like oral or nasal airways. If your skills permit you, a Laryngeal Mask Airway (LMA) can be useful here. The patient may need sedative drugs at this point, but only do this if you are skilled to deal with managing the airway of an anesthetised patient. Laryngeal Mask Airway Guedel Oral Airways Whatever your level of experience, it is important to prepare for the possibility of a difficult airway and a difficult intubation. This is due to airway trauma, oedema and bleeding which may be associated with the tracheostomy procedure or the underlying pathology. Remember also that critically ill patients do not have the same reserve as healthy ones and will become cardiovascularly unstable and desaturate more quickly than in health. If you are intubating the patient, pass the tube beyond the stoma to seal it off (see figure). Use an un-cut tube to allow this but pay extra care that you haven t passed the tube too far into the left or right main bronchi (endobronchial intubation). The ideal situation is a stable, ventilating, oxygenating patient. If this is achieved just by holding an appropriate facemask, then that s fine! Get someone to gather appropriate drugs and equipment that may be used by an expert for definitive management of the airway or tracheostomy when they arrive. Videos showing basic and advanced airway management are available by clicking here. 36


37 What if you can t oxygenate using upper airway maneuvers? Turn your attention back to the stoma. This is going to be the only route left to try and oxygenate your patient. This is a very dire situation, but the following steps may help to secure a means of oxygenating the patient. It is important to stress that if the patient is adequately oxygenating, then the safest thing to do is to await an expert, but if the clinical situation is deteriorating, then the following outlines the options available to you. Videos and presentations detailing these options can be found here. Attempt intubation of the stoma This can be attempted using a 6.0 cuffed endotracheal tube or a new tracheostomy tube. The reason for this choice is that it is likely to be readily available and familiar to nonexperts. Always use at least one size smaller tube than the one removed, so if the patient had a 6.0 tracheostomy tube in situ, then use a 5.0 endotracheal tube instead. The same goes for a new tracheostomy tube. Experts may be experienced in a particular technique and may use different equipment here. If you are experienced, then you may wish to consider using a Bougie / Aintree catheter / Suction catheter as guide. A fibre-optic scope may give you a better idea of where you are heading, but is not always as good as you might imagine, especially if there is tissue trauma or bleeding. Attach the tube to a Waters circuit or similar and assess for signs that the tube is in the correct place. The gold standard for this is Capnography if available, but clinical detection of breath sounds (spontaneous or on careful ventilation) should be possible. If there is resistance to ventilation, it is essential to stop. You have probably caused a false passage and further attempts will cause subcutaneous emphysema and worsen the situation. Attempt ventilation via the stoma If you cannot easily and safely intubate the stoma, then you may be able to oxygenate or even ventilate via the stoma by applying either a small facemask or an LMA to the skin surrounding the stoma (not into the stoma). You may not get a very good seal, but this technique may allow critical oxygenation of the patient. 37
38 Laryngectomy algorithm The Algorithm is different in places for those patients who do not have a larynx as previously explained. The initial steps are similar in calling for help and applying oxygen to the face and stoma. Clearly, if those in attendance understand that applying facial oxygen is pointless in this situation then it is not necessary. This step has been left in to ensure consistency when managing the much more common emergencies with tracheostomies and a potentially patent upper airway (ie no laryngectomy) as described in the previous section. There may not always be a tracheostomy tube in the stoma to remove. You can still assess the patency of the stoma by passing suction catheter however. The algorithm is essentially the same until after the tracheostomy tube is removed. There is now no point attempting oral maneuvers as there is no communication between the facial upper airways and the lungs. Attention is turned straight to the stoma, as this is the only method of oxygenating the patient. The stoma is managed similarly to above by first attempting to oxygenate or ventilate by applying a small face mask or LMA to the stoma. If this is unsuccessful, attempts at intubation of the stoma should be attempted with either a small 6.0 endotracheal tube or a tracheostomy tube as described above. An expert may choose their own technique or be familiar with guides like a suction catheter, Aintree catheter, Bougie, a minitrachesotomy or a fibre-optic scope. 38
39 39
40 Options available to the airway expert The algorithms above are designed for first responders who may be non-medical or nonairway trained. They are thus designed to be simple and clear and allow safe initial management of the compromised tracheostomy patient. They should address life threatening situations in order and the focus is on oxygenation of the patient. For the purposes of this guidance, an airway expert may be considered as an individual with training and experience in advanced tracheostomy and airway management who will be both confident and competent to manage these difficult situations. The standard will be that of an ST 3 doctor in training (or above) in critical care or anaesthesia. An expert will be called early in the algorithm. On their arrival, there will be one of three situations 1. First responder has resolved the situation a. Supportive intervention only 2. Stable patient oxygenating by face or stoma a. May need sedation or anaesthetic to facilitate re-intubation or re-fashioning of stoma b. Non-emergency situation 3. A loss of airway crisis The purpose of the emergency algorithm is to provide a standard approach to managing respiratory difficulties in the tracheostomy patient. The key points are 1. Oxygenate by the oral and tracheostomy routes 2. Early removal of the tracheostomy if it is blocked, partially or completely dislodged and the patient is deteriorating 3. Simple oral airway maneuvers 4. Appreciation that patients with a laryngectomy have no communication between the face and the lungs Maintaining oxygenation and ventilation by oral or tracheostomy routes may mean that you encounter the patient in a stable condition and a decision about how to proceed in managing the tracheostomy is required. These options would also be applicable in managing the emergency situation with loss of the airway. Several options are described below. Details of types of surgical tracheostomy are found in the earlier chapters. There is no right answer for these situations, and management will depend on your experience and expertise, the clinical situation and the patient. This guideline aims to provide details on the options that are available to you. Decisions on whether to use sedation or paralysing agents again depend on your experience, and in your confidence in being able to manage an effective airway and adequately 40
 then sedation and muscle relaxation should not be given")

41 oxygenate and ventilate once spontaneous respiratory efforts have ceased. As a general rule, if there is spontaneous ventilatory effort and the patient is safely oxygenating (by mouth or via the tracheostomy stoma) then sedation and muscle relaxation should not be given until skilled personnel and equipment are immediately available to manage the airway. This may require a return to the anaesthetic room, critical care environment or operating theatre. Once the patient is paralysed, then you must be able to ventilate the patient yourself, which may prove difficult or impossible. Manipulation of a surgical tracheostomy There may be stay sutures present that allow the trachea to be pulled more anteriorly and the opening in the trachea to be made wider. This can help facilitate re-insertion of a tracheostomy tube, particularly in the first 7-10 days after the stoma has been formed, as the tract will not be established. Cautions with a percutaneous tracheostomy Remember not to pull on the suture holding down the ramplike flap of a Björk flap type tracheostomy as this will probably just tear the flap and potentially worsen the situation. (See figures on page 6). As explained above, the tract from the opening in the trachea to the skin does not establish itself fully until 7-10 days after formation. This is more likely with a percutaneous tracheostomy as the tissues have only been stretched (dilated) as against cut in the case of a surgical tracheostomy. Practically, this means that once the tracheostomy tube has been removed, the tissues are likely to spring back into place quickly and this is more likely to happen the newer the tracheostomy is. Manufacturers do not recommend changing tracheostomy tubes for 7-10 days after a percutaneous tracheostomy for this reason, as the passage from the skin to the trachea may be lost quickly. If this happens, manipulation of the tracheostomy under the same conditions that it was inserted originally under is usually required, namely with the upper airway controlled and bronchoscopic guidance to visualize the guide, catheter or tracheostomy entering the trachea. Attempting blind placement may cause a false passage and should be avoided. Figure showing intubated patient with tracheostomy being refashioned under bronchoscopic guidance. An anaesthetic, full monitoring and Capnography should ideally be used. 41


42 Advanced upper airway options Depending on your skill and experience and the clinical situation, advanced airway techniques may be required to manage the upper airway. A full description is beyond the scope of this document. Whether to give sedative or paralysing drugs is a decision that depends on your experience and confidence in managing the situation and airway once consciousness has been lost. Videos and animations showing these options are available. Options for the upper airway include Alternative laryngoscope blades McCoy, Straight blades Laryngeal Mask Airways Classic, Proseal, Intubating LMAs Fibre-optic laryngoscopes Airtrach, McGrath, Glidescope Fibre-optic endoscopes via the nose or oral routes Aintree Catheters or similar Blind placement of a tube, orally or nasally Options for managing the stoma If the upper airway cannot be managed safely, then attention will turn to the stoma. If the patient is stable, then the stoma should be managed in a controlled situation and environment if possible. This may necessitate a trip to theatre with an appropriate surgeon. In an emergency, the following options are available. Attempted ventilation of the stoma, as described in the previous section Using a suction catheter (probably the least traumatic) an Aintree catheter (allows oxygenation) or a gum-elastic bougie to try and enter the stoma. A tracheostomy tube can be rail-roaded over the guide, but there is a risk of false passage creation and incorrect placement. Capnography would be ideal here. Blind placement of a small (6.0) endotracheal or tracheostomy tube. Specialist tubes. There are tapered tubes available, or some tubes which come with shaped introducers, as shown below. Repeating a percutaneous or surgical tracheostomy Cricothyroidotomy 42

43 Advanced Algorithm 43
44 Essential Equipment for Emergencies Any clinical area caring for patients with a tracheostomy must have emergency equipment immediately available. This may be in the form of the trachi-case or similar that accompanies the patient, or stocked on a difficult airway trolley in a critical care area. This equipment, including suction, should accompany the patient wherever they go during their hospital stay. They must also be accompanied by an appropriately trained carer who is competent to use the equipment in an emergency. It is important to check all equipment is available at the beginning of every shift. TRACHI- CASE TM is one of a number of commercially available kits for this purpose. Basic airway equipment oxygen masks, self inflating bags, oral and nasal airways Advanced airway equipment LMAs and laryngoscopes with appropriate tubes (arrest trolley or similar) Tracheostomy equipment spare tubes (one the same size, one a size smaller) Tracheal dilators* Bougies Suction A fibre-optic endoscope to assess trachy position Scissors Water soluble lubricating jelly Sterile dressing pack Tracheostomy dressings, ties and tapes Personal protective equipment (gloves, aprons, eye protection) *There is conflicting opinion on whether tracheal dilators are useful in an emergency. This should be agreed locally and influences include patient demographics and types of tracheostomy performed and clinician preference. A fibre-optic scope may not be necessary on all wards that receive the occasional tracheostomy patient, but everyone caring for the patient should know where a scope is and how to get access to one immediately. Critical care areas, specialist ward areas and areas who look after a high volume of tracheostomy patients should all have immediate access to a fibre-optic scope. This should ideally be portable and able to be used quickly without a lightsource and separate stack system. One of the recommendations to come from the work looking at patent safety incidents is to cohort patients together to concentrate staff, skills, equipment and expertise. This should make equipping and training locations that will be designated to care for tracheostomy patients easier. 44

45 Other equipment to be kept at the bedside Sterile water- for cleaning the suction tube Clean pot for spare inner cannula Sterile gloves- for performing deep suction Tracheostomy dressings Tracheostomy tapes Large yellow bag- for clinical waste e.g. suction catheters Nurse call bell- the patient may be unable to verbally call for help Communication aids- the patient may not be able to verbalise The bed-side of a tracheostomised patient should have a checklist completed at least once every 24 hours of the above equipment. 45
46 Management of the day-to-day needs of the patient with a tracheostomy There should be a detailed plan of care for all patients with a tracheostomy. A suggested care plan is provided as an appendix, but local policies may already be in place. The care plan should be reviewed on a daily basis and updated if there is any change. The patient with a tracheostomy needs diligent observation and assessment. The nurse caring for the patient is responsible for this, seeking advice from other professionals as appropriate. Patient assessment At the start of each shift the Staff Nurse caring for the patient with a tracheostomy should carry out a full assessment of the patient which should include: Why does the patient have a tracheostomy? When was the tracheostomy performed? Was it surgical or percutaneous (may have implications for ease of re-insertion) and does the patient have a larynx? (Ie do they have a communication between the oral airway and the lungs?) Bed head signs should be available at the patients bed space to quickly and easily communicate this information. Type and size of tracheostomy tube & availability of spare & emergency equipment Cough effort Ability to swallow, including any SALT assessments Sputum characteristics (Colour, Volume, Consistency, Odour) Check and change inner cannula for any build up of secretions (see later) Check tracheostomy holder is secure and clean Check stoma dressing is clean Routine observations This assessment should be documented on the care plan at the start of every shift. 46
47 Humidification It is mandatory that a method of artificial humidification is utilised when a tracheostomy tube is in situ, for people requiring oxygen therapy dry oxygen should never be given to someone with a tracheostomy. The type of humidification will be dictated by the needs of the patient. In normal breathing, inspired air is warmed, filtered and moistened by ciliated epithelial cells in the nose and upper airways. However, these humidifying functions are impaired by a tracheostomy tube and air inspired will be cold and dry (eg oxygen therapy), due to the body s natural mechanisms for warming/moistening inspired air being bypassed. Inadequate humidification can result in a number of physiological changes which can be serious to the patient and potentially fatal, including: Retention of viscous, tenacious secretions Impaired mucociliary transport Inflammatory changes and necrosis of epithelium Impaired cilia activity Destruction of cellular surface of airway causing inflammation, ulceration and bleeding) Reduction in lung function (e.g. atelectasis/pneumonia) Increased risk of bacterial infiltration. As a result, humidification must be artificially supplemented to assist normal function and facilitate secretion removal. Failure to adequately humidify could result in tube blockage as secretions become dry and viscous, forming a crust around the tracheostomy. The assessment of a patient with a tracheostomy should include management of their secretions and can identify the effectiveness and adequacy of the humidification of that patient. A tracheostomy tube can become completely blocked by thick secretions, leading to a respiratory arrest but this can be prevented by regular and effective assessment of the patient s humidification, regular inner cannula care and suctioning. Warning signs can be identified which will allow for an appropriate change in management and this should prevent tube blockage. Patient assessment should include: Frequency of suctioning and/or cleaning or inner cannula Tenacity of secretions Evidence of airflow via tracheostomy Respiration rate Use of accessory muscles Patient coughing (ineffective or excessive) Requirement for supplementary oxygen 47


48 High risk patients include those with reduced or thickened secretions and those with a longer length and/or single lumen tube. These patients should be cared for with extra vigilance in order to minimize the risk of tube blockage. Methods of artificial humidification The chosen method of humidification will: provide adequate humidification of chest secretions, help maintain body temperature, be convenient and cost effective be physically suited to the patient. Consideration should be made relating to the potential infection risk of each device.any chosen device should be used in accordance with the manufacturer s guidelines and staff trained and assessed as competent in its use. Heated Humidification Heated Humidification operates actively by increasing the heat and water vapour content of inspired gas, so that gas is delivered fully saturated at core temperature. It is indicated for tracheostomy patients requiring mechanical ventilation or oxygen therapy for 96 hours. Cold Humidification Cold humidification bubbles gas through cold water, but only delivers a relative humidity of 50% at ambient temperatures. For tracheostomy patients on high inspiratory flow rates of oxygen with tenacious secretions or patients complaining of subjective dryness a heated device is indicated and can be incorporated into the circuit. Note: Condensation from heated or cold humidification should be considered infectious waste and disposed of according to hospital policy using strict universal precautions. Because condensate is infectious waste, it should never be drained back into the humidifier reservoir. Left figure shows a heated humidifier and the right figure shows a saline nebulizer attached to a trachy-mask. 48

.")

49 Saline Nebulisation The nebuliser unit converts saline into a supersaturated aerosol of liquid droplets which penetrates the lung moistening the airways. It may be indicated in tracheostomy patients who are mechanically ventilated, receiving oxygen therapy or self-ventilating on air. Saline nebulisers help to reduce the viscosity of secretions which makes them easier to remove by suction or cough. Saline nebulising involves administration of 5 mls 0.9% sterile normal saline into the nebuliser unit 2-4 hourly or as required. Nebulisers must be connected to a gas source with a flow rate of 6-8 litres/minute (or follow manufacturer's guidelines). Ensure nebulisation is given via the tracheostomy (not the face mask!). A nebuliser can be attached to tracheostomy mask or T-piece circuit. Heat Moisture Exchanger Eg. Thermovent, Swedish nose HMEs consists of rolls of metal gauze or a condenser element like propylene sponge/fibre sheet/corrugated paper. These products are placed directly onto the end of the tracheostomy tube and conserve heat and moisture on expiration y tube. They need to be checked regularly to ensure they are not occluded by secretions which may obstruct the airway. They require checking regularly and must be changed at least every 24 hours. Some product ranges also offer oxygen delivery inlets, suction ports. Heat moisture devices are available as small cylinder or nozzles which attach directly to tracheostomy tubes allowing for patient mobility and may have speaking valves incorporated in them. Swedish nose below and Thermovent right Swedis Heat Moisture Exchanger (HME) 49

50 Stoma filters or bibs This group of humidification devices contains a foam layer which absorbs moisture from the patient s expired gases. They are predominantly used for established tracheostomy patients and are often favoured by patients as they are less bulky and conspicuous and are able to completely obscure the tube from sight. Documentation Record method of humidification in use in the patients care plan /clinical record as per local procedure. Record evidence of evaluation and instigation of action taken in the patients care plan /clinical record as per local procedure. Record signature for accountability of care for each shift as per local procedure. Record date and time that devices are changed and/or are due to be changed. 50
51 Changing tracheostomy tubes Changing the tracheostomy tube should be a multidisciplinary decision. The first change should always be performed or supervised by a suitably trained member of the medical staff. Videos of tube changes can be found here. Knowledge and Understanding In order to change a tracheostomy tube safely and appropriately the practitioner must appreciate the specific clinical indications for the formation of the individual patient s tracheostomy. In addition they will need to know when and how the tracheostomy was formed. It is considered that a newly formed tracheostomy will close more quickly than an established tracheostomy tract, and indeed within the first 48 hours extreme caution must be taken as a tube change may be difficult or even impossible. Patient assessment Indications to change a tracheostomy tube change include: The tube has been in-situ for maximum recommended duration: 30 days for tubes with a removable inner cannula and 7-10 days for single lumen tubes Facilitating weaning by inserting a smaller, uncuffed or fenestrated tube The patient needs ventilatory support or resuscitation and requires a cuffed tube To improve fit or comfort of tube To replace a faulty tube To resolve a misplaced or displaced tube A tube change may be contra-indicated if the patient: Is in an unstable condition Requires high levels of ventilatory support The risk of loosing the airway is high The tracheostomy was performed within the last 7 days The patient is undergoing radiotherapy to the neck region (or has completed course in last 2 weeks) In palliative care patients where quality of life will not be improved by tube change Patient refuses Each tracheostomy tube change and each patient should be assessed individually prior to each and every tube change. The procedure will require two competent practitioners and more where the patient may become agitated during the procedure. Particular caution is taken where previous tubes changes were difficult or if the patient has an obstructed upper airway, both of which will increase the clinical risk associated to the procedure. Additional risk factors to be considered include; changes within 7 days of procedure, patients with a large neck, patients requiring high levels of ventilation, patients with tumours surrounding the tracheostomy tract and/or patients with significant granulation tissue around the stoma site. 51
52 NB: If a difficult tube change is anticipated then a clinician experienced in endotracheal intubation or a clinician proficient in securing the tracheostomy should be present. The stoma and tract to the skin from the patient's trachea may not be fully formed initially. Ideally the first tube change should not take place for 3-5 days (ideally 7-10 days) for a percutaneous tracheostomy, but may be sooner for a surgical tracheostomy. Consult local guidelines or the surgical team involved if you are not sure. Thereafter, changing the tube can be performed by a competent and suitably trained person but medical assistance and emergency equipment should be readily available at all times. The tubes may be changed like-for-like, changed for a different type of tracheostomy (eg fenestrated tube), changed for a smaller tube (down-sizing) or removed completely (decanulation). Indications for Tube Change Every 7-10 days for a tube without an inner cannula, but less frequently as secretions reduce and the stoma becomes more established. Every days (or as clinical need dictates) for double cannula tracheostomy tubes (European Directive 1993). Evidence of tracheostomy tube obstruction that may lead to a rapid deterioration in the patient's respiratory status. Infection around stoma site. Part of weaning process. Equipment Required Pen torch. Two tracheostomy tubes of appropriate make. 1 same size, 1 size smaller. Tracheostomy tube tape and possibly Tracheostomy tube holder. Dressing Pack Normal saline (0.9%) to clean 10 ml syringe Sterile gloves and protective eye wear. Water soluble lubricating gel. Tracheal dilators. Forceps and scissors. Suction equipment and suction catheters. An exchange device Aintree catheter /Bougie. Pre-cut keyhole tracheostomy dressing uncut gauze swabs are not recommended. Resuscitation equipment. Fibreoptic scope available. 52
53 Additional equipment that may be required include Action Syringe Cuff pressure manometer Stethoscope Stitch cutters Oxygen Continuous oxygen saturation monitoring Resuscitation equipment including re-breath bag Access to Intubation equipment Exchange device: pre-cut suction catheter, bougie or guidewire (the use of these additional devices are not contained within these guidelines, please refer to appropriate clinicians for further advice). Rationale Identify need for tracheostomy tube change and clarify type of tube to be inserted Patient preparation may include ensuring Nil by mouth for 4 hours and/or aspirate nasogastric tube Explain the procedure to the patient and obtain verbal consent if appropriate Ensure appropriate staff and equipment are available Set up bedside suction and oxygen equipment Prepare new tube(+/- inflate and check cuff), lubricate outer tube surface (and cuff), insert introducer and attach tapes Remove any obstructing clothing or equipment Position patient for procedure by placing a roll under the patient s shoulders, extending the stable neck. Patient may be placed lying down or sitting upright depending on individual patient assessment. To ensure tube change is necessary and the correct tube type is selected for current and ongoing patient care needs To limit the risk of aspiration during tube change procedure To ensure the patient understands the procedure To deal appropriately with additional measures to secure an airway. To ensure oxygen and suction are available (when needed) To ensure new tube has no faults and is prepared for insertion and application. To ensure neck area is accessible for tube change To bring the trachea closer to the skin and to stretch stoma opening in order to aide tube insertion 53
54 If the tracheostomy tube is sutured in-situ, remove all sutures. Skin sutures may be considered for removal if appropriate. Deflate cuff (if present) simultaneously suctioning Untie tapes and remove dressing whilst tube is held firmly in place Remove existing tube with a firm out and downwards movement as patient breathes out Observe stoma site and tracheal opening. Holding the introducer in place, insert new tube into stoma Remove introducer Check correct positioning: Ask patient to breathe out, air should be felt through end of tracheostomy Auscultate Bilateral chest movement Suction below the end of the tracheostomy to confirm placement within trachea To allow tube removal and to prevent sutures becoming embedded or an infection risk. To enable existing tube to be removed and for secretions to be cleared. To remove old dressings and tapes. To reduce patient coughing To identify signs of infection, granulation tissue and/or bleeding. To pass tube along contour of tract. To allow patient to breathe and to allow confirmation of correct tube position Evidence of airflow exiting the tube will confirm correct placement within the airway Once correct tube placement confirmed: Re-attach any oxygen or ventilation needs Inflate cuff and check cuff pressure, (as per guidelines). To recommence respiratory requirements and secure tube position Apply tapes and dressing (as per guidelines) Re-position patient as to patient requirements and comfort To maintain patient comfort 54
55 If correct tube position not confirmed: Remove tube and attempt second reinsertion. To safely manage the tracheostomy tube insertion Following a failed third attempt, a smaller tube may be considered. Additional support should be sought for further management or advice. Post procedure Dispose of equipment in clinical waste Ensure bedside equipment is re-stocked with appropriate tube selection To reduce risk of infection To ensure emergency equipment is replaced or exchanged for new tube. Documentation Documentation of the procedure in medical and nursing notes should include: Size and type of tube Difficulties experienced with tube change Comments on stoma Patients response to tube change Expected date of next tube change Who should carry out a tracheostomy tube change? Changing a tracheostomy tube is not without risk, and therefore any practitioner or patient who is preparing to change a tracheostomy tube must be suitably prepared and supported. The risks of each individual procedure must be considered and plans identified to deal with possible complications. Individual practitioners will need to discuss with local clinicians and refer to local guidelines prior to embarking on this procedure. 55
56 Decannulation (removing a tracheostomy tube) The removal of a tracheostomy should occur as soon as there is no further need for it to remain in-situ. The process of removing a tracheostomy tube is referred to as decannulation. It should be considered only when a patient has successfully progressed through a structured tracheostomy weaning programme. The use of a standardised multidisciplinary process will reduce the risk of complications following the removal of the tube. Prior to the removal of a tracheostomy tube, there must be multidisciplinary agreement. The tracheostomy MDT will regularly include: Ward Nurse Physiotherapist Speech and language therapist Specialist Nurse (Tracheostomy, ENT or Outreach) Anaesthetist or Intensivist Respiratory physician Head and neck surgeon The timing of the decannulation procedure needs consideration, to minimise the risks to the patient. The clinical environment should have sufficient competent staff available to allow for any additional monitoring required and ready access to suitably trained staff to assist in assessing potential complications. Videos of decannulation are available here. The position of the patient within their clinical setting should allow staff to visualise the patient easily and the patient should have constant access to an appropriate call system. Staff should also consider the condition of the immediate patient environment and consider the removal of the bed head in case of an emergency. It may be necessary to transfer the patient undergoing decannulation to an area where 1:1 nursing care can be offered and ready access to specialist staff who could appropriately deal with a failed decannulation or other complications. In most clinical settings it is ill advised to decannulate late in the working day or at the weekend when support staff are scarce, thereby increasing the risk to the patient if the decannulation fails or leads to complications. Prior to Decannulation the Tracheostomy MDT will confirm: The patient can maintain and protect their airway spontaneously They are free from ventilatory support They have stable arterial blood gases They are haemodynamically stable They are absent of fever or active infection The patient is consistently alert They have a strong consistent cough (able to cough into mouth) They have control of saliva + / - a competent swallow They are not planned for procedures requiring anaesthesia within next 7-10 days They are considered stable 56
57 Extra caution is essential if the patient is known to have a complex airway (e.g. requiring an adjustable flange tracheostomy) or has a previously documented difficult intubation. In these cases, it is essential to liaise with the Head and neck and Intensive Care teams if not already involved. These discussions and any subsequent decannulation should be coordinated by the same expert clinicians who led the tracheostomy wean since decannulation is not without risk. Equipment For all decannulation procedures, standard bedside equipment and: Oxygen available Continuous oxygen saturation monitoring Sterile dressing pack 0.9% Saline Semi-permeable occlusive dressing MDT documentation Additional equipment may include Stitch cutter 10ml syringe Gum elastic bougie Bag valve mask circuit Rebreathe circuit Facial nebuliser circuit / adrenaline available for nebulisation Procedure This is a 2 person procedure to reduce risks. Action Discuss the procedure with the patient. Have communication aids available e.g. interpreters. Initiate continuous oxygen saturation monitoring for procedure, explaining rationale to patient Both personnel to wash hands and put on an apron. Ensure patient sitting in an upright position. Stop any naso-gastric feed or oral intake for 4 hours pre-procedure. Local policy may allow aspiration of NG tube. Rationale To ensure consent, understanding and reduce anxiety. To identify and alert staff to desaturation following procedure. To reduce the risk of cross infection. To promote chest expansion and reduce risk of aspiration. To minimise the risk of aspiration and / or acute desaturation. 57
58 While holding onto the tracheostomy tube, undo ties and remove all dressings in preparation for removal. Ensure cuff is deflated if present. Remove the tracheostomy on maximal inspiration or as per local policy. Prior to dressing application: check for signs of respiratory distress and confirm patient can voice/cough whilst stoma occluded Using a sterile technique, clean the stoma site with saline and dress site with a semipermeable occlusive dressing. Ensure close observation of patients respiratory status post-procedure as per local guidelines. Update MDT post-procedure and clarify further monitoring requirements, dressing needs and alert to possible complications Redress site at least every 24 hours. Measurements of the closing fistula may assist with objective assessment of a slow healing wound. To prepare tube for removal To minimise the risk of alveolar collapse. To monitor for complications to tube removal prior to dressing application To reduce the risk of infection and optimise wound healing. To reduce patient risk. To optimise team communication and safe patient rehabilitation To monitor for appropriate wound closure (estimated at 7-14 days) Documentation Local policy and practice must ensure that The team performing a decannulation document all associated events in patient notes immediately following the procedure The team performing a decannulation document if they plan to re-review routinely or have discharged from caseload. If the team performing the decannulation have discharged the patient from review, they must provide written criteria and contact details for urgent re-referral should the patients condition deteriorate The level of respiratory observation required is identified The ward MDT have written guidance of how to access expert help in an emergency at all times Tracheostomy emergency equipment should be left at the bedside for a further 48 hours following decannulation 58
59 Post -decannulation Following the removal of the tracheostomy tube, the patient is left with an opening into their trachea. This needs protection form entry of water or foreign bodies and needs assistance to close. An airtight dressing is required to prevent the ongoing passage of air through the tract (tracheo-cutaneous fistula) which will delay wound healing. Where possible, the patient should be encouraged to apply gentle pressure to the dressing whilst coughing or speaking. This will reduce the air pressure through the fistula to the underside of the dressing, which will loosen the dressing s contact with the skin, necessitating frequent dressing changes. The wound should be airtight within two weeks and if not, then a referral to the Ear, Nose and Throat team should be considered as tracheostomy tube movement can cause constant friction that can result in tissue hypergranulation. Tissue forming along the fistula may require specialist assessment and treatment. The use of a standardised weaning procedure should reduce the risk of patients failing a decannulation attempt. However, a patient s condition can alter which may necessitate consideration for re-insertion of the tracheostomy. The emergency tracheostomy equipment should be left at the patient s bedside for 48 hours following decannulation to enable access to tracheostomy equipment for this period post decannulation. This is particularly important to maintain for those patients transferred to other clinical settings within 48 hours post Decannulation. 59
60 Suctioning a Tracheostomy Tube The health of the lower respiratory tract is maintained by its mucus blanket. Mucus produced in the trachea and bronchi is transported up to the larynx by the ciliated mucosa of the trachea. The mucus blanket is disturbed following tracheostomy for several reasons. The loss of normal humidification from the nasal airway. The post-surgical inflammation produces a more tenacious mucus blanket. The presence of the tracheostomy tube paralyses the cilia in contact with it. The loss of a normal cough from bypassing the larynx. This results in the tracheal mucus collecting at the lower end of the tracheostomy tube. The amount of mucus build up and the problems it causes will vary between patients and with the duration of the tracheostomy. Some patients may be able to project the mucus through the tube by forced expirations, but most often it must be removed by suctioning the tube. Types of Tracheal Suctioning Most patients only need routine tracheostomy suction and this should be limited to the lumen of the tube. If the suction catheter is passed deeper into the normal trachea it will further paralyse the cilia and aggravate the situation. In some patients with chest problems the tracheostomy will have been performed to give access to the lower respiratory tract. In such patients deep bronchial suction may be required, but this should only be performed following medical instruction. The frequency of routine tracheostomy suction varies considerably between patients depending on their clinical status. It should only be used when the patient assessment indicates that it is necessary. Patient assessment In order for the practitioner to assess whether the patient requires suctioning via the tracheostomy they may first (with an awake co-operative patient) encourage them to cough up the secretions, thereby reducing excessive suctioning. Support your patient in a position which will aide coughing (unless contra-indicated). Indications that the patient may require suctioning include: Noisy and or moist respirations Increased respiratory effort Increased or decreased pulse Increased or decreased respiration rate Increased or decreased blood pressure Prolonged expiratory breath sounds Restlessness Skin colour and sweating Reduced oxygen saturation levels Increased or ineffective coughing Increased use of intercostal muscles Patient request 60
61 Equipment Clean disposable gloves as per local policy Protective eyewear Appropriately sized sterile suction catheters (See selection guide below) Sodium Chloride 0.9% ampoules (only for closed circuit units) Receptacle for clean tap water, for flushing suction tubing Oxygen therapy wall flow meter & tracheostomy mask - if necessary Oxygen saturation monitor where appropriate Suction equipment (wall or portable unit) Suction catheter selection Tracheal damage and hypoxia may be caused during tracheal suction. This can be minimised by using the appropriate sized suction catheter. If the catheter is too large the suction it creates will cause damage. A large catheter will also occlude the tracheal tube which may cause hypoxia - it is recommended that the diameter of the catheter should be no more than half the internal diameter of the tracheal tube. If the catheter is too small it will not be adequate to remove secretions so repeated attempts will be necessary which have also been shown to damage the trachea. (See selection guide below) Suction catheter guide Inner diameter of tracheostomy tube Suction Catheter (mm) (NB: see manufacturers details to confirm FG (mm) 10 mm 14 (4.5) 9mm 12 (4) 8 mm 12 (4) 7 mm 12* (4) 6 mm 10 (3.3) 5 mm 8 (2.6) * It is more appropriate to use a size 12 catheter as although it is slightly larger than ½ diameter it is more effective for secretion removal. 61
62 Procedure Action Give the individual relevant information, support and reassurance in a manner which is sensitive to their needs and concerns Consider analgesia prior to or following suctioning Rationale Relieve patient anxieties Suctioning can be a painful procedure Switch suction unit on and check that the suction pressure on circuit occlusion does not exceed: mm Hg or kPa pressure. To ensure the machine is working correctly. Too great a suction pressure can cause trauma, hypoxaemia and atelectasis Greater suction pressure does not equal increased secretion removal. Wash your hands, put on gloves, apron and goggles, Ensure that an appropriate non-fenestrated inner tube is in place Consider pre-oxygenation if receiving oxygen. Increase by 20% Remove tracheostomy devices prior to suctioning e.g; tracheostomy mask, HME or stoma protector (bib) Reduce the risk of cross infection Larger fenestrations will permit the suction catheter to pass through them, causing trauma to tracheal wall. To prevent hypoxaemia To allow access for sterile suction catheter tip Connect suction catheter keeping catheter tip covered (sterile) Place top double glove on dominant hand Do not apply suction whilst introducing the catheter, Do not push against resistance at any time. To reduce the risk of transferring infection from the hands to the suction tubing. To aide removal and replacement of fresh gloves per each suction episode Suctioning while introducing the catheter causes mucosal irritation, damage & hypoxia 62
63 Action Limit length of suction tube inserted to length of tracheostomy tube (measure length with spare inner tube) Rationale This ensures that the end of the suction catheter does not come in contact with the tracheal mucosa and damage it. For Deep Bronchial Suction under medical orders. This length of catheter limits damage to the carina. Insert catheter to level of carina or until resistance is felt. Withdraw catheter 1cm and apply suction. Use same length of catheter for subsequent suctions Action Occlude suction port with gloved thumb and suction on removal of suction catheter (no need to rotate on removal as catheters have circumferential holes) Period of suction should not exceed 10 seconds Suctioning should be continuous not intermittent Observe the patient throughout the procedure to ensure their general condition is not affected. For patients requiring oxygen therapy, reattach O 2 within 10 seconds. Remove the glove from the dominant hand by inverting it over the used catheter & dispose clinical waste bag Assess the patient s respiratory rate, skin colour and/or oxygen saturation to ensure they have not been compromised by the procedure and determine if they need further suction. Rationale Prolonged suctioning will result in hypoxia and trauma To reduce risk of mucosal damage and hypoxaemia Intermittent suctioning does not reduce trauma and is less effective Tracheal suction may cause vagal stimulation leading to bradycardia, hypoxia and may stimulate bronchospasm To limit hypoxia To minimise the risk of infection Suction should be performed only when needed and not as part of a routine, so that damage to the trachea is avoided 63
64 It is recommended that no more than 3 episodes of suctioning are carried out in succession To limit side effects and maximise recovery period Difficulties in suctioning tenacious mucus may be due to inadequate humidification. Use a more effective humidifier. Consider use of nebuliser or ultrasonic humidifier under medical control. Saline instillation used traditionally has been found to less effective. It may still be used in Deep Bronchial Suction and Bronchial Lavage Post suctioning, it may be advisable to carry out chest auscultation. If O 2 delivery was increased, review for return to previous level. Flush through the connection tubing with the clean water. Empty water receptacle and ensure this is ready for further use. Wash hands. To evaluate effectiveness of suctioning To prevent unnecessary oxygen delivery To minimise the risk of infection If the patient needs further suction, repeat the above actions using new glove & a new catheter Documentation Documentation of suctioning must convey to other members of the MDT the suctioning frequency, secretion type (colour, tenacity and/or sign of blood or infection). The entry should also ensure accurate reporting of any adverse reaction the patient experienced with the procedure and actions taken or still required. This should be documented within the appropriate area of the MDT notes. Closed System Multiple Use Suction Units (CSMU) A CSMU suction unit is a catheter contained in a plastic sheath, which allows the catheter to be inserted into the patient s tracheostomy on repeated occasions without the need to change it. It sits on a catheter mount and remains closed off to the tracheostomy tube until it is required for use.the CSMU is constantly attached to the tracheostomy which allows suctioning to be carried out without breaking the circuit and thereby minimising the disturbance to oxygen/ventilation delivery. CSMU suction units are available in various diameter and two lengths, the shorter being suitable for standard length tracheostomy tubes, whereas a longer length tracheostomy tube may require the longer CSMU predominately used for endotracheal tubes. 64
65 These systems are also beneficial for those patients who are dependent on ventilatory support to maintain oxygen saturation i.e.: those patients requiring IPPV (intermittent positive pressure ventilation) or high levels of PEEP (positive end expiratory pressure). CSMU are also related to reduced risk of cross infection by containing secretions and also closed suctioning reduces the incidence of nosocomial pneumonia by avoiding opening the airway to contamination. Figure below shows the correct technique for tracheostomy suction. Some types of trachy-mask (which supply oxygen to the patient via a tracheostomy) have an opening in them to allow suction without having to interrupt the supply of oxygen. 65
66 Stoma care and securing the tracheostomy tube The management of a tracheostomy depends on the type of surgical procedure used to create the tracheostomy tract. Traditionally tracheostomy was created through a linear incision in the front of the neck. With this technique the opening in the trachea can be clearly demonstrated by the use of tracheal dilators to open the superficial layers of the neck. However it is a surgical wound and must be cared for appropriately. Increasingly tracheostomy is being performed by a percutaneous puncture technique. The tract down to the trachea and the tracheal opening are progressively dilated to allow for the passage of the tracheostomy tube. This procedure has the advantage of minimising the size of the surgical wound. The major problem with this procedure occurs if the tube becomes displaced. If this occurs the dilated tract will rapidly contract and it becomes impossible to relocate the tracheal opening. The use of tracheal dilators is useless and the tube can only be replaced by repeating the original dilatational procedure. Consequently a new Percutaneous Tracheostomy Set must be available at. After some 7-10 days the tract of a percutaneous tracheostomy becomes more stable. The type of tracheostomy performed should be clearly documented at the bedside and the appropriate equipment for its care immediately available. Securing tube position Tube displacement is more common in the first few days following tracheostomy. Consequently many surgeons, in addition to the tracheostomy tapes, will suture the tube to the neck skin. This makes removing the tube in an emergency more difficult however should it become partially displaced and is not mandatory. Suturing also may make cleaning under the tube more difficult but the sutures should not be removed until instructed. The bedhead sign should make clear what sutures are in situ and how long they should remain for. A tracheostomy wound is a full thickness wound, where skin adjacent to tubes, open wounds and tape areas are at risk of chemical and mechanical injury. Secretions may ooze out of the surgical excision and stoma site which can result in wetness and cause irritation of the skin and can lead to skin maceration and/or excoriation. This moist environment may also act as a medium for bacterial growth and can prevent the stoma site from healing. The aim of stoma care is therefore to keep the area clean and dry, reducing the risk of skin irritation and infection. Dressings placed at the tracheostomy site should always be pre-cut by the manufacturers to avoid loose fibres from a cut dressing edge entering into the airway. Strict management of these dressings is essential as wound degradation will occur if wet/soggy dressings remain in contact with the surrounding skin. 66
67 Patient assessment When selecting the most appropriate technique and product for securing the tracheostomy tube, consideration must be given to the risk factors that each patient is exposed to. A tracheostomy tube that becomes displaced is at risk of causing significant respiratory difficulties and/or airway obstruction. It is, therefore, vital to ensure the tracheostomy tube is appropriately secured at all times. Patients at risk of their tube becoming displaced are: agitated or confused patients patients with ventilator circuits attached patients with tapes that are too loose allowing excessive tube movement Regular checks of the tapes will help prevent the tube becoming displaced. The dressings will need to be changed at least every 24 hours or when the dressing becomes soiled. This will also allow assessment of the tracheostomy site. Indications to carry out wound care include: dressing visibly soiled or wet 24 hour period expired since last change The patient who has undergone reconstructive surgery to the neck area which may include a skin and/or muscle flap may well require their tracheostomy tube to be secured without applying pressure to the delicate flap area. For these patients, the tube is likely to be secured to the area directly surrounding the tracheostomy, by sutures. Care must be taken to ensure these sutures adequately support the tube in place and prevent tube misplacement. Equipment in addition to standard bedside equipment: Dressing trolley. Gloves, disposable apron, and protective eye wear. Sterile dressing pack. 0.9% sterile saline solution (warmed) Sterile gauze squares Tracheostomy dressing (pre-cut) Tracheostomy securing device: either Velcro tube holder or cotton ties (2 pieces approx 50-80cm each) Blunt ended scissors Barrier cream Suction unit with appropriate suction catheters 67
68 Procedure The tracheostomy tapes should only be changed when their contamination is thought to be an infection hazard. In this situation it is advisable that 2 people assist with changing the tapes to help prevent accidental decannulation. It should be clearly communicated throughout the procedure, which person is responsible for holding the tracheostomy tube. The procedure must be undertaken using an aseptic technique to prevent contamination and the risk of infection. Action Explain and discuss the procedure with the patient as appropriate. Wash hands and put on gloves, apron and eye protection if patient high risk Rationale Reduce anxiety and gain consent and cooperation Hand hygiene is a pre-requisite to undertaking a technique that enables asepsis to be maintained. Failure to peform adequate hand hygiene can result in contamination of equipment or transmission of pathogenic bacteria to the patient resulting in infection. Aprons and eye protection protect the nurse from unexpected exposure to secretions. Prepare sterile dressing trolley Each practitioner performs hand hygiene and put on clean gloves Position the patient with their neck slightly extended. Remove any clothing that will impede procedure. Practitioner 1 holds the tracheostomy tube, whilst Practitioner 2 removes the tapes and dressing. Discard these into the waste bag. Prerequisite for maintaining asepsis Required for aseptic technique to prevent contamination of equipment/patient To help access to the neck area for the procedure. To stabilise the tracheostomy tube and reduce the risk of dislodgement of tracheostomy tube. Ensures correct disposal of waste Assess the stoma for signs of infection, inflammation, or trauma, and record accurately on the appropriate documentation. Take a swab if there are any signs of infection: To assess for skin excoriation, haematoma, signs of infection. To facilitate early recognition and treatment of infection. 68
69 Sign of infection include: Purulent discharge Pain Odour Abscess formation Cellulitis and discolouration Observe for signs of Hypergranulation tissue (red polyp like growths develop in response to tube movement and over active healing process) seen at the stoma edge. Granulomas may cause scarring, bleeding, pain and cause difficulty at tube changes which may require a different tube shape/size or to be treated with silver nitrate cautery, CO 2 laser. Perform hand hygiene and Change gloves to proceed with aseptic wound care and dressing application. Sterile gauze squares soaked in saline should be used to clean the wound and around the tube to remove secretions and crusting. Gently pat dry underneath the tracheostomy tube. The tube should be held firmly throughout with minimal movement of the tube Apply a thin layer of barrier cream if the skin is at risk of excoriation from moisture from humidification and/or secretions. Apply a clean tracheostomy dressing. To adhere to aseptic technique. Saline is the preferred wound cleansing solution. Tube movement can cause coughing and discomfort and may increase the risk of accidental decannulation. To promote skin integrity. To bring secretions away from the wound, and also to provide comfort from the tube constantly resting on the neck. Securing a Velcro tracheostomy tube holder: (suitable and preferred for adult patients) The tube must be held securely throughout the procedure, until the securing device is attached Practitioner 1 should insert small velcro end through opening on tracheostomy neckplate (insert velcro from underneath neckplate) and bring out and secure velcro on main neckband of tube holder To prevent accidental decannulation To secure device 69
70 Repeat on other side Smooth the tapes onto the patient s neck, ensuring no devices or hair is caught beneath tube holder Secure tube holder using main velcro attachments, checking correct tension by placing no more than 1-2 fingers between tube holder and neck ensure the neck is in the neutral (non extended) position when securing the Velcro strap. Trim excess tube holder length with care not to cut appliances e.g.; nasogastric tube or cuff pilot line To secure device To ensure no devices or hair will impede tube holder securing tracheostomy in place To prevent accidental decannulation with loose tapes or skin damage and/or discomfort from too tight tube holder To remove unnecessary tube holder length carefully OR To secure using cotton tapes: suitable for patients deemed at risk of pulling their tube out which may lead to a potentially fatal accidental decannulation. Cotton tapes are then preferred as they cannot be accidentally untied. The tube must be held securely throughout the procedure, until the securing device is securely attached Blunt ended scissors should be used to cut and remove existing tapes, ensuring any devices in area are not accidentally cut Fold each tie into 1/3 (short length) and 2/3(long) lengths. Pick up tape by loop, and from underside of neckplate fold loop through slit in tubes neckplate and leave loop exposed Pull two loose ends through exposed loop and tighten knot Repeat on other side of tube with tie 2. Passing tie (long length end) around neck with no twists or bumps start to secure with simple reef knot to tie (short length end) on other side Once both sides are loosely knotted, check tension of ties, you should be able to place 1-2 fingers between tapes and neck with neck flexed. in the neutral position. To prevent accidental decannulation To allow safe removal of tracheostomy ties. To provide a loop for knot formation To provide a secure attachment To provide a secure attachment To provide comfortable and secure ties To prevent excess tube movement, misplacement or discomfort from ill fitting tapes 70
71 Once happy with tension of tapes, tighten tie knots and trim excess cotton tie length (leave at least 2 cms) Trim excess cotton tapes with care not to cut appliances e.g.; nasogastric tube or cuff pilot line To secure tube firmly. To remove unnecessary tube holder length carefully Following either tube securing procedure: Remove dressing equipment from patient area and dispose of in clinical waste bag. To ensure safe patient environment and prevent infection risk. Clean trolley and wash hands. Document dressing change and the condition of the tracheostomy site in the patient s records. To prevent cross infection. To document care given and to communicate with MDT necessary information. Documentation Following the dressing change and/tape change, this should be documented in the nursing and/or medical notes as appropriate. Any complication identified (e.g. infection and swabs taken) should be considered for further management and this also documented. Skin sutures Following a tracheostomy formation, skin sutures may be required to aide wound closure. These sutures will generally be ready for removal between 5-7 days, or as guided by the practitioner who inserted the tracheostomy. Granulation tissue Overgranulation or hypergranulation at the site of the tracheostomy can be caused by an ill fitting tube, excessive movement of the tube and /or in response to an infection at the wound site. This tissue can cause bleeding or pain at the wound site and in severe cases make tracheostomy tube changes difficult. A polyurethane dressing significantly reduces the rate of hypergranulation. Treatment may include local application of silver nitrate. This requires local skin to be protected with petroleum jelly, and may require repeat applications until the overgranulation tissue has shrunken sufficiently. It should be considered, that until the tracheostomy tube is removed, the cause of the over granulation remains 71
72 Patients undergoing radiotherapy to the neck Carrying out a tracheostomy dressing and tape change for a patient undergoing radiotherapy to the neck must be carried out with caution and particular consideration to the increased discomfort that the patient may experience. Radiotherapy may cause radiotherapy burns, moist or dry desquamation and broken areas of skin. It is advisable to liaise with the radiotherapists to assess skin integrity and to advise on suitable skin treatments. Appropriate analgesia may also be required prior to tapes and dressing changes. It is also the practitioner s responsibility to identify appropriate timing of tapes and dressing changes and not to be considered simply routine care to avoid unnecessary discomfort or skin damage. 72
73 Cleaning the inner cannula This procedure aims to remove secretions from the inner cannula to reduce the risk of potential obstruction with sputum and reduce the risk of infection. Secretions can adhere to the internal lumen of a tracheostomy tube and severely reduce the inner lumen diameter over time. This potentially can increase the work of breathing and/or obstruct the patient s airway. The inner cannula should be removed and inspected at least once per 8 hour shift or if the patient shows any signs of respiratory distress. For a patient undergoing mechanical ventilation, it may not be safe to repeatedly disconnect the ventilator circuit and change the inner tube routinely. Cleaning or changing an inner tube should always represent the best balance of risks to the patient. If an inner tube is not changed, then it should be clearly documented and communicated, along with the rationale. There is debate within the literature on the most appropriate cleaning solution to be used in the context of inner cannula care. A wide variety of solutions are used across health care including tap water, sterile water, sterile saline and hydrogen peroxide 10w/v (3%). Evidence to support the use of tap, sterile water or other solutions is equivocal and therefore local policies are highly likely to vary in their recommendations. This is acceptable from a patient safety perspective but local practice should be influenced by the available water supply and quality, types of tubes used and patient condition. It is important to note that the central rationale for cleaning of inner cannula is to mechanically remove debris which may physically obstruct a patients airway. A secondary outcome of mechanical cleaning is a reduction in the numbers of microbes present. Inner cannulae can be cleaned at the patient s bedside. Facilities for the disposal of associated waste should be made in line with local waste management policy. When assessing the patient for signs which suggest inner cannula change it is important to observe for: The patient experiencing difficulty in breathing Secretions in the cannula which cannot be cleared by tracheal suction/coughing Patient requests tube cleaning Patient exhibits noisy breathing Patient stops breathing Equipment in addition to standard bedside equipment includes: Clean, disposable gloves Clean and dry replacement inner cannula Tracheostomy cleaning devices (sponges or brushes) Fragrance free detergent Cleaning solution: tap water, sterile water or sterile saline (refer to local guidelines from infection control department) Clean and dry covered container for spare inner cannula 73
74 Procedure (videos available here) Action Explain and discuss procedure with the patient as appropriate Clean your hands immediately prior to donning and put on gloves and apron Perform tracheal suction if necessary With one hand stabilise the outside of the tracheostomy tube as per the manufacturer s instructions. This may necessitate firm removal of inner cannula whilst anchoring the tracheostomy tube side flange in a friction locked device, or rotation of the inner cannula to release it in preparation for removal. With the other hand remove the inner cannula in an outward and downward direction. If the inner tube is clean and clear of secretions, reinsert using an upward and forward movement and secure the inner cannula as per the manufacturer s instructions. If there is difficulty in removing the inner tube call for help from an appropriately trained healthcare professional. If inner tube requires cleaning, replace with clean/spare inner cannula whilst cleaning is taking place If the inner tube is fully or partially blocked with secretions, flush with locally agreed cleaning solutions and if necessary use a tracheostomy cleaning sponge or brush If tube is coated with dried- on secretions, it may need to be disposed of and a replacement cannula placed at bedside Rationale To relieve patient anxieties and gain patient consent and co- operation. To reduce the risk of cross infection To ensure airway is clear prior to procedure commencing To aid easy removal of the tube and cause minimal movement of the tube on inner cannula removal Discomfort and trauma are reduced if the inner tube is reinserted following the contour of the outer tracheostomy tube. Dry tenacious secretions or granulation may prevent the inner tube from being removed which requires prompt attention The tracheostomy tube should always have an inner cannula in place to prevent tube blockage. To remove debris that may block the tube this may become a source of infection. Cleaning devices should be used with caution and care not to cause abrasion to inner surface of inner cannula. Excessive cleaning can damage the cannula and they should not be left to soak as it is an infection risk. 74
75 Rinse the inner cannula through with warm running water or with sterile water if requested by local infection control guidelines. Shake excess water off inner cannula and place in covered clean container to dry prior to re-use. Ensuring the cannula is locked into place as per the manufacturer s instructions Observe secretions amount and consistency To remove secretions and reduce infection risk To ensure a clean and dry inner cannula is available for use. To prevent the cannula dislodging To observe for signs of infection or inadequate humidity Documentation should include accurate records of inner cannula care in the required format within the patient s record as per local procedure. Ensure handover of all information, reporting any problems in changing the inner cannula or missing inner cannulas. Document any condition or behaviour which may signify adverse reactions to the procedure and take appropriate action. Record the outcomes of the activity using the method agreed in your care setting. 75
76 Oral and Personal Hygeine Patients with tracheostomies, especially those who are nil by mouth, require regular oral care due to the reduced evaporation of oral secretions, which accumulate in the mouth. This is due to the disruption of normal airflow during inhalation and exhalation. Patients who are able to should be encouraged to maintain their own oral hygiene by using a toothbrush and using mouthwashes. Incapacitated patients should have a daily assessment of their buccal mucous membranes to observe for bacterial, viral or fungal infections, skin tears or ulceration. Aspirated infective saliva can contribute to respiratory problems. If the patient has a dry mouth then consider artificial saliva. Regular oral hygiene - minimum x 2 per day but preferably every 2-4 hours if possible. Document on care plan. Patient s teeth should be brushed with toothbrush and toothpaste at least twice a day if not self caring. If patient self caring encourage oral hygiene. There is no reason why patients with tracheostomies can t wear their dentures. Showering is permitted If the patient will tolerate oxygen being off for the duration of the shower The tracheostomy is covered with a Heat Moisture Exchange Device (HME) - Thermovent/Swedish Nose. Ensure the patient is angled away from shower spray. It is easier if the shower is angled from behind. 76
77 Cuff management It is usual that the initial tracheostomy tube to be inserted will be a cuffed tube. The cuff provides a sealed airway until a patient is weaned from the ventilator, the wound has stabilised and the patient can control their own secretions. Management of the cuffed tracheostomy tube focuses on the appropriate management of the distal cuff. Tracheal capillary pressure lies between 20-30mm Hg and an impairment of this blood flow will be caused by an obstruction between 22-37mm Hg. The complications from the continued use of an over inflated cuff include tracheal stenosis, tracheal malacia, and tracheo-oesophageal and tracheoinominate fistulae. In addition a patient with an inflated cuff will experience desensitisation of the larynx, a reduced cough reflex and the likely loss of voice or sound production. Adversely, too low a cuff pressure will cause an air leak and loss of ventilation and the cuff will develop longitudinal folds which permit micro aspiration of secretions which have collected above the cuff that will subsequently increase the risk of nosocomial pneumonia. The accepted pressure is the minimum pressure required to prevent a leak but which must not exceed 35cmH 2 O. Recommendations suggest that the cuff pressure should be kept between 15-25cmH 2 O (10-18mm Hg). Regular cuff pressure checks are carried out every 8 hour shift. Patient assessment: cuff deflation The decision to trial cuff deflation, should be made by appropriate members of the multidisciplinary team and carried out and monitored by appropriately trained and skilled staff. Patients who may require cuff deflation include: Prior to tube removal Prior to assessment of patients ability to manage oral secretions Prior to eating or drink (where swallowing is assessed as safe) A patient using a speaking valve or occlusion (decannulation) cap As part of a structured weaning programme Procedure: cuff deflation It is recommended that two people are required for this procedure. This will allow cuff deflation with simultaneous suctioning. Action Explain and discuss procedure with the patient as appropriate. Explaining that they can expect to experience the movement of air and secretions within the upper airway and may be able to make audible sounds. Rationale Allay patient anxieties where possible 77
78 Wash your hands and put on gloves, apron and protective eyewear Suction via tracheostomy and/or mouth (where necessary) Deflate the cuff slowly using a clean syringe to aspirate air from the cuff via the pilot balloon Perform tracheal suction as necessary whilst deflating cuff Assess patient comfort, respiratory rate and oxygen saturation throughout the procedure Assess the need for re-inflation and re-inflate if required (see cuff inflation procedure) Reduce the risk of cross infection To remove secretions prior to cuff deflation To deflate cuff To exclude the risk of aspiration of secretions To identify significant changes in respiratory pattern which may indicate cuff re-inflation. To alleviate respiratory distress experienced with cuff deflation Patient assessment: cuff inflation Patients who may require cuff inflation include: Patients immediately post tracheostomy formation At risk of (or known) aspiration Problematic leak with ventilation To allow positive pressure ventilation or resuscitation Procedure: cuff inflation (including monitoring cuff pressure) Suitable for inflation of air cuffs. If using a tracheostomy tube which has a water filled cuff, refer to manufacturers guidelines for inflation and pressure checking. Action Explain and discuss procedure with the patient as appropriate Wash your hands and put on gloves, apron and protective eyewear Place a stethoscope below the thyroid cartilage Using a syringe or cuff pressure manometer inflate cuff until it reaches Minimal Occlusive Volume Rationale Allay patient anxieties if possible and gain patients consent Reduce the risk of cross infection Best position to hear leaking air sounds Air sounds will cease when the cuff 78
79 (MOV) or Minimal Leak Technique (MLT). Listen for air sounds using a stethoscope placed on the trachea above the tracheostomy site. is sufficiently inflated These techniques are not recommended for patients with an upper airway obstruction, as the movement of air will not be heard or felt. Check that the cuff pressure does not exceed 25 cm H 2 O by using a cuff pressure manometer in accordance with manufacturer s instructions. If cuff pressure reaches 25 cm H 2 O and air leaks are still heard seek specialist advice. To ensure appropriate inflation of the cuff to prevent injury as excessive cuff pressure can cause capillary occlusion. To resolve problem Where high cuff pressure is required to prevent a ventilator leak possible solutions include: Increasing the tracheostomy tube size Changing the mode of ventilation to reduce peak airway pressure Placing a tracheostomy below the area of dilation, or Accepting a small leak Cuff pressure should be checked regularly according to local procedure Identify if balloon or cap is leaking air and is appropriately inflated to safe levels Documentation Document cuff pressure checks at least once per shift, or in accordance with local guidelines. Record cuff pressure measurements correctly in the required format in the patients record as per local procedure. Ensure handover of all appropriate information reporting any problems in measuring cuff pressures. Document any condition or behaviour which may signify adverse reactions to the procedure and take appropriate action. Record the outcomes of the activity using the method agreed in your care setting. 79
80 Management of Swallowing with a tracheostomy tube Patients with a tracheostomy tube may present with swallowing difficulties. These swallowing difficulties are more often the result of the patient s medical condition than the tracheostomy tube itself. Assessment of the safety of the swallow is necessary as swallowing difficulties (dysphagia) can result in aspiration and the complications arising from this. A patient with a tracheostomy tube may have difficulty swallowing secretions as well as food and drink. To minimize the occurrence of complications practitioners must follow best practice guidelines. Prior to assessing the swallow of a tracheostomy patient there must be expert multidisciplinary team (MDT) agreement that the patient s medical and weaning status indicate that they are 1) appropriate to trial cuff deflation to assess tolerance of secretions and/or 2) appropriate to trial oral intake. Knowledge of the individual patient s condition including indication for the tracheostomy, current nutrition and respiratory status and weaning plan should all be understood before assessment. Those caring for the tracheostomy patient must also have a sound understanding of the signs of swallowing difficulties and must be able to take necessary actions in the event of an emergency. Since the process of assessing the safety of the swallow is not without risk the screening, assessment and management of dysphagia must be carried out by a dysphagia trained practitioner. According to local policy, screening for dysphagia may be carried out by identified members of the MDT. They should have specific training in dysphagia and should, for example, be skilled to the level of foundation dysphagia practitioner as outlined by the interprofessional dysphagia framework. They should refer on to a more qualified dysphagia practitioner if dysphagia is identified. The full assessment and management of dysphagia in the tracheostomised patient should be carried out by a practitioner specifically trained in dysphagia and should, for example, be skilled to the level of specialist dysphagia practitioner as outlined by the interprofessional dysphagia framework. This will ideally be a speech and language therapist. Ideally the patient will have the cuff deflated and be wearing a speaking valve during assessment of secretion tolerance and oral intake. This is to help restore more normal physiology to the upper airway and provide the practitioner with more clinical indicators of swallow safety. This ideal may need to be tailored to the individual, for example; the palliative care patient. Research does not fully support the use of the modified Evans blue dye test (MEBDT) to identify presence or absence of aspiration due to its high false negative rate. The research suggests that the MEBDT is better at identifying larger volume aspiration than smaller volumes and that it does not identify the biomechanical errors leading to aspiration. The research concludes that at best the MEBDT can be used as a screening tool; however with a false negative rate of approximately 50% negative results have the potential to be 80
81 misleading. It is a single sign only and needs to be combined with other patient risk factors and underlying diagnosis to attribute risk. The patient must be deemed safe at tolerating their secretions before assessing for tolerance of oral intake. Aspiration of secretions is significantly linked to aspiration of oral intake. Patients that are nil by mouth or are at risk of aspiration should have a strict program of oral care in place (following local policy) to minimize the risk of developing aspiration pneumonia. Patient assessment The following are the ideal circumstances under which to assess the swallow for tolerance of secretions and oral intake: The patient should be alert The patient should be sat upright (if medically able) The oral cavity should been clean and clear The tracheostomy tube cuff should be deflated (if present) A speaking valve should be attached All patients identified as at risk of or presenting with dysphagia should be referred to a specialist dysphagia practitioner for clinical assessment. Where access to fibreoptic endoscopic evaluation swallowing (FEES) or videofluoroscopy is available then referral to these services may be appropriate. Signs of dysphagia to be aware of during and after assessment/intake are: Coughing or choking (NB patients may silently aspirate) Increased work of breathing Fatigue Change in the voice quality e.g. sounds wet Noteworthy decrease in 0 2 saturation levels and/or change in skin pallor Deteriorating chest status Increase in frequency of suctioning required Evidence of aspirated material on suctioning Loss of saliva or food/fluid from the mouth Holding of saliva or food/fluid in the mouth Patient reports difficulty swallowing 81
82 Procedure Action Explain and discuss the procedure with the patient. Have communication aids available e.g. alphabet chart, pen and paper, interpreters if necessary. Wash hands and put on gloves and apron. Sit the patient upright (unless contra-indicated) Suction the patient if necessary Perform cuff deflation (suctioning at the same time according to local policy) and observe for signs of acute respiratory distress, desaturation, patient discomfort and signs of dysphagia. Re-inflate cuff if not tolerated and agree review date. This may be as frequently as daily. Refer to a specialist dysphagia practitioner if necessary. Ideally a speech and language therapist. Recognise signs of clinical deterioration or improvement and refer on to a specialist dysphagia practitioner as appropriate, ideally a speech and language therapist. If cuff deflation tolerated, attach the speaking valve if applicable to the patients individual weaning plan following local policy. Dysphagia trained practitioner to trial patient on selected food/fluid. Observing for signs of dysphagia. If signs of aspiration are observed, cease trials and refer to a specialist dysphagia practitioner, ideally a speech and language therapist. If trials successful progress cautiously to oral intake as each consistency is deemed safe. Rationale To ensure consent, understanding and reduce anxiety. To promote effective 2 way communication To reduce the risk of cross infection. To promote chest expansion and help reduce aspiration risk To remove secretions prior to cuff deflation To ensure the patient is able to tolerate their secretions prior to proceeding to oral intake. To optimise success and reduce patient risk. To optimise physiology of upper airway and provide additional clinical indicators of dysphagia. To optimize progression to oral intake and to reduce risk of aspiration. 82
83 Remove speaking valve and re-inflate the cuff post-assessment/trial according to the patient s individual weaning plan. Involve MDT throughout process e.g. parent/family, medical team, speech and language therapist, ward nursing team, physiotherapists, pain team, Ear Nose and Throat team, intensivists and/or Psychologists. To optimise weaning success and reduce patient risk. To optimise success and reduce patient risk. Documentation Outcomes of the assessment of swallowing secretions and oral intake must be clearly documented in the medical notes. Documentation must convey to other members of the MDT the findings of the assessment and the resulting recommendations. The entry should also ensure accurate reporting of any adverse reaction the patient experienced with the procedure and actions taken or still required. If referral on to a specialist dysphagia practitioner (eg Speech and Language Therapist) is required or has been made, this must be documented. 83
84 Weaning a patient with a tracheostomy towards decannulation Within the hospital setting, patients will present with one of three different types of tracheostomy: permanent (non-weanable), long-term (non-weanable) or temporary (weanable). Tracheostomy tubes may cause permanent damage to the airway and therefore timely weaning, where indicated, is advantageous. Prior to the weaning of a temporary tracheostomy tube, there must be expert multidisciplinary team (MDT) agreement where it should be established that the indication for the tracheostomy has now been resolved sufficiently. The weaning process must be led by a clearly designated and accessible expert clinician(s) since the process is not without risk. This same team should remain the main point of contact for at least 48 hours post decannulation (unless patient location prevents this being a viable option). Tracheostomy MDT will regularly include: Ward Nurse Physiotherapist Speech and language therapist Specialist Nurse (Tracheostomy, ENT or Outreach) Respiratory physician Head & Neck surgeon Anaesthetist or Intensivist Knowledge of the individual patient condition including indication for tracheostomy, established indicators for decannulation and plan of further assessments to be undergone to proceed through to decannulation. The weaning process involves pre-decannulation safety checks, the staged weaning of the use of the tracheostomy as an airway through to a MDT assessment to determine suitability to proceed to decannulation. Practitioners caring for the patient through the decannulation process must have a sound understanding of the signs of deterioration during or post-decannulation and must be able to take necessary actions in the event of an emergency. Patient assessment In assessing whether a patient is a suitable candidate to attempt weaning with an aim of Decannulation, it must first be clarified whether the reason for the tracheostomy has now been resolved. This may need assessment by endoscopy to assess patency of upper airway and movement of vocal cords, this will usually be carried out by an Ear, Nose and Throat surgeon. A more general assessment of the patient is also required to ascertain whether the patient is well enough to endure the remove of the tracheostomy within the coming days. A checklist to use prior to commencing weaning may ask: Can the patient maintain and protect their airway spontaneously? Are they free from ventilatory support? 84
85 Are they haemodynamically stable? Are they absent of fever or active infection? Is the patient consistently alert? Do they have a strong consistent cough (able to cough into mouth)? Do they have control of saliva + / - a competent swallow Are there any planned procedures requiring anaesthesia within next 7-10 days? Is this patient causing us concern? Can we safely support the weaning process in the patient s current clinical environment? The weaning process will only succeed if the tracheostomy tube in situ is of an appropriate size to allow sufficient airflow around and/or through the tube to the upper airway allowing the patient to tolerate the speaking valve or occlusion cap. It is recommended that a patient should progress through to tube occlusion with a tube that is one size smaller than ideal for their airway certainly no larger than a 7.5mm in males (ID mm) however the team should make individual assessment based on each patient s ability to tolerate a speaking valve or tube occlusion with their tube. Some patients may, however, need a change of tube which will offer less resistance to the passage of air to the upper airways. This may include the insertion of a smaller cuffed tube or an uncuffed tube. A fenestrated tube (with single or multiple holes on outer curvature of tube) may be used for weaning but is not essential. They are used as appropriate and caution must be taken as the fenestrations may cause the formation of granulation tissue within the trachea and/or allow trauma to the posterior tracheal wall if suctioned through accidentally. When a patient is known to have a complex airway (e.g. requiring an adjustable flange tracheostomy) or has a previously documented difficult intubation extra caution is taken throughout the whole process. In these cases, it is essential to liaise with the Ear Nose and Throat (ENT) and Intensive Care teams if not already involved. Equipment in addition to standard bedside equipment: Other equipment needed: Occlusion cap Speaking valve Continuous oxygen saturation monitoring Stethoscope 10 ml syringe Clean pot containing weaning tubes appropriate for tracheostomy MDT weaning documentation 85
86 Procedure Action Explain and discuss the procedure with the patient. Have communication aids available e.g. alphabet chart, pen and paper, interpreters if necessary. Wash hands and put on gloves and apron. Sit the patient upright (unless contra-indicated) Suction the patient if necessary Perform the 1 st trial cuff deflation (suctioning at the same time according to local policy) and observe for signs of acute respiratory distress, de-saturation or patient discomfort. Re-inflate cuff if not tolerated and agree re-review date. This may be as frequently as daily. If cuff deflation tolerated, proceed with wean to point of decannulation according to local guidelines. Rationale To ensure consent, understanding and reduce anxiety. To promote effective 2 way communication To reduce the risk of cross infection. To promote chest expansion and help reduce aspiration risk To remove secretions prior to 1 st cuff deflation To ensure timely tracheostomy wean and reduce risk of tracheal damage. To optimise wean and reduce patient risk. Involve MDT throughout process e.g. parent medical team, ward nursing team, Speech and Language therapists, physiotherapists, pain team, Ear Nose and Throat team, intensivists and/or Psychologists. Recognise signs of clinical deterioration or improvement and slow / stop / restart / speed up the weaning process as indicated To optimise wean success and reduce patient risk. To optimise wean success and reduce patient risk. 86
87 An example of a staged weaning approach may be: Stage 1 Trial cuff deflation and speaking valve (up to 30 mins) Stage 2 Increase speaking valve use up to hours (Cuff may still be inflated overnight if necessary) Stage 3 Trial tube occlusion capping off up to hours Stage 4 MDT assessment and confirm decision to decannulate Stage 5 Decannulate and assess stoma Stage 6 Remove tracheostomy equipment after non eventful 48 hours post decannulation Documentation The standardised weaning and subsequent decannulation practices must be locally agreed and supported by multi disciplinary guidelines and documentation. Local guidelines and practice must ensure that The team taking responsibility for a patients tracheostomy wean review the patient regularly Their assessment, interventions and plan is clearly documented to guide the ward MDT Observation charts include tracheostomy and respiratory observations are accurately maintained The ward MDT have written guidance of how to access expert help in an emergency at any time 87
88 88
89 Infrastructure considerations Introduction In order to safely care for patients with tracheostomies in our hospitals, we need to address the organisation and infrastructure of the clinical areas who will manage patients with tracheostomies and laryngectomies. We have been able to look at many Trust s policies and documentation as part of this project. We have also been able to view detailed reports from coronial inquests and serious untoward incident reviews which have helped to inform the following pages. Any clinical are can potentially look after these patients, but they must be: Adequately staffed Adequately trained Adequately equipped Adequately supported In order to do this effectively, most Trusts will have to cohort patients with tracheostomies together into designated wards. This allows training and equipment to be targeted and concentrates expertise and experience. Nominated areas would typically include: Critical care areas Head and neck wards Designated respiratory / medical / surgical wards Patients with tracheostomies or laryngectomies should not be cared for outside these areas. This has implications for the flow of patients into, out of and around a hospital, and the bed managers will need to be adequately involved in planning patient movement. Patients can also come direct from the community or through the emergency department. The key areas to consider for those designated wards are: 1. Competency and training a. Staff must have received documented training appropriate to their duties b. Knowledge of where to find additional resources (some of the resources presented as part of this project could be considered just-in-time training) c. Staff must know who to call and what to do in an emergency 2. Equipment provision a. Wards must be stocked with airway and tracheostomy specific equipment b. Only suitable tubes should be used (uncuffed, inner cannula) c. Immediate access to a fibre-optic endoscope d. Bedside emergency equipment must be available at all times and accompany the patient if they move around the hospital e. Equipment must be checked and a means of documenting this must be in place 89
90 3. Staffing numbers a. Extra staff may be required if the dependency of a tracheostomy patient requires it. b. Consideration of one-to-one nursing / nursing auxiliary on initial step-down from a higher level of care for hrs 4. Discharge planning a. Multi-disciplinary b. Documented 5. Follow up a. Medical and multi-disciplinary follow up arrangement must be clear and documented b. Who to call in an emergency must be explicit (bed head sign) 6. Documentation With regard to interhospital transfer between acute hospital sites, it is the responsibility of the transferring/discharging hospitals/units to ensure that the patient transfer is communicated to the relevant team (e.g. critical care or surgical team) within the receiving Trust. Adult patients with tracheostomies should only be transferred to hospital sites where there is twenty four hour availability of an appropriately skilled discipline e.g. ENT/critical care. 90
91 Draft tracheostomy policy outline The policy detailed below is an example based on amalgamated policies from several hospitals in the North West Region. Clearly, hospital policies will vary, but this is included to give the reader a framework if you were considering writing your on tracheostomy policy. It may be useful to designate specialist areas (ICU, HDU or a head and neck unit), nonspecialist areas which will be nominated, trained, adequately staffed and equipped to care for patients with tracheostomies and then all other clinical areas. Duties within the organisation Chief Executive The Chief Executive is responsible for ensuring the requirements within this policy are fulfilled and operational responsibilities are in place when patients who are neck breathers are nursed on general wards. Chief Nurse The Chief Nurse is responsible for ensuring requirements within this policy are fulfilled and that this policy is disseminated to all Heads of Nursing for appropriate action. Executive Medical Director The Medical Director is responsible for ensuring that this policy is disseminated to Consultants who supervise medical staff in training and that education and training facilities are available to ensure medical staff can maintain level of clinical standards to appropriately manage patients who trigger on the MEWS. Divisional General Managers The Divisional General Managers will ensure that adequate resources are available within their divisions to make provisions within this policy feasible. Consultant The Consultant is the professional with the overall clinical responsibility for their patients, therefore will ensure patients cared for in a designated area other than their allocated ward will receive a daily visit from a member of their team. The Consultant will ensure that clinical standards are maintained and that any necessary deviation from this policy is documented and explained in the medical notes. Heads of Nursing Heads of Nursing have a responsibility to ensure that this policy is disseminated to Matrons and Ward Managers to inform clinical staff of their responsibilities in the safe care of patients who are neck breathers. 91
92 In collaboration with Matrons and Ward Managers, Heads of Nursing must ensure that adverse clinical incidents in relation to the care of patients who are neck breathers in their clinical areas are reported and investigated and action plans produced to prevent future occurrence. Matrons and Ward managers Matrons and Ward Managers have a responsibility to ensure that any staff responsible for caring for patients who are neck breathers receive training on their care and management and recognise when to escalate care when needed to the appropriate people. Matrons and Ward Managers have a responsibility to ensure that all clinical staff have access to equipment and documents for providing safe care for patients who are neck breathers Bed Managers Bed Managers must ensure that patients with a tracheostomy/laryngectomy admitted to a general ward from a critical care area, specialised ward or from any community setting must be cared for in the designated areas. These areas will be identified following a Trust-wide consultation process. Critical Care/Specialist Ward Clinical Staff Patients with a tracheostomy discharged from a critical care Unit or specialist ward will have an un-cuffed tracheostomy tube with an inner cannula sited. (You may wish to standardise or limit the different types of tube available to make teaching easier and reduce potential confusion). At least 24hour notice must be given to the receiving ward when a patient is being discharged from a Critical Care/specialist area. This will ensure the receiving ward can make all necessary preparations to safely accept responsibility for the patient with a tracheostomy. Patients with a tracheostomy will not be discharged from a critical care/specialist area between the hours of and A tracheostomy Care Plan will be completed by the Critical Care/Specialist Ward Nurse which will be communicated to the receiving ward nurse and agreed before the patient is discharged from Critical Care/Specialist Ward. This will ensure a full handover of care is given and the receiving ward can maintain a safe environment for the patient with a tracheostomy. A documented visit to meet the patient and to assess dependency by a member of the receiving ward will be carried out prior to discharge. A risk assessment should be completed and agreed with the receiving ward. Any problems with the tracheostomy should be clearly communicated. (see draft risk assessment). 92
93 An emergency airway box will be sent to the general ward with a patient with a tracheostomy, to be kept at the patients bedside all times in case of an airway emergency. A referral must also be made to the Outreach Team by the nurse discharging the patient from a Critical Care/Specialist ward, who will then arrange to visit the patient on a daily basis to offer advice, education and support Receiving Ward Clinical Staff The receiving ward should ensure that the patient with a tracheostomy/laryngectomy is nursed in a bed that is observable from the nursing station and wherever possible not in a side room. As a general rule the patient should be nursed in an open observation area, rather than a side room (unless continuous 1:1 staffing is provided). Discussion with infection control teams should take place as close observation for airway compromise is likely to take priority over use of a sideroom for infection control purposes. The receiving ward should ensure that the patient with a tracheostomy/laryngectomy must have access to a nurse call bell and other communication aids, if they are able to use them. If a patient does not have adequate means of communication due to their clinical state, then adequate provision for one-to-one care must be adopted. The receiving ward should ensure that the patient with a tracheostomy or laryngectomy requiring oxygen must have an oxygen supply and suction equipment at the bedside, and that the oxygen is prescribed on the patients prescription chart. Any patient with a tracheostomy/laryngectomy who is oxygen dependant should have their oxygen warmed and humidified. The receiving ward should ensure that the patient with a tracheostomy has the emergency airway box at the patients bedside at all times. The appropriate Bed-Head sign should be completed describing the details of the tracheostomy. This form will be completed by the person performing the tracheostomy or by a competent member of staff if a patient is admitted to the Trust with an existing tracheostomy. Patients with a tracheostomy/laryngectomy must have regular checks carried out as per the tracheostomy/laryngectomy care plan and patient bedside checklist The receiving ward should ensure that the patient with a tracheostomy/laryngectomy has been referred to the Physiotherapy Team for a daily visit and also receives a daily visit at the weekend. The receiving ward clinical staff should ensure that all patients with a tracheostomy/laryngectomy are referred to the SALT team for a swallowing assessment due to the high risk of aspiration of secretions / food and fluids. Recommendations regarding 93
94 safety of oral feeding and appropriate diet/fluid consistencies will be advised and documented following assessment by the SALT team. If a patient is admitted to a general ward from a community care setting the Outreach team must be informed, who will visit on a daily basis to offer support and advice on the care and management of patients who are neck breathers. The receiving ward should ensure that all equipment necessary for the care of a patient with a tracheostomy/laryngectomy is ordered and available on the receiving ward at all times. Training and information resources can also be accessed at Critical Care Outreach Team The outreach team will be informed by critical care or staff on the receiving ward when a patient is being discharged/admitted with a tracheostomy/laryngectomy. The outreach team will then visit the patient on a daily basis to provide support and education to clinical staff, patients and carers whilst that patient remains as an inpatient within the Trust. The outreach team will maintain a record of all neck breathers nursed on a general ward for audit purposes. The outreach team will provide an emergency care box to be kept at the patients bedside at all times, and ensure the appropriate Trust Emergency Algorithms are displayed above the patients bed for any patient who are neck breathers nursed on a general ward. Emergency teams Any patients with a tracheostomy or laryngectomy who develop breathing difficulties or display any of the Tracheostomy Red Flags need prompt assessment by Critical Care Outreach or a relevant medical team. For tracheostomy/laryngectomy problems (or where clinical deterioration may be related to the airway) the patient must be seen by the ENT or MaxFax team (for ENT or MaxFax patients) or by the Critical Care Medical team within 30 minutes. Contact details are displayed on the appropriate Bed Head signs. For an emergency related to the airway, decide in advance who should be called (depending on your hospital setup) Hospital Incident Reporting System (HIRS) A HIRS report must be completed by any clinical staff or senior nurse who detects any failure to comply to this policy. The shift leader must take responsibility to ensure that a report has been completed and sent Guidance on incident reporting can be found in the Trust Incident Reporting Policy available on the Trust Intranet, and through the Risk Management Training for HIRS 94
95 Process for monitoring compliance to the Policy for Management of ward based adult patients with a tracheostomy or laryngectomy Audit compliance to this policy by ensuring that every patient who is a neck breather cared for in a general ward environment has received care in accordance with the principles set out in this policy and the guidelines on care of patients with a tracheostomy/laryngectomy on a general ward. (Guidelines appendix) Any non compliance to this policy will be reported to the appropriate line managers and through the Hospital Incident Reporting System. Results of the audits will be disseminated to appropriate Senior Nurses, Matrons, and Ward Managers, Governance managers, Clinical Directors and appropriate committees such as the Patient Safety First Committee. Any deviances from this policy will be reported to the appropriate line managers and through the Hospital Incident Reporting System. Further education and training will be given if any problems with care are highlighted during audit Standards/key performance indicators and process for monitoring compliance The following Standards/key performance indicators will be used for monitoring compliance to this policy during audit The Critical Care Outreach Team have been informed of any patient nursed on a general ward within the Trust with a tracheostomy or laryngectomy A Tracheostomy/laryngectomy Discharge Plan has been completed for patients discharged from a Critical Care or Specialist Area. The patient is cared for in a designated area. The designated area has been given 24 hours notice before the patient has been admitted from a Critical Care or Specialist Area Any patient with a tracheostomy tube will have an uncuffed double cannulae tube sited Time of discharge from a Critical Care or Specialist Area is between and A tracheostomy/laryngectomy care plan is in use and completed correctly An emergency airway box is at the patients bedside Emergency Algorithms are displayed above the patients bed where appropriate Suction equipment is connected correctly and working An oxygen supply is available at the bedside Other emergency equipment is available on the ward The patient is nursed in a bed which is easily observable to nursing staff If administering oxygen via a stoma it is humidified A referral is made to physiotherapy for a daily and weekend visit An adequate supply of all necessary equipment is available on the receiving ward 95
96 Dissemination, Implementation and Access to this Document All staff working on a receiving ward will receive documented training and education on the care of the patient with a tracheostomy or laryngectomy on a regular basis. This will be facilitated and delivered by the Practice based educators and members of the Outreach Team. The Trust guidelines on caring for a patient on a general ward with a tracheostomy or laryngectomy will be used as the basis of this education (Guidelines appendix ) A record of training and education will be kept by the Practice Educators on the receiving wards. 96
97 RISK ASSESSMENT The following risk factors must be taken into consideration when determining an appropriate clinical environment for a patient with a tracheostomy. Any of these factors place the patient at a greater risk of airway obstruction requiring more frequent observation by trained and competent staff and greater visibility at all times. These should form the principles for the risk assessment for the patient that should be determined by the lead clinician. Tracheostomy tube change where a tracheostomy has been formed in the last 7 days can be a particularly difficult procedure especially in patients with percutaneously performed tracheostomies Patient discharged from critical care within last 48 hours Patients requiring a single lumen tracheostomy tube for clinical reasons Patient known to have a complex airway and/or difficult endotracheal intubation or tube insertion Patients unable to call for help (including unable to use call system) Patients at risk of self decannulation 1. Delirious 2. Agitated Patients with an obstructed upper airway (dependent on their tracheostomy for breathing) or dependent on ventilation support. 97
98 Care plans The tracheostomy care pathway will vary from Trust to Trust. We have again viewed many excellent local examples and provided a summary that you may wish to consider for reference if updating your own pathways. Any care pathway should be used in conjunction with the bedhead sign, detailing essential details about the tracheostomy, including any major incidents, such as decannulation, tube obstruction etc. The pathway should include the following: Record of tracheostomy tube insertion and changes (and how easy/hard these were) Tracheostomy equipment checklist Tracheostomy weaning plan Daily care record From reviewing several coronial inquests and serious untoward incident investigations, it is useful to look at this documentation from the point of view of an external agency trying to establish facts like, when was the tracheostomy suctioned or was the inner tube changed today. Your documentation should make this easy to record and establish. Daily care record should therefore include the following: Type of tube inserted Cuff up/down? Speaking valves? Inner tube cleaning Suction peformed Humidification Oxygen Stoma care / dressing Securing the tube Nutrition / hydration It should also be easy to locate tracheostomy specific documentation and instructions relating to SALT / swallowing assessment / instruction Plans for cuff deflation / down-sizing / decannulation Physiotherapy plans Risk assessments (which may alter during the course of the inpatient stay) 98
99 Draft Care Plan from ICS
100 Competencies for staff caring for patients with tracheostomies or laryngectomies Knowledge First Responder TRACHEOSTOMY INSERTION Indications and contraindications for tracheostomy Techniques of insertion (percutaneous and different types of surgical trachy) Types of trachy tubes Complications of trachy insertion LONG TERM MANAGEMENT Oxygen delivery masks and devices Humidification Inner cannulae Suctioning Swallowing and feeding Speaking valves Tube change Decannulation EMERGENCIES Emergency algorithm Assess patency of a tube Decide whether to remove a blocked/displaced tube Emergency oxygenation via mouth and stoma Describe the differences in approaching the patient with a laryngectomy Airway Experts Anatomy of larynx Indications and contraindications for tracheostomy Techniques of insertion (percutaneous and different types of surgical trachy) Types of trachy tubes Complications of trachy insertion Monitoring o During the tracheostomy procedure o During routine use Bronchoscopy Sedation for the procedure Oxygen delivery masks and devices Humidification Inner cannulae Suctioning Swallowing and feeding Speaking valves Tube change Decannulation Emergency algorithm Assess patency of a tube Decide whether to remove a blocked/displaced tube Emergency oxygenation via mouth and stoma Describe the differences in approaching the patient with a laryngectomy Knowledge of Advanced algorithm 100
101 Skills Demonstrate assessment and management of emergency on a manikin. Ability to assist in safely change the tube of an established tracheostomy Demonstrate assessment and management of emergency on a manikin. Demonstrate advanced algorithm on a manikin Ability to safely change the tube of an established tracheostomy For medical staff Ability to assist in performing a percutaneous tracheostomy Managing the airway (for anaesthetic / ICM trainees) Managing sedation (for anaesthetic / ICM trainees) Assisting the operator Obtains consent appropriately Attitudes Communicates well with other team members Recognises limitations and calls for help appropriately Senior medical assistance Physiotherapy Speech therapy Surgical assistance Consideration of comfort & dignity For medical staff Obtains consent appropriately Emergency surgical airway Tracheostomy Set up of equipment including tracheostomy and bronchoscopy Ability in airway management and bronchoscopy during procedure Ability in use of USS of neck pre procedure Ability to safely perform percutaneous or surgical tracheostomy Identifies landmarks and positions patient Use of local anaesthetic / vasoconstricer Aseptic technique Selection of appropriate tube Performs procedure safely Confirms correct placement Ability in management of anaesthesia during procedure (for anaes / ICU) Cleaning of equipment Recognition and management of emergencies Communicates well with other team members Recognises limitations and calls for help appropriately Senior medical assistance Physiotherapy Speech therapy Surgical assistance ENT/Max Fax Consideration of comfort & dignity 101
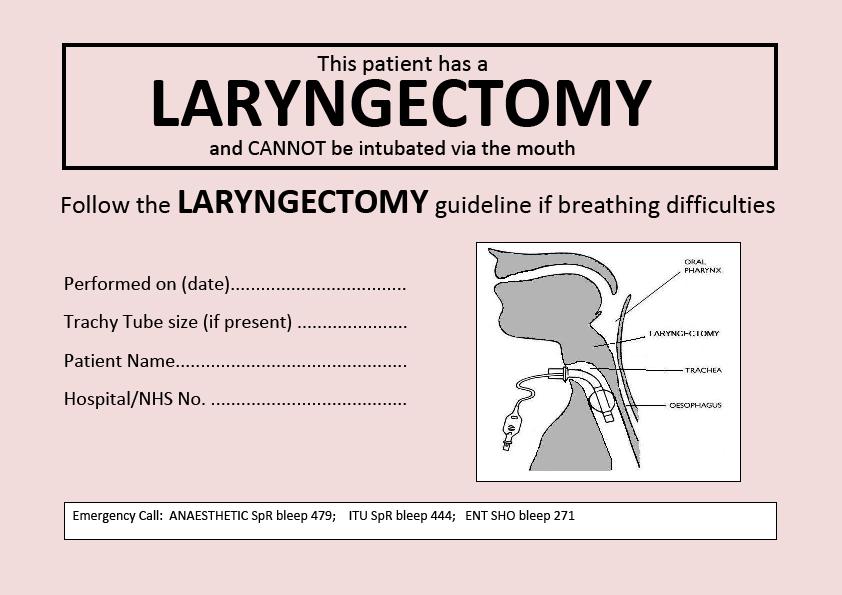
102 102
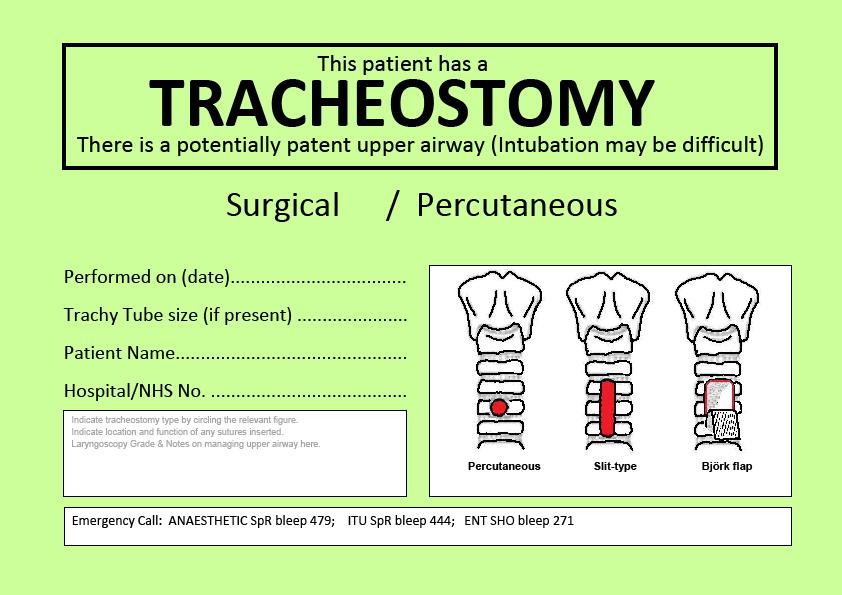
103 103
Tracheostomy and laryngectomy airway emergencies: an overview for medical and nursing staff
 2013 Medical Journal Tracheostomy and laryngectomy airway emergencies: an overview for medical and nursing staff Steven Lobaz 1 and Paul Bush 2 1 ST6 and 2 Consultant Department of Anaesthesia and Intensive
*gurgle* *snore* *slaver* Tracheostomy Emergencies with Trachy Tracey Helen Lyall ACCP LUHT 03/06/2016
 *gurgle* *snore* *slaver* Tracheostomy Emergencies with Trachy Tracey Helen Lyall ACCP LUHT 03/06/2016 Learning objectives Describe the difference in anatomy between a tracheotomy and a laryngectomy Understand
Competency 1: General principles and equipment required to safely manage a patient with a tracheostomy tube.
 Competency 1: General principles and equipment required to safely manage a patient with a tracheostomy tube. Trainee Name: ------------------------------------------------------------- Title: ---------------------------------------------------------------
Tracheostomy. Information for patients and relatives
 Tracheostomy Information for patients and relatives page 2 What is a tracheostomy? A tracheostomy is a small hole (stoma) made at the front of the neck, which goes into the trachea (windpipe). A tube called
Foundations of Critical Care Nursing Course. Tracheostomy Workbook
 Foundations of Critical Care Nursing Course Tracheostomy Workbook 1 Key Reference: Dawson D (2014) Essential principles:trachepstomy care in the adult patient, Nursing in Critical Care, Vol 19, 2 p.63-72.
Emergency)tracheostomy)management)/)Patent)upper)airway)
tracheostomy)management)/)Patent)upper)airway)") Emergency)tracheostomy)management)/)Patent)upper)airway) Call,for,airway,expert,help,,Look,,listen,&,feel,at,the,mouth,and,tracheostomy) A)Mapleson)C)system)(e.g.) Waters)circuit ))may)help)assessment)if)available)
Emergency)tracheostomy)management)/)Patent)upper)airway) Call,for,airway,expert,help,,Look,,listen,&,feel,at,the,mouth,and,tracheostomy) A)Mapleson)C)system)(e.g.) Waters)circuit ))may)help)assessment)if)available)
CARING FOR THE TRACHEOSTOMISED PATIENT: WHAT TO LOOK OUT FOR
 CARING FOR THE TRACHEOSTOMISED PATIENT: WHAT TO LOOK OUT FOR DR MOHD NAZRI ALI Anaesthesiologist & Intensivist HRPZ II, Kota Bharu, Kelantan Tracheostomy The Enabling Disability Tracheostomy Are becoming
TRACHEOSTOMY CARE. Tracheostomy- Surgically created hole that extends from the neck skin into the windpipe or trachea.
 1 TRACHEOSTOMY CARE Definitions: Trachea-Windpipe Tracheostomy- Surgically created hole that extends from the neck skin into the windpipe or trachea. Outer Cannula- The outer part of a trach tube. Usually
Changing tracheostomy tubes
 Changing tracheostomy tubes Changing the tracheostomy tube should be a multidisciplinary decision. The first change should always be performed or supervised by a suitably trained member of the medical
Oral care & swallowing
 Oral care & swallowing Oral care is important as it has a role to play in preventing healthcare associated infections. Dental plaque and the oropharynx can become colonized by bacteria and a biofilm can
Disclosures. Learning Objectives. Coeditor/author. Associate Science Editor, American Heart Association
 Tracheotomy Challenges for airway specialists Elizabeth H. Sinz, MD Professor of Anesthesiology & Neurosurgery Associate Dean for Clinical Simulation Disclosures Coeditor/author Associate Science Editor,
Tracheostomy management Kate Regan MRCP FRCA Katharine Hunt FRCA
 Kate Regan MRCP FRCA Katharine Hunt FRCA The use of tracheostomy has increased over recent years. Traditionally, it was confined to the emergency management of upper airway obstruction; more recently,
TRACHEOSTOMY. Tracheostomy means creation an artificial opening in the trachea with tracheostomy tube insertion
 TRACHEOSTOMY Definition Tracheostomy means creation an artificial opening in the trachea with tracheostomy tube insertion Indications for tracheostomy 1-upper airway obstruction with stridor, air hunger,
Tracheostomy discharge information. Information for community nurses, patients and carers
 Tracheostomy discharge information Information for community nurses, patients and carers What is a tracheostomy? A tracheostomy is a surgical incision (cut) through the neck tissues into the trachea leaving
Other methods for maintaining the airway (not definitive airway as still unprotected):
:") Page 56 Where anaesthetic skills and drugs are available, endotracheal intubation is the preferred method of securing a definitive airway. This technique comprises: rapid sequence induction of anaesthesia
Page 56 Where anaesthetic skills and drugs are available, endotracheal intubation is the preferred method of securing a definitive airway. This technique comprises: rapid sequence induction of anaesthesia
Tracheostomy. Hope Building Neurosurgery
 Tracheostomy Hope Building Neurosurgery 0161 206 5055 All Rights Reserved 2017. Document for issue as handout. Unique Identifier: CS36(17). Review date: November 2019 What is a tracheostomy? A tracheostomy
Clearing the air.. How to assist and rescue neck breathing patients. Presented by: Don Hall MCD, CCC/SLP Sarah Markel RRT, MHA
 Clearing the air.. How to assist and rescue neck breathing patients Presented by: Don Hall MCD, CCC/SLP Sarah Markel RRT, MHA Learning Objectives Define common terms identified with total (laryngectomy)
Rota-Trach Double Lumen Tracheostomy Tube VITALTEC
 Rota-Trach Double Lumen Tracheostomy Tube VITALTEC Contents INTRODUCTION HISTORY REVIEW ANATOMY & PHYSIOLOGY OPERATIVE PROCEDURE THE RANGE OF TRACHEOSTOMY TUBES ROTA-TRACH TRACHEOSTOMY TUBE INTRODUCTION
Head and neck cancer - patient information guide
 Head and neck cancer - patient information guide The development of reconstructive surgical techniques in the last 20 years has led to major advances in the treatment of patients with head and neck cancer.
Section 4.1 Paediatric Tracheostomy Introduction
 Bite- sized training from the GTC Section 4.1 Paediatric Tracheostomy Introduction This is one of a series of bite- sized chunks of educational material developed by the Global Tracheostomy Collaborative.
Tracheostomy. Intensive Care Unit Patient Information Leaflet
 Tracheostomy Intensive Care Unit Patient Information Leaflet Introduction This leaflet is for patients having a tracheostomy and their relatives. It gives information on the procedure, and its benefits
Tracheostomy and Ventilator Education Program Module 2: Respiratory Anatomy
 Tracheostomy and Ventilator Education Program Module 2: Respiratory Anatomy Disclaimer This material is intended for use by trained family members and caregivers of children with tracheostomies who are
Adult Patients Going Home with a Tracheostomy
 Physiotherapy Department Adult Patients Going Home with a Tracheostomy Darent Valley Hospital Darenth Wood Road Dartford Kent DA2 8DA www.dvh.nhs.uk In case of emergencies you will need to dial 999 If
Policy x.xxx. Issued: Artificial Airways and Airway Care. ABC Home Medical Company Policy & Procedure Manual. A. Tracheostomy Tubes ( trach tubes)
") A. Tracheostomy Tubes ( trach tubes) A tracheotomy is a surgical procedure whereby an opening is cut into the trachea of the patient for the purpose of inserting a tube (trach tube). The trach tube allows
A. Tracheostomy Tubes ( trach tubes) A tracheotomy is a surgical procedure whereby an opening is cut into the trachea of the patient for the purpose of inserting a tube (trach tube). The trach tube allows
All bedside percutaneously placed tracheostomies
 Page 1 of 5 Scope: All bedside percutaneously placed tracheostomies Population: All ICU personnel Outcomes: To standardize and outline the steps necessary to safely perform a percutaneous tracheostomy
COMMUNICATION. Communication and Swallowing post Tracheostomy. Role of SLT. Impact of Tracheostomy. Normal Speech. Facilitating Communication
 Communication and Swallowing post Tracheostomy. Role of SLT 1. 2. 3. Management of communication needs. Management of swallowing issues. Working with the multidisciplinary team to facilitate weaning. Impact
Review July Page 1 of 36. Title of Guideline. Contact Names and Job Title (authors) Directorate & Speciality
 Directorate & Speciality") Title of Guideline Contact Names and Job Title (authors) Directorate & Speciality Date of submission 06/07/2017 Date on which guideline must be reviewed Explicit definition of patient group to which it
Title of Guideline Contact Names and Job Title (authors) Directorate & Speciality Date of submission 06/07/2017 Date on which guideline must be reviewed Explicit definition of patient group to which it
Section 2.1 Daily checks Humidification
 Bite- sized training from the GTC Section 2.1 Daily checks Humidification This is one of a series of bite- sized chunks of educational material developed by the Global Tracheostomy Collaborative. The GTC
TRACHEOSTOMY EMERGENCIES
 TRACHEOSTOMY EMERGENCIES MODULE: AIRWAY TARGET: ALL ANAESTHETISTS, INTENSIVISTS, ED & ACUTE PHYSICIANS, FOUNDATION DOCTORS BACKGROUND: Around 16% of ICU patients may have a tracheostomy. Life- threatening
Your anaesthetic for heart surgery
 Your anaesthetic for heart surgery Information for patients and carers First Edition 2018 www.rcoa.ac.uk/patientinfo This leaflet gives you information about your anaesthetic for adult heart (cardiac)
Day-to-day management of Tracheostomies & Laryngectomies
 Humidification It is mandatory that a method of artificial humidification is utilised when a tracheostomy tube is in situ, for people requiring oxygen therapy dry oxygen should never be given to someone
Kapitex Healthcare. making things clearer for tracheostomy patients
 Kapitex Healthcare making things clearer for tracheostomy patients preface In publishing this booklet, Kapitex Healthcare Ltd hopes to provide information and understanding for both the patient and carer
Neonatal Airway Disorders, Treatments, and Outcomes. Steven Goudy, MD Pediatric Otolaryngology Emory University Medical Center
 Neonatal Airway Disorders, Treatments, and Outcomes Steven Goudy, MD Pediatric Otolaryngology Emory University Medical Center Disclosure I have nothing to disclose Neonatal and Pediatric Tracheostomy Tracheostomy
Airway and Ventilation. Emergency Medical Response
 Airway and Ventilation Lesson 14: Airway and Ventilation You Are the Emergency Medical Responder Your medical emergency response team has been called to the fitness center by building security on a report
The essential principles of tracheostomy care
 The essential principles of tracheostomy care Deborah Dawson Consultant Nurse Critical Care Excellence in specialist and community healthcare Key publications https://www.stgeorges.nhs.uk/gps-andclinicians/clinical-resources/tracheostomyguidelines/
Nasopharyngeal airways for craniofacial conditions
 Great Ormond Street Hospital for Children NHS Foundation Trust: Information for Families Nasopharyngeal airways for craniofacial conditions This information sheet from Great Ormond Street Hospital (GOSH)
Critical Care Services: Equipment and Procedures Information for Patients, Relatives and Carers
 Critical Care Services: Equipment and Procedures Information for Patients, Relatives and Carers The Critical Care unit can be a frightening place for patients and visitors. Seeing a loved one attached
Translaryngeal tracheostomy
 Translaryngeal tracheostomy Issued: August 2013 NICE interventional procedure guidance 462 guidance.nice.org.uk/ipg462 NICE has accredited the process used by the NICE Interventional Procedures Programme
AIRWAY MANAGEMENT AND VENTILATION
 AIRWAY MANAGEMENT AND VENTILATION D1 AIRWAY MANAGEMENT AND VENTILATION Basic airway management and ventilation The laryngeal mask airway and Combitube Advanced techniques of airway management D2 Basic
Waitin In The Wings. Esophageal/Tracheal Double Lumen Airway (Combitube ) Indications and Use for the Pre-Hospital Provider
 Indications and Use for the Pre-Hospital Provider") Waitin In The Wings Esophageal/Tracheal Double Lumen Airway (Combitube ) Indications and Use for the Pre-Hospital Provider 1 CombiTube Kit General Description The CombiTube is A double-lumen tube with
Waitin In The Wings Esophageal/Tracheal Double Lumen Airway (Combitube ) Indications and Use for the Pre-Hospital Provider 1 CombiTube Kit General Description The CombiTube is A double-lumen tube with
Having a PEG tube inserted
 Having a PEG tube inserted This information leaflet is for patients who are having a PEG (Percutaneous Endoscopic Gastrostomy) tube inserted. It explains what is involved, what to expect and what significant
Tracheostomy management
 BJA Education, 15 (3): 149 153 (2015) doi: 10.1093/bjaceaccp/mku008 Advance Access Publication Date: 25 April 2014 Matrix reference 1C02, 2A01, 3A01 Tracheostomy management Katharine Hunt MBBS FRCA 1,
TRACHEOSTOMY 186 INTENSIVE CARE
 186 INTENSIVE CARE Table 7.4 Indications for tracheostomy Upper-airway obstruction Prolonged mechanical ventilation To facilitate bronchopulmonary toilet To maintain and protect the airway use of oral
Inserting a percutaneous biliary drain and biliary stent (a tube to drain bile)
") Patient information - Radiology Unit Tel 0118 322 7991 Inserting a percutaneous biliary drain and biliary stent (a tube to drain bile) Introduction This leaflet tells you about the procedures known as
Patient information - Radiology Unit Tel 0118 322 7991 Inserting a percutaneous biliary drain and biliary stent (a tube to drain bile) Introduction This leaflet tells you about the procedures known as
Appendix (i) The ABCDE approach to the sick patient
 The ABCDE approach to the sick patient") Appendix (i) The ABCDE approach to the sick patient This appendix and the one following provide guidance on the initial approach and management of common medical emergencies which may arise in general
Appendix (i) The ABCDE approach to the sick patient This appendix and the one following provide guidance on the initial approach and management of common medical emergencies which may arise in general
Airway complications on the general medical unit after prolonged ICU admission
 Airway complications on the general medical unit after prolonged ICU admission Palash Kar Discipline of Acute Care Medicine, University of Adelaide Intensive Care Unit, Royal Adelaide Hospital, Adelaide,
Tracheostomy Sim Course
 Patients Name: Robert Smith Patients Age / DOB: 45 year old gentleman on medical ward Major Medical Problem Displaced tracheostomy tube Learning Goal Medical Early recognition of displaced tracheostomy
Tracheostomy Guidelines for NHS Wales
 Tracheostomy Guidelines for NHS Wales Prepared by the All Wales Tracheostomy Advisory Group, chaired by Duncan Ingrams, Assistant Medical Director ABUHB. 1 Introduction April 2018 Formulating one set of
Insertion of a totally implantable vascular access device (TIVAD)
") Insertion of a totally implantable vascular access device (TIVAD) What is a TIVAD? A TIVAD is a long hollow tube that is inserted into one of the large veins in your body. One end of the tube sits in a
Insertion of a totally implantable vascular access device (TIVAD) What is a TIVAD? A TIVAD is a long hollow tube that is inserted into one of the large veins in your body. One end of the tube sits in a
Policies and Procedures. I.D. Number: 1154
 Policies and Procedures Title: TRACHEOSTOMY TUBE CHANGE - PEDIATRIC I.D. Number: 1154 Authorization: [X ] SHR Nursing Practice Committee Source: Nursing Date Effective: October 2008 Date Revised: March
Safer Tracheostomy Care Course
 Patients Name: Samira Patel Patients Age / DOB: 65 year old female on a general ward Major Medical Problem Blocked tracheostomy tube Learning Goal Medical Early recognition of respiratory distress Understanding
LESSON ASSIGNMENT. After completing this lesson, you should be able to:
 LESSON ASSIGNMENT LESSON 3 Cricothyroidotomy LESSON ASSIGNMENT Paragraphs 3-1 through 3-7. LESSON OBJECTIVES After completing this lesson, you should be able to: 3-1. Define cricothyroidotomy. 3-2. Identify
TRUSTED SOLUTIONS FOR SIMPLIFIED PATIENT CARE. Shiley Tracheostomy Product Guide GettyImages
 TRUSTED SOLUTIONS FOR SIMPLIFIED PATIENT CARE. Shiley Tracheostomy Product Guide GettyImages 503532118 TABLE OF CONTENTS Shiley Flexible Adult Tracheostomy Tubes 3 Shiley Extended-Length Tracheostomy Tubes
Clinical Guidelines for Tracheostomy Care. On behalf of the Tracheostomy Care Group, South Tees Hospitals NHS FT. June 2017 Tracheostomy Care Group 1
 June 2017 On behalf of the Tracheostomy Care Group, South Tees Hospitals NHS FT June 2017 Tracheostomy Care Group 1 TABLE OF CONTENTS 1. INTRODUCTION... 4 Key Issues... 5 Tracheostomy Care Group at South
PEMSS PROTOCOLS INVASIVE PROCEDURES
 PEMSS PROTOCOLS INVASIVE PROCEDURES Panhandle Emergency Medical Services System SURGICAL AND NEEDLE CRICOTHYROTOMY Inability to intubate is the primary indication for creating an artificial airway. Care
Welcome to the Specialized Medical Services respiratory training webinar series!
 Welcome to the Specialized Medical Services respiratory training webinar series! SMS is your LTC facility single source for oxygen, medical equipment, respiratory care services and supplies nationwide.
AIRWAY MANAGEMENT SOLUTIONS
 KAPITEX HEALTHCARE - SPECIALIST KNOWLEDGE, SUPPORT AND CARE AIRWAY MANAGEMENT SOLUTIONS Specialist tracheostomy management solutions you can trust Kapitex - Adding Quality of Life to Airway Management
Imaging Department Investigative procedure information leaflet Percutaneous biopsy of Lung (CT guided)
") Imaging Department Investigative procedure information leaflet Name of procedure: Percutaneous biopsy of Lung (CT guided) It has been recommended you have a biopsy of your lung using CT (computerised tomography,
Imaging Department Investigative procedure information leaflet Name of procedure: Percutaneous biopsy of Lung (CT guided) It has been recommended you have a biopsy of your lung using CT (computerised tomography,
Full Range of Tracheostomy Solutions
 Full Range of Tracheostomy Solutions Every Breath Counts Choices by Setting Throughout the hospital or home Smiths Medical tracheostomy tubes are designed for performance ER The Portex Cricothyroidotomy
Collaborative Regional Benchmarking Group (North of England, North Yorkshire & Humber and West Yorkshire)
") Collaborative Regional Benchmarking Group (North of England, North Yorkshire & Humber and West Yorkshire) Best Practice Guidance Endo Tracheal Tube Care These recommendations are based on the current evidence
Collaborative Regional Benchmarking Group (North of England, North Yorkshire & Humber and West Yorkshire) Best Practice Guidance Endo Tracheal Tube Care These recommendations are based on the current evidence
MASTOID EXPLORATION (MASTOID SURGERY) AND MASTOIDECTOMY
 AND MASTOIDECTOMY") MASTOID EXPLORATION (MASTOID SURGERY) AND MASTOIDECTOMY This information leaflet is to support your decision with your Specialist. This leaflet will explain about the ear are and what surgery can be offered
MASTOID EXPLORATION (MASTOID SURGERY) AND MASTOIDECTOMY This information leaflet is to support your decision with your Specialist. This leaflet will explain about the ear are and what surgery can be offered
Cough Assist. Information for patients, families and carers Therapy Services
 Cough Assist Information for patients, families and carers Therapy Services PROUD TO MAKE A DIFFERENCE SHEFFIELD TEACHING HOSPITALS NHS FOUNDATION TRUST page 2 of 16 Table of contents Why do I need a Cough
Airway Management. DFMRT Casualty Care Examination Course. Revision notes for. January Les Gordon
 Airway Management Revision notes for DFMRT Casualty Care Examination Course January 2013 Les Gordon Indicating special information in Revision Notes presentations New information since Casualty Care in
Having a radiologically inserted gastrostomy. An information guide
 TO PROVIDE THE VERY BEST CARE FOR EACH PATIENT ON EVERY OCCASION Having a radiologically inserted gastrostomy An information guide Having a radiologically inserted gastrostomy Introduction This leaflet
Introduction to Emergency Medical Care 1
 Introduction to Emergency Medical Care 1 OBJECTIVES 8.1 Define key terms introduced in this chapter. Slides 12 15, 21, 24, 31-34, 39, 40, 54 8.2 Describe the anatomy and physiology of the upper and lower
Tracheostomy: Procedures, Timing and Tubes
 TRACHEOSTOMY: PROCEDURES, TIMING AND TUBES Gail M. Sudderth RRT Clinical Specialist Passy-Muir Inc. gsudderth@passy-muir.com (949) 833-8255 Objectives Explain how the timing of the tracheotomy and tube
(ix) Difficult & Failed Intubation Queen Charlotte s Hospital
 Difficult & Failed Intubation Queen Charlotte s Hospital") (ix) Difficult & Failed Intubation Queen Charlotte s Hospital Pre-operative Assessment Clinical assessment of airway and risk of difficult intubation: (can be performed in a matter of seconds): 1. Mouth
(ix) Difficult & Failed Intubation Queen Charlotte s Hospital Pre-operative Assessment Clinical assessment of airway and risk of difficult intubation: (can be performed in a matter of seconds): 1. Mouth
You will receive a copy of all communications sent to your GP. Please let us know if you would prefer not to receive this.
 This leaflet provides information about having a tonsillectomy. We hope it answers some of the questions that you or those who care for you may have. This leaflet is not meant to replace the discussion
8/8/2013. Disclaimer. Tracheostomy Care in the Home. Polling Question 1. Upper Airway and Respiratory System
 Disclaimer Appendix 3 Declaration of Vested Interest Form Name of presenter: Heather Murgatroyd RRT RPSGT Name of employer: DeVilbiss Healthcare Tracheostomy Care in the Home Heather Murgatroyd, RRT, RPSGT
Anatomy and Physiology. The airways can be divided in to parts namely: The upper airway. The lower airway.
 Airway management Anatomy and Physiology The airways can be divided in to parts namely: The upper airway. The lower airway. Non-instrumental airway management Head Tilt and Chin Lift Jaw Thrust Advanced
Cryotherapy for localised prostate cancer
 Cryotherapy for localised prostate cancer Introduction This leaflet is written for patients and their family. It provides information on prostate cryotherapy for prostate cancer which has not previously
Caring for Your TRACHEOSTOMY. Getting On with Your Life
 Caring for Your TRACHEOSTOMY Getting On with Your Life A New Pathway for Air Have you had a tracheostomy? Or, are you about to have one? If so, you may be wondering what the future holds for you. It s
Trans-catheter aortic valve implantation (TAVI) work up
 work up") Trans-catheter aortic valve implantation (TAVI) work up You have been referred for an assessment known as a TAVI work up because you have been diagnosed with aortic stenosis. This factsheet explains the
Trans-catheter aortic valve implantation (TAVI) work up You have been referred for an assessment known as a TAVI work up because you have been diagnosed with aortic stenosis. This factsheet explains the
E09 PEG. Expires end of March 2018 VITALITY.CO.UK
 VITALITY.CO.UK E09 PEG Expires end of March 2018 You can get more information and share your experiences at www.aboutmyhealth.org Tell us how useful you found this document at www.patientfeedback.org eidohealthcare.com
UMC HEALTH SYSTEM Lubbock, Texas :
 Consent for Commonly Performed Procedures in the Adult Critical Care Units I, the undersigned, understand that the adult intensive and intermediate care units ( critical care units ) are places where seriously
This interdisciplinary clinical support document provides guidelines for the safe establishment of an artificial airway.
 PURPOSE This interdisciplinary clinical support document provides guidelines for the safe establishment of an artificial airway. POLICY STATEMENTS Endotracheal intubation will be performed by the Most
Advanced Airway Management. University of Colorado Medical School Rural Track
 Advanced Airway Management University of Colorado Medical School Rural Track Advanced Airway Management Basic Airway Management Airway Suctioning Oxygen Delivery Methods Laryngeal Mask Airway ET Intubation
Geoffrey Axiak M.Sc. Nursing (Manch.), B.Sc. Nursing, P.G. Dip. Nutrition & Dietetics Clinical Nutrition Practice Nurse
, B.Sc. Nursing, P.G. Dip. Nutrition & Dietetics Clinical Nutrition Practice Nurse") The Percutaneous Endoscopic Gastrostomy Geoffrey Axiak M.Sc. Nursing (Manch.), B.Sc. Nursing, P.G. Dip. Nutrition & Dietetics Clinical Nutrition Practice Nurse What is a P.E.G.? Percutaneous Endoscopic
The Percutaneous Endoscopic Gastrostomy Geoffrey Axiak M.Sc. Nursing (Manch.), B.Sc. Nursing, P.G. Dip. Nutrition & Dietetics Clinical Nutrition Practice Nurse What is a P.E.G.? Percutaneous Endoscopic
Major complications of airway management in the United Kingdom
 The Royal College of Anaesthetists The Difficult Airway Society 4th National Audit Project of The Royal College of Anaesthetists and The Difficult Airway Society Major complications of airway management
PRODUCTS FOR THE DIFFICULT AIRWAY. Courtesy of Cook Critical Care
 PRODUCTS FOR THE DIFFICULT AIRWAY Courtesy of Cook Critical Care EMERGENCY CRICOTHYROTOMY Thyroid Cartilage Access Site Cricoid Cartilage Identify the cricothyroid membrane between the cricoid and thyroid
Information for Patients
 Having a Percutaneous Drainage Information for Patients In this leaflet: Introduction 2 What is a percutaneous drainage?..... 2 Why do I need a percutaneous drainage?.....2 Are there any risks?....2 What
BRAIN DEATH. Frequently Asked Questions 04for the General Public
 BRAIN DEATH Frequently Asked Questions 04for the General Public Neurocritical Care Society BRAIN DEATH FAQ s FOR THE GENERAL PUBLIC NEUROCRITICAL CARE SOCIETY 1. Q: Why was this FAQ created? A: Several
ARTERIAL BYPASS GRAFTS IN THE LEG
 The Christchurch Department of Vascular Surgery is actively involved in research projects aimed at improving treatment for patients with arterial disease. Marilyn Ollett Department of Surgery Christchurch
National Hospital for Neurology and Neurosurgery
 National Hospital for Neurology and Neurosurgery Venous sinus stents (for the treatment of venous sinus stenosis and idiopathic intracranial hypertension) Lysholm Department of Neuroradiology If you would
This information will help you care for your tracheostomy while you re in the hospital and at home.
 PATIENT & CAREGIVER EDUCATION Caring for Your Tracheostomy This information will help you care for your tracheostomy while you re in the hospital and at home. Your Trachea Your trachea (windpipe) is part
Patient information leaflet. Royal Surrey County Hospital. NHS Foundation Trust. Nephrostomy. Radiology
 Patient information leaflet Royal Surrey County Hospital NHS Foundation Trust Nephrostomy Radiology This leaflet informs you about the procedure known as a nephrostomy. It explains what is involved and
Specialist Referral Service Willows Information Sheets. Cataract surgery
 Specialist Referral Service Willows Information Sheets Cataract surgery An operating microscope in use A total cataract - the normally black pupil is bluish white Cataract surgery These notes do not cover
This information was created and reviewed through a partnership with the UAMS Patient and Family Advisory Councils.
 Tracheostomy Care You have a: Cuffed Tracheostomy Cuffless Tracheostomy What is a tracheostomy? A tracheostomy (sometimes called a trach rhymes with cake ) is a small opening, or stoma, in your throat.
student handbook BARS handbook September 2012.indd Front Cover 27/11/12 12:08 PM
 student handbook BARS handbook September 2012.indd Front Cover 27/11/12 12:08 PM All materials regarding the Basic Airway Resuscitation Strategy Course were written and developed by Dr. Richard Morris
Bronchoscopy. Information for patients at King s College Hospital only. Confirming your identity
 Bronchoscopy Information for patients at King s College Hospital only Confirming your identity Before you have a treatment or procedure, our staff will ask you your name and date of birth and check your
Tracheostomy/ Laryngectomy PRODUCT CATALOG
 1 Tracheostomy/ Laryngectomy PRODUCT CATALOG 2 3 is a highly experienced manufacturer of medical devices for tracheostomized and laryngectomized patients. For many years we have been supplying our customers
All about your anaesthetic
 Patient information leaflet All about your anaesthetic Regional anaesthesia 4 and associated risks For patients having a surgical procedure at a Care UK independent diagnostic and treatment entre This
Having a therapeutic gastroscopy with oesophageal dilatation
 Please telephone the Endoscopy Unit with regards information contained within this leaflet. A member of the nursing team will be glad to advise you. For all general enquiries please use the following contact
Scottish Parliament Region: Lothian. Case : Lothian NHS Board. Summary of Investigation. Category Health: Hospital; cancer; diagnosis
 Scottish Parliament Region: Lothian Case 201202271: Lothian NHS Board Summary of Investigation Category Health: Hospital; cancer; diagnosis Overview The complainant (Mr C) attended the Ear, Nose and Throat
Sentinel lymph node biopsy for early oral cancer
 Sentinel lymph node biopsy for early oral cancer Information for patients from the Oral and Maxillofacial Department When cancer cells start to spread from the main cancer this represents an important
Airway/Breathing. Chapter 5
 Airway/Breathing Chapter 5 Airway/Breathing Introduction Skillful, rapid assessment and management of airway and ventilation are critical to preventing morbidity and mortality. Airway compromise can occur
Procedures/Risks:central venous catheter
 Procedures/Risks:central venous catheter Central Venous Catheter Placement Procedure: Placement of the central venous catheter will take place in the Interventional Radiology Department (IRD) at The Ohio
Nephrostomy. Radiology Department. Patient information leaflet
 Nephrostomy Radiology Department Patient information leaflet This leaflet informs you about the procedure known as a nephrostomy. It explains what is involved and the possible risks. The benefits and risks
Femoral endarterectomy
 Femoral endarterectomy The femoral arteries run from the groin to the thigh delivering blood to your legs. When there is a narrowing or blockage in these arteries, the blood supply to the legs is reduced,
Unconscious exchange of air between lungs and the external environment Breathing
 Respiration Unconscious exchange of air between lungs and the external environment Breathing Two types External Exchange of carbon dioxide and oxygen between the environment and the organism Internal Exchange