Checklist for Going Home with a Tracheostomy Tube... page 4. Parts of a Tracheostomy Set... page 5. Tracheostomy Skin Care (Stoma Care)...
|
|
|
- Miranda Pauline Norton
- 6 years ago
- Views:
Transcription
1 Tracheostomy Care
2 This booklet was developed by UPMC/Jefferson Regional Home Health, L.P. in collaboration with the respiratory care nurses and therapists across the. Table of contents Introduction... page 2 Checklist for Going Home with a Tracheostomy Tube... page 4 Parts of a Tracheostomy Set... page 5 Humidification... page 6 Tracheostomy Skin Care (Stoma Care)... page 7 Suctioning... page 9 Caring for the Inner Cannula... page 12 Tracheostomy Ties... page 13 Tracheostomy Cuff Care... page 14 Changing the Outer Cannula (Tracheostomy Tube)... page 16 Fenestrated Tracheostomy Tubes... page 17 Using a Speaking Valve... page 20 Resuscitation Bag... page 21 Emergency Tips... page 23 When to Call the Doctor... page 24 Tips for Everyday Living... page 25 continued
3 Learning to care for a tracheostomy requires the support and individual attention of your care team doctor, respiratory therapist, nurse, and possibly speech therapist and dietitian. This booklet was developed to supplement this instruction. Each of these procedures should be performed only with the help of a member of your health care team until you are able to do it on your own. Introduction What is a tracheostomy? A tracheostomy is an artificial opening in the neck into the windpipe (trachea). This opening is called a stoma. It allows air to go in and out of the lungs. It also allows any mucus to be removed. A small tube (the tracheostomy tube) is inserted through this opening. Breathing occurs through this tube. The tracheostomy tube is inserted into the windpipe (trachea). Breathing occurs through this opening. When you breathe through the nose and mouth, the air is filtered, warmed, and moistened (humidified) before it gets to the lungs. When you breathe through a tracheostomy tube, air enters directly into the windpipe and the usual warming, humidifying, and filtering do not occur. This booklet will teach you ways to safely care for yourself with a tracheostomy tube. Learning and practicing It is important to learn how your tracheostomy works and the best way to care for it. Caring for your tracheostomy tube should begin as soon as possible. Your training will begin before you go home. This training may happen in the hospital, rehabilitation hospital, or skilled nursing facility. The upper airway warms, filters, and humidifies the air we breathe. 2 continued
4 It is important to have the support of family members or a friend. At least 1 person should learn how to help you. Have this person join you when you get instructions in the hospital. Ask questions about caring for your tracheostomy tube. Caring for your tracheostomy at home may be a little different from the care you get in the hospital. What you do at home depends on your home setting, equipment, and condition. One of the main differences at home compared to the hospital is the use of clean technique versus sterile technique. Sterile technique In the hospital, sterile or aseptic (ay-sep-tik) technique is used. This means that all equipment used is packaged or cleaned in a way that is free of all germs. Sterile gloves are used when handling anything that will go into the tracheostomy or anything used to clean around it. When you are learning in the hospital, you will use sterile technique. At least 1 of your gloved hands will stay sterile. Clean technique At home, most people can use a clean technique. The home care nurse, along with your doctor, will help decide if this is possible. Clean technique still requires special precautions and care of equipment. The procedures in this booklet describe clean technique. Your doctor will tell you whether any changes in these instructions are necessary based on your situation. Wash your hands. 3 continued
5 Recommended checklist for going home with a tracheostomy tube Brand: Size: Disposable inner cannula OR Non-disposable inner cannula Cuffed OR Cuffless Fenestrated OR Non-Fenestrated Home equipment supplier Phone number Extra tracheostomy tube of the same size Smaller size tracheostomy tube if doctor determines it is needed Guide (obturator) and any parts that go with the tracheostomy tube currently in place Suction catheters: Size Suction machine with extension tubing arranged Normal saline or sterile water Tracheostomy care kits (including brush and pipe cleaners) Oxygen, if ordered Tracheostomy ties twill tape or Velcro tracheostomy tube holders Syringe for cuff care Cotton-tip applicators Gloves clean, disposable, and powderless Hydrogen peroxide 4 inch x 4 inch gauze dressings (NO cotton fillers), if needed Disposable inner cannulas (if you have a disposable inner cannula tracheostomy tube) Manual resuscitation bag, if ordered Humidifier Saline bullets for instillation, if ordered 4 continued

6 Parts of the tracheostomy set Your new airway is kept open by using a tracheostomy tube. You may have only 1 tube (an outer cannula) or you may have 2 tubes (an outer cannula and an inner cannula). Tubes are made of metal or synthetic materials. 1. Cuff - the balloon on the end of the tracheostomy tube. When inflated, it forms a seal against the wall of your windpipe. This stops the air flow through your mouth and nose so that you breathe through the tracheostomy tube. You are unable to speak when the cuff is inflated. 2. Inflation line - thin plastic tubing that carries air to and from the cuff 3. Cuff port - a small, plastic balloonlike component on the end of the inflation line. The cuff port shows if the cuff is inflated. It is also called a pilot balloon. 4. Luer valve - where the syringe is connected to inflate or deflate the cuff mm connector - part of the tracheostomy tube or inner cannula that sticks out at the neck. Ventilator tubing, a manual resuscitation bag, or a speaking valve may be connected to the 15mm connector. 6. Neck flange - usually contains product information and has holes on either side for securing neck ties. 7. Outer cannula (CAN-you-luh) - the tube that is inserted into your windpipe. It stays there all the time and may have another part (the inner cannula) that slides inside of it. 8. Inner cannula - the tube that fits inside your outer tracheostomy tube. It is removed for cleaning or replacement. 9. Obturator (OB-ter-ay-ter) - a guide used to insert the tracheostomy tube. Inner cannula Cuff 15mm connector Outer cannula Cuff port Obturator Neck flange Inflation line Luer valve 5 continued

7 Humidification Your nose and mouth normally warm and moisten the air you breathe. Because you are now bypassing your nose and mouth by breathing through your tracheostomy, you must replace the moisture. Without moisture, your mucus may become thick and hard to cough out. This will make breathing difficult. You can increase the moisture in your airway: Drink plenty of fluids (8 to 10 cups a day) unless your doctor tells you to drink less. Use a humidifier in your main living area during the day and beside your bed during the night. Clean the humidifier each day according to the manufacturer s instructions to keep germs from growing. Your doctor may order a humidity machine that can be attached to a tracheostomy collar. A tracheostomy collar is a soft plastic mask that fits over and around the tracheostomy tube. It allows humidified oxygen or humidified air to be delivered. If you have this equipment, you need to learn how to take care of it from your home equipment supplier. Your doctor might recommend squirting sterile saline into your tracheostomy. If so, you may use saline bullets. These are made especially for patients who use respiratory equipment. This helps you cough and remove secretions. Squirt the saline slowly into the tracheostomy while you take a deep breath. Cough 1 to 2 times to clear your airway. Talk with your health care provider about using saline and how often you should use it. Humidifier 6 continued
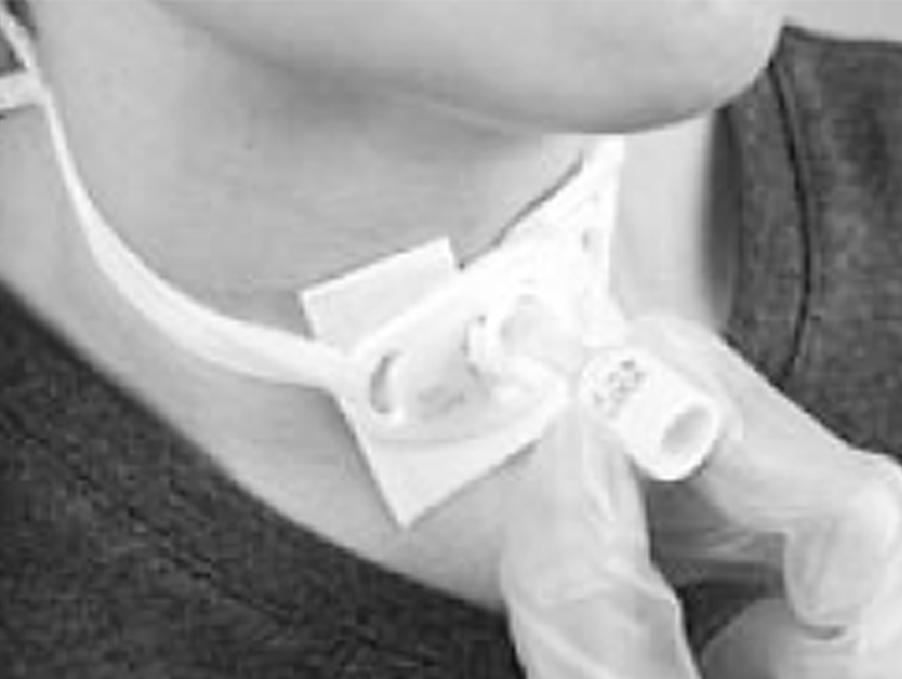
8 Tracheostomy skin care (stoma care) It is important to routinely clean the skin around the opening of the tracheostomy (stoma). This will help prevent skin irritation and the buildup of secretions. Follow your doctor s instructions. The list below applies to most patients. Equipment gloves (clean, disposable, and powderless) clean, cotton, lint-free, white wash cloth or towel mild soap and water hydrogen peroxide 4 x 4 gauze dressing without cotton filler cotton tip applicators normal saline or sterile water container to mix hydrogen peroxide and saline (or sterile water) clean tracheostomy ties Procedure 1. Wash your hands well. Gather the supplies. Put on gloves. 2. Dampen lint-free, white cotton wash cloth. 3. Gently clean around the neck plate and skin under the plate with mild soap and water. Be careful not to get any soap or water into the tracheostomy opening. Rinse well. Cleaning with cotton applicator. 4. Crusts may be removed by loosening with peroxide (dilute equal parts of peroxide and water) on a cotton-tip applicator. Hold cottontip applicator securely to keep it from going in to the stoma. Rinse well. 5. If mucus is a problem, you may use 4 x 4 gauze without cotton filler around the tracheostomy tube. 6. Adjust the tracheostomy ties or apply new ones. Refer to the section on tracheostomy ties (page 13) for directions. 7. Check your skin daily for redness or irritation. Tell your health care provider if you see redness. 7 continued


9 Most people who use trach dressings purchase pre-cut tracheostomy gauze dressings, but you can make your own with 4 x 4 gauze. DO NOT cut the gauze. The fraying can make lint or fuzz that could enter your tracheostomy. To make a folded 4 x 4 gauze dressing to be placed around the tracheostomy tube: 1. Open a sterile 4 x 4 gauze to its fullest length. 2. Fold the gauze in half lengthwise to form a long, thin rectangle. 3. Fold center of gauze. Fold each gauze side to center to create a V-shaped gauze. 4. Put gauze under the neck flange as shown in step 4. Step 1. Step 2. Step 3. Step 4. 8 continued

10 Suctioning Suctioning removes secretions or mucus from the tracheostomy tube and keeps the airway open. Use suction only when it is necessary. You may not need to suction yourself at home. You and your caretakers should know how to suction if you can t cough mucus out. When to suction when you feel a build up of secretions that you can t clear by coughing if you are having trouble getting your breath. If suctioning doesn t help you catch your breath, refer to page 23, Emergency Tips. suction catheters that are no greater than half the diameter of the tracheostomy tube clean, disposable, powderless gloves paper towels, facial tissues, or napkins (lint-free) a bowl, a glass, plastic cup, or unwaxed paper cup. Fill it with fresh, cool water. oxygen or resuscitation bag, if ordered suction canister bowl with water Equipment suction machine and tubing set up according to manufacturer s instructions connecting tube catheter gloves clean work area Suction machine 9 continued
11 How to suction 1. Wash your hands thoroughly. If you are going to wear gloves, put them on. 2. Attach the suction catheter to the connecting tubing of the suction machine. 3. Turn on the suction machine as instructed. 4. Dip the catheter tip into the suction rinse water and test suction by placing your thumb over the port of the catheter. Release. 5. Make sure your head and shoulders are slightly elevated. 6. Cough and wipe mucus from your tube and mouth using paper towels, facial tissues, or napkins. A damp paper towel is best because it produces the least lint. 7. Take 3 or 4 deep breaths, or increase the oxygen flow rate as your doctor explained. Hole (vent) is open when inserting 8. Insert the catheter with NO suction applied. The vent, or Y connector, will be open. Gently insert the catheter about 4 to 5 inches, or until resistance is met, or until you cough. Let the natural curve of the catheter follow the curve of the tube. Pull the suction catheter back a little before you apply suction. Thumb covers hole (vent) on suction catheter. 9. Apply suction by covering the hole (vent) with your thumb. At the same time, slowly take out the catheter by twisting it. DO NOT leave the suction catheter in for longer than you can hold your breath. This is no more than 10 seconds. 10. Take deep breaths and use oxygen if your doctor ordered it. 11. Rinse the catheter by suctioning water or normal saline from the bowl through it. 12. Repeat steps 8 to 11 if needed. 13. Return oxygen flow rate to the level it was before suctioning. 10 continued
12 Caring for suctioning equipment Follow your equipment supplier s directions. Suction catheters In some situations, a new catheter will be used each time you suction. When this is the case, the used suction catheter should be rinsed and placed in a plastic sealed bag (sandwich bag) and thrown away. In many situations, suction catheters can be re-used at home. Your health care provider will help you make this decision. If you are reusing the suction catheter, flush it out with water and moisturizer-free, clear dish detergent after each use. Rinse with plain water. Dry the outside of the catheter with a clean, lint-free cloth. Attach the catheter to the suction machine, turn the machine on, and apply suction to dry the inside of the suction catheter. Wrap the catheters in a clean, lint-free cloth and leave them beside the suction machine. Throw away catheters that are cracked or look unclear. Suction machine Clean the machine, container, bowl, and tubing every day. Empty and rinse the suction container with cool water. Wash the suction container with water containing clear, moisturizerfree dish detergent. Rinse with hot water and dry with a clean cloth. Additional cleaning may be necessary. Your equipment will have a filter which may require cleaning. The equipment supplier may suggest you use a vinegar mixture to clean the filter. Follow the manufacturer s instructions. 11 continued

13 Caring for the inner cannula If your tracheostomy tube has an inner cannula, it is important to remove and clean the inner cannula or tube often. The nurse can help you establish a schedule based on your own needs. If your tracheostomy has a disposable inner cannula, change it according to your health care provider s instructions. DO NOT clean and reuse a disposable inner cannula. Equipment for non-disposable cannula a small bowl filled with a mix of equal parts of hydrogen peroxide and water tracheostomy brush or pipe cleaners gloves (clean, disposable, powderless) How to clean the non-disposable inner cannula 1. Wash your hands. 2. Suction your tracheostomy if needed. 3. Unlock the inner cannula and remove it. 4. Place inner cannula into diluted peroxide mixture. 5. Using a brush, gently cleanse and remove mucus from the inner cannula. 6. Re-soak and clean as many times as needed to get the inner cannula visibly clean. 7. Rinse the tube well with cool, running water. Check the inner cannula to make sure it is clean. 8. Gently reinsert the inner cannula and lock in place. Equipment for new disposable inner cannula new disposable inner cannula How to change the disposable inner cannula 1. Wash your hands. 2. Suction your tracheostomy if needed. 3. Open the package of a new disposable inner cannula. 4. Unlock and remove the disposable inner cannula according to the manufacturer s directions. 5. Gently insert a new disposable inner cannula and lock in place according to the manufacturer s directions. 6. Place used inner cannula into a garbage bag and throw away in the trash. Place used disposable cannula in a bag and throw away. Use brush to clean inner cannula. 12 continued
14 Tracheostomy ties There are 2 different types of tracheostomy ties, twill ties and Velcro ties. The ties hold the tracheostomy tube in place and keep it from coming out. The tube could fall out or be coughed out if the ties weren t there. The ties need to be changed when they are soiled or more often if your health care provider tells you. If possible, have another person help you change the ties. Twill ties 1. Leave old ties in place. Pull one end of the twill tie through either neck flange hole. Adjust the ends of the tie until one is 3 to 4 inches longer than the other one. 2. Bring both ends of the tie around your neck, and insert the longer end of the tie through the other neck flange hole. 3. Pull the tie snug. Place one finger between the tie and the neck, and tie the two ends together using a square knot. Do not use a bow. 4. Cut the ends of the ties leaving only 1 or 2 inches. 5. Carefully cut and remove soiled ties. Velcro ties 1. Follow manufacturer s directions for measuring and applying the tie. 2. Use fingers to hold both sides of the neck plate of the tracheostomy tube in place. Release 1 side of the Velcro fastener. 3. Insert and secure the Velcro strip into the same neck plate hole. 4. With fingers still holding both sides of the neck plate, remove the old Velcro tie from the other side. 5. Insert and secure the clean Velcro strip into the neck plate, and remove the old Velcro tie from the other side. 6. Adjust the clean ties to fit your neck. You should be able to fit 1 to 2 fingers between the tie and the neck. 13 continued
15 Tracheostomy cuff care A cuffed tracheostomy tube has an inflatable cuff attached to it. When the cuff is inflated with air or water, it forms a seal between the windpipe (trachea) and the tracheostomy tube. There are different types of cuffs. Each requires a different type of care and maintenance. Air-filled cuff care To deflate: Suction the mouth to remove mucus that may have built up on top of the cuff. 1. Attach a syringe to the valve and remove the air. Cuffs can be air-filled, water-filled, or pre-filled (Fome cuff). The type of cuff I have is: r Air-filled Deflated cuff valve r Water-filled r Fome cuff Reasons for using a cuffed tube provides a seal if using a breathing machine (ventilator) may prevent choking (aspiration) from nose or mouth drainage may prevent choking (aspiration) of food from the stomach To inflate: 1. Attach an air-filled syringe to the valve. 2. Slowly inject air into the cuff until you cannot feel or hear air moving from the nose or mouth. 3. A cuff pressure-measuring device can be used if available. Follow the manufacturer s instructions. Supplies you will need syringe (size depends on your type of cuff, but usually 5 to 10 cc) cuff pressure measuring device, if available Inflated cuff valve 14 continued
16 Water-filled cuff care Some newer tracheostomy tubes have water-filled cuffs. Follow the directions provided by the manufacturer. The directions are basically the same as those for the air-filled cuff, except you will use sterile water to fill the cuff instead of air. Fome cuff A Fome cuff is normally inflated. The cuff must be deflated before removing an old tube or inserting a new tube. To deflate: 1. Suction the mouth to remove mucus that may have built up on top of the cuff. 2. Attach a syringe to the cuff port and remove air. Immediately cap the port. If the port is left open, the cuff will reinflate. Deflated cuff Fome cuff automatically inflates To inflate after insertion: 1. After the tube is inserted, uncap the port and keep it open. The cuff automatically inflates as air lets the foam expand. Important points to remember about cuffed tracheostomy tubes You will get specific instructions about the care of your cuffed tracheostomy tube from your health care provider. General points to remember about caring for your cuffed tracheostomy tube are: When the cuff is inflated, the only way to breathe is through the tracheostomy tube opening. The tube must be kept open and clean. The person with an inflated cuff cannot speak because no air passes over the vocal cords. If the tracheostomy tube cuff is overinflated, it can cause serious damage to the windpipe (trachea). For air- and water-filled cuffs, inject air and water into the cuff only until you cannot feel or hear air moving from the nose and mouth. Before the cuff is deflated, you may need to cough or to be suctioned because mucus may build up on the top of the cuff while it is inflated. Your health care provider may tell you to deflate your cuff from time to time. red cap is open 15 continued
17 Changing the outer cannula (tracheostomy tube) DO NOT remove the outer cannula unless your doctor tells you to do so. If you will be changing the outer cannula, your health care provider will help you with the following procedure. A tracheostomy tube should never be changed if the stoma is less than 1 week old. Equipment clean set of tracheostomy tubes and obturator (some patients will also get a smaller size tracheostomy tube set) tracheostomy ties water-soluble lubricant gloves syringe (if using a cuffed tube) Procedure to change outer cannula 1. Wash your hands thoroughly. 2. Remove the inner cannula from the clean set. 3. If tube is cuffed, check the cuff for a leak according to the manufacturer s directions. 4. Apply tracheostomy ties to the clean outer cannula. 5. Suction the tracheostomy if needed. 6. Insert an obturator guide into the clean outer cannula. 7. Lubricate the clean outer cannula with water-soluble lubricant. 8. Hold the clean outer cannula with the guide (obturator) inside. 9. If your old tracheostomy tube is cuffed and inflated, deflate it before removal. 10. Take a deep breath and remove the tracheostomy tube. Be sure to remove the tube following the curve of the throat. 11. Immediately insert the clean cannula and guide (obturator), again following the curve of the throat. Never force re-entry. 12. Hold the tube in place with 1 hand and quickly remove the guide (obturator) with the other hand. 13. Attach the tracheostomy ties as indicated. Check for tension by slipping 1 to 2 fingers between the ties and neck. Be sure to plan ahead. When you are learning about changing the tracheostomy tube, ask your health care provider what you should do if you can t get the tube back in. At this time, the smaller size tracheostomy tube may be temporarily inserted to keep the airway open. Be sure to tell your doctor if you do this. Some more suggestions are included in the Emergency tips section on page continued
18 Fenestrated tracheostomy tubes A fenestrated (FEN-ess-tray-ted) tracheostomy tube has 1 hole or several smaller holes along the outer cannula. When a person has a tracheostomy that is fenestrated and has the outer opening of the tracheostomy tube capped, breathing in and out happens through the nose and mouth. Mucus is coughed up through the mouth. A person can talk because exhaled air passes through the holes in the outer cannula up to the vocal cords. The type of fenestrated tracheostomy tube I have is: q Cuffed OR q Cuffless q Disposable inner cannula OR q Reusable inner cannula Why have a fenestrated tracheostomy tube? Short-term use while weaning from the tracheostomy tube Weaning with a fenestrated tracheostomy tube lets your doctor see how well you could breathe without the tracheostomy tube. Note: Airflow occurs through mouth and nose. (Diagram courtesy of Mallinckrodt/Shiley) Types of fenestrated tracheostomy tubes cuffed or cuffless Disposable inner cannula or reusable inner cannula Long-term use Some people choose to have a fenestrated tracheostomy tube on a long-term basis. Your doctor and health care team can help you decide if this is right for you. In the daytime, the fenestrated tracheostomy tube may be capped for normal mouth and nose breathing and speaking. For sleeping and suctioning, the inner cannula can be inserted. Then breathing and suctioning can occur through the tracheostomy tube. Fenestrated tracheostomy tubes also may help swallowing. 17 continued
19 Parts of the fenestrated tracheostomy tube The fenestrated tracheostomy tube has several differences: holes (fenestration) on re-usable inner cannula and outer cannula (used with re-usable fenestrated tracheostomy tubes) cap (may fit directly on the outer cannula or on to the fenestrated inner cannula-depending upon the type of tracheostomy tube) Holes Fenestrated tube Cap Important points about fenestrated tracheostomy tubes Before the fenestrated tracheostomy tube is capped, the cuff MUST be deflated. A person CANNOT breathe with the cuff inflated and the tube capped. If you have 2 inner cannulas (fenestrated and non-fenestrated), make sure the fenestrated inner cannula is in when capped. If you have trouble breathing when the tube is capped, REMOVE the cap immediately. It is important to relax when you first start using a fenestrated tracheostomy tube. You need to get used to breathing in and out of the nose and mouth again. It is important to have a health care provider there when learning how to breathe through a fenestrated tracheostomy tube. Clean the inner cannula and cap as instructed in inner cannula care. Do not cap a fenestrated tracheostomy tube until you ve received instructions and have practiced. 18 continued
20 TRACHEOSTOMY Using the fenestrated tracheostomy tube 1. Deflate the cuff. 2. Remove the non-fenestrated inner cannula. 3. Place the fenestrated inner cannula into the outer cannula and lock it. This step depends on the type of tracheostomy tube you have. 4. Secure the cap onto the end of the inner cannula. 5. Breathe, speak, and cough through the nose and mouth. Using the fenestrated tracheostomy tube as a non-fenestrated tracheostomy 1. Put the non-fenestrated inner cannula into the tracheostomy tube and lock it. 2. Inflate the cuff as instructed. Store the cleaned cap and spare inner cannula in a sealed, clean, dry container. NEVER place the cap on the tracheostomy tube when the cuff is inflated. 19 continued
21 Using a speaking valve Speaking valves contain a one-way valve. They can be placed on the end of a tracheostomy tube. The valve stays open while you breathe in and closes while you breathe out. This allows air to move up and through the vocal cords. You can speak without covering the end of the tracheostomy tube with your finger. Your speech may sound more natural. Your doctor will determine if you can use a speaking valve. Taking care of a speaking valve 1. Wash the valve in soapy water every day using moisturizer-free, clear detergent. 2. Rinse thoroughly in cool (tepid) water, not hot. 3. Air dry. While wearing the valve, you may notice these things: air exhaling through the nose and mouth speech is improved and you can speak in full sentences strong coughing may blow the valve off mouth and nose mucus will lessen you will be able to remove mucus from your throat or lungs by coughing you will be able to blow your nose and sneeze To use the speaking valve The tracheostomy cuff must be deflated. Increase the amount of time you wear the speaking valve as you are able. If you have a dry mouth, you may need to increase your mouth care. Do not wear the speaking valve while you are sleeping. The disc could become clogged with mucus. Do not throw the speaking valve away. It is not disposable. Follow your doctor or speech language pathologist s instructions. Remove the speaking valve if breathing becomes difficult. Do not use a speaking valve with a Fome cuff tracheostomy tube. 20 continued
22 The resuscitation bag The resuscitation (re-suss-i-tay-shun) bag is a football-shaped bag that can help give breaths of air and oxygen to a person who needs help breathing or is unable to take breaths on his or her own. When the bag is squeezed between the hands, the air leaves the bag and enters into the person s lungs. The exhaled air flows out of the lungs, through the windpipe (trachea), and through a special exhalation valve in the resuscitation bag. Parts of the resuscitation bag Bag: The bag holds the air and oxygen. When squeezed, a breath goes into a person s lungs. Tracheostomy connector: The tracheostomy connector connects the resuscitation bag to the person s tracheostomy tube. Exhalation valve: When the bag is released, exhaled air moves from the lungs, out through this valve. Oxygen port: This port allows extra oxygen to be added to each breath. Reasons to use a resuscitation bag to give larger breaths that will help loosen mucus plugs in the lungs to provide more oxygen before and after suctioning to help with breathing if shortness of breath is getting worse to give breaths and oxygen Patients who use a breathing machine (ventilator) can use a resuscitation bag if they need to disconnect from the breathing machine, or if there is a power failure or problem with the breathing machine. If a person s breathing stops, call 911 immediately and begin to use the resuscitation bag. exhalation valve oxygen port tracheostomy connector bag 21 continued
23 TRACHEOSTOMY How to use the resuscitation bag Assisted breathing 1. Attach the tracheostomy connector to the tracheostomy tube. 2. Squeeze the bag until about 1/3 to 1/2 the air is forced out, then release the bag. Look at the chest when squeezing the bag. The chest should rise and fall with each bag breath. Give a breath large and deep enough so the person feels comfortable. You may need to squeeze the bag with 2 hands. If the person is breathing on his or her own, try to match the delivered breaths with the person s own efforts. As soon as the person starts to inhale, squeeze the bag. Give a breath every 4 to 5 seconds, allowing the bag to refill after each breath. If the person is short of breath, then deliver breaths at a faster rate, still allowing for the bag to refill, about 12 to 16 breaths per minute. Providing oxygen You may need to give oxygen in addition to assisted breaths if: the doctor has prescribed it there is increased shortness of breath If breathing stops, call 911 immediately. To give oxygen: 1. Attach the oxygen tubing from the oxygen supply to the oxygen port located on the resuscitation bag. 2. If you are giving extra oxygen, turn the oxygen supply on, setting the flow rate to a maximum of 15 liters. 3. If you are giving the prescribed amount of oxygen, set the oxygen flow to. 4. Deliver breaths as described above. When you are finished using the resuscitation bag with oxygen, be sure to reconnect the oxygen source as directed or turn off the oxygen. 22 continued
24 Emergency tips If your tracheostomy tube comes out or becomes blocked, you need to have a plan to deal with the emergency situation quickly. If you are unable to solve the problem quickly, call 911. If the tracheostomy tube comes out and another tube is available 1. Insert a clean, lubricated tracheostomy tube in the stoma using the guide (obturator). 2. Hold the tube in place with your fingers. 3. Pull out the obturator. 4. Replace the ties. If the tracheostomy tube comes out and another tube is not available The stoma (neck opening) may stay open for a short period of time. 1. If possible, reinsert the old tracheostomy tube. 2. If you can not insert the old one, insert and hold a hollow tube such as a straw, suction catheter, or inner cannula into the stoma. Sometimes the smaller inner cannula can be inserted until emergency help arrives. 3. If using a straw, suction catheter, or inner cannula, replace with a new tracheostomy tube or the old tracheostomy tube as soon as possible. If the tracheostomy tube becomes blocked 1. Remove the inner cannula. 2. Try to remove the plug by suctioning. Saline may be helpful, as described on Page If a resuscitation bag is available, use it. 4. Deflate the cuff and try to suction again. 5. If this doesn t work, cut the ties, remove the tube, and replace it with a new one. Emergency kit It is good to make an emergency kit. It should include all of the supplies needed for a tracheostomy tube change. These supplies are: a clean tracheostomy tube set with obturator water soluble lubricant, such as Surgilube suction catheter syringe, if you have a cuffed tracheostomy tube sterile saline bullets gloves tracheostomy ties a smaller size tracheostomy tube set with obturator Remember to make an emergency plan. 23 continued
25 When to call the doctor You should call the doctor if: the amount of mucus increases the mucus changes color the mucus becomes much thicker you have a fever of 101F or higher you have difficulty breathing secretions become bloody Other health care professionals may be helpful If you need help with your nutritional needs, you may want to talk to a dietitian. If you need help with swallowing or speaking, talk to a speech language pathologist. Follow-up Continue to see your doctor at regular intervals. He or she can answer your questions and coordinate your care. Talk with your doctor about how often the tracheostomy tube should be changed. Some patients, depending upon the situation, may need to have this scheduled as a procedure in the hospital s ambulatory or outpatient area. My next doctor appointment is: My doctor s phone number is: 24 continued
26 Tips for everyday living You can do most things with a tracheostomy. One thing you will not be able to do is swim. You also will not be able to do anything where there is a lot of dust. Follow these precautions for everyday activities: Carry some form of identification in case of any emergency. We recommend that you have a Medical Alert Bracelet that states Neck Breather. Use a humidifier to moisten the air you breathe. Keep the humidifier clean by following the manufacturer s instructions. Stay healthy by eating a balanced diet and drinking enough fluids. You should drink 8 cups per day unless your doctor tells you otherwise. Get plenty of rest and stay away from people who have a cold or the flu. Protect your stoma from very hot or freezing temperatures, and from heavy pollution. Use a dressing, crocheted bib, clothing, or other shield to cover your stoma. Make sure you can breathe through the stoma covering. You can buy stoma coverings at medical supply companies. In the shower, aim the showerhead low or wear a special shower shield to keep water from entering your lungs. It may be easier to take a bath in the tub. You can buy protective shower guards at medical supply companies. Be careful that nothing enters your new airway. This includes cotton swabs, tissues, shaving cream, hairs, powders, and aerosols. When you are outside, make sure insects, leaves, and other things don t enter the tracheostomy tube. Give special attention to your nose and mouth. These areas are no longer moist, and it is harder for you to detect mouth odor. Good mouth care stimulates taste buds. Pay attention to the type and amount of mucus through your stoma. Report any changes to your doctor. Tell your doctor before you take any medicines. Some drugs may dry out secretions. Men need to be careful when shaving. It is easy to cut yourself because nerve endings cut during surgery can decrease sensation. Tracheostomy tapes, usually called twill tape, can be bought on a roll in a sewing store or anywhere thread and buttons are sold. Velcro ties also are available from your medical supplier. Some people use shoelaces as another option. To loosen secretions and help remove mucus plugs, your doctor may recommend using drops of saline, sometimes called saline bullets. Do not go into areas where there is a lot of dust, fumes, and smoke. 25 continued
27 For help in finding a doctor or health service that suits your needs, call the UPMC Referral Service at UPMC (8762) or UPMC (8762). Select option 1., PA, USA Medical Center 2007 SYS JPL/SZ ORIG 8/07 Form # The is an equal opportunity employer. Policy prohibits discrimination or harassment on the basis of race, color, religion, national origin, ancestry, sex, age, marital status, familial status, sexual orientation, disability, or veteran status. Further, UPMC will continue to support and promote equal employment opportunity, human dignity, and racial, ethnic, and cultural diversity. This policy applies to admissions, employment, and access to and treatment in UPMC programs and activities. This commitment is made by UPMC in accordance with federal, state, and/or local laws and regulations. This information is not intended to be used as a substitute for professional medical advice, diagnosis, or treatment. You should not rely entirely on this information for your health care needs. Ask your own doctor or health care provider any specific medical questions that you have.
This information was created and reviewed through a partnership with the UAMS Patient and Family Advisory Councils.
 Tracheostomy Care You have a: Cuffed Tracheostomy Cuffless Tracheostomy What is a tracheostomy? A tracheostomy (sometimes called a trach rhymes with cake ) is a small opening, or stoma, in your throat.
Policy x.xxx. Issued: Artificial Airways and Airway Care. ABC Home Medical Company Policy & Procedure Manual. A. Tracheostomy Tubes ( trach tubes)
") A. Tracheostomy Tubes ( trach tubes) A tracheotomy is a surgical procedure whereby an opening is cut into the trachea of the patient for the purpose of inserting a tube (trach tube). The trach tube allows
A. Tracheostomy Tubes ( trach tubes) A tracheotomy is a surgical procedure whereby an opening is cut into the trachea of the patient for the purpose of inserting a tube (trach tube). The trach tube allows
Information for patients preparing for a tracheostomy at Toronto General Hospital
 Tracheostomy Information for patients preparing for a tracheostomy at Toronto General Hospital This booklet will answer the following questions: What is a tracheostomy or trach? Why do I need a tracheostomy?
Caring for Your TRACHEOSTOMY. Getting On with Your Life
 Caring for Your TRACHEOSTOMY Getting On with Your Life A New Pathway for Air Have you had a tracheostomy? Or, are you about to have one? If so, you may be wondering what the future holds for you. It s
Tracheostomy Care at Home
 Patient & Family Guide 2016 Tracheostomy Care at Home Aussi disponible en français : Trachéostomie Soins à dispenser à la maison (FF85-1725) www.nshealth.ca This booklet tells you about your tracheostomy
This information will help you care for your tracheostomy while you re in the hospital and at home.
 PATIENT & CAREGIVER EDUCATION Caring for Your Tracheostomy This information will help you care for your tracheostomy while you re in the hospital and at home. Your Trachea Your trachea (windpipe) is part
The Adult with A Tracheostomy
 The Adult with A Tracheostomy You have a tracheostomy (trach), a surgical incision (opening) made into the trachea or windpipe (figure 1). A small plastic tube called a trach, is placed into the opening
Changing Your Trach Tube
 Patient & Family Guide 2017 Changing Your Trach Tube www.nshealth.ca Changing Your Trach Tube Your entire trach tube should be changed about once a month, or sooner if you notice an odour (smell) or get
TRACHEOSTOMY CARE. Tracheostomy- Surgically created hole that extends from the neck skin into the windpipe or trachea.
 1 TRACHEOSTOMY CARE Definitions: Trachea-Windpipe Tracheostomy- Surgically created hole that extends from the neck skin into the windpipe or trachea. Outer Cannula- The outer part of a trach tube. Usually
Adult Patients Going Home with a Tracheostomy
 Physiotherapy Department Adult Patients Going Home with a Tracheostomy Darent Valley Hospital Darenth Wood Road Dartford Kent DA2 8DA www.dvh.nhs.uk In case of emergencies you will need to dial 999 If
Suprapubic and Mitrofanoff Catheter Care
 Urinary catheters are tubes that drain urine from your child s bladder. There are many different types of urinary catheters. Your nurse will teach you how to care for these catheters. Here is information
Table of Contents. Dialysis Port Care Chemotherapy Port Care G-Tube Care Colostomy Bags Wound Dressings
 Table of Contents Dialysis Port Care Chemotherapy Port Care G-Tube Care Colostomy Bags Wound Dressings Dialysis Port Care Know What Type of Vascular Access You Have. Fistula: An artery in your forearm
Tracheostomy discharge information. Information for community nurses, patients and carers
 Tracheostomy discharge information Information for community nurses, patients and carers What is a tracheostomy? A tracheostomy is a surgical incision (cut) through the neck tissues into the trachea leaving
Drainage Frequency: PATIENT GUIDE. Dressing Frequency: Every Drainage Weekly Drainage. Physician Contact Information. Dr. Phone:
 Drainage Frequency: PATIENT GUIDE Dressing Frequency: Every Drainage Weekly Drainage Physician Contact Information Dr. Phone: CHEST DRAINAGE Pleural Space Insertion Site Cuff Exit Site Catheter Valve Connector
Clearing the air.. How to assist and rescue neck breathing patients. Presented by: Don Hall MCD, CCC/SLP Sarah Markel RRT, MHA
 Clearing the air.. How to assist and rescue neck breathing patients Presented by: Don Hall MCD, CCC/SLP Sarah Markel RRT, MHA Learning Objectives Define common terms identified with total (laryngectomy)
Managing your suprapubic catheter
 Managing your suprapubic catheter What you need to know The information contained in this booklet is intended to assist you in understanding your proposed surgery. Not all of the content will apply to
Facility Name: Name: Date: Tracheostomy Care Evaluation Checklist
 Name: Date: Tracheostomy Care Evaluation Checklist Objective: Learner will be able to demonstrate tracheostomy care with a disposable inner cannula. Review facility protocol for caring for Airway Management:
Tracheotomy Care Handbook. Bloomer, Jessica
 Tracheotomy Care Handbook Bloomer, Jessica 1 TABLE OF CONTENTS I II III V VI INTRODUCTION What is a tracheostomy? 2 TRACHEOTOMY CARE Types and Parts of Tracheotomy Tubes 3 Tracheotomy Suctioning 4 Tracheotomy
Urinary Catheter Care
 Nikki Hardness, DO Aashish Kabra, MD John Logan, MD Jeremy Weiss, DO Elizabeth Kelly McKnight, PA Phone: (303) 388-9321 What is a urinary catheter? Urinary Catheter Care A urinary catheter is a long, hollow,
Tracheostomy. Hope Building Neurosurgery
 Tracheostomy Hope Building Neurosurgery 0161 206 5055 All Rights Reserved 2017. Document for issue as handout. Unique Identifier: CS36(17). Review date: November 2019 What is a tracheostomy? A tracheostomy
Breezhaler. Open to see clear capsule. How do I use my Breezhaler? Care of my Breezhaler
 Breezhaler 3 Pull cap off Press buttons once and release Breathe in rapidly and steadily. Hold. Open. Place capsule in chamber. Close (click). Breathe out 4 Open to see clear capsule. If not all clear
Medications. Managing and Administering Medication
 Medications Managing and Administering Medication The Medication Administration Checklist Administering medications is an important and vital responsibility. It is important to make sure that no errors
Central Venous Catheter Care and Maintenance (includes catheter troubleshooting guide)
") Central Venous Catheter Care and Maintenance (includes catheter troubleshooting guide) A Guide for Patients in the Home Phone Number: Nurse/Contact: Central Venous Catheters This manual is a guide for
Central Venous Catheter Care and Maintenance (includes catheter troubleshooting guide) A Guide for Patients in the Home Phone Number: Nurse/Contact: Central Venous Catheters This manual is a guide for
Welcome to the Specialized Medical Services respiratory training webinar series!
 Welcome to the Specialized Medical Services respiratory training webinar series! SMS is your LTC facility single source for oxygen, medical equipment, respiratory care services and supplies nationwide.
How to Change a. Foley catheter. Patient Education Rehabilitation Nursing. Step-by-step instructions for the caregiver
 Patient Education How to Change a Foley Catheter Step-by-step instructions for the caregiver This handout gives step-bystep instructions for changing a Foley catheter, which is a tube in your bladder to
Nephrostomy Tube Care
 Nephrostomy Tube Care CEAC 0585 January 2012 Problems to report to the doctor If your nephrostomy tube falls out, call your urologist or go to a hospital Emergency Department immediately to have the tube
Tracheostomy. Information for patients and relatives
 Tracheostomy Information for patients and relatives page 2 What is a tracheostomy? A tracheostomy is a small hole (stoma) made at the front of the neck, which goes into the trachea (windpipe). A tube called
Complex Care Hub Manual: Continuous Positive Airway Pressure (CPAP) Ventilation
 Ventilation") Complex Care Hub Manual: Continuous Positive Airway Pressure (CPAP) Ventilation Table of Contents 1. What is Continuous Positive Airway Pressure (CPAP)?... 2 2. Important information for support worker...
Complex Care Hub Manual: Continuous Positive Airway Pressure (CPAP) Ventilation Table of Contents 1. What is Continuous Positive Airway Pressure (CPAP)?... 2 2. Important information for support worker...
How to Use Inhaled Medications for Asthma and COPD
 How to Use Inhaled Medications for Asthma and COPD This information is not intended to diagnose health problems or to take the place of medical advice or care you receive from your physician or other health
Management of Chronic Obstructive Lung Disease
 Management of Chronic Obstructive Lung Disease 慢性阻塞性肺病的治療與護理 Chapter Three Put Yourself in Control LEARNING HELPFUL WAYS TO BREATHE Learning helpful ways to breathe means learning to use your lungs smarter
HumaPen LUXURA HD INSULIN DELIVERY DEVICE INSTRUCTIONS FOR USE
 1 HumaPen LUXURA HD INSULIN DELIVERY DEVICE INSTRUCTIONS FOR USE For use only with Lilly 3 ml insulin cartridges (100 units/ml). Do not use other brands of insulin cartridges. The color of your HumaPen
Changing Your Two-Piece Disposable Urostomy Appliance
 PATIENT & CAREGIVER EDUCATION Changing Your Two-Piece Disposable Urostomy Appliance This information will help you care for your 2-piece disposable urostomy appliance. Changing Your Appliance You will
Home Care for Your Nephrostomy Catheter - The James
 PATIENT EDUCATION patienteducation.osumc.edu Home Care for Your Nephrostomy Catheter - The James This handout tells you how to care for your nephrostomy catheter. If you have any questions about this information,
Using an Inhaler and Nebulizer
 Using an Inhaler and Nebulizer Introduction An inhaler is a handheld device that is used to deliver medication directly to your airways. A nebulizer is an electric or battery powered machine that turns
Catheter Care How to Care for a Urinary Catheter
 Catheter Care How to Care for a Urinary Catheter Ensure patient/client is provided with any available product specific instructions along with this booklet. About Your Catheter Your urinary catheter allows
Going Home with Your Peripheral Nerve Catheter and Pain Relief Pump
 Northwestern Memorial Hospital Patient Education CARE AND TREATMENT If you have any questions about the pain relief pump, please call the Anesthesia Pain Service. Going Home with Your Peripheral Nerve
For use only with Lilly 3 ml insulin cartridges (100 units/ml). Do not use other brands of insulin cartridges.
. Do not use other brands of insulin cartridges.") MS9662 MS9663 HumaPen LUXURA INSULIN DELIVERY DEVICE INSTRUCTIONS FOR USE For use only with Lilly 3 ml insulin cartridges (100 units/ml). Do not use other brands of insulin cartridges. Your HumaPen LUXURA
MS9662 MS9663 HumaPen LUXURA INSULIN DELIVERY DEVICE INSTRUCTIONS FOR USE For use only with Lilly 3 ml insulin cartridges (100 units/ml). Do not use other brands of insulin cartridges. Your HumaPen LUXURA
Effective Date: August 31, 2006 SUBJECT: CARE AND USE OF NEBULIZER AND INTERMITTENT POSITIVE PRESSURE BREATHING DEVICE
 COALINGA STATE HOSPITAL NURSING POLICY AND PROCEDURE MANUAL SECTION - Treatments POLICY NUMBER: 421 Effective Date: August 31, 2006 SUBJECT: CARE AND USE OF NEBULIZER AND INTERMITTENT POSITIVE PRESSURE
CARING FOR YOUR CATHETER AT HOME
 CARING FOR YOUR CATHETER AT HOME After surgery (radical prostatectomy) for prostate cancer you will have a urinary catheter for a short period of time and will need to go home with the catheter still in
For use only with Lilly 3 ml insulin cartridges (100 units/ml). Do not use other brands of insulin cartridges.
. Do not use other brands of insulin cartridges.") MS9673 HumaPen LUXURA HD INSULIN DELIVERY DEVICE INSTRUCTIONS FOR USE For use only with Lilly 3 ml insulin cartridges (100 units/ml). Do not use other brands of insulin cartridges. The colour of your HumaPen
MS9673 HumaPen LUXURA HD INSULIN DELIVERY DEVICE INSTRUCTIONS FOR USE For use only with Lilly 3 ml insulin cartridges (100 units/ml). Do not use other brands of insulin cartridges. The colour of your HumaPen
Grey Bruce Health Network EVIDENCE-BASED CARE PROGRAM PATIENT EDUCATION BOOKLET TURP (TRANS URETHRAL RESECTION OF THE PROSTATE) PATHWAY
 PATHWAY") Grey Bruce Health Network EVIDENCE-BASED CARE PROGRAM PATIENT EDUCATION BOOKLET TURP (TRANS URETHRAL RESECTION OF THE PROSTATE) PATHWAY Introduction: Prostate or bladder surgery requires special care.
Grey Bruce Health Network EVIDENCE-BASED CARE PROGRAM PATIENT EDUCATION BOOKLET TURP (TRANS URETHRAL RESECTION OF THE PROSTATE) PATHWAY Introduction: Prostate or bladder surgery requires special care.
Caring for Your Drainage Gastrostomy Tube
 PATIENT & CAREGIVER EDUCATION Caring for Your Drainage Gastrostomy Tube This information will help you care for your drainag e g astrostomy tube (g-tube). About Your Drainage G-Tube A drainage g-tube is
GASTRECTOMY. Date of Surgery. Please bring this booklet the day of your surgery. QHC#34
 GASTRECTOMY Date of Surgery Please bring this booklet the day of your surgery. QHC#34 What is a Gastrectomy? A Gastrectomy is the surgical removal of all or part of the stomach. The stomach is the digestion
Policies and Procedures. I.D. Number: 1154
 Policies and Procedures Title: TRACHEOSTOMY TUBE CHANGE - PEDIATRIC I.D. Number: 1154 Authorization: [X ] SHR Nursing Practice Committee Source: Nursing Date Effective: October 2008 Date Revised: March
DEPARTMENT NAME GASTROSTOMY CARE AND MANAGEMENT
 GASTROSTOMY CARE AND MANAGEMENT Texas Children s Hospital Advanced Practice Provider Conference Pediatric Surgery April 4 th, 2019 Madison Fitzgerald PA-C, Celia Flores PA-C OBJECTIVES 1. Identify the
Post Operative Instructions
 Mary A. Stanley, MD, FACS Breast Surgery Activity: Post Operative Instructions Gradually increase your activity the following day. You may drive as long as you are not taking narcotic pain medicine. It
Thank you very much for agreeing to participate in the Ontario Sleep Health Study
 Thank you very much for agreeing to participate in the Ontario Sleep Health Study By participating in this study, you are playing a key role in helping us better understand the impact of our genes on our
Instructions for Use. Welcome!
 Instructions for Use Welcome! The AMJEVITA SureClick autoinjector is a single-use prefilled autoinjector. Consult your doctor if you have any questions about your dose. Your doctor has prescribed AMJEVITA
Module 22 TRACHEOSTOMY CARE AND SUCTIONING. Unit 1 Basic Information Related to Tracheostomy
 580 Module 22 TRACHEOSTOMY CARE AND SUCTIONING Unit 1 Basic Information Related to Tracheostomy OBJECTIVES Upon completion of this unit, you should be able to: Define selected essential terms related to
Foundations of Critical Care Nursing Course. Tracheostomy Workbook
 Foundations of Critical Care Nursing Course Tracheostomy Workbook 1 Key Reference: Dawson D (2014) Essential principles:trachepstomy care in the adult patient, Nursing in Critical Care, Vol 19, 2 p.63-72.
Positive Pressure Therapy
 Positive Pressure Therapy Positive Pressure Therapy...2 What is Sleep Apnea?....2 Positive Pressure Machines..................................................... 4 Types..................................................................................
Ileal Conduit Diversion Surgery
 Here are some words and pictures to help you understand this surgery: Bladder: the bladder stores urine that is made by the kidneys Bowels: the bowels are the parts of the body that digest food and fluids.
The essential principles of tracheostomy care
 The essential principles of tracheostomy care Deborah Dawson Consultant Nurse Critical Care Excellence in specialist and community healthcare Key publications https://www.stgeorges.nhs.uk/gps-andclinicians/clinical-resources/tracheostomyguidelines/
Caring for Your Urinary (Foley ) Catheter
 Catheter") PATIENT & CAREGIVER EDUCATION Caring for Your Urinary (Foley ) Catheter This information will help you care for your urinary (Foley ) catheter while you re at home. You have had a Foley catheter (a thin,
PATIENT & CAREGIVER EDUCATION Caring for Your Urinary (Foley ) Catheter This information will help you care for your urinary (Foley ) catheter while you re at home. You have had a Foley catheter (a thin,
English. Fealite Nasal Pillows System. User Manual
 Fealite Nasal Pillows System User Manual 0123 Table of Contents Fealite Nasal Pillows System 1 Intended Use 1 Medical Information 1 Parts of the Fealite 3 Fitting the Fealite 5 Using Tube Retainer (Optional)
Thank you very much for agreeing to participate in the Ontario Sleep and Brain Health Study
 Thank you very much for agreeing to participate in the Ontario Sleep and Brain Health Study By participating in this study, you will play a key role in helping us better understand the links between sleep
Pneumonia. Trachea , The Patient Education Institute, Inc. id Last reviewed: 11/11/2017 1
 Pneumonia Introduction Pneumonia is an inflammation and infection of the lungs. Pneumonia causes millions of deaths every year. It can affect anybody, but is more dangerous to older adults, babies and
WHAT TYPES OF CONTINENCE PRODUCTS ARE THERE?
 15 CAN HELP MANAGE WHAT ARE? Continence products help manage the symptoms of poor bladder and bowel control. They may be used for a short time during treatment. They can also be used long term if poor
TRUSTED SOLUTIONS FOR SIMPLIFIED PATIENT CARE. Shiley Tracheostomy Product Guide GettyImages
 TRUSTED SOLUTIONS FOR SIMPLIFIED PATIENT CARE. Shiley Tracheostomy Product Guide GettyImages 503532118 TABLE OF CONTENTS Shiley Flexible Adult Tracheostomy Tubes 3 Shiley Extended-Length Tracheostomy Tubes
Caring for Your Peripherally Inserted Central Catheter (PICC)
") PATIENT & CAREGIVER EDUCATON Caring for Your Peripherally Inserted Central Catheter (PICC) This information will help you care for your peripherally inserted central catheter (PICC) at home. A PICC is
PATIENT & CAREGIVER EDUCATON Caring for Your Peripherally Inserted Central Catheter (PICC) This information will help you care for your peripherally inserted central catheter (PICC) at home. A PICC is
Short-Term Side Effects from Head and Neck Radiation
 PATIENT EDUCATION patienteducation.osumc.edu Short-Term Side Effects from Head and Neck Radiation Side effects are problems caused by radiation therapy. These problems are different for each person and
Cough Assist. Information for patients, families and carers Therapy Services
 Cough Assist Information for patients, families and carers Therapy Services PROUD TO MAKE A DIFFERENCE SHEFFIELD TEACHING HOSPITALS NHS FOUNDATION TRUST page 2 of 16 Table of contents Why do I need a Cough
Information and instruction for Home Helps caring for clients with indwelling urinary catheters
 Information and instruction for Home Helps caring for clients with indwelling urinary catheters This leaflet provides you with information and instructions on caring for clients who have an indwelling
Going Home with a Urinary Catheter and an All in One Day/Night Drainage Bag
 Going Home with a Urinary Catheter and an All in One Day/Night Drainage Bag Doctor: Phone Number: About Your Catheter A urinary catheter is a small tube that goes through your urethra and into your bladder.
HumaPen SAVVIO INSULIN DELIVERY DEVICE INSTRUCTIONS FOR USE
 HumaPen SAVVIO INSULIN DELIVERY DEVICE INSTRUCTIONS FOR USE For Single Patient Use Only www.lilly.ca INTRODUCTION HumaPen SAVVIO is designed for ease of use. You can give yourself multiple doses from one
For use only with INSTRUCTIONS FOR USE
 TM For use only with INSTRUCTIONS FOR USE IMPORTANT NOTICE: Please read this safety information first. 1. Follistim Pen is a precision device. It is very important that you read and follow all directions
What is a catheter? What do I need to learn about catheter care?
 Catheter care What is a catheter? A catheter is a tube that drains urine from your child s body. The catheter is connected to tubing and a bag to collect the urine. Catheters come in different sizes and
INSTRUCTIONS FOR USE HUMIRA 40 MG/0.8 ML, 20 MG/0.4 ML AND 10 MG/0.2 ML SINGLE-USE PREFILLED SYRINGE
 INSTRUCTIONS FOR USE HUMIRA (Hu-MARE-ah) (adalimumab) 40 MG/0.8 ML, 20 MG/0.4 ML AND 10 MG/0.2 ML SINGLE-USE PREFILLED SYRINGE Do not try to inject HUMIRA yourself until you have been shown the right way
How to Care for a Foley Catheter After Surgery
 Form: D-3251 How to Care for a Foley Catheter After Surgery For patients going home from the Day Surgery Unit at Toronto Western Hospital Read this brochure to learn about: How to take care of the Foley
Medescan Nebuliser Med - S600A Instructions Manual
 Medescan Nebuliser Med - S600A Instructions Manual Please read this guidebook carefully before operating this unit Your Nebuliser is intended for use in the treatment of asthma, COPD and other respiratory
Central venous access devices for children with lysosomal storage disorders
 Great Ormond Street Hospital for Children NHS Foundation Trust: Information for Families Central venous access devices for children with lysosomal storage disorders This information explains about central
Asthma and COPD Awareness breathe with ease sm and Chronic Obstructive Pulmonary Disease
 Asthma and COPD Awareness breathe with ease sm and Chronic Obstructive Pulmonary Disease Medicare Newsletter Spring 2012 Getting Rid of Mold There are many types of molds. Molds will not grow without water
Skills Checklist Manual
 Skills Checklist Manual Alexandra L. Quittner, Ph.D. Kristen K. Marciel, Ph.D. Ivette Cruz, M.S. University of Miami Quittner, Marciel, & Cruz, 2009 i revised 2/5/09 Table of Contents Instructions 1 Airway
The Infant/Child with a Bowel Ostomy
 The Infant/Child with a Bowel Ostomy Thank you for choosing the Medical College of Georgia Hospitals and Clinics for your child s health care needs. This information is to help answer some of the questions
Ophthalmology Department. 2009, The Permanente Medical Group, Inc. All rights reserved, Ophthalmology Department.
 Glaucoma: Title of article Trabeculectomy is Ahmed positioned Valve here POST-SURGICAL SUB TITLE POSITIONED INSTRUCTIONS HERE These instructions are for patients recovering from one of the following eye
EduCare Knowledge & Skill Assessment Medication I Routes
 EduCare Knowledge & Skill Assessment Medication I Routes Employee Name Date Demonstration/Skill Assessment Oral (O) Pass Fail 1. Wash your hands; apply gloves. 2. Perform the 3 safety checks on the Simple
CAST CARE. Helping Broken Bones Heal
 CAST CARE Helping Broken Bones Heal When You Need a Cast Are you injured and in need of a cast? Don t worry, you ll get through it. Wearing a cast will help your injured body part heal. Healing takes time,
Gastrostomy Tube for Decompression
 Gastrostomy Tube for Decompression What is a Gastrostomy? A gastrostomy (g-tube) is a procedure that creates a small opening in your outer abdomen into the stomach. A thin tube is placed through this hole.
YOUR HOME ENTERAL NUTRITION SURVIVAL GUIDE FOR JEJUNOSTOMY FEEDINGS
 YOUR HOME ENTERAL NUTRITION SURVIVAL GUIDE FOR JEJUNOSTOMY FEEDINGS INTRODUCTION: Your health care team may prescribe a program of home Enteral nutrition (or home tube feeding) designed to meet your nutritional
In case of an urgent concern or emergency, call 911 or go to the nearest emergency department right away.
 Asthma Basics Patient and Family Education This teaching sheet contains general information only. Talk with your child s doctor or a member of your child s healthcare team about specific care of your child.
CARE OF A TUNNELED CATHETER (HICKMAN & BROVIAC ) with a Needleless Connector (MicroClave Clear)
 with a Needleless Connector (MicroClave Clear)") CARE OF A TUNNELED CATHETER (HICKMAN & BROVIAC ) with a Needleless Connector (MicroClave Clear) Table of Contents Part 1 Learning about the Catheter...2 Part 2 Caring for Your Child s Catheter...3 A. Preventing
CARE OF A TUNNELED CATHETER (HICKMAN & BROVIAC ) with a Needleless Connector (MicroClave Clear) Table of Contents Part 1 Learning about the Catheter...2 Part 2 Caring for Your Child s Catheter...3 A. Preventing
Understanding Respiratory Illnesses
 Understanding Respiratory Illnesses Respiratory illnesses and the people you support Is a major cause of unplanned hospitalizations. Usually occur in fall and winter. It is important for you to Help people
TRANSCRIPT for Lantus SoloSTAR pen injection for your patients
 TRANSCRIPT for Lantus SoloSTAR pen injection for your patients SUPER: Prescription Lantus is a long-acting insulin used to treat adults with type 2 diabetes and adults and pediatric patients (children
Nasal Surgery. Types of Surgery. This handout explains different types of nasal surgery and what to expect.
 Nasal Surgery This handout explains different types of nasal surgery and what to expect. Types of Surgery Septoplasty is a surgery done to straighten the septum. The septum is made of bone and cartilage.
WELCOME TO... Please read this brochure & the Provent Instructions For Use before starting Provent Sleep Apnea Therapy.
 WELCOME TO... Please read this brochure & the Provent Instructions For Use before starting Provent Sleep Apnea Therapy. Obstructive Sleep Apnea (OSA) is a serious medical condition characterized by pauses
Kapitex Healthcare. making things clearer for tracheostomy patients
 Kapitex Healthcare making things clearer for tracheostomy patients preface In publishing this booklet, Kapitex Healthcare Ltd hopes to provide information and understanding for both the patient and carer
MICAFUNGIN MIXING
 1 1-800-862-2731 MICAFUNGIN MIXING Drug Name: MICAFUNGIN Volume and Rate: over 1 hour Schedule: KEY POINTS: FLUSHING: Saline Micafungin Saline Heparin 1. Always wash your hands with an antibacterial soap
Procedure for removal and reinsertion of a supra pubic catheter
 Procedure for removal and reinsertion of a supra pubic catheter Equipment required collect prior to procedure Perform this procedure as an aseptic technique to minimise the risk of introducing Clean the
Radiation Therapy to the Head and Neck: What You Need to Know About Swallowing
 PATIENT & CAREGIVER EDUCATION Radiation Therapy to the Head and Neck: What You Need to Know About Swallowing This information describes swallowing problems that can be caused by radiation therapy to the
Infection Control Blood Borne Pathogens. Pines Behavioral Health
 Infection Control Blood Borne Pathogens Pines Behavioral Health Definition: Infection control is preventing the spread of germs that cause illness and infection. Infection control starts with understanding
Treatment Options Not Not access
 Treatment Options Treatment options for Chronic Kidney Disease (CKD) CKD is a permanent condition. Treatment will: Help the patient feel better Not cure the disease Not make the kidneys start working again
Inserting Your Own Urinary Catheter Self-Catheterization Instructions for Women
 CCO/ Clker-Free-Vector-Images/Pixabay.com Inserting Your Own Urinary Catheter Self-Catheterization Instructions for Women Your family practitioner (family doctor or nurse practitioner) has told you that
UW MEDICINE PATIENT EDUCATION. Peritoneal Dialysis. A treatment option for kidney disease. There are 2 types of PD: continuous ambulatory
 UW MEDICINE PATIENT EDUCATION Peritoneal Dialysis A treatment option for kidney disease Class Goals 1. Understand the purpose and basic principles of continuous ambulatory peritoneal dialysis (CAPD). 2.
Home Tracheostomy Care Booklet
 Our Services Adven s ENT Services is dedicated to providing excellence in standards of care to children and adults for all condi ons of Ear, Nose & Sinus, Throat & Voice, Head & Neck, Hearing & Speech
PNEUMONIA. Your Treatment and Recovery
 PNEUMONIA Your Treatment and Recovery Understanding Pneumonia Symptoms of Pneumonia Do you feel feverish and tired, with a cough that won t go away? If so, you may have pneumonia. This is a lung infection
IMPORTANT: PLEASE READ. Don t
 PATIENT/CAREGIVER INSTRUCTIONS FOR USE - ORENCIA (ABATACEPT) PREFILLED SYRINGE WITH BD ULTRASAFE PASSIVE TM NEEDLE GUARD WITH FLANGE EXTENDERS Getting started with ORENCIA therapy Did you receive self-injection
Fact Sheet Looking after your stoma following a laryngectomy
 Fact Sheet Looking after your stoma following a laryngectomy THE NAME YOU CAN TRUST Your national specialist service provider It is our aim to be the best we possibly can and never to let a customer down.
Flu: What You Can Do. Caring for People at Home
 Flu: What You Can Do Caring for People at Home Flu: What You Can Do Caring for People at Home For more information, please visit: www.mass.gov/dph/flu CONTENTS: What is the flu? 2 table of contents Flu
Understanding Respiratory Illnesses
 Understanding Respiratory Illnesses Respiratory illnesses can make you very sick. Some respiratory illnesses are not serious. A cold may make you feel sick for a few days, but you will get better. Other
LESSON ASSIGNMENT. Urinary System Diseases/Disorders. After completing this lesson, you should be able to:
 LESSON ASSIGNMENT LESSON 4 Urinary System Diseases/Disorders LESSON ASSIGNMENT Paragraphs 4-1 through 4-8. LESSON OBJECTIVES After completing this lesson, you should be able to: 4-1. Identify the purposes