LET OUR IMAGE ENHANCE YOUR IMAGE. Operating Instructions MedRx Video Portable OtoScope System
|
|
|
- Daniel Taylor
- 5 years ago
- Views:
Transcription

1 LET OUR IMAGE ENHANCE YOUR IMAGE Operating Instructions MedRx Video Portable OtoScope System RD2 Portable Video Otoscope Manual Rev 1 Effective September 2004
2 Table of Contents Introduction to the MedRx Video OtoScope System... 2 Accessories and System Components... 3 Assembly and Installation... 4 Instructions for Attaching/Disconnecting Fiber Optic Cable to Probe... 5 Fuzzy Video Images... 5 MedRx Wiring Diagram... 6 Operating Instructions for Using the MedRx Video OtoScope System... 7 Using the Portable Hand Held Camera Probe... 8 Care, Maintenance, and Storage... 9 Trouble Shooting Guide Limited Warranty

3 Introduction to the MedRx Video OtoScope System The Portable Video OtoScope System: MedRx Patented OtoScope Probe MedRx High Resolution Camera High Resolution Sony Color Video Monitor Watt Halogen Light Source Universal Fiber Optic Cable 3mm Specula Carrying Case All Necessary Cables and Attachments One Year Warranty Options: Full Image/Radiograph Lens with Adjustable IRIS Extended Warranty Sony Color Video Monitor Otoscope Camera & Probe Light Source 2
4 Accessories and System Components Camera/Probe Assembly This hand held assembly part includes the custom designed and patented optical probe and high resolution color video camera. These are the key components to the system. Color Monitor The high-resolution video monitor has one video input jack. Light Source This high quality 150-watt variable intensity light source is designed to provide a small spot of high intensity light which enhances the quality of the image. A fiber optic cable transfers the light from the light source to the probe. A 3/4 rotation of the dial is usually appropriate. However, some adjustment may be necessary for optimum image clarity. Fiber Optic Cable The cable, containing thousands of high-grade glass fibers, connects the light source to the probe. The connection to the probe uses a connector which pushes on and locks in place on the probes optical socket. The connector is released from the probe by pulling firmly on the connector. Twin Lead Power Cable This cable connects to the camera. The other end connects to the front of the Light Source. Cerumen Management Tools (Curettes) Accessory Replace the speculum on the tapered tip of the probe with a curette, and insert into the canal to remove cerumen. This should only be done by persons with specific training in this procedure. Full Image Lens - Accessory (Option) This lens is interchangeable with the probe lens and allows you to demonstrate to your patient how to insert the hearing instrument in the ear. If a CIC (completely-in-the-canal) hearing instrument is being used, you can show your patient that the CIC is not visible. Speculum - Accessory A reusable 3mm-speculum cover is used to protect the probe tip. Welsh Allyn 3mm (Part Number: 24303). Lamp EJA Accessory This bulb, used in the light source, lasts approximately 200 hours. We suggest you keep a spare bulb on hand. 3
5 Assembly and Installation Installation Instructions Although no specific order is required for connecting the Video OtoScope System, it is sometimes helpful to understand the flow of the signal from the camera to the monitor. The following instructions follow the path of the video signal flow. Before you put the system together, please refer to page 5 for connecting instructions, and page 6 for the wiring diagram. After unpacking the individual components, the interconnecting wires can be installed. Connect the camera to the light source with the 8' twin lead cable, which plugs into the back of the camera and the front of the light source. One of the plugs, called a BNC, plugs in and turns 1/8 of a turn to lock the plug in place. The power plugs straight into the camera and the light source. The video cable, coming from the back of the light source, plugs directly into the video input on the back of the monitor. The fiber optic cable plugs directly into the post of the probe, the other end slides into the light source and is tightened down by the thumb screw on the right of the bushing/port. The monitor, and light source need to be plugged into the power strip. (The fiber optic cable needs to be attached into the light source and the probe.) Caution: Take care to avoid the following circumstances that could cause extensive damage to your fiber optic cable: - Do not roll chairs or carts over the cable. - Do not close the carrying case on the cable. - Do not pull or yank the cable to disconnect it from the camera. 4
6 Instructions for Attaching/Disconnecting Fiber Optic Cable to Probe To Connect Push the connector end into the probe as shown in figure 1. To Disconnect With thumb and forefinger, gently pull the connector away from the probe. Fuzzy Video Images Cerumen and/or fog on the lens tip most often cause fuzzy video images. You can correct or prevent either condition by using an alcohol wipe on the lens tip before and after each use. SNAP ON Figure 1 5

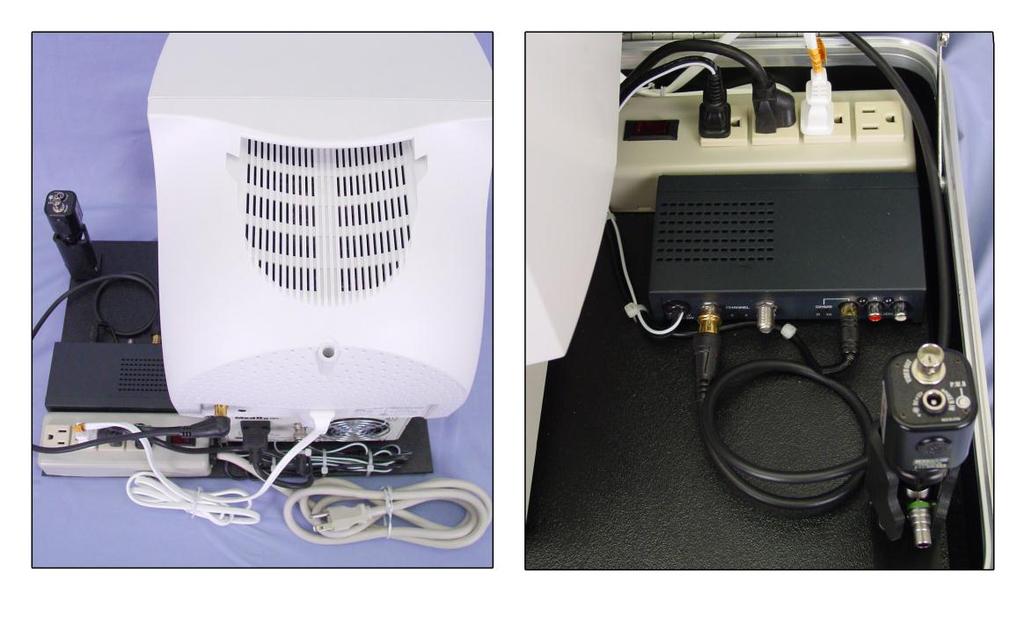
7 MedRx Wiring Diagram 6
8 Operating Instructions for Using the MedRx Video OtoScope System Turning on the Video OtoScope System Light Source The light source intensity is controlled by rotating a knob located on the front of the light box. The light source should be turned to 3/4 intensity. Once the probe is in the ear, you may need to adjust the intensity control to achieve an optimum picture. When in the standby mode, leave the light on but turn the intensity down to the lowest setting. Camera The camera power switch is located in front of the Light Source. An indicator light turns red when the power is on. If no picture is showing, check to see that the display is turned on and that all connections are correct. Suggested Operating Procedure Keep the camera, in the on position. The light source can be left on for long periods of time, but the lamp intensity should be turned down except when being used. Following this guideline will greatly extend the bulb life, which is estimated to be about 200 hours. We suggest you keep a spare bulb on hand at all times. 7
9 Using the Portable Hand Held Camera Probe CAUTION: The hand held camera probe/assembly is only to be used by a person qualified in the use an Otoscope. Misuse can cause a patient pain and possible ear damage. The speculum cover is always to be used with the system. The speculum cover must be cleaned or replaced between usage per accepted medical practice procedures. Prior to insertion, the probe should be held within 1/4" of a known object, such as your finger, to check the quality of the image. Sometimes the lens is smeared with cerumen or other matter and will need to be vigorously cleaned with an alcohol wipe in order to provide a clear image. Practice is essential to achieving optimum picture quality. Cerumen and/or fog on the lens tip most often cause fuzzy video images. You can correct or prevent either condition by using an alcohol wipe on the lens tip before and after each use. 8
10 Care, Maintenance, and Storage Your MedRx Video OtoScope has been designed to provide years of trouble-free service. Do not remove or open the cabinets of the equipment, as there are no user serviceable components inside. Cleaning To keep your system looking new, wipe the exterior of the components with a soft cloth. Stubborn stains may be removed using a cloth moistened with water and mild detergent. Do not allow debris or fluid to enter in the components. Use an alcohol wipe to clean the lens on the end of the OtoScope probe, or a common disinfectant. Operational Tips When using the camera be sure camera is in the upright position so you can read the horizontal writing on the side. This helps orientation of the UP/DOWN on video screen. IMPORTANT: THE PROBE TIP COVER SHOULD BE RETAINED AND USED FOR ADDITIONAL TRANSPORTATION PROTECTION OF THE VIDEO SCOPE OPTICS WHILE IN OR OUT OF THE FOAM CASE MEDRX SUGGESTS THAT AFTER USING THE LIGHT SOURCE, TO REDUCE INTENSITY ON THE DIMMER TO LOWEST POINT AND LET THE BULB COOL FOR 1 2 MINUTES PRIOR TO TURNING THE LIGHT SOURCE OFF. Since the Video Otoscope incorporates glass lenses for image transmission and fibers for illumination it is breakable. Although the tip is tapered to improve durability, any impact or crushing to the tip may cause serious damage to the instrument. Video Otoscope Disinfecting The Video Otoscope is sealed so that it may be wiped with the following surface cleaners to disinfect: 75% alcohol Chlorhexiderm Cidex Nolvasan Parvocide Parvosol Roccal Synphenol The scope should NEVER be heat sterilized, gas sterilized or soaked in liquid because damage may result. 9
11 Trouble Shooting Guide Problem Main Cause Solution Fuzzy or out of focus picture Dirty probe tip (dried cerumen) Short in twin lead cable Vigorously clean probe tip with an alcohol wipe Replace twin lead cable No picture on monitor Light Source not turned on Or Loose wire connection Push in button in front of light source Re-check wire connection Indicator light switch on Light Source not on No light from probe tip Picture is dark Can't clean probe Power supply not plugged in Light source not on Bulb burnt out Switch on back of camera in wrong position Light source too low Probe dropped and physically damaged Unplug twin cable from light source; see if light comes on, if so replace twin leads cable Turn on light source Replace bulb Move camera shutter switch to off position Turn up intensity of light source Call MedRx for service This guide was designed to assist you in diagnosing minor problems. Should service be needed, please call MedRx for Technical Support Monday-Friday, EST 9:00 a.m.-5:00 p.m. at 1(888) , or us at 10
12 Limited Warranty MedRx, Inc. warrants the MedRx Video OtoScope System to be free from defects in material and workmanship for one year from the time of purchase. Optics have a two year warranty. If this system fails to perform as specified during this period, the purchaser is responsible for calling MedRx at (727) The company's representative will advise the owner to either return specific components or the entire system to: MedRx, Inc Starkey Road #105 Largo, FL MedRx will repair or replace any defective parts, fully test and calibrate the system and/or components and ship the system promptly back to the owner. There is no cost for this warranty service, provided the system is one year old or less and has not been misused, abused, or damaged. Such damage includes, but is not limited to, dropping, exposure to excessive heat (greater than 100 degrees F), and water/liquid damage. Repair or replacement of the system as provided under this warranty is the sole and exclusive remedy of the purchaser. MedRx shall not be liable for any consequential or incidental damages, or for breach of any express or implied warranty. Except to the extent of applicable law, any implied warranty, merchantability or fitness of this product is limited to the duration of this warranty. MedRx will, at its discretion, service and repair out of warranty components at the purchaser's request, charging for parts and labor as necessary. 11
Ultra View Manual Rev. 2 Effective 7/05
 Congratulations on Purchasing the MedRx Ultra View The MedRx Ultra View Includes: MedRx Deluxe Video Otoscope Durable Tapered 3mm Probe Compact Color Video Camera Focus Always Feature 9 Color Video Monitor
INSTALLATION MANUAL. VIDEO Camera, Probe and Lightsource OTOSCOPES.
 INSTALLATION MANUAL VIDEO Camera, Probe and Lightsource OTOSCOPES www.medrx-int.com Contents Using The Video Otoscope... 3 The Battery Operated LED Light Source... 4 Wiring Diagram - Battery Operated LED
MedRx sells several different Video Otoscope configurations with either the battery powered light source or the external light source
 MedRx sells several different Video Otoscope configurations with either the battery powered light source or the external light source We have combined the wiring instructions, trouble shooting & warranty
Contents.
 Contents Using The Video Otoscope... 3 The Battery Operated LED Light Source... 4 Connecting the Video Otoscope... 5 Connect the LEMO Cable... 6 Wiring Diagram... 7 Specula Adapter... 8 Trouble Shooting
LET OUR IMAGE ENHANCE YOUR IMAGE. Operating Instructions MedRx Digitally Enhanced Video OtoScope System
 LET OUR IMAGE ENHANCE YOUR IMAGE Operating Instructions MedRx Digitally Enhanced Video OtoScope System Digital Video Otoscope Manual Rev 1 Effective August 2003 Table of Contents Introduction to the MedRx
AVANT Audiometer Manual Rev. 2 Effective 10/05
 Contents AVANT Audiometer Software Installation...3 AVANT Audiometer Driver Installation... 4 AVANT Audiometer Setup... 5-7 Loading Calibration Files...7 Wiring Diagrams... 8-9 Limited Warranty... 10 To
TRAINING MANUAL AVANT HIT+ Hearing Instrument Test Chamber.
 TRAINING MANUAL AVANT Hearing Instrument Test Chamber HIT+ www.medrx-int.com Contents Getting to know your HIT+... 3 AVANT HIT Software Overview.. 4 AVANT HIT Software Options.... 5 Preparing for Testing...
TRAINING MANUAL. VIDEO Camera, Probe and Lightsource OTOSCOPES.
 TRAINING MANUAL VIDEO Camera, Probe and Lightsource OTOSCOPES www.medrx-int.com Contents Video Otoscope Drivers & Software USB CAMERA Getting to Know Your Video Otoscope... 3 Computer Requirements... 4
Pocket Diagnostic Instruments. Use, Care, & Maintenance
 Pocket Diagnostic Instruments Use, Care, & Maintenance Thank you for choosing an ADC Diagnostic set. We re proud of the care and quality that goes into the manufacture of each and every diagnostic instrument
For more information visit or contact hearx:
 USER MANUAL hearscope - Ground Floor, Building 2, Ashlea Gardens Office Park, 180 Garsfontein Road, Ashlea Gardens, Pretoria, 0081, South Africa hearscope v2. HSCP-MN-EN hearscope IFU v1.0 For more information
C200 bands are available in a variety of colors. Visit us at LifeTrakUSA.com
 Information Guide HOW TO CHANGE YOUR BANDS The bands of your C200 are reversible and replaceable: 1. Carefully slide the bands off the Core. The bands can slide in either direction. 1 C200 bands are available
OWNER S MANUAL. Quick Insertion Guide: INSERT EARTIP into ear canal and rotate earpiece backwards & into position CHECK FOR SEAL
 OWNER S MANUAL Quick Insertion Guide: 1 2 3 4 IDENTIFY EARPIECES marked (R) for right and (L) for left ALIGN EARPIECES at the ear canal, with cord facing forward & slightly downward INSERT EARTIP into
TABLE OF CONTENTS 1.1. WARRANTY DAMAGED SHIPMENTS SERVICE INTRODUCTION UNPACKING AND INSTALLATION
 TABLE OF CONTENTS EDITION 5 Section 1 - WARRANTY & SERVICE 1.1. WARRANTY 2 1.2. DAMAGED SHIPMENTS 2 1.3. SERVICE 2 Section 2 - INTRODUCTION 2.1. INTRODUCTION 3 Section 3 - GENERAL 3.1. UNPACKING AND INSTALLATION
MARCY DIAMOND ELITE UTILITY BENCH MD-440. Model MD-440. Retain This Manual for Reference OWNER'S MANUAL
 NOTE: Please read all instructions carefully before using this product Table of Contents Safety Notice Hardware Identifier MARCY DIAMOND ELITE UTILITY BENCH MD-440 Assembly Instruction Parts List Warranty
USER S MANUAL QUESTIONS? CAUTION. Visit our website at.
 Model No. NTCCBE950 Serial No. Write the serial number in the space above for future reference. USER S MANUAL Serial Number Decal (under seat) QUESTIONS? As a manufacturer, we are committed to providing
IMPORTANT SAFETY INSTRUCTIONS
 IMPORTANT SAFETY INSTRUCTIONS When using an electrical appliance, basic precautions should always be followed, including the following. Read all instructions before using this appliance. DANGER - To reduce
Otoscope & Ophthalmoscope Instrument Set. Use, Care, & Maintenance
 Otoscope & Ophthalmoscope Instrument Set Use, Care, & Maintenance Thank you for choosing an ADC Diagnostc Instrument Set. We re proud of the care and quality that goes into the manufacture of each and
E. SelectTech 3.1 Bench Assembly / Owner s Manual
 000-6190.121212.E SelectTech 3.1 Bench Assembly / Owner s Manual Congratulations on your commitment to fitness and your purchase of the Bowflex SelectTech 3.1 Bench. Before assembling your Bowflex SelectTech
AquaJogg Hydro Treadmill
 AquaJogg Hydro Treadmill PART #: F-WXAQJG 330 LB. [150 kg] MAXIMUM WEIGHT CAPACITY MANDATORY LEAVE THIS MANUAL WITH TREADMILL OWNER To assemble your equipment read entire manual and follow all instructions.
USER S MANUAL QUESTIONS? CAUTION. For a great selection of new CD and MP3 workouts. Visit our website at. or call
 Model No. RBBE950 Serial No. Write the serial number in the space above for future reference. USER S MANUAL Serial Number Decal (Under Seat) QUESTIONS? As a manufacturer, we are committed to providing
Owner s Manual. General Information Care & Maintenance Warranty Hearing Care Information
 Owner s Manual General Information Care & Maintenance Warranty Hearing Care Information Congratulations and thank you for your purchase of the Westone CR1. The information in this booklet will help you
#0086.
 USER MANUAL Contents Introduction... 3 AVANT POLAR HIT Software Overview.. 4 AVANT POLAR HIT Software Options. 5 Preparing for Testing.. 7 Rotational Table Control.. 10 Making HIT Measurements 11 Sample
USER S MANUAL QUESTIONS? CAUTION. Visit our website at. new products, prizes, fitness tips, and much more!
 Model No. WEBE44.0 Serial No. Write the serial number in the space above for future reference. USER S MANUAL Serial Number Decal QUESTIONS? As a manufacturer, we are committed to providing complete customer
E. SelectTech 5.1 Bench Owner s / Assembly Manual
 000-6189.080118.E SelectTech 5.1 Bench Owner s / Assembly Manual Congratulations on your commitment to fitness and your purchase of the Bowflex SelectTech 5.1 Bench. Before assembling your Bowflex SelectTech
AquaJogg Hydro Treadmill
 AquaJogg Hydro Treadmill PART #: F-WXAQJG 330 LB. [150 kg] MAXIMUM WEIGHT CAPACITY MANDATORY LEAVE THIS MANUAL WITH TREADMILL OWNER To assemble your equipment read entire manual and follow all instructions.
PRO HEAR II, PRO HEAR II+, PRO HEAR IV User s Guide
 PRO HEAR II, PRO HEAR II+, PRO HEAR IV User s Guide Pro Hear Amplification & Protection Devices Increase Hearing amplifying what you want to hear and filtering out noise. Protect Hearing using a Sound
HCS70004P, HCS70004G HCS70004C, HCS70004BL HCS70004DP, HCS70004 AEROMIST COLORS NEBULIZER COMPRESSOR KIT. Instruction Manual
 HCS70004P, HCS70004G HCS70004C, HCS70004BL HCS70004DP, HCS70004 AEROMIST COLORS NEBULIZER COMPRESSOR KIT Instruction Manual TABLE OF CONTENTS IEC Symbols...2 Important Safeguards...2 Introduction...3 Specifications...4
EXERTEC FLAT BENCH ETC-2.1. Model ETC-2.1. Retain This Manual for Reference OWNER'S MANUAL IMPEX INC.
 NOTE: Please read all instructions carefully before using this product Safety Notice Hardware Identifier Assembly Instruction EXERTEC FLAT BENCH ETC-2.1 Parts List Warranty Ordering Parts Model ETC-2.1
Activated Transponder & Activator Instruction Manual
 Activated Transponder & Activator Instruction Manual Westhold Corporation General Warranty Modules and other equipment ("Goods") purchased from Westhold Corporation are warranted against defects in materials
Thank you for purchasing the AB COASTER. Our customer service staff is ready to help and to answer any questions.
 Thank you for purchasing the AB COASTER. Our customer service staff is ready to help and to answer any questions. Our phone number is: 908-879-2713 The Ab Coaster Company, 173 Route 206, P.O. Box 9 Chester,
USER'S MANUAL QUESTIONS?
 Model No. WL000 QUESTIONS? USER'S MANUAL As a manufacturer, we are committed to providing complete customer satisfaction. If you have questions or find that there are missing or damaged parts, we will
TRAINING MANUAL. AVANT The Perfect Screening Audiometer AIR+
 TRAINING MANUAL AVANT The Perfect Screening Audiometer AIR+ www.medrx-usa.com Contents Introduction. 3 AVANT Audiometer Software Overview.. 4 AVANT Audiometer Software Options.... 4 Preparing for Testing.
Fibrlok II 2529 Universal Optical Fiber Splice
 Fibrlok II 2529 Universal Optical Fiber Splice Instructions January 2007 78-8128-0163-3-E Contents: 1.0 General... 3 2.0 Splicing Set-up... 4 3.0 Fiber Preparation... 5 4.0 Splice Assembly... 6 5.0 For
APEX FLAT BENCH JD 2.1
 NOTE: Please read all instructions carefully before using this product Safety Notice Hardware Identifier Assembly Instruction APEX FLAT BENCH JD 2.1 Parts List Warranty Ordering Parts Model JD-2.1 Retain
Universal Monitor User s Guide. Insertion Instructions Care and Maintenance Hearing Care Information Warranty
 Universal Monitor User s Guide Insertion Instructions Care and Maintenance Hearing Care Information Warranty UM Monitor Care and Maintenance Congratulations on your choice of Westone UM monitors! The information
THE TOTALLY WICKED TORNADO NC CONGRATULATIONS ON PURCHASING YOUR TOTALLY WICKED TORNADO NC ELECTRONIC CIGARETTE KIT
 USER MANUAL THE TOTALLY WICKED TORNADO NC CONGRATULATIONS ON PURCHASING YOUR TOTALLY WICKED TORNADO NC ELECTRONIC CIGARETTE KIT 3 QUICK START GUIDE For those familiar with e-cigarettes, the steps below
38IN MINI TRAMPOLINE OWNER S MANUAL CAUTION MODEL NO Assembly Adjustments Parts Warranty
 OWNER S MANUAL MODEL NO. 1231040 Assembly Adjustments Parts Warranty 38IN MINI TRAMPOLINE CAUTION You must read and understand this owner s manual before operating unit. SAFETY PRECAUTIONS Thank you for
Quick Start Guide. Congratulations on your journey to better hearing
 Quick Start Guide Congratulations on your journey to better hearing At Starkey, we believe that to hear better is to live better. Get the most out of your hearing aids Please visit starkey.com/care for
COMPACT BENCH MWB Model MWB Retain This Manual for Reference OWNER'S MANUAL
 NOTE: Please read all instructions carefully before using this product Table of Contents Safety Notice COMPACT BENCH MWB-20100 Important Assembly Information Care and Maintenance Parts List Warranty Ordering
POWER STATION With Fold up Bench
 NOTE: Please read all instructions carefully before using this product Table of Contents Safety Notice Important Assembly Information Care and Maintenance POWER STATION With Fold up Bench STB-98502 Parts
Owner s Manual. Customer Service (Option 3) Monday-Friday 6:00am to 5:00pm Pacific OR Support
 Monday-Friday 6:00am to 5:00pm Pacific OR Support") Owner s Manual Customer Service 888-678-2476 (Option 3) Monday-Friday 6:00am to 5:00pm Pacific OR Email Support parts@stairmaster.com IMPORTANT: READ ALL ASSEMBLY INSTRUCTIONS AND SAFETY PRECAUTIONS BEFORE
Owner s Manual Customer Service 888-678-2476 (Option 3) Monday-Friday 6:00am to 5:00pm Pacific OR Email Support parts@stairmaster.com IMPORTANT: READ ALL ASSEMBLY INSTRUCTIONS AND SAFETY PRECAUTIONS BEFORE
PedAlert 100. PedAlert 120
 PedAlert 100 & PedAlert 120 Operator s Manual 1996 PLANET LLC, Patent #6,174,294, B1 Notice: The manufacturer reserves the right to make changes to the device and Operator s Manual without obligation to
MARCY Magnetic-Resistance Upright Bike
 NOTE: Please read all instructions carefully before using this product Table of Contents Safety Notice Hardware Pack Assembly Instruction Parts List Warranty MARCY Magnetic-Resistance Upright Bike ME-708
MARCY ECLIPSE BE1000 STANDARD BARBELL BENCH
 NOTE: Please read all instructions carefully before using this product Table of Contents Safety Notice MARCY ECLIPSE BE1000 STANDARD BARBELL BENCH Important Assembly Information Care and Maintenance Parts
Escalade International Limited
 Motion Elliptical Product Code: ER3000D Escalade International Limited Pleasant Road, Penllergaer, Swansea. SA4 9GE Tel: 00 44 1792 222 550 Fax 00 44 1792 895 781 www.escaladesports.co.uk info@escaladesports.co.uk
USER S MANUAL QUESTIONS? CAUTION. Visit our website at. For a great selection of new CD and MP3 workouts. or call
 Model No. IFBE3540 Serial No. Write the serial number in the space above for future reference. USER S MANUAL Serial Number Decal (Under Seat) QUESTIONS? As a manufacturer, we are committed to providing
Compressor Nebulizer Instruction Manual Part No.: 5055
 Compressor Nebulizer Instruction Manual Part No.: 5055 DISTRIBUTED BY: SAVE THESE INSTRUCTIONS. CAUTION - U.S. Federal Law restricts this device to sale by or on the order of a physician. 666002-6310 V1.3
Compact Massager Instructions
 Instructions 2 Please read all instructions carefully to familiarise yourself with your new massager before using. Save these instructions for further reference. For any further assistance or information
Digital MacroView Otoscope
 Digital MacroView Otoscope See it. Share it. Save it. Offering you clear, live and still images of the ear canal and tympanic membrane, the Digital MacroView Otoscope is a valuable tool in support of the
MARCY WEIGHT BENCH MWB Model MWB Retain This Manual for Reference OWNER'S MANUAL
 NOTE: Please read all instructions carefully before using this product Table of Contents Safety Notice Important Assembly Information Care and Maintenance MARCY WEIGHT BENCH MWB-26780 Parts List Warranty
Table of Contents. Introduction Indications For Use Contraindications Warnings Precautions...5
 User Manual 3 Table of Contents Introduction....4 1. Indications For Use...4 2. Contraindications...4 3. Warnings...5 4. Precautions...5 5. Adverse Reactions...5 6. Step-By-Step Instructions...6 A. Contents...6
weight.detach/bench ITEM NO: 76310
 weight.detach/bench ITEM NO: 76310 OWNER S MANUAL IMPORTANT: Read all instructions carefully before using this product. Retain this owner s manual for future reference. The specifications of this product
Deep Kneading Shiatsu Massager EXTRA-POWERFUL SHIATSU RELIEF
 Deep Kneading Shiatsu Massager EXTRA-POWERFUL SHIATSU RELIEF TABLE OF CONTENTS Warnings and Cautions...1 Location of Parts and Controls... 6 Operation....7 Replacing the Fabric Node Cover.... 9 Care and
INSTALLATION MANUAL. MedRx TINNOMETER. Revolutionary Tinnitus Assessment.
 INSTALLATION MANUAL Revolutionary Tinnitus Assessment MedRx TINNOMETER www.medrx-usa.com Contents Getting to Know Your Tinnometer 3 Computer Requirements 4 Tinnometer 5 Transducers and Accessories 5 Software
SelectTech 3.1 Bench Assembly / Owner s Manual
 SelectTech 3.1 Bench Assembly / Owner s Manual Congratulations on your commitment to fitness and your purchase of the Bowflex SelectTech 3.1 Bench. Before assembling your Bowflex SelectTech 3.1 Bench please
COMPRESSOR NEBULIZER MODEL: JB USER S MANUAL
 COMPRESSOR NEBULIZER MODEL: JB0112-062 USER S MANUAL Read this manual before operating the nebulizer Save these instructions for future reference Caution: Federal law restricts this device to sale by or
STANDARD INDOOR SIGNS INSTRUCTION MANUAL REVISION DATE: PART#:
 STANDARD INDOOR SIGNS INSTRUCTION MANUAL REVISION DATE: 10-02-2009 PART#: 98-0016-01 SERVICE & CUSTOMER INFORMATION CUSTOMER MUST HAVE PART NUMBER WHEN ORDERING ITEMS THROUGH THE SERVICE DEPARTMENT. IF
Dumbbell Rack IVK 400. Model IVK 400. Retain This Manual for Reference OWNER'S MANUAL
 NOTE: Please read all instructions carefully before using this product Safety Notice Hardware Identifier Dumbbell Rack IVK 400 Assembly Instruction Parts List Warranty Ordering Parts Model IVK 400 Retain
COMPETITOR WEIGHT BENCH
 NOTE: Please read all instructions carefully before using this product Table of Contents Safety Notice Important Assembly Information COMPETITOR WEIGHT BENCH CB-20110 Care and Maintenance Parts List Warranty
APEX 3-Level Dumbbell Rack
 NOTE: Please read all instructions carefully before using this product Safety Notice Assembly Instruction APEX 3-Level Dumbbell Rack DBR-86 Parts List Warranty Ordering Parts Model DBR-86 Retain This Manual
MARCY ECLIPSE BE5000 OLYMPIC WIDTH BARBELL BENCH
 NOTE: Please read all instructions carefully before using this product Table of Contents Safety Notice Important Assembly Information MARCY ECLIPSE BE5000 OLYMPIC WIDTH BARBELL BENCH Care and Maintenance
NS-1104U MAGNETIC-RESISTANCE UPRIGHT BIKE. Model NS-1104U. Retain This Manual for Reference OWNER'S MANUAL
 NOTE: Please read all instructions carefully before using this product Table of Contents Safety Notice Hardware Pack MAGNETIC-RESISTANCE UPRIGHT BIKE NS-1104U Assembly Instruction Parts List Warranty Ordering
WARNING Read these materials prior to assembling and using this rebounder trampoline Use trampoline only with mature, knowledgeable supervision.
 Fitness Trampoline User s Manual Arched Leg, Folding Models DO NOT attempt or allow somersaults. Landing on the head or neck can cause serious injury, paralysis or death, even when landing in the middle
MARCY Foldable Bike NS-652. Model NS-652. Retain This Manual for Reference OWNER'S MANUAL IMPEX INC.
 NOTE: Please read all instructions carefully before using this product Table of Contents Safety Notice Hardware Pack Assembly Instruction Parts List MARCY Foldable Bike NS-652 Warranty Ordering Parts Model
Chair Massager With Heat Instructions
 Model: IS-7000 Your Personal Masseuse Chair Massager With Heat Instructions 1 INCLUDED IN BOX A. trumedic InstaShiatsu+ Chair Massager with Heat B. A/C Adapter A B *Photos and drawings are for illustrative
Active Sport Massager WITH 3 INTERCHANGEABLE MASSAGE NODES
 Active Sport Massager WITH 3 INTERCHANGEABLE MASSAGE NODES TABLE OF CONTENTS Warnings and Cautions... 2 Location of Parts and Controls... 7 Operation... 8 Changing Your Massage Nodes... 8 Using your Massager...
MARCY PRO OLYMPIC BENCH
 NOTE: Please read all instructions carefully before using this product Table of Contents Safety Notice Important Assembly Information MARCY PRO OLYMPIC BENCH PM-70210 Care and Maintenance Parts List Warranty
Installation and Maintenance Instructions
 Limited One Year Warranty T&S warrants to the original purchaser (other than for purposes of resale) that such product is free from defects in material and workmanship for a period of one (1) year from
Compressor Nebulizer. Guidebook
 NSTRU Compressor Nebulizer Guidebook MODEL: MQ6002 READ THIS INSTRUCTION MANUAL CAREFULLY BEFORE USE Compressor Nebulizer MODEL NO: MQ6002 INSTRUCTIONS INDEX 1. Introduction ----------------------------------------------------------------
RSD SYSTEM. Owner s Manual
 RSD SYSTEM Owner s Manual RSD Parts Identification Diagram Index RSD Parts Identification Diagram Page 3 Cord Guide Page 4 Attaching the RSD Page 5 Attaching the Handle Page 6 Screw Cord Guide T-nut Handle
OPERATING INSTRUCTIONS. Orascoptic DK
 User Manual Orascoptic DK is a versatile, 3-in-1 dental device that employs a handheld LED light source and three unique, interchangeable diagnostic instruments. Table of Contents 1. Orascoptic DK Kit
USER S MANUAL CAUTION ACTIVATE YOUR WARRANTY CUSTOMER CARE. Model No. WEBE Serial No.
 www.weiderfitness.com Model No. WEBE15911.0 Serial No. Write the serial number in the space above for reference. USER S MANUAL Serial Number Decal ACTIVATE YOUR WARRANTY To register your product and activate
Identification. Eartips. Battery Door. 2-Position Switch. Eartip. Removal Cord. Flexible Neck Cord Protective Case. Filter Tool and Extra ACCU Filters
 English User Manual Warnings Failure to follow these recommendations may severely reduce the amount of hearing protection provided by the earplugs. Earplugs comply with EN-352 standard of measurement.
Owner s Manual Cath Ergometer
 Owner s Manual Cath Ergometer Owner Model Serial # Date Medical Positioning, Inc. 1146 Booth Street, Kansas City, Kansas 66103 T: 816-474-1555 1-800-593-3246 www.medicalpositioning.com Symbols and Definitions...
WEIGHT BENCH MWB Model MWB Retain This Manual for Reference OWNER'S MANUAL
 NOTE: Please read all instructions carefully before using this product Table of Contents Safety Notice WEIGHT BENCH MWB-50100 Important Assembly Information Care and Maintenance Parts List Warranty Ordering
Adjustable Ab Board G
 Exclusively distributed by: RFE UK Ltd The Performance Centre Maidstone Road Kingston, Milton Keynes MK10 0BD, UK + (0)10 73020 sales@goldsgymfitness.com 2010. All rights reserved. Manufactured under license
MARCY WEIGHT BENCH MWB-479. Model MWB-479. Retain This Manual for Reference OWNER'S MANUAL
 NOTE: Please read all instructions carefully before using this product Table of Contents Safety Notice Important Assembly Information MARCY WEIGHT BENCH MWB-479 Care and Maintenance Parts List Warranty
Thank you for purchasing the AB COASTER. Our customer service staff is ready to help and to answer any questions.
 Thank you for purchasing the AB COASTER. Our customer service staff is ready to help and to answer any questions. Our phone number is: 908-879-2713 The Ab Coaster Company, 173 Route 206, P.O. Box 9 Chester,
PEMF Users Manual. IMPORTANT: Read Me Before Powering On Your Machine!
 PEMF 4000 Users Manual IMPORTANT: Read Me Before Powering On Your Machine! 2013 Lemuria Technologies LLC At the time of publishing the PEMF 4000 is not approved by the FDA. It is for experimental use or
Quick Start Guide. Congratulations on your journey to better hearing
 Quick Start Guide Congratulations on your journey to better hearing At Starkey, we believe that to hear better is to live better. Muse iq Rechargeable hearing aids help you stay connected to the people
MARCY Magnetic-Resistance Upright Bike/Hand Pulse
 NOTE: Please read all instructions carefully before using this product Table of Contents Safety Notice Hardware Pack Assembly Instruction Parts List MARCY Magnetic-Resistance Upright Bike/Hand Pulse NS-908UP
TECH 2 Dew Point Retrofit Kit
 TECH 2 Dew Point Retrofit Kit THORESON McCOSH TECH II Instruction Manual 412765A THORESON-McCOSH INC 1885 Thunderbird St. Troy MI. 48084 Phone 1-248-362-0960 Fax 1-248-362-5270 sales@thoresonmccosh.com
Quick Start Guide. Congratulations on your journey to better hearing
 Quick Start Guide Congratulations on your journey to better hearing At Audibel, we believe that to hear better is to live better. Get the most out of your hearing aids Please visit audibel.com/care for
STANDARD BENCH MWB-382. Model MWB-382. Retain This Manual for Reference OWNER'S MANUAL
 NOTE: Please read all instructions carefully before using this product Table of Contents Safety Notice Important Assembly Information STANDARD BENCH MWB-382 Care and Maintenance Parts List Warranty Ordering
Cordless 7-in-1 Super Massager WITH INTERCHANGEABLE NODES FOR 7 MAGNIFICENT MASSAGE TECHNIQUES
 Cordless 7-in-1 Super Massager WITH INTERCHANGEABLE NODES FOR 7 MAGNIFICENT MASSAGE TECHNIQUES TABLE OF CONTENTS Warnings and Cautions...1 Lithium-Ion Battery Warning.... 6 Location of Parts and Controls...7
HEINE Otoscopes. Page 007 / / GENERAL MEDICINE AND ENT INSTRUMENTS OTOSCOPES [ 006 ] 01. K 180 F.O. mini 3000 F.O.
![HEINE Otoscopes. Page 007 / / GENERAL MEDICINE AND ENT INSTRUMENTS OTOSCOPES [ 006 ] 01. K 180 F.O. mini 3000 F.O.](/thumbs/89/98265586.jpg "HEINE Otoscopes. Page 007 / / GENERAL MEDICINE AND ENT INSTRUMENTS OTOSCOPES [ 006 ] 01. K 180 F.O. mini 3000 F.O.") [ 006 ] 01 OTOSCOPES HEINE Otoscopes BETA 400 F.O. BETA 200 F.O. K 180 F.O. mini 3000 F.O. BETA 100 K 100 mini 3000 Housing construction Metal Polycarbonate Viewing window Glass Acrylic 3 x magnification
[ 006 ] 01 OTOSCOPES HEINE Otoscopes BETA 400 F.O. BETA 200 F.O. K 180 F.O. mini 3000 F.O. BETA 100 K 100 mini 3000 Housing construction Metal Polycarbonate Viewing window Glass Acrylic 3 x magnification
Neckmike Mobile User Guide Neckmike USA. Table of Contents
 Table of Contents Neckmike Mobile User Guide Quick Start Guide 2 Neckmike Components 3 Proper Fitment and Care of Earplug Speakers 3 Proper Fitment of Neckmike Microphone 5 Using With a Mobile Phone 6
OWNER S MANUAL. BODYCRAFT 7699 Green Meadows Dr., Lewis Center, Ohio Tel:
 OWNER S MANUAL BODYCRAFT 7699 Green Meadows Dr., Lewis Center, Ohio 43035 Tel: 800.990.5556 1 www.bodycraft.com SAFETY INSTRUCTION WARNING: To reduce the risk of serious injury, read the following safety
Flex-Point HEATED MUSCLE MASSAGER
 Flex-Point HEATED MUSCLE MASSAGER TABLE OF CONTENTS Cautions and Warnings...1 FCC Information...5 Location of Controls...6 Operation...6 Using the Node Covers...7 Care and Maintenance...7 Specifications...7
IGS-02 CALF RAISE BENCH. Model IGS-02. Retain This Manual for Reference OWNER'S MANUAL
 NOTE: Please read all instructions carefully before using this product Safety Notice Hardware Identifier Assembly Instruction IGS-02 CALF RAISE BENCH Exploded Diagram Parts List Warranty Ordering Parts
 Exclusively distributed by: RFE UK Ltd The Performance Centre Maidstone Road Kingston, Milton Keynes MK10 0BD, UK +44 (0)1908 793020 sales@goldsgymfitness.com www.goldsgymfitness.com 2010. All rights reserved.