itero Orthodontic Scanner
|
|
|
- Timothy Wiggins
- 6 years ago
- Views:
Transcription
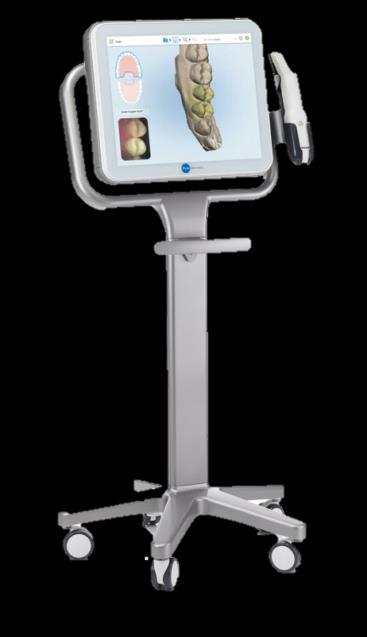
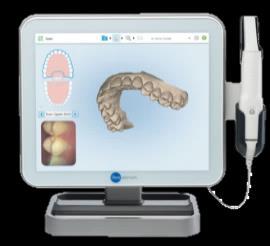


1 itero Orthodontic Scanner IOC HD2.9 Element
2 OraMetrix has its headquarters in Richardson, Texas, with offices in Berlin, Germany and Chatswood, Australia. For general information about OraMetrix, visit the OraMetrix website at Contact us for support To contact us, please call one of the phone numbers listed below, or us at Region Phone Number United States & Canada or Europe, Australia, New Zealand, Japan & South Korea Note: We are currently rolling out this number on a country-bycountry basis. If not yet available in your country, you can still call us by using our All other countries toll number below. All other countries OraMetrix, Inc. All rights reserved. suresmile, orascanner, SureWhite, and OraMetrix are registered trademarks of OraMetrix in the USA. Invisalign, itero, Element and OrthoCAD are registered trademarks of Align Technology, Inc. All other trademarks are the property of their respective owners. DOC suresmile URL:
3 Table of Contents About this Guide... 4 Getting Started... 5 What is suresmile?... 5 Workflow for itero Scanner... 8 Taking Required 2D Records... 9 Standards for suresmile Patients Scan Procedure - Element Scan Procedure IOC & HD Review Scan Quality Using the itero Scanner to Capture Data for suresmile Ordering a Therapeutic Model from STL/PLY Files Ordering an Update Model Ordering a Therapeutic Model from a CBCT Scan and a Supplemental Scan Ordering Diagnostic or Final Models FAQs Glossary itero Scanning Job Aid for Bonded Patients itero Orthodontic Systems 3


4 About this Guide This guide includes the protocol and procedures for using the itero Orthodontic Digital Ecosystem or its precursor, the Element Scanner, for suresmile treatment. Although informative for the doctor, the primary audience is the clinical assistant who will be performing itero scans and entering suresmile orders. Any practice implementing an itero system with suresmile can use this document as a reference, including: New suresmile practices planning to use the itero Element scanner for all model types. Existing suresmile practices using the orascanner who have decided to obtain an itero Element scanner. Any suresmile practice planning to use the itero Element scanner to capture supplemental and update scans for their suresmile-certified CBCT system. Practices using CBCT must also refer to the applicable guide for the suresmile protocol for CBCT scans. These documents are available in the suresmile online help. To access this area, 1. go to suresmile via your web browser 2. click the? icon and select Help Center 3. Next, find the Other Resources section in the lower-right corner of the window and select Useful Documents. 4. When this page opens, find the appropriate CBCT guide under the heading, Scanning Protocols. Prerequisite Training Prior to conducting the suresmile training and launch: The practice should be trained in the proper use of the itero imaging system by an Align Technology, Inc. clinical trainer. Scan technicians should have successfully performed at least 10 scans prior to scanning patients for suresmile. If using CBCT, the practice should be trained in the safe and effective operation of CBCT equipment by a representative of the manufacturer. To begin the process of validating your system for use with suresmile, visit sure u. You will find instructions here: > Resources > Overview > Find resource by topic > Integrated Systems > Becoming a suresmile CBCT user suresmile supports: itero Orthodontic Digital Ecosystem WARNING: suresmile does NOT support the itero Restorative system for dentists. 4 suresmile URL:

5 Getting Started Obtain a MyAligntech.com Logon Contact Align Technology, Inc. customer support at to obtain a username and password for myaligntech.com. This online account portal offers an export option for storage data. NOTE: Username and password is the same one you would use to log in on the scanner with. Upgrade OrthoCAD The export option is available in OrthoCAD or higher. If this version is not installed, click Support at the bottom of any MyAligntech.com page and choose OrthoCAD installation instructions. Install suresmile software and OrthoCAD on the same computer Prepare a computer to process orders for suresmile patients. For your convenience, choose a computer with access to your MyAligntech.com account so you can perform tasks with OrthoCAD and suresmile at the same computer using a patient data folder accessible to both programs. If you use CBCT, you can also set up a folder for patient CBCT data accessible to this computer. Install a suresmile-supported browser to submit model orders based on STL/PLY data Install surescan software to submit model orders based on CBCT data (if applicable) Cybersecurity Guidelines 1. Keep your computer's operating system up to date with patches and fixes. 2. Install and maintain an anti-virus program. 3. Install and maintain a firewall between your LAN and the internet. 4. Avoid installing browser add-ins or plug-ins. 5. Avoid downloading or installing software from unknown sites 6. Create a hard to guess password by using at least 8 characters of mixed case letters, numbers, and symbols. 7. Avoid using common words or phrases. 8. Do not reuse the same password for any accounts. 9. Consider using a password program to manage passwords, such as KeePass or LastPass 10. Do not display your password where others can see it. 11. Change your password periodically, every 60 to 90 days. 12. Logout or lock your workstation when leaving your desk. 13. Avoid clicking on links in . Instead, go directly to the site and login using your user-id and password. Contacts for service or software issues: For issues with suresmile orders, software, or CBCT protocols for suresmile, contact suresmile Customer Care per the listing on page 2 or in the suresmile online help. To access suresmile online help, go to suresmile via your web browser, click the icon and select Help Center. For issues with the itero imaging systems or exporting your STL files, please contact Align Technology, Inc. customer support. itero Orthodontic Systems 5


6 What is suresmile? The suresmile system is the first end-to-end solution that allows the orthodontist to apply 3D diagnostic imaging and computer-aided treatment planning to produce custom appliances. This results in greater control and efficiency for orthodontic care. The suresmile system is comprised of several technology components: Scanning technologies to produce a 3D model of the patient s dentition that may be captured in an optical scan by our orascanner or a certified third party scanner; scans may also be captured by a certified CBCT system. suresmile 3D software, which provides powerful visualization tools for precision diagnosis, treatment simulation and customized appliance design. The doctor can review the digital setup with this software and use it to communicate with patients and with the suresmile Digital Lab. surescan software primarily used for scan acquisition with the orascanner or CBCT data submission The suresmile Digital Lab provides scan and setup processing to produce precise robotically bent custom archwires; or you may send the models to your lab to fabricate other appliances such as aligners. IMPORTANT: OraMetrix does not determine patient care. OraMetrix provides therapeutics as directed by the doctor. The best possible results from the suresmile process depend on the application of the doctor s diagnostic and clinical judgment. 6 suresmile URL:
7 Treatment Models The table below lists the 3D models produced from scans to support suresmile treatment. An optical scan may be captured by scanning a patient in-vivo (intraorally) or by scanning a plaster model. However, an in-vivo scan is required for wire therapy and strongly recommended when capturing any model used for appliance design. The Digital Lab also produces a setup, which is a model of the doctor s treatment plan based on the therapeutic model to fabricate custom appliances. Model Purpose Source Data Diagnostic Model Models the malocclusion, including individual teeth, to support: full dental examination using 3D diagnostic tools, a simulation of treatment options, and/or a model for appliance design. Optical scan In-vivo or plaster CBCT In-vivo or plaster Therapeutic Model This scan is captured intraorally (or by in-vivo CBCT). For bonded patients, models the patient s current tooth anatomy and bracket positions. Captured any time after bonding in preparation for designing custom archwires. Optical scan In-vivo* CBCT In-vivo scan For unbonded patients, models the patient s current tooth anatomy to support: full dental examination using 3D diagnostic tools, a simulation of treatment options, and/or a model for appliance design. CBCT users have an additional scan option that accompanies a therapeutic scan: Supplemental scan an intraoral scan primarily used to capture areas with restorations that cannot be accurately modeled from a CBCT scan. The two scans of the patient are combined to produce a complete model. Optical scan In-vivo* Update Model (for bonded patients only) This scan is taken intraorally by an optical scanner to capture areas that have changed since the last model was produced. Schedule an update scan when you need to order archwires, but bracket positions have changed or new teeth have erupted. Note: If new teeth are captured, you must order a new setup prescription before ordering wires. Optical scan In-vivo* Final Model Models the patient s final tooth positions with individual teeth to support a full Dental Examination using 3D diagnostic and quality grading tools, and/or a model for appliance design. Optical scan In-vivo or plaster CBCT In-vivo or plaster * Visit under integrated systems for a list of optical scanners that are certified to capture data for therapeutic models. itero Orthodontic Systems 7
8 Workflow for itero Scanner While you may use your itero scanner to scan either intraorally or scan a plaster model, the following scan types must be captured intraorally: Therapeutic scans upper and lower arches (both arches are required even if the patient is receiving single arch treatment since both are needed to plan the occlusion) Update scans arches or partial scans of arches to capture changes to tooth anatomy and/or brackets Supplemental scans arches or partial scans of arches to capture supplemental data for CBCT scans In addition, we strongly recommend capturing diagnostic and final scans intraorally when you plan to use them to design an appliance (aligners, for example). After capturing the data, export.stl files and submit them to the suresmile Digital Lab via an order. The process for the therapeutic scan appointment, which contains the most steps since it must be captured intraorally and requires records, is depicted below. Overview of the Therapeutic Scan Appointment Prepare the patient Wires out, bracket doors closed Scan Capture data using the itero scanner and send to Align Take photos/ x-rays Reinsert wires Export* Retrieve stored data via MyAligntech.com; export to.stl Submit suresmile Order* Attach data to suresmile order and submit for modeling *The steps to export the data from MyAligntech.com and attach it to a suresmile order may be completed after the patient appointment. To avoid delays to treatment, make sure you submit orders by the end of the day. 8 suresmile URL:
9 Taking Required 2D Records The suresmile system requires current photos and x-rays any time a scan is taken to optimize 3D modeling accuracy. Each photo is used for a specific purpose in Digital Lab modeling or setup processing. A standard photo set consists of: 3 extraoral photos: Extraoral photos indicate the natural jaw position and natural smile line. The Digital Lab uses this information when orienting the 3D model to the head position. 5 intraoral photos: The Digital Lab references intraoral photos to confirm tooth anatomy, check bite registration, and confirm bracket placement. The following table illustrates the records required (or recommended) for each model type. Required Photos Required X-Rays Strongly Recommended Diagnostic Model Therapeutic Model - - Five standard intraoral + three facial + full mouth Five standard intraoral + three facial Panorex + initial or current Ceph* Panorex, Ceph Full Mouth + Overjet Final Model - - Five standard intraoral + three facial + full mouth Panorex, Ceph For best results, photos should be taken the same day as the scan. To meet minimum modeling requirements, they must be taken within 4 weeks before or 2 weeks after the scan. * For the most accurate orientation of the model to the head position, the Digital Lab recommends importing a ceph that includes the Frankfort Plane. If the patient s CBCT scan does not capture this anatomy, you can import the ceph from the initial records. itero Orthodontic Systems 9


10 Import Records On Time Import required photos/x-rays into the patient s suresmile record before the data is sent to OraMetrix. If the 3D data arrives at the Digital Lab without the required records, the order will be placed on customer hold, and you will have to release the hold before work can begin in the Digital Lab Create a new image set Create the image set using an integrated imaging system to automatically create the patient record and upload the set, or create the set manually in suresmile via the web: 1. On the patient overview, click Image Sets and then select Add Image Set Enter the name for the image set. 3. If you need to change the date, type the date or click the calendar icon and select the date that the records were taken. 4. Click Save. Upload multiple images Next, upload photos and x-rays. 1. Click the Upload Files button for the image set. 2. Select multiple image files from the Open dialog, and click Open. 3. Drag and drop images into their correct position in the montage. 10 suresmile URL:


11 Standards for suresmile Patients If the patient is not bonded, you will follow your usual scanning procedure for capturing a model of the patient s teeth. Like your Invisalign orders, suresmile requires 100% tooth coverage in scans with 2mm of gingiva. Even if your office is experienced with using an itero scanner with Invisalign cases, you will need to understand how to capture data for suresmile patients who are bonded. The requirements are: 100% tooth coverage and interproximal areas 100% of bracket face/wings 70% of bracket mesial and distal profiles 2mm of gingiva Because the suresmile system will fill in holes with artificial data, these standards must be met to produce an accurate representation of the patient. See page 15 for coverage examples. Prepare the Patient 1. If the patient is bonded, remove the patient s wires in the arches to be scanned. If they are suresmile archwires, keep track of their orientation to help you reinsert them correctly at the end of the appointment. 2. Remove calculus and any other material that will misrepresent the true shape of the teeth. If the patient has turbos: If the turbos are scheduled to be removed at this appointment, remove them before the scan. Otherwise, enter a note in the suresmile order to describe the location of the turbos. 3. If you are using self-ligating brackets, close bracket doors. NOTE: The manufacturer recommends using retractors to avoid capturing excessive tissue in scans especially for anterior teeth (see the Scanner User Guide). itero Orthodontic Systems 11
12 Scan Procedure - Element Scanning Bonded Patients If the patient is bonded, add the best practices on the following pages to your procedure to adequately capture teeth with brackets. Depending on user preference, you can begin scan on either upper or lower arch and on right or left side. Keep Areas Dry Part of capturing a high quality scan, it is important to keep areas being scanned completely dry. Saliva and bubbles can distort the surface captured by the scanner. Be sure to have extra cotton rolls or gauze in addition to having a constant suction at hand. Opaque Brackets Before you begin scanning, you must apply an opaque material to brackets in order to capture with this scanning technology Use a material such as SureWhite (available from suresmile Customer Care) that can provide a thin coating for the bracket without obscuring its detail. Lower Upper 12 suresmile URL:


13 Brackets Present While completing the case Rx, it is important to be aware of the recipient being scanned. Do the patient s teeth have brackets bonded or not? If so, it is critical that the Brackets Present field is checked. This will allow the scanner to include all attributes of the bracket in the processed scan. Brackets Present feature Bracket scan quality if Brackets Present checked Bracket scan quality if Brackets Present is NOT checked Notice how the system tries to remove the bracket data from the processed scan itero Orthodontic Systems 13


14 Capture the Occlusal Segment of an Arch To scan the occlusal surface, move in a single continuous motion. Being sure to keep wand flat on the occlusal, steadily bring wand toward anterior. When you reach the bicuspid continue by swiping across the anterior, tilting slightly to the lingual at the contralateral bicuspid and then proceed by moving the tip straight back to the contralateral terminal tooth. This will allow for capture of continuous segments of anatomy. Capture the Lingual Segment of an Arch Once you reach the most terminal molar, rotate to lingual. Bring cable end out to side and maintain a 45 angle of wand tip to lingual surface. Using twisting motion, continue around entire arch being sure to capture the interproximal anatomy of the entire lingual surface. Holding the want tip against the tooth will help to retract the tongue. 14 suresmile URL:


15 Capture the Buccal Segment of an Arch If the patient is in lingual treatment, remember the side that is bonded is the most critical view for modeling. After scanning of lingual is complete, rotate to buccal surface. Tilt wand at larger angle (bringing cable end away from arch) and move towards midline to capture distal of tooth/bracket and interproximal anatomy of the buccal. Once you cross the midline, move wand tip to opposite terminal tooth and use same technique to capture distal and interproximal anatomy of buccal moving from posterior to anterior. Moving from posterior to anterior when scanning buccal surface reduces interference from cheek and allows for a smoother scanning experience Tilting wand tip (bringing cable end closer to the arch) and at a slight diagonal angle will allow better capture of the mesial surface of tooth/bracket and the underside of bracket area. itero Orthodontic Systems 15


16 Capture the Upper/Lower Anterior After scanning of buccal is completed, move to anterior to capture incisal surface. Place wand so that the lingual of the cuspid and lateral are centered in view finder. Roll from lingual surface, over incisal edge to buccal/facial surface. Repeat on contralateral side. These scan helps to ensure that lingual and buccal segments are joined with the accurate incisal surfaces. Capture the Palate To scan the palate: Begin at the midline directly behind the central incisors. Follow with additional scans until reaching the soft palate. Fill remaining palatal surfaces by sliding the wand side to side. 16 suresmile URL:

17 Capture the Bite The final segment is the bite. Prior to scanning confirm the patient s bite. Have the patient open, use the wand to retract the cheek and have patient close in centric occlusion. Bring wand tip gently against teeth observing the occlusion in the view finder. Start with the first molars. Center the wand between the upper and lower arches and slowly move forward in a small wave-like motion, capture 3-4 teeth and then move to the contralateral side using the same technique. Once bite has been captured, the upper and lower arches will occlude according to the bite scan. Proceed to Review Scan Quality section itero Orthodontic Systems 17
18 Scan Procedure IOC & HD2.9 Plan Segments Since the itero IOC and HD2.9 scanners offers a limited amount of pictures per segment. we recommend the techniques detailed in the following sections to achieve these goals: Ensure that completed segments will merge Capture accurate and complete modeling data, including bracket features Follow the most efficient steps WARNING: Do NOT complete a segment without capturing all required anatomy; including interproximal areas and bracket face/wings, since the irecord case type causes the system to fill in holes upon completion of a segment. You will typically need all pictures for maximum accuracy with suresmile. Remember, the IOC and HD2.9 scanners offers a maximum of 8 segments per upper/lower scan. In other words, there are 4 segments per arch (labial right, lingual right, labial left, lingual left). Scanning Bonded Patients If the patient is bonded, add the best practices on the following pages to your procedure to adequately capture teeth with brackets. Depending on user preference, you can begin scan on either upper or lower arch and on right or left side. Keep Areas Dry Part of capturing a high quality scan, it is important to keep areas being scanned completely dry. Saliva and bubbles can distort the surface captured by the scanner. Be sure to have extra cotton rolls or gauze in addition to having a constant suction at hand. Opaque Brackets Before you begin scanning, you must apply an opaque material to brackets that are difficult to capture with this scanning technology Use a material such as SureWhite (available from suresmile Customer Care) that can provide a thin coating for the bracket without obscuring its detail. 18 suresmile URL:


19 Capture the Occlusal Segment of an Arch To scan the occlusal surface, move in a single continuous motion. Being sure to keep wand flat on the occlusal, steadily bring wand toward anterior. Capture the Buccal Segment of an Arch If the patient is in lingual treatment, remember the side that is bonded is the most critical view for modeling. After starting with your occlusal surface of the last molar, hold the wand over the buccal cusps of the molars for an occlusal/buccal view of the posterior teeth. It is necessary to capture some of the occlusal view in the buccal segment to help the system merge with the lingual segment later. Continue scanning along the segment working your way mesially until you cross the midline. Since the brackets will block your view and leave holes, position the wand perpendicular to the buccal view and take additional pictures to fill in the holes. Follow the manufacturer s recommendations for rocking mesially and distally to capture interproximal areas. This method is recommended to help avoid shadowing (which will become holes in the data). See your itero tutorials for a demonstration. Rocking pattern recommended by the manufacturer to position the wand to capture interproximal areas. itero Orthodontic Systems 19


20 Capture the Lingual Segment of an Arch If you still have holes after you have used up your buccal pictures, you can try to compensate as you scan the lingual view. Hold the wand at an angle to capture both lingual and occlusal views. Remember to continue using the rocking pattern, if needed, to capture interproximal areas. Capture the Lower Anterior As recommended in the itero tutorials, scan across the facial surface of the lower anterior (holding the wand sideways) also capturing incisal edges. Capture the Upper Anterior As recommended in the itero tutorials, scan across the facial surface of the upper anterior (holding the wand sideways) also capturing incisal edges. However, for the lingual surface of the upper anterior, hold the wand vertically while scanning to include incisal edges with lingual views. 20 suresmile URL:


21 Review Scan Quality Examples of Insufficient Overlap in Anterior If you see ridges or grooves at the incisal edge that do not reflect actual tooth anatomy, the scan has not accurately registered; and it will ultimately be rejected by the suresmile Digital Lab. Do not order this scan. Instead, delete the segment and re-scan to capture accurate data. NOTE: Once the scan is sent to Align Technology, Inc., it cannot be modified. If the scan is rejected by suresmile, the patient must be recalled and the data re-captured. itero Orthodontic Systems 21
 coverage.")

 These images are from")


22 Examples of Coverage Here are examples of scans with good and bad (insufficient) coverage. suresmile requires 100% of tooth surfaces. itero Scans with Good Coverage itero Scans with Bad Coverage 100% of coverage area Multiple voids. Insufficent coverage (<100%) These images are from suresmile after the itero data has been imported. Looking at the left buccal view, you can see the missing coverage causes the brackets shape to be distorted. The distortion will cause bracket registration to be compromised. 22 suresmile URL:


23 Magnification of the UL5 bracket shows the distortion of the upper mesial wing and pad. itero Orthodontic Systems 23

24 Using the itero Scanner to Capture Data for suresmile Start the Patient s itero Record 1. Create or open the patient s record on the itero scanner. 2. For the Case Type, select irecord. WARNING: The irecord case type is provided for model storage. You may be charged a storage fee depending on your service terms. To find out more, contact Align Technology, Inc. customer support at If you accidentally order your scan using another case type, you may be charged an Invisalign case fee. Contact Align Technology, Inc. customer support immediately to correct the type. An Invisalign scan can only be used for an Invisalign case; if you choose the wrong case type, the patient will need to be re-scanned. 3. Proceed to the scanning windows and tools. 24 suresmile URL:

25 Take the Scan/Send Order 1. If you are capturing data for a therapeutic model, capture the upper and lower OR If you are capturing data for an update scan or supplemental scan, capture only the arches or areas needed. 2. Fill in any voids to capture: Therapeutic scan: 100% of tooth surfaces for all teeth in a therapeutic scan Update scan: 100% of tooth surfaces for changed teeth plus adjacent teeth for a minimum of 3 teeth (to provide good coverage for integrating new data with the therapeutic model) Supplemental scan: 100% of tooth surfaces for teeth that cannot be modeled from the CBCT scan plus adjacent teeth for a minimum of 3 teeth (to provide good coverage for integrating new data with the therapeutic model) 100% of bracket face/wings 70% of bracket mesial and distal profiles Gingival margins 3. Complete the order to send the data to MyAligntech.com. You can take patient photos and x-rays at the time that works best for you during the appointment. Since the file transfer process may take several minutes, you may find this is a good time to take records. NOTE: The suresmile Digital Lab recommends marking the bite with articulating paper when preparing to take photos. Also, wires must be removed for suresmile records. 4. Reinsert the archwires and complete the patient appointment. itero Orthodontic Systems 25


26 Export your Scan Data from MyAligntech.com You may export the patient s data during the appointment, or wait until later to process several cases at once. 1. Go to the computer where you can access MyAligntech.com and suresmile. 2. Logon to your MyAlignTech account. 3. On the individual patient Order Information page, click Export. 4. Clicking the Export (OrthoCAD 3.5 or higher) will launch OrthoCAD. If it doesn t open, click on link in this window to download. 5. Open File message window will display indicating that a storage folder was not defined. Choose OK to select the folder and store the downloaded model Choose Cancel to store the downloaded model in a temporary folder. 6. Once you select OK, the Options. Model Folders window opens allowing user to define the folder for the downloaded model. Choose option that works best with your office s workflow. 26 suresmile URL:
. Otherwise, your model may be rejected by the Digital Lab, 8.")

27 7. Select these settings: Export Type: Open Shell Data Format: Two Files (arches oriented in occlusion) Folder: Enter the folder name you have created for this purpose and save the data with the patient s name. WARNING: Be careful to choose the correct data format of Two Files (arches oriented in occlusion). Otherwise, your model may be rejected by the Digital Lab, 8. You may repeat these steps for any other patients with data waiting to be exported. 9. Close MyAligntech.com and OrthoCAD when you are finished exporting scans. Next, you will open suresmile and use a model order to submit your data to the suresmile Digital Lab as described on the following pages. NOTE: OrthoCAD will not export a bite segment. The arches are put into occlusion during the scan, so no bite segment is required Open the suresmile Patient Record 1. Log onto suresmile, preferably on the computer that can also access the itero.stl export feature. 2. If the patient record has NOT been created in suresmile, start a new record. Otherwise, find and open the patient record. itero Orthodontic Systems 27
28 Continue to Specific Scan Steps If you are using an integrated imaging system such as Dolphin, you can push your new record set to initiate a suresmile patient record. If not, you will need to start a new record and then a new image set. After the patient record is created in suresmile, continue to the section for the scan type you are ordering: Ordering a Therapeutic Model from STY/PLY Files Ordering an Update Model Ordering a Therapeutic Model from a CBCT Scan and a Supplemental Scan Ordering Diagnostic or Final Models 28 suresmile URL:

 3. In the drop-down menu, select the appropriate case type and click Save Changes.")

29 Ordering a Therapeutic Model from STL/PLY Files Create/Open a Patient Record 1. Login to suresmile: 2. Add a new patient record or open a patient record. Select a Case Type 1. On the Patient Overview, click the New button and look at the menu. 2. If the Select Case Type option is available, choose it from the menu to go to the Patient Profile page. (If it is not available, continue to the steps below Start a Therapeutic Model Order. ) 3. In the drop-down menu, select the appropriate case type and click Save Changes. The software returns to the Patient Overview. WARNING: If your patient will be treated with custom wires now or as a later therapy, do NOT select the Aligner case type. 4. Continue to the steps below Start a Therapeutic Model Order. Start a Therapeutic Model Order 1. On the Patient Overview, click the New button and choose Therapeutic Model. A new model order opens. 2. Update the Dental Exam for the Teeth tab. 3. If the patient is bonded, select the Brackets tab and update the Dental Exam for the bracket assignments. itero Orthodontic Systems 29
30 Upload 3D Scan Data Files 1. For Upper Jaw, click the Choose File button, select the patient s upper scan file and click Open. 2. For the Lower Jaw, click the Choose File button, select the patient s lower scan file and click Open. At this point, the files are simply assigned but not yet uploaded. The Submit Product button will not become available until you upload files. NOTE: The bite data is not required since the upper/lower relationship was set at the time the data was captured. 3. Click Upload Files and wait a minute for the files to be copied to the cloud. A confirmation appears in the Already uploaded area. Submit the suresmile Order for a Therapeutic Scan The Submit Product button becomes available for a therapeutic model order when you have uploaded files for both the upper and lower arches. TIP: If you see a red notice instead of the Submit button, you have skipped the steps to select a case type. Follow the link in the notice to make your choice. 1. Click in the Product Notes area, and type any relevant notes regarding your order. 2. Click the Deliver with Brackets checkbox as needed: In a therapeutic model order, the Deliver with Brackets checkbox is checked by default. If this is correct (the patient is bonded and will receive custom wires), continue to the next step. OR, if you are scanning a patient that is NOT bonded (or will be debonded at the next appointment) to transition from braces to aligners, uncheck the Deliver with Brackets checkbox. 3. Click Submit Product. Once an order is submitted, the therapeutic model order status is updated to Ordered. The order is now restricted to Read Only in the practice. This means you can review it, but you cannot change it. If you have submitted an order that you would like to cancel or change, please contact suresmile Customer Care. 30 suresmile URL:
31 Ordering an Update Model An update scan is used to update the therapeutic model of bonded patients in the event of: A newly erupted tooth has been added to treatment. One or more brackets were rebonded or repositioned. The tooth anatomy has changed to the extent that the setup is affected. NOTE: The update scan is applicable to bonded patients only, and is not available in an aligner case type Capture Scan Pieces Although the itero software is designed for full arch scanning, you can capture just a section for a suresmile update scan. Here are some tips: You do not have to start at a terminal tooth. The scanner will allow you to start and end at any tooth. When you stop and view the scan, the software will simply close up the hole at either end. Use the itero menus to choose Next or Previous to skip to the appropriate area and capture each piece. To capture multiple areas in one arch, we recommend performing a full arch scan. The sections to be modeled by the Digital Lab should be captured at the highest possible quality; however ancillary areas can be captured to lower standards. To help the Digital Lab accurately merge and process the update scan data to update the therapeutic model, follow these requirements: Requirements Capture the affected teeth AND the adjacent teeth. Example If you rebonded the LL4 and LL5, capture the LL3-LL6 Capture a minimum of three teeth. If you added the UL7 to treatment, capture the UL5-UL7 For the required area, follow quality criteria described for Therapeutic Scans If you changed the brackets on the molars, completely capture anatomy and brackets for the molars. The anterior may be captured at a lower quality as long as the arch is connected into one piece. WARNING: Although suresmile can upload many segments, your itero or OrthoCAD software may limit you to two segments per patient. Scan full arches as needed. itero Orthodontic Systems 31
32 Start an Update Scan 1. On the Patient Overview, click the New button and choose Update Model. A new model order opens. NOTE: If the update model option is not available: If you selected the Standard or Extended case type, make sure that you have submitted a therapeutic model order. If you selected the Aligner case type, you cannot use the update model feature. To capture changes to tooth anatomy for this case type, order another therapeutic model (additional fees may apply). 2. Update the dental exam and bracket assignments, if changed. 32 suresmile URL:
 and click Open. 3. Click the Coverage drop-down adjacent to Segment 1. A dialog appears with a tooth chart. 4.")

33 Upload 3D Scan Data Files 1. For Segment 1, click the Choose File button, and browse to the patient folder you created for this purpose. 2. Select the STL file you saved for the patient s arch (or partial arch) and click Open. 3. Click the Coverage drop-down adjacent to Segment 1. A dialog appears with a tooth chart. 4. In the tooth chart, indicate your modeling request: If you are capturing a bracket rebond, click the corresponding tooth symbol ONCE. The bracket symbol is shaded in dark blue. OR If you are capturing a new tooth, click the corresponding tooth symbol TWICE. Both the tooth and bracket symbols are shaded in dark blue. 5. Click Close to close the tooth chart. 6. Repeat these steps for each segment you captured for this patient. You may attach up to four segments. OR To remove a data segment, click the Remove button adjacent to the segment information. NOTE: There is room for four segments, which should be more than sufficient. If there are extensive changes to the patient s teeth and brackets, we recommend ordering a new therapeutic model (full scan of both arches). 7. Click Upload Files button and wait a minute for the files to be copied to the cloud. A confirmation appears in the Already uploaded area. itero Orthodontic Systems 33

34 Submit the suresmile Order for an Update Model The Submit Product button becomes available for an update model order when you have attached data. 1. Click in the Product Notes, and type any relevant notes regarding your order. 2. Click Submit Product. 3. Click OK to confirm you have updated bracket assignments, if changed. Once an order is submitted, the update model order status is updated to Ordered. The order is now restricted to Read Only in the practice. This means you can review it, but you cannot change it. If you have submitted an order that you would like to cancel or change, please contact suresmile Customer Care. 34 suresmile URL:
 to the data from a CBCT scan to form a complete representation of the patient.")

 is needed.")


35 Ordering a Therapeutic Model from a CBCT Scan and a Supplemental Scan A supplemental scan is used to add data from an optical scan (itero) to the data from a CBCT scan to form a complete representation of the patient. This scan is required if the patient has a certain number of teeth with restorations that cannot be accurately modeled from a CBCT Scan. Optionally, it can be used to add a bite segment as well as order a premium modeling service where all or most crowns are modeled from the optical data (additional fee applies). Refer to the appropriate CBCT protocol to determine if a supplemental scan (or premium) is needed. Capture Scan Pieces Although the itero software is designed for full arch scanning, you can capture just a section for patients with minimal restorations requiring a supplemental scan. Here are some tips: You do not have to start at a terminal tooth. The scanner will allow you to start and end at any tooth. When you stop and view the scan, the software will simply close up the hole at either end. Use the itero menus to choose Next or Previous to skip to the appropriate area and capture each piece. To capture multiple areas in one arch, we recommend performing a full arch scan. The sections to be modeled by the Digital Lab should be captured at the highest possible quality; however ancillary areas can be captured to lower standards. See the appropriate CBCT protocol to determine when a patient is eligible for a CBCT scan; and, if the patient requires a supplemental scan or a premium supplemental. itero Orthodontic Systems 35

36 To help the Digital Lab accurately merge and process the supplemental scan data into the therapeutic model, follow these requirements: Requirements Capture the affected teeth AND the adjacent teeth. Example If the upper laterals have been built up, capture the UL3-UR3 Capture a minimum of three teeth. If the UL7 contains a large filling, capture the UL5- UL7 For the required area, follow quality criteria described for Therapeutic Scans If both sides of an arch have been restored in the posterior, completely capture anatomy and brackets for the restored teeth and adjacent teeth. The anterior may be captured at a lower quality as long as the arch is connected into one piece. WARNING: Although suresmile can upload many segments, your itero or OrthoCAD software may limit you to two segments per patient. Scan full arches as needed. Start a Therapeutic Model Order (for CBCT Scans) 1. In the browser, create an order for a Therapeutic CBCT scan following the instructions in the suresmile protocol for your CBCT Scanner. 2. Complete the dental exam. 3. Refer to surescan to import the CBCT data. NOTE: You must attach CBCT data using the Select CBCT scan data folder button before the Finish Scan button becomes available in surescan and the Submit button available in suresmile browser. 36 suresmile URL:

 to select all teeth and gingiva in the arch for premium modeling (additional fee applies).")
37 Import STL Files for Supplemental Scans 1. Select the Files (PLY/STL) tab. 2. Under the tab, click the Create/Preview/Edit icon adjacent to the segment name (such as Segment 1). 3. In the tooth chart, select each tooth in one arch to be modeled from the supplemental scan due to limitations of CBCT processing. For example, if the UR5 and UR6 both have metal fillings larger than 3 mm, select each tooth symbol. OR Click the arch checkbox (upper or lower) to select all teeth and gingiva in the arch for premium modeling (additional fee applies). WARNING: This option requires full arch data for the supplemental scan to be processed successfully by the Digital Lab. If you captured partial segments, do not use this feature! itero Orthodontic Systems 37
, and then click Open. 6. If needed, use the on-screen camera navigation controls to view the model.")

38 4. Click the folder icon in the New Supplemental Scan Segment window, and browse to the patient folder you created for this purpose. 5. Select the STL file you saved for the patient s arch (or piece), and then click Open. 6. If needed, use the on-screen camera navigation controls to view the model. Click OK when you are finished to close the New Supplemental Scan Segment window. Notice that the name of the segment is updated according to the teeth you selected. 7. If you have another segment, click to add another row of segment icons and repeat steps 2-7 to add another data segment. OR To remove a data segment, click the button adjacent to the segment information or to view the segment. NOTE: The bite option is not applicable with itero scans since bite information is stored within the upper and lower arch files. 38 suresmile URL:


39 Submit the suresmile Order for a CBCT Scan with a Supplemental Scan surescan 1. Once all necessary scan data have been uploaded for the CBCT scan with supplemental order, it is time to complete the task. Click in the white area, and type any additional notes regarding your order. 2. Click on Finish Scan to complete task for this patient and submit the scan. 3. Click OK and return to suresmile in the browser to submit the product. itero Orthodontic Systems 39

40 Return to suresmile 1. Return to suresmile in the browser (F5 to refresh if patient is not showing). if suresmile is on the same computer as surescan If surescan is already opened: click the globe icon in the surescan menu bar. The system creates a new tab in the browser with the refreshed data. If surescan is not open, click the globe icon in the surescan menu bar to open the order page in suresmile for the patient. on a different computer go to that computer and open suresmile. 2. Open the order page for the patient and scroll down to Submit Order. Enter any additional information about the order for the Digital Lab if needed (optional). If you have not fulfilled all of the prerequisites when you return to the suresmile browser, suresmile opens to the Missing Prerequisites section of the Order page and shows which prerequisites are still missing. The system displays a reminder to refresh the screen. A message, Scan data missing, remains displayed until you manually refresh the web page. (Press the F5 key.) You must submit all missing prerequisites before you can submit the product order. Once you fulfill all missing prerequisites, click Submit Product to order the model. The Select your 3D Scan Data files section of the Order page closes. 40 suresmile URL:


 Model. A new model order opens.")
41 Ordering Diagnostic or Final Models The suresmile software supports the same STL/ PLY format option for importing data to build diagnostic and final models. You can capture the patient s dentition using your itero scanner or any other device that can export a PLY or STL file. For example, some offices use a tabletop scanner to capture plaster models for initial and final records. The requirements for suresmile scan quality are: 100% of every tooth surface 2 mm of gingiva No interproximal, gingival or lingual holes No missing cusp tips Just like the therapeutic scan, a standard record set including photos and x-rays helps the Digital Lab with tooth modeling. For diagnostic and final models, these records are recommended rather than required. Start a Diagnostic/Final Scan 1. Open suresmile via your browser. On the Patient Overview, click the New button and choose Diagnostic (or Final) Model. A new model order opens. NOTE: If you see a $ sign in the menu option, a fee applies for this service. 2. Update the Dental Exam for the Teeth tab. $ indicates a fee will apply for that service itero Orthodontic Systems 41


42 Import STL Files for Diagnostic/Final Scans 1. For Upper Jaw, click the Choose File button, select the patient s upper scan file and click Open. 2. For the Lower Jaw, click the Choose File button, select the patient s lower scan file and click Open. At this point, the files are simply assigned but not yet uploaded. The Submit button will not become available until you upload files. NOTE: The bite data is not required since the upper/lower relationship was set at the time the data was captured. 3. Click Upload Files and wait a minute for the files to be copied to the cloud. A confirmation appears in the Already uploaded area. Submit the Order for a Diagnostic/Final Model The Submit Product button becomes available when you have attached data. 1. Click in the Product Notes area, and type any relevant notes regarding your order. 2. Click the Deliver as Finished checkbox as needed: For diagnostic models, leave the box checked if you prefer the model to be delivered with a workflow task that includes options for starting an IDB tray or treatment simulation. Uncheck the box if you prefer the model to be delivered in a Review Order state. For final models, leave the box checked if you prefer the model to be delivered without a task. Uncheck the box if you prefer the model to be delivered in a Review Order state. 3. Click Submit Product. Once an order is submitted, the order status is updated to Ordered. The order is now restricted to Read Only in the practice. This means you can review it, but you cannot change it. If you have submitted an order that you would like to cancel or change, please contact suresmile Customer Care. 42 suresmile URL:
 will visit your office to support you as you launch suresmile treatment.")
43 FAQs How will I learn to integrate the itero scanner with suresmile treatment? If you are new to suresmile, your Account Manager (AM) will visit your office to support you as you launch suresmile treatment. During this visit, the AM will educate selected staff on all of the functionality for completing and managing suresmile orders. As an additional reference, visit sure u: > Resources > find resources by topic > integrated systems > itero Integration with suresmile Which brackets can we use with patients scanned using the itero scanner? All brackets in the suresmile bracket library are available for use with the itero scanner. However, if you are using CBCT for therapeutic scans with the itero scanner capturing any needed supplemental scans, you are limited to brackets labeled CBCT-Approved. Can I use SureWhite on the teeth or brackets to help with itero scanning? If you are having difficulty capturing clear brackets, such as 3M Unitek Clarity, you can apply a thin coating of SureWhite on these brackets prior to scanning. In addition to helping you capture clear brackets, SureWhite can also help you scan restorations such as veneers that inhibit data capture. What if I am interrupted while working on completing the order in suresmile and cannot finish importing required records until later? Do not click Submit. When you are ready to complete the order, select the Tasks tab and filter for Submit Order to easily find your incomplete patient records. Why would I submit an update model order? An update scan is used to update the therapeutic model in the event of: A newly erupted tooth has been added to treatment. One or more brackets were rebonded or repositioned. The tooth anatomy has changed to the extent that the Setup is affected. itero Orthodontic Systems 43

44 When is a supplemental scan required? There are two situations when a supplemental scan is required: During the initial examination, you determine that the patient has restorations that do not meet our requirements for CBCT-only scans. Your CBCT scan was rejected due to excessive noise (usually from metal fillings), and the Digital Lab requested a supplemental scan. If the patient has 7 teeth per arch (or 11 total) with problematic restorations, the CBCT scan will most likely be distorted. To compensate for this issue, you may scan full arches in the supplemental scan area to request our premium service (available for an additional fee). Or, to avoid the fee, do not submit a CBCT scan. Instead, submit a full intraoral scan of the patient using your itero. Do we need to take the CBCT scan and the supplemental scan the same day? Yes. When you examine the patient at the beginning of treatment, you will see which teeth cannot be captured in a CBCT scan and will require a supplemental scan. At that time, schedule the patient for the CBCT scan AND for chair time with the itero scanner during the same appointment. Since the data will be combined in the suresmile Digital Lab, the scans should be taken the same day. What if my scan is rejected because a supplemental scan is needed or has a problem? Recall the patient to capture the area that was missed or is a problem. This appointment must be scheduled within 2 weeks of the CBCT scan or the new scan may not register with the CBCT scan since the teeth are moving. Refer to the suresmile Digital Lab product notes for instructions. When you open the patient record, double-click the name of the rejected product (shaded in red under the Items heading). You will need to click Yes to restart work on the scan. Next, attach the new data and submit the order. Users of the orascanner can take a bite scan to supplement a CBCT scan. Can we do this with the itero scanner? No. The itero scanner does not store a bite scan as a file that can be downloaded for import into suresmile. What if I don t have a supplemental scan to upload when I m importing my CBCT scan? 1. If supplemental cannot be provided at the same time as importing of CBCT Data, do not Finish Scan 2. Click Save 3. Click Back. This will create a task for this patient and return you back to the Tasks page in surescan 44 suresmile URL:
45 Do I need to capture a full arch on the itero to submit update or supplemental scans? No, you may capture an area of an arch following these requirements: In addition to capturing the teeth to be remodeled, capture the adjacent teeth which serve as anchor teeth to help the Digital Lab merge this data with the therapeutic model. A minimum of three teeth must be included in the scan to accurately merge the data. Follow quality and coverage requirements to accurately represent the patient. Since the itero is designed for full arch scans, how do I capture areas of an arch for an update scan or supplemental scan? Use the itero menus to choose Next or Previous to skip to the appropriate area and capture each piece. Remember to capture adjacent teeth with a minimum of three teeth per piece. If you need to capture multiple areas in one arch, we recommend performing a full arch scan. We scanned a patient before the brackets were available in the library. Now that they have been added, how do we update the patient s therapeutic model? This situation is more common for new practices that are in the process of getting brackets added to the suresmile Bracket Library. If none of the patient s brackets are available in the library, the order will be placed on Hold. In this state, the brackets can be easily identified once they are available by following the steps to release a hold. Alternatively, if the case was processed into a finished therapeutic model because some brackets were available and registered, you will order an update model. 1. Open the patient record and start an order for an update model. 2. Select the Brackets tab and make the new bracket assignments. WARNING: Do not re-apply brackets to teeth that were already correctly assigned with bracket part numbers. 3. Upload the patient s therapeutic data. (This is the same data you previously uploaded for the therapeutic model order.) NOTE: The Digital Lab recommends keeping the patient s data until the model is finished; or, you can export it again from OrthoCAD as needed. 4. Indicate in the coverage area which brackets you are updating. 5. Type notes explaining that these brackets have become available, and submit your order. What if I send my scan through and did not check the brackets present box? If it is within 21 days after you sent the scan, then you will be able to resend the scan without having the patient come back in the office. 1. In the Element scanner, go into the patient record and select Scan. 2. Go to Add Rx 3. Choose Case Type - irecord 4. Check the Brackets Present box 5. Proceed to scan screen. Scan data will automatically display and reprocess. 6. Send scan again itero Orthodontic Systems 45
46 Glossary Aligner case type: a preselected set of products recommended for patients who will receive aligners based on suresmile models, but will not be bonded nor receive wires: 1 unbonded therapeutic model from optical scan only; 1 setup with Digital Lab assistance. archwire prescription: Archwire design instructions based on a setup or a treatment simulation. Used to order custom archwires. bracket set: Collection of predefined bracket choices used to quickly assign a bracket prescription to a suresmile patient record. case items: Case items consist of suresmile products and simulations. CBCT scan: A scan taken with a suresmile-certified Cone Beam CT scanner (in the practice or at an imaging center) of a patient to capture their individual tooth anatomy, roots and bracket positions to produce a patient model. custom archwires: Archwires custom-bent for a patient using suresmile. Customer Care: Customer service department of OraMetrix providing technical and software support for suresmile. diagnostic model: A digital model of the malocclusion comprised of individual tooth models created from an in-vivo scan or a scan of a plaster model. A 3D model created from a plaster model or from an impression can be used for analysis. A 3D model created from an in-vivo scan can be used for analysis, labial or lingual bracket placement simulations, bracket placement simulation for IDB tray design, and aligner or wire therapy treatment simulations. Digital Lab: Located at OraMetrix's headquarters in Richardson, Texas (a suburb of Dallas), the suresmile Digital Lab includes all of the departments that process scans, develop 3D models, and fills orders for archwires, staged models and IDB trays. final model: A digital model of the final tooth positions after debonding. It can be created from an in-vivo scan or a scan of a plaster model. in vivo: In suresmile, means that the procedure is performed on a patient rather than on a model; e.g., an invivo scan means a scan performed on a patient. optical scanner: A handheld intraoral camera used to capture 3D images of a patient's dentition, such as the orascanner or itero. patient ID: Number automatically assigned to each patient by the suresmile software. Contains the first initials from the patient's last name and first name followed by a six-digit number; for example, patient ID for John Doe: DJ plan: Used in suresmile to refer to the setup model or setup prescription. 46 suresmile URL:

47 robot: The mechanical device that heats and bends each wire to the specifications in the archwire prescription. scan: 3D digital image of the patient's dentition. Scans are taken with a suresmile orascanner, a suresmileapproved intraoral scanner or a suresmile-approved CBCT scanner. suresmile scans are associated with the following suresmile products: diagnostic model, therapeutic model, update scan and final model. supplemental scan: A partial intraoral scan to capture areas with restorations which were not captured adequately during a CBCT scan. The suresmile Digital Lab merges the partial intraoral scan with the CBCT scan to produce a complete model. If the restored teeth number 6 or less per arch (or 10 total), there is no additional fee for a supplemental scan. If more teeth are involved, you may capture full arches to request our premium model service (available for an additional fee) or submit a full intraoral scan in lieu of a CBCT with supplemental. therapeutic model: A model of the patient's individual tooth anatomy and bracket positions. It is created from an intraoral scan or an in-vivo CBCT scan. It is taken when the patient is ready for custom archwires. Use for analysis and treatment simulations. update scan: Intraoral scan used to capture changes to brackets or newly erupted teeth after the therapeutic scan has been taken. (Only relevant to wire therapy.) itero Orthodontic Systems 47

48 48 suresmile URL:
, and update.")
49 itero Scanning Job Aid for Bonded Patients For best results, submit complete scan orders that meet suresmile s requirements for quality. Scans that must be captured intraorally are: therapeutic, supplemental segments and/or bite (CBCT users only), and update. To meet quality requirements, follow guidelines for scan criteria, scan pattern and SureWhite handling. Scan Criteria for Segments SureWhite Instructions Follow scan criteria to capture a complete representation of the patient s teeth anatomy and brackets 100% tooth coverage and interproximal areas 100% of bracket face/wings 70% of bracket mesial and distal profiles 2mm of gingiva Apply SureWhite as directed on the package insert: dry, apply, dry. Scan Pattern for Segments with IOC & HD2.9 Upper & Lower Arches To scan the occlusal surface, move in a single continuous motion. Being sure to keep wand flat on the occlusal, steadily bring wand toward anterior. To capture buccal surface, hold the wand over the buccal cusps of the molars for an occlusal/buccal view of the posterior teeth. It is necessary to capture some of the occlusal view in the buccal segment to help the system merge with the lingual segment later. To scan the lingual use twisting motion, continue around entire arch being sure to capture the interproximal anatomy of the entire lingual surface. To capture the upper/lower anterior, roll from lingual surface, over incisal edge to buccal/facial surface. Scan Pattern for Segments with Element Upper & Lower Arches To scan the occlusal surface, move in a single continuous motion. Being sure to keep wand flat on the occlusal, steadily bring wand toward anterior. To scan the lingual use twisting motion, continue around entire arch being sure to capture the interproximal anatomy of the entire lingual surface. To scan the buccal, tilt wand at larger angle and move towards midline to capture distal of tooth/bracket and interproximal anatomy of the buccal. To capture the upper/lower anterior, roll from lingual surface, over incisal edge to buccal/facial surface. Bite Start with the first molars. Center the wand between the upper and lower arches and slowly move forward in a small wave-like motion, capture 3-4 teeth and then move to the contralateral side using the same technique. Once bite has been captured, the upper and lower arches will occlude according to the bite scan. Brackets Present While completing the case Rx, it is important to be aware of the recipient being scanned. Do the patient s teeth have brackets bonded or not? If so, it is critical that the Brackets Present field is checked. This will allow the scanner to include all attributes of the bracket in the processed scan. itero Orthodontic Systems 49
50 Therapeutic Scan A full intraoral scan used to model the patient s current tooth anatomy and bracket positions. Supplemental Scan (CBCT Users only) A partial intraoral scan to capture optional bite and/or: Teeth with restorations which were not captured adequately during a CBCT scan (6 or less teeth in an arch or 10 total) $ Premium service to model more/all teeth Update Scan A partial intraoral scan to capture changes after the therapeutic scan has been taken: Newly erupted tooth Rebond Change in anatomy that will affect setup Prepare patient Remove wires Close bracket doors Remove turbos/equilibrate Plan scan segments Remove wire(s) for segments Close bracket doors for segments Remove turbos/equilibrate Plan scan segments Remove wire(s) for segments Close bracket doors for segments Photos and panorex must be taken within 4 weeks before or 2 weeks after the scan. Standard set required Recommended: Take current photos to capture the reason for the scan Take photos & x-rays Also recommended: Current panorex required: Ceph required (current preferred, but initial is acceptable): Take scan Capture upper, lower, bite Use approved scanning technique (serpentine, and sweep-rock) For bite scan, use natural bite Open existing order or start a new CBCT order Take scan intraorally Capture teeth with restorations: crowns, bridges, PVC, PFM, metal fillings 3mm or larger) Capture incisal restorations Capture a minimum of 3 teeth Capture 2 or more anchor teeth per segment Select ONCE for a bracket change Select AGAIN for tooth remodel/new Capture teeth with changes plus adjacent teeth Use approved scanning techniques (serpentine and sweep-rock) Touch to start next segment Touch to start next segment Replace wire/instruct Brush Replace wires Give instructions/wire appointment handout Upload photos and x-rays. Upload photos & x-rays* *The steps to submit the order and upload records may be completed later in the day as time allows Submit order* Update dental exam for missing teeth Update dental exam for brackets Submit order/set wire appointment date Update dental exam Submit order/set wire appointment date For bracket updates, order new wire(s) and note the update scan For tooth updates, order new setup 50 suresmile URL:

51 To learn more about suresmile, click the icon in suresmile web software and select the option for sure u or go directly to: itero Orthodontic Systems 51

52 52 suresmile URL:
fusion treatment is powered by suresmile technology to provide 3D models and fully-customized wires based on your scans of the patient.
 fusion treatment is powered by suresmile technology to provide 3D models and fully-customized wires based on your scans of the patient. Capture two scans per patient: Initial 3D scan this scan may be
Protocol for itero and ioc
 Protocol for itero and ioc fusion treatment is powered by suresmile technology to provide 3D models and fully-customized wires based on your scans of the patient. Capture two scans per patient: Initial
3Shape TRIOS Scanner
 3Shape TRIOS Scanner OraMetrix has its headquarters in Richardson, Texas, with offices in Berlin, Germany and Chatswood, Australia. For general information about OraMetrix, visit the OraMetrix website
SureSmile protocol. CEREC Scanner with Omnicam
 SureSmile protocol CEREC Scanner with Omnicam OraMetrix has its headquarters in Richardson, Texas, with offices in Berlin, Germany and Chatswood, Australia. For general information about OraMetrix, visit
Protocol for 3Shape TRIOS
 Protocol for 3Shape TRIOS fusion treatment is powered by suresmile technology to provide 3D models and fully-customized wires based on your scan of the patient. Capture two scans per patient: Initial 3D
fusion treatment is powered by suresmile technology to provide 3D models and fully-customized wires based on your scan of the patient.
 Protocol for 3M True Definition fusion treatment is powered by suresmile technology to provide 3D models and fully-customized wires based on your scan of the patient. Capture two scans per patient: Initial
itero Troubleshooting Guide Version itero troubleshooting guide
 Troubleshooting Guide Version 4.0.0.70 Intra oral scanning Computer-aided design Computer-aided manufacture itero o TM R core3dcentres Australia PO Box 796, North Ryde BC 2113, Australia Tel +61 2 8090
i-cat CBCT systems CLASSIC (14-BIT) NEXT GENERATION suresmile protocol for i-cat systems DOC
 NEXT GENERATION suresmile protocol for i-cat systems DOC") i-cat CBCT systems NEXT GENERATION FLX CLASSIC (14-BIT) suresmile protocol for i-cat systems DOC 500273-12 1 OraMetrix has its headquarters in Richardson, Texas, with offices in Berlin, Germany and Chatswood,
i-cat CBCT systems NEXT GENERATION FLX CLASSIC (14-BIT) suresmile protocol for i-cat systems DOC 500273-12 1 OraMetrix has its headquarters in Richardson, Texas, with offices in Berlin, Germany and Chatswood,
What s New in itero Scanner 4.0
 What s New in itero Scanner 4.0 New User Interface itero has a new user interface with a completely new look and feel. The new user interface is designed to: - Maximizes the use of available screen space
Connect your Scanner to SomnoMed Canada. SOMGauge Protrusive Bite Recording - Manual. Scanning Impressions - Lower and Upper
 IOS Instructions How to create and submit the best scans to SomnoMed Canada for the creation of a custom SomnoDent Sleep Apnea Appliance Its a simple process: STEP 1 Connect your Scanner to SomnoMed Canada
Using the Eraser Tool for Occlusal Reduction
 Insight Insight The following set of cards has been crafted to help you get the most from your Align itero system. From the most efficient ways to use the eraser tool, effective scanning for implants to
The Comprehensive Treatment Management System
 The Comprehensive Treatment Management System Contact your suremile consultant to learn more! SureSmile is the most powerful Treatment Management System in orthodontics Defining new opportunities that
< > INVISALIGN OUTCOME SIMULATOR QUICK REFERENCE GUIDE. Home Contents Overview Important Notes. STEP 1 Scan Patient s Teeth Submit Scan
 INVISALIGN OUTCOME SIMULATOR QUICK REFERENCE GUIDE 2012 Align Technology, Inc. All rights reserved. N12653 CONTENTS A STEP-BY-STEP GUIDE FOR THE INVISALIGN OUTCOME SIMULATOR Scan patient s teeth Inspect
How to provide intraoral scans to SomnoMed for the production of SomnoDent device.
 How to provide intraoral scans to SomnoMed for the production of SomnoDent device. KEY QUESTIONS: 1. Where do I send my Case? Send intra-oral scan files (maxilla and mandible in protrusive bite) and an
TRIOS BY 3SHAPE HOW TO PROVIDE 3SHAPE TRIOS INTRAORAL SCANS FOR THE PRODUCTION OF SOMNODENT DEVICE. KEY QUESTIONS: 1 How do I send my case?
 HOW TO PROVIDE 3SHAPE TRIOS INTRAORAL SCANS FOR THE PRODUCTION OF SOMNODENT DEVICE. TRIOS BY 3SHAPE KEY QUESTIONS: 1 How do I send my case? Send TRIOS scan files to your local SomnoMed Laboratory via 3Shape
Recommended IDB Protocol
 Recommended IDB Protocol The bonding appointment is critical to fusion treatment since custom wires are designed to work with the bracket positions captured in the scan after bonding. Follow this protocol
A. McGann opening comments:
 Session 2, Sequence of Study A. McGann opening comments: Welcome to session 2. Your 10 patients have accepted YOU as their treating dentist and have indicated this by taking records (for a fee). All the
Invisalign G4 FAQs. General:
 Invisalign G4 FAQs General: 1. What are the next generation of SmartForce features and clinical innovations (Invisalign G4) and when will they become available? The next generation of SmartForce features,
Efficient Bonding Protocol for the Insignia Custom Bracket System
 Efficient Bonding Protocol for the Insignia Custom Bracket System Abstract The Insignia appliance is reverse-engineered from a digital set-up of the prescribed dental alignment. Each bracket configuration,
Contents. Quick Start Guide
 Quick Start Guide Tip Scan Button Handpiece Docking Station Contents Installation Guide:... 1 Attaching, Detaching & Rotating the Tip:... 2 Patient Environment:... 2 Tip Cleaning & Sterilization:... 3
Sleep Apnea Therapy Software Clinician Manual
 Sleep Apnea Therapy Software Clinician Manual Page ii Sleep Apnea Therapy Software Clinician Manual Notices Revised Notice Trademark Copyright Sleep Apnea Therapy Software Clinician Manual 103391 Rev A
Digital Impression Scanning
 Digital Impression Scanning Table of Contents Using ScanIt Orthodontics (Recommended Software) Software Settings... 1 Control Panel... 1 System Settings... 1 Export Format... 1 Filling Out Patient Information...
Attachment G. Orthodontic Criteria Index Form Comprehensive D8080. ABBREVIATIONS CRITERIA for Permanent Dentition YES NO
 First Review IL HFS Dental Program Models Second Review Ortho cad Attachment G Orthodontic Criteria Index Form Comprehensive D8080 Ceph Film X-Rays Photos Narrative Patient Name: DOB: ABBREVIATIONS CRITERIA
CS User and Installation Guide
 CS 3600 User and Installation Guide Notice No part of this publication may be reproduced, stored in a retrieval system, translated to another language, or transmitted in any form by any means, electronic,
OneTouch Reveal Web Application. User Manual for Healthcare Professionals Instructions for Use
 OneTouch Reveal Web Application User Manual for Healthcare Professionals Instructions for Use Contents 2 Contents Chapter 1: Introduction...4 Product Overview...4 Intended Use...4 System Requirements...
A THESIS SUBMITTED TO THE FACULTY OF THE GRADUATE SCHOOL OF THE UNIVERSITY OF MINNESOTA BY
 THE EFFECTIVENESS OF SURESMILE TECHNOLOGY TO ACHIEVE PREDICTED TREATMENT OUTCOME A THESIS SUBMITTED TO THE FACULTY OF THE GRADUATE SCHOOL OF THE UNIVERSITY OF MINNESOTA BY CHRISTOPHER JOHN VAUBEL IN PARTIAL
Invisalign Quick Start Guide I.
 Invisalign Quick Start Guide I. All you need to know to start treating 0-Invisalign-Quick Start Guide I-v0b-AW.indd 0/0/0 :56 Section : Invisalign Treatment Supplies Section : Clinical Preferences Section
RESULTS REPORTING MANUAL. Hospital Births Newborn Screening Program June 2016
 RESULTS REPORTING MANUAL Hospital Births Newborn Screening Program June 2016 CONTENTS GETTING STARTED... 1 Summary... 1 Logging In... 1 Access For New Hires... 2 Reporting Parental Refusals... 3 Adding
invisalign clinical results
 invisalign G3 Engineered to deliver even better clinical results Invisalign G3 is the most significant collection of innovations in Align Technology s history. Invisalign G3 builds on the Enhanced Clinical
Lab Forms and Communications Precise Indirect Bonding Systems.
 Lab Forms and Communications Precise Indirect Bonding Systems. Presented by IN-tendo www.intendo-ortho.com and The Torque Angulation Laboratory www.torque-angulationlab.com The correct information and
Instructor Guide to EHR Go
 Instructor Guide to EHR Go Introduction... 1 Quick Facts... 1 Creating your Account... 1 Logging in to EHR Go... 5 Adding Faculty Users to EHR Go... 6 Adding Student Users to EHR Go... 8 Library... 9 Patients
Table of Contents D4D Technologies LLC All rights reserved A Table of Contents
 Exercise Workbook Table of Contents Introduction... 3 3D Movement... 4 Drawing and Editing Margins...17 Embrasures and Contacts...25 Pre-op as a Library Tooth...36 Multiple Inlay and Onlay...39 Anteriors...55
IOS & The Sirona Connect System Clinician Procedure
 Clinician Procedure Surgeon (Please ensure that these instructions are forwarded to the restorative clinician.) STEP 1: Select a BellaTek Encode Healing Abutment with the appropriate restorative platform
CEREC CONNECT. Omnicam and Bluecam Workflow and Upload Instructions for Sending Cases to the Laboratory
 CEREC CONNECT Omnicam and Bluecam for Sending Cases to the Laboratory Send your CEREC Omnicam and Bluecam scans to the laboratory via CEREC Connect portal. The CEREC intra-oral impression file is loaded
MEDICAL ASSISTANCE BULLETIN COMMONWEALTH OF PENNSYLVANIA DEPARTMENT OF PUBLIC WELFARE
 MEDICAL ASSISTANCE BULLETIN COMMONWEALTH OF PENNSYLVANIA DEPARTMENT OF PUBLIC WELFARE ISSUE DATE EFFECTIVE DATE NUMBER October 21,1996 October 28,1996 03-96-06 SUBJECT BY Information on New Procedures
Sleep Apnea Therapy Software User Manual
 Sleep Apnea Therapy Software User Manual Page ii Notices Revised Notice Trademark Copyright 103392 Rev B Published February 8, 2013 and supersedes all previous versions. The information contained in this
PH-04A: Clinical Photography Production Checklist With A Small Camera
 PH-04A: Clinical Photography Production Checklist With A Small Camera Operator Name Total 0-49, Passing 39 Your Score Patient Name Date of Series Instructions: Evaluate your Series of photographs first.
Diabetes Management App. Instruction Manual
 Diabetes Management App Instruction Manual Accu-Chek Connect Diabetes Management App Overview The Accu-Chek Connect diabetes management app (hereafter referred to as the app) is designed to help you: Transfer
Chairside Reference Guide
 Chairside Reference Guide With this Chairside Reference Guide, you re on your way to efficiency and accuracy with LUMINEERS with LUMITray. As you familiarize yourself with the procedure, follow these
2017 FAQs. Dental Plan. Frequently Asked Questions from employees
 2017 FAQs Dental Plan Frequently Asked Questions from employees September 2016 Dental plan Questions we ve heard our employees ask Here are some commonly asked questions about the Dental plan that our
Contour Diabetes app User Guide
 Contour Diabetes app User Guide Contents iii Contents Chapter 1: Introduction...5 About the CONTOUR DIABETES app...6 System and Device Requirements...6 Intended Use...6 Chapter 2: Getting Started...7
MNSCREEN TRAINING MANUAL Hospital Births Newborn Screening Program October 2015
 MNSCREEN TRAINING MANUAL Hospital Births Newborn Screening Program October 2015 CONTENTS PART 1: GETTING STARTED... 2 Logging In... 2 Access for New Hires... 2 Reporting Refusals... 3 Adding Patient Records...
BOCL-01: Bonding Materials Checklist
 Task 19: Gather materials to bond partner using toothpaste as etchant Take a photo of gathered materials and submit with this completed checklist BOCL-01: Bonding Materials Checklist Date: Patient: Operator:
Archwire Insertion and Disengagement Instruments Technique Guide
 Clarity SL and SmartClip SL3 Self-Ligating Brackets Archwire Insertion and Disengagement Instruments Technique Guide Recommended Archwire Insertion Instruments Single point torquing key for tight spots
Virtual Treatment Planning
 feature \\ case presentation Virtual Treatment Planning Reduce Frustration with The Right Sequence Jamie Reynolds, DDS, MS Virtual treatment planning that directs the fabrication of customized orthodontic
Instructions for CT Scanning
 16 Argon Dental USA 1000 Corporate Drive Marshfield, WI 54449 Instructions for CT Scanning Questions? Please contact: Joel A. Gonzales Director of Sales & Service West Argon Dental USA (480) 440-3927 joelg@argondentalusa.com
Checklist with summary points
 Checklist with summary points Question 1: Are your doctor Invisalign preferences on your home page up to date? Go to your doctor home page and open up your doctor preferences pages. Be sure to update item
DTSS Online Application Suite User Manual. Version 1.2
 DTSS Online Application Suite User Manual Version 1.2 Contents Dental Application Suite... 3 How to install your Sha2 Certificate using Internet Explorer... 3 Claiming... 5 Dental Claim Entry... 5 A1 Dental
The 4 views of DSD! The Dynamic Dento-Facial Documentation (video)!
!") The 4 views of DSD To have a 3 dimensional understanding of the dento-facial relationship through 2 dimensional photos we analyze 6 photos in 4 specific angles: -Frontal Facial (retracted and smile) (Fig
The 4 views of DSD To have a 3 dimensional understanding of the dento-facial relationship through 2 dimensional photos we analyze 6 photos in 4 specific angles: -Frontal Facial (retracted and smile) (Fig
OneTouch Reveal Web Application. User Manual for Patients Instructions for Use
 OneTouch Reveal Web Application User Manual for Patients Instructions for Use Contents 2 Contents Chapter 1: Introduction...3 Product Overview...3 Intended Use...3 System Requirements... 3 Technical Support...3
The Hospital Anxiety and Depression Scale Guidance and Information
 The Hospital Anxiety and Depression Scale Guidance and Information About Testwise Testwise is the powerful online testing platform developed by GL Assessment to host its digital tests. Many of GL Assessment
ORTHODONTIC BANDING AND CEMENTATION. Materials
 ORTHODONTIC BANDING AND CEMENTATION Materials Required Materials for fitting bands: 1. Selection of bands of different sizes for the teeth to which you are fitting bands 2. Tweezers to take the bands out
The following standards and procedures apply to the provision of orthodontic services for children in the Medicaid/NJ FamilyCare (NJFC) programs.
 programs.") B.4.2.11 Orthodontic Services The following standards and procedures apply to the provision of orthodontic services for children in the Medicaid/NJ FamilyCare (NJFC) programs. Orthodontic Consultation
B.4.2.11 Orthodontic Services The following standards and procedures apply to the provision of orthodontic services for children in the Medicaid/NJ FamilyCare (NJFC) programs. Orthodontic Consultation
Data Management System (DMS) User Guide
 User Guide") Data Management System (DMS) User Guide Eversense and the Eversense logo are trademarks of Senseonics, Incorporated. Other brands and their products are trademarks or registered trademarks of their respective
Data Management System (DMS) User Guide Eversense and the Eversense logo are trademarks of Senseonics, Incorporated. Other brands and their products are trademarks or registered trademarks of their respective
Content Part 2 Users manual... 4
 Content Part 2 Users manual... 4 Introduction. What is Kleos... 4 Case management... 5 Identity management... 9 Document management... 11 Document generation... 15 e-mail management... 15 Installation
Table of Contents. Contour Diabetes App User Guide
 Table of Contents Introduction... 3 About the CONTOUR Diabetes App... 3 System and Device Requirements... 3 Intended Use... 3 Getting Started... 3 Downloading CONTOUR... 3 Apple... 3 Android... 4 Quick
Volume 22 No. 14 September Dentists, Federally Qualified Health Centers and Health Maintenance Organizations For Action
 State of New Jersey Department of Human Services Division of Medical Assistance & Health Services Volume 22 No. 14 September 2012 TO: Dentists, Federally Qualified Health Centers and Health Maintenance
Available for CEREC SW, inlab CAD SW, 3Shape, Dental Wings, DWOS Lava Edition, exocad, Open design software. Atlantis. Atlantis Core File.
 Atlantis Atlantis Core File User guide Available for CEREC SW, inlab CAD SW, 3Shape, Dental Wings, DWOS Lava Edition, exocad, Open design software Atlantis CONTENTS This user guide for the Atlantis Core
CT Scanning Protocol For V2R Guided Surgery Solutions
 CT Scanning Protocol For V2R Guided Surgery Solutions 2 V2R CT Scanning Protocol \\ Contents Contents General requirements... 3 V2R Dual Scan Protocol... 5 V2R Single Scan Protocol... 8 Overview... 10
3D CONTROL HAS ARRIVED
 TM 3D CONTROL HAS ARRIVED 1 Pitts 21 Self-Ligating System Pitts 21 Self-Ligating System Integrated Hooks An available option on the 3 s, 4 s and 5 s for your convenience at no extra charge. Smooth, Rounded
ProScript User Guide. Pharmacy Access Medicines Manager
 User Guide Pharmacy Access Medicines Manager Version 3.0.0 Release Date 01/03/2014 Last Reviewed 11/04/2014 Author Rx Systems Service Desk (T): 01923 474 600 Service Desk (E): servicedesk@rxsystems.co.uk
Arrangement of the artificial teeth:
 Lecture Prosthodontic Dr. Osama Arrangement of the artificial teeth: It s the placement of the teeth on a denture with definite objective in mind or it s the setting of teeth on temporary bases. Rules
Invisalign Quick Start Guide. ClinCheck plan review. Dedicated to help you treat with confidence.
 Invisalign Quick Start Guide. ClinCheck plan review. Dedicated to help you treat with confidence. Treatment plans review. Tips tricks. ClinCheck software is required to review all treatments. Install ClinCheck
MemRx Orthodontic Appliances
 MemRx Orthodontic Appliances Uses and Instructions The MemRx Fundamentals As the need for faster, more efficient treatment of non-compliant patients increases, orthodontic!technology and materials has
THE MBT VERSATILE+ APPLIANCE SYSTEM
 THE MBT VERSATILE+ APPLIANCE SYSTEM McLaughlin, Bennett, Trevisi The MBT Versatile+ Appliance System THE DEVELOPMENT OF A TREATMENT MECHANICS AND APPLIANCE PHILOSOPHY The first fully programmed preadjusted
UNDERSTANDING DIGITAL DENTISTRY: CBCT AND INTRA-ORAL 30 SCANNING
 UNDERSTANDING DIGITAL DENTISTRY: CBCT AND INTRA-ORAL 30 SCANNING -=- & UNDERSTANDING DIGITAL DENTISTRY: CBCT AND INTRA-ORAL 30 SCANNING ----CBCTi-------iTERO------ NewTom VGi *Vertical Patient Positioning
Visualise a better practice
 Visualise a better practice Powerful & portable I m itero Element 2 and I bring innovation to visualisation itero Element 2 delivers faster scan processing than the current itero Element scanner, enhanced
Treatment Planning: Visualization Software ClinCheck. min45
 Treatment Planning: Visualization Software ClinCheck min45 David A. Chenin, DDS Manager of Clinical Process Development Today s Clinical Expert Align Technology Managed the incoming inspection of >50K
Keeping all these knowledge in mind I will show you 3 cases treated with the Forsus appliance.
 Due to technical difficulties there were some audio problems with the webinar recording. Starting at 27:54, please use this guide to follow along with Dr. Kercelli s presentation. Keeping all these knowledge
Student Guide to EHR Go
 Student Guide to EHR Go I. Introduction... 1 II. Quick Facts... 1 III. Creating your Account... 1 IV. Applying Your Subscription... 4 V. Logging in to EHR Go... 7 VI. Library... 8 VII. Receiving Assignments
Scanora 3D Scanning Protocol
 Scanora 3D Scanning Protocol Page 1 Scanning Protocol for the Scanora 3D For Use with ident General This protocol is written specifically for users of Scanora 3D CBCT scanner. Patient Scan with the appliance
ATLANTIS WebOrder. ATLANTIS ISUS User guide
 ATLANTIS WebOrder ATLANTIS ISUS User guide Contents ATLANTIS WebOrder Entering an ATLANTIS ISUS order 3 ATLANTIS ISUS implant suprastructures 4 ATLANTIS ISUS Bar 5 ATLANTIS ISUS Bridge 7 ATLANTIS ISUS
USER GUIDE: NEW CIR APP. Technician User Guide
 USER GUIDE: NEW CIR APP. Technician User Guide 0 Table of Contents 1 A New CIR User Interface Why?... 3 2 How to get started?... 3 3 Navigating the new CIR app. user interface... 6 3.1 Introduction...
TMWSuite. DAT Interactive interface
 TMWSuite DAT Interactive interface DAT Interactive interface Using the DAT Interactive interface Using the DAT Interactive interface... 1 Setting up the system to use the DAT Interactive interface... 1
TURN CLASS II INTO SIMPLE CLASS I PATIENTS.
 TURN CLASS II INTO SIMPLE CLASS I PATIENTS. THE CARRIERE MOTION TM APPLIANCE fast gentle natural The Carriere Philosophy. Fast. Shortens overall treatment time by up to four months as it treats Class II
Concepts of occlusion Balanced occlusion. Monoplane occlusion. Lingualized occlusion. Figure (10-1)
") Any contact between teeth of opposing dental arches; usually, referring to contact between the occlusal surface. The static relationship between the incising or masticatory surfaces of the maxillary or
Any contact between teeth of opposing dental arches; usually, referring to contact between the occlusal surface. The static relationship between the incising or masticatory surfaces of the maxillary or
Advantages. Fantastic. systems. Together with Unitek Lateral Development Archwires, this system puts you in control to
 3M Self-Ligating Appliances Lateral Development System Treatment Advantages Fantastic Finishes For orthodontic professionals who choose lateral development as a desired treatment outcome, 3M now offers
INDICATIONS. Fixed Appliances are indicated when precise tooth movements are required
 DEFINITION Fixed Appliances are devices or equipments that are attached to the teeth, cannot be removed by the patient and are capable of causing tooth movement. INDICATIONS Fixed Appliances are indicated
THE POWER OF THE PERFECT FIT
 THE POWER OF THE PERFECT FIT SCAN, DESIGN, MILL The PLANMECA FIT CAD/CAM system allows you to perform highly advanced, powder-free digital restorations, including same-day crowns, inlays, onlays, bridges
Invisalign Finishing. Treatment Monitoring & Tips & Techniques Guide to Help Doctors Achieve Ideal Patient Outcomes
 Invisalign Finishing Treatment Monitoring & Tips & Techniques Guide to Help Doctors Achieve Ideal Patient Outcomes Introduction This Guide is intended to help the Invisalign practitioner address monitoring
ClinCheck Fact Sheet.
 ClinCheck Fact Sheet. Introducing new features of ClinCheck Pro with 3D Controls and ClinCheck Web Powered by your needs to optimize your treatment planning journey. This fact sheet provides an overview
CS 3600 / CS 3600 ACCESS A SMARTER WAY TO SCAN INTRAORAL SCANNING
 CS 3600 / CS 3600 ACCESS A SMARTER WAY TO SCAN INTRAORAL SCANNING R R HARNESS THE POWER OF INTRAORAL SCANNING AWARDS AND RECOGNITION CLINICIANS REPORT Excellent in Rapid Acquisition and Margin Detail Capture;
Data Management System (DMS) User Guide
 User Guide") Data Management System (DMS) User Guide Eversense and the Eversense logo are trademarks of Senseonics, Incorporated. Other brands and their products are trademarks or registered trademarks of their respective
Data Management System (DMS) User Guide Eversense and the Eversense logo are trademarks of Senseonics, Incorporated. Other brands and their products are trademarks or registered trademarks of their respective
Step by Step: How to maximize your benefits
 Step by Step: How to maximize your benefits Learn how to access your ID card, search for a dentist near you, download the Delta Dental mobile app and more! Click on a topic below to learn more: Subscriber
The Ultimate Guide. Orthodontic Treatment. Dr. Reese McElveen
 The Ultimate Guide to Orthodontic Treatment Dr. Reese McElveen Table of Contents 1. Why Do People Need Braces? 2 2. At What Age Should My Child Be Evaluated for Orthodontic Treatment? 3 3. What Is the
Kois Dento-Facial Analyzer System Instructions
 These instructions apply to the following items: M Panadent Corporation 580 S. Rancho Avenue Colton, California 92324, USA Tel: (909) 783-1841 USA & Canada (800) 368-9777 Kois Dento-Facial Analyzer System
Benefit Changes for Texas Health Steps Orthodontic Dental Services Effective January 1, 2012
 Benefit Changes for Texas Health Steps Orthodontic Dental Services Effective January 1, 2012 Information posted November 14, 2011 Effective for dates of service on or after January 1, 2012, the following
The Tip-Edge appliance and
 Figure 1: Internal surfaces of the edgewise archwire slot are modified to create the Tip-Edge archwire slot. Tipping surfaces (T) limit crown tipping during retraction. Uprighting surfaces (U) control
Bands and Attachments
 RxWeld Service Custom Services Convenient prescription program for orthodontists who reorder 3M Unitek seamless bands prewelded with 3M Unitek attachments Reduces reorder time and paperwork Eliminates
CEREC v3.8 Biogeneric Software. by Dr Simon Smyth
 CEREC v3.8 Biogeneric Software by Dr Simon Smyth v3.8 Improvements Biogeneric Crowns (no more Database) Buccal Bite option for Antagonist Improvements to Correlation design Replication design now called
Clay Tablet Connector for hybris. User Guide. Version 1.5.0
 Clay Tablet Connector for hybris User Guide Version 1.5.0 August 4, 2016 Copyright Copyright 2005-2016 Clay Tablet Technologies Inc. All rights reserved. All rights reserved. This document and its content
Corporate Medical Policy
 Corporate Medical Policy File Name: Origination: Last CAP Review: Next CAP Review: Last Review: orthodontics_for_pediatric_patients 2/2014 10/2017 10/2018 10/2017 Description of Procedure or Service Children
Simplant. Immediate Smile. featuring Atlantis Abutment, Clinical and laboratory procedures
 Simplant Immediate Smile featuring Atlantis Abutment, Clinical and laboratory procedures Contents Immediate Smile featuring Atlantis Abutment Product description 4 Advantages 5 Process at a glance 6 When?
6610 NE 181st Street, Suite #1, Kenmore, WA
 660 NE 8st Street, Suite #, Kenmore, WA 9808 www.northshoredentalacademy.com.08.900 READ CHAPTER The Professional Dental Assistant (p.-9) No Key Terms Recall Questions:,,,, and 6 CLASS SYLLABUS DAY READ
your talent. our technology. the perfect fit.
 your talent. our technology. the perfect fit. itero - exclusively distributed in Europe by The digital revolution Changing the Face of Dentistry Digital technology ensures a more accurate impression from
What s NEW in Version 4.6
 What s NEW in Version 4.6 Dear ECO Community Members, Everyone at E4D is excited to bring you the latest version of our E4D Dentist system software. This version 4.6 software update is a direct response
myphonak app User Guide
 myphonak app User Guide Getting started myphonak is an app developed by Sonova, the world leader in hearing solutions based in Zurich, Switzerland. Read the user instructions thoroughly in order to benefit
Straumann CARES Visual 9
 Straumann CARES Visual 9 Software Update What s New Software Version 9.0 Release Date October 15 th 2014 New Feature Highlights New Graphical User Interface New Bar Types Different Custom Abutment Types