Stiff alginate for denture impressions, why?
|
|
|
- Edward Harrell
- 5 years ago
- Views:
Transcription
1 Stiff alginate for denture impressions, why? Every dentist or dental prosthetist knows how difficult it is to make a well-fitting, stable denture. What they do not always realise, however, is the importance of the primary impression. An accurate, complete primary impression makes the following steps quite a bit simpler. This lecture explains how you can succeed in making your impression more complete and more accurate using stiff alginate, what the advantages are for the subsequent steps and how this contributes to the success of the full denture. Rien van Waas, ACTA Amsterdam Cavex Holland BV

2 Can stiff alginate help us? The question now is whether stiff alginate can help us prevent such failures. And what is the advantage to the subsequent procedure?

3 Full Denture Impressions using stiff alginate Removable partial denture And stiff alginate can help us not only for full dentures, but also for partial dentures. How and why will become clear during this presentation.
4 Subjects The impression procedure anatomy Primary impression edentulous maxilla Primary impression edentulous mandible lining up The final impression Alginate impression with dentulous trays Impressions in partially edentulous situations stiff alginate The lecture covers 6 subjects. We start with the impression procedure. This is closely related to the anatomy as an aid to the lining up of the impression, which is simplified by the use of stiff alginate. The impression procedure is explained for the edentulous upper and lower jaws. Furthermore the use of the stiff alginate technique combined with dentulous trays and in case of partial dentures is explained.

5 An edentulous patient

6 ..with a well rounded maxilla The patient s upper jaw is still nice and well rounded. The details are clearly visible.

7 .. And an atrophic lower jaw Where to situate the flanges of the denture? The mandible or lower jaw is a rather different story, because it is severely resorbed. It will be difficult to make a good impression. The major question in this situation is, Where to situate the flanges of the denture?
8 Anatomical illustration of the jaw To answer this question it requires a considerable knowledge of anatomy. In other words, you need to be able to interpret a lot of the details on this drawing to be able to achieve a good impression in case of boner esorbtion. The use of stiff alginate can help here.
.")
9 Bone resorbtion Knife edge ridge High and large Severely resorbed But what is bone resorbtion. Bone resorption is a gliding process. The edentulous patient generally starts off with a high, sturdy jaw and over the course of the years this disappears. It can resorb down to 15mm or even 10mm (a flat jaw). There is also a kind of interim phase, a situation that does not always arise, where there is virtually no vertical decrease in the bone, but the jaw shrinks severely horizontally. This is known as a knife edge ridge.

10 Anatomical example: knife edge ridge Here you can see an anatomical example. Vertically, the jaw has remained intact, but horizontally it has shrunk to a razor-sharp edge.

11 Full bone resorbtion However it becomes increasingly difficult to make a well-fitting denture when the jaw shrinks as a whole, as well the upper as lower jaw. In the situation on the left, with minimal resorbtion and therefore little room between the two jaws, you can still get enough purchase for the denture. In the case of the severely resorbed jaws, as on the right, however, there is little place to find any purchase. You can imagine it s essential to devote the maximum attention to the anatomy of the jaw.

12 Severely resorbed jaw

13 Severely resorbed lower jaw Negative arch If you examine this lower jaw clinically and try to interpret it, then at the back you will see a kind of negative arch. There are also irregularities. How are you going to interpret those? This also requires knowledge of anatomy. What is this bone structure

14 Severely resorbed upper jaw Flabby ridge Impacted canine If you look at the upper jaw, you can imagine there is little bone underneath, that it is flabby. At the back of the mouth, too, all the structures have disappeared and the tubera are no longer visible. As we already have mentioned, it was fortunate that there was still an impacted canine in the jaw, which helped to gain stability for the denture. Here, too, knowledge of anatomy is indispensable. Severely resorbed
15 Primary impression Primary impression fitting tray stiff alginate line up impression Let s start with step 1: the primary impression, comprising 3 parts: the well-fitting tray, the use of stiff alginate and the lining up of the impression.


16 Well fitting tray : anatomically formed Linea mylohyoidea Trigonum labial/lingual/bucal frenae Upper jaw/maxilla Lower jaw/mandible anatomical structures are integrated in form of tray For a good impression, you need a well-fitting tray. There are only a few trays that conform to those requirements because the anatomical structures for both the upper and lower jaw need to be integrated in the form of the tray. A nice example are the trays designed by Schreinemakers. Look at the anatomical details. At the back you can clearly see the trigonum, the tray is deeper on the inside at the location of the linea mylohoidea and at the front a gap has been made for the brides. Such a tray will more easily provide a good impression.

17 Selection of tray size You can choose from a number of trays in various sizes. This naturally raises the question of which tray size you should choose, as you will not achieve a good impression with this tray just like that.

18 Selection of tray size is based on the width of the jaw and not the height!!!

19 No resorbtion the same tray! Resorbtion Or to put it another way, the size of the chosen tray is always the same regardless of the degree of resorbtion. In other words, whether there is no resorbtion or a lot of resorbtion, you always choose the same size tray.

20 Tray size This means that, in this situation, this, this and - in the most extreme case - this situation, the same tray is used. In the first situation, the tray is close to the arch. And in the case of the last situation the tray hangs above the mandible. If you would depress the tray, then you would erase any recognisable anatomical structure and therefore end up with a useless impression. The anatomically-formed tray should therefore be used extremely consciously and you should realise that, with a severely resorbed jaw, the tray hangs above the arch.

21 Severely resorbed jaw A lot or room between arch and tray A great deal of impression material required Stiff alginate recommended So in case of a severely resorbed jaw, there is a lot of room between the arch and the tray. And as the tray is hanging above, you need a great deal of impression material to bridge the gap. In this case, stiff alginate is a must.
22 Tray size As mentioned earlier, the tray is chosen based on the width of the jaw. It is important to ensure that the tray has enough room for the alginate, roughly the thickness of the compass arm. If there is less room, then there will be too little alginate, so the material will quickly distort. A wider tray is also far from ideal, as the anatomical details would then disappear.

23 Tray size For the upper denture, you measure the distance between the widest part of the jaw in the mucobuccal fold at the position of the tubera maxillares. Ensure that the tray is big enough. If in doubt, use one size larger. For the lower denture, you need to ensure that the dorsal tray rim covers the retro-molar path entirely. Measure the inside of the lower jaw with the outer edge of the compasses at the position of the retromolar path. Ensure that the tray is lingual not too far from the jaw; if in any doubt use one size smaller.


24 Tray size If you have an old denture, then you don t need the compasses. You then choose for the upper denture a tray that is slightly bigger than the jaw and for the lower denture a tray that is slightly smaller than the jaw.

25 Fitting in mouth Check the measurement of the tray in the mouth.


26 Stiff alginate If the jaw is severely shrunken, then stiff alginate is essential. You can achieve this by adjusting the amount of water. When you add less water, the alginate becomes stiffer. With a severely shrunken jaw you are recommended to use 1/3 less water. With a less shrunken jaw, you can adhere to a more normal ratio. The more shrunken the jaw, the stiffer the alginate. As an auxiliary aid, the Cavex measuring beaker has an extra high viscosity water level, which corresponds with approximately 1/3 less water.


27 Stiff alginate How to proceed? Measure 3 level scoops of alginate powder. Use alginate with a good water absorption, which mixes easily with as few lumps as possible, such as Cavex Impressional. Add 30% less water (the high viscosity line on the Cavex water beaker). Mix this in a supple beaker with a metal spatula. It takes quite a bit of effort to mix the stiff alginate and, initially, it looks as if there is no more water, only granules. It might look as if it is not mixing properly, but that is not the case. This is one of the moments when the quality of the alginate becomes clearly visible. An alginate with a good water absorption and minimal lumpiness ultimately gives a well-mixed mass. If you wish to simplify the mixing, then the Cavex alginate mixer is recommended. The result is at least the same, but the mixing is quite a lot easier.

28 Primary impression maxilla What you need to watch out for if you want to make an impression of all the anatomical details of the upper jaw: make sure the patient is relaxed and the tray is centred in the mouth. There are 2 techniques for centering the tray. You can centre the tray in the front and then rotate backwards. The risk here is that the border turn out too short by the tubera. This can be avoided by lubricating the tubera beforehand. Alternatively, you can chose to centre the tray dorsally and then rotate it forwards. In the case, it is important to lubricate the front. Thanks to the stiff alginate, the lips and cheeks are extended. Then impress the anatomical structures with your fingers. You can make an impression of the frenula by making some room in the front and pressing gently.

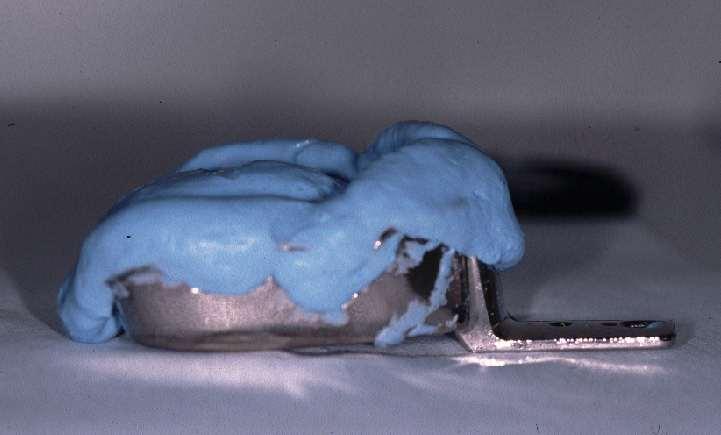
29 Importance of a complete primary impression
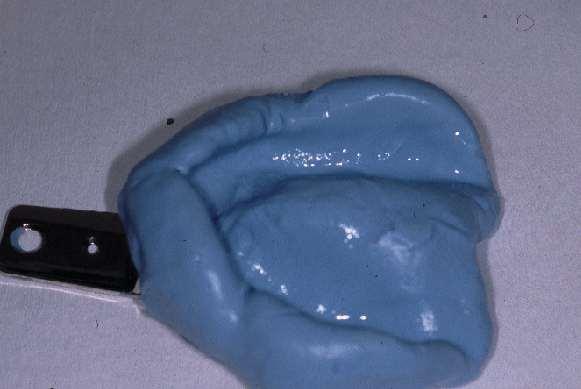
30 Lining up primary impression maxilla Where to situate the borders of the denture? here you see a primary impression with a well-fitting tray and stiff alginate. The question now is whether we have made a good impression. We therefore have to check whether all the anatomical structures which are relevant for the borders of the denture, have been reproduced in the alginate impression. This is why we advise the lining up of the primary impression, too.
31 Lining up primary impression maxilla Buccale frenae Buccale sulcus Foveae palatinae Labial frenae Hamulus pterygoideus

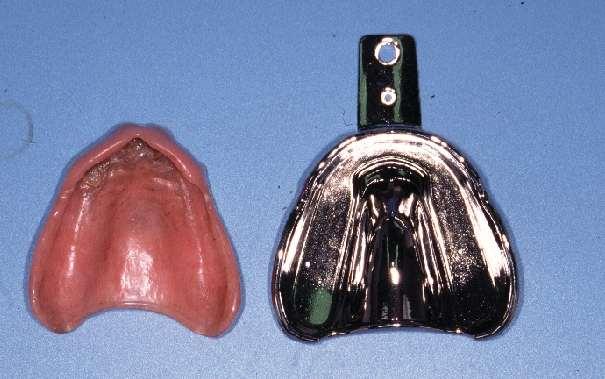
32 Lining up primary impression maxilla This is the result of the alignment; the impression can now be cast and the custom tray can be made.
33 Subjects The impression procedure Primary impression edentulous maxilla Primary impression edentulous mandible The final impression Alginate impression with dentulous trays Impression in partially edentate situations

34 Fitting tray on the mandible As we said, for the lower jaw we choose a tray that is slightly smaller than the arch or in case of an old denture a little smaller than the old denture.

35 Fitting tray on the mandible That is quite a subtle art. Take this patient with a protruding mouth floor, for example. Here, you really need to make sure there is the minimum space between the arch and the tray and not the maximum space, as, if the tray is too large, you risk the mouth floor coming above the arch or between the tray and the tongue, and that is not the intention.


36 Protruding mouth floor Minimal space between jaw and tray Here, you see a more extreme example of a patient with a protruding mouth floor. If you move the tongue to the left or right, then you will see that the mouth floor is conspicuous. It is absolutely essential to make sure this distance is no more than the thickness of the compass arm. The minimum space, in other words.


37 Stiff alginate for the mandible We have already seen how to make stiff alginate. In the case of a severely resorbed mandible it can be that stiff, that you can make a roll of it. Place the roll in the tray and moisten it slightly.

38 Primary impression mandible Centre the tray in the mouth. Ask the patient to stick out his tongue. This eliminates the mouth floor. It is only then that you push down the tray. If you continue to push down and the tongue is above then you are forcing the mouth floor to come further in between the tray and the arch. You then depress the frenae slightly from the outside so the anatomical structure becomes visible.

39 Primary impression mandible And this is the result. The question now is whether the impression has been successful. We can check this by lining up the impression based on the anatomy in the mouth.
40 Lining up primary impression mandible Frenulum buccale M. Mentalis M. Masseter M. buccinator Linea mylohyoideus M. mylohyoideus M. genioglossus Spina Mentalis Posterior Frenulum labiale But which anatomical structures are important for the customised tray and therefore for the lining up of the edentulous mandible? By the trigonum (retromolar pad), you need to make room for the masseter muscle, in other words the tray has to taper slightly by the trigonum. The Masseter muscle will become visible in the impression, as it is tensed during impression. We then come to the Buccinator muscle, where the pouch is. There, you can expand outwards as far as possible, close up against the Buccinator muscle. The tray border then tapers somewhat by the buccal frenae because, if you want the denture to stay in place while talking, etc., then it must not be too long. In the front we have a similar problem, as the Mental muscle is not tensed so highly, which means the denture can be a little longer there. Often, there is a labial frenae present, but not always. When it is present, you need to make space for it. On the inside is the spina mentalis posterior. In a severely shrunken arch this structure is very prominent, but that is not always the case. If it is there, then the denture can be situated against the edge of the spina line. The genioglossus muscle runs from the spina to the tongue. Finally, there is the mylohyoid line and the mylohyoid muscle, which determine the border at the back. As the mylohyoid muscle runs quite vertically at the back, it does not displace the denture and the denture border can be made behind the mylohyoid line at the back. It is therefore important for the primary impression to continue to just behind. In other words, you end up with a customised tray and therefore also a denture with a fairly long lingodorsal ridge, which nevertheless does not cause any displacement of the denture.
41 lining up primary impression mandible Masseter muscle Mylohyoid line Mylohyoid muscle Buccinator muscle Buccal frenae Spina Mentalis Posterior Genioglossus muscle Mental muscle Labial frenae


42 Lining up primary impression mandible Let s just check the impression. The mouth floor has been depressed and all the anatomical details have been reproduced. The trigonum is reproduced in its entirety, including the masseter muscle and mylohyoid line, the labial tendon is visible and the mouth floor has been depressed. Everything is visible on the other side, too. So the impression is successful and can be lined up.
43 Lining up primary impression mandible In this impression, too, the anatomical structures are clearly visible: the masseter, the pouch, here the impression was overextended and, on visual inspection in the mouth, you could see that it could not be extended any further, but that everything had been reproduced. In one place the alignment goes in and in another it goes out again.


44 Final result impression of the mandible With a protruding mouth floor, you might think you ought to make the lingual rims of the denture shorter. So why devote so much attention to the impression process? These 2 examples illustrate why. This was the loose old denture and this is the new one. The rims here have been made longer lingually, up passing mylohyoid line. by depressing the mouth floor. Practice has shown that this length is possible.

45 After lining up the primary impression a primary model will be made, which will be lined up according to the anatomy as reproduced and aligned on the primary impression. Primary cast


46 Custom tray Here you can see the lining up of the primary cast. The customised tray has to fit it exactly, the tray follows the lining up precisely.


47 Custom tray Always use acrylic denture base materials, as it is important for the customised tray to be pressed well onto the jaw. A wax rim is then applied.
48 The impression procedure Final model/ definitive Stap 5 cast visible borders Final Final impression checking borders rims moulding finish borders off rims detailed impression detailed impression Stap 4 And this brings us to the difficult step, step 4, making the final impression. During the first 3 steps a lot of time was spent on the anatomy, as a basis for determining the borders of the customised tray and the denture. It is therefore extremely important to try the borders of the customised tray in the mouth at the beginning of step 4. Primary Beginafdruk impression fitting passende tray Stap 1 lepel stiff alginate stug alginaat lining belijnen up impression afdruk Primary Stap cast 2 complete record peripheral lining Customised tray Stap 3 border requirements wax rim requirements


49 check customised tray in the mouth In other words, an impression and a model have been made based on the anatomy. The model has been lined up and a customised tray has been made following the peripheral lining. To be sure that the impression procedure has been followed accurately and that the information is correct, the tray need to be tried in the mouth. What do you need to watch out for when trying the custom tray? First of all the length. This is checked by asking the patient to stick out his tongue and touch the upper lip with it, to see whether the tray stays in place, in other words that it fits properly lingually. If the tray moves, then the tray is too long. You can check whether the tray is too short by looking in the mouth

50 Functional moulding Previously border trimming Borders are 2 mm shorter Stiffer stents (impression compound) Nowadays finishing off the borders Borders are <1 mm shorter Supple (viscous) stents Once the borders are checked in the mouth, the border can be trimmed or rather, be finished off. According to the classic technique, where no attention was paid to the alginate impression and the lining up, you often had a border which was 2 mm too short in comparison to the final denture, then the border need to be trimmed with stiff stents. With the stiff alginate technique, a great deal of attention is devoted to the alginate impression and the lining up of that impression and the primary model, which results in a customised tray with anatomical structures and a border more or less equal to that of the final denture. This is why we no longer talk about trimming the border, but about finishing it off, which is done with supple impression compound with a lower melting point.


51 Finishing off borders Also the finishing off is carried out step by step, so all the details are properly reproduced. And you ll see it the customised tray fits properly, the finished off borders are hardly any longer, because the borders only get longer where the customised tray is too short, which is not the case.


52 Finishing off the border If the tray fits properly, then you naturally need to ensure that the tray continues to fit, so the superfluous material that gets in between during finishing has to be removed.
53 The impression procedure Final model visible borders Stap 5 Final impression checking borders moulding borders detailed impression Stap 4 Primary Beginafdruk impression fitting passende tray Stap 1 lepel stiff stug alginate alginaat lining belijnen up impression afdruk Primary Beginmodel cast Stap 2 complete alles ruim record erin peripheral belijnen model lining Custom Individuele tray lepel Stap 3 border eisen requirements lepelranden wax rim eisen requirements waswal The tray has now been checked and finished off. This brings us to the last stage of the final impression, the detailed impression.


54 The final impression Don t forget adhesive! Here you see the tray, with the finished border. The anatomical structure is clearly visible and the borders are clearly reproduced. Only the anatomical structure of the middle part is not clear yet. Therefore a detailed impression with light viscosity material need to be made. Ensure that all movements are made. You see the result, the borders have not become any longer and in the middle part the anatomical details are properly reproduced. Finally, don t forget the adhesive, as you can easily pull fine material apart.
55 The impression procedure Final model visible borders Stap 5 Final Final impression checking borders moulding borders Stap 4 detailed impression Primary Beginafdruk impression fitting passende Stap tray 1 lepel stiff stug alginate alginaat lining belijnen up impression afdruk Primary Beginmodel Stap 2 complete alles ruim record erin peripheral belijnen model lining Custom Individuele tray lepel Stap 3 border eisen lepelranden requirements wax eisen rim requirements waswal
56 Final model Here you see a patient s primary and final model. The great difference between the two models is the raised plaster border. The entire impression procedure can be derived from that border.

57 Final model It is therefore essential to cast the model carefully, preserving width and depth of the sulci, so the border remains clearly visible. If this border is filed away, then you ll miss all the detailed information, which is a waste of the energy that has been spent on the anatomy.
58 Subjects The impression procedure Primary impression edentulous maxilla Primary impression edentulous mandible The final impression Alginate impression with dentulous trays Impression in partially edentulous situations during this impression procedure we ve used an edentulous tray, but it happens an edentulous tray is not appropriate and one need a dentulous tray in case of an edentulous jaw.

59 Using dentulous trays with edentulous patients Because dentulous trays for the edentulous mouth, it really is possible. But not all dentulous trays are suitable. Particularly important is that the tray runs dorsally up to and including the trigonum and the tuberosities, so the primary impression can reproduce the information in full.

60 Dentulous trays: when? Why use a dentulous tray? Here is an example for which it is difficult to find a suitable edentulous tray. This is because the jaw is only slightly shrunken, as there are still roots in the upper arch. The edentulous trays are often too short. In such a situation, the use of a dentulous tray can be appealing. First try amongst the edentulous trays and if you don t succeed then the dentulous trays are a good alternative. Another case in which


61 Dentulous trays: when? With this patient, a primary impression is being made with stiff alginate and a dentulous tray.

62 Impression with dentulous tray

 do include the tuberosities, so they can be")
63 Which dentulous trays? As we mentioned earlier, not all trays are suitable for this technique. Most trays do not include the tuberosities, so if you use them to make an impression of an edentulous jaw you miss essential information and it will not work properly. Schreinemaker s dentulous trays (in plastic or metal) do include the tuberosities, so they can be used for making impressions of edentulous jaws.
64 Impression with dentulous tray Drill holes!! Adhesion by means of - perforations under rimlock - using stiff alginate - moistening alginate - using excess alginate - using adhesive
65 Subjects The impression procedure Primary impression edentulous maxilla Primary impression edentulous mandible The final impression Alginate impression with dentulous trays Impression in partially edentulous situations
66 Impression for removable partial dentures This will be illustrated with the case based on which we explained the impression procedure with a dentulous tray for the edentate maxilla. Here you see the partial mandible, which requires a frame prosthesis. In this case, however, it is important to make sure all the anatomical details are reproduced. The question is, Will that work with a dentulous tray and will it work with alginate?

67 Impressions for removable partial dentures Should include: the teeth the occlusal rest seats the denture bearing tissues the lingual area What is the problem? When making an impression for a partial denture a number of factors play a major role: the teeth must be clear, the occlusal rest seats must be clearly recognisable, the denture bearing tissues must be clearly visible and finally, the lingual space has to be correct. So how do you make a good impression of this?


68 Purpose of the impression procedure 0.1 mm mm


69 What are the options? Precision impression with custom tray Altered cast method Dentulous fabrication tray with stiff alginate There are 3 methods for this. The first is the precision impression with the custom tray. This is actually the most accurate method. Then there is the altered cast method. This is also very accurate, but quite laborious, not only for the dentist but also for the dental technician. Finally, there is the technique using a dentulous off-the-shelf tray with stiff alginate. This, too, clearly reproduces the anatomical structures and is relatively simple. This technique will be explained based on our case.

70 Impression options We still have a lower front excluding canine. We want to make an impression and see all the details. How can we realise this?

71 Stiff alginate method Here, you use the anatomical trays and stiff alginate. A tray is chosen based on the model and that appears to succeed quite well.


72 Stiff alginate method The alginate impression can be made. The tray is placed above the jaw in the mouth, then it is depressed. We ask the patient to stick out his tongue so that the brides are included.

73 Stiff alginate method Resulting in this impression. And are all the anatomical details included?

74 Stiff alginate method Look: the brides are clearly visible, even the tongue tendon, thanks to the room made in the tray.

75 Stiff alginate method Also at the back, everything is included, up to behind the linea mylohyoidea, including the trigonum and overextended flanges. Thanks to the stiff alginate you get a perfect imprint of the bearing area under pressure.
76 Stiff alginate method In other words, looking at the impression and the plaster model you will see that all the anatomical details important for the partial denture have been sufficiently reproduced. Alginate is sufficiently detailed, so the elements and occlusal rests seats are clearly visible. And the mucosal parts are imprinted completely and under pressure.

77 Stiff alginate method You then assemble the prosthesis and fill up the rims. They should be longer than shown here.


78 Stiff alginate method Adhesion through - perforations under rimlock - using stiff alginate - using a lot of alginate - using adhesive Tips : block out interdigitations break impression trays

79 Impressions with stiff alginate CD RPD Summarizing, there has been spoken about impressions using stiff alginate in the case of an edentate jaw and a partially edentate jaw. Resulting in a complete denture or removable partial denture. Related to this a number of subjects have been discussed.
80 The impression procedure Final Final model/def.cast Stap 5 visible rims borders Final impression checking rims borders finish moulding off borders Stap rims 4 detailed impression Primary Beginafdruk impression fitting passende Stap tray 1 lepel stiff stug alginate alginaat lining belijnen up impresson afdruk Primary Beginmodel Stap 2 complete alles ruim details erin peripheral belijnen model lining Customised Individuele tray lepel Stap 3 border eisen lepelranden requirements wax eisen rim requirements waswal
81
82 Advantages of stiff alginate for impressions of edentate jaw All anatomical structures are visible in the over-contoured impression and therefore easily interpretable Prevents the impression tray being pushed into the muco-buccal fold with severely resorbed jaws Prevents interposition of a protruding mouth floor


83 Impression with dentulous tray Drill holes!! Adhesion by means of - perforations under rimlock - using stiff alginate - moistening alginate - using excess alginate - using adhesive
84 Impression options in case of partial edentulous jaws Dentulous fabrication tray with stiff alginate
85 Advantages of stiff alginate for impressions of partially edentate jaw The VP advantages + Pressure on the mucosa to compensate for the discrepancy in impressebility of mucosa elements with Kennedy I and II The procedure is simple and effective
86 Shopping list An anatomical shaped tray (including trigonum,linea mylohoidea and a gap for the frenae) eg. Schreinemakers trays High quality alginate with a good water-absorption, easy mixing without lumps, high tear-resistance and elasticity eg. Cavex Impressional A souple impression compound with a lower melting point Light viscosity wash material : eg. Xantopren blue, Provil novo light CD, A universal adhesive
87
DEVELOPING ANALOGUE/SUBTITUTE FOR THE MANDIBULAR DENTURE BEARING AREA. Dr Muhammad Rizwan Memon FCPS Assistant Professor
 DEVELOPING ANALOGUE/SUBTITUTE FOR THE MANDIBULAR DENTURE BEARING AREA Dr Muhammad Rizwan Memon FCPS Assistant Professor Crest of Residual Ridge Buccal Shelf Shape of supporting structure Mylohyoid Ridge
ARAB AMERICAN UNIVERSITY. Lab. Manual. Prosthetic Dentistry1; Removable Prosthodontics. 3 rd year
 ARAB AMERICAN UNIVERSITY Lab. Manual Prosthetic Dentistry1; Removable Prosthodontics 3 rd year Department of Fixed and removable prosthetic Dentistry Faculty of Dentistry 2012/2013 Course Instructor Dr.
Complete denture impressions
 Lec.5 Complete denture impressions د. غسان الطائي Dental Impression: a negative imprint of an oral structure used to produce a positive replica of the structure to be used as a permanent record or in the
IMPRESSION MAKING (IN COMPLETE DENTURES)
") IMPRESSION MAKING (IN COMPLETE DENTURES) DR ZURYATI AB GHANI BDS (WALES), Grad Dip Clin Dent (Adelaide), Doctor in Clinical Dentistry (prosthodontics), Adelaide, FRACDS 17.06.2007 Impressions An impression
IMPRESSION MAKING (IN COMPLETE DENTURES) DR ZURYATI AB GHANI BDS (WALES), Grad Dip Clin Dent (Adelaide), Doctor in Clinical Dentistry (prosthodontics), Adelaide, FRACDS 17.06.2007 Impressions An impression
DEVELOPING ANALOGUE SUBTITUTE FOR THE MAXILLARY DENTURE BEARING AREA. Dr Muhammad Rizwan Memon FCPS Assistant Professor
 DEVELOPING ANALOGUE SUBTITUTE FOR THE MAXILLARY DENTURE BEARING AREA Dr Muhammad Rizwan Memon FCPS Assistant Professor Mucous membrane Residual Ridge Incisive papilla Rugae area Mid palatine raphe Hard
Reference to primary publication Properties of alginates in ZWP 4/2014 Xantalgin Crono - Introduction
 Reference to primary publication in ZWP 4/2014 Dr. Marcus Holzmeier, Wuerzburg Xantalgin Crono - Highly accurate alginate impressions. Introduction Even today when digital impression techniques are gaining
IMPRESSION TRAYS. Stainless Steel Edentulous Impression Trays. 73
 IMPRESSION TRAYS Standard Stainless Steel Trays Perforated stainless steel impression trays - the most popular type. Retention is assured by holes over the whole surface of the tray. A rim on the back
Impression Manual.
 Impression Manual www.paladigitaldentures.com Contents Page 1 Requirements for Impressions Complete Denture Single Arch Maxillary Denture Single Arch Mandibular Denture Maxillary Impression Maxillary
Set the patient in up right position. For mandibular impression the dentist stand in front of the patient
 Set the patient in up right position For mandibular impression the dentist stand in front of the patient For maxillary impression the dentist stand behind the patient Denture retention relies on a number
Arrangement of the artificial teeth:
 Lecture Prosthodontic Dr. Osama Arrangement of the artificial teeth: It s the placement of the teeth on a denture with definite objective in mind or it s the setting of teeth on temporary bases. Rules
Figure (2-6): Labial frenum and labial notch.
: Labial frenum and labial notch.") The anatomy of the edentulous ridge in the maxilla and mandible is very important for the design of a complete denture. The consistency of the mucosa and architecture of the underlying bone is different
The anatomy of the edentulous ridge in the maxilla and mandible is very important for the design of a complete denture. The consistency of the mucosa and architecture of the underlying bone is different
THE BIOMECHANICAL BASIS OF RETENTION IN COMPLETE DENTURES
 THE BIOMECHANICAL BASIS OF RETENTION IN COMPLETE DENTURES Factors affecting the retention of dentures Retention is the resistance of the denture to removal along its path of insertion. Strictly speaking,
Horizontal jaw relations: The relationship of mandible to maxilla in a
 Horizontal relations Horizontal jaw relations: The relationship of mandible to maxilla in a horizontal plane (in anteroposterior and side to side direction). a- Protruded or forward relation. b-lateral
SURVEYING OF REMOVABLE PARITAL DENTURES FEB, 11, 2015
 SURVEYING OF REMOVABLE PARITAL DENTURES FEB, 11, 2015 Dental Surveyor: It is a mechanical device used to determine the relative parallelism of the teeth surfaces and the undercuts areas in relation to
UDELL DENTAL LABORATORY Instructions for Use PREAT Precision Attachments
 Indications Instructions The Locator Root Attachment is designed for use with overdentures or partial dentures, retained in whole or in part by endodontically treated roots in the mandibular or maxilla.
VIP Partner Laboratory (PL) Process Flow
 Process Flow") VIP Partner Laboratory (PL) Process Flow 1. VIP Software 2. CT Scan Appliance 3. CT Scan Clinician purchases VIP for PL fabricates CT Scan Appliance Patient submitted for scans treatment planning purposes
VIP Partner Laboratory (PL) Process Flow 1. VIP Software 2. CT Scan Appliance 3. CT Scan Clinician purchases VIP for PL fabricates CT Scan Appliance Patient submitted for scans treatment planning purposes
Upper arch. 1Prosthodontics. Dr.Bassam Ali Al-Turaihi. Basic anatomy & & landmark of denture & mouth
 1Prosthodontics Lecture 2 Dr.Bassam Ali Al-Turaihi Basic anatomy & & landmark of denture & mouth Upper arch Palatine process of maxilla: it form the anterior three quarter of the hard palate. Horizontal
3. The Jaw and Related Structures
 Overview and objectives of this dissection 3. The Jaw and Related Structures The goal of this dissection is to observe the muscles of jaw raising. You will also have the opportunity to observe several
ident CT Guide Protocol
 ident CT Guide Protocol The ident computer planning and iguide production starts with the CT Guide. This is a simple device which can be made by a dental technician, but it is essential that it is made
Try-in of the Trial Denture by Dr. Mahmoud Ramadan
 Published 1/25/2009 Try-in of the Trial Denture by Dr. Mahmoud Ramadan Definition: Preliminary insertion of complete denture wax up (trial denture) to determine the fit, esthetics, maxillomandibular relations
Lect. 14 Prosthodontics Dr. Osama
 Lect. 14 Prosthodontics Dr. Osama Principles of Removable Partial Denture Design Difference in Prosthesis Support and Influence on Design: For a tooth-supported prosthesis, the movement potential is less
Difference between Provider Centric Approach and Patient Centric Approach in Complete Denture Impression
 Difference between Provider Centric Approach and Patient Centric Approach in Complete Denture Impression Shinichi Nukazawa Journal of the Academy of Clinical Dentistry Vol.29 No.1-2 combined edition: 18-26,
Secondary, master, (functional impression) taking methods Dr. Károlyházy Katalin Semmelweis Univ. Budapest, Department of Prosthodontics Head of the
 taking methods Dr. Károlyházy Katalin Semmelweis Univ. Budapest, Department of Prosthodontics Head of the") Secondary, master, (functional impression) taking methods Dr. Károlyházy Katalin Semmelweis Univ. Budapest, Department of Prosthodontics Head of the Dept.: Prof. Dr.Hermann Péter Med.Habil. 2017. Secondary
Secondary, master, (functional impression) taking methods Dr. Károlyházy Katalin Semmelweis Univ. Budapest, Department of Prosthodontics Head of the Dept.: Prof. Dr.Hermann Péter Med.Habil. 2017. Secondary
UNDERSTANDING DIGITAL DENTISTRY: CBCT AND INTRA-ORAL 30 SCANNING
 UNDERSTANDING DIGITAL DENTISTRY: CBCT AND INTRA-ORAL 30 SCANNING -=- & UNDERSTANDING DIGITAL DENTISTRY: CBCT AND INTRA-ORAL 30 SCANNING ----CBCTi-------iTERO------ NewTom VGi *Vertical Patient Positioning
Nagri D et al. Linear occlusion and Neutral Zone recording for severely resorbed ridges
 Doi:10.21276/ledent.2018.02.01.02 Case Report LINEAR OCCLUSION AND NEUTRAL ZONE RECORDING USING TISSUE CONDITIONER REPORT OF A SEVERELY RESORBED RIDGE Divya Nagri, 1Ashish Kakkar, 2Neeraj Mittal, 3Lovely
Denture Troubleshooting Guide
 Denture Troubleshooting Guide Technical bulletin from National Dentex Comfort Sore spot in vestibule upper or lower denture Sore spot in upper post dam. (posterior limit of upper) Single sore spots on
Principles of. By: Dr. Ahmad Rabah
 Principles of By: Dr. Ahmad Rabah 1. Utilize what's present: Whenever possible, select a design that fits the teeth and soft tissues, rather than choosing one that requires tissue alteration. When minimal
PH-04A: Clinical Photography Production Checklist With A Small Camera
 PH-04A: Clinical Photography Production Checklist With A Small Camera Operator Name Total 0-49, Passing 39 Your Score Patient Name Date of Series Instructions: Evaluate your Series of photographs first.
Samantha W. Chou, D.M.D N. Southport Ave. Chicago, Illinois Phone: Fax:
 Samantha W. Chou, D.M.D. 2325 N. Southport Ave. Chicago, Illinois 60614 Phone: 312-608-6881 Fax: 773-296-0601 Samanthawchou@gmail.com What is our role as the dentist? "We live in a culture in which people
Oral cavity landmarks
 By: Dr. Ahmed Rabah Oral cavity landmarks The knowledge of oral anatomy and physiology will help the operator and provides enough landmarks to act as positive guide during denture construction. This subject
Guided immediate loading implant surgery planned with Implant Studio D.D.S. Jae-min, Lee
 Guided immediate loading implant surgery planned with Implant Studio D.D.S. Jae-min, Lee Jung-plant Dental office 1 PROLOGUE How can we deal with the immediate loading implant cases easier and more accurate
Horizontal Jaw Relation
 Horizontal Jaw Relation Horizontal Jaw Relation It is the relationship of the mandible to the maxilla in a horizontal plane. It can also be described as the relationship of the mandible to the maxilla
Instructions for CT Scanning
 16 Argon Dental USA 1000 Corporate Drive Marshfield, WI 54449 Instructions for CT Scanning Questions? Please contact: Joel A. Gonzales Director of Sales & Service West Argon Dental USA (480) 440-3927 joelg@argondentalusa.com
Arrangement of posterior artificial teeth Standardized parameters Curve of Wilson Curve of Spee
 . Arrangement of posterior artificial teeth Posterior teeth are set up in tight centric occlusion. The mandibular teeth are set in the wax occlusion rim over the residual ridge in their ideal buccolingual
Removable partial dentures
 Removable partial dentures Feb, 4, 2015 McCracken's Removable Partial Prosthodontics, Twelfth Edition Carr, Alan B 1 Prosthesis that replaces the missing teeth and associated supporting structures in a
Mandibular ridge changes after adaptation. An issue of shortened dental arch to be considered from changes of soft tissues after unattended tooth loss
 (Journal of Dental Outlook, Vol.110, Vol.6:1021~1027, Japan 2007. An issue of shortened dental arch to be considered from changes of soft tissues after unattended tooth loss Dr. Jiro Abe Abe Dental Clinic
AFFINIS Sys360 putty maximum precision and easy to use
 AFFINIS Sys360 putty maximum precision and easy to use Dr. RALPH SCHÖNEMANN, November 2010 Dentists can now select from a wide range of very different impression materials supplied by a large number of
The Anatomical Study of the Sinew String Observed on the Buccal Mucosa of Mandibular Second Molar and Posterior of Retromolar Pad
 The Anatomical Study of the Sinew String Observed on the Buccal Mucosa of Mandibular Second Molar and Posterior of Retromolar Pad Seiichiro Someya Vol.28 No.1-2 combined edition: 14-20, 2008 (Japanese)
ISPUB.COM. Habitual Centric: A Case Report. Manisha, N Kathuria, A Gupta, N Gupta INTRODUCTION CASE REPORT
 ISPUB.COM The Internet Journal of Geriatrics and Gerontology Volume 6 Number 2 Habitual Centric: A Case Report Manisha, N Kathuria, A Gupta, N Gupta Citation Manisha, N Kathuria, A Gupta, N Gupta. Habitual
MANAGEMENT OF LAX TISSUES TO IMPROVE POSSESSION BY WINDOW TECHNIQUE. Dept.of Prosthodontics, A.M.E.S Dental College&Hospital, Raichur
 MANAGEMENT OF LAX TISSUES TO IMPROVE POSSESSION BY WINDOW TECHNIQUE. Subashani T *, Sunil Dhaded ** Dept.of Prosthodontics, A.M.E.S Dental College&Hospital, Raichur - 584103 *-Sr.Lecturer **-Professor
Complete Denture Clinic Complete Removable Dental Prosthesis Procedures
 Complete Denture Clinic Complete Removable Dental Prosthesis Procedures Diagnostic Appointment Comprehensive Exam Extra oral Intra oral Discuss current dentures Main complaint Esthetic concerns Prosthetic
Preci Clix Instructions for Ball Retained Overdenture Attachments
 www.preat.com 800-232-7732 Preci Clix Instructions for Ball Retained Overdenture Attachments Dentist Direct Placement Technique #1293 / 1297 In one appointment, an existing removable partial denture may
IMPRESSION TECHNIQUE AND MATERIALS
 IMPRESSION TECHNIQUE AND MATERIALS DR ZURYATI AB GHANI BDS (WALES), Grad Dip Clin Dent (Adelaide), Doctor in Clinical Dentistry (prosthodontics( prosthodontics), Adelaide, FRACDS (Australia). 29.06.08
Instruction Guide. Today is the day you change the way you live with dentures. How to Apply DenSureFit Soft Silicone Reline Material
 Instruction Guide Today is the day you change the way you live with dentures. How to Apply DenSureFit Soft Silicone Reline Material Dentist-grade soft silicone denture reline materialnow available in an
Interim Denture Interim Complete Dental Prosthesis Clinical Steps
 Interim Denture Interim Complete Dental Prosthesis Clinical Steps Diagnostic Appointment Comprehensive Exam Extra oral Intra oral Address: Main complaint Esthetic concerns Other concerns Discuss (if present)
Construction of Removable Partial Denture
 Construction of Removable Partial Denture Peter Hermann Department of Prosthodontics Semmelweis University Treatment options for edentulous spaces Fixed prosthodontics (crowns/bridges) Removable prosthodontics
Preci Clix Instructions for Ball Retained Overdenture Attachments
 www.preat.com 800-232-7732 Preci Clix Instructions for Ball Retained Overdenture Attachments Dentist Direct Placement Technique In one appointment, an existing removable partial denture may be converted
Rehabilitation of Resorbed Mandibular Ridge with Implant Supported Overdenture- A Clinical Report
 Rehabilitation of Resorbed Mandibular Ridge with Implant Supported Overdenture- A Clinical Report 1 2 1 1 Mittal R, Saxena D, Rao S, Kumar M Abstract: Statement of Problem: Complete denture rehabilitation
There is one thing different. Everything.
 There is one thing different. Everything. THE MODEL MAKER THE SET-UP MODEL MAKER THE OCCLUSAL PLANE REFERENCE THE SURGICAL MODEL ACCURACY DEVICE Precise - Easy - Clean - Economical - Multi Purpose - Essential
Removable Partial Dentures
 Removable Partial Dentures Replacement of missing teeth Fixed partial denture Removable partial denture Complete removable Transitional denture Partial removable Implant retained prosthodontics No prosthetic
4/15/2015. Secondary Impressions: Anatomic and Physiologic Impressions. April, 8, Impressions for tooth-supported RPDs
 Secondary Impressions: Anatomic and Physiologic Impressions Impressions for tooth-supported RPDs April, 8, 2015 Impressions for tooth and tissue supported RPDs In tooth-supported removable partial denture
Q. How soon can I have a denture after my teeth are taken out? A. Usually dentures can be fitted straight after your teeth
 DENTURES Q. What is a denture? A. People wear dentures to replace lost or missing teeth so they can enjoy a healthy diet and smile with confidence. Dentures are made of either acrylic (plastic) or metal
Accu-Dent. impression system. Procedural guide. System 2 TM. For removable dentate impressions
 Accu-Dent impression system System 2 TM Procedural guide System 2 TM For removable dentate impressions The Complete System 2 TM Accu-Dent s System 2 is designed for partials, immediate dentures, orthodontics,
A comparative evaluation of three different techniques for single step border molding
 ORIGINAL RESEARCH A comparative evaluation of three different techniques for single step border molding Kheur M 1, Jambhekar S 2, Sethi T 3, Kheur S 4 1Professor, 3 PG student, Dept. of Prosthodontics,
Universal Plunger Loc Attachment
 Universal Plunger Loc Attachment www.preat.com 800-232-7732 Universal Plunger Loc Complete Universal 7.5mm length TI plunger attachment. Compatible with Lew Passive and Swiss Loc NG. 1.5mm plunger, 7.5mm
J. 0. AKINOSI, B.D.s., F.D.S.R.C.S.
 British Journal of Oral Surgery 15 (1977-78) 83-87 A NEW APPROACH TO THE MANDIBULAR NERVE BLOCK J. 0. AKINOSI, B.D.s., F.D.S.R.C.S. Department of Oral Surgery and Pathology, College of Medicine, Lagos
Prosthodontic Management of Compromised Mandibular Ridge Using Modified Functional..
 IOSR Journal of Dental and Medical Sciences (IOSR-JDMS) e-issn: 2279-0853, p-issn: 2279-0861.Volume 15, Issue 6 Ver. IX (June 2016), PP 55-59 www.iosrjournals.org Prosthodontic Management of Compromised
AccuDent XD. A beautiful smile makes a great impression... Office Procedure Guide. ...but it takes a great impression to make a beautiful smile.
 AccuDent XD Alginate Impression System Office Procedure Guide A beautiful smile makes a great impression......but it takes a great impression to make a beautiful smile. EXPLORE. SHOP. LEARN. Accu-Dent
A perfect fit for ultimate comfort. Soft and Extra Soft
 A perfect fit for ultimate comfort GC RELINE Soft and Extra Soft GC RELINE Soft & GC RELINE Extra Soft Ready-to-use, temporary soft silicone based reline materials. Vinyl polysiloxane materials in cartridges
See the end from the beginning
 Staub Cranial See the end from the beginning with Staub Cranial Recently a new technology was introduced to the United States that will revolutionize the way our industry restores teeth. The Staub Cranial
Table of Contents. Flexi-Overdenture Characteristics
 A s with Flexi-Post Flexi-Overdenture has the unique threaded split shank that creates maximum retention with minimum stress to the root. It is manufactured in stainless steel for the direct/non-coping
What you need to know about the Invisalign
 Info pack What you need to know about the Invisalign System. Learn about the Invisalign System. From how it works, its benefits, what the treatment process is like, what it s like living with Invisalign
STEP-BY-STEP-ANLEITUNG
 STEP-BY-STEP-ANLEITUNG VON TECHNIKERN FÜR TECHNIKER LABORATORY PROCEDURES, STEP BY STEP BY TECHNICIANS FOR TECHNICIANS Eclipse junior Laboratory Procedures, Step by Step* Splints Drilling Stents Temporaries
Dr.Mikulás Krisztina. Fabrication of the trial denture, and the try in procedure
 Dr.Mikulás Krisztina Fabrication of the trial denture, and the try in procedure the correct shape for the labial, buccal and palatal surfaces Adjusting the upper record rim Before starting adjustment-upper
SPECIAL TRAY. Dr. Barbara Kispélyi Associate Professor. Semmelweis University, Faculty of Dentistry Department of Prosthodontics
 SPECIAL TRAY Dr. Barbara Kispélyi Associate Professor Semmelweis University, Faculty of Dentistry Department of Prosthodontics Primary impression Primary cast Special tray From web OUTLINE Primary impression
MODIFIED FUNCTIONAL IMPRESSION TECHNIQUE FOR RESORBED MANDIBULAR RIDGE: TWO CASE STUDIES
 Prosthetic dentistry MODIFIED FUNCTIONAL IMPRESSION TECHNIQUE FOR RESORBED MANDIBULAR RIDGE: TWO CASE STUDIES Divia CHUGH 1, Siddharth PHULL 2, Arpan RANA 1, Yashendra SAINI 1 1 Resident (Prosthodontics)
EVALUATION KIT INSTRUCTION GUIDE
 EVALUATION KIT INSTRUCTION GUIDE Welcome to the Club! YOU RE ONE STEP CLOSER TO A MORE BEAUTIFUL SMILE Enclosed, you ll find everything you need to get started on your impressions: This easy-to-follow
 ISSN 1560-1587 81 7.18 11.51 9.21 72.84 4.94 22.22 4 Exploring the distance between upper central incisor edge and incisive papilla in Taiwanese population Sheau-Jiuan Huang 1, Tsau-Mau Chou 1, Huey-Er
International Journal of Dentistry and Oral Science (IJDOS) ISSN:
 ISSN:") International Journal of Dentistry and Oral Science (IJDOS) ISSN: 2377-8075 A Novel Functional Impression Procedure for Distal-Extension Removable Partial Dentures Li QL *, Cao Y Case Report Department
International Journal of Dentistry and Oral Science (IJDOS) ISSN: 2377-8075 A Novel Functional Impression Procedure for Distal-Extension Removable Partial Dentures Li QL *, Cao Y Case Report Department
Real World Implant Prosthetics: Fixed and Removable Samuel M. Strong, DDS
 Real World Implant Prosthetics: Fixed and Removable Samuel M. Strong, DDS Presurgical planning Health history-systemic conditions Case presentation Financial agreement Radiographs- PA s, FMX, Panoramic,
IMPRESSION PROCEDURES TRAINING MANUAL
 IMPRESSION PROCEDURES TRAINING MANUAL 01 01 A.B. DENTAL A.B. Dental is proud to present this impression taking procedure protocol. This manual explains, step by step, the procedure while using A.B. Dental
Complete denture copy technique A practical application
 Singapore Dental Journal 35 (2014) 65 70 Available online at www.sciencedirect.com journal homepage: www.elsevier.com/locate/sdj Case report Complete denture copy technique A practical application Steven
Fixed Twin Blocks. Guidelines for case selection are similar to those for removable Twin Block appliances.
 Fixed Twin Blocks Development of Fixed Twin Blocks Dr Clark has enjoyed the cooperation of Dynaflex in developing the Fixed Twin Block. Six years of clinical testing has confirmed that this technique produces
Enhanced Control in the Transverse Dimension using the Unitek MIA Quad Helix System by Dr. Sven G. Wiezorek
 Enhanced Control in the Transverse Dimension using the Unitek MIA Quad Helix System by Dr. Sven G. Wiezorek Dr. Wiezorek studied dental medicine at Kiel University, Germany from 1987 to 1993. He then finished
أ.م. هدى عباس عبد اهلل CROWN AND BRIDGE جامعة تكريت كلية. Lec. (2) طب االسنان
 طب االسنان") Lec. (2) CROWN AND BRIDGE أ.م. هدى عباس عبد اهلل Patient selection and examination A thorough diagnosis must first be made of the patient's dental condition, considering both hard and soft tissues. this
Lec. (2) CROWN AND BRIDGE أ.م. هدى عباس عبد اهلل Patient selection and examination A thorough diagnosis must first be made of the patient's dental condition, considering both hard and soft tissues. this
Face-Bow Instructions
 M Panadent Corporation 580 S. Rancho Avenue Colton, California 92324, USA Tel: (909) 783-1841 USA & Canada (800) 368-9777 The following procedure is followed when Panadent Bite-Tab compound discs are used
How to provide intraoral scans to SomnoMed for the production of SomnoDent device.
 How to provide intraoral scans to SomnoMed for the production of SomnoDent device. KEY QUESTIONS: 1. Where do I send my Case? Send intra-oral scan files (maxilla and mandible in protrusive bite) and an
Therapeutic Exercises for the Foot & Ankle August 19 th, 2018
 Therapeutic Exercises for the Foot & Ankle August 19 th, 2018 VIRASANA Come on to your hands and knees. Bring the knees to touch and separate the feet wider than the hips. Place a block between your feet.
Complete yourself. How restoring your teeth can win back your life.
 Complete yourself. How restoring your teeth can win back your life. Intro Quality of life Intro Intro Quality of life Intro Why you shouldn t ignore missing or damaged teeth Missing or damaged teeth affect
Lateral throat form re classified using a customized gauge: A clinical study
 Original Article Lateral throat form re classified using a customized : A clinical study N. Kalavathy, P. Roshan Kumar, Shefali Gupta, J. Sridevi, Mitha Shetty, Archana K. Sanketh Department of Prosthodontics,
6610 NE 181st Street, Suite #1, Kenmore, WA
 660 NE 8st Street, Suite #, Kenmore, WA 9808 www.northshoredentalacademy.com.08.900 READ CHAPTER The Professional Dental Assistant (p.-9) No Key Terms Recall Questions:,,,, and 6 CLASS SYLLABUS DAY READ
Fixed Partial Denture
 University of Minnesota School of Dentistry Fixed Partial Denture Self-guided Instructional Material for Dental Students Authors Ranier M. Adarve, DMD, MS, MHPE Lisa Fedor James, DDS, Cert. Pros. Fixed
Case report: Lingualized occlusion -A better way for enhancing function & esthetic
 Case report: Lingualized occlusion -A better way for enhancing function & esthetic 1Dr. Vishrut Shah, 2 Dr. Sunil Dhaded, 3 Dr. Chandrashekar Sajjan 1Post graduate student, Department of Prosthodontics,
AD2 MEASURES CONDYLE DISPLACEMENT (MCD) MANUAL
 MANUAL") AD2 MEASURES CONDYLE DISPLACEMENT (MCD) MANUAL Dr. Jorge Ayala Puente, DDS* Dr. Gonzalo Gutiérrez Álvarez, DDS* Dr. José Miguel Obach M., DDS Translation: Dr. Barbara Fernández Lübbert, DDS Edited: Dr.
AD2 MEASURES CONDYLE DISPLACEMENT (MCD) MANUAL Dr. Jorge Ayala Puente, DDS* Dr. Gonzalo Gutiérrez Álvarez, DDS* Dr. José Miguel Obach M., DDS Translation: Dr. Barbara Fernández Lübbert, DDS Edited: Dr.
-SQA-SCOTTISH QUALIFICATIONS AUTHORITY. Hanover House 24 Douglas Street GLASGOW G2 7NG NATIONAL CERTIFICATE MODULE DESCRIPTOR
 -SQA-SCOTTISH QUALIFICATIONS AUTHORITY Hanover House 24 Douglas Street GLASGOW G2 7NG NATIONAL CERTIFICATE MODULE DESCRIPTOR -Module Number- 0069143 -- -Superclass- PF -Title- DENTAL SPECIAL TRAYS -DESCRIPTION-
Connect your Scanner to SomnoMed Canada. SOMGauge Protrusive Bite Recording - Manual. Scanning Impressions - Lower and Upper
 IOS Instructions How to create and submit the best scans to SomnoMed Canada for the creation of a custom SomnoDent Sleep Apnea Appliance Its a simple process: STEP 1 Connect your Scanner to SomnoMed Canada
Get Out of Back Pain
 A bit about shoulders and stretching: Shoulder Supermoves Ideally, it s best to work with a trained fitness professional or physical therapist when starting any new exercise or stretching program. You
Hex-Lock Abutment System. Restorative Manual
 System Restorative Manual 32 Restorative options with s s are manufactured from titanium alloy and used as the support foundation for single- or multiple-unit cement-retained, partially edentulous fixed
THE SnoreFree SYSTEM. No Impressions No Models No Costly Lab Bills No Long Time-Consuming Appointments No Adjustments With Handpieces
 THE SnoreFree SYSTEM Recently a wealth of information has been presented through the print, radio and broadcast media about different methods to treat snoring. As the public has been made aware that dental
Vertical relation: It is the amount of separation between the maxilla and
 Vertical relations Vertical relation: It is the amount of separation between the maxilla and the mandible in a frontal plane. Vertical dimension: It is the distance between two selected points, one on
Techniques of local anesthesia in the mandible
 Techniques of local anesthesia in the mandible The technique of choice for anesthesia of the mandible is the block injection and this is attributed to the absence of the advantages which are present in
Component parts of Chrome Cobalt Removable Partial Denture
 Lec. 5 د.بسام الطريحي Component parts of Chrome Cobalt Removable Partial Denture Major connectors: Are either bars or plates, the difference between them is in the amount of tissue covers. Plates are broad
STANDARDS & GUIDELINES
 STANDARDS & GUIDELINES 3.1.1. Complete Dentures 2 APPENDIX A FOR 3.1.1 Complete Dentures.. 3 Patient History and Treatment Plan Impressions Centric and Protrusive Denture Try In Insertion 3.1.2. Partial
Contents. DUPLICATION PROHIBITED by copyright holder. copyright Wendy Murdoch and Trafalgar Square Books
 Contents Introduction 1 Names for the Different Seats and Riding Positions 5 Working on the Exercise Ball 6 Guidelines to Learning 6 How to Use the Fixes 10 Section 1: Lower Back and Pelvis 13 Introduction
Surveying. 3rd year / College of Dentistry/University of Baghdad ( ) Page 1
 Page 1") د. فائزة Lec.3 Prosthodontics Surveying The ideal requirements for successful removable partial denture are: 1. Be easily inserted and removed by the patient. 2. Resist dislodging forces. 3. It should
د. فائزة Lec.3 Prosthodontics Surveying The ideal requirements for successful removable partial denture are: 1. Be easily inserted and removed by the patient. 2. Resist dislodging forces. 3. It should
Implant Studio Patient Case
 Jung-plant dental office Dr. Jae-min, Lee D.D.S. Implant Studio Patient Case Full mouth rehabilitation Case information On first visit, the patient was wearing a removable partial denture on lower jaw
Pre prosthetic surgery
 Pre prosthetic surgery The surgical procedures designed to facilitate fabrication of a prosthesis or to improve the prognosis of prosthodontics care. AIMS OF PRE PROSTHETIC SURGERY 1-provide adequate bony
Pushups and Pistols April 2018 Challenge
 Pushups and Pistols April 2018 Challenge For this Challenge, here is the instructional playlist. Day 1 Assessment For the pushup portion of this challenge, we need to figure out your strength level that
The fitting process of SomnoGuard AP. Hints to complement the user instructions
 The fitting process of SomnoGuard AP Hints to complement the user instructions Essential equipment and instruments Spray disinfectant for all instruments Boling water bath Water boiler Disposable gloves
An overview of posture
 An overview of posture What is posture? Posture is the description of an overall body position. This can be intentional or unintentional how we are hold our bodies, but it is the way each individual will