Evolve 3 & 5 Service Manual
|
|
|
- Elizabeth Rogers
- 5 years ago
- Views:
Transcription

1 Evolve 3 & 5 Service Manual 1

2 Product Browse 2
3 Contents CHAPTER 1: SERIAL NUMBER LOCATION... 5 CHAPTER 2: CONSOLE INSTRUCTIONS 2.1 Console Overview Evolve 3 Console Overview Evolve 5 Console Overview Display Window Indication Getting Started & Selecting a Workout Program Information CHAPTER 3: ENGINEERING MODE 3.1 Engineering Mode Engineering Mode Overview CHAPTER 4: TROUBLESHOOTING 4.1 Electrical Diagram Troubleshooting No Power to The Console ECB Controller Instructions Troubleshooting No RPM display Troubleshooting No Resistance Troubleshooting Heart Rate Function Issues CHAPTER 5: PART REPLACEMENT GUIDE 5.1 Console Replacement Console Mast Replacement Arm Set Replacement Link Arm Replacement Crank Set Replacement
4 5.6 Side Cover Replacement ECB Motor Replacement


5 CHAPTER 1: Serial Number Location 1.1 SERIAL NUMBER LOCATION 5
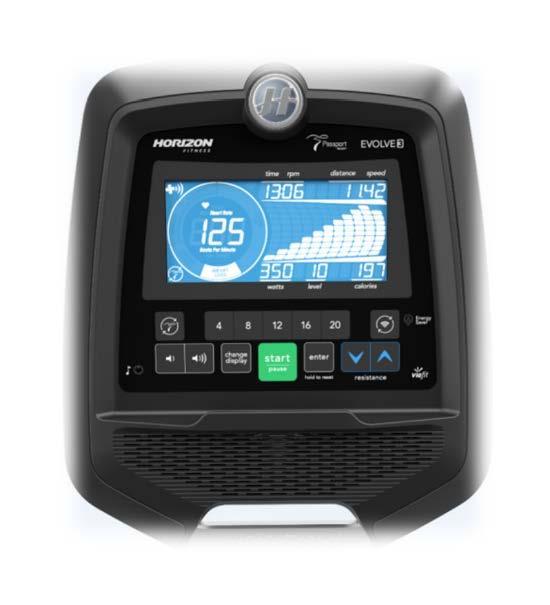
 LCD DISPLAY WINDOW: time, distance, speed, calories, RPM, Watts, level, and heart rate. B) START/PAUSE KEY: press to start workout and pause workout.")
6 CHAPTER 2: Console Instructions 2.1 CONSOLE OVERVIEW EVOLVE 3 Console Overview Note: There is a thin protective sheet of clear plastic on the overlay of the console that should be removed before use. A) LCD DISPLAY WINDOW: time, distance, speed, calories, RPM, Watts, level, and heart rate. B) START/PAUSE KEY: press to start workout and pause workout. C) ENTER KEY: press to confirm selection during programming setup. D) CHANGE DISPLAY: press to change display feedback during workout. E) RESISTANCE KEYS: press to adjust resistance level. F) QUICK KEYS: used to reach desired resistance level quickly. G) SPEAKERS: plays music through speakers when connected to your media player. H) READING RACK: holds reading material. I) WI-FI CONNECT & SYNC: press to reset and connect your wireless internet connection. See Page 8 for more info. J) PASSPORT CONNECTS & SYNC: press to reset and connect your Passport box for Virtual Active programming. K) VOLUME: used to adjust volume up or down. L) AUDIO IN JACK: plug your media player into the console using the included audio adaptor cable. M) ENERGY SAVER LIGHT: indicates if machine is in Energy Saver mode. 6
 LCD DISPLAY WINDOW: time, distance, speed, calories, RPM, Watts, level, and heart rate. B) START/PAUSE KEY: press to start workout and pause workout.")
7 CHAPTER 2: Console Instructions EVOLVE 5 Console Overview Note: There is a thin protective sheet of clear plastic on the overlay of the console that should be removed before use. A) LCD DISPLAY WINDOW: time, distance, speed, calories, RPM, Watts, level, and heart rate. B) START/PAUSE KEY: press to start workout and pause workout. C) ENTER KEY: press to confirm selection during programming setup. D) CHANGE DISPLAY: press to change display feedback during workout. E) RESISTANCE KEYS: press to adjust resistance level. F) QUICK KEYS: used to reach desired resistance level quickly. G) SPEAKERS: plays music through speakers when connected to your media player. H) READING RACK: holds reading material. I) WI-FI CONNECT & SYNC: press to reset and connect your wireless internet connection. See Page 8 for more info. J) PASSPORT CONNECTS & SYNC: press to reset and connect your Passport box for Virtual Active programming. K) VOLUME: used to adjust volume up or down. L) AUDIO IN JACK: plug your media player into the console using the included audio adaptor cable. M) ENERGY SAVER LIGHT: indicates if machine is in Energy Saver mode. 7

8 CHAPTER 2: Console Instructions 2.2 DISPLAY WINDOWS INDICATION TIME: Shown as minutes: seconds. View the time remaining or the time elapsed in your workout. SPEED: Shown as MPH. Indicates how fast the foot pads are moving. CALORIES: Total calories burned or remaining for your workout. DISTANCE: Shown as miles. Indicates distance traveled or distance remaining during your workout. RPM: Rotations Per Minute. WATTS: Displays current user power output. LEVEL: Shows the current level of resistance. HEART RATE: Shown as BPM (beats per minute). Use to monitor your heart rate (displayed when contact is made with both pulse grips). A) CARDIOCOMPASS HEART RATE WHEEL: Displays what activity zone you are in during your workout. WARM UP: 0-60% of maximum heart rate WEIGHT LOSS: 60-70% of maximum heart rate IMPROVE FITNESS: 70-80% of maximum heart rate IMPROVE PERFORMANCE: 80-90% of maximum heart rate MAXIMUM PERFORMANCE: % of maximum heart rate B) PROGRAM PROFILE: Represents the profile of the program being used (resistance during resistance based programs and incline during incline based programs). C) PASSPORT: Indicates Passport box connection is present. D) WI-FI: Indicates wireless connection is present and the strength (low, medium, high). 8
9 CHAPTER 2: Console Instructions SET UP XID ACCOUNT FOR VIAFIT CONNECTIVITY Creating a xid account will allow you to save and share workout data using the ViaFit Wi-Fi. Up to four users can be saved on a machine. This process is the first step in connecting your equipment. It must be done from a computer, tablet, or mobile device. 1) Visit the web site: 2) Once at the web site, select the CONNECT YOUR EQUIPMENT option on the top menu bar. 3) The first step in connecting your equipment will to be creating your xid account. This will be your login to Via Fit. 4) Enter your phone number or another easy-to-remember digit number. This will be your account number. 5) Fill in your profile information to finish the xid account set up process. You will be asked to provide an address not associated with any other xid account. Check your after the set-up process for a link to validate your account. CONNECT WI-FI Once you have created your xid account, you will be able to move on to activating the Wi-Fi on your equipment. Reminder, this requires you to use your computer, tablet, or mobile device that is connected to the internet. 1) Press and hold for 3-5 seconds until you see the message ACTIVATED on your screen. 2) On your computer or other device, go to your Wi-Fi settings. You should select the network with your model name. Doing this enables you to connect your equipment to your wireless network. 3) A new window will pop up with the list of wireless networks your equipment can see. Select your home Wi-Fi network and connect. 4) The remaining step is to reconnect your computer or other device back to your Wi-Fi network. Go to your settings again and connect as you normally would. Congratulations! You are now connected and ready to get started. 2.3 GETTING STARTED & SELECTING A WORKOUT 1) Check to make sure no objects are nearby that will hinder the movement of the elliptical. 2) Plug in the power cord. 3) Select your xid account, User, Guest, or Edit a User using and press ENTER. 4) When you log in for the first time as User 1-4, you will be prompted to enter your xid information. a) Enter your xid account number using and press ENTER to select the numbers. Press ENTER after each input to move to the next digit. After the final input, press ENTER. b) Enter your passcode using to select the numbers. Press ENTER after each input to move to the next digit. After the final input, press ENTER twice. c) If you key the incorrect number at any point while entering your xid or passcode, press and hold CHANGE DISPLAY for 3-5 seconds to clear the selection and begin again. A) QUICK START Simply press START to begin working out. Time will count up from 0:00. The resistance level will default to level 1. B) SELECT A PROGRAM 9
10 CHAPTER 2: Console Instructions 1) Select a PROGRAM using and press ENTER. 2) Set workout program information using and press ENTER after each selection. 3) Press START to begin workout. NOTE: You can adjust the resistance level during your workout. C) FINISHING YOUR WORKOUT When your workout is complete, the console will display workout complete and beep. Your workout information will stay displayed on the console for 30 seconds and then reset. TO CLEAR CURRENT SELECTION To clear the current program selection or screen, press and hold ENTER for 3 seconds. MANUAL: Adjust your resistance level manually during workout. User sets time and starting resistance level. CALORIES: Set goals for burning calories with six (Evolve 3) or nine (Evolve 5) workouts. Choose from 100, 200, 300, 400, 500, 600, and (Evolve 5 only) 700, 800, or 900 calorie burn workouts. User sets starting resistance level. Calories burned are calculated using weight input of user profile. DISTANCE: Push yourself and go further during your workout with 10 distance workouts. Choose from 1 mile, 2 miles, 5k, 5miles, 10k, 8 miles, 15k, 10 miles, 20k, and half marathon goals. User sets starting resistance level. STEPS: Promotes healthy activity with 10 step-based workouts calculated using average stride length. Choose from 1000, 2000, 3000, 4000, 5000, 6000, 7000, 8000, 9000, and 10,000 step workouts. User sets starting resistance level. Press ENTER to see step count. INTERVALS: An effective fat-burning workout that helps you improve your fitness level. Choose from speed intervals and endurance intervals. PERFORMANCE: Challenge yourself with targeted performance workouts intent on helping you improve specific training elements. Choose from constant watts, interval watts, target heart rate zone* and % target heart rate* workouts. (* Evolve 5 only.) CUSTOM (EVOLVE 5 ONLY): Lets you create and reuse a perfect workout for you with specific resistance and time combination. The ultimate in personal programming. Time-based goal. Your custom workout will be saved automatically. 10
 Connect the included AUDIO ADAPTOR CABLE to the AUDIO IN JACK on the left of the console and the headphone jack on your media player.")
11 CHAPTER 2: Console Instructions 2.4 PROGRAM INFORMATION USING YOUR MEDIA PLAYER 1) Connect the included AUDIO ADAPTOR CABLE to the AUDIO IN JACK on the left of the console and the headphone jack on your media player. 2) Use your media player buttons to adjust song settings. 3) Remove the AUDIO ADAPTOR CABLE when not in use. ENERGY SAVER (STANDBY MODE) This machine has a special feature called Energy Saver mode. This mode is NOT automatically activated. When Energy Saver mode is activated, the display will automatically enter standby mode (Energy Saver mode) after 15 minutes of inactivity. This feature saves energy by disabling most power to the machine until a key is pressed on the console. This feature can be turned on or off in the engineering menu. To enter the engineering menu, press and hold the RESISTANCE key and RESISTANCE key for 3-5 seconds. Use to navigate to SWITCH FUNCTION and press ENTER. Press ENTER to select Energy Saver mode, use to select ENERGY SAVE ON or OFF. Press and hold ENTER for 3-5 seconds to exit SWITCH FUNCTION. Press and hold ENTER again for 3-5 seconds to exit the engineering menu. 11

12 CHAPTER 3: Console Instruction PASSPORT MEDIA PLAYER The Passport player, featuring Virtual Active technology, is a high definition experience that uses real destination footage and matching ambient sounds from stunning destinations around the world. The ultimate in workout entertainment, Passport lets you escape the confines of a regular workout routine while enjoying a dynamic experience. A Passport player is available for purchase separately from your Horizon Fitness retailer. Additional courses are available from your Horizon Fitness retailer. For more information, go to: SYNCING CONSOLE WITH PASSPORT 1) Use the arrow keys on the Passport remote to scroll to the setup icon and press select. 2) Follow the on-screen prompts to press on the equipment console. 3) The message displayed on screen will notify you if the sync was a success or failure. NOTE: See PASSPORT OWNER S MANUAL for more information. 12
13 CHAPTER 3 : Engineering Mode 3.1 ENGINEERING MODE 13

14 CHAPTER 4 : Engineering Mode 3.2 ENGINEERING MODE OVERVIEW 14
15 CHAPTER 4: Troubleshooting 4.1 ELECTRIC DIAGRAME EVOLVE 3 15
16 CHAPTER 4: Troubleshooting EVOLVE 5 16
 First, try to re-connect the wires.")
17 CHAPTER 4: Troubleshooting 4.2 No power to the console Symptom: Console does not light up. Reason: 1. Adaptor incorrect or defective. 2. Console cable defective. 3. Console defective. Solution: 1. The adaptor for this model is 12V -1A. Make sure to use an adapter with the correct specification, and replace the adaptor if it is defective. 2. A) First, try to re-connect the wires. B) Test pins 1 & 2 of the connecter to verify that the voltage of the console cable is 12V-1A (Fig A). If it is not, make sure that the DC cable and ECB cable are fully connected. Replace the cables as necessary. C) Check the wires in the console to make sure they are all fully connected. (Console cable s connectors with PCB) (Fig A) If the console cable s output is DC 12V but the console does not light up, the console PCB is defective. Replace the console set. 17

18 CHAPTER 4: Troubleshooting 4.3 ECB Controller Instructions 1. Attach the steel cable here 2. Reposition the orange block to adjust the resistance (left side is minimum and right side is maximum) 18


19 CHAPTER 4: Troubleshooting 4.4 No RPM display Symptom: No RPM shown on the console. Reason: 1. Bad connection between the console cable and the console 2. Speed sensor wire defective 3. Magnet has fallen off of pulley 4. Console defective Solution: 1. Re-connect the console wire. 2. Check the gap between the speed sensor and magnet on pulley. It is normally within 5mm (Fig. A). If the gap is larger, adjust the sensor. 3. Re-install a new magnet (Fig. B). 4. Replace the console set (Fig. A) (Fig. B) 19

.")
 If ECB motor cannot move, the resistance will not be changed. The ECB motor or console cable is defective.")
20 CHAPTER 4: Troubleshooting 4.5 No resistance or incorrect resistance Symptom:1. The resistance cannot be adjusted during exercise. 2. The resistance is reversed or too strong. Reason: 1. Speed sensor wire is defective. 2. Console cable or ECB motor is defective. 3. ECB motor s steel rope is positioned incorrectly. 4. Inside magnet is defective. Solution: 1. Turn on the console, and check the ECB motor. In resistance level 1, the head of steel rope should point to the top right side (around 45 degrees). If the head of steel rope points to bottom left side, the resistance will be reverse. Adjust the head of steel rope to the correct position. 2. Press key + to adjust the resistance. A) If ECB motor cannot move, the resistance will not be changed. The ECB motor or console cable is defective. Make sure the console cable is inserted in the ECB motor. Next, try to re-connect the console cable. If the issue remains, replace the console cable. If the issue remains after replacing the console cable, replace the ECB motor. 20
 B) If the")


21 CHAPTER 4: Troubleshooting 4.5 No resistance or incorrect resistance (continued) B) If the ECB motor can move, the resistance can be adjusted. If the resistance is too strong, check they flywheel to make sure that the gap between orange block and the bottom is within 1-2 mm. If the gap is bigger than 1-2 mm, the resistance will be stronger than normal. Adjust the cable to the correct gap range. 3. If steps 1 & 2 do not fix the issue, the inside magnet is defective. Replace the inside magnet. 21
22 CHAPTER 4: Troubleshooting 4.6 Heart Rate Function Issues Symptom: Heart rate function does not work or is reading incorrectly Solution: 1. With a multi-meter set for DC voltage, place one terminal on each of the HR grip plates. The HR grip should give a voltage reading of between 0.5 and 2.0VDC. If the voltage is not between 0.5 and 2.0VDC, remove the 3 screws holding the HR grip together and check the connection of the HR grip wiring. 2. Check continuity of the HR grip wiring. Place one terminal of a multi-meter set for resistance on the HR grip wiring at the HR grip, and the other terminal on the HR grip wiring at the console. The multi-meter should register an ohm reading of around 1. If the reading is higher than 1, replace the HR grip wiring. 3. Remove the console. Remove the 6 screws holding the front of the console to the rear. Check the connection of the HR board wiring to the UCB. If all the wiring is intact and has good contact, replace the HR board. 4. If the HR board, HR grips, and HR grip wiring do not solve the issue, replace the UCB. 22
23 CHAPTER 5: PART REPLACEMENT GUIDE 5.1 CONSOLE REPLACEMENT 1. Remove the 4 screws of the console mast (Figure A). 2. Take off the console and disconnect the wires. FIGURE A 23


.")

24 CHAPTER 5: Part Replacement Guide 5.2 CONSOLE MAST REPLACEMENT 1. Remove the two console mast covers (Figure A). FIGURE A 2. Loosen the 4 nuts and then take off the console mast (Figure B). FIGURE B 24
25 CHAPTER 5: Part Replacement Guide 5.3 ARM SET REPLACEMENT 1. Loosen the screw and take off the washers, then move to the next step (Figure A). 2. Loosen the screw and remove the washers to take off the whole arm set (Figure B). 3. Take off the arm set (Figure C). 25
26 CHAPTER 5: Part Replacement Guide 5.4 LINK ARM REPLACEMENT 1. Loosen the screws and washers to remove the link arm from the arm set. 26


27 CHAPTER 5: Part Replacement Guide 5.5 CRANK SET REPLACEMENT 1. Loosen the screws and remove the cover (Figure A). FIGURE A 2. You will see the crank set. Loosen the screws to take off the crank set (Figure B). FIGURE B 27

. FIGURE A FIGURE B 2.")
. 3.")
28 CHAPTER 5: Part Replacement Guide 5.6 SIDE COVER REPLACEMENT 1. Loosen the 4 screws in the side covers (Figure A). FIGURE A FIGURE B 2. Loosen the 4 screws at the bottom of the side covers (Figure B). 3. After removing the side cover, you will see the inside structure (Figure C). FIGURE C 28


29 CHAPTER 5: Part Replacement Guide 5.7 ECB MOTOR REPLACEMENT 1. Loosen the two different screws (Figure A). 2. Loosen the screws on the other side, remove the belt, and then take off the ECB (Figure B). FIGURE A FIGURE B 29
Adventure 3 Plus Service Manual
 Adventure 3 Plus Service Manual 1 TABLE OF CONTENTS CHAPTER 1: SERIAL NUMBER LOCATION...3 CHAPTER 2: PREVENTATIVE MAINTENANCE 2.1 Preventative Maintenance. 4 2.2 Tension and Centering the Running Belt....6
Adventure 4 Plus Service Manual
 Adventure 4 Plus Service Manual 1 TABLE OF CONTENTS CHAPTER 1: SERIAL NUMBER LOCATION...3 CHAPTER 2: PREVENTATIVE MAINTENANCE 2.1 Preventative Maintenance. 4 2.2 Tension and Centering the Running Belt....6
841T. Adventure4 Adventure5 TREADMILL OWNER S MANUAL
 841T Adventure4 Adventure5 TREADMILL OWNER S MANUAL Read the treadmill guide before using this owner s manual. ASSEMBLY WARNING There are several areas during the assembly process that special attention
Adventure 5 Plus Service Manual
 Adventure 5 Plus Service Manual 1 TABLE OF CONTENTS CHAPTER 1: SERIAL NUMBER LOCATION...3 CHAPTER 2: PREVENTATIVE MAINTENANCE 2.1 Preventative Maintenance. 4 2.2 Tension and Centering the Running Belt....6
TREADMILL. Vision Fitness Classic Console TF40
 TREADMILL Vision Fitness Classic Console TF40 CLASSIC CONSOLE OPERATION A) LARGE LED DISPLAY WINDOW - displays workout time B) ALPHANUMERIC DISPLAY WINDOW displays incline, distance, speed, calories, pace,
Read the elliptical guide before using this owner s manual.
 LS7.9E LS9.9E LS12.9E ELLIPTICAL OWNER S MANUAL Read the elliptical guide before using this owner s manual. INTRODUCTION Congratulations and thank you for your purchase of this LIVESTRONG elliptical! Purchases
FITNESS BIKE. Vision Fitness E3100
 FITNESS BIKE Vision Fitness E3100 E3100 Fitness Bike PROPER SEAT POSITIONING To determine the proper seat position, sit on the seat and position the ball of your foot on the centre of the pedal. Your knee
CIRCUIT ZONE ELLIPTICAL
 CIRCUIT ZONE ELLIPTICAL SF-E386 USER MANUAL IMPORTANT! Please retain owner s manual for maintenance and adjustment instructions. Your satisfaction is very important to us, PLEASE DO NOT RETURN UNTIL YOU
Nord.cTracICA.Cr USER'S MANUAL A CAUTION QUESTIONS? .. Visit our website'at. new products, prizes, fitness tips, and much more!
 Nord.cTracICA.Cr Model No. NTCW90907.1 Serial No. Write the serial number in the space above for reference. _ USER'S MANUAL Serial Number Decal (under frame) QUESTIONS? As a manufacturer, we are committed
Monitor Instructions for Models: CHB-R6 CHB-UV6
 Monitor Instructions for Models: CHB-R6 CHB-UV6 Power supply: output DC 9v/ 1000mA transformer adaptor TABLE OF CONTENTS Function Buttons ----------------------------------------------------------------------------
HealthCare International, Inc. PO Box 1509, Langley, WA P: (360) or (800)
 or (800)") Owner s Manual V2.2 HealthCare International, Inc. PO Box 1509, Langley, WA 98260 www.hcifitness.com sales@hcifitness.com P: (360) 321-7090 or (800) 398-9121 1 Table of Contents Safety Precautions... 3
Owner s Manual V2.2 HealthCare International, Inc. PO Box 1509, Langley, WA 98260 www.hcifitness.com sales@hcifitness.com P: (360) 321-7090 or (800) 398-9121 1 Table of Contents Safety Precautions... 3
HealthCare International, Inc.
 Owner s Manual V.2 HealthCare International, Inc. 1 Table of Contents Safety Precautions... 3 Warranty Information... 4 Assembly Instructions... 5 Quick Tips... 8 AC Adaptor:... 8 Levelers:... 8 Seat Adjustments:...
Read the elliptical guide before using this owner s manual.
 LS7.9E ELLIPTIAL OWNER S MANUAL Read the elliptical guide before using this owner s manual. INTRODUTION ASSEMLY ongratulations and thank you for your purchase of this LIVESTRONG elliptical! Purchases of
GS1050T TREADMILL OWNER S MANUAL
 GS1050T TREADMILL OWNER S MANUAL Read the treadmill guide before using this owner s manual. 2 ASSEMBLY WARNING There are several areas during the assembly process that special attention must be paid. It
HIIT AiRBIKE AT-1000B
 HIIT AiRBIKE AT-1000B V2.2 AirTEK Fitness www.airtekfitness.com PO Box 1509 Langley WA, 98260 (360) 321-7090 or (800) 398-9121 TABLE OF CONTENTS SAFETY FIRST... 3 WARRANTY INFORMATION... 4 ASSEMBLY NOTE...
User Guide for Lifegear RUNNER App
 User Guide for Lifegear RUNNER App http://www.lifegear.com.tw Contents LifeGear RUNNER App Installation 2 Connect Your Mobile Device to the Specific Bluetooth Fitness Equipment 4 Entering Your Profile
R25 Recumbent Bike ASSEMBLY & PARTS MANUAL
 V2 R25 Recumbent Bike ASSEMBLY & PARTS MANUAL MA902 Recreation Supply Inc. Model No. R25 V2 P.O. BOX 181 BODYCRAFT is a division of Recreation Supply Sunbury, OH 43074 www.bodycraft.com 800-990-5556 info@bodycraft.com
Read the TREADMILL GUIDE before using this OWNER S MANUAL. 2.5 TREADMILL OWNER S MANUAL
 Read the TREADMILL GUIDE before using this OWNER S MANUAL. 2.5 TREADMILL OWNER S MANUAL 2 ASSEMBLY WARNING There are several areas during the assembly process that special attention must be paid. It is
It All StArtS with A VISIon FItneSS. X70 Elliptical t raine r SEr V ice ManU a l
 It All StArtS with A VISIon It All StArtS with A VISIon FItneSS X70 Elliptical t raine r SEr V ice ManU a l table of contents chapter 1: SErial number location... 1 chapter 2: important SafEty instructions
CONTENTS. page 2. page 2. page 3. page 4. page 5-7. page page 12 PRECAUTIONS OPERATING INSTRUCTION EXPLODED DRAWING PARTS LIST
 CONTENTS PRECAUTIONS OPERATING INSTRUCTION EXPLODED DRAWING PARTS LIST ASSEMBLY INSTRUCTIONS MONITOR INSTRUCTION MANUAL WARRANTY INFORMATION page 2 page 2 page 3 page 4 page 5-7 page 8-11 page 12 1 PRECAUTIONS
USER MANUAL EN. IN 5559 Elliptical Trainer insportline Cruzz
 USER MANUAL EN IN 5559 Elliptical Trainer insportline Cruzz SAFETY INSTRUCTIONS To ensure the best safety of the exerciser, regularly check it on damages and worn parts. If you pass on this exerciser to
Casall INFINITY 1.2X CROSSTRAINER 93008
 Casall INFINITY 1.2X CROSSTRAINER 93008 1 Important: Please locate your serial number and record in the box below for service support purposes. Serial number here: 2 3 ScrewM3*14L(2)allenboltM8*30L(2)Curvewasher17.5*25*0.3T(2)FlatWasher16forM8bolt(4)AllenBolt(movablehandlebar)M8*55(2)ScrewM3*25L(8)allenboltM8*12L(8)Allen
LS7.9T TREADMILL OWNER S MANUAL
 LS7.9T TREADMILL OWNER S MANUAL Read the treadmill guide before using this owner s manual. LS7.9T_OM_Rev1.2.indd 1 INTRODUCTION ASSEMBLY Congratulations and thank you for your purchase of this LIVESTRONG
FITNESS #1 HOME
 TROJAN MY SPACE MY TIME CAUTION READ ALL PRECAUTIONS AND INSTRUCTIONS IN THIS MANUAL BEFORE USING THIS EQUIPMENT. KEEP THIS MANUAL FOR FUTURE REFERENCE WARRANTY 0861 876526 0861 TROJAN #1 HOME SOUTH AFRICA
CROSS TRAINING MAGNETIC TREADMILL
 CROSS TRAINING MAGNETIC TREADMILL SF-T7615 USER MANUAL IMPORTANT : Read all instructions carefully before using this product. Retain this manual for future reference. For customer service, contact support@sunnyhealthfitness.com
SU UPRIGHT OWNER S MANUAL PLEASE CAREFULLY READ THIS ENTIRE MANUAL BEFORE OPERATING YOUR UPRIGHT!
 SU135-40 UPRIGHT OWNER S MANUAL PLEASE CAREFULLY READ THIS ENTIRE MANUAL BEFORE OPERATING YOUR UPRIGHT! Safety Hints WARNING - Read all instructions before using this appliance. Do not operate upright
510Ic Owner s Manual CONSOLE OVERVIEW & GENERAL NOTES CONSOLE KEYPAD FUNTION
 CONSOLE OVERVIEW & GENERAL NOTES A primary feature of the 510Ic is the ability to control and monitor the user s workout program via the brilliant LCD console. At any time, the user may view their speed,
TABLE OF CONTENTS. 2.0 USING MANAGER PREFERENCE 2.1 Using manager preference mode 2.2 Selecting US or metric 2.3 Using CSafe
 E L L I P T I C A L T O T A L B O D O W N E R S M A N U A L TABLE OF CONTENTS 1.0 IMPORTANT SAFET INSTRUCTIONS Read and save these instructions Setting up the Elliptical total body 1.1 Installation requirements
HealthCare International, Inc. PO Box 1509, Langley, WA P: (360) or (800)
 or (800)") Owner s Manual V.2.2 HealthCare International, Inc. PO Box 1509, Langley, WA 98260 www.hcifitness.com sales@hcifitness.com P: (360) 321-7090 or (800) 398-9121 Table of Contents Safety Precautions... 2
Owner s Manual V.2.2 HealthCare International, Inc. PO Box 1509, Langley, WA 98260 www.hcifitness.com sales@hcifitness.com P: (360) 321-7090 or (800) 398-9121 Table of Contents Safety Precautions... 2
T320X T460X T460XC OWNER S MANUAL TREADMILLS. Part no: R0: T460x illustrated
 T320X T460X T460XC TREADMILLS OWNER S MANUAL Part no: 691009 R0:10-2007 T460x illustrated BODYGUARD FITNESS, division of Procycle CANADA 9095, 25 th Avenue, Saint-Georges (Québec) Canada G6A 1A1 The name
18 TREADMILL SF-T7512 USER MANUAL
 18 TREADMILL SF-T7512 USER MANUAL IMPORTANT: Read all instructions carefully before using this product. Retain owner s manual for future reference. For customer service, please contact: support@sunnyhealthfitness.com
Read the TREADMILL GUIDE before using this OWNER S MANUAL. 2.7 TREADMILL OWNER S MANUAL
 Read the TREADMILL GUIDE before using this OWNER S MANUAL. 2.7 TREADMILL OWNER S MANUAL 2 IMPORTANT PRECAUTIONS SAVE THESE INSTRUCTIONS When using an electrical product, basic precautions should always
RXT-1000 OWNER S MANUAL. Healthcare International, Inc. PO Box 1509, Langley, WA p
 RXT-1000 OWNER S MANUAL Healthcare International, Inc. PO Box 1509, Langley, WA 98260 www.hcifitness.com p.360.321.7090-1 - SAFETY PRECAUTIONS This exercise equipment was designed and built for optimum
HUDSON UBE-BDP OWNER S MANUAL
 HUDSON UBE-BDP OWNER S MANUAL Table of Contents Important Safety Information 3 Before You Start 4 Asembly part List 5 Assembly Instruction 6-10 Console Overview 11-13 Monitoring Your Heart Rate 14-16 Exploded
Contour Diabetes app User Guide
 Contour Diabetes app User Guide Contents iii Contents Chapter 1: Introduction...5 About the CONTOUR DIABETES app...6 System and Device Requirements...6 Intended Use...6 Chapter 2: Getting Started...7
BH Fitness T4 / T6 SPORT Treadmill Owner s Manual
 BH Fitness T4 / T6 SPORT Treadmill Owner s Manual BEFORE YOU BEGIN It is very important to become familiar with the frequently used components of your treadmill. Computer Console Circuit Breaker ON/OFF
USER S MANUAL CAUTION CUSTOMER SERVICE. Model No. PFEVEX Serial No. Write the serial number in the space above for reference.
 Model No. PFEVEX73916.0 Serial No. Write the serial number in the space above for reference. USER S MANUAL Serial Number Decal CUSTOMER SERVICE UNITED KINGDOM Call: 0330 123 1045 From Ireland: 053 92 36102
built for performance
 my goal. my path. my machine. built for performance THE PERFORMANCE SERIES TREADMILLS runs on motivation + desire For 25 years, TRUE Fitness has made incredible strides in the exercise equipment industry.
TR1120 OWNER S MANUAL
 TR1120 OWNER S MANUAL IMPORTANT: For maximum effectiveness and safety, please read this owner s manual before using your BodyCraft treadmill. Retain this owner s manual for future reference. 1. It is the
h o m e a n d c o m m e r c i a l
 h o m e a n d c o m m e r c i a l e Glide TRAINERS www.spiritfitness.com 2012 the Spirit Fitness Story We built our first fitness product in 1983, with the simple goal of giving our customers the highest
USER MANUAL T012 AUTO INCLINE TREADMILL WITH BLUETOOTH
 USER MANUAL T012 AUTO INCLINE TREADMILL WITH BLUETOOTH IMPORTANT: Read all instructions carefully before using this product. Retain owner s manual for future reference. For customer service, please contact:
Computer T4.2 IWM. COMPUTER MANUAL Reebok T
 Computer T4.2 IWM COMPUTER MANUAL Reebok T4.5-20110111 DISPLAY GB GB Buttons and Functions START Press to start exercise at an initial speed of 0.5 mph / 0.8 km/h. STOP Press to stop exercise during workout.
Motorised Treadmill Model No: JI1625
 BODYWORX Motorised Treadmill Model No: JI1625 Retain this owner s manual for future reference Read and follow all instructions in this owner s manual Version A 1 TABLE OF CONTENTS OVERVIEW DRAWING 2 ASSEMBLY
dogpacer QUICK START GUIDE LF 3.1 For latest info, tips, and photos go online to:
 dogpacer QUICK START GUIDE LF 3.1 For latest info, tips, and photos go online to: www.dogpacer.com Congratulations! You have taken the first step in your dog s health, happiness, and a better life! We
FreeMotion 7.7 R Bike
 FreeMotion 7.7 R Bike 20 resistance levels Large high resolution LCD display Programs: pulse, manual, random, interval, quick start, foothills, peaks, all-terrain, custom, plateau Integrated speakers Integrated
OWNER S MANUAL. BODYCRAFT 7699 Green Meadows Dr., Lewis Center, Ohio Tel:
 OWNER S MANUAL BODYCRAFT 7699 Green Meadows Dr., Lewis Center, Ohio 43035 Tel: 800.990.5556 1 www.bodycraft.com SAFETY INSTRUCTION WARNING: To reduce the risk of serious injury, read the following safety
E 1 X E l l i p t i c a l S E R V i c E M a N U a l
 E1X Elliptical SERVICE MANUAl table of contents CHAPTER 1: Serial number location... 1 CHAPTER 2: Important Safety instructions 2.1 Before Getting Started... 2 2.2 Read and Save These Instructions...
Manual en Español Latino Americano: ASSEMBLY MANUAL / OWNER S MANUAL
 Manual en Español Latino Americano: http://www.schwinnfitness.com ASSEMBLY MANUAL / OWNER S MANUAL Table of Contents Important Safety Instructions - Assembly 3 Safety Warning Labels / Serial Number 4 Specifications
Casall R300 II Manual ROWER MACHINE
 Casall R300 II Manual ROWER MACHINE Important: Please locate your serial number and record in the box below for service support purposes. Serial number here: - 3 - R300 II Assembly Diagram EXPLODED DIAGRAM
FS1.5 ELLIPTICAL OWNER S MANUAL PLEASE CAREFULLY READ THIS ENTIRE MANUAL BEFORE OPERATING YOUR NEW ELLIPTICAL
 FS1.5 ELLIPTICAL OWNER S MANUAL PLEASE CAREFULLY READ THIS ENTIRE MANUAL BEFORE OPERATING YOUR NEW ELLIPTICAL Congratulations On Your New Elliptical and Welcome to the XTERRA Fitness Family! Thank you
TORNADO AIR BIKE SF-B2706 USER MANUAL
 TORNADO AIR BIKE SF-B2706 USER MANUAL IMPORTANT! Read all instructions carefully before using this product. Retain owner s manual for future reference. For customer service, please contact: support@sunnyhealthfitness.com
HealthCare International, Inc. PO Box 1509, Langley, WA P: (360) or (800)
 or (800)") Owner s Manual V.2 HealthCare International, Inc. PO Box 1509, Langley, WA 98260 www.hcifitness.com sales@hcifitness.com P: (360) 321-7090 or (800) 398-9121 1 Table of Contents Safety Precautions... 3
Owner s Manual V.2 HealthCare International, Inc. PO Box 1509, Langley, WA 98260 www.hcifitness.com sales@hcifitness.com P: (360) 321-7090 or (800) 398-9121 1 Table of Contents Safety Precautions... 3
USER MANUAL T013 TREADMILL WITH BLUETOOTH
 USER MANUAL T013 TREADMILL WITH BLUETOOTH IMPORTANT: Read all instructions carefully before using this product. Retain owner s manual for future reference. For customer service, please contact: service@zoovaa.com
USER S MANUAL CAUTION CUSTOMER SERVICE. Model No. NTIVEL Serial No. Write the serial number in the space above for reference.
 Model No. NTIVEL49416.0 Serial No. Write the serial number in the space above for reference. USER S MANUAL Serial Number Decal CUSTOMER SERVICE UNITED KINGDOM Call: 0330 123 1045 From Ireland: 053 92 36102
Owner s Guide X6850HRT COMMERCIAL INCLINE ELLIPTICAL TRAINER
 Owner s Guide X6850HRT COMMERCIAL INCLINE ELLIPTICAL TRAINER C ongratulations on choosing a VISION FITNESS Incline Elliptical Trainer. You ve taken an important step in developing and sustaining an exercise
Instruction Manual ROWER MACHINE R-600
 Instruction Manual ROWER MACHINE R-600 KIT TOOL & SCREW SET - List R600 I-1 Allen Bolt M8x16mm ]8 ^ I-2 Curved washer for?8*?19*2t bolt(8) I-3 Screw M5*12 (8) Screwdriver (1) (Pedal Wrench) Allen Key(1)
Casall EB200 Bike 91001
 Casall EB200 Bike 91001 Important: Please locate your serial number and record in the box below for service support purposes. Serial number here: EB200 NO:J-1 Aorra Nut for M8 Bolt(4) No:J-6 Spring Washer
USERʼS MANUAL QUESTIONS? CAUTION. Model No. PFCW Serial No.
 www.proform.com Model No. PFCW50707.0 Serial No. Write the serial number in the space above for reference. USERʼS MANUAL Serial Number Decal (under frame) QUESTIONS? If you have questions, or if parts
Table of Contents. Product Safety Part Drawing & Contents Hardware & Tools Assembly Adjustment
 Ver.1 Table of Contents Product Safety.. 01. Part Drawing & Contents..... 02. Hardware & Tools.. 03. Assembly... 04. Adjustment... 10. Trouble Shooting & Maintenance.. 11. Computer... 12. Warm Up... 19.
CONSOLE GUIDE & SET-UP INSTRUCTIONS STANDARD CONSOLE
 CONSOLE GUIDE & SET-UP INSTRUCTIONS STANDARD CONSOLE ii TABLE OF CONTENTS Standard Console Guide ZR7000 / ZR8000 Console Features... 1 Dynamic Display (LCD)... 2 Keypad Buttons... 4 User (Club) Settings...
SP850 OWNER S MANUAL
 SP850 OWNER S MANUAL Product may vary slightly from the item pictured due to model upgrades Read all instructions carefully before using this product. Retain this owner s manual for future reference. NOTE:
Table of Contents. Contour Diabetes App User Guide
 Table of Contents Introduction... 3 About the CONTOUR Diabetes App... 3 System and Device Requirements... 3 Intended Use... 3 Getting Started... 3 Downloading CONTOUR... 3 Apple... 3 Android... 4 Quick
Manual en Español Latino Americano: ASSEMBLY MANUAL / OWNER S MANUAL
 Manual en Español Latino Americano: http://www.schwinnfitness.com ASSEMBLY MANUAL / OWNER S MANUAL TABLE OF CONTENTS Important Safety Instructions - Assembly 3 Safety Warning Labels / Serial Number 4 Specifications
HealthCare International, Inc. PO Box 1509, Langley, WA P: (360) or (800)
 or (800)") Owner s Manual V.2 HealthCare International, Inc. PO Box 1509, Langley, WA 98260 www.hcifitness.com sales@hcifitness.com P: (360) 321-7090 or (800) 398-912 Table of Contents Safety Precautions... 2 Warranty
Owner s Manual V.2 HealthCare International, Inc. PO Box 1509, Langley, WA 98260 www.hcifitness.com sales@hcifitness.com P: (360) 321-7090 or (800) 398-912 Table of Contents Safety Precautions... 2 Warranty
IMPORTANT: Please read all instructions carefully before using this
 IMPORTANT: Please read all instructions carefully before using this product. Retain this manual for future reference. CONTENTS IMPORTANT SAFETY NOTICE page 2 EXPLOADED DIAGRAM page 3 PARTS LIST page 4
SF-T7635 TREADMILL USER MANUAL
 SF-T7635 TREADMILL USER MANUAL IMPORTANT: Read all instructions carefully before using this product. Retain owner s manual for future reference. For customer service, please contact: support@sunnyhealthfitness.com
USERʼS MANUAL QUESTIONS? CAUTION. Visit our website at Model No. PFEVEL79940 Serial No. Serial Number Decal
 Model No. PFEVEL79940 Serial No. USERʼS MANUAL Serial Number Decal QUESTIONS? As a manufacturer, we are committed to providing complete customer satisfaction. If you have questions, or if there are missing
SPORTSART C521M BI-DIRECTIONAL BIKE
 2011.12 C521M BIKE SPORTSART C521M BI-DIRECTIONAL BIKE TABLE OF CONTENTS 1. INTRODUCTION... 2. IMPORTANT SAFETY PRECAUTIONS... 3. LIST OF PARTS... 1 2 6 4. ASSEMBLING THE PRODUCT STEP 0 Separate the Product
USER MANUAL CT
 USER MANUAL CT-300 93015 Important: Please locate your serial number and record in the box below for service support purposes. Serial number Serial number here: CT-300 CT-300 CT-300 l-12 L-14 Exploded
BH Fitness T8 SPORT Treadmill Owner s Manual
 BH Fitness T8 SPORT Treadmill Owner s Manual BEFORE YOU BEGIN It is very important to become familiar with the frequently used components of your treadmill. User Safety: SECTION 1 IMPORTANT SAFETY INSTRUCTIONS
Connectivity guide for ReSound Smart 3D app
 Connectivity guide for ReSound Smart 3D app Table of contents Introduction to ReSound Smart Hearing Aids... 3 Mobile Devices that Work with ReSound Smart Hearing Aids... 3 Connectivity and ReSound Smart
USER'S MANUAL ORDERING REPLACEMENT PARTS QUESTIONS? CAUTION. Visit our website at.
 ORDERING REPLACEMENT PARTS To order replacement parts, contact the ICON Health & Fitness, Ltd. office, or write: ICON Health & Fitness, Ltd. Customer Service Department Unit Revie Road Industrial Estate
anniversary x201 owner s manual yorkfitness.com
 anniversary x201 owner s manual yorkfitness.com VERSION II - 28/05/2007 Congratulations on purchasing a cross trainer from York Fitness. You have chosen a high quality, safe and innovative piece of equipment
Assembly & Operating Instructions For Indoor Bike S
 Assembly & Operating Instructions For Indoor Bike S600 91007 F-14 O 1 EXPLORATION DRAWING F-16 O 1 COMPLETE BIKE ASSEMBLY F-16 O 2 ASSEMBLY INSTRUCTIONS STEP 1 1. Assembly the rear and front stabilizer
- 1 - INSTRUCTION MANUAL
 - 1 - INSTRUCTION MANUAL SAFETY PRECAUTIONS Before You Begin This exercise equipment was designed and built for optimum safety. However, certain precautions apply whenever you operate a piece of exercise
OWNER S GUIDE. Fitness Bikes AND Elliptical Trainers. SIMPLE, DELUXE, and PREMIER
 OWNER S GUIDE Fitness Bikes AND Elliptical Trainers SIMPLE, DELUXE, and PREMIER C ongratulations on choosing a VISION FITNESS product. You ve taken an important step in developing and sustaining an exercise
CONSOLE GUIDE & SET-UP INSTRUCTIONS STANDARD CONSOLE
 Time Calories Distance Pace Length Height HR% HR Level GET STARTED IN 5 SIMPLE STEPS 1 HOP FROM SIDE TO SIDE 2 START WITH SHORT STRIDES 3 KICK YOUR HEELS TO YOUR GLUTES 4 SLOWLY EXTEND YOUR STRIDE 5 MOVE
ELLIPTICAL EXERCISER. User s Manual CAUTION ICON MY-HOME. Model No Serial No. Serial Number Decal
 Model No. 30509.1 Serial No. Serial Number Decal If you are MISSING PARTS or require INFORMATION on how to operate this product, call 1-888-936-ICON (1-888-936-4266). ELLIPTICAL EXERCISER User s Manual
Manual. HTR 2.0 Ergometer Hometrainer. T +31 (0) e w
 e w") HTR 2.0 Ergometer Hometrainer Manual For questions or missing parts please contact Fitness Benelux: Fitness Benelux Uw partner in fitness twekkelerweg 263 7553 lz Hengelo the netherlands T +31 (0)74-7600219
HTR 2.0 Ergometer Hometrainer Manual For questions or missing parts please contact Fitness Benelux: Fitness Benelux Uw partner in fitness twekkelerweg 263 7553 lz Hengelo the netherlands T +31 (0)74-7600219
BRITE R450. LightTrak Sensor Time/Date. Goal Progress Bar Activity Value Activity Type Notification Alert. Quick Start Guide
 BRITE R450 LightTrak Sensor Time/Date Goal Progress Bar Activity Value Activity Type Notification Alert Quick Start Guide Welcome to LifeTrak. Let s take a quick tour of the basic features. To turn on
STRIDER TREADMILL WITH 20 WIDE LOPRO DECK SF-T7718 USER MANUAL
 STRIDER TREADMILL WITH 20 WIDE LOPRO DECK SF-T7718 USER MANUAL IMPORTANT: Read all instructions carefully before using this product. Retain owner s manual for future reference. For customer service, please
FREECLIMBER 4400/4600 PT/CL CONSOLE
 The StairMaster FreeClimber 4400/4600 PT/CL systems console is divided into seven sections: the display window, the workout options, the numeric keypad, the entertainment keypad, the workout statistics,
SUNNY MAGNETIC EXERCISE BIKE
 SUNNY MAGNETIC EXERCISE BIKE SF-B910 IMPORTANT! Please read the manual carefully before assembling and using the bike. For Customer Service, please contact: support@sunnyhealthfitness.com IMPORTANT SAFETY
BIKE EXERCISER User s Manual
 Model No. 831.21952.3 Serial No. Write the serial number in the space above for reference. BIKE EXERCISER User s Manual Serial Number Decal (under frame) Assembly Operation Maintenance Part List and Drawing
IMAGINE APP COMPATIBLE
 IMAGINE APP COMPATIBLE Imagine is a groundbreaking ipad app that turns your ipad into a powerful fitness equipment console. Download imagine from the App Store and then connect your ipad* to compatible
OARTEC TRAINING MONITOR OTM-2
 OARTEC TRAINING MONITOR OTM-2 OPERATION MANUAL Introduction Thankyou for purchasing the Oartec DX with our new training monitor, the OTM-2. The OTM-2 has a number of advanced features including automatic
Dear Customer, SAFETY INSTRUCTIONS
 Dear Customer, SAFETY INSTRUCTIONS CONTENTS 1.1 Technical data LCD display Weight and dimensions: 1.2 Personal safety 1.3 Electrical safety 1.4 Set-up place 2.1 General instructions 2.2 Faults and Troubleshooting
USER MANUAL EN IN 6447 Climber For Home Use insportline SM-3276
 USER MANUAL EN IN 6447 Climber For Home Use insportline SM-3276 Product May Vary Slightly From Picture MADE IN TAIWAN CONTENTS SAFETY INSTRUCTION... 3 ASSEMBLY PARTS... 4 HARDWARE IDENTIFICATION CHART...
Programmable 1012 Elliptical Cross Trainer (pc) ITEM NO: 1012
 ITEM NO: 1012") Programmable 1012 Elliptical Cross Trainer (pc) ITEM NO: 1012 OWNER S MANUAL IMPORTANT: Read all instructions carefully before using this product. Retain this owner s manual for future reference. The specifications
Programmable 1012 Elliptical Cross Trainer (pc) ITEM NO: 1012 OWNER S MANUAL IMPORTANT: Read all instructions carefully before using this product. Retain this owner s manual for future reference. The specifications
TABLE OF CONTENTS. SAFETY INSTRUCTIONS WARNING: To reduce the risk of serious injury, read the following Safety Instructions before using the
 TABLE OF CONTENTS Page Page Safety Instructions 2 Conditioning Guidelines 11 Hardware Identification Chart 3 Warm-up and Cool-Down 12 Assembly Instructions 4 Product Parts Drawing 13 Set Up Instructions
Owner s Manual. Active 120 Exercise Cycle. WATER BOTTLE NOT INCLUDED
 Owner s Manual Active 120 Exercise Cycle 53062 WATER BOTTLE NOT INCLUDED 19JAN2012 Table of contents Congratulations on purchasing your exercise equipment from CONTENTS Safety information 03 Customer support
USER S MANUAL CAUTION ACTIVATE YOUR WARRANTY CUSTOMER CARE. nordictrack.com. Model No Serial No.
 nordictrack.com Model No. 23939.0 Serial No. Write the serial number in the space above for reference. USER S MANUAL Serial Number Decal ACTIVATE YOUR WARRANTY To register your product and activate your
How to install the Wahoo RPM Cadence on your bike: How to install the Wahoo RPM Cadence using the Shoe Clip Mount:
 Setup This setup guide is intended to assist with installing your Wahoo RPM Cadence sensor on your bike or shoe and pairing to the Wahoo Fitness app. How to install the Wahoo RPM Cadence on your bike:
T7.6 TREADMILL OWNER S MANUAL
 T7.6 TREADMILL OWNER S MANUAL Read the treadmill guide before using this owner s manual. T7.6-OM-rev1.2.indd 1 8/30/10 3:30 PM ASSEMBLY WARNING There are several areas during the assembly process that
USER S MANUAL QUESTIONS? CAUTION. Visit our website at. Model No. VFMEX Serial No.
 Model No. VFMEX3107.0 Serial No. USER S MANUAL Write the serial number in the space above for reference. Model and Serial Number Decal QUESTIONS? At FreeMotion Fitness, we are committed to providing complete
Owners manual. HTR 1.0 Exercise Bike. T +31 (0) E W ENG. Fitness Benelux
 E W ENG. Fitness Benelux") HTR 1.0 Exercise Bike Owners manual Fitness Benelux Uw partner in fitness T +31 (0)74-7600219 E service@fitnessbenelux.nl W www.fitnessbenelux.nl INDEX Safety instruction 3 Assembly instruction 4-9 Exploded
HTR 1.0 Exercise Bike Owners manual Fitness Benelux Uw partner in fitness T +31 (0)74-7600219 E service@fitnessbenelux.nl W www.fitnessbenelux.nl INDEX Safety instruction 3 Assembly instruction 4-9 Exploded
SF-T7705 TREADMILL WITH AUTO INCLINE USER MANUAL
 SF-T7705 TREADMILL WITH AUTO INCLINE USER MANUAL IMPORTANT: Read all instructions carefully before using this product. Retain owner s manual for future reference. For customer service, please contact:
BIKE EXERCISER. User s Manual CAUTION. Assembly Operation Maintenance Part List and Drawing. Sears, Roebuck and Co., Hoffman Estates, IL 60179
 Model No. 831.283120 Serial No. Write the serial number in the space above for reference. BIKE EXERCISER User s Manual Serial Number Decal Assembly Operation Maintenance Part List and Drawing Patent Pending