Minimally Invasive System for Total Hip Arthroplasty. Surgical Technique
|
|
|
- Justina Ball
- 5 years ago
- Views:
Transcription


1 Minimally Invasive System for Total Hip Arthroplasty Surgical Technique

2 INTRODUCTION The DePuy MI System was created by an International team of surgeons whose first priority was to achieve patient gain through minimally invasive surgery using established surgical techniques. Their collaboration with DePuy Synthes' engineers and scientists constitutes the essence of an accomplished and complete minimally invasive system where all aspects of THR are considered. Besides specially designed instrumentation, our complete system includes a very comprehensive and individualised educational programme as well as a unique portfolio of successful and established implants. The focus of the DePuy MI System is to make orthopaedic surgery a less traumatic experience and we strongly believe that we are uniquely positioned for such a mission. The DePuy MI System is designed to accommodate any DePuy Synthes cementless acetabular and femoral implants. In this surgical technique, DURALOC cups and CORAIL stems are used as an example. If you are using other DePuy Synthes implants, please also refer to the appropriate surgical technique.
3 CONTENTS Patient selection and pre-operative planning 2 Acetabular and femoral templating 3 Patient positioning 4 Exposure 5 Femoral neck resection and acetabular preparation 10 Acetabular reaming 11 Cup inserter assembly 12 Acetabular cup trial and position 13 Polyethylene liner trial 15 Femoral canal preparation 16 Trial reduction 17 Acetabular cup trial removal and cup implantation 18 Polyethylene liner insertion 19 Femoral component insertion and proximal bone impaction 20 Femoral head impaction and closure 21 Ordering Information 23 1
4 PATIENT SELECTION AND PRE-OPERATIVE PLANNING Patient selection Minimally invasive THR is not recommended in the following cases. Obese patients with BMI>30 - especially in conjunction with large upper thigh circumference Large gluteus medius muscle mass Revision hip surgery Patients with previous surgery to the hip Patients with scarring to or in the region of the hip joint Patients with abnormal anatomy e.g. severe DDH, severe anteversion of the femoral head Pre-operative planning The contralateral side is compared in anterior/ posterior (A/P) and lateral projections. The desired magnification for all imaging should correspond to the templates provided. Magnification markers taped to the patient s leg at the level of the trochanter will assist in determining actual magnification. Both extremities are placed in 15 degrees of internal rotation to position the head and neck parallel to the coronal plane in the A/P projection. The beam is centred on the symphysis pubis to ensure the proximal femoral shaft is included in the radiograph. The radiographs should clearly demonstrate the acetabular configuration and the endosteal and periosteal contours of the femoral head, neck and proximal femur. Frequently, the affected hip is fixed in external rotation, which leads to an under estimation of the amount of offset present. In this situation it may be helpful to template the normal hip. 2


5 ACETABULAR AND FEMORAL TEMPLATING Take into consideration any anatomical anomoly, dysplasia, previous fracture or leg length discrepancy. Acetabular templating DURALOC templates allow assessment of the most likely size of the cup to be implanted. The acetabular component should be placed on structurally sound bone to optimise the opportunity for bone ingrowth. The cup should be placed so that the head centre is as near to the anatomical position as possible and the most inferior part of the cup should normally be at the level of the bottom of the teardrop (Figure 1A). Femoral templating The CORAIL Hip System provides a comprehensive pre-operative range of femoral templates, at 20% magnification. These are placed over the A/P and lateral X-rays to determine offset, implant size and neck length in order to restore the patient s natural anatomy. Particular attention should be paid to achieving optimum metaphyseal filling. Figure 1 As the CORAIL stem is a self-locking design, there should be apparent contact between the stem and the bone at the calcar level on the medial side and below the flare of the implant on the lateral side. Distally, there should be a gap of 1 mm between the stem and the cortex. Templating will also indicate the level of neck resection. This should be at an angle of 45º, usually 1 cm above the lesser trochanter (Figure 1B). Figure 2 3

6 PATIENT POSITIONING The patient is placed on the operating table in the lateral decubitus position. The pelvis must be supported so that it remains perpendicular to the table throughout the procedure. The unaffected leg is fixed in approximately 90 of flexion at the knee (Figure 3). Figure 3 4
 (Figure 4). The fatty layer is divided in line with the skin incision.")
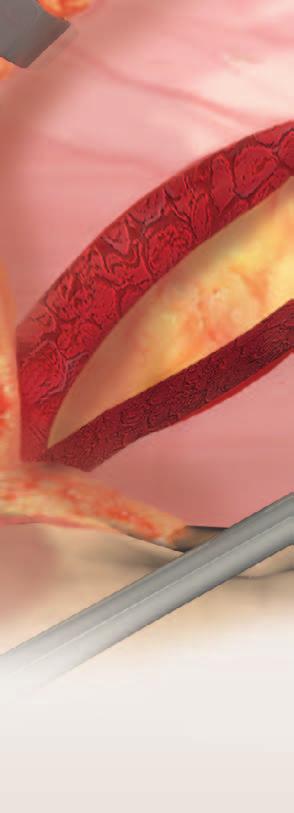
7 EXPOSURE An initial skin incision is made over the tip of the greater trochanter. The incision is extended approximately 2.5 cm distally, in line with the leg, and 5 cm proximally, following a gentle curve (convex anteriorly) (Figure 4). The fatty layer is divided in line with the skin incision. The skin is lifted and the fatty layer is undermined, allowing the skin opening to be moved above the fascia lata. A deep, forked retractor may be introduced at this stage to open the window (Figure 5). Figure 4 Figure 5 5
8 EXPOSURE Pass through the fascia lata following the line of the incision, dividing the layer, both distally and proximally under the initial incision. Exposure is continued down through gluteus maximus (Figure 6). The forked retractors can now be repositioned to retract gluteus medius. With the leg in internal rotation, the sciatic nerve is located by placing the foot onto a Mayo table, but it is not exposed at the base of the wound. The layer of fat, which is below the tip of the greater trochanter, is swept back and away using a swab to expose the short rotator muscles (Figure 7). Figure 6 Figure 7 6
9 Gluteus Medius The gluteus medius retractor is placed behind the trochanter and gluteus medius is retracted to improve visualisation of the rotator muscles. The piriformis tendon is identified, close to the femur. Blunt scissors are passed under the short rotator muscles, including the piriformis muscle, to allow a single suture to be passed through the entire group (Figure 8). The suture is tied and the muscles are detached close to the femur. Tension on the suture will allow any adhesions between the rotator muscles and the capsule to be identified and released (Figure 9). Piriformis Quadratus Femoris Rotator Muscles Figure 8 Figure 9 7
10 EXPOSURE Circumflex Artery The released rotator muscles will now provide protection for the sciatic nerve. The gluteus medius retractor is removed and a second forked retractor introduced to open the wound. The quadratus femoris muscle may limit access to the capsule. If the muscle is to be divided, care should be taken to limit bleeding from the vessels of the circumflex femoral artery which passes along the femur, close to the attachment of the rotator muscles (Figure 10). Sciatic Nerve Figure 10 Quadratus Femoris Muscle At this point, the leg can be rotated to help identify the femoral head and establish good visualisation of the acetabular anatomy. The capsule is incised using a single curved incision that starts above the superior border of the acetabulum, extending over the rim of the acetabulum. The incision continues close along the intertrochanteric line of the femur until the level of the lesser trochanter is reached (Figure 11). Figure 11 8
11 A single suture is passed through the capsule. Tension is applied and the flap of capsular tissue is distracted. The forked retractor (shown in Figure 7) can now be repositioned to retract the capsule and expose the hip joint (Figure 12). With the leg internally rotated, the knee is brought into adduction and the hip is dislocated. It may be necessary to make a further release of the tight capsular fibres in the orbicular zone, close to the femoral neck, to facilitate dislocation without force. This will also improve access to the femoral neck and release of the anterior capsule. The superior capsular retractor is placed under the femoral neck and the gluteous medius retractor is placed under the greater trochanter. This should provide a clear view of the femoral neck (Figure 13). Figure 12 Gluteus Medius Retractor Superior Capsular Retractor Figure 13 9
12 FEMORAL NECK RESECTION AND ACETABULAR PREPARATION Femoral neck resection A trial stem or broach of the size determined during pre-operative templating is laid above and along the mid line of the femur, so that its tip points to the centre of the knee. The neck resection will be made at the level determined during templating and at the angle set by the shoulder of the stem (Figure 14). A corkscrew instrument may be used to ease extraction of the head from the wound, allowing any remaining attachments to be released. Figure 14 Gluteus Medius Retractor Acetabular preparation 2 cm Incision Access to the acetabulum is now improved by displacing the femur anteriorly. A two centimetre incision may be made in the anterior capsule, just before it joins the femur. With the tip of the gluteus medius retractor inserted through the incision, so that its blade is centred over the femoral neck, the leg is then rotated back into neutral position on the table (Figure 15). With a clear view past the femur, the full circumference of the acetabulum is presented into the wound. Any remaining soft tissues are cleared from the rim of the acetabulum. Superior Capsular Retractor The entire labrum is excised and any osteophytes are removed to ensure that the anterior and posterior margins of the acetabulum are identified, and the true floor of the acetabulum is established. Figure 15 10
13 ACETABULAR REAMING Acetabular reaming The aim of acetabular reaming is to restore the original centre. Using the smallest reamer attached to the 45 driver, introduced perpendicular to the table, ream the acetabulum, holding close to the transverse ligament (Figure 16). Once the acetabulum has been deepened to the level determined during pre-operative templating, the reamer size is sequentially increased in 1 2 mm increments. Reaming stops when the socket has become a true hemisphere and when the reamer makes contact with the anterior and posterior walls of the acetabulum. Any cysts of fibrous tissue should be removed with a curette. Pack any defects densely with cancellous bone. 45 Transverse Ligament Figure 16 11
14 SHELL INSERTER ASSEMBLY Either the standard or bantam threaded connector is selected (depending on the cup to be implanted). The rotation locking catch is disengaged and the release button is inserted into the acetabular inserter body. The shaft assembly is inserted into the acetabular inserter body, holding down the release button to allow the shaft to fully engage into the body. The selected threaded connector is inserted into the acetabular inserter body and the hex socket is engaged into the shaft. Releasing the button will lock the acetabular inserter in position. Rotating the shaft handle should now rotate the threaded connector (Figure 17). Rotating Shaft Handle Shaft Assembly Rotation Locking Catch Standard or Bantam Threaded Connector Release Button Trial Shell Acetabular Inserter Body Figure 17 Acetabular Inserter Assembly 12

15 ACETABULAR CUP TRIAL AND POSITION Following preparation of the acetabulum, a trial cup of 1 to 2 mm larger in diameter than the last reamer is inserted to assess the coverage of the acetabular component and to gauge the seating depth of the actual cup. The rim fit of the fully seated trial should be tight enough to make it difficult to alter its position. The inferior rim of the trial liner should be level with the bottom of the teardrop and its position should match the templated position (Figure 18). Using cup and trial liners in conjunction with the femoral component trials is essential to assure optimum position of the implants. The cup trial is screwed onto the threaded connector of the acetabular inserter until locked. The trial cup should not be over tightened. Figure 18 The alignment guide is attached to the acetabular inserter, and the trial is introduced to the acetabulum. Appropriate trial cup orientation can be verified with external alignment guides in addition to bony landmarks. With the patient in the lateral decubitus position and the version guide parallel to the floor the cup will be at 45 degrees. (Figure 19). Alignment Guide 45 Figure 19 13
. The external alignment guide will not be accurate if the pelvis is tilted or if the patient has rolled forward or backward.")
16 ACETABULAR CUP TRIAL AND POSITION When the extended rod of the version guide, corresponding the affected hip, follows the long axis of the patient s body, the trial cup is in 30 degrees of anterversion (Figure 20). The external alignment guide will not be accurate if the pelvis is tilted or if the patient has rolled forward or backward. The transverse ligament is used as a natural landmark to further verify the alignment. 30 Alignment Guide Figure 20 14


17 POLYETHYLENE LINER TRIAL The locking catch is placed in the unlocked position and the handle rotated counter clockwise to release the threaded connector from the trial. The inserter is then removed. (Figure 21). Polyethylene liner trial The liner trial is secured to the cup trial through the apical hole screw using a hex head screwdriver (Figure 22). Locking Catch Rotation Handle Figure 21 Figure 22 15
18 FEMORAL CANAL PREPARATION To preserve bone stock, improve stability and offer optimal conditions for bone ongrowth, the femoral preparation for the CORAIL stem removes as little cancellous bone from the metaphysis as possible. An impactor is used to compact the cancellous bone prior to broaching of the metaphysis (Figure 23). The broaches are then used to tamp down the cancellous bone and to produce a femoral cavity. Figure 23 To avoid undersizing, varus positioning and to permit in-line broaching, it is sometimes necessary to remove a small piece of cortex from the greater trochanter with a chisel or the CORAIL osteotome, to ensure an adequately lateral starting point. Beginning with the smallest broach attached to the broach handle, progressively enlarge the medullary cavity until the level of the neck resection is reached, and no further. The anteversion is automatically set during broaching. Broaching should continue until complete stability is achieved (Figure 24). The size of each broach is the same as the corresponding implant without HA coating. The last broach is left in place. Figure 24 16
19 TRIAL REDUCTION The calcar mill is placed into the medial hole in the broach and the femoral neck is milled to produce a flat surface (Figure 25). Trial reduction With the broach in situ, the appropriate trial neck and head are attached (Figure 26). The hip is reduced and adjustments, if any, are made to ensure joint stability through a full range of motion. Leg length may be adjusted by varying the trial neck and head length if necessary. Leg length may be reduced with a second neck osteotomy and further broaching to prepare the femoral canal. After trial reduction, carefully remove the broach from the femur with the broach handle to avoid enlarging the prepared femoral canal. To preserve the surface of the compacted cancellous bone, and to promote bone ongrowth, irrigation and drying of the femur is not recommended. Figure 25 Figure 26 17
20 ACETABULAR CUP TRIAL REMOVAL & CUP IMPLANTATION Acetabular cup trial removal The inserter handle is rotated to secure the threaded connector into the trial. The inserter handle is pulled back to extract the trial (Figure 27). Acetabular cup implantation Securely thread the acetabular cup prosthesis onto the threaded connector. Figure 27 Rotate the cup with the alignment handle to position any sector holes. Engage the locking catch when the correct alignment is achieved. Introduce the cup into the acetabulum, using the external alignment guide as before. With correct cup positioning achieved, impact the cup in place (Figure 28). Figure 28 18
. An apical hole eliminator may be inserted with a hex head screwdriver following cup impaction.")
21 POLYETHYLENE LINER INSERTION Given the nature of a hemispherical acetabular component, rim contact will occur before dome seating occurs. This may require additional impaction to ensure seating. Confirm seating by sighting through the apical hole or, if present, screw holes (Figure 29). An apical hole eliminator may be inserted with a hex head screwdriver following cup impaction. If adjustments to the cup orientation are necessary, thread the inserter back into the apical hole to adjust the cup position. Unlocking and rotating the alignement handle allows the removal of the acetabular inserter from the cup. Polyethylene liner insertion Prior to inserting the final acetabular liner, thoroughly irrigate and clean the cup. It is important to check the cup/liner locking groove for the removal of all debris. Remove all soft tissue from the face of the cup so as not to impede liner seating (Figure 30). Figure 29 The liner anti-rotational device (ARD) tabs are aligned with the ARD scallops on the cup. The correct sized liner inserter head is selected and attached to the acetabular inserter. The liner is seated using firm hand pressure only. Final impaction into the cup is completed using the acetabular inserter and the correctly sized liner inserter head. Figure 30 19
22 FEMORAL COMPONENT INSERTION & PROXIMAL BONE IMPACTION Femoral component insertion The definitive prosthesis is the same size as the last broach used. With the taper still protected by the cover, the implant is introduced and impacted into the canal using the femoral component impactor, aligned in the central axis of the femur, to the level of the HA coating (Figure 31). With the prosthesis in situ, the silicone cover is removed and the trial head added to carry out a trial reduction. The prosthesis is irrigated and cleaned, ensuring the taper is free of debris. Proximal bone impaction Figure 31 When the definitive stem is fully seated, cancellous bone graft from the femoral head is packed around the proximal part of the prosthesis. A tamp is provided for this purpose (Figure 32). This procedure encourages bone ongrowth and allows a complete seal to form between the proximal femur and the implant. Figure 32 20

23 FEMORAL HEAD IMPACTION & CLOSURE Femoral head impaction The appropriate femoral head is placed onto the taper and lightly tapped home using the head impactor (Figure 33). The hip is reduced and a final stability check is performed. Closure The flap of capsular tissue retained by suture is returned to its natural position over the joint and sutured to the opposing remnant of the capsule over the acetabulum. Three stitches are used to reattach the flap of the capsule (Figure 34). Figure 33 Figure 34 21
24 The tendonous attachments of the short rotator muscles are passed and stitched to the tendon of the gluteous medius (Figure 35). Gluteus medius will then close naturally over the wound. If the fascia lata is visible or can be felt distally below the muscle, a single stitch is used to close the layer at this point. Closure is completed in the normal way. Figure 35 22


25 ORDERING INFORMATION DePuy MI System Core Set Instruments Bantam Connector Shaft Impactor Tip mm Impactor Tip 26 mm Impactor Tip 28 mm Impactor Tip 32 mm Impactor Tip 36 mm Angled Acetabular Inserter Angled Reamer Driver Version Guide Primary Acetabular Case Complete MI Gluteus Medius Retractor MI Inferior Posterior Retractor Right MI Inferior Posterior Retractor Left DePuy MI System Additional Instruments MI Blunt Right Angle Posterior Capsular Retractor MI Cobra Retractor with Armrest MI Superior Capsular Retractor MI Sciatic Nerve Retractor MI Right Angle Posterior Capsular Retractor MI XL Femoral Neck Elevator Retractor Case Complete 23


26 ORDERING INFORMATION DePuy MI System Additional Instruments Zimmer to Hudson Adaptor CHARNLEY Initial Incision Retractor CHARNLEY Initial Incision Retractor Arm CHARNLEY Horizontal Retractor CHARNLEY Vertical Retractor CHARNLEY Pin Retractor & Handle QUICKSET Grater Head QUICKSET Grater Head QUICKSET Grater Head QUICKSET Grater Head QUICKSET Grater Head QUICKSET Grater Head QUICKSET Grater Head QUICKSET Grater Head QUICKSET Grater Head QUICKSET Grater Head QUICKSET Grater Head QUICKSET Grater Head QUICKSET Grater Head QUICKSET Grater Head QUICKSET Grater Head QUICKSET Grater Head QUICKSET Grater Head QUICKSET Grater Head QUICKSET Grater Head QUICKSET Grater Head QUICKSET Grater Head QUICKSET Grater Head QUICKSET Grater Head QUICKSET Grater Head QUICKSET Grater Head QUICKSET Grater Head QUICKSET Grater Head QUICKSET Grater Head QUICKSET Grater Head QUICKSET Grater Head QUICKSET Grater Head QUICKSET Grater Head QUICKSET Grater Head Grater Case Complete Educational Material DePuy MI System Product Rationale Interactive CD-ROM 24


27 DePuy MI System includes a comprehensive and tailored educational programme offering cadaver workshops and visits with our design surgeons. Talk to your DePuy Synthes Account Manager to organise your individual education plan. 25
28 DePuy Orthopaedics EMEA is a trading division of DePuy International Limited. Registered Office: St. Anthony s Road, Leeds LS11 8DT, England Registered in England No DePuy Orthopaedics, Inc. 700 Orthopaedic Drive Warsaw, IN USA Tel: +1 (800) Fax: +1 (574) depuysynthes.com DePuy International Ltd St Anthony s Road Leeds LS11 8DT England Tel: +44 (0) Fax: +44 (0) DePuy International Ltd. and DePuy Orthopaedics, Inc All rights reserved version 2 Issued: 08/13 CA#DPEM/ORT/1212/0407
Templating and Pre Operative Planning 2. Preparation of the Acetabulum 4. Trial Sizing and Impaction of the Shell 5.
 Surgical Technique Contents Templating and Pre Operative Planning 2 Preparation of the Acetabulum 4 Trial Sizing and Impaction of the Shell 5 Cup Positioning 6 Joint Stability 7 Trial sizing and Impaction
This publication is not intended for distribution in the USA. SURGICAL TECHNIQUE
 This publication is not intended for distribution in the USA. SURGICAL TECHNIQUE DePuy Synthes DURALOC Surgical Technique CONTENTS Templating and Pre Operative Planning 2 Preparation of the Acetabulum
Bone Preservation Stem
 TRI-LOCK Bone Preservation Stem Featuring GRIPTION Coating Surgical Technique Implant Geometry Extending the TRI-LOCK Stem heritage The original TRI-LOCK Stem was introduced in 1981. This implant was
AML Hip System. Design Rationale/ Surgical Technique
 AML Hip System Design Rationale/ Surgical Technique Design Rationale Evolution In 1977, DePuy Synthes Companies introduced the original cementless total hip. The AML Hip launched in order to solve one
Optimum implant geometry
 Surgical Technique Optimum implant geometry Extending proven Tri-Lock heritage The original Tri-Lock was introduced in 1981. This implant was the first proximally coated tapered-wedge hip stem available
Preoperative Planning. The primary objectives of preoperative planning are to:
 Preoperative Planning The primary objectives of preoperative planning are to: - Determine preoperative leg length discrepancy. - Assess acetabular component size and placement. - Determine femoral component
AUTOBLOQUANTE AUTOBLOQUANTE. Product Rationale Surgical Technique
 AUTOBLOQUANTE AUTOBLOQUANTE Product Rationale Surgical Technique AUTOBLOQUANTE The Product of Long-Term Clinical Experience The AUTOBLOQUANTE femoral component is a direct descendant of the original straight
Approach Patients with Confidence
 Approach Patients with Confidence The is the first stem specifically designed to be utilized with tissue sparing approaches, such as the anterior approach, as well as traditional approaches. The implant
This publication is not intended for distribution in the USA. SURGICAL TECHNIQUE
 This publication is not intended for distribution in the USA. SURGICAL TECHNIQUE CONTENTS Introduction 2 Pre-operative Planning 4 Determining the Centre of Rotation 5 Surgical Technique 6 Acetabular Preparation
HIP SYSTEM SURGICAL TECHNIQUE
 HIP SYSTEM SURGICAL TECHNIQUE Introduction...2 Preoperative Planning...3 Preoperative Planning...3 Templating and Radiographs...4 Determination of Leg Length Discrepancy...5 Determining Acetabular Cup
Approach Patients with Confidence
 Surgical Technique Approach Patients with Confidence The ACTIS Total Hip System is the first DePuy Synthes stem specifically designed to be utilized with tissue sparing approaches, such as the anterior
CORAIL HIP SYSTEM SURGICAL TECHNIQUE
 CORAIL HIP SYSTEM SURGICAL TECHNIQUE THE SCIENCE OF SIMPLICITY With 2,000,000 stems provided for patients worldwide 1 and thirty years of clinical history, the CORAIL Total Hip System now has a very extensive
Integral 180 Surgical Technique
 Integral 180 Surgical Technique The Integral 180 and 225 are part of the Alliance Family Total Hip System. The Integral 225 femoral component is marketed for use with bone cement in the United States.
S U R G I C A L T E C H N I Q U E
 SURGICAL TECHNIQUE RECOVERY FUNCTION SURVIVORSHIP DePuy believes in an approach to total hip replacement that places equal importance on recovery, function and survivorship. The DePuy PROXIMA Hip System
Clinical Evaluation Surgical Technique
 Clinical Evaluation Surgical Technique Table of Contents EMPERION Specifications 3 EMPERION Surgical Technique 9 EMPERION Catalog 18 Nota Bene: This technique description herein is made available to the
Anterior Approach Surgical Technique. Paragon Stem System. enabling people to enjoy life
 Anterior Approach Surgical Technique Paragon Stem System enabling people to enjoy life Contents Pre-Operative Planning... 2 Suggested Templating Method... 2 Surgical Technique... 3 Surgical Approach...
Trinity. Advanced Bearing Acetabular System Surgical technique
 Advanced Bearing Acetabular System Surgical technique Contents Operative summary Introduction Pre-operative planning Acetabular preparation Acetabular reaming Reamer guide Acetabular shell trials Acetabular
Encina Taper Stem. Stinson Orthopedics Inc. 303 Twin Dolphin Drive, Suite 600 Redwood City, CA
 Stinson Orthopedics Inc. 303 Twin Dolphin Drive, Suite 600 Redwood City, CA 94065 info@stinsonortho.com www.stinsonortho.com Table of Contents Introduction 3 Features 4 Surgical Technique 5 Preoperative
Cementless Tapered Femoral Stem Surgical technique
 Cementless Tapered Femoral Stem Surgical technique Contents Operative summary 4 Pre-operative planning 5 Femoral neck osteotomy 5 Femoral canal preparation 5 Intra-medullary (IM) reamer 6 Sequential rasping
DIRECT ANTERIOR APPROACH. Guide for use with the Furlong Evolution Femoral Stem & CSF Plus Acetabular Cup
 DIRECT ANTERIOR APPROACH Guide for use with the Furlong Evolution Femoral Stem & CSF Plus Acetabular Cup Contents Introduction Patient set up Capsulotomy Femoral elevation and capsule release Preparation
Cementless Tapered Femoral Stem Surgical technique
 Cementless Tapered Femoral Stem Surgical technique Contents Operative summary 4 Pre-operative planning 5 Femoral neck osteotomy 5 Femoral canal preparation 5 Intra-medullary (IM) reamer 6 Sequential rasping
FLH /11
 FLH 225 04/11 This publication has been issued by: European Central Marketing Waterton Industrial Estate Bridgend, South Wales CF31 3XA, United Kingdom Tel: +44 (0)1656 655221 Fax: +44 (0)1656 645454 www.biomet.com
Tissue Sparing. DEsign Rationale
 Tissue Sparing Solutions DEsign Rationale TISSUE SPARING SOLUTIONS Instruments designed to accommodate your surgical approach preference and implant choice Enabling efficient, repeatable, tissue-sparing
Surgical Technique r5.indd 1 12/8/10 10:36 AM
 Surgical Technique The science of simplicity With more than 700,000 implantations and two and a half decades of clinical success, the Corail Total Hip System now has the most extensive experience with
DURALOC. Acetabular Cup System. Surgical Technique
 DURALOC Acetabular Cup System Surgical Technique Table of Contents Surgical Technique Templating and Pre Operative Planning 2 Preparation of the Acetabulum 4 Trial Sizing and Impaction of the Shell 5
THE NATURAL FIT. Surgical Technique. Hip Knee Spine Navigation
 THE NATURAL FIT Surgical Technique Hip Knee Spine Navigation MiniMAX Surgical Technique Hip Knee Spine Navigation INTRODUCTION The MiniMAX TM is a cementless anatomic stem available in 9 right sizes and
Stinson Orthopedics Inc. 303 Twin Dolphin Drive, Suite 600 Redwood City, CA
 Stinson Orthopedics Inc. 303 Twin Dolphin Drive, Suite 600 Redwood City, CA 94065 info@stinsonortho.com www.stinsonortho.com Encina HA Stem Table of Contents Introduction 3 Encina HA Stem Features 4 Surgical
Rx90 Total Hip System Acetabular Series
 Rx90 Total Hip System Acetabular Series The Rx90 Total Hip System was developed by Stanley Asnis, M.D., in conjunction with David Dines, M.D. and Micheal Errico M.D., Co-Section-Chiefs of the North Shore
Surgical Technique CHARNLEY CHARNLEY, THE WORLD S MOST SUCCESSFUL HIP IMPLANT
 Surgical Technique CHARNLEY CHARNLEY, THE WORLD S MOST SUCCESSFUL HIP IMPLANT The pre-operative preparation and surgical approach have been described by: Mr MH Stone M Phil FRCS (Ed), Mr D McDonald FRCS
MetaFix. Cementless Total Hip Replacement Surgical technique
 Cementless Total Hip Replacement Surgical technique Contents Operative summary Acetabular preparation Pre-operative templating Femoral neck osteotomy Femoral canal preparation Femoral punch Tapered IM
TaperFill. Surgical Technique
 TaperFill Surgical Technique Table of Contents Indications and Contraindications 3 TaperFill Hip Size Charts 4-5 DJO Surgical 9800 Metric Boulevard Austin, TX (800) 456-8696 www.djosurgical.com Preoperative
Dual Mobility System Surgical technique
 Trinity Dual Mobility System Surgical technique 2 Contents Operative summary 4 Overview 5 Operative technique 6 1. Acetabular reaming 6 Reamer guide 6 2. Acetabular shell trial 7 3. Acetabular shell implantation
Dual Mobility System Evaluation surgical technique
 Trinity Dual Mobility System Evaluation surgical technique Contents Operative summary 4 Overview 5 Operative technique 6 1. Acetabular reaming 6 Reamer guide 6 2. Acetabular shell trial 6 3. Acetabular
Anterior Approach. Skills Stations
 Anterior Approach Skills Stations Anterior Approach Draping Option One Extra large drape Clear drape Step 1 Use a clear U drape (non sterile) around operative area and towards the foot. Tip: A towel wrapped
CERAMAX Ceramic Total Hip System. Surgical Technique
 CERAMAX Ceramic Total Hip System Surgical Technique Table of Contents Surgical Technique Introduction 5 Templating and Pre-operative Planning 6 Surgical Approach Anterolateral 8 Surgical Approach Posterolateral
MIAA. Minimally Invasive Anterior Approach Surgical technique
 MIAA Minimally Invasive Anterior Approach Surgical technique Contents Introduction 3 With-Table MIAA technique 4 A1. Patient positioning/draping 4 A2. Skin incision 4 A3. Muscular dissection 4 A4. Muscle
ACETABULAR CUP SURGICAL TECHNIQUE
 ACETABULAR CUP SURGICAL TECHNIQUE ACETABULAR CUP DEVICE INDICATIONS FOR USE The ICONACY I-Hip total hip replacement is indicated for the following conditions: 1. A severely painful and/or disabled hip
This publication is not intended for distribution in the USA.
 This publication is not intended for distribution in the USA. Extraction of a CORAIL Stem Surgical Technique Introduction Given the excellent long-term results of the CORAIL stem, 1,2,3 its extraction
Manza Cup HA SURGICAL TECHNIQUE.
 1 PRE-OPERATIVE PLANNING. Preoperative assessment of the appropriate size and position of the acetabular component will provide intraoperative guidance for acetabular reaming. To determine the acetabluar
PRODUCT RATIONALE & SURGICAL TECHNIQUE
 This publication is not intended for distribution in the USA. PRODUCT RATIONALE & SURGICAL TECHNIQUE THE PRODUCT OF LONG-TERM CLINICAL EXPERIENCE The TRILOC cemented UHMWPE cup is a direct descendant of
Distal Cut First Femoral Preparation
 Surgical Technique Distal Cut First Femoral Preparation Primary Total Knee Arthroplasty LEGION Total Knee System Femoral preparation Contents Introduction...3 DCF femoral highlights...4 Preoperative planning...6
Surgical Technique. Hip System
 Surgical Technique Hip System INDICATIONS FOR USE The TaperSet Hip System is designed for total or partial hip arthroplasty and is intended to be used with compatible components of the Consensus Hip System.
PAL Pelvic Alignment Level
 PAL Pelvic Alignment Level Surgical Protocol For consistency during surgery Pelvic Alignment Level (PAL) Features Pelvic Alignment Level Surgical Protocol To Table To Floor 1. Patient Positioning & Preparation
AVANTEON. Operative Technique & Catalogue Information AVANTEON
 AVANTEON Operative Technique & Catalogue Information AVANTEON H I P S Y S T E M Pre-operative Planning The overall aim of pre-operative planning is to establish anatomical data from the patient to guide
CERAMAX CERAMiC ToTAl Hip SySTEM SuRgiCAl TECHniquE
 CERAMAX Ceramic Total Hip System Surgical Technique Table of Contents Surgical Technique introduction 5 Templating and Pre-operative Planning 6 Surgical Approach Anterolateral 8 Surgical Approach Posterolateral
CHARNLEY MODULAR HIP SYSTEM SURGICAL TECHNIQUE. This publication is not intended for distribution in the USA.
 CHARNLEY MODULAR HIP SYSTEM This publication is not intended for distribution in the USA. SURGICAL TECHNIQUE CONTENTS Pre-operative Templating 4 Surgical Approaches 6 Anterolateral Approach 6 Surgical
CAUTION: Ceramic liners are not approved for use in the United States.
 Total Hip Prostheses, Self-Centering Hip Prostheses and Hemi-Hip Prostheses IMPORTANT: This essential product information sheet does not include all of the information necessary for selection and use of
SURGICAL TECHNIQUE CEMENTED & PRESS-FIT UNIFIED INSTRUMENTATION INTRAOPERATIVE FLEXIBILITY PROVEN BIOMECHANICS
 SURGICAL TECHNIQUE CEMENTED & PRESS-FIT UNIFIED INSTRUMENTATION INTRAOPERATIVE FLEXIBILITY PROVEN BIOMECHANICS INTRODUCTION The Summit Tapered Hip System s comprehensive set of implants and instruments
HP Knee Extraction Instrumentation. Product Overview
 HP Knee Extraction Instrumentation Product Overview HP Extraction Knee Instruments DePuy Orthopaedics is working with Symmetry Medical * to distribute Advanced Knee Extraction instruments. These instruments
Surgical Technique. Cup System
 Surgical Technique Cup System INDICATIONS AND USAGE Indications for the use of the CS2 ACETABULAR CUP SYSTEM must be carefully considered with respect to the patient s entire evaluation and alternative
SURGICAL TECHNIQUE IMPROVED WEAR REDUCTION PROVEN FIXATION PRECISE INSTRUMENTATION RELIABILITY
 SURGICAL TECHNIQUE IMPROVED WEAR REDUCTION PROVEN FIXATION PRECISE INSTRUMENTATION RELIABILITY TABLE OF CONTENTS Surgical Technique PAGE 02 PAGE 04 PAGE 06 PAGE 09 PAGE 10 PAGE 14 PAGE 15 PAGE 16 PAGE
This publication is not intended for distribution in the USA. SURGICAL TECHNIQUE
 This publication is not intended for distribution in the USA. SURGICAL TECHNIQUE CONTENTS Introduction 3 Surgical Technique Templating and Pre Operative Planning 4 Acetabular Reaming 6 Acetabular Cup
Zimmer M/L Taper Hip Prosthesis. Surgical Technique
 Zimmer M/L Taper Hip Prosthesis Surgical Technique Zimmer M/L Taper Hip Prosthesis 1 Zimmer M/L Taper Hip Prosthesis Surgical Technique Table of Contents Preoperative Planning 2 Determination of Leg Length
pact SYSTEM Surgical Technique HEMISPHERICAL CEMENTLESS CUP SYSTEM MULTI-HOLE & RIM-HOLE Hip Knee Spine Navigation
 pact SYSTEM HEMISPHERICAL CEMENTLESS CUP SYSTEM MULTI-HOLE & RIM-HOLE Surgical Technique Hip Knee Spine Navigation Mpact Surgical Technique Hip Knee Spine Navigation PREFACE The Mpact Multi-hole and the
SURGICAL TECHNIQUE. Alpine Cementless Hip Stem
 SURGICAL TECHNIQUE Alpine Cementless Hip Stem The following technique is a general guide for the instrumentation of the Alpine Cementless Hip Stem. It is expected that the surgeon is already familiar with
CC TRIO VERSAFITCUP. Surgical Technique. each to their own. Hip Knee Spine Navigation
 VERSAFITCUP CC TRIO each to their own Surgical Technique Hip Knee Spine Navigation Versafitcup CC TRIO Surgical Technique Hip Knee Spine Navigation EACH TO THEIR OWN The Versafitcup CC Trio is a range
Arcos Interlocking Distal Stem. Surgical Technique Addendum to the Arcos Modular Femoral Revision System
 Arcos Interlocking Distal Stem Surgical Technique Addendum to the Arcos Modular Femoral Revision System One Surgeon. One Patient. Over 1 million times per year, Biomet helps one surgeon provide personalized
Surgical Technique. CONQUEST FN Femoral Neck Fracture System
 Surgical Technique CONQUEST FN Femoral Neck Fracture System Table of Contents Introduction... 3 Indications... 3 Product Overview... 4 Surgical Technique... 5 Patient Positioning... 5 Reduce the Fracture...
TaperFit. Cemented Total Hip Replacement Surgical technique
 TaperFit Cemented Total Hip Replacement Surgical technique TaperFit Contents Operative summary 4 Pre-operative templating 5 Surgical exposure 5 Femoral neck resection 5 Acetabular preparation 5 Cenator
Optimum implant geometry
 Design Rationale Optimum implant geometry Extending proven Tri-Lock heritage The original Tri-Lock was introduced in 1981. This implant was the first proximally coated tapered-wedge hip stem available
Zimmer MIS Mini-Incision THA Anterolateral Approach
 Zimmer MIS Mini-Incision THA Anterolateral Approach Retractor Placement Guide Optimizing exposure and preserving soft tissue during MIS THA Minimally invasive surgery allows you to follow the basic principles
Taperloc Complete Hip System. Surgical Technique
 Taperloc Complete Hip System Surgical Technique One Surgeon. One Patient. Over 1 million times per year, Biomet helps one surgeon provide personalized care to one patient. The science and art of medical
Fixed and Variable Geometry Total Shoulder Arthroplasty
 Fixed and Variable Geometry Total Shoulder Arthroplasty RECOVERY FUNCTION SURVIVORSHIP DePuy believes in an approach to total shoulder replacement that places equal importance on recovery, function and
Arcos Modular Femoral Revision System. Broach and Calcar Proximal Bodies Surgical Technique
 Arcos Modular Femoral Revision System Broach and Calcar Proximal Bodies Surgical Technique Table of Contents Pre-operative Planning...2 Patient Positioning and Surgical Approach...2 Removal of a Cemented
*smith&nephew CONTOUR
 Surgical Technique *smith&nephew CONTOUR Acetabular Rings CONTOUR Acetabular Rings Surgical technique completed in conjunction with Joseph Schatzker MD, BSc (Med.), FRCS (C) Allan E. Gross, MD, FRCS (C)
Surgical Technique CERAMAX ULTAMET MARATHON FREEDOM TO CHOOSE WITHOUT COMPROMISE
 Surgical Technique CERAMAX ULTAMET MARATHON FREEDOM TO CHOOSE WITHOUT COMPROMISE Contents Introduction 3 Surgical Philosophy 4 Surgical Technique Templating and Pre-operative Planning 6 Surgical Approach
Trilogy Acetabular System
 Trilogy Acetabular System Surgical Technique Versatility in a proven design Trilogy Acetabular System 1 Trilogy Acetabular System Surgical Technique Table of Contents Acetabular Reaming 2 Component Sizing
ZMR Over-the-Junction Instruments for Revision Hip Arthroplasty. Surgical Technique IMAGE TO COME
 ZMR Over-the-Junction Instruments for Revision Hip Arthroplasty Surgical Technique IMAGE TO COME ZMR Over-the-Junction Instruments for Revision Hip Arthroplasty Introduction The ZMR Over-the-Junction (OTJ)
Pre-Operative Planning. Positioning of the Patient
 Surgical Technique Pre-Operative Planning Decide upon the size and angle of the barrel plate to be used from measuring the x-rays. To maximise the sliding action when using shorter lag screws, the Short
EVOLVING OUR HERITAGE, MEETING YOUR NEEDS. Surgical Technique
 EVOLVING OUR HERITAGE, MEETING YOUR NEEDS Surgical Technique Joint Spine Sports Med Mpact DM Surgical Technique Joint Spine Sports Med INTRODUCTION The Mpact DM is part of the Mpact Acetabular System and
PLR. Proximal Loading Revision Hip System
 PLR Proximal Loading Revision Hip System The PLR splined revision stem is designed to recreate the natural stresses in the revised femur, where proximal bone may be compromised. PLR Hip System Design Considerations
VerSys Fiber Metal Taper Hip Prosthesis. Surgical Technique
 VerSys Fiber Metal Taper Hip Prosthesis Surgical Technique VerSys Fiber Metal Taper Hip Prosthesis Surgical Technique 1 VerSys Fiber Metal Taper Hip Prosthesis Surgical Technique Table of Contents Preoperative
This surgical technique describes how to perform an anatomic total shoulder arthroplasty implanting a short stem.
 INTRODUCTION This surgical technique describes how to perform an anatomic total shoulder arthroplasty implanting a short stem. CAUTION Federal law (USA) restricts this device to sale distribution and use
FLH183 04/08. Biomet UK Ltd Waterton Industrial Estate Bridgend, South Wales CF31 3XA, United Kingdom. Tel. +44 (0) Fax: +44 (0)
 Fax: +44 (0)") FLH183 04/08 Biomet UK Ltd Waterton Industrial Estate Bridgend, South Wales CF31 3XA, United Kingdom Tel. +44 (0)1656 655221 Fax: +44 (0)1656 645454 Exceed ABT Operative Technique The Exceed ABT TM acetabular
FLH183 04/08 Biomet UK Ltd Waterton Industrial Estate Bridgend, South Wales CF31 3XA, United Kingdom Tel. +44 (0)1656 655221 Fax: +44 (0)1656 645454 Exceed ABT Operative Technique The Exceed ABT TM acetabular
Burwood Road, Concord 160 Belmore Road, Randwick
 www.orthosports.com.au 47 49 Burwood Road, Concord 160 Belmore Road, Randwick Anterior Approach to the Hip Orthopaedic surgeon What s the fuss all about this NEW surgery? Not a new approach or surgery
Zimmer NexGen MIS Tibial Component. Cemented Surgical Technique IMAGE TO COME
 Zimmer NexGen MIS Tibial Component Cemented Surgical Technique IMAGE TO COME Zimmer NexGen MIS Tibial Component Cemented Surgical Technique 1 Zimmer NexGen MIS Tibial Component Cemented Surgical Technique
PINNACLE Hip Solutions. Surgical Techniques
 PINNACLE Hip Solutions Surgical Techniques 2 DePuy Synthes PINNACLE Hip Solutions Surgical Technique Contents Introduction 3 Surgical Technique Templating and Pre Operative Planning 4 Acetabular Reaming
RECLAIM REVISION SOLUTIONS
 RECLAIM REVISION SOLUTIONS Where Strength and Modularity Connect This publication is not intended for distribution in the USA. SURGICAL TECHNIQUE CONTENTS RECLAIM Modular Revision Hip System SURGICAL TECHNIQUE
Natural-Hip System. Surgical Technique. Addressing surgical concerns comprehensively
 Natural-Hip System Surgical Technique Addressing surgical concerns comprehensively Natural-Hip System Surgical Technique Natural-Hip System Surgical Technique Developed in conjunction with Aaron A. Hofmann,
ADEPT Extra Fixation Cup. Operative Technique. Delivering Results Through Performance
 ADEPT Extra Fixation Cup Operative Technique Delivering Results Through Performance Contents Section 1 Introduction 3 Section 2 Preparation of the Acetabulum 4 Section 3 Preparation of the Extra Fixation
Following a tradition of success. VerSys Heritage Primary Hip Prosthesis Surgical Technique
 Following a tradition of success VerSys Heritage Primary Hip Prosthesis Surgical Technique VerSys Heritage Primary Hip Prosthesis 1 Surgical Technique For VerSys Heritage Primary Hip Prosthesis Dennis
VerSys LD/Fx Cemented and Press-Fit Hip Prostheses. Surgical Technique IMAGE TO COME. Versatile solutions for total and partial hip replacement
 VerSys LD/Fx Cemented and Press-Fit Hip Prostheses Surgical Technique IMAGE TO COME Versatile solutions for total and partial hip replacement VerSys LD/Fx Cemented and Press-Fit Hip Prostheses VerSys
Surgical Technique.
 Surgical Technique www.biomet.co.uk INTRODUCTION design principals Recent advances in imaging technology have enabled orthopaedic surgeons to extend closed treatment of femoral fractures to include more
UNDERSTANDING TRADITION, MASTERING INNOVATION. Surgical Technique
 UNDERSTANDING TRADITION, MASTERING INNOVATION Surgical Technique Joint Spine Sports Med MasterLoc Surgical Technique Joint Spine Sports Med INTRODUCTION This document describes the Surgical Technique for
Bi-Polar 22.2mm & 28mm System - Operative technique
 Disclaimer Biomet UK Ltd, as the manufacturer of this device, does not practice medicine and does not recommend any particular surgical technique for use on a specific patient. The surgeon who performs
TRK REVISION KNEE Surgical Technique
 1 TRK REVISION KNEE Surgical Technique 1. 2. 3. 4. 5. 6. 7. 8. 9. 10. INTERCONDYLAR RESECTION...... page FEMORAL STEM...... page NON CEMENTED FEMORAL STEM...... page TRIAL FEMORAL COMPONENTS...... page
Trilogy Acetabular System
 Trilogy Acetabular System Surgical Technique Versatility in a proven design Trilogy Acetabular System 1 Trilogy Acetabular System Surgical Technique Table of Contents Acetabular Reaming 2 Component Sizing
S U R G I C A L T E C H N I Q U E David A. McQueen, MD Return to Menu
 S U R G I C A L T E C H N I Q U E David A. McQueen, MD TOTAL KNEE INSTRUMENTS Wichita Fusion Nail Introduction...1 Preoperative Planning...2 Surgical Technique...3-8 Wichita Fusion Nail Surgical Technique
Trilogy Acetabular System
 Trilogy Acetabular System Surgical Technique Versatility in a proven design Trilogy Acetabular System 1 Trilogy Acetabular System Surgical Technique Table of Contents Acetabular Reaming 2 Component Sizing
Featuring. Technology. Product Rationale
 Featuring Technology Product Rationale 2 Optimum implant geometry Extending proven TRI-LOCK heritage The original TRI-LOCK Stem was introduced in 1981. This implant was the first proximally coated tapered-wedge
asterloc Surgical Technique HIP SYSTEM UNDERSTANDING TRADITION, MASTERING INNOVATION Hip Knee Spine Navigation
 asterloc HIP SYSTEM UNDERSTANDING TRADITION, MASTERING INNOVATION Surgical Technique Hip Knee Spine Navigation Masterloc Surgical Technique Hip Knee Spine Navigation INTRODUCTION This document describes
EMPERION Modular Hip System Surgical Technique
 Surgical Technique Introduction The EMPERION Modular Hip System is a versatile system that can be used for primary and revision hip surgeries. Using modular proximal bodies, this system addresses the proximal
Surgical technique MkII instrumentation
 MiniHip Surgical technique MkII instrumentation Contents Operative summary 4 Overview 5 Pre-operative templating 6 Operative technique 7 1. Intra-operative templating 7 2. Neck starter awl 7 3. Curved
Surgical Technique. Unisyn Hip System
 Surgical Technique Unisyn Hip System INDICATIONS AND USAGE Significantly impaired joints resulting from rheumatoid, osteo, and post-traumatic arthritis. Revision of failed femoral head replacement, hip
operative technique Kent Hip
 operative technique Kent Hip The Kent Hip Operative Technique The Kent Hip was developed by Mr Cliff Stossel, FRCS in Maidstone, Kent, UK and first implanted in 1986. It was designed to deal with problems
LAMINA SPREADER SURGICAL TECHNIQUE
 LAMINA SPREADER SURGICAL TECHNIQUE Balanced and appropriate external rotation of the femoral component is important for tibio-femoral stability in flexion and patello-femoral tracking/function. Depending
APS Natural-Hip System
 APS Natural-Hip System Surgical Technique Bone conserving, anatomic fit APS Natural-Hip System Surgical Technique APS Natural-Hip System Surgical Technique Developed in conjunction with Jay Butler, MD
PINNACLE REVISION CUP SYSTEM
 PINNACLE REVISION CUP SYSTEM This publication is not intended for distribution in the USA. DESIGN RATIONALE FLEXIBILITY. PRECISION. CONFIDENCE. DePuy Synthes Joint Reconstruction is proud to offer the
21st Century Fracture Management ETS. Surgical Protocol
 21st Century Fracture Management ETS Surgical Protocol ETS Operative Technique Step 1 Confirm that a cemented hemiarthroplasty is indicated. An X-ray template of the ETS is provided. This should be used
Triple Tapered Stabilised Hip C-STEM AMT. Surgical Technique
 Triple Tapered Stabilised Hip C-STEM AMT Surgical Technique CONTENTS Pre-operative planning: X-ray templating 2 Step 1: Femoral Neck Resection 3 Step 2: Opening the Femoral Canal 4 Step 3: Metaphyseal