Contents.
|
|
|
- Kristina McDonald
- 5 years ago
- Views:
Transcription
1

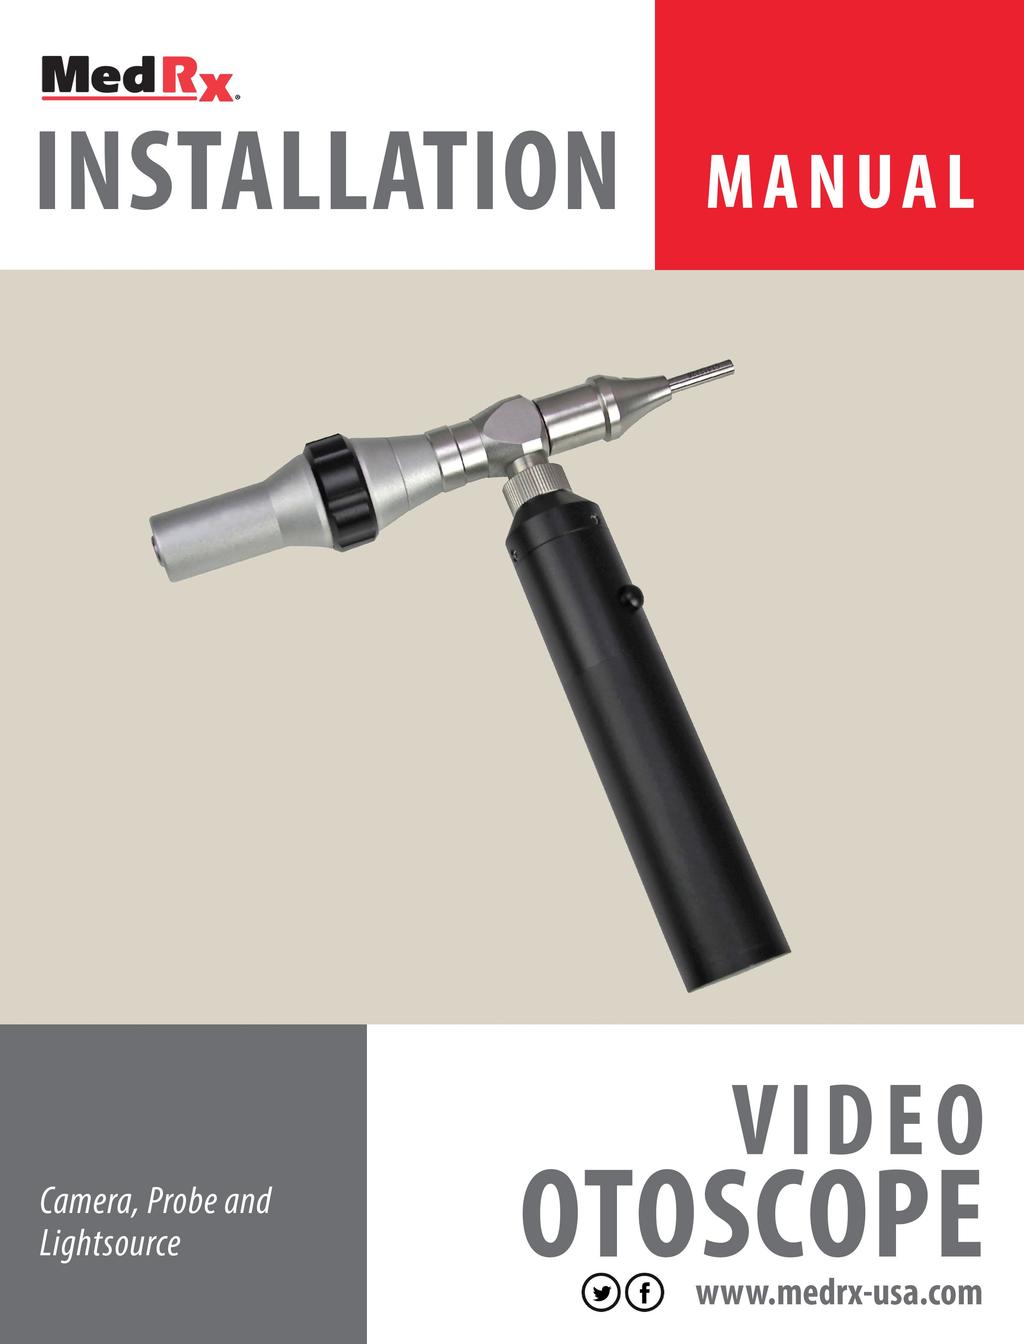
2 Contents Using The Video Otoscope... 3 The Battery Operated LED Light Source... 4 Connecting the Video Otoscope... 5 Connect the LEMO Cable... 6 Wiring Diagram... 7 Specula Adapter... 8 Trouble Shooting Guide... 9 Cleaning & Disinfecting Transportation & Storage Safety Limited Warranty Starkey Rd., #105, Largo FL U.S.A. Toll Free: (888) (727) Fax: (727) medrx@medrx-usa.com 2 D D 12/2018
3 Using the Video Otoscope CAUTION: The MedRx Video Otoscope is only to be used by a person qualified in the use of an Otoscope. Misuse can cause a patient pain and possible injury. Intended Use Statement: The MedRx Video Otoscope is used to perform otoscopic examination of the outer ear and tympanic membrane. It is also used to assist with hearing aid and probe microphone placement for real ear measurements. These devices are to be operated by professionals with education and/or training in the field of audiometry. The device consists of an Otoscope connected to a video camera that can present the image on a video screen. This function gives you the option to capture images for storage. Indication For Use Statement: The MedRx Video Otoscope is for use by professionals with education and/or training in the field of audiometry to provide detailed examinations of the outer ear canal and tympanic membrane. Also used to assist the hearing aid and probe mic placement for Real Ear Measurements. The image provided by the camera can be captured and stored as a visual record of the examination. Video Otoscopy has multiple purposes in hearing assessment and hearing instrument fitting. The Video Otoscope is used for: Performing the initial otoscopic examination prior to testing. Capturing and storing images to the NOAH patient database. Troubleshooting problems with the hearing aid, such as blocked receivers and microphones. Probe microphone placement for Live Speech Mapping measurements. Always perform an otoscopic examination of the ear canal prior to testing to determine if earwax or other foreign matter will interfere with probe tube insertion. If this is a problem, the patient should be referred to an appropriate resource for removal of the wax or debris. If abnormal ear conditions are noticed on this examination, an appropriate medical referral is recommended before evaluating hearing or fitting hearing instruments. The speculum is always to be used with the system. The speculum must be cleaned or replaced between patients per accepted medical practice procedures. (Reference section: Cleaning and Disinfecting for more information) Prior to insertion, the probe should be held within 1/4" of a known object, such as your finger, to check the quality of the image. Sometimes the lens is smeared with cerumen or other matter and will need to be vigorously cleaned with an alcohol wipe in order to provide a clear image. IMPORTANT: The Video Otoscope is composed of rigid glass lenses and a delicate ¼ CCD micro-camera if either of these are treated roughly, i.e. dropped, the glass lens, video camera or cable may break. IMPORTANT: Disconnecting the LEMO cable from the back of the Video Otoscope, or disconnecting the DC power adapter from the LEMO cable is the ONLY way to turn off the power to the Video Otoscope. If you do not disconnect one of these the Video Otoscope will remain on, and may burn out the image sensor. 3 D D 12/2018


4 The Battery Operated LED Light Source The LED light handle has three components: the black light handle, the rechargeable batteries and the battery charger. End cap removed showing batteries in holder and inserted into handle. Battery Replacement WARNING Grasp the upper portion of the black handle NOT the probe or camera, when unscrewing the lower section to replace the battery. Otherwise, possible damage may occur to the probe. LED light handle in position to install on Otoscope. LED light handle installed on Otoscope. (Note: Black button to turn the light on and off) Wrong Way Right Way 4 D D 12/2018
, if not you can connect them by screwing the threaded end onto the Otoscope light post.")

5 Connecting the Video Otoscope Remove the Video Otoscope from the padded case, along with the LED light handle. These 2 units should already be connected (Figure 1), if not you can connect them by screwing the threaded end onto the Otoscope light post. The video otoscope features a manual focus wheel to adjust the focal range for better live images. NOTE: Be careful with the Video Otoscope which is composed of rigid glass lenses and a delicate ¼ CCD microcamera. If either of these are treated roughly, i.e. dropped, the glass lens, video camera or cable may break. These instructions are for both sizes of Video Otoscopes. A. For Adults 0405T mm - 45mm B. For Children 0205T mm - 54mm 5 D D 12/2018

6 Connect the LEMO Cable Once the Video Otoscope and the LED light handle are connected, plug the 4-pin LEMO cable into the back of the Video Otoscope. There is a red dot on the back of the camera unit and a red line on the LEMO cable. Line these marks up to properly connect the cable to the camera unit. To disconnect the LEMO cable you have to grip the rough area of the LEMO cable behind the red line, and pull this back. There are little hooks on the outside of the cable, and pulling on the cable will not disconnect it. This rough silver area on the cable has to be pulled back to pull the hooks in and allow the cable to be removed. This is a safety feature so the cable is not pulled out in the middle of an examination. The LEMO cable provides the video camera unit with power and exports the live color image via an RCA video cable to your TV monitor, or to your computer via a USB capture device. NOTE: Disconnecting the LEMO cable from the back of the Video Otoscope, or Disconnecting the DC power adapter from the LEMO cable is the ONLY way to turn off the power to the Video Otoscope. If you don t disconnect one of these the Video Otoscope will remain on, and may burn out the image sensor. 6 D D 12/2018

7 Wiring Diagram Once you have connected the LEMO cable to the Video Otoscope, plug the corresponding RCA video cable plug, and the 7.5V power adapter plug to the other end of the LEMO cable (Figure 3). Connect the Power adapter to the power plug first, and ensure that the power adapter is connected to the proper outlet. This will power the Video Otoscope. The RCA video cable plug will have the silver tip, and the power adapter plug will have the wider opening. Connect the RCA video cable to the RCA video plug on the LEMO cable, and connect the other end of the RCA Video cable directly to the composite video input on the back, or side, of your TV monitor. If you are using the USB capture device, the RCA video cable can be connected to the yellow video input plug of the capture device. Once the RCA cable is connected to the monitor you may need to change the input signal on your monitor to Video 1 or 2 to locate the image. This changes the signal source from Cable TV to the Video Camera. 7 D D 12/2018

8 Specula Adapter Once the Video Otoscope is working attach the specula adaptor (Figure 4), and use the disposable tips to perform sanitary otoscopic exams. To do this, locate the green dot on the base. This dot acts as a reference point to ensure that the adapter is properly attached. With the green dot facing down, slide the specula adapter over the insertion tube, directly to the base of the locking mechanism. Twist the specula adaptor 90 degrees to the left and lock it into place over the otoscope. You can now attach one of the disposable specula tips over the adapter. Note: Make sure the disposable specula sticks out a bit further than the lens to insure that it protects the tip and keeps it clean. The extra length should not obstruct your view. The video camera should now project the live image onto your monitor. To view the live color image, turn ON the attached LED light source by pressing the button once. This will cause light to illuminate from the tip of the Otoscope. To turn off the video camera after use simply detach the LEMO cable from the video camera. The Video Otoscope is set up for close inspections, test it out on your hand rather than objects far away. There is also a focus ring located on the unit. Try adjusting this to see how it affects the image (see Figure 1). 8 D D 12/2018
9 Trouble Shooting Guide Problem Main Cause Solution Fuzzy or out of focus picture No picture on display Focus Ring not adjusted Dirty probe tip (dried cerumen) Short in cable Light Source not turned on Loose wire connection Turn Focus Ring until image is in focus Carefully clean probe tip with an alcohol wipe Replace cable Turn light source on Re-check wire connection No light from probe tip Light source not on Turn on light source Cleaning probe does not improve picture Probe dropped and physically damaged Call MedRx for service No light from probe tip Light source not on Turn on light source This guide was designed to assist you in diagnosing minor problems. Should service be needed, please call MedRx at or for Technical Support.` Monday Friday, EST 9AM to 5PM 9 D D 12/2018
10 Cleaning & Disinfecting Your MedRx Video Otoscope has been designed to provide years of trouble-free service. Do not remove or open the camera housing, as there are no user serviceable components inside. Cleaning To keep your system looking new, wipe the exterior of the components with a soft cloth. Stubborn stains may be removed using a cloth moistened with water and mild detergent. Do not allow debris or fluid to enter into the components. Use an alcohol wipe to clean the lens on the end of the Otoscope probe, or a common disinfectant. Video Otoscope Disinfecting The Video Otoscope is sealed so that it may be wiped between patients with the following surface cleaners to disinfect; 70% Alcohol, Chlorhexiderm, Cidex, Nolvasan, Parvocide, Parvoso, Roccal or Synphenol. Follow instructions provided with the disinfectant. The scope should NEVER be heat sterilized, gas sterilized or soaked in liquid because damage may result. Speculum / Curette Disinfecting / Replacement The speculum is always to be used with the system. The speculum and curette must always be cleaned (per accepted medical practices and instructions provided with the disinfectant) or replaced between patients. Transportation & Storage When transporting or storing your Video Otoscope, it is best to use the original packing case or similar packaging. Store the system in a cool, dry location and do not place your system in direct sunlight. Care must be taken to protect the system from shock, moisture damage and mishandling. Do not place heavy objects on any of the system's components. To assure proper operation and warranty protection, use manufacturer's replacement components only. 10 D D 12/2018
 equipment that is part of an ME system.")

 are supplied as an electronic copy on a USB flash drive.")

11 Safety Regarding electrical safety, this device is to be used only by professionals in the hearing healthcare industry. The MedRx Video Otoscope is a Class II Medical Electrical (ME) equipment that is part of an ME system. Power is supplied for video capture by the USB cable connected to a computer. A medical grade isolation transformer is recommended to achieve optimum safety. A medical grade computer is recommended and a medical grade isolation transformer will help minimize ground current. The use environment should be between 10 C and 35 C, humidity between 30% and 90%. All components with patient contact are made of bio-compatible materials. The Instructions for Use (the Installation and Software Training manuals) are supplied as an electronic copy on a USB flash drive. Paper copies of the manuals may be also requested from the company and will be sent within one business day of the request. Mild soapy water is the preferred cleaning solution. All repairs should be sent to MedRx for evaluation and / or repair. Symbols that may be used: Caution, General warning sign or SN Indicates that the device serial number will follow. Read the instruction manuals for safe usage of the device. (Operating instructions) Type B applied part. Manufacturer (MedRx) Authorized Representative in Europe 11 D D 12/2018
12 Limited Warranty MedRx, Inc. warrants this product to be free from defects in material and workmanship for one year from the time of purchase. If this system fails to perform as specified during this period, the purchaser is responsible for calling MedRx at (888) or (727) The company's representative will advise the owner to either return specific components or the entire system to: MedRx, Inc Starkey Road #105 Largo, FL USA MedRx will repair or replace any defective devices, fully test the system and/or components and ship the system promptly back to the owner. There is no cost for the repair or return shipping, provided the system is one year old or less and has not been misused, abused or damaged. Such damage includes, but is not limited to, dropping, exposure to excessive heat greater than 100ºF and water/liquid damage. Repair or replacement of the system as provided under this warranty is the sole and exclusive remedy of the purchaser. MedRx shall not be liable for any consequential or incidental damages or for breach of any express or implied warranty. Except to the extent of applicable law, any implied warranty, merchantability or fitness of this product is limited to the duration of this warranty. MedRx will, at its discretion, service and repair out of warranty products at the purchaser's request, charging for parts and labor as necessary. The limited warranty is deemed void if software or hardware is installed on this product which is not pre-approved by MedRx, Inc. Approved software includes NOAH and HIMSA approved hearing aid manufacturer programming modules for fitting hearing aids. MedRx, Inc is not responsible for problems resulting from installation of unapproved software or hardware. In the event of unapproved software or hardware installed on the system causing a conflict, MedRx will service the product for a fee to be determined at the time of service. Any extension of this warranty past the initial one-year warranty is subject to the following (where applicable). 1. A $300 deductible per repair. 2. Extended warranty does not include cables, connectors or peripherals. 3. Extended warranty of the Video Otoscope covers optics only. 12 D D 12/2018
INSTALLATION MANUAL. VIDEO Camera, Probe and Lightsource OTOSCOPES.
 INSTALLATION MANUAL VIDEO Camera, Probe and Lightsource OTOSCOPES www.medrx-int.com Contents Using The Video Otoscope... 3 The Battery Operated LED Light Source... 4 Wiring Diagram - Battery Operated LED
Ultra View Manual Rev. 2 Effective 7/05
 Congratulations on Purchasing the MedRx Ultra View The MedRx Ultra View Includes: MedRx Deluxe Video Otoscope Durable Tapered 3mm Probe Compact Color Video Camera Focus Always Feature 9 Color Video Monitor
MedRx sells several different Video Otoscope configurations with either the battery powered light source or the external light source
 MedRx sells several different Video Otoscope configurations with either the battery powered light source or the external light source We have combined the wiring instructions, trouble shooting & warranty
LET OUR IMAGE ENHANCE YOUR IMAGE. Operating Instructions MedRx Video Portable OtoScope System
 LET OUR IMAGE ENHANCE YOUR IMAGE Operating Instructions MedRx Video Portable OtoScope System RD2 Portable Video Otoscope Manual Rev 1 Effective September 2004 Table of Contents Introduction to the MedRx
AVANT Audiometer Manual Rev. 2 Effective 10/05
 Contents AVANT Audiometer Software Installation...3 AVANT Audiometer Driver Installation... 4 AVANT Audiometer Setup... 5-7 Loading Calibration Files...7 Wiring Diagrams... 8-9 Limited Warranty... 10 To
TRAINING MANUAL. VIDEO Camera, Probe and Lightsource OTOSCOPES.
 TRAINING MANUAL VIDEO Camera, Probe and Lightsource OTOSCOPES www.medrx-int.com Contents Video Otoscope Drivers & Software USB CAMERA Getting to Know Your Video Otoscope... 3 Computer Requirements... 4
TRAINING MANUAL AVANT HIT+ Hearing Instrument Test Chamber.
 TRAINING MANUAL AVANT Hearing Instrument Test Chamber HIT+ www.medrx-int.com Contents Getting to know your HIT+... 3 AVANT HIT Software Overview.. 4 AVANT HIT Software Options.... 5 Preparing for Testing...
LET OUR IMAGE ENHANCE YOUR IMAGE. Operating Instructions MedRx Digitally Enhanced Video OtoScope System
 LET OUR IMAGE ENHANCE YOUR IMAGE Operating Instructions MedRx Digitally Enhanced Video OtoScope System Digital Video Otoscope Manual Rev 1 Effective August 2003 Table of Contents Introduction to the MedRx
#0086.
 USER MANUAL Contents Introduction... 3 AVANT POLAR HIT Software Overview.. 4 AVANT POLAR HIT Software Options. 5 Preparing for Testing.. 7 Rotational Table Control.. 10 Making HIT Measurements 11 Sample
For more information visit or contact hearx:
 USER MANUAL hearscope - Ground Floor, Building 2, Ashlea Gardens Office Park, 180 Garsfontein Road, Ashlea Gardens, Pretoria, 0081, South Africa hearscope v2. HSCP-MN-EN hearscope IFU v1.0 For more information
TRAINING MANUAL. AVANT The Perfect Screening Audiometer AIR+
 TRAINING MANUAL AVANT The Perfect Screening Audiometer AIR+ www.medrx-usa.com Contents Introduction. 3 AVANT Audiometer Software Overview.. 4 AVANT Audiometer Software Options.... 4 Preparing for Testing.
INSTALLATION MANUAL. MedRx TINNOMETER. Revolutionary Tinnitus Assessment.
 INSTALLATION MANUAL Revolutionary Tinnitus Assessment MedRx TINNOMETER www.medrx-usa.com Contents Getting to Know Your Tinnometer 3 Computer Requirements 4 Tinnometer 5 Transducers and Accessories 5 Software
C200 bands are available in a variety of colors. Visit us at LifeTrakUSA.com
 Information Guide HOW TO CHANGE YOUR BANDS The bands of your C200 are reversible and replaceable: 1. Carefully slide the bands off the Core. The bands can slide in either direction. 1 C200 bands are available
Compressor Nebulizer Instruction Manual Part No.: 5055
 Compressor Nebulizer Instruction Manual Part No.: 5055 DISTRIBUTED BY: SAVE THESE INSTRUCTIONS. CAUTION - U.S. Federal Law restricts this device to sale by or on the order of a physician. 666002-6310 V1.3
Pocket Diagnostic Instruments. Use, Care, & Maintenance
 Pocket Diagnostic Instruments Use, Care, & Maintenance Thank you for choosing an ADC Diagnostic set. We re proud of the care and quality that goes into the manufacture of each and every diagnostic instrument
Owner s Manual. General Information Care & Maintenance Warranty Hearing Care Information
 Owner s Manual General Information Care & Maintenance Warranty Hearing Care Information Congratulations and thank you for your purchase of the Westone CR1. The information in this booklet will help you
INSTALLATION MANUAL. AVANT Air, Bone, Speech and Masking Audiometry AUDIOMETERS.
 INSTALLATION MANUAL AVANT Air, Bone, Speech and Masking Audiometry AUDIOMETERS www.medrx-int.com Contents Getting to Know Your Audiometer.. 3 Computer Requirements.. 4 Avant A2D+ 5 Avant Stealth... 6 Transducers
Quick Start Guide. Congratulations on your journey to better hearing
 Quick Start Guide Congratulations on your journey to better hearing At Starkey, we believe that to hear better is to live better. Muse iq Rechargeable hearing aids help you stay connected to the people
USER S MANUAL QUESTIONS? CAUTION. Visit our website at.
 Model No. NTCCBE950 Serial No. Write the serial number in the space above for future reference. USER S MANUAL Serial Number Decal (under seat) QUESTIONS? As a manufacturer, we are committed to providing
Charging base guide. A Sonova brand
 Charging base guide A Sonova brand Thank you Thank you for choosing this rechargeable solution. We care deeply about people with hearing loss. We work closely with hearing healthcare professionals to make
USER S MANUAL QUESTIONS? CAUTION. Visit our website at. new products, prizes, fitness tips, and much more!
 Model No. WEBE44.0 Serial No. Write the serial number in the space above for future reference. USER S MANUAL Serial Number Decal QUESTIONS? As a manufacturer, we are committed to providing complete customer
Digital MacroView Otoscope
 Digital MacroView Otoscope See it. Share it. Save it. Offering you clear, live and still images of the ear canal and tympanic membrane, the Digital MacroView Otoscope is a valuable tool in support of the
Quick Start Guide. Congratulations on your journey to better hearing
 Quick Start Guide Congratulations on your journey to better hearing At Starkey, we believe that to hear better is to live better. Get the most out of your hearing aids Please visit starkey.com/care for
Universal Monitor User s Guide. Insertion Instructions Care and Maintenance Hearing Care Information Warranty
 Universal Monitor User s Guide Insertion Instructions Care and Maintenance Hearing Care Information Warranty UM Monitor Care and Maintenance Congratulations on your choice of Westone UM monitors! The information
IMPORTANT SAFETY INSTRUCTIONS
 IMPORTANT SAFETY INSTRUCTIONS When using an electrical appliance, basic precautions should always be followed, including the following. Read all instructions before using this appliance. DANGER - To reduce
Quick Start Guide. Congratulations on your journey to better hearing
 Quick Start Guide Congratulations on your journey to better hearing At Audibel, we believe that to hear better is to live better. Get the most out of your hearing aids Please visit audibel.com/care for
AquaJogg Hydro Treadmill
 AquaJogg Hydro Treadmill PART #: F-WXAQJG 330 LB. [150 kg] MAXIMUM WEIGHT CAPACITY MANDATORY LEAVE THIS MANUAL WITH TREADMILL OWNER To assemble your equipment read entire manual and follow all instructions.
Recharge. Relax.Repeat.
 Recharge. Relax.Repeat. Recharge. Relax.Repeat. What s Inside Your rechargeable hearing aids will be delivered to you in two boxes. Please note that both ZPower rechargeable batteries and disposable batteries
InsuPad User Manual. Charger Base The charger base can be connected by the attached USB cable to the power adapter supplied for charging.
 InsuPad User Manual System overview The InsuPad is designed to improve the delivery of injected insulin into the blood by controlled warming of the area which surrounds the point of injection. The device
OWNER S MANUAL. Quick Insertion Guide: INSERT EARTIP into ear canal and rotate earpiece backwards & into position CHECK FOR SEAL
 OWNER S MANUAL Quick Insertion Guide: 1 2 3 4 IDENTIFY EARPIECES marked (R) for right and (L) for left ALIGN EARPIECES at the ear canal, with cord facing forward & slightly downward INSERT EARTIP into
TABLE OF CONTENTS 1.1. WARRANTY DAMAGED SHIPMENTS SERVICE INTRODUCTION UNPACKING AND INSTALLATION
 TABLE OF CONTENTS EDITION 5 Section 1 - WARRANTY & SERVICE 1.1. WARRANTY 2 1.2. DAMAGED SHIPMENTS 2 1.3. SERVICE 2 Section 2 - INTRODUCTION 2.1. INTRODUCTION 3 Section 3 - GENERAL 3.1. UNPACKING AND INSTALLATION
USER S MANUAL QUESTIONS? CAUTION. For a great selection of new CD and MP3 workouts. Visit our website at. or call
 Model No. RBBE950 Serial No. Write the serial number in the space above for future reference. USER S MANUAL Serial Number Decal (Under Seat) QUESTIONS? As a manufacturer, we are committed to providing
MARCY DIAMOND ELITE UTILITY BENCH MD-440. Model MD-440. Retain This Manual for Reference OWNER'S MANUAL
 NOTE: Please read all instructions carefully before using this product Table of Contents Safety Notice Hardware Identifier MARCY DIAMOND ELITE UTILITY BENCH MD-440 Assembly Instruction Parts List Warranty
Activated Transponder & Activator Instruction Manual
 Activated Transponder & Activator Instruction Manual Westhold Corporation General Warranty Modules and other equipment ("Goods") purchased from Westhold Corporation are warranted against defects in materials
EXERTEC FLAT BENCH ETC-2.1. Model ETC-2.1. Retain This Manual for Reference OWNER'S MANUAL IMPEX INC.
 NOTE: Please read all instructions carefully before using this product Safety Notice Hardware Identifier Assembly Instruction EXERTEC FLAT BENCH ETC-2.1 Parts List Warranty Ordering Parts Model ETC-2.1
AquaJogg Hydro Treadmill
 AquaJogg Hydro Treadmill PART #: F-WXAQJG 330 LB. [150 kg] MAXIMUM WEIGHT CAPACITY MANDATORY LEAVE THIS MANUAL WITH TREADMILL OWNER To assemble your equipment read entire manual and follow all instructions.
IGS-02 CALF RAISE BENCH. Model IGS-02. Retain This Manual for Reference OWNER'S MANUAL
 NOTE: Please read all instructions carefully before using this product Safety Notice Hardware Identifier Assembly Instruction IGS-02 CALF RAISE BENCH Exploded Diagram Parts List Warranty Ordering Parts
Thank you for purchasing the AB COASTER. Our customer service staff is ready to help and to answer any questions.
 Thank you for purchasing the AB COASTER. Our customer service staff is ready to help and to answer any questions. Our phone number is: 908-879-2713 The Ab Coaster Company, 173 Route 206, P.O. Box 9 Chester,
E. SelectTech 3.1 Bench Assembly / Owner s Manual
 000-6190.121212.E SelectTech 3.1 Bench Assembly / Owner s Manual Congratulations on your commitment to fitness and your purchase of the Bowflex SelectTech 3.1 Bench. Before assembling your Bowflex SelectTech
Blood Glucose Monitoring System. User Guide
 Blood Glucose Monitoring System User Guide Table of Contents Introduction...2 Important Safety Instructions...2 About ipet PRO Blood Glucose Monitoring System...3 About ipet PRO Meter...4 About the ipet
E L E C T R O N I C VA P O R I Z E R S. User Manual
 E L E C T R O N I C VA P O R I Z E R S User Manual Thank you for purchasing a Signature Series Product. Please read this manual carefully before use so as to use correctly. If you require additional information
USER S MANUAL QUESTIONS? CAUTION. Visit our website at. For a great selection of new CD and MP3 workouts. or call
 Model No. IFBE3540 Serial No. Write the serial number in the space above for future reference. USER S MANUAL Serial Number Decal (Under Seat) QUESTIONS? As a manufacturer, we are committed to providing
HCS70004P, HCS70004G HCS70004C, HCS70004BL HCS70004DP, HCS70004 AEROMIST COLORS NEBULIZER COMPRESSOR KIT. Instruction Manual
 HCS70004P, HCS70004G HCS70004C, HCS70004BL HCS70004DP, HCS70004 AEROMIST COLORS NEBULIZER COMPRESSOR KIT Instruction Manual TABLE OF CONTENTS IEC Symbols...2 Important Safeguards...2 Introduction...3 Specifications...4
E. SelectTech 5.1 Bench Owner s / Assembly Manual
 000-6189.080118.E SelectTech 5.1 Bench Owner s / Assembly Manual Congratulations on your commitment to fitness and your purchase of the Bowflex SelectTech 5.1 Bench. Before assembling your Bowflex SelectTech
Escalade International Limited
 Motion Elliptical Product Code: ER3000D Escalade International Limited Pleasant Road, Penllergaer, Swansea. SA4 9GE Tel: 00 44 1792 222 550 Fax 00 44 1792 895 781 www.escaladesports.co.uk info@escaladesports.co.uk
MedRx Video Otoscope Software
 OPERATIONS MANUAL MedRx Video Otoscope Software Bringing Video Otoscopy To Your Computer Let Our Image Enhance Your Image 2 OS-I-MOSW-3 Effective 10/14/2013 Contents Video Otoscope Software Software Installation
Hearing Assist II, LLC PO Box 2259 Virginia Beach, VA ReCharge! HA-302 Hearing Aid User Manual
 Hearing Assist II, LLC PO Box 2259 Virginia Beach, VA 23450-2259 www.hearingassist.com 800.640.9785 ReCharge! HA-302 Hearing Aid User Manual Contents Preface...1 Features...4 Preparation...5 Operation...6
Version 2.0 June 18. In-The-Ear (ITE) Hearing Aid User Manual
 Hearing Aid User Manual") Version 2.0 June 18 In-The-Ear (ITE) Hearing Aid User Manual Contents Preface... 1 Features... 4 Preparation... 5 Operation... 5 Charging System... 6 Assembling your hearing aids... 8 How to wear your
Version 2.0 June 18 In-The-Ear (ITE) Hearing Aid User Manual Contents Preface... 1 Features... 4 Preparation... 5 Operation... 5 Charging System... 6 Assembling your hearing aids... 8 How to wear your
NS-1104U MAGNETIC-RESISTANCE UPRIGHT BIKE. Model NS-1104U. Retain This Manual for Reference OWNER'S MANUAL
 NOTE: Please read all instructions carefully before using this product Table of Contents Safety Notice Hardware Pack MAGNETIC-RESISTANCE UPRIGHT BIKE NS-1104U Assembly Instruction Parts List Warranty Ordering
Quick Start Guide. Congratulations on your journey to better hearing
 Quick Start Guide Congratulations on your journey to better hearing At Starkey, we believe that to hear better is to live better. Get the most out of your hearing aids Please visit starkey.com/care for
Owner s Manual. Customer Service (Option 3) Monday-Friday 6:00am to 5:00pm Pacific OR Support
 Monday-Friday 6:00am to 5:00pm Pacific OR Support") Owner s Manual Customer Service 888-678-2476 (Option 3) Monday-Friday 6:00am to 5:00pm Pacific OR Email Support parts@stairmaster.com IMPORTANT: READ ALL ASSEMBLY INSTRUCTIONS AND SAFETY PRECAUTIONS BEFORE
Owner s Manual Customer Service 888-678-2476 (Option 3) Monday-Friday 6:00am to 5:00pm Pacific OR Email Support parts@stairmaster.com IMPORTANT: READ ALL ASSEMBLY INSTRUCTIONS AND SAFETY PRECAUTIONS BEFORE
PRO HEAR II, PRO HEAR II+, PRO HEAR IV User s Guide
 PRO HEAR II, PRO HEAR II+, PRO HEAR IV User s Guide Pro Hear Amplification & Protection Devices Increase Hearing amplifying what you want to hear and filtering out noise. Protect Hearing using a Sound
USER'S MANUAL QUESTIONS?
 Model No. WL000 QUESTIONS? USER'S MANUAL As a manufacturer, we are committed to providing complete customer satisfaction. If you have questions or find that there are missing or damaged parts, we will
ESSENTIAL GUIDE. Companion Microphone. How-to videos on hihealthinnovations.com
 ESSENTIAL GUIDE Companion Microphone How-to videos on hihealthinnovations.com 1 TABLE OF CONTENTS Introduction...3 Caring for Companion Microphone...3 Companion Microphone at a Glance...4-5 Charging Companion
User Manual RECHARGEABLE KIT. Includes: 1 PLUS+ rechargeable pack 2 PLUS+ batteries 1 wall charger 1 USB cable 3 Classic Tobacco flavor tanks
 User Manual RECHARGEABLE KIT Includes: 1 PLUS+ rechargeable pack 2 PLUS+ batteries 1 wall charger 1 USB cable 3 Classic Tobacco flavor tanks For optimum performance, it is recommended that you charge your
Otoscope & Ophthalmoscope Instrument Set. Use, Care, & Maintenance
 Otoscope & Ophthalmoscope Instrument Set Use, Care, & Maintenance Thank you for choosing an ADC Diagnostc Instrument Set. We re proud of the care and quality that goes into the manufacture of each and
Dear HighQ Check System Owner :
 Dear HighQ Check System Owner : Thank you for purchasing the HighQ Check Blood Glucose Monitoring System. This manual provides important information to help you to use the system properly. Before using
Compact Massager Instructions
 Instructions 2 Please read all instructions carefully to familiarise yourself with your new massager before using. Save these instructions for further reference. For any further assistance or information
This Page Left Intentionally Blank
 TRAINING MANUAL This Page Left Intentionally Blank 2 Contents Introduction... 4 AVANT Audiometer Software Overview. 5 AVANT Audiometer Software Options 6 Preparing for Testing.. 9 Pure Tone Audiometry
MARCY Magnetic-Resistance Upright Bike
 NOTE: Please read all instructions carefully before using this product Table of Contents Safety Notice Hardware Pack Assembly Instruction Parts List Warranty MARCY Magnetic-Resistance Upright Bike ME-708
Dumbbell Rack IVK 400. Model IVK 400. Retain This Manual for Reference OWNER'S MANUAL
 NOTE: Please read all instructions carefully before using this product Safety Notice Hardware Identifier Dumbbell Rack IVK 400 Assembly Instruction Parts List Warranty Ordering Parts Model IVK 400 Retain
RSD SYSTEM. Owner s Manual
 RSD SYSTEM Owner s Manual RSD Parts Identification Diagram Index RSD Parts Identification Diagram Page 3 Cord Guide Page 4 Attaching the RSD Page 5 Attaching the Handle Page 6 Screw Cord Guide T-nut Handle
Thank you for purchasing the AB COASTER. Our customer service staff is ready to help and to answer any questions.
 Thank you for purchasing the AB COASTER. Our customer service staff is ready to help and to answer any questions. Our phone number is: 908-879-2713 The Ab Coaster Company, 173 Route 206, P.O. Box 9 Chester,
IMPORTANT SAFETY INSTRUCTIONS
 IMPORTANT SAFETY INSTRUCTIONS When using an electrical appliance, basic precautions should always be followed, including the following: Read all instructions before using this appliance. DANGER To reduce
User s Guide 2004 Horizon Fitness Products Designed & Engineered in the U.S.A. Made in China
 VersaBALL_Pro_User s_guide_v1.0.qxd 8/20/2004 10:26 AM Page 1 HORIZON FITNESS 800 BURTON BOULEVARD DEFOREST, WI 53532 Phone 1-800-244-4192 Fax 1-608-842-1660 www.horizonfitness.com User s Guide Functional
Compressor Nebulizer. Guidebook
 NSTRU Compressor Nebulizer Guidebook MODEL: MQ6002 READ THIS INSTRUCTION MANUAL CAREFULLY BEFORE USE Compressor Nebulizer MODEL NO: MQ6002 INSTRUCTIONS INDEX 1. Introduction ----------------------------------------------------------------
COMPRESSOR NEBULIZER MODEL: JB USER S MANUAL
 COMPRESSOR NEBULIZER MODEL: JB0112-062 USER S MANUAL Read this manual before operating the nebulizer Save these instructions for future reference Caution: Federal law restricts this device to sale by or
2. Before Testing Monitor Checker Test...10 Inserting Lancets into Lancing Device...11 Quality Control Testing...13
 Table of Contents 1. About your HemoSmart Haemoglobin Screening System Contents of Kit...4 HemoSmart Haemoglobin Meter...5 HemoSmart Haemoglobin Test Strip...7 Adjustable Lancing Device and Lancets...8
Biomet SpinalPak Non-Invasive Spine Fusion Stimulator System
 Biomet SpinalPak Non-Invasive Spine Fusion Stimulator System A Patient s Guide 100 Interpace Parkway Parsippany, NJ 07054 800-526-2579 www.biomet.com BNS231003 2009 EBI, LLC. All trademarks are the property
PORTABLE COMPRESSOR NEBULIZER Guidebook & Manual Reorder No. 5606
 PORTABLE COMPRESSOR NEBULIZER Guidebook & Manual Reorder No. 5606 Please read this guidebook carefully before operating this unit. Your Nebulizer is intended for use in the treatment of asthma, COPD and
Dip Station G
 Exclusively distributed by: RFE UK Ltd The Performance Centre Maidstone Road Kingston, Milton Keynes MK 0BD, UK +44 (0)190 793020 sales@goldsgymfitness.com 20. All rights reserved. Manufactured under license
Please read this User s Manual completely before use to ensure full and proper function of your newly purchased SmokeStik. Please keep this manual in
 Please read this User s Manual completely before use to ensure full and proper function of your newly purchased SmokeStik. Please keep this manual in good condition and readily accessible for future reference.
USERʼS MANUAL QUESTIONS? CAUTION. Model No. WEBE Serial No.
 www.weiderfitness.com Model No. WEBE1998.1 Serial No. Write the serial number in the space above for future reference. USERʼS MANUAL Serial Number Decal QUESTIONS? If you have questions, or if parts are
TRAINING MANUAL. MedRx TINNOMETER. Revolutionary Tinnitus Assessment.
 TRAINING MANUAL Revolutionary Tinnitus Assessment MedRx TINNOMETER www.medrx-int.com Contents Introduction. 3 AVANT Audiometer Software Overview.. 4 AVANT Audiometer Software Options.... 4 Preparing for
NovoPen Echo User guide
 NovoPen Echo User guide Read this user guide carefully before you use your NovoPen Echo for insulin delivery the first time Find a quick guide at the back of this manual NovoPen Echo Pen Insulin window
ReSound Vea Custom In-the-canal (ITC) and In-the-ear (ITE)
 and In-the-ear (ITE)") Hearing Instrument Supplement ReSound Vea Custom In-the-canal (ITC) and In-the-ear (ITE) hearing instruments This supplement details the how-to aspects of your newly purchased hearing instruments. Please
Hearing Instrument Supplement ReSound Vea Custom In-the-canal (ITC) and In-the-ear (ITE) hearing instruments This supplement details the how-to aspects of your newly purchased hearing instruments. Please
USER S MANUAL CAUTION ACTIVATE YOUR WARRANTY CUSTOMER CARE. Model No. WEBE Serial No.
 www.weiderfitness.com Model No. WEBE15911.0 Serial No. Write the serial number in the space above for reference. USER S MANUAL Serial Number Decal ACTIVATE YOUR WARRANTY To register your product and activate
Compressor Nebulizer. Guidebook
 NSTRU Compressor Nebulizer Guidebook MODEL: CN02WS (MQ6003) READ ALL INSTRUCTION BEFORE USE Airial TM Compressor Nebulizer INSTRUCTIONS INDEX 1. Introduction ----------------------------------------------------------------
 Exclusively distributed by: RFE UK Ltd The Performance Centre Maidstone Road Kingston, Milton Keynes MK10 0BD, UK +44 (0)1908 793020 sales@goldsgymfitness.com www.goldsgymfitness.com 2010. All rights reserved.
SelectTech 3.1 Bench Assembly / Owner s Manual
 SelectTech 3.1 Bench Assembly / Owner s Manual Congratulations on your commitment to fitness and your purchase of the Bowflex SelectTech 3.1 Bench. Before assembling your Bowflex SelectTech 3.1 Bench please
LIFEBOX TROUBLESHOOTING. Tips and hints
 LIFEBOX TROUBLESHOOTING Tips and hints 2012 Lifebox Foundation. Registered as a charity in England and Wales (1143018). 1 About this guide Your Lifebox pulse oximeter was specially designed by experts
USER S MANUAL CAUTION ACTIVATE YOUR WARRANTY CUSTOMER CARE. Model No. WEBE Serial No.
 www.weiderfitness.com Model No. WEBE9971. Serial No. Write the serial number in the space above for reference. USER S MANUAL Serial Number Decal ACTIVATE YOUR WARRANTY To register your product and activate
Flex-Point HEATED MUSCLE MASSAGER
 Flex-Point HEATED MUSCLE MASSAGER TABLE OF CONTENTS Cautions and Warnings...1 FCC Information...5 Location of Controls...6 Operation...6 Using the Node Covers...7 Care and Maintenance...7 Specifications...7
DELUXE CLUB REVOLUTION CYCLE
 NOTE: Please read all instructions carefully before using this product Table of Contents Safety Notice Hardware Pack DELUXE CLUB REVOLUTION CYCLE NSP-122 Assembly Instruction Parts List Warranty Ordering
TURBINE ROWER NS-6050RE. Model NS-6050RE. Retain This Manual for Reference ASSEMBLY & OWNER'S MANUAL
 NOTE: Please read all instructions carefully before using this product Table of Contents Safety Notice Hardware Pack TURBINE ROWER NS-6050RE Assembly Instruction Parts List Warranty Ordering Parts Model
Fibrlok II 2529 Universal Optical Fiber Splice
 Fibrlok II 2529 Universal Optical Fiber Splice Instructions January 2007 78-8128-0163-3-E Contents: 1.0 General... 3 2.0 Splicing Set-up... 4 3.0 Fiber Preparation... 5 4.0 Splice Assembly... 6 5.0 For
Adjustable Ab Board G
 Exclusively distributed by: RFE UK Ltd The Performance Centre Maidstone Road Kingston, Milton Keynes MK10 0BD, UK + (0)10 73020 sales@goldsgymfitness.com 2010. All rights reserved. Manufactured under license
Magnetic-Resistance Recumbent Bike NS-40502R. Model NS-40502R. Retain This Manual for Reference ASSEMBLY & OWNER'S MANUAL
 NOTE: Please read all instructions carefully before using this product Table of Contents Safety Notice Hardware Pack Magnetic-Resistance Recumbent Bike NS-40502R Assembly Instruction Parts List Warranty
TWISTING STAIR STEPPER WITH BANDS NO. 068 USER MANUAL
 TWISTING STAIR STEPPER WITH BANDS NO. 068 USER MANUAL IMPORTANT: Read all instructions carefully before using this product. Retain owner s manual for future reference. For customer service, please contact:
Custom instruments. Insio primax User Guide. Hearing Systems
 Custom instruments Insio primax User Guide Hearing Systems Content Welcome 4 Your hearing instruments 5 Instrument type 5 Getting to know your hearing instruments 5 Components and names 6 Controls 8 Settings
MARCY Magnetic-Resistance Recumbent Bike
 NOTE: Please read all instructions carefully before using this product Table of Contents Safety Notice Hardware Pack Assembly Instruction Parts List Warranty MARCY Magnetic-Resistance Recumbent Bike ME-709