Periodontology Clinical Manual
|
|
|
- Blake Blair
- 5 years ago
- Views:
Transcription


1 KING SAUD UNIVERSITY College of Dentistry Department of Periodontics and Community Dentistry Periodontology Clinical Manual Periodontology Clinics for Third and Fourth year Dental Students PCS 313, Credits/Course Division of Periodontology College of Dentistry King Saud University
2 Reviewed and Updated by PCS Department Courses Review and Update Committee - Prof. Nahid Ashri Chairperson - Prof. Nadir Babay Member - Dr. Salwa Al Sadhan Member - Dr. Amel Darwish Member - Dr. Reem Al Kattan Member - Dr. Mansour Al Askar Member 2

3 PRINCIPLES OF PERIODONTAL INSTRUMENTATION Dental Operator and Chair Position Neutral Position for the Clinician Research indicates that over 80 percent of dental hygienists complain of pain in the upper body and back. This musculoskeletal pain often is the direct result of body positioning and movements made by dental healthcare professionals in their daily work. Neutral position is the ideal positioning of the body while performing work activities and is associated with decreased risk of musculoskeletal injury. It is generally believed that the more a joint deviates from the neutral position, the greater the risk of injury. Neutral Seated Position 1. Forearms parallel to the floor. 2. Weight evenly balanced. 3. Thighs parallel to the floor. 4. Hip angle of Seat height positioned low enough so that you are able to rest the heels of your feet on the floor. 6. When working from clock positions 9-12:00 (or 12-3:00), spread feet apart so that your legs and the chair base form a tripod, somewhat like the legs of a threelegged stool. This tripod formation creates a very stable position from which to work. AVOID positioning your legs under the back of the patient chair. In this position the patient chair will be too high and you will need to raise your upper arms to reach the patient's mouth Neutral Neck Position Head tilt of 0 to 15 The line from your eyes to the treatment area should be as near to vertical as possible AVOID: Head tipped too far forward Head tilted to one side 3
4 Neutral Shoulder Position Shoulders in horizontal line Weight evenly balanced when seated AVOID: Shoulders lifted up toward ears Shoulders hunched forward Sitting with weight on one hip Neutral Back Position Leaning forward slightly from the waist or hips Trunk flexion of 0 to 20 AVOID: Over flexion of the spine (curved back) Neutral Upper Arm Position Upper arms hang in a vertical line parallel to long axis of torso Elbows at waist level held slightly away from body AVOID: Greater than 20 of abduction of elbows away from the body Elbows held above waist level Neutral Forearm Position Held parallel to the floor Raised or lowered, if necessary, by pivoting at the elbow joint AVOID: Angle between forearm and upper arm of less than 60 Neutral Hand Position Little finger-side of palm is slightly lower than thumbside of palm Wrist aligned with forearm AVOID: Thumb-side of palm rotated down so that palm is parallel to floor Hand and wrist bent up or down 4

5 Patient Position- Supine Patient Position Supine position the position of the patient during dental treatment, with the patient lying on his or her back in a horizontal position and the chair back nearly parallel to the floor. The Supine Patient Position Recommended position Body - The patient's heels should be slightly higher than the tip of his or her nose. This position maintains good blood flow to the head. An apprehensive patient is more likely to faint if positioned with the head higher than the heels. The chair back should be nearly parallel to the floor for maxillary treatment areas. The chair back may be raised slightly for mandibular treatment areas. Head - The top of the patient's head should be even with the upper edge of the headrest. If necessary, ask the patient to slide up in the chair to assume this position. Headrest - If the headrest is adjustable, raise or lower it so that the patient's neck and head are aligned with the torso. Patient head positions The patient's head position is an important factor in determining whether the clinician can see and access the teeth in a treatment area. Unfortunately, many clinicians ignore this important aspect of patient positioning. A clinician may contort his or her body into an uncomfortable position instead of asking the patient to change head positions. Working in this manner not only causes stress on the clinician's musculoskeletal system, but also makes it difficult to see the treatment area. Remember that the patient is only in the chair for a limited period of time while the clinician spends hours at chair-side day after day. The patient should be asked to adjust his head position to provide the clinician with the best view of the treatment area. 5
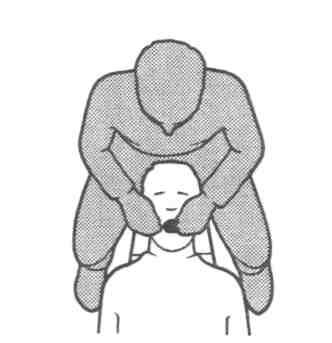
6 Basic Patient Head Positioning Recommended Position Position on headrest For you to be able to see and reach the patient's mouth comfortably the top of the patient's head must be even with the end of the headrest. Mandibular areas Ask your patient to open the mouth and tilt the head downward. The term for this patient head position is the chin-down position. Maxillary areas Ask your patient to open the mouth and position the head in a neutral position. The term for this patient head position is the chin-up position. Clinician Stool And Patient Chair The Adjustable Clinician Chair Ergonomics is the science of adjusting the design of tools, equipment, tasks, and environments for safe, comfortable and effective human use. Manufacturers of dental equipment are constantly working to design seating for clinicians that is more ergonomic in design. Blood circulation to your legs, thighs, and feet is maintained by adjusting the stool to a proper height. Minimize stress on your spine by moving the chair back closer or farther away from the seat so that your upper arms and torso are aligned with the long axis of your body. Each individual who uses the chair should readjust it to fit his or her own body. A chair that is adjusted correctly for another person may be uncomfortable for you. Just as each driver of the family car must change the position of the driver's seat and mirrors; you should adjust the stool height and seat back to conform to your own body proportions and height. The chair should have the following design characteristics: 1. Legs five legs for stability; casters for easy movement 2. Height Should allow clinician to sit with thighs parallel to the floor. A seat height range of 14 to 20 inches will accommodate both tall and short clinicians. Should be easily adjustable from a seated position. 3. Seat Fabric that breathes (ex: cloth rather than vinyl). Front edge of seat should have a waterfall shape (rounded front edge). Should not be too heavily padded; thick padding requires constant minor readjustments in order to maintain balance. When seated with the back against the backrest, the seat length should not impinge on the back of the clinician's knees. A seat length of 15 to 16 inches will fit most clinicians. 4. Backrest Should be adjustable in both vertical and horizontal directions so that it can be positioned to touch the lumbar region of the back when comfortably seated. Angle between the seat and the chair back should be between 85- and 100-degrees. 6

7 Patient Position Relative To The Clinician Once comfortably seated, several other factors influence the clinician's ability to maintain correct neutral positioning. While working, the clinician must be able to gain access to the patient's mouth and the dental unit without bending, stretching, or holding his or her elbows above waist level. To maintain neutral position, the patient and the dental unit must be positioned correctly in relation to the clinician. Establishing neutral position 1. First, adjust the height of the clinician chair to establish a hip angle of Next, lower the patient chair until the tip of the patient's nose is below waist level. Your elbow angle should be at 90 when your fingers are touching the teeth in the treatment area. An easy technique for establishing neutral position in relation to the patient The most common ergonomic hazard during instrumentation is positioning the patient too high in relation to the clinician. Determining the proper placement of the patient Sit alongside of the patient with your arms against your sides and crossed at your waist. The patient's open mouth should be below the point of your elbow. With the patient in this position, the clinician will be able to reach the mouth without placing stress on the muscles of her shoulders or arms. 7
8 Description Summary Sheet: Relationship to Patient and Dental Unit Clinician chair Height of patient chair Clinician's body position Bracket table Dental light Your thighs should be parallel to the floor and you should be able to rest your heels on the floor. When working from clock positions 9-12:00 (or 12-3:00), your legs and the stool base should form a tripod, somewhat like the legs of a three-legged stool. This tripod formation creates a very stable position from which to work. TEST FOR PROPER NEUTRAL POSITION: Fold your arms across your waist. The tip of the patient's noise should be lower than your elbows. You should not have to raise your elbows above waist level when working in the patient's mouth. Your lower arms should be in a horizontal position or raised slightly so that the angle formed between your lower and upper arms is slightly less than 90 degrees. In this position, your muscles are well positioned to control fine wrist and finger movements. Your shoulders should be level and should not be hunched up toward your ears. Position it slightly above the patient's body. The lower the tray level, the easier it will be for you to see the periodontal instruments resting on it. Position the light as far away from the patient's face as possible while still keeping it within easy reach 8


9 Dental Light Position Mandibular Treatment Areas For the mandibular treatment areas, position the dental light directly above the patient's head, so that the light beam shines directly down into the patient's mouth. Remember to keep the light at arm's length. Maxillary Treatment Areas Position the dental light above the patient's chest area for maxillary treatment areas. Tilt the dental light so the light beam shines into the patient's mouth at an angle. Remember to keep the light at arm's length. 9

 Sit facing the patient with your hips in line with the patient's elbows. To reach the patient's mouth, hold your arms slightly away from your sides.")
10 Dental Clinicians Chair Positions (Clock Positions) Instrumentation of the various treatment areas may be accomplished from one of four basic clinician positions. The four basic clinician positions are usually identified in relation to a 12-hour clock face: 1. the 8 o'clock position, to the front of the patient's head, 2. the 9 o'clock position, to the side of the patient's head, 3. the 10 to 11 o'clock position, to the back of the patient's head, or 4. the 12 o'clock position, directly behind the patient's head. The 8 o'clock Position (Front Position) Sit facing the patient with your hips in line with the patient's elbows. To reach the patient's mouth, hold your arms slightly away from your sides. Hold your lower right arm over the patient's chest. The side of your left hand rests in the area of the patient's right cheekbone and upper lip. NOTE: Do not rest your arm on the patient's head or chest. Your line of vision is straight ahead, into the patient's mouth. 10

 Sit at the top right corner of the headrest; the midline of your torso is even with the temple region of the patient's head.")
 Sit directly behind the patient's head.")
11 The 9 o'clock Position (Side Position) Sit facing the side of the patient's head. The midline of your torso is even with the patient's mouth. To reach the patient's mouth, hold the lower half of your right arm in approximate alignment with the patient's shoulder. Hold your left hand and wrist over the region of patient's right eye. Your line of vision is straight down into the mouth. The 10 to 11 o'clock Position (Back Position) Sit at the top right corner of the headrest; the midline of your torso is even with the temple region of the patient's head. To reach the patient's mouth, hold your right hand directly across the corner of the patient's mouth. Hold your left hand and wrist above the patient's nose and forehead. Your line of vision is straight down into the mouth. The 12 o'clock Position (Directly behind Patient) Sit directly behind the patient's head. To reach the patient's mouth, hold your wrists and hands above the region of the patient's ears and cheeks. Your line of vision is straight down into the patient's mouth. 11


12 Positioning for the Anterior Sextants Anterior Surfaces toward the Clinician 8 to 9 o'clock position 1. Head turned slightly toward the clinician 2. Chin-down position 8 to 9 o'clock position 1. Head turned slightly toward the clinician 2. Chin-up position 12


13 Anterior Surfaces Away From the Clinician 12 o'clock position 1. Head turned slightly toward the clinician 2. Chin-down position 12 o'clock position 1. Head turned slightly toward the clinician 2. Chin-up position 13


14 Posterior aspects toward the Clinician Positioning for the Posterior Sextants 9 o'clock position 1. Head turned slightly away from the clinician 2. Chin-down position 9 o'clock position Head turned slightly the away from clinician Chin-up position 14


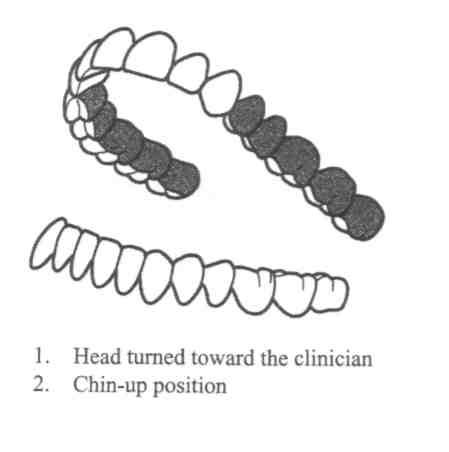
15 Posterior Aspects Away From the Clinician 10 to 11 o clock position 1. Head turned toward the clinician 2. Chin-down position 10 to 11 o clock position 1. Head turned toward the clinician 2. Chin-up position 15
16 Reference Sheet: Positioning for the RIGHT-Handed Clinician Positioning Summary Treatment Area Clock Position Patient Head Position Anterior surfaces, toward Mandibular arch 8-9:00 Anterior surfaces, toward Maxillary arch 8-9:00 Anterior surfaces, away Mandibular arch 12:00 Anterior surfaces, away Maxillary arch 12:00 Slightly toward Chin-down Slightly toward Chin-up Slightly toward Chin-down Slightly toward Chin-up Posterior aspects, toward Mandibular arch (right facial and left lingual) 9:00 Slightly away Chin-down Posterior aspects, toward Maxillary arch (right facial and left lingual) 9:00 Slightly away Chin-up Posterior aspects, away Mandibular arch (right lingual and left facial) 10-11:00 Toward Chindown Posterior aspects, away Maxillary arch (right lingual and left facial) 10-11:00 Toward Chin-up Reference: Nield-Gehrig JS. Fundamentals of periodontal instrumentation 4 th ed, 2000 Lippincott Williams and Wilkins, Philadelphia. 16
17 INTRA-ORAL EXAMINATION The aim of the clinical examination is to identify signs of a possible disease including changes in the color, shape, consistency and height of the gingiva and changes in other oral structures such as the lips, mucosa, tongue, oropharynx, floor of the mouth, hard and soft palate. It is important to examine both the general aspect of these structures and also any possible localized alteration. EXAMINATION FOR DENTAL PLAQUE Examination for plaque is the most useful introduction to the examination of the adjacent periodontal tissues due to the inter-relationship between the plaque and inflammatory changes within the tissues. Dental plaque can be detected clinically by: 1. Visual detection - Plaque can be seen as a white-creamy film on the tooth surface. It is more visible if the tooth has been dried or if the plaque is of sufficient thickness. 2. Use of instrument - The use of a dental instrument (e.g. periodontal probe) is useful and convenient for plaque detection. The probe is run along the tooth surface in the region of the gingival margin. The presence of plaque is recorded if it can be collected on the probe. This method has an advantage of detecting the plaque in the inter-proximal areas (where the plaque is not immediately visible to the examiner) as well as the plaque of insufficient thickness. 3. Use of disclosing agents - These are dyes used to stain dental plaque and make it more visible. As color changes in the tissues may be obscured by the dye, it is advisable to examine the periodontal tissues before using the dye. EXAMINATION OF THE PERIODONTAL TISSUES Examination of the periodontal tissues is important in the diagnosis and treatment planning. I - Examination For Marginal Gingival Inflammation Gingiva should be dried before examination as light reflection from moist gingiva may obscure details. Color, size, contour, consistency, surface texture, position in relation to the cement-enamel junction, cause of bleeding and pain if present should be carefully evaluated and recorded. The gingiva is assessed on the basis of the following parameters: Color PARAMETERS NORMAL ( examples) DISEASED ( examples) Contours Papillary Coral pink with/without melanin pigmentation Papillae fill embrasures, pointed tip, pyramidal Marginal knife edged Rolled Red, bluish red- cyanotic, whitened. Blunted, bulbous, cratered 17
18 Consistency (Tone) Resilient, firm, non-retractable with air Edematous, soft & spongy, air retractable Texture Stippled Smooth & shiny (loss of stippling) Position At cemento-enamel junction More coronal - More apical The common signs of inflammation around the gingival margin are swelling (with change in contour, consistency and texture of the gingiva), redness and bleeding. Swelling and redness of the marginal gingiva can be clear and useful indicators for periodontal inflammation. However, these changes are not always easily detected especially when they are less marked. Furthermore, this method of assessment is based on the superficial changes in the appearance of the marginal gingiva. These changes are dependent on many variables and can only be appreciated subjectively. Thus, it is difficult to achieve standardization between different examiners in the interpretation of these superficial changes. Gingival bleeding on probing is a more consistently reliable method to assess ongoing inflammation in the periodontal tissues. It is based on the presence or absence of bleeding from the marginal gingiva, following gentle probing. Placing a periodontal probe inside the gingival sulcus and in contact with the inflamed gingiva is sufficient to evoke bleeding. BOP indicates some sort of destruction or ulceration of the sulcular epithelium and bleeding from lamina propria. Recording BOP Bleeding Index = Total number of bleeding points x 100 Total number of teeth x 6 In addition to swelling, redness and bleeding of the inflamed marginal gingiva, other parameters such as probing pocket depth, gingival recession, tooth mobility and bone contour/level (determined by x-ray) are assessed to judge the presence and severity of periodontal disease. Of these parameters, probing pocket depth is perhaps the most objective and recordable one. II- Periodontal Probing Measuring of the periodontal pocket s depth should ideally be a normal part of the dental diagnostic visit. Periodontal pockets should be examined for their presence, type and distribution in relation to each tooth in the dentition. This can be done by systematic and careful probing for all surfaces of each tooth with a periodontal probe. During probing, the probe should be used with gentle pressure. A probing force of 25 grams (0.75 Newtons) has been found to be well tolerated and accurate. The probe should be inserted parallel to the long axis of the tooth and it should be "walked" around the entire circumference of each tooth. Probing depth is recorded for six locations per tooth (mesio-buccal, buccal, disto-buccal, mesio-lingual, lingual, and disto-lingual). 18
 from its tip as following: 1, 2, 3, 5 then 7, 8, 9 and 10 mm.")
19 Williams Periodontal Probe Figure 2 Figure 1 Williams periodontal probe is a round, conical-shaped device used to assess the progression and extent of a disease within the periodontal tissues. The probe is marked in millimeters (mm) from its tip as following: 1, 2, 3, 5 then 7, 8, 9 and 10 mm. The spaces between the 3 and 5 mm markings and between the 5 and 7 mm markings are to avoid confusion in the reading of the measurement. The probe may be available with color coding (Figures 1 and 2). 19
20 Periodontal Pocket Pocket depth is measured as the distance between the gingival margin and the probe tip at the base of the pocket. The average healthy pocket depth is registered at a range of 0-3 mm with no bleeding upon probing. Depths greater than 3 mm can be associated with or without "attachment loss" of the tooth to the surrounding alveolar bone. More than 3 mm pocket depth with attachment loss is a characteristic feature of periodontitis (true periodontal pocket). More than 3 mm pocket depth with no loss of periodontal attachment can be a sign of gingival overgrowth (false pocket) (Figure 3). Measuring and Recording the Probing Pocket Depth (PPD) Proper use of the periodontal probe is necessary to maintain accuracy. 1. Use William's periodontal probe. 2. Insert the probe tip down into the gingival sulcus with gentle pressure of 25 gm (no blanching). This results in obscuring a section of the periodontal probe. 3. Keep the probe parallel to the long axis of the tooth and gently "walk" the probe s tip along the bottom of the pocket. 4. The first marking visible above the gingival margin indicates the measurement of the depth of the sulcus/pocket (Figure 4). 5. Record the measurements at six locations (mentioned above). 6. Interproximally, the probe should be inserted at o below the contact area (Figures 5 & 6). 7. In the periodontal chart, write dash (-) for 1 and 2 mm, and (10 + ) for more than 10 mm. If the gingival margin is located between two marks, select the greater one (e.g. if it is between 2 and 3 mm, record it 3 mm). Figure 3: Although probe indicates probing depth of 5mm measured from the gingival margin, note the probe tip ends at the CEJ. This is a FALSE POCKET 20
 resulting in exposure of the root surface to the oral environment.")
21 Figure 4: Probe indicates a probing depth of 5 mm measured from the gingival margin Figure 5: Incorrect angle correct angle Figure 6: Incorrect angle (Over-angulation) III - Gingival Recession Gingival recession refers to the location of the gingival margin apical to the cemento-enamel junction (CEJ) resulting in exposure of the root surface to the oral environment. It is a common problem in adults over the age of 40, but it may also occur starting from the teens. Gingival recession is measured from the visible CEJ to the gingival margin using the periodontal probe as a measuring instrument. Measuring And Recording Gingival Recession 1. Determine the location of CEJ. 2. Measure the distance from GM to CEJ with a periodontal probe at six locations per tooth (Figure 7). 3. In the corresponding column in the periodontal chart, record gingival recession (CEJ-GM) as follows: a. 0 mm if GM coincides with the CEJ. b. + value if GM is apical to CEJ (e.g. 4 mm if GM is 4 mm apical to CEJ). c. - value if GM is coronal to CEJ (e.g. -2 mm if GM is 2 mm coronal to CEJ (gingival overgrowth/false pocket). 21
22 Although the probing depth has great significance, it is not enough to make periodontal diagnosis. Why? What is the attachment level? How can you measure it and use it to help your patients? IV - Periodontal Connective Tissue Attachment There are two types of inflammatory changes existing within the periodontal tissues in response to plaque: 1) One type causes no destruction of the periodontal connective tissue attachment and its evidence exists at the gingival margins; 2) The other type is destructive as it destroys the periodontal connective tissue attachment and leaves an evidence of previous history of attachment loss (destruction). The evidence of loss of attachment can be in the form recession, pockets, or recession + pockets. The periodontal probe is suitable for the assessment of loss of attachment. In the clinic, the Williams probe is used. CEJ is the landmark of the attachment loss as it marks the most coronal termination of the periodontal attachment. Clinical Attachment Level Figure 7: Probe indicates 5 mm of recession measured from GM to CEJ. Clinical attachment level (CAL) is the amount of space between the attached periodontal tissues (base of the pocket) and a fixed point, usually CEJ. CAL represents the best measure of disease severity in terms of loss of support for the teeth. Furthermore, it is used to assess the stability of attachment as part of a periodontal maintenance program as it allows the dentist to accurately monitor the progression of disease over time. For more detailed records, CAL may be recorded at 6 locations per tooth (as with probing depth and gingival recession). CAL is calculated as follows: CAL = (PD) + (CEJ GM). When the gingival margin coincides with the CEJ (no recession), the loss of attachment and the pocket depth are equal. If the gingival margin is apical to CEJ (+ value), the loss of attachment will be greater than the pocket depth. If the gingival margin is coronal to CEJ (- value), the loss of attachment will be less than the pocket depth (Figure 8). 22

23 CEJ-GM = - 3 PPD = 6 CAL = 3 CEJ-GM = 0 PPD = 6 CAL = 6 CEJ-GM = 3 PPD = 6 CAL = 9 V- Examination for Calculus Calculus is divided into two types: 1. Supragingival calculus: It is derived from the plaque which calcifies above the gingival margin. Its mineral salts are obtained from saliva. It is creamy white in color and comparatively easy to remove. Supragingival calculus is easy to recognize, because it is visually apparent. 2. Subgingival calculus: It commences its calcification subgingivally, irrespective of its final location. At examination, it may be supragingival due to gingival recession occurring after its initial calcification. It derives its mineral salts from the inflammatory fluid of inflamed marginal gingiva. It is dark in color due to the inclusion of blood pigments. Such inflamed gingival margins with their tendency for hemorrhage will contribute to this feature of color as well as providing the mineral salts. Subgingival calculus is comparatively more difficult to remove than supragingival calculus. Often, it is not visible and, therefore, must be detected by feeling it with a suitable instrument. 23
24 Importance of Calculus Calculus makes the task of mechanical plaque control difficult for patients. Therefore, its removal is an essential component of treatment. VI- Furcation Involvement For multi-rooted teeth (e.g. molars and possibly premolars), loss of periodontal attachment may involve the root furcation. In those circumstances, furcation involvement must be recorded. Furcation involvement can be readily detected in good periapical or bitewing radiographs. Clinically, it can be confirmed by using the Nabers probe. Furcation involvement is recorded on the basis of class I, II, III and IV according to the Glickman s classification of furcation involvement as follows: Class I Involvement: Pocket formation into the fluting of the furca, but the interradicular bone is intact. No gross or radiographic evidence of bone loss. This is recorded on the periodontal chart as Class II Involvement: Inter-radicular bone is destroyed on one or more aspects of the furcation, but a portion of alveolar bone and periodontal ligament remains intact. This is recorded on the periodontal chart as Grade III Involvement: The furcation is occluded by gingiva but the interradicular bone has been destroyed so that a probe can be passed through from one surface to the other. This is recorded on the periodontal chart as Grade IV Involvement: The periodontium is destroyed to such a degree that the furcation is open, exposed and clinically visible. This is recorded on the periodontal chart as 24

25 VII - Tooth Mobility Tooth mobility, if present, is recorded by the Roman numerals I, II or III. Mobility is detected by using the ends of the handles of two instruments (e.g. mirror and periodontal probe). I II III Detectable increased tooth mobility < 1 mm in bucco-lingual direction. Detectable increased tooth mobility > 1 mm, but < 2 mm in bucco-lingual direction. Detectable increased tooth mobility > 2 mm in bucco-lingual direction and/or clinically evident apical movement upon application of force with an instrument handle on the tooth crown directed in an apical direction. VIII- Radiographic Evaluation Examine the C.M.S radiographs in an orderly sequence so that you do not miss any significant finding. Start with tooth #18 and work your way clockwise to tooth # 48. Assess, identify and record the following: Plaque Retention Factors Assess for visible calculus deposits, caries at or near the gingival margin and defective restorations (overhanging margins, poor contour and open margins).record the presence of these factors by tooth number and their location (e.g. # 14 (m), 15 (m,d)) Alveolar Bone Assessment Observe the general pattern of bone resorption and notice whether it is horizontal, vertical or combined. Always report your findings by sextant. Horizontal Bone Loss (%) It is necessary to consider the percentage of bone loss that exists radiographically when making the diagnosis. Measure the distance between the CEJ and the alveolar bone crest, estimate the percentage of the bone loss (%) and record sextant by sextant as follows (any significant exceptions may be noted separately): 1. 0% bone loss Bone level 1.5 mm apical to the CEJ with no signs of loss of crestal density. It suggests normal bone level % bone loss Bone level between 2-4 mm apical to the CEJ. It suggests slight bone loss %-50% bone loss Bone level > 4 mm, but < 6 mm apical to the CEJ. It suggests moderate bone loss % bone loss Bone level >6 mm apical to the CEJ. It suggests severe bone loss. Note: Bone loss may exhibit different severity in different areas of the mouth. This must be taken into 25
 than normal on the radiographs.")
26 consideration while making individual tooth diagnosis. Loss of Crestal Bone Density Examine the crestal lamina dura for its continuity. When there is active destructive inflammation, the crestal bone will undergo resorption and will appear less dense (fuzzy) than normal on the radiographs. This appears more obvious on the bitewing films because of the x-ray orientation. Loss of crestal bone density may indicate presence of periodontitis which cannot be ascertained without clinical examination. The isolated areas with loss of continuity are recorded with the tooth number. If more than 3 interproximal areas are involved in a sextant, record it with the sextant number of the involved teeth. Vertical Defects Note the location, type, and extent of the defects. When you correlate between clinical and radiographic findings, it will be easier and more accurate to interpret vertical defects. Record the presence of vertical defects by tooth number and defect site, for example # 44 (m), # 46 (m,d) Furcation Radiolucencies Note the location and extent of any apparent furcation radiolucency and record the tooth number (e.g. # 46, 47). You should correlate this information with the clinical data. PDL Width Record any tooth with obvious widening of the PDL space and record the tooth number and involved site (e.g. # 33 (m), 32 (m,d)) Root length/ form/proximity Record the tooth number for any root abnormality seen radiographically such as short roots dilacerations, any approximated roots and crown to root ratio (C : R). Clinical Crown To Root Ratio 26
27 Other Significant Findings Any other factors which may be of significance such as periapical pathology, cyst, impacted teeth, etc. may be recorded. STEPS FOR REEVALUATION 1. Examine the gingival tissues 2. Inspect for visible hard and soft deposits 3. Call your instructor 4. Record Bleeding Index & Plaque Index IF NO visible deposits Bleeding Index > 18% Bleeding Index < 18% Plaque Index > 20% Plaque Index < 20% PATIENT IS READY FOR REEVALUATION REEVALUATION PATIENT IS NOT READY FOR Re-probe the periodontal pockets > 3 mm Write the definitive treatment plan Call your instructor Identify the causes Record findings on patient s chart OHI, scaling, polishing Re-schedule the patient after 1-2 weeks 27
28 Periodontal Examination & Charting Form Student Name: Computer No.: Patient s Name: File No. Age: yrs. Gender: Marital Status: Nationality Occupation: Date Chief Complaint: Dental History Medical History I. Extra-Oral Examination: Smoking: No - Yes (Type?, frequency?, how long?) II. Intra-Oral Examination: I.1. Buccal Mucosa I.2. Gingiva I.2.a. Color I.2.b. Tone (consistency) Oral Hygiene Habits Type of Tooth brush: Soft - Medium - Hard Brushing Technique I.2.c. Contour I.2.d. Attached Gingiva I.3. Mucogingival Defects Interdental Aids Yes (type): No Miswak Yes No Other 28
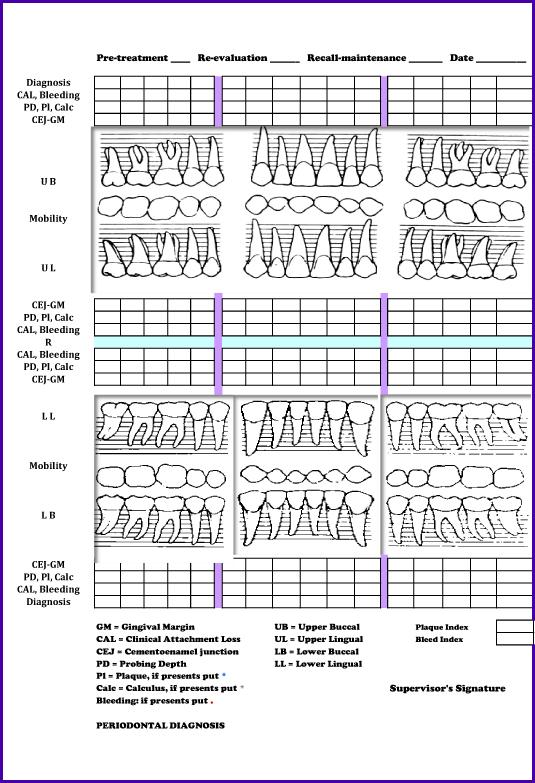
29 29
30 Radiographic Evaluation Plaque Retentive Factors: Over-hangs / defective restorations: Calculus: Caries: Alveolar Bone Assessment: Horizontal Bone Loss (%) Crestal Bone Density: Vertical Defects: Furcation Radiolucencies: PDL Width: Root length/ form/proximity: Other findings / pathology: Supervisor s Signature Date 30
31 Diagnosis (Oral Diagnosis) Overall: Individual: Prognosis Treatment Plan Phase I Phase II Phase III Phase IV Supervisor s Signature Date 31
32 Revaluation Definitive Treatment Plan Supervisor s Signature Date 32
33 Recall and Maintenance Supervisor s Signature Date 33
34 Periodontal Examination & Charting Form (Sample) Student Name: X student Patient s Name: X Patient Computer No. : xxxxxxxx File No. xxxxxxx Age: _X yrs. Gender: x Occupation: xxxxxx Nationality XXXXXX Marital Status: XXXXX Date x.x.09 Chief Complaint: Used patient own word exactly Dental History Date & Type of any previous dental work (fillings, prosthesis, extractions, periodontal treatment etc) Medical History: - Heart diseases / need for AB coverage - Blood diseases - Diabetes mellitus (Duration, Type, Hbc1?) - Medications (Aspirin / blood thinner etc) dose / for what? I. Extra-Oral Examination: L.N: Movable? Palpable? Tender? TMJ: Pain? Clicking? Any deviation during closure? Thyroid gland: Any swelling Any other observable extra-oral abnormalities Smoking: (now or before?) If smoker before when stopped? and for how long used to smoke No Yes (type?, frequency?, how long?) II. Intra-Oral Examination: I.1. Buccal Mucosa: Report if there is any linea alba, lesions, change in color etc? I.2. Gingiva: I.2.a. Color: I.2.b.Tone (consistency) I.2.c.Contour I.2.d.Attached Gingiva I.3.Mucogingival Defects: (obvious recession, high frenum attachment etc? ) Others: Report any lesions/ abnormalities in floor of the mouth, lips, checks, tongue..etc) Oral Hygiene Habits Type of Tooth brush: Soft Medium - Hard Brushing Technique Horizontal- Vertical Circular - Combination Interdental Aids Yes (type) No Miswak Other (tooth pick, mouthwash, proxabrush, superfloss..etc) 34
35 Radiographic Evaluation laque Retentive Factors: Calculus deposits Caries at or near the gingival margin Defective restorations (overhanging margins, poor contour and open margins) Alveolar Bone Assessment: 0% Bone Loss bone level 1.5 mm apical to the CEJ with no signs of loss of crestal density loss it suggest normal bone level. 20% Bone Loss bone level will be between 2-4 mm apical to the CEJ, it suggests slight bone loss. 20%-50% Bone Loss bone level more than 4 mm but <6 mm apical to the CEJ, it suggests Moderate bone loss. 50% Bone Loss bone level >6 mm apical to the CEJ it suggest severe bone loss. Horizontal Bone Loss (%) 20% 30% 25% 30 % 50% 25% Crestal Bone Density: Examine the continuity of the crestal lamina dura (Less dense (Fuzzy) / Normal) Vertical Defects: Correlate the clinical with radio-graphical findings to accurately evaluate the vertical defect (M #11 ) Furcation Radiolucencies: Record the tooth number of teeth with furcation involvement. #36 and #47 PDL Width: Record any areas with obvious widening of the PDL space. Wide around #11 and #24 Root length/ form/proximity: Record any root abnormalities seen radiographically, e.g. Dilaceration, periapical lesions, short roots (poor crown to root ratio). Root proximity between 14 and 15 Other findings / pathology: (periapical pathology, cysts, impacted teeth..etc) RL around #11 and Pericapical to #24 Supervisor s Signature Date 35
36 Diagnosis (Overall Dental Diagnosis) Multiple Caries lesion Missing teeth #16, 26, 27,36,46,47 Priapical Pathosis 23, 24 Periodontal Diagnosis Generalized moderate chronic periodontitis w/localized sever chronic periodontitis Prognosis Overall: Fair Individual: Poor for #11 Phase I: Treatment Plan - Case presentation and pt motivation - OHI: Soft (Aquafresh) tooth brush Waxed Floss (Johnson and Johnson) Proxabrush (Jordan) Brushing technique: Modified Stillman technique - Gross U/L scaling and Selective root planning - Polishing and fluoride application - Restoration of carious teeth - Endodontic treatment - Re-evaluation of response to phase I Phase II: Replacement of missing teeth (RPD) and/or implant Phase III: Maintenance: Periodic recheck (4-6 months) Plaque and calculus Gingival condition Occlusion and mobility Other pathological changes Supervisor s Signature Date 36
37 Revaluation In this step you need to know if the patient is following a good oral hygiene regimen and if you did a good job with your scaling and root planning in addition to the hygiene instruction, so you should Reevaluate results of initial therapy (4-6 weeks after initial therapy) and Re-evaluate oral hygiene status of the patient using the Bleeding and plaque score. Compare with initial findings: Therefore, A PATIENT TO BE READY FOR RE-EVALUATION must have no obvious calculus present clinically and have all local etiologic factors eliminated, "hopeless" teeth extracted, carious teeth filled, over hanged restorations or over contoured crowns corrected and the patients achieved a satisfactory level of oral hygiene (assess plaque control (<20%), bleeding score (<18%), assess tissues response to initial treatment, plan further treatment that should take the form of a definitive treatment plan and may include maintenance care or periodontal surgery. Definitive Treatment Plan A. Pocket Elimination Surgery 1. Gingival Curettage 2. Gingivectomy/Gingivoplasty 3. Various types of Flap Operations [Mucogingival Flap (unrepositioned) Mucogingival Flap (apically repositioned)] 4. Osseous Surgery (Bone Grafts Ostectomy/Osteoplasty) B. Non-Pocket Elimination Surgery Mucogingival Surgery Free Gingival Graft Pedicle Grafts Bone Denudation procedures 37 Supervisor s Signature Date
38 Recall and Maintenance Recall/Maintenance (Supportive Therapy) Recall visits should be depending on the Periodontal Status and clinicians judgment. 1. Patients with high motivation and no systemic conditions (every 6 months). 2. Patients with moderate or severe periodontal disease (3-4 months or even earlier in high risk patients). On each recall visit. The following should be emphasized: 1. Evaluation of the current oral health status. 2. Necessary maintenance treatment. 3. See if recurrence of disease or any other dental treatment needed. 4. Provide necessary periodontal scaling and root planning. 5. Patient motivation 38 Supervisor s Signature Date
Advanced Probing Techniques
 Module 21 Advanced Probing Techniques MODULE OVERVIEW The clinical periodontal assessment is one of the most important functions performed by dental hygienists. This module begins with a review of the
14/09/15. Assessment of Periodontal Disease. Outline. Why is Periodontal assessment needed? The Basics of Periodontal assessment
 Assessment of Periodontal Disease Dr Wendy Turner Outline Why is Periodontal assessment needed? The Basics of Periodontal assessment Probing: Basic Periodontal Examination for adults and children. Detailed
Periodontal Disease. Radiology of Periodontal Disease. Periodontal Disease. The Role of Radiology in Assessment of Periodontal Disease
 Radiology of Periodontal Disease Steven R. Singer, DDS srs2@columbia.edu 212.305.5674 Periodontal Disease! Includes several disorders of the periodontium! Gingivitis! Marginal Periodontitis! Localized
Sample Competency Forms
 Sample Competency Forms The competency and assessment forms and grading criteria included in this packet are suggestions only. Utilize and/or modify as it fits with your institution s practices. Procedures
TASKS. 2. Apply a disclosing agent to make the plaque visible.
 TASKS EQUIPMENT AND MATERIALS Personal protective equipment Assortment of nylon, soft-bristled toothbrushes Assortment of dental Floss, waxed and nonwaxed Disclosing solution Face mirror 3. Demonstrate
Periodontics. Sheet Slide Hand Out 9/2/2015. Murad. Hadeel Al-Jarhi. Lecture No. Date: Doctor: Done by: University of Jordan. Faculty of Dentistry
 University of Jordan Faculty of Dentistry Fourth year 2nd semester 2014-2015 Periodontics Sheet Slide Hand Out Lecture No. Date: Doctor: Done by: 2 9/2/2015 Murad Hadeel Al-Jarhi Examination and diagnosis
Fundamental & Preventive Curvatures of Teeth and Tooth Development. Lecture Three Chapter 15 Continued; Chapter 6 (parts) Dr. Margaret L.
 Dr. Margaret L.") Fundamental & Preventive Curvatures of Teeth and Tooth Development Lecture Three Chapter 15 Continued; Chapter 6 (parts) Dr. Margaret L. Dennis Proximal contact areas Contact areas are on the mesial and
Fundamental & Preventive Curvatures of Teeth and Tooth Development Lecture Three Chapter 15 Continued; Chapter 6 (parts) Dr. Margaret L. Dennis Proximal contact areas Contact areas are on the mesial and
Patient had no significant findings in medical history. Her vital signs were 130/99, pulse 93.
 Julia Collins Den 1200 Journal #4 1. Demographics Patient is J.S. age 29, Heavy/II 2. Assessment Patient had no significant findings in medical history. Her vital signs were 130/99, pulse 93. Patient does
It s a fact... Your computer workstation should include a chair that s right for you.
 MARCH 2002 DoD Ergonomics Working Group It s a fact... Your computer workstation should include a chair that s right for you. Most chairs are designed for people weighing no more than 275 pounds. If you
PH-04A: Clinical Photography Production Checklist With A Small Camera
 PH-04A: Clinical Photography Production Checklist With A Small Camera Operator Name Total 0-49, Passing 39 Your Score Patient Name Date of Series Instructions: Evaluate your Series of photographs first.
Periodontal Maintenance
 Periodontal Maintenance Friday, February 20, 2015 1:06 PM Periodontal disease control always begins with patient education - Plaque control, diet, smoking cessation, impact that systemic health has on
ESI Wellness Program The BioSynchronistics Design. Industrial Stretching Guide
 ESI Wellness Program The BioSynchronistics Design Industrial Stretching Guide ESI Wellness The BioSynchronistics Design Industrial Stretching Basics Stretch 2-4 times/day Hold each Stretch for 5 seconds
Office Ergonomics and Workstation Analysis
 Office Ergonomics and Workstation Analysis Ergonomics is the study of the relationship between people and their environment. In the workplace, ergonomics is the science of designing or redesigning the
OFFICE ERGONOMICS SELF-ASSESSMENT
 This self-assessment is designed to assist Coast Community College District employees achieve an ergonomically correct work posture. Through a progressive series of questions and solutions, this program
OPNAVINST G 30 Dec 05
 Appendix 23-B Computer Workstation Checklist The computer workstation checklist is one method available for performing computer workstation assessments. The checklist is designed to be printed as two double-sided
Principles of Periodontal Instrumentation. Periodontology I - 4th year 23/2/2012 Dr. Murad Shaqman
 Principles of Periodontal Instrumentation Periodontology I - 4th year 23/2/2012 Dr. Murad Shaqman Outline Classification of periodontal instruments General principles of instrumentation Principles of scaling
Dental Hygiene 10/16/2012 8/20/2012 8/29/2013 COURSE OUTLINE DHT 105 Dental Hygiene Clinic I - Preclinic 5 credit hours
 COURSE OUTLINE Dental Hygiene Clinic I - Preclinic 5 credit hours Course Description This course will introduce theories, rationales, and foundational knowledge for performing basic dental hygiene skills
Prosthetic Options in Implant Dentistry. Hakimeh Siadat, DDS, MSc Associate Professor
 Prosthetic Options in Dentistry Hakimeh Siadat, DDS, MSc Associate Professor Dental Research Center, Department of Prosthodontics & Dental s Faculty of Dentistry, Tehran University of Medical Sciences
Low Back Program Exercises
 Low Back Program Exercises Exercise 1: Knee to Chest Starting Position: Lie on your back on a table or firm surface. Action: Clasp your hands behind the thigh and pull it towards your chest. Keep the opposite
Plaque and Occlusion in Periodontal Disease Wednesday, February 25, :54 AM
 Plaque and Occlusion in Periodontal Disease Wednesday, February 25, 2015 9:54 AM 1. The definition of Trauma From Occlusion: Primary TFO, Secondary TFO, and Combined TFO 2. Clinical and Radiographic signs
6610 NE 181st Street, Suite #1, Kenmore, WA
 660 NE 8st Street, Suite #, Kenmore, WA 9808 www.northshoredentalacademy.com.08.900 READ CHAPTER The Professional Dental Assistant (p.-9) No Key Terms Recall Questions:,,,, and 6 CLASS SYLLABUS DAY READ
An overview of posture
 An overview of posture What is posture? Posture is the description of an overall body position. This can be intentional or unintentional how we are hold our bodies, but it is the way each individual will
Handling Skills Used in the Management of Adult Hemiplegia: A Lab Manual
 Handling Skills Used in the Management of Adult Hemiplegia: A Lab Manual 2nd Edition Isabelle M. Bohman, M.S., P.T., NDT Coordinator Instructor TM Published by Clinician s View Albuquerque, NM 505-880-0058
Ergonomics Checklist - Computer and General Workstations 1
 Ergonomics Checklist - Computer and General Workstations 1 Information to collect before conducting the Ergonomics Assessment 1. Evaluation Completed by 2. Date 3. Employee Name(s) observed 4. Department
Principles of Periodontal flap surgery. Dr.maryam khosravi
 Principles of Periodontal flap surgery Dr.maryam khosravi Goals of periodontal SURGICAL phase 1 - Controlling or eliminating periodontal disease. 2 Correcting anatomic conditions that may a. favor periodontal
1B Getting Ready for Instrumentation: Mathematical Principles and Anatomic Descriptors
 MODULE 1B Getting Ready for Instrumentation: Mathematical Principles and Anatomic Descriptors Module Overview This module contains a review of the mathematical principles and anatomic descriptors used
According to the Occupational Safety and Health Administration OSHA many office workers report work-related musculoskeletal disorders or MSDs every
 According to the Occupational Safety and Health Administration OSHA many office workers report work-related musculoskeletal disorders or MSDs every year. For some, the problem becomes so severe that they
European Veterinary Dental College
 European Veterinary Dental College EVDC Training Support Document Preparation of Radiograph Sets (Cat and Dog) Document version : evdc-tsd-radiograph_positioning_(dog_and_cat)-20120121.docx page 1 of 13
Mobility sequencing!
 Mobility sequencing When practicing joint mobility drills we have the opportunity to improve our movement. The muscles associated with the joint being mobilised as well as the joint itself will improve
Commonwealth Health Corporation NEXT
 Commonwealth Health Corporation This computer-based learning (CBL) module details important aspects of musculoskeletal disorders, body mechanics and ergonomics in the workplace. It examines: what causes
All About Stretching Going for the 3 Increases: Increase in Health, Increase in Happiness & Increase in Energy
 All About Stretching Going for the 3 Increases: Increase in Health, Increase in Happiness & Increase in Energy Strategies for Success in Health Management By: James J. Messina, Ph.D. Benefits of regular
Attachment G. Orthodontic Criteria Index Form Comprehensive D8080. ABBREVIATIONS CRITERIA for Permanent Dentition YES NO
 First Review IL HFS Dental Program Models Second Review Ortho cad Attachment G Orthodontic Criteria Index Form Comprehensive D8080 Ceph Film X-Rays Photos Narrative Patient Name: DOB: ABBREVIATIONS CRITERIA
Rehabilitating a Compromised Site for Restoring Form, Function and Esthetics- A Case Report
 Research & Reviews: Journal of Dental Sciences Rehabilitating a Compromised Site for Restoring Form, Function and Esthetics- A Case Report Priyanka Prakash* Division of Periodontology, Department of Dental
Stretching. Knees: Rotate your knees in a circle, keeping them together and bending down slightly.
 Stretching Stretching the Major Muscle Groups Static Stretches Hamstrings: Hang down and try to reach your toes; don t push it. Keep legs and back straight. Just go down to a comfortable level for your
Thoracic Home Exercise Program
 Home Exercise Program 1. Bridging Laying on your back, knees bent with feet flat on the floor, arms along side resting on the floor, tighten your abdominals to stabilize your low back. Raise your buttocks
Appendix 4. Case Summary Template. Social history. Patient (Name and Date of birth): Presenting complaints. History Medical history
: Presenting complaints. History Medical history") Appendix 4 Case Summary Template Patient (Name and Date of birth): Presenting complaints Chief complaint Subsidiary complaints History of complaints Patient s expectations History Medical history Medical
Appendix 4 Case Summary Template Patient (Name and Date of birth): Presenting complaints Chief complaint Subsidiary complaints History of complaints Patient s expectations History Medical history Medical
Ergonomics Seminar. Presented by Stephanie Materazzi & Christine Miller
 Ergonomics Seminar Presented by Stephanie Materazzi & Christine Miller The muscles in the back are unlike many other muscles in your body. They are almost always in use. They hold your torso in an upright
Adopting a healthy sitting working posture during patient treatment.
 Adopting a healthy sitting working posture during patient treatment. Prof Oene Hokwerda, dentist and dental ergonomist oene.hokwerda@home.nl Rolf de Ruijter, dentist r.a.g.de.ruijter@med.umcg.nl Sandra
Low Back Pain Home Exercises
 Low Back Pain Home Exercises General Instructions The low back exercise program is a series of stretching exercises and strengthening exercises prescribed by your physician for your medical condition.
Physical Capability Exam Testing Protocol
 Test Duration: ~ min Physical Capability Exam Testing Protocol Pinch Gauge Grip Dynamometer Inclinometer Stop Watch Lift Box Table Weight Plates (5 lbs., lbs., lbs., 50 lbs., 0 lbs.) Physical Capability
Ergonomics. Julie W. Burnett, COTA/L, ATP
 Ergonomics Julie W. Burnett, COTA/L, ATP What is Ergonomics? Definition: the Science of designing a person s environment so that it facilitates the highest level of function Good Ergonomics: Prevent Injury
Posture. In this article
 Posture Posture is the way we hold our bodies against gravity and maintaining a good posture involves training yourself to become aware of how you hold yourself in all activities as your posture is constantly
Zody s Ergonomic Features and Adjustments
 Zody s Ergonomic Features and Adjustments by: Teresa A. Bellingar, Ph.D. Ergonomic standards and guidelines recommend several working postures sitting while reclining, upright, or in forward tilt; standing
PERSONAL COMPUTER WORKSTATION CHECKLIST
 PERSONAL COMPUTER WORKSTATION CHECKLIST Last Revised: 6/26/17 A. Summary Use the following checklists to assess your own computer workstation. If you say No to any items within the lists, it may indicate
Corporate Safety Manual. Chapter 8 Office Ergonomics
 Corporate Safety Manual Chapter 8 Office Ergonomics Last updated: April 2015 Office Ergonomics Chapter 8: Office Ergonomics Index Page Introduction to Ergonomics...8-3 Work-related Musculoskeletal Disorders
2002 Physioball Supplement
 2002 Physioball Supplement These exercises are not detailed on the 2002 Off-Ice Training video but will be taught in detail during the 2002 Reach for the Stars Seminar. CORE STRENGTH Physioball/ Sport
Osteoporosis Exercise: Weight-Bearing and Muscle Strengthening Exercises. Osteoporosis Exercise: Weight-Bearing and Muscle Strengthening Exercises
 Osteoporosis Exercise: Weight-Bearing and Muscle Strengthening Exercises Osteoporosis Exercise: Weight-Bearing and Muscle Strengthening Exercises Introduction Weight-bearing and resistance exercises have
Shoulder Exercises. Wall Press Up with Gym Ball
 Shoulder Exercises The exercises listed below are part of a treatment regime for patients attending The Police Rehabilitation Centre. They are reproduced here as an aide memoire for those patients. The
Dental Policy Subject: Teeth with a Poor or Guarded Prognosis Guideline #: Clinical Policy - 01 Publish Date: 03/15/2018 Status:
 Dental Policy Subject: Teeth with a Poor or Guarded Prognosis Guideline #: Clinical Policy - 01 Publish Date: 03/15/2018 Status: Revised Last Review Date: 02/06/2018 Description This document addresses
ANATOMY OF THE PERIODONTIUM. Dr. Fatin Awartani
 ANATOMY OF THE PERIODONTIUM Part II Cementum and Alveolar bone Associate Professor Periodontal division King Saud university Cementum Calcified mesenchymal tissue that forms the outer covering of the anatomic
General Principles of Stretching. To be effective, stretching must be done slowly, gently and frequently.
 General Principles of Stretching To be effective, stretching must be done slowly, gently and frequently. Slowly means that while the exercise is being done the muscle being stretched must be moved slowly
Purpose: To assess the long term survival of sites treated by GTR.
 Cortellini P, Tonetti M. Long-term tooth survival following regenerative treatment of intrabony defects. J Periodontol 2004; 75:672-8. (28 Refs) Purpose: To assess the long term survival of sites treated
Dental Morphology and Vocabulary
 Dental Morphology and Vocabulary Palate Palate Palate 1 2 Hard Palate Rugae Hard Palate Palate Palate Soft Palate Palate Palate Soft Palate 4 Palate Hard Palate Soft Palate Maxillary Arch (Maxilla) (Uppers)
Do the same as above, but turn your head TOWARDS the side that you re holding on to the chair.
 Stretch 4-6 times per day and hold each stretch for a minimum of 30 seconds. Perform the stretch gently without bouncing. Discuss any problems with your Chiropractor. Sit upright with your head and shoulder
Radiology. & supporting structures. Lec. 14 Common diseases of teeth Dr. Areej
 Radiology Lec. 14 Common diseases of teeth Dr. Areej & supporting structures A radiograph is only one part of the diagnostic process. Usually one does NOT make a diagnosis solely from a radiograph. A diagnosis
34 Pictures That Show You Exactly What Muscles You re Stretching
 By DailyHealthPostJanuary 27, 2016 34 Pictures That Show You Exactly What Muscles You re Stretching Stretching before and after a workout is a great way to promote blood flow to the muscles and increase
the back book Your Guide to a Healthy Back
 the back book Your Guide to a Healthy Back anatomy Your spine s job is to: Support your upper body and neck Increase flexibility of your spine Protect your spinal cord There are 6 primary components of
Osteoporosis Exercise:
 Osteoporosis Exercise: Balance, Posture and Functional Exercises Osteoporosis Exercise: Weight-Bearing and Muscle Strengthening Exercises Introduction You can help improve and maintain your balance, posture
Feel Better. Stanford University ADJUSTING YOUR WORKSTATION PROPER ERGONOMIC POSTURE. USEFUL ERGONOMIC TIPS Work Better.
 Feel Better. PROPER ERGONOMIC POSTURE ADJUSTING YOUR WORKSTATION USEFUL ERGONOMIC TIPS Work Better. Stanford University Your workspace should respond to your changing needs, helping you eliminate uncomfortable
OFFICE ERGONOMICS. Department of Environmental Health and Safety University of Pittsburgh
 OFFICE ERGONOMICS Department of Environmental Health and Safety University of Pittsburgh Ergonomics What is it? Why should I be interested? What do I need to know to help myself? Where can I get help?
Monster Walk Stand with your feet slightly closer than shoulder-width apart in an athletic stance. Loop an elastic band around your ankles.
 Off-season Lower-Body Tennis Exercises Research conducted on elite tennis players shows that lower-body strength is the same on both the left and right sides. Therefore, lower-body training for tennis
TPW 's Upper Back Menu
 TPW 's Upper Back Menu # Sets Reps Duration E-cise 1 1 1 00:10:00 Static Back 2 3 10 Static Back Reverse Presses 3 3 10 Static Back Pullovers 4 1 1 0:01:00 Floor Block 5 1 1 0:02:00 Static Extension Position
FRACTURES AND LUXATIONS OF PERMANENT TEETH
 FRACTURES AND LUXATIONS OF PERMANENT TEETH 1. Treatment guidelines and alveolar bone Followup Procedures INFRACTION Clinical findings Radiographic findings Treatment Follow-Up Favorable Outcome Unfavorable
2017 COS ANNUAL MEETING AND EXHIBITION HOME EXERCISES
 UPPER BODY Push Up From a push up position. Lower whole body down to floor. Press up to return to start position. Maintain abdominal hollow and neutral spinal alignment throughout movement. Note: Perform
Shoulder Exercises Phase 1 Phase 2
 Shoulder Exercises Phase 1 1. Pendulum exercise Bend over at the waist and let the arm hang down. Using your body to initiate movement, swing the arm gently forward and backward and in a circular motion.
Version February 2016
 Version 3.1 29 February 2016 Health and Safety Unit 1 Table of Contents 1. Setting up your computer workstation... 3 Step 1: Adjusting yourself to the correct height... 3 Step 2 Adjusting your Chair...
Mindful Yoga Foot Foundation
 Mindful Yoga Foot Foundation Did you know that with 26 bones, 33 muscles, 31 joints and over 100 ligaments per foot, our feet contain a quarter of all the bones of your body? With 250,000 sweat glands
Cybex Weight Machine Manual
 Cybex Weight Machine Manual Note: Machine adjustments are indicated by a yellow knob or lever. Feel free to ask our staff for guidance. Lower Body Leg Press - Adjust the back rest to a comfortable position.
Range of motion and positioning
 Range of motion and positioning Learning guide Why is motion important? Most people take free, comfortable movement for granted. Motion is meant to be smooth and painless. The ligaments, tendons, muscles,
HOW TO CHOOSE THE RIGHT CHAIR
 HOW TO CHOOSE THE RIGHT CHAIR ADJ SEAT HEIGHT & BACK: A GOOD SIZED SEAT: GOOD SEAT PADDING: Easy to adjust seat height. Provide a good range of approximately 40-53cm from the floor to the height of the
Classifications for Gingival Recession: A Mini Review
 Galore International Journal of Health Sciences and Research Vol.3; Issue: 1; Jan.-March 2018 Website: www.gijhsr.com Review Article P-ISSN: 2456-9321 Classifications for Gingival Recession: A Mini Review
Kath s Summer Fitness Exercises
 Kath s Summer Fitness Exercises Enjoy your summer with a mixture of different exercises i.e. walking, swimming, cycling etc. The following session can last for 15 30 minutes or longer if you do more repetitions.
Shoulder Exercises 2016
 Shoulder Exercises 2016 The exercises listed below are part of a treatment regime for patients attending The Police Rehabilitation Centre. They are reproduced here as an aide memoire for those patients.
Yoga for your Neck and Shoulders
 Yoga for your Neck and Shoulders Refrain from judging or placing high expectations on yourself as you learn these exercises. When you feel discomfort or pain, simply stop. If you feel dizzy or nauseous
FROZEN SHOULDER REHABILITATION EXERCISES
 FROZEN SHOULDER REHABILITATION EXERCISES Exercise no. 1) Bend forward so that your torso is parallel to the ground, and lean on a stool or table with your healthy arm. Completely relax your sore arm, and
Ergonomics: How to set-up your office equipment BAYLOR UNIVERSITY DEPARTMENT OF ENVIRONMENTAL HEALTH & SAFETY KEN O CONNOR
 Ergonomics: How to set-up your office equipment BAYLOR UNIVERSITY DEPARTMENT OF ENVIRONMENTAL HEALTH & SAFETY KEN O CONNOR KENNETH_OCONNOR@BAYLOR.EDU What is office ergonomics? Ergonomics addresses the
Seniors Helping Seniors Stretch Routine TRAINING PEER LEADERS TO SUPPORT SENIORS HEALTH AND WELLNESS
 Seniors Helping Seniors Stretch Routine TRAINING PEER LEADERS TO SUPPORT SENIORS HEALTH AND WELLNESS 2018 - BACK STRETCHES Back Extensions Hold for about 10 seconds Back Flexion Back Rotation, each side
1 Pause and Practice: Facilitating Trunk and Shoulder Control with the Therapy Ball
 1 Pause and Practice: Facilitating Trunk and Shoulder Control with the Therapy Ball This is an example of Facilitating Combinations of Movements and Active Assist. Starting Position Have your patient sit
Body Bar FLEX. Stretching Exercises for GOLF. by Gordon L. Brown, Jr. for Body Bar, Inc.
 Body Bar FLEX Stretching Exercises for GOLF by Gordon L. Brown, Jr. for Body Bar, Inc. 1 Introduction This presentation features stretching exercises using the Body Bar FLEX Personal Training Device. The
GOLFERS TEN PROGRAM 1. SELF STRETCHING OF THE SHOULDER CAPSULE
 GOLFERS TEN PROGRAM 1. SELF STRETCHING OF THE SHOULDER CAPSULE POSTERIOR CAPSULAR STRETCH Bring your arm across your chest toward the opposite shoulder. With the opposite arm grasp your arm at your elbow.
Chairside Education Cards
 Chairside Education Cards Sunstar is proud to offer the attached Chairside Education Cards to assist you with your patient's education. 2018 Sunstar Americas, Inc. P18043 How Healthy Are Your Gums? Healthy
DF1 Case Studies Surgical Case Michael Hicks
 DF1 Case Studies Surgical Case Michael Hicks North Western Deanery Background Miss M attended as a new patient requiring treatment. She was a nervous patient and required basic periodontal therapy, an
UPPER BODY STANDING 12. March in place (hand to opposite knee) For more intensity raise arms above head if your balance is GOOD. 13.
 For more intensity raise arms above head if your balance is GOOD. 13.") LOW IMPACT EXERCISES SITTING 1. Breathe 2. Half circles with head 3. Neck movements (Chin to chest, ear to shoulder) 4. Neck Stretch Sitting in your chair, reach down and grab the side of the chair with
LOW IMPACT EXERCISES SITTING 1. Breathe 2. Half circles with head 3. Neck movements (Chin to chest, ear to shoulder) 4. Neck Stretch Sitting in your chair, reach down and grab the side of the chair with
The Golfers Ten Program. 1. Self Stretching of the Shoulder Capsule
 The Golfers Ten Program 1. Self Stretching of the Shoulder Capsule A. Posterior capsular stretch Bring your arm across your chest toward the opposite shoulder. With the opposite arm grasp your arm at your
SURVEYING OF REMOVABLE PARITAL DENTURES FEB, 11, 2015
 SURVEYING OF REMOVABLE PARITAL DENTURES FEB, 11, 2015 Dental Surveyor: It is a mechanical device used to determine the relative parallelism of the teeth surfaces and the undercuts areas in relation to
Quads (machines) Cable Lunge
 Cable Lunge") Cable Lunge Cable Lunge 1) Stand with feet hip width apart and a cable attached around your waist. Take left leg and step back approximately 2 feet standing on the ball of the foot. 2) Start position:
Cable Lunge Cable Lunge 1) Stand with feet hip width apart and a cable attached around your waist. Take left leg and step back approximately 2 feet standing on the ball of the foot. 2) Start position:
Screenings, Indices Their influence on the treatment plan (Berne concept)
") Screenings, Indices Their influence on the treatment plan (Berne concept) 1. 2. 3. 4. Garguilo AW, Wentz FM, Orban B. Dimensions and relations of thedentogingival junction in humans. J Periodontol 1961;
Screenings, Indices Their influence on the treatment plan (Berne concept) 1. 2. 3. 4. Garguilo AW, Wentz FM, Orban B. Dimensions and relations of thedentogingival junction in humans. J Periodontol 1961;
REMEMBER GOOD POSTURE DURING ALL YOUR EXERCISES, AVOID SLOUCHING AS YOUR CURRENT PROGRAM BECOMES EASY SLOWLY INCREASE:
 REMEMBER GOOD POSTURE DURING ALL YOUR EXERCISES, AVOID SLOUCHING Apr 06, 2017 AS YOUR CURRENT PROGRAM BECOMES EASY SLOWLY INCREASE: # OF LAPS YOU ARE WALKING # OF REPITITIONS # OF SECONDS YOU HOLD A STRETCH
WHAT IS THE PURPOSE OF WHAT WE DO? TEAM PERIODONTICS: WORKING TOGETHER TO IMPROVE PATIENT CARE YOU ARE THE PERIODONTISTS IN YOUR PRACTICE!
 Setter Periodontics 2075 SW 1 st Ave #2L Portland, OR 97201 503-222-9961 michael@setterperio.com WHAT IS THE PURPOSE OF WHAT WE DO? Gum Gardeners Study Club 2.27.17 TEAM PERIODONTICS: WORKING TOGETHER
Bacterial Plaque and Its Relation to Dental Diseases. As a hygienist it is important to stress the importance of good oral hygiene and
 Melissa Rudzinski Preventive Dentistry Shaunda Clark November 2013 Bacterial Plaque and Its Relation to Dental Diseases As a hygienist it is important to stress the importance of good oral hygiene and
Stretch Packet. Stretch Packet
 Stretch Packet Stretch Packet Stretching is a form of physical exercise in which a specific muscle or tendon is deliberately flexed or stretched in order to improve the muscle's felt elasticity and achieve
Posture. recreational activities.
 Posture Why maintain correct posture? When maintaining correct posture, the joints, ligaments and muscles of the neck and back are positioned optimally so they are under minimal stress. Maintaining this
Examination of teeth and gingiva
 Examination of teeth and gingiva Siriporn Chattipakorn, DDS, PhD. SUBJECTIVE HISTORY Chief complaint In patient s own words My tooth hurts when I chew hard foods I can t drink cold drink I have bad breath
أ.م. هدى عباس عبد اهلل CROWN AND BRIDGE جامعة تكريت كلية. Lec. (2) طب االسنان
 طب االسنان") Lec. (2) CROWN AND BRIDGE أ.م. هدى عباس عبد اهلل Patient selection and examination A thorough diagnosis must first be made of the patient's dental condition, considering both hard and soft tissues. this
Lec. (2) CROWN AND BRIDGE أ.م. هدى عباس عبد اهلل Patient selection and examination A thorough diagnosis must first be made of the patient's dental condition, considering both hard and soft tissues. this
Lesson Sixteen Flexibility and Muscular Strength
 Lesson Sixteen Flexibility and Muscular Strength Objectives After participating in this lesson students will: Be familiar with why we stretch. Develop a stretching routine to do as a pre-activity before
WALL PUSH UPS TABLE PUSH UPS
 WALL PUSH UPS Standing at a wall; place your arms out in front of you with your elbows straight so that your hands just reach the wall. Next, bend your elbows slowly to bring your chest closer to the wall.
Body Bar FLEX. Stretching and Strengthening Exercises. Organized by Muscle Groups Exercised. by Gordon L. Brown, Jr. for Body Bar, Inc.
 Body Bar FLEX Stretching and Strengthening Exercises Organized by Muscle Groups Exercised by Gordon L. Brown, Jr. for Body Bar, Inc. 1 Stretching and Strengthening Exercises This presentation features
Stretching - At the Workstation Why is stretching important?
 Stretching - At the Workstation Why is stretching important? No matter how well a workstation is designed, problems may arise if attention is not paid to the way the work is done. Working at a computer
Body Bar FLEX. Exercises for the Core and Abdominals. by Gordon L. Brown, Jr. for Body Bar, Inc.
 Body Bar FLEX Exercises for the Core and Abdominals by Gordon L. Brown, Jr. for Body Bar, Inc. 1 Exercises for the Core and Abdominals This presentation features stretching and strengthening exercises
Snow Angels on Foam Roll
 Thoracic Mobilization on Foam Roll Lie on your back with a foam roller positioned horizontally across your mid back, and arms crossed in front of your body. Bend your knees so your feet are resting flat