SURGICAL TECHNIQUE GUIDE
|
|
|
- Noreen Barton
- 5 years ago
- Views:
Transcription

1
2 DANGER indicates an imminently hazardous situation which, if not avoided, will result in death or serious injury. WARNING indicates a potentially hazardous situation which, if not avoided, could result in death or serious injury. CAUTION indicates a potentially hazardous situation which, if not avoided, may result in minor or moderate injury. CAUTION used without the safety alert symbol indicates a potentially hazardous situation which, if not avoided, may result in property damage. INDICATIONS The OSTEOMED ReFlexion Toe System (RTS) is indicated for reconstruction of the severely disabled and/or painful metatarsalphalangeal joints resulting from osteoarthritis, rheumatoid arthritis, arthritis secondary to trauma or failure of prior arthroplasty. Device is intended for bone cemented use only. CONTRAINDICATIONS Use of the RTS is contraindicated in cases of active or suspected infection; in patients sensitive to the implant materials or in patients support an implant. Use of the implant is further contraindicated in which the implant would be subjected to excessive stresses or wear due to patient weight, activity level or in patients who may ignore the PRECAUTIONS Before clinical use, the surgeon should be familiar with all aspects of the ReFlexion Toe System, its instrumentation, indications, contraindications and the surgical technique protocol. Accepted surgical practice should be followed in postoperative care. PATIENTS SHOULD BE ADVISED OF THE LIMITATIONS OF THEIR PROSTHESIS AND SHOULD BE INSTRUCTED TO GOVERN THEIR ACTIVITIES ACCORDINGLY. CAUTIONS instruments and trials should be used to implant the device. Failure to correctly select, assemble and implant the prosthesis components could contribute to joint instability and lead to premature failure. Patients should be followed closely after surgery for any signs of implant movements and/or loosening. SURGICAL TECHNIQUE GUIDE GOALS AND OBJECTIVES implants in the metatarsal and phalangeal bones. FIT between the bone and the implant interface. The conical portion of the implant should be supported by the endosteum of the metaphy- providing long-term stability for the implant. POSITION While the design of the system does allow for some slight adjustment of joint alignment, the implant cannot be expected to overcome should be addressed by other means such as orthotics, soft tissue correction, or osteotomy. In the sagittal plane, the metatarsal component should be positioned low within the metatarsal metaphysis to minimize any elevation of the metatarsal head. Care should be taken to avoid impingement of the sesamoids. The metatarsal component should also be positioned far enough proximally to maintain or possibly reduce metatarsal length. The phalangeal component should be positioned centrally in the phalangeal base. The position of the articulating surface with respect to soft tissue forces will have an effect on the angle and motion of the hallux. However, since the articulating surfaces of the implant are spherical, the angular orientation of the phalangeal component will not have any effect on the resulting angle of the hallux. WARNINGS Do not use implant if sterile package is damaged. DO NOT OPERATE REAMERS AT SPEEDS ABOVE 1000 RPM. 1
. Orient the blade to remove more bone dorsally versus plantar.")
.")

3 Note: Stem of implant parallel to dorsal cortex of metatarsal Template of metatarsal stem and head positioned over pre-operative lateral radiograph of 1st metatarsal. INITIAL RESECTION METATARSAL HEAD Remove 4-5mm of bone with a sagittal or oscillating saw (Figure 1). Orient the blade to remove more bone dorsally versus plantar. the hallux in order to access the canals of the metatarsal and the phalanx. Template of phalangeal component positioned over pre-operative lateral radiograph of proximal phalanx. Figure 1 AVOID IMPINGEMENT OF THE SESAMOIDS PHALANGEAL BASE Remove approximately 3-4mm of bone (Figure 2). This cut should pass through the subchondral bone distal to the concave surface of the phalangeal base. Leave the intrinsic if possible. Template of metatarsal stem and head positioned over pre-operative dorsal-plantar radiograph of 1st metatarsal. Template of phalangeal component positioned over pre-operative dorsal-plantar radiograph of proximal phalanx. Figure 2 SESAMOIDS If the sesamoids are immobile, the surgeon may elect to release them with a McGlamery type elevator. 2
.")


4 METATARSAL PREPARATION INSERTION OF GUIDE PIN Locate the Metatarsal Guide Pin insertion point on the metatarsal head (Figure 3). This point is generally centered M-L and 2-3 mm more plantar than dorsal on the metatarsal ALIGNMENT With one of the Alignment Guide Rods over the dorsal aspect of the metatarsal and the other over the medial aspect, tilt the drill and Guide Pin until the Guide Rods are parallel and centered on the metatarsal (Figures 5 & 6). Figure 3 With the Metatarsal Guide Pin chucked in a drill or wire driver, slide the pin through the Alignment Guide and push the point of the pin slightly into the bone at the insertion point (Figure 4). Figure 5 Figure 4 Figure 6 NOTE: Make sure the Metatarsal Guide Pin is properly placed because the position and angle of the Metatarsal Guide Pin As an alternative or adjunct to the use of the alignment device, a mini-c-arm can be used to visualize the metatarsal shaft and aid in positioning the Guide Pin. 3
. This point is about the line etched around the reamer shaft (Figure 8).")


5 INSERTION OF THE GUIDE PIN Drive the Metatarsal Guide Pin into the metatarsal canal to a point beyond the isthmus of the metatarsal but short of the metatarsal base. Drive the Starter Reamer over the blunt Guide Pin into the metatarsal canal approximately 45mm (1.75 inches). This point is about the line etched around the reamer shaft (Figure 8). Do not drive the Metatarsal Guide Pin into or beyond the metatarsal-cuneiform joint. NOTE: Once the Metatarsal Guide Pin has penetrated the dense bone of the metatarsal head, it should advance freely through the intramedullary canal. If continuous resistance is encountered, it is likely that the pin is misdirected and is engaging the cortical wall of the metatarsal diaphysis. If this is the case, check alignment and insertion point and redirect the pin. Resistance should be encountered as the tip of the pin meets the cortical bone of the metatarsal base. At that point, remove the pin and replace it with the blunt Guide Pin. INSERTING THE BLUNT GUIDE PIN To reduce the potential of penetrating the metatarsal-cuneiform joint during reaming, replace the Metatarsal Guide Pin with the blunt Guide Pin. Seat the pin into the base of the metatarsal by tapping it gently with a mallet. CYLINDRICAL REAMING The diameter of all the reamer shafts is 0.25 (6.35 mm). A. STARTER REAMER (4.5MM) With the power off, place the Starter Reamer into a Jacobs Chuck and slide it over the blunt Guide Pin (Figure 7). Figure 8 cutting through the dense bone of the metatarsal head. Once this bone has been penetrated, the reamer should advance with little resistance. If continuous resistance is encountered, reamer position and alignment should be checked. NOTE: Cylindrical reaming extends beyond the length of the actual implant stem in order to allow clearance for the Cone Reamer Guide and avoid the potential for impingement of the stem tip. B. SMALL REAMER (5.5MM) Drive the small Straight Reamer over the blunt Guide Pin to the line etched around the reamer shaft (Figure 9). Figure 7 Figure 9 4

. Make sure the stem points dorsally. B.")

. Figure 14 Figure 11 NOTE: Rotating the guide laterally will position the center of the metatarsal head laterally and will reduce the effective IM")

6 PLACEMENT OF THE CONE REAMER GUIDE The Cone Reamer Guide maintains a 17 degree angle between the axis of the reamed cylinder in the metatarsal and the cone to be reamed into the metaphysis. This guide orients the position of the articulating head. A. INSERTING THE SMALL CONE REAMER GUIDE (5.5MM) Insert the small Cone Reamer Guide into the reamed cylindrical canal (Figure 10) until the serrations come in contact with the resected surface of the bone (Figure 11). Make sure the stem points dorsally. B. SETTING THE CONE AXIS Place one of the Cone Reamers on the guide and note the direction of the reamer stem (Figure 12). Figure 13 Figure 10 Rotate the Cone Reamer Guide slightly from medial to lateral and note the orientation of the reamer stem. A general rule of thumb is that the reamer stem should be parallel with the second toe (provided there are no deformities of the second toe) (Figure 13). Figure 14 Figure 11 NOTE: Rotating the guide laterally will position the center of the metatarsal head laterally and will reduce the effective IM angle. Conversely, rotating the guide medially will position the center of the head medially and will increase the effective IM angle. Verify that the Cone Reamer is evenly spaced relative to the metatarsal head (Figure 14). C. LOCKING THE ORIENTATION OF THE CONE REAMER GUIDE Once the orientation has been determined, the Cone Reamer Guide can be pushed into the canal to the point where the serrations prevent further rotation of the guide. Figure 12 5


7 CONE REAMING The Cone Reamer shafts are 0.25 (6.35mm) in diameter. A. REAMING TO DEPTH Slide the small Cone Reamer over the stem of the Cone Reamer Guide (Figure 15). Do not turn power on until the reamer is fully seated over the post of the Cone Reamer Guide. B. REAMING TO DIAMETER Once the appropriate reaming depth has been established, the diameter can be expanded if desired by using a larger straight the corresponding larger cone reamer, until the desired size is achieved. (Total of three sizes available.) (Figure 17) Figure 15 Before turning power on, advance the guide and reamer as a unit until the cutting surfaces of the reamer are fully engaged into the bone (Figure 16). If the Cone Reamer Guide does not advance, it may be necessary to tap with a mallet. Advance the reamer to the desired position taking into consideration how much bone was resected and how much metatarsal length is to be removed. Figure 17 It is important to check the position of the reamer teeth with respect to the plantar cortex. Final implant position should not impinge the sesamoid apparatus and the cortex should be shelf of plantar bone. The outer edge of the reamer should just reach the external cortical surface of the metatarsal metaphysis medially, laterally and dorsally (Figure 18). Figure 16 Reaming should be done at a speed less than 1000 rpm. Irrigation will minimize the potential for bone necrosis and heating of with bone, it may be necessary to clean the reamer to maintain Figure 18 Additionally, you may use the metatarsal cone head trial to check the position of the reamed out area by placing it over the cone reamer guide. It is important that the Cone Reamer be advanced far enough into the metatarsal metaphysis to allow for satisfactory dorsi- geal base. 6

. Figure 21 C. INSERTING THE PHALANGEAL GUIDE PIN Figure 19 INSERTION OF THE PHALANGEAL GUIDE PIN A.")


8 PHALANGEAL PREPARATION The phalangeal component should be placed centrally, with the stem slightly inclined from proximal central to distal dorsal (Fig- potentially breaking through the dorsal cortex proximally or plantar cortex distally. B. ALIGNMENT Align the Phalangeal Guide Pin parallel with the shaft of the proximal phalanx M-L (Figure 21) and direct toward the dorsal aspect of the IP joint in the D-P plane (Figure 22). Figure 21 C. INSERTING THE PHALANGEAL GUIDE PIN Figure 19 INSERTION OF THE PHALANGEAL GUIDE PIN A. INSERTION POSITION The Phalangeal Guide Pin should be centered M-L on the phalangeal shaft and D-P on the base of the proximal phalanx (Figure 20). and access to the phalangeal base. The hallux should be plan- should be visible. Drive the Phalangeal Guide Pin into the shaft of the proximal phalanx, taking care not to penetrate the IP joint. Once the pin has penetrated the subchondral bone of the base, it should advance easily through the phalangeal canal. Resistance should be encountered again as the tip of the pin approaches the distal end of the proximal phalanx. Remove the Phalangeal Guide Pin when this resistance is encountered. Figure 22 D. INSERTING THE BLUNT GUIDE PIN Replace the Phalangeal Guide Pin with the Blunt Guide Pin. Gently tap the pin with a mallet to seat it in the cortical bone. Figure 20 7


.")
9 PHALANGEAL REAMING A. REAMING THE PROXIMAL PHALANX Place the Starter Reamer over the blunt Guide Pin and advance the dense subchondral bone of the base (Figure 23). Figure 26 Figure 23 B. PHALANGEAL REAMER Place the small Phalangeal Reamer over the blunt Guide Pin and ream into the base of the proximal phalanx to the desired (Figure 24). Figure 27 If more motion is desired, more bone can be removed by reaming the proximal phalanx deeper one millimeter at a time (Figure 27). Keep in mind that as you ream deeper, it is necessary to use the Base Planer to remove the excess bone around the cortex to keep the same shape of the Phalangeal Base. ion that can be achieved immediately following the surgery. Figure 24 C. DESIRED PHALANGEAL SIZE Insert the small (green) plastic phalangeal trial into the reamed phalangeal base (Figure 25). Check the range of motion with the metatarsal stem and metatarsal head trials previously selected (Figure 26). Once the desired depth has been established with the small Phalangeal Reamer, the diameter of the cone can be increased using the medium or large Phalangeal Reamers as needed if a larger phalangeal implant is necessary (Figure 28). Figure 28 Figure 25 8
. Removal of excess bone will allow the Phalangeal Component to seat fully in the cone without hanging FINAL SEATING OF THE IMPLANTS A.")
.")

10 FINAL BASE PLANING After depth and cone diameter have been determined, use the Base Planer (size corresponds to size implant to be used, small, medium or large) to remove excess bone from around the opening of the cone (Figure 29). Removal of excess bone will allow the Phalangeal Component to seat fully in the cone without hanging FINAL SEATING OF THE IMPLANTS A. Remove selected implants from the double pouched, sterile packages. Care should be taken to avoid damaging the morse taper on the Metatarsal Component. B. First insert the Metatarsal Stem by hand. Gently guide the cone to the proper rotational orientation. Use the Metatarsal Stem Impactor with a mallet to seat the component (Figures 31 & 32). Figure 29 When the bone is completely planed, the Base Planer should turn freely on the smooth pilot without any resistance (Figure 30). Figure 31 Figure 32 Figure 30 FINAL TRIAL REDUCTION A. INSERT THE METATARSAL STEM TRIAL. B. INSERT THE PHALANGEAL TRIAL. C. INSERT THE METATARSAL HEAD TRIAL. Check the joint for range of motion and stability. If desired, great- on the metatarsal or phalangeal side of the joint as previously described. With trial implants in place, use a saw, rasp, bur or rongeurs to remove excess bone around the trial components to reduce the potential for damaging the actual implants once they are in place. 9


11 plantar surface of the proximal phalanx (Figure 33). Figure 33 Use the Phalangeal Impactor with a mallet to seat the Phalangeal Base (Figure 34). Figure 34 The Metatarsal Head Component is placed on the morse taper of the Metatarsal Stem. The taper should be wiped clean and the head should be seated using the Metatarsal Head Impactor with a mallet. CLOSURE With all the components implanted, check alignment, range of motion and carefully inspect soft tissue balance. Perform any adjustments if the alignment, range of motion, component debris from the joint space or implant, irrigate, then close using standard closure techniques. 10


12 11
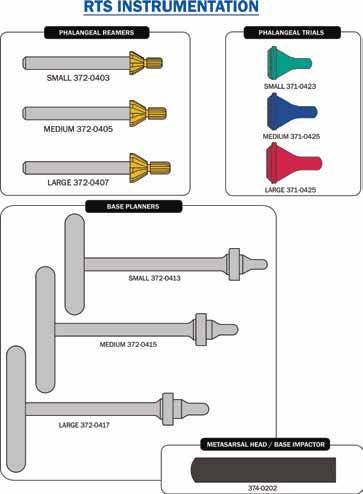
13 Part Number Description Implants Metatarsal Head, Standard Metatarsal Head, Long Metatarsal Head, Extra Long Metatarsal Stem, Small Metatarsal Stem, Medium Metatarsal Stem, Large Phalangeal Base, Small Phalangeal Base, Medium Phalangeal Base, Large Part Number Description Trials Metatarsal Head Trial, Standard Metatarsal Head Trial, Long Metatarsal Head Trial, Extra Long Metatarsal Stem Trial, Small Metatarsal Stem Trial, Medium Metatarsal Stem Trial, Large Metatarsal Cone-Head Trial, Small Metatarsal Cone-Head Trial, Medium Metatarsal Cone-Head Trial, Large Phalangeal Base Trial, Small Phalangeal Base Trial, Medium Phalangeal Base Trial, Large ReFlexion Autoclave Tray Part Number Description Instruments for Metatarsal System mm Straight Reamer mm Straight Reamer mm Straight Reamer mm Straight Reamer Small Cone Reamer Medium Cone Reamer Large Cone Reamer Metatarsal Wire Alignment Guide Small Cone Reamer Guide Medium Cone Reamer Guide Large Cone Reamer Guide Metatarsal Guide Pin Metatarsal Guide Pin, Blunt Metatarsal Stem Impactor Metatarsal Head Impactor Part Number Description Instruments for Phalangeal System Small Phalangeal Reamer Medium Phalangeal Reamer Large Phalangeal Reamer Small Base Planer Medium Base Planer Large Base Planer Metatarsal Wire Alignment Guide Small Cone Reamer Guide Medium Cone Reamer Guide Large Cone Reamer Guide Metatarsal Guide Pin Metatarsal Guide Pin, Blunt Phalangeal Guide Pin 12

14
HemiEDGE. Patent No. 8,845,750. Surgical Technique
 HemiEDGE Patent No. 8,845,750 Surgical Technique Contents Product Based on the clinical success of our First MPJ Hemi Implant, the HemiEDGE, incorporates an overlapping edge extending around the medial,
Integra. DigiFuse Cannulated Intramedullary Fusion System SURGICAL TECHNIQUE
 Integra DigiFuse Cannulated Intramedullary Fusion System SURGICAL TECHNIQUE Table of Contents Design Rationale... 2 System Features... 2 Indications... 2 Contraindications... 2 Surgical Technique...3 Step
U2 PSA. Revision Knee. Surgical Protocol
 U2 PSA TM Revision Knee Surgical Protocol Table of Contents 1 Component Removal... 1 2 Tibial Preparation... 1 2.1 Tibial Canal Preparation... 1 2.2 Proximal Tibial Resection... 2 2.3 Non Offset Tibial
First MPJ Hemi Implant
 First MPJ Hemi Implant Surgical Technique Contents Product The BioPro First MPJ Hemi Implant is a simple, durable, metallic hemiarthroplasty resurfacing prosthesis for the hallux metatarsophalangeal joint
DuaFit. Proximal Interphal angeal Impl ant
 DuaFit Proximal Interphal angeal Impl ant DUAFIT - TABLE OF CONTENTS PRODUCT DESCRIPTION 3 INDICATIONS 6 SURGICAL TECHNIQUE #1 7 Without guide wire (DuaFit 0 10 17 ) SURGICAL TECHNIQUE #2 14 With guide
CANNULINK. Intraossous Fixation System SURGICAL TECHNIQUE
 CANNULINK Intraossous Fixation System SURGICAL TECHNIQUE Contents Chapter 1 4 Introduction The CANNULINK Advantage Indications for Use Preoperative Planning Chapter 2 5 Surgical Technique CANNULINK Standard
LMH. Minimal Bone Resection. Lesser Metatarsal Head Implant. Thin, low-profile design for minimal bone resection
 Minimal Bone Resection LMH Lesser Metatarsal Head Implant Thin, low-profile design for minimal bone resection Stem offset dorsally for anatomically correct alignment in medullary canal Rectangular shape
3. PATIENT POSITIONING & FRACTURE REDUCTION 3 8. DISTAL GUIDED LOCKING FOR PROXIMAL NAIL PROXIMAL LOCKING FOR LONG NAIL 13
 Contents IMPLANT FEATURES 2 1. INDICATIONS 3 2. PRE-OPERATIVE PLANNING 3 3. PATIENT POSITIONING & FRACTURE REDUCTION 3 4. INCISION 4 5. ENTRY POINT 4-6 6. PROXIMAL NAIL INSERTION 6-7 7. PROXIMAL LOCKING
A novel cementless option. Zimmer NexGen Trabecular Metal Primary Patella Surgical Technique
 A novel cementless option Zimmer NexGen Trabecular Metal Primary Patella Surgical Technique Zimmer Trabecular Metal Primary Patella 1 Zimmer NexGen Trabecular Metal Primary Patella Surgical Technique
Zimmer Trabecular Metal Ankle Interpositional Spacer and Trabecular Metal Ankle Fusion Spacer
 Zimmer Trabecular Metal Ankle Interpositional Spacer and Trabecular Metal Ankle Fusion Spacer Surgical Technique 2 Zimmer Trabecular Metal Ankle Interpositional Spacer and Trabecular Metal Ankle Fusion
Trabecular Metal Primary Patella
 Trabecular Metal Primary Patella NexGen Complete Knee Solution Surgical Technique Table of Contents Introduction... 2 Prepare the Patella... 2 Patella Reamer Technique... 3 Insetting Technique... 5 Universal
System. Humeral Nail. Surgical Technique
 System Humeral Nail Surgical Technique Contents IMPLANT FEATURES 2 1. INDICATIONS 3 2. PRE-OPERATIVE PLANNING 3 3. PATIENT POSITIONING & FRACTURE REDUCTION 3 4. INCISION 4 5. ENTRY POINT 4-6 6. PROXIMAL
ToeMobile. Surgical Technique. Great Toe Endoprosthesis
 Great Toe Endoprosthesis Surgical Technique Merete Medical, Inc. 99 Purchase Street Rye, N.Y. 10580 Phone: 914 967-1532 Fax: 914-967-1542 E-Mail: service@merete-medical.com www.merete-medical.com - Description
Taperloc Complete Hip System. Surgical Technique
 Taperloc Complete Hip System Surgical Technique One Surgeon. One Patient. Over 1 million times per year, Biomet helps one surgeon provide personalized care to one patient. The science and art of medical
Foot & Ankle. EasyClip. Osteosynthesis Compression Staples. Foot & Ankle
 Foot & Ankle EasyClip Osteosynthesis Compression Staples Foot & Ankle Operative Technique EasyClip Osteosynthesis Compression Staples 2 This publication sets forth detailed recommended procedures for using
Correction System. Surgical Technique
 Nextra Hammertoe Correction System Surgical Technique Maximized Bone Purchase* Stable and Secure Phalanx Optimized Screw Design Adjustable Bone-to-Bone Apposition Progressive Ratchet Tightening Mechanism
Preoperative Planning. The primary objectives of preoperative planning are to:
 Preoperative Planning The primary objectives of preoperative planning are to: - Determine preoperative leg length discrepancy. - Assess acetabular component size and placement. - Determine femoral component
Ascension. MCP surgical technique. surgical technique Ascension MCP PyroCarbon Total Joint
 Ascension MCP surgical technique PyroCarbon Total Joint WW 1.0 Table of Contents 2.0 Introduction............................ 2 3.0 Ascension MCP Implants................ 2 4.0 Instrumentation for MCP
ACETABULAR CUP SURGICAL TECHNIQUE
 ACETABULAR CUP SURGICAL TECHNIQUE ACETABULAR CUP DEVICE INDICATIONS FOR USE The ICONACY I-Hip total hip replacement is indicated for the following conditions: 1. A severely painful and/or disabled hip
Hemi Phalangeal Implant SURGICAL TECHNIQUE
 SURGICAL TECHNIQUE SIZING AND ORDERING HEAD WIDTH A HEAD HEIGHT B HPI-0001 1 16.9 12 HPI-0002 2 19.5 13.8 HPI-0003 3 22.4 15.9 PART NO. A B SIZE DIMENSIONS ARE IN MILLIMETERS. The HPI stemmed prosthesis,
Hip Resurfacing System
 Hip Resurfacing System The Arthrosurface HemiCAP Hip Hemiarthroplasty System restores the articular surface geometry of the femoral head and preserves functional structures using an innovative 3 dimensional
Contents. Chapter 1 4 Chapter Chapter Chapter Chapter 5 15
 Contents Chapter 1 4 Chapter 2 5 5 Chapter 3 6 6 7 Chapter 4 8 8 8 8 9 10 10 11 12 13 14 14 Chapter 5 15 Introduction Intended Use Indications Device Description Implant Options and Sizing Instrumentation
TRK REVISION KNEE Surgical Technique
 1 TRK REVISION KNEE Surgical Technique 1. 2. 3. 4. 5. 6. 7. 8. 9. 10. INTERCONDYLAR RESECTION...... page FEMORAL STEM...... page NON CEMENTED FEMORAL STEM...... page TRIAL FEMORAL COMPONENTS...... page
Technique Guide Hammertoe Correction System
 Technique Guide Hammertoe Correction System TM The ToeMATE Hammertoe Correction System is an easy to implant bone screw system intended for the correction of hammertoe deformity. It is provided in a complete
Encina Taper Stem. Stinson Orthopedics Inc. 303 Twin Dolphin Drive, Suite 600 Redwood City, CA
 Stinson Orthopedics Inc. 303 Twin Dolphin Drive, Suite 600 Redwood City, CA 94065 info@stinsonortho.com www.stinsonortho.com Table of Contents Introduction 3 Features 4 Surgical Technique 5 Preoperative
Zimmer NexGen Tibial Stem Extension & Augmentation. Surgical Technique IMAGE TO COME. Stem Extensions and Augments
 Zimmer NexGen Tibial Stem Extension & Augmentation Surgical Technique IMAGE TO COME Stem Extensions and Augments Zimmer NexGen Tibial Stem Extension & Augmentation Surgical Technique 1 Zimmer NexGen Tibial
WristMotion Wrist Hemiarthroplasty System Instructions for Use
 WristMotion Wrist Hemiarthroplasty System Instructions for Use Description The Arthrosurface WristMotion Wrist Hemiarthroplasty System consists of a contoured capitate articular implant designed to articulate
NEXGEN COMPLETE KNEE SOLUTION S A. Tibial Stem Extension & Augmentation Surgical. ATechnique
 NEXGEN COMPLETE KNEE SOLUTION ATechnique Tibial Stem Extension & Augmentation Surgical INTRODUCTION The NexGen Complete Knee Solution Intramedullary Tibial Instruments have been designed to provide an
Lesser MPJ Hemi Implant
 Lesser MPJ Hemi Implant Surgical Technique Contents Product The BioPro Lesser MPJ Hemi Implant is a simple, durable, metallic hemiarthroplasty resurfacing prosthesis for the treatment of arthritis, Freiberg
Optimum implant geometry
 Surgical Technique Optimum implant geometry Extending proven Tri-Lock heritage The original Tri-Lock was introduced in 1981. This implant was the first proximally coated tapered-wedge hip stem available
Talar Dome System Surgical Technique
 Talar Dome System Surgical Technique CAP TALAR DOME RESURFACING HEMIARTHROPLASTY IMPLANT Surgical Technique Guide Description The HemiCAP Contoured Articular Prosthetic incorporates an articular resurfacing
TaperFill. Surgical Technique
 TaperFill Surgical Technique Table of Contents Indications and Contraindications 3 TaperFill Hip Size Charts 4-5 DJO Surgical 9800 Metric Boulevard Austin, TX (800) 456-8696 www.djosurgical.com Preoperative
ZMR Over-the-Junction Instruments for Revision Hip Arthroplasty. Surgical Technique IMAGE TO COME
 ZMR Over-the-Junction Instruments for Revision Hip Arthroplasty Surgical Technique IMAGE TO COME ZMR Over-the-Junction Instruments for Revision Hip Arthroplasty Introduction The ZMR Over-the-Junction (OTJ)
Cementless Tapered Femoral Stem Surgical technique
 Cementless Tapered Femoral Stem Surgical technique Contents Operative summary 4 Pre-operative planning 5 Femoral neck osteotomy 5 Femoral canal preparation 5 Intra-medullary (IM) reamer 6 Sequential rasping
DYNAMIC, TRANSVERSE COMPRESSION. Low Profile, Anatomic Design, Type II Anodized. Mechanical Compression Designed to Stimulate the Fusion Process
 CoLink_XP_ST_080218.pdf 1 8/2/18 8:36 AM SURGICAL TECHNIQUE CoLink XP Plates DYNAMIC, TRANSVERSE COMPRESSION C M Y CM MY CY CMY K MTP Std. Plate MTP Revision Plate Lapidus Standard +1mm and +2mm Y Plate
Arcos Interlocking Distal Stem. Surgical Technique Addendum to the Arcos Modular Femoral Revision System
 Arcos Interlocking Distal Stem Surgical Technique Addendum to the Arcos Modular Femoral Revision System One Surgeon. One Patient. Over 1 million times per year, Biomet helps one surgeon provide personalized
EXACTECH KNEE. Operative Technique ADDENDUM. Metaphyseal Cones. Surgeon focused. Patient driven. TM
 EXACTECH KNEE Operative Technique ADDENDUM Metaphyseal Cones Surgeon focused. Patient driven. TM TABLE OF CONTENTS INTRODUCTION...1 DESCRIPTION...1 DETAILED OPERATIVE TECHNIQUE Initial Preparation and
Trabecular Metal Tibial Cone Surgical Technique
 Trabecular Metal Tibial Cone Surgical Technique Provides structural support in areas of bone loss Trabecular Metal Cone 1 Zimmer Trabecular Metal Tibial Cone Surgical Technique Table of Contents Overview
AcUMEDr. FoREARM ROD SYSTEM
 AcUMEDr FoREARM ROD SYSTEM FoREARM ROD SYSTEM Since 1988 Acumed has been designing solutions to the demanding situations facing orthopedic surgeons, hospitals and their patients. Our strategy has been
PRIMARY POROUS PATELLA WITH TRABECULAR METAL. Surgical Technique
 PRIMARY POROUS PATELLA WITH TRABECULAR METAL Surgical Technique 1 SURGICAL TECHNIQUE FOR NEXGEN PRIMARY POROUS PATELLA * WITH TRABECULAR METAL CONTENTS PREPARE THE PATELLA............... 2 Patella Reamer
Ascension. Silicone MCP surgical technique. surgical technique Ascension Silicone MCP
 Ascension Silicone MCP surgical technique WW 2 Introduction This manual describes the sequence of techniques and instruments used to implant the Ascension Silicone MCP (FIGURE 1A). Successful use of this
MetaFix Ludloff Plate
 Merete MetaFix Ludloff Plate Low Profile Locking Bone Plate System Surgical Technique and Ordering Information - Content - Content 1. Description.................................................. 3 2.
Correction System. Surgical Technique
 Nextra Hammertoe Correction System Surgical Technique Maximized Bone Purchase* Stable and Secure Phalanx Optimized Screw Design Adjustable Bone-to-Bone Apposition Progressive Ratchet Tightening Mechanism
HELIOS h i p s y s t e m
 HELIOS h i p s y s t e m Design The Helios stem is a highly polished, High Nitrogen Stainless Steel (ISO5832-9) dual tapered cemented stem. The design of the stem is based on the clinically lly successful
Cementless Tapered Femoral Stem Surgical technique
 Cementless Tapered Femoral Stem Surgical technique Contents Operative summary 4 Pre-operative planning 5 Femoral neck osteotomy 5 Femoral canal preparation 5 Intra-medullary (IM) reamer 6 Sequential rasping
Technique Guide. LCP Proximal Femoral Hook Plate 4.5/5.0. Part of the LCP Periarticular Plating System.
 Technique Guide LCP Proximal Femoral Hook Plate 4.5/5.0. Part of the LCP Periarticular Plating System. Table of Contents Introduction Features and Benefits 2 AO ASIF Principles 4 Indications 5 Surgical
Tradition Hip Primary Surgical Technique
 Design Rationale Many total hip designs in today s marketplace do not take advantage of the known forces present in the femur. Long term stability of a total hip prosthesis requires an implant design and
Progeny Hip Stem. Surgical Protocol and Product Specifications
 Progeny Hip Stem Surgical Protocol and Product Specifications Progeny Hip Stem Introduction With emphasis on maximum stability and ease of use, the StelKast ProgenyTM Hip System provides the surgeon with
SURGICAL TECHNIQUE. Alpine Cementless Hip Stem
 SURGICAL TECHNIQUE Alpine Cementless Hip Stem The following technique is a general guide for the instrumentation of the Alpine Cementless Hip Stem. It is expected that the surgeon is already familiar with
Approach Patients with Confidence
 Surgical Technique Approach Patients with Confidence The ACTIS Total Hip System is the first DePuy Synthes stem specifically designed to be utilized with tissue sparing approaches, such as the anterior
CARTIVA. Synthetic Cartilage Implant SURGICAL IMPLANTATION TECHNIQUE. First Metatarsal Phalangeal Joint THE DIFFERENCE IS MOVING.
 CARTIVA Synthetic Cartilage Implant SURGICAL IMPLANTATION TECHNIQUE First Metatarsal Phalangeal Joint THE DIFFERENCE IS MOVING. CARTIVA SYNTHETIC CARTILAGE IMPLANT TABLE OF CONTENTS Introduction... 3 Cartiva
Surgical Technique. Unisyn Hip System
 Surgical Technique Unisyn Hip System INDICATIONS AND USAGE Significantly impaired joints resulting from rheumatoid, osteo, and post-traumatic arthritis. Revision of failed femoral head replacement, hip
SURGICAL TECHNIQUE CHI. Cannulated Hemi Implants 1 ST MPJ ARTHROPLASTY
 CHI Cannulated Hemi Implants 1 ST MPJ ARTHROPLASTY SURGICAL TECHNIQUE CHI Cannulated Hemi Implants Design Rationale Pain of the great toe joint often leads to altered lifestyles. The goal of MPJ implant
TECHNICAL BROCHURE. Capture Facet Fixation System
 TECHNICAL BROCHURE Capture Facet Fixation System Table of Contents Product Overview...2 Instruments...4 Capture Facet Screw Surgical Technique Patient Preparation and Positioning...6 Guide Pin Placement...7
MICRONAIL. Intramedullary Distal Radius System SURGICAL TECHNIQUE
 MICRONAIL II Intramedullary Distal Radius System SURGICAL TECHNIQUE Contents Introduction 3 4 Chapter 1 5 Chapter 2 6 Appendix A 18 Appendix B 19 Surgeon Design Team Introduction Product Information Surgical
Zimmer NexGen MIS Tibial Component. Cemented Surgical Technique IMAGE TO COME
 Zimmer NexGen MIS Tibial Component Cemented Surgical Technique IMAGE TO COME Zimmer NexGen MIS Tibial Component Cemented Surgical Technique 1 Zimmer NexGen MIS Tibial Component Cemented Surgical Technique
Arcos Modular Femoral Revision System. Broach and Calcar Proximal Bodies Surgical Technique
 Arcos Modular Femoral Revision System Broach and Calcar Proximal Bodies Surgical Technique Table of Contents Pre-operative Planning...2 Patient Positioning and Surgical Approach...2 Removal of a Cemented
Resurfacing Distal Femur. Orthopaedic Salvage System
 Resurfacing Distal Femur Orthopaedic Salvage System Primary Arthroplasty OSS 3cm Resurfacing Distal Femur Distal Femoral Resection Drill and ream the distal femur in the following sequence: (Figure 1)
Silicone PIP, MCP & MCP-X (PreFlex)
") Silicone PIP, MCP & MCP-X (PreFlex) Finger Joint Arthroplasty Operative Technique Silicone PIP Silicone MCP Silicone PreFlex (MCP-X) Stryker Disclaimer This publication sets forth detailed recommended
Silicone PIP, MCP & MCP-X (PreFlex) Finger Joint Arthroplasty Operative Technique Silicone PIP Silicone MCP Silicone PreFlex (MCP-X) Stryker Disclaimer This publication sets forth detailed recommended
Surgical Technique Carpal Fusion
 Carpal Fusion Patent and Patent Pending CAUTION: Federal Law (USA) restricts this device to sale by or on the order of a physician. INDICATIONS FOR USE The Extremity Medical Lag Screw and X-Post System
VerSys LD/Fx Cemented and Press-Fit Hip Prostheses. Surgical Technique IMAGE TO COME. Versatile solutions for total and partial hip replacement
 VerSys LD/Fx Cemented and Press-Fit Hip Prostheses Surgical Technique IMAGE TO COME Versatile solutions for total and partial hip replacement VerSys LD/Fx Cemented and Press-Fit Hip Prostheses VerSys
LOWER EXTREMITIES SINGLE-USE INSTRUMENTATION SURGICAL IMPLANTATION TECHNIQUE. First Metatarsal Phalangeal Joint FOOT THE DIFFERENCE IS MOVING.
 LOWER EXTREMITIES SINGLE-USE INSTRUMENTATION SURGICAL IMPLANTATION TECHNIQUE First Metatarsal Phalangeal Joint FOOT THE DIFFERENCE IS MOVING. CARTIVA SYNTHETIC CARTILAGE IMPLANT SURGICAL IMPLANTATION TECHNIQUE
Surgical Technique. Hip System
 Surgical Technique Hip System INDICATIONS FOR USE The TaperSet Hip System is designed for total or partial hip arthroplasty and is intended to be used with compatible components of the Consensus Hip System.
TOTAL KNEE ARTHROPLASTY SYSTEM
 SURGICAL TECHNIQUE TOTAL KNEE ARTHROPLASTY SYSTEM 90-SRK-700000 B.0 0 Contents 1. Implant Sizing 2. Surgical Technique a. Incision and Exposure b. Distal Femoral Resection c. Tibial Resection d. Femoral
AML Hip System. Design Rationale/ Surgical Technique
 AML Hip System Design Rationale/ Surgical Technique Design Rationale Evolution In 1977, DePuy Synthes Companies introduced the original cementless total hip. The AML Hip launched in order to solve one
TORNIER BIO-RSA. Bony Increased Offset - Reversed Shoulder Arthroplasty SURGICAL TECHNIQUE
 TORNIER BIO-RSA Bony Increased Offset - Reversed Shoulder Arthroplasty SURGICAL TECHNIQUE 2 Table of Contents: Concept...4 Bony Increased Offset Reversed Shoulder Arthroplasty (BIO-RSA ) Concept...4 Surgical
Bone Preservation Stem
 TRI-LOCK Bone Preservation Stem Featuring GRIPTION Coating Surgical Technique Implant Geometry Extending the TRI-LOCK Stem heritage The original TRI-LOCK Stem was introduced in 1981. This implant was
SURGICAL TECHNIQUE. Alpine Cemented Hip Stem
 SURGICAL TECHNIQUE Alpine Cemented Hip Stem The following technique is a general guide for the instrumentation of the Alpine Cemented Hip Stem. It is expected that the surgeon is already familiar with
Technique Guide Hip Resurfacing System
 Technique Guide Hip Resurfacing System Approximately 5%-18% of all hip arthroplasties are completed on patients with a primary diagnosis of osteonecrosis. Patients are generally younger adults age 35 years
HammerFUZE HAMMERTOE COMPRESSION SYSTEM SURGICAL TECHNIQUE
 HammerFUZE HAMMERTOE COMPRESSION SYSTEM SURGICAL TECHNIQUE HammerFUZE HAMMERTOE COMPRESSION SYSTEM SURGICAL TECHNIQUE Design Rationale The HammerFUZE Hammertoe Compression System was designed to simplify
CHARLOTTE. Snap-Off Screws SURGICAL TECHNIQUE
 CHARLOTTE Snap-Off Screws SURGICAL TECHNIQUE CHARLOTTE snap-off screws surgical technique SURGICAL ADVISORS ROBERT ANDERSON, MD BRUCE COHEN, MD W. HODGES DAVIS, MD Proper surgical procedures and techniques
Triathlon Knee System. Universal Baseplate Surgical Protocol
 Triathlon Knee System Universal Baseplate Surgical Protocol Table of Contents Acknowledgments..........................................................2 Introduction...............................................................2
LCP Medial Distal Tibia Plate, without Tab. The Low Profile Anatomic Fixation System with Angular Stability and Optimal Screw Orientation.
 LCP Medial Distal Tibia Plate, without Tab. The Low Profile Anatomic Fixation System with Angular Stability and Optimal Screw Orientation. Technique Guide LCP Small Fragment System Table of Contents Introduction
Stinson Orthopedics Inc. 303 Twin Dolphin Drive, Suite 600 Redwood City, CA
 Stinson Orthopedics Inc. 303 Twin Dolphin Drive, Suite 600 Redwood City, CA 94065 info@stinsonortho.com www.stinsonortho.com Encina HA Stem Table of Contents Introduction 3 Encina HA Stem Features 4 Surgical
operative technique Kent Hip
 operative technique Kent Hip The Kent Hip Operative Technique The Kent Hip was developed by Mr Cliff Stossel, FRCS in Maidstone, Kent, UK and first implanted in 1986. It was designed to deal with problems
PHALINX. Hammertoe Fixation SURGICAL TECHNIQUE
 PHALINX Hammertoe Fixation SURGICAL TECHNIQUE Contents Chapter 1 4 Product Information 4 Device Description Chapter 2 5 Intended Use 5 Indications 5 Contraindications Chapter 3 6 Surgical Technique 6
Zimmer ITST Intertrochanteric/ Subtrochanteric Fixation System. Abbreviated Surgical Technique
 Zimmer ITST Intertrochanteric/ Subtrochanteric Fixation System Abbreviated Surgical Technique ITST System Abbreviated Surgical Technique Indications The ITST Intramedullary Nail is indicated for use in
Astrid Modular Forefoot System. Surgical Technique
 Astrid Modular Forefoot System Surgical Technique Table of Contents Astrid a System for Surgery of the Forefoot... Scarf Osteotomies...6 Stabilization by Means of Two Parallel Double-Threaded Screws Introduced
Triathlon Knee System Universal Baseplate Surgical Protocol
 Triathlon Knee System Universal Baseplate Surgical Protocol Triathlon Knee System Universal Baseplate Surgical Protocol Table of Contents Acknowledgments... 2 Introduction... 2 Assembly Instructions...
Merete BLP. Surgical Technique. - Bunion Locking Plate - Low Profile Locking Bone Plate System
 Merete BLP - Bunion Locking Plate - Low Profile Locking Bone Plate System Surgical Technique Merete Medical, Inc. 49 Purchase Street Rye, N.Y. 10580 Phone: 914 967-1532 www.merete-medical.com - Surgical
Longevity Offset and Oblique Liners. Surgical Technique
 Longevity Offset and Oblique Liners Surgical Technique Longevity Offset & Oblique Liners Surgical Technique 1 Introduction Complete Acetabular System Joint instability is an important issue in both primary
Clinical Evaluation Surgical Technique
 Clinical Evaluation Surgical Technique Table of Contents EMPERION Specifications 3 EMPERION Surgical Technique 9 EMPERION Catalog 18 Nota Bene: This technique description herein is made available to the
Correction System. Surgical Technique
 Re+Line Bunion Correction System Surgical Technique Bunion Correction System Easy insertion and medial placement accuracy using Landmark Guide technology 1 mm compression slot and fixed tines to encourage
Integra. PyroSphere System SURGICAL TECHNIQUE
 Integra PyroSphere System SURGICAL TECHNIQUE Table of Contents Indications For Use...02 Contraindications...02 Warnings...03 Precautions...03 Patient Positioning...03 Surgical Technique... 04 Step 1 Initial
Revision. Hip Stem. Surgical Protocol
 U2 TM Revision Hip Stem Surgical Protocol U2 Revision Hip Stem Table of Contents Introduction... 1 Preoperative Planning... 2 Femoral Preparation... 3 Trial Reduction... 5 Implant Insertion... 6 Ordering
4766 Research Dr. San Antonio, TX insightdentalsystems.com
 OVERVIEW OF THE INSIGHT DENTAL IMPLANT DELIVERY SYSTEM The IDS system comes in a unit dose implant system where its advantage provides sterile instrumentation in one single-use kit. It is organized to
Surgical Technique. Forearm Fracture Solutions
 Surgical Technique Forearm Fracture Solutions Acumed is a global leader of innovative orthopaedic and medical solutions. We are dedicated to developing products, service methods, and approaches that improve
Enhancing Glenoid Placement. Bigliani/Flatow The Complete Shoulder Solution Cannulated Instruments Surgical Technique
 Enhancing Glenoid Placement Bigliani/Flatow The Complete Shoulder Solution Cannulated Instruments Surgical Technique Bigliani/Flatow The Complete Shoulder Solution Cannulated Instruments 11 Bigliani/Flatow
InCoreTM Lapidus System
 InCoreTM Lapidus System Precision Guided Correction Surgical Technique InCore TM Lapidus System Precision Guided Correction Tri-Planar Correction Targeting Guide is intended to aid and stabilize angular/rotational
Ovation Hip System. Surgical Technique
 Ovation Hip System Surgical Technique Ovation Hip System Surgical Technique Ovation Designing Surgeons: Andrew Petrella, M.D. Lecanto, FL Richard Vlasak, M.D. Gainesville, FL Ovation Tribute Designing
THE NATURAL FIT. Surgical Technique. Hip Knee Spine Navigation
 THE NATURAL FIT Surgical Technique Hip Knee Spine Navigation MiniMAX Surgical Technique Hip Knee Spine Navigation INTRODUCTION The MiniMAX TM is a cementless anatomic stem available in 9 right sizes and
Foot and Ankle Technique Guide Proximal Inter-Phalangeal (PIP) Fusion
 Fusion") Surgical Technique Foot and Ankle Technique Guide Proximal Inter-Phalangeal (PIP) Fusion Prepared in consultation with: Phinit Phisitkul, MD Department of Orthopedics and Rehabilitation University of Iowa
Surgical Technique Foot and Ankle Technique Guide Proximal Inter-Phalangeal (PIP) Fusion Prepared in consultation with: Phinit Phisitkul, MD Department of Orthopedics and Rehabilitation University of Iowa
Integra. Silicone PIP Implant SURGICAL TECHNIQUE
 Integra Silicone PIP Implant SURGICAL TECHNIQUE Table of Contents Indications For Use...2 Contraindications...2 Warnings and Precautions...2 Surgical Technique Preoperative Assessment... 3 Step 1: Initial
SWANSON. Flexible Hinge Toe Implant SURGIC AL TECHNIQUE
 SWANSON Flexible Hinge Toe Implant SURGIC AL TECHNIQUE SWANSON flexible HINGE TOE IMPLANT with SWANSON Flexible Hinge Grommet surgical technique presented by ALFRED B. SWANSON, MD, FACS, GRAND RAPIDS,
Cannulated Angled Blade Plate 3.5 and 4.5, 90.
 Cannulated Angled Blade Plate 3.5 and 4.5, 90. Technique Guide This publication is not intended for distribution in the USA. Instruments and implants approved by the AO Foundation. Table of Contents Introduction
Approach Patients with Confidence
 Approach Patients with Confidence The is the first stem specifically designed to be utilized with tissue sparing approaches, such as the anterior approach, as well as traditional approaches. The implant
NeoFit. Metatarsophal angeal Arthrodesis Pl ate
 NeoFit Metatarsophal angeal Arthrodesis Pl ate 2 NEOFIT - TABLE OF CONTENTS PRODUCT DESCRIPTION 3 INDICATIONS 6 Download «PRINT» version (white background) SURGICAL TECHNIQUE 7 1 - Incision 8 2 - Preparation
Description Materials Indications Patient selection factors to be considered include: Contraindications Absolute contraindications include:
 Description The Patello-Femoral Wave Arthroplasty Systems incorporate a distal femoral trochlear surface articular component that mates to a taper post via a taper interlock, and an all-polyethylene patella
FLH /11
 FLH 225 04/11 This publication has been issued by: European Central Marketing Waterton Industrial Estate Bridgend, South Wales CF31 3XA, United Kingdom Tel: +44 (0)1656 655221 Fax: +44 (0)1656 645454 www.biomet.com