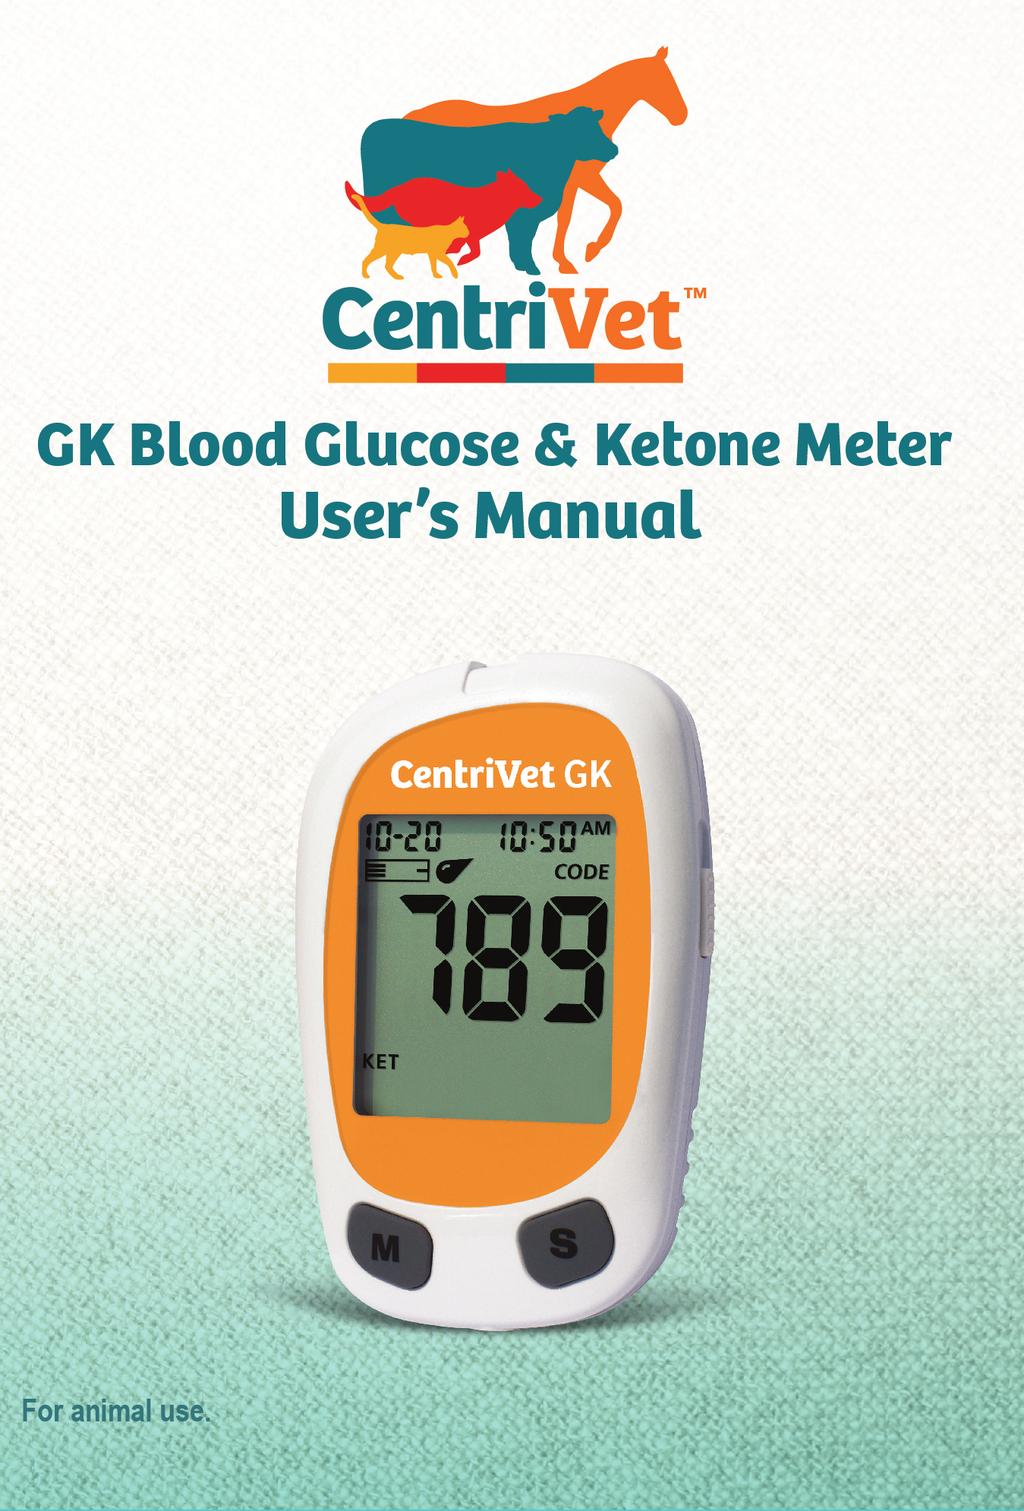
CentriVet GK Blood Glucose & Ketone Monitoring System
|
|
|
- Morgan Wheeler
- 5 years ago
- Views:
Transcription
1


")


2 CentriVet GK Blood Glucose & Ketone Monitoring System FOR ANIMAL USE. NOT FOR HUMAN USE. Welcome and thank you for choosing the CentriVet GK Blood Glucose & Ketone Monitoring System. The CentriVet GK Blood Glucose & Ketone Monitoring System will provide accurate blood glucose or β-ketone (β-hydroxybutyrate) results from fresh whole blood samples in just a few simple steps. To ensure accurate results from the CentriVet GK Blood Glucose & Ketone Monitoring System, please follow these guidelines: Read instructions before use. Use the code chip that accompanies each box of test strips with the appropriate animal species it is labeled for. Use only CentriVet Blood Glucose Test Strips with the CentriVet GK Blood Glucose & Ketone Meter to test the animal s blood glucose concentration. i
3 Use only CentriVet Blood Ketone Test Strips with the CentriVet GK Blood Glucose & Ketone Meter to test the animal s blood β-ketone concentration. For animal use. The CentriVet GK Blood Glucose & Ketone Monitoring System is intended to be used by veterinary professionals or under the guidance of a veterinary professional as an aid to monitor glucose and ketone levels in animals. Test only whole blood samples with the CentriVet GK Blood Glucose & Ketone Monitoring System. Keep out of reach of children. Do not feed control solution to animal. Keep this User s Manual in a safe place, do not discard it. Use the CentriVet GK Blood Glucose & Ketone Meter according to the instruction. If not, the protection provided by the meter may be impaired. By following the instructions outlined in this User's Manual, you will be able to use the CentriVet GK Blood Glucose & Ketone Monitoring System to monitor blood glucose and β-ketone levels in your animal. ii
4 Table of Contents Getting Started 1 Component Descriptions 3 CentriVet GK Blood Glucose & Ketone Meter.. 4 Meter Display 6 CentriVet Blood Glucose Test Strips.. 9 CentriVet Glucose Control Solution CentriVet Blood Ketone Test Strips 15 CentriVet Ketone Control Solution.. 18 Installing the Battery. 20 Meter Setup Before Testing. 21 Step 1 Coding the Meter. 21 Step 2 Adjusting the Meter Settings. 24 Performing a Quality Control Test. 29 Glucose Quality control Test 29 Ketone Quality control Test Testing Your Animal s Blood Glucose. 36 Animal Specimen Collection and Preparation Step 1 Testing Blood Glucose 37 "HI" and "LO" Messages 40 "Hypo" and "Hyper" Messages 40 "Ketone" Message 41 Precautions and Limitations for Blood Glucose Testing 41 Testing Your Animal s Blood Ketone Animal Specimen Collection and Preparation 42 Step 1 Testing Blood Ketone. 43 "HI" Message. 45 Precautions and Limitations for Blood Ketone Testing.. 46 Using the Meter Memory.. 47 Viewing Stored Records 47 Clearing the Memory 49 iii
5 Maintenance. 50 Replacing the Battery. 50 Caring for the CentriVet GK Blood Glucose & Ketone Monitoring System Comparing Meter and Laboratory Results.. 52 Troubleshooting Guide. 53 Specifications 55 Warranty 56 Index 57 iv


6 Getting Started Before testing, read the instructions carefully to learn about all the components of the CentriVet GK Blood Glucose & Ketone Monitoring System. Some of the components may need to be purchased separately. Please check the list of contents on the outer box for details on which components are included with your purchase. CentriVet GK Blood Glucose & Ketone Meter CentriVet Blood Ketone Test Strips CentriVet Ketone Code Chip CentriVet Ketone Control Solution 1

7 CentriVet Blood Glucose Test Strips CentriVet Glucose Code Chip CentriVet Glucose Control Solution Carrying Case 2
8 Component Descriptions 1. Meter: Reads the test strips and displays the blood glucose or β-ketone concentration. 2. Test Strips: Strips with a chemical reagent system used with the meter to measure glucose or β-ketone concentration in blood. 3. Code Chip: Automatically calibrates the meter with the code number and species of animal when inserted into the meter. 4. Control Solution: Verifies the proper operation of the monitoring system by checking the test strips and meter against a pre-calibrated control solution called Control Solution. 5. Carrying Case: Provides portability for blood glucose or β-ketone testing wherever you go. 6. User's Manual: Provides detailed instructions on using the CentriVet GK Blood Glucose & Ketone Monitoring System. 7. Quick Reference Guide: Provides a brief overview of the CentriVet GK Blood Glucose & Ketone Monitoring System and testing procedures. This small guide can be kept in the carrying case. 8. Quick Start Guide: Provides a brief overview of the CentriVet GK Blood Glucose & Ketone Meter setup. This small guide can be kept in the carrying case. 9. Warranty Card: Should be completed and returned to the distributor to qualify for the 5-year meter warranty. 3

9 CentriVet GK Blood Glucose & Ketone Meter The CentriVet GK Blood Glucose & Ketone Meter is designed for use with the CentriVet Blood Glucose Test Strips to test blood glucose in animals and for use with the CentriVet Blood Ketone Test Strips to test blood β-ketone concentration in animals. Use this diagram to become familiar with all the parts of the meter. Code Chip Strip Port Liquid Crystal Display (LCD) Strip Ejector M Button SButton Data Port Battery Cover Tab Battery Cover Code Chip Slot 4
10 Liquid Crystal Display (LCD): Shows test results, and guides you through the testing process. M Button: Recalls previous test results from the meter memory and performs other menu selection functions. S Button: Selects meter settings and performs other menu selection functions. Strip Port: Test strips are inserted into this area to perform a test. Strip Ejector: Slide the ejector forward to discard the used test strip. Note: Dispose of blood samples and materials carefully. Treat all blood samples as if they are infectious materials. Follow proper precautions and obey all local rules when disposing of blood samples and materials. Battery Cover: Remove the battery cover to install two CR2032 coin cell batteries. Battery Cover Tab: Press the battery cover tab to open battery cover. Code Chip Slot: Insert the code chip. Data Port: Sends information to a computer via an optional data transfer cable to view, analyze and print stored data in the meter. Please contact your distributor to see if this accessory is supported with your meter. 5
: Appears with the control solution test result or when you mark an invalid blood glucose test result to prevent it from being included in the average.")
11 Meter Display Blood Drop / Strip Symbol: Two symbols that appear at the same time to tell you when to apply the sample. Pound Sign (#): Appears with the control solution test result or when you mark an invalid blood glucose test result to prevent it from being included in the average. Battery Symbol: Warns when you should replace the battery. Ketone / Glucose: KET indicates a code number of ketone test strips or a blood β-ketone test result. GLU indicates a code number of glucose test strips or a blood glucose test result. These two symbols will never appear at the same time. Control Solution Symbol: Indicates a control test result. A pound sign (#) will also be displayed when control solution symbol appears. Test Result Area: Indicates code number and test result. Measurement Unit: Only one unit of blood glucose concentration will be displayed on the meter and cannot be adjusted. Before Meal Symbol: Appears when before-meal test results are displayed. After Meal Symbol: Appears when after-meal test results are displayed. Test Remind Symbol: Appears to remind you to test. Hyper Symbol: Appears when the blood glucose concentration is above the Hyperglycemia (high blood sugar) target level that you have set. Hypo Symbol: Appears when the blood glucose concentration is below the Hypoglycemia (low blood sugar) target level that you have set. 6
12 Ketone?: Appears when the blood glucose concentration is above 16.7 mmol/l (300 mg/dl). A ketone test is recommended when this symbol appears. Consult your veterinarian professional about testing for ketones in your animal. Note: This symbol does not mean that the system has detected ketones. It simply recommends that a ketone test should be taken. CODE: Appears with the code number of the test strips. MEM: Shows a test result stored in memory. 7
13 Meter Use and Precautions The meter is pre-set to display blood glucose concentration in either millimoles per liter (mmol/l) or milligrams per deciliter (mg/dl) depending on which unit of measure is standard in your country. This unit of measure cannot be adjusted. The meter is pre-set to display blood β-ketone concentration only in millimoles per liter (mmol/l). Do not get water or other liquids inside the meter. Keep the strip port area clean. Keep the meter dry and avoid exposing it to extremes in temperature or humidity. Do not leave it in your car. Do not drop the meter or get it wet. If you do drop the meter or get it wet, check the meter by running a quality control test. Refer to Quality Control Test on page 29 for instructions. Do not take the meter apart. Taking the meter apart will void the warranty. Refer to the Caring for the Meter section on page 51 for details on cleaning the meter. Keep the meter and all associated parts out of reach of children. Note: Follow proper precautions and all local regulations when disposing of the meter and used batteries. All Glucose systems preventive warnings with regard to EMC 1. This instrument is tested for immunity to electrostatic discharge as specified in IEC However, use of this instrument in a dry environment, especially if synthetic materials are present (synthetic clothing, carpets, etc.) may cause damaging static discharges that may cause erroneous results. 2. This instrument complies with the emission and immunity requirements described in EN and EN Do not use this instrument in close proximity to sources of strong electromagnetic radiation. It may interfere with proper operation of the meter. 3. For professional use, the electromagnetic environment should be evaluated prior to operation of this device. 8
14 CentriVet Blood Glucose Test Strips The CentriVet Blood Glucose Test Strips work with the CentriVet GK Blood Glucose & Ketone Meter to measure the glucose concentration in whole blood from your animal. The CentriVet Blood Glucose Test Strips are thin strips with a chemical reagent system. After the strip is inserted into the meter, blood is applied to the sample tip of the test strip. The blood is then automatically absorbed into the reaction cell. A reaction takes place, and a transient electrical current is formed. The blood glucose concentration is calculated based on the electrical current detected by the meter. The result is shown on the meter display. The meter is calibrated to display plasma-like concentration results. Sample Tip Apply blood or control solution here. Check Window Check to confirm that a sufficient sample has been applied. Contact Bars Insert this end of the test strip into the meter until it stops. IMPORTANT: Apply sample only to the sample tip of the test strip. Do not apply blood or control solution to the top of the test strip as this may result in an inaccurate reading. Correct Incorrect Hold the blood sample to the sample tip of the test strip until the check window is completely full and until the meter begins to count down. If you applied the blood sample, but the meter does not start to count down, you may reapply a second 9
15 drop of blood within 3 seconds. If the check window does not fill and meter starts to countdown, then do not add more blood to the test strip. If you do then you may get an E-5 message or an inaccurate test result. In this case if the meter begins to countdown and check window does not fill, discard the strip and begin the test again with a fresh test strip. Correct Incorrect Code Number Each package of blood glucose test strips is printed with a code number (CODE) that starts with a G, lot number (LOT), unopened expiration date (EXP) and control range (CTRL). On the code chip, the front side will include the code chip number, starting with a G. On the top side of the code chip, a letter will denote which species of animal the code chip has been calibrated for. In the picture below, B specifies that this code chip is for testing bovine blood. This information can be found on the test strip box. Take special care to check that the correct code chip is being used with the appropriate species of animal. 10
16 Storage and handling Please review the following storage and handling instructions: Store blood glucose test strips in a cool, dry place at F (2-35ºC). Store them away from heat and direct sunlight. Do not freeze or refrigerate. Do not store or use test strips in a humid place such as a bathroom. Do not store the meter, the test strips or control solution near bleach or cleaners that contain bleach. Replace the cap on the test strip vial immediately after removing a test strip. The test strip should be used immediately after removing it from container. Do not use the test strips past the unopened expiration date printed on the label. Using test strips past the unopened expiration date may give incorrect test results. Note: The expiration date is printed in Year-Month format means January, Special instructions for blood glucose test strip in the vial Test strips should be stored in their tightly capped protective vial to keep them in good working condition. Do not store test strips outside their protective vial. Test strips must be stored in the original vial with the cap tightly closed. Do not transfer test strips to a new vial or any other container. Replace the cap on the test strip vial right away after removing a test strip. A new vial of blood glucose test strips may be used for 6 months after first being opened. Write the opened expiration date on the vial label after opening. Discard the vial 6 months after it is first opened. Usage after this period may result in inaccurate readings. Blood Glucose Test Strip Precautions For animal use. Test strips are to be used outside the body for testing purposes. Do not use test strips that are torn, bent, or damaged in any way. Do not reuse test strips. Before running a blood glucose test, make sure that the code number on the 11
17 meter display matches the number shown on the blood glucose test strip vial and that the correct code chip is selected for the type of animal being tested. Keep the test strip vial away from children. Consult your veterinarian before making any changes in your animal s treatment plan based on the blood glucose test results. See the CentriVet Blood Glucose Test Strips insert for more details. 12
18 CentriVet Glucose Control Solution The CentriVet Glucose Control Solution can be used for a glucose quality control test. CentriVet Glucose Control Solution The CentriVet Glucose Control Solution contains a known concentration of glucose. It is used to confirm that the meter and glucose test strips are working together properly and that you are performing the glucose test correctly. It is important to run a glucose quality control test regularly to make sure you are getting correct glucose test results for your animal. You should run a glucose quality control test: Before you first use the meter to test blood glucose, to familiarize yourself with its operation. Before using a new box of blood glucose test strips. When you suspect that the meter or blood glucose test strips are not working properly. When you suspect that the blood glucose test results are inaccurate, or if they are inconsistent with the animal s physical behavior. When you suspect the meter is damaged. After cleaning the meter. At least once a week. Refer to Glucose Quality Control Test on page 29 for instructions on running a glucose quality control test. 13
19 Storage and Handling Please review the following storage and handling instructions: Store the glucose control solution at F (2-30 C). Do not refrigerate or freeze. If the control solution is cold, do not use until it has warmed to room temperature. Use before the unopened expiration date that is shown on the bottle. Note: The expiration date is printed in Year-Month format means January, 2016 Each bottle of glucose control solution can be used for 6 months after first opened. Record the opened expiration date on the bottle label. Glucose Control Solution Precautions For animal use. The glucose control solution is for testing only outside the body. Do not swallow, inject, or feed to animal. Shake well before using. Glucose control solution tests are specified to be accurate only when tested between 10 and 40 C ( F). The control ranges shown on the blood glucose test strip vial are not recommended ranges for blood glucose levels. Blood glucose target ranges should be determined by a veterinary professional. Do not touch the test strip with the tip of the control solution bottle. Use the CentriVet Glucose Control Solution with CentriVet Blood Glucose Test Strips to perform a quality control test. See the CentriVet Glucose Control Solution insert for more details. 14
20 CentriVet Blood Ketone Test Strips The CentriVet Blood Ketone Test Strips are thin strips with a chemical reagent system which can work with the CentriVet GK Blood Glucose & Ketone Meter to measure the β-ketone concentration in whole blood. After the strip is inserted into the meter, blood is applied to the sample tip of the test strip. The blood is then automatically absorbed into the reaction cell. A reaction takes place, and a transient electrical current is formed. The blood β-ketone concentration is calculated based on the electrical current detected by the meter. The result is shown on the meter display. The meter is calibrated to display plasma-like concentration results. Sample Tip Apply blood or control solution here. Check Window Check to confirm that a sufficient sample has been applied. Contact Bars Insert this end of the test strip into the meter until it stops. IMPORTANT: Apply sample only to the sample tip of the test strip. Do not apply blood or control solution to the top of the test strip as this may result in an inaccurate reading. Correct Incorrect Hold the blood sample to the sample tip of the test strip until the check window is completely full and until the meter begins to count down. If you applied blood, but the meter does not start to count down, you may reapply a second drop of blood within 3 seconds. If the check window does not fill and meter starts to countdown, 15

21 do not add more blood to the test strip. If you do then you may get an E-5 message or an inaccurate test result. In this case if the meter begins to countdown and check window does not fill, discard the strip and begin the test again with a fresh test strip. Correct Incorrect Code Number Each package of CentriVet Blood Ketone Test Strips is printed with a code number (CODE) that starts with a K, lot number (LOT), unopened expiration date (EXP) and control range (CTRL). On the code chip, the front side will include the code chip number, starting with a K. On the top side of the code chip, a letter will denote which species of animal the code chip has been calibrated for. In the picture below, the B specifies that this code chip has been calibrated for bovine blood. This information is also on the test strip box. Take special care to check that the correct code chip is being for the right species of animal. 16
22 Storage and Handling Please review the following storage and handling instructions: Store CentriVet Blood Ketone Test Strips in a cool, dry place, F (5-30ºC). Store them away from heat and direct sunlight. Do not freeze or refrigerate. Do not store or use test strips in a humid place such as a bathroom. Do not store the meter, the test strips or control solution near bleach or cleaners that contain bleach. Replace the cap on the test strip vial immediately after removing a test strip. The test strip should be used immediately after removing it from container. Do not use the test strips past the unopened expiration date printed on the label. Using test strips past the unopened expiration date may give incorrect test results. Note: The expiration date is printed in Year-Month format means January, Special instructions for blood ketone test strip in the vial Test strips should be stored in their tightly capped protective vial to keep them in good working condition. Do not store test strips outside their protective vial. Test strips must be stored in the original vial with the cap tightly closed. Do not transfer test strips to a new vial or any other container. Replace the cap on the test strip vial right away after removing a test strip. A new vial of test strips may be used for 6 months after first being opened. Write the opened expiration date on the vial label after opening. Discard the vial 6 months after you first open it. Usage after this period may result in inaccurate readings. Blood Ketone Test Strip Precautions For animal use. Test strips are to be used outside the body for testing purposes. Do not use test strips that are torn, bent, or damaged in any way. Do not reuse test strips. Before running a blood β-ketone test, make sure that the code number on the meter display matches the number shown on the test strip vial and that the 17
23 correct code chip is selected for the type of animal that you are testing. Keep the test strip vial away from children. Consult your veterinarian before making any changes in your animal s treatment plan based on the blood β-ketone test results. See the CentriVet Blood Ketone Test Strips insert for more details. CentriVet Ketone Control Solution The CentriVet Ketone Control Solution contains a known concentration of β-ketone. It is used to confirm that the CentriVet GK Blood Glucose & Ketone Meter and the CentriVet Blood Ketone Test Strips are working together properly and that you are performing the test correctly. It is important to run a ketone quality control test to make sure the blood β-ketone test results are correct. CentriVet Ketone Control Solution You should run a ketone quality control test: Before you first use the meter to test blood β-ketone, to familiarize yourself with its operation. Before using a new box of CentriVet Blood Ketone Test Strips. When you suspect that the CentriVet GK Blood Glucose & Ketone Meter or the CentriVet Blood Ketone Test Strips are not working properly. When you suspect that the blood β-ketone test results are inaccurate. When you suspect the meter is damaged. After cleaning the meter. Refer to Ketone Quality Control Test on page 32 for instructions on running a ketone quality control test. 18
24 Storage and Handling Please review the following storage and handling instructions: Store the CentriVet Ketone Control Solution at F (5-30 C). Do not refrigerate or freeze. If the control solution is cold, do not use until it has warmed to room temperature. Use before the unopened expiration date that is shown on the bottle. Note: The expiration date is printed in Year-Month format means January, Each bottle of CentriVet Ketone Control Solution can be used for 6 months after first opened. Record the opened expiration date on the bottle label. Ketone Control Solution Precautions For animal use. The control solution is for testing only outside the body. Do not swallow, inject, or feed to animal. Shake well before using. The tests with CentriVet Ketone Control Solution are specified to be accurate only when tested between 10 and 40 C ( F). The control ranges shown on the test strip vial are not recommended ranges for blood β-ketone levels. Consult with your veterinarian professional for an appropriate blood β-ketone range for your animal. Do not touch the test strip with the tip of the control solution bottle. Use only the CentriVet Ketone Control Solution with the CentriVet Blood Ketone Test Strips to perform a ketone quality control test. See the CentriVet Ketone Control Solution insert for more details. 19
25 Installing the Battery The battery may not be preinstalled in the meter. Two CR V coin cell batteries are required. Please find the batteries in the carrying case and install them according to the following steps: 1. Turn over the meter to locate the battery cover. Press the battery cover tab on the top and lift the cover to open it. 2. Insert two new CR V coin cell batteries on top of the plastic tape. Make sure it is aligned with the plus (+) side facing up in the battery carrier. 3. Close the battery cover and make sure that it snaps shut. 20

26 Meter Setup Before Testing Before testing, the following steps should be followed: Step 1 Coding the Meter Every time you change to a new box of test strips, you need to insert the code chip packed with the new box of test strips. Each code chip will have a set of letters and numbers printed on the code chip that make it unique to the test strips it was packaged with. Coding the meter before using a new box of blood glucose test strips 1. Check that the letter printed on the front side of the code chip starts with a G followed by a code number. The G denotes that this code chip is to be used with the CentriVet Glucose Test Strips. 2. Check that the code number printed on the front side of the code chip matches the code number printed on the vial of test strips. If the two numbers are not the same, you may get inaccurate results. If the code number on the code chip does not match the number on the vial of strips with which it was packaged, please contact your local distributor immediately. 3. The letter printed on the top side of the code chip denotes the species of animal the code chip was designed and calibrated for. The CentriVet GK Blood Glucose and Ketone Monitoring System is uniquely designed to test blood glucose levels for different animal species. Make sure to use the correct code chip for the animal that you are testing. In the example below, the B signifies that this code chip is for testing bovine or cows. 4. With the meter turned off, insert the new glucose code chip into the code chip slot of the meter. It should easily snap into place. The code chip should remain in the meter, do not take it out until you change to another new box of test strips. 21


27 5. Turn the meter on by inserting a blood glucose test strip. You can see the code number and the GLU symbol appear on the center of the screen. The code will now be automatically stored in the meter. If the code on the code chip does not match the code that is displayed on the screen, please contact your local distributor immediately. Note: The most recently used glucose code will be stored in the meter as a default glucose code for the rest of the blood glucose tests, until a new code chip is inserted into the meter. If a blood glucose test strip is inserted and no glucose code is stored in memory, the display will flash and CODE. Coding the meter before using a new box of blood ketone test strips 1. Check that the letter printed on the front side of the code chip starts with a K followed by a code number. The K denotes that this code chip is to be used with the CentriVet Ketone Test Strips. 2. Check that the code number printed on the front side of the code chip matches the code number printed on the vial of test strips. If the two numbers are not the same, you may get inaccurate results. If the code number on the code chip does not match the number on the vial of strips with which it was packaged, please contact your local distributor immediately. 3. The letter printed on the top side of the code chip denotes the species of animal the code chip was designed and calibrated for. The CentriVet GK Blood Glucose and Ketone Monitoring System is uniquely designed to test 22

28 blood ketone levels for different animal types. Make sure to use the correct code chip for the animal that you are testing. In the example below, the B signifies that this code chip is for testing bovine or cows. 4. With the meter turned off, insert the new ketone code chip into the code chip slot of the meter. It should easily snap into place. The code chip should remain in the meter, do not take it out until you change to another new box of test strips. 5. Turn the meter on by inserting a blood ketone test strip. You can see the code number and the KET symbol appear on the center of the screen. The code will now be automatically stored in the meter. If the code number on the ketone code chip does not match the number that is displayed on the screen, please contact your local distributor immediately. Note: The most recently used ketone code will be stored in the meter as a default ketone code for the rest of the blood β-ketone tests, until you insert a new ketone code chip into the meter. 6. If a blood ketone test strip is inserted and no ketone code is stored in memory, the display will flash and CODE. 23
29 Step 2 Adjusting the Meter Settings Before using the meter for the first time, you will need to adjust the settings that are listed in detail below. 1. Meter Setup Mode: Press the S button for 2 seconds to enter the meter setup mode. The meter will automatically enter the setup mode when turned on for the first time. 2. Clock: Set the clock for either 12 or 24 hour mode. Press the M button to switch between the two settings. Then press the S button to save your choice and move on to setting the year, month, and date. Note: The clock needs to be reset after replacing the battery. OR 3. Date: The year will appear at the top of the display. Press the M button until the correct year is displayed. Once you have selected the correct year, press the S button to save your choice, proceeding to setting the month. Press the M button until the correct month is displayed. Then press the S button to save your choice, proceeding to setting the date. Press the M button until the correct date is displayed. Then press the S button to save your choice, proceeding to setting the time. Year Month Date 4. Time: The hour will appear at the top of the display. Adjust the hour with the M button until the correct hour is displayed. Press the S button to save your choice, proceeding to setting the minutes. Press the M button to change to the correct minute. Press the S button to save your choice, proceeding to setting the meal marker feature. 24
30 Hour Hour OR Minute Minute OR 5. Meal Marker: The meter comes with the meal marker feature disabled. The user can enable or disable the meal marker option. The words On or Off will be displayed on the screen. The symbol of before meal and after meal will be displayed as shown below. OR Press the M button to switch between turning the meal marker On and Off. Press the S button to confirm your selection. 6. Audio Feature: The meter comes with the meter audio feature enabled. The meter will give one short beep when it is turned on, after sample detection, and when the result is ready. The meter will sound three short beeps to sound a warning when an error has occurred. Please check the error number on the display to confirm what kind of error has occurred. 25
31 Press the M button to switch between turning the meter beep On and Off. Press the S button to confirm your selection. 7. Ketone Indicator: The meter comes with the Ketone indicator feature disabled. Press the M button to switch between turning the Ketone indicator On and Off. Press the S button to confirm your selection. When the Ketone indicator is enabled, if the test result is higher than 16.7 mmol/l (300 mg/dl), the symbol of "Ketone?" will appear on the display. OR 8. Hyper Indicator: The meter comes with the Hyper indicator feature disabled. Press the M button to switch between turning the Hyper indicator On and Off. Press the S button to confirm your selection. When the Hyper indicator is Off, pressing the S button will go to the next Hypo indicator set up. When the Hyper indicator is On, pressing the S button will go to the Hyper indicator level set up. At the Hyper level set up, press the M button to adjust the Hyper level then press the S button to go to the Hypo indicator set up. OR Note: The meter allows the hyperglycemia level to be as low as 6.7 mmol/l (120 mg/dl) or higher. The hyperglycemia level should be above the 26
32 hypoglycemia level. Consult your veterinary professional before determining what your animal s hyper blood glucose level is. 9. Hypo Indicator: The meter comes with the Hypo indicator feature disabled. Press the M button to switch between turning the Hypo indicator On and Off. Press the S button to confirm your selection. When the Hypo indicator is Off, pressing the S button will go to the Test Reminder set up. When the Hypo indicator is On, pressing the S button will go to the Hypo indicator level set up. At the Hypo level set up, press the M button to adjust the Hypo level then press the S button to go to the Test Reminder set up. OR Note: The meter allows the hypoglycemia level to be as high as 5.6 mmol/l (100 mg/dl). The hyperglycemia level should be above the hypoglycemia level. Consult your veterinary professional before determining what your animal s hypo blood glucose level is. 10. Test Reminder: Test reminder is a useful way to remind you when to test your animal. You can set 1 to 5 reminders per day. The meter is preset with the test reminder disabled. You must turn it on to use this feature. Press the M button to switch between turning the first Test Reminder On and Off. Press the S button to confirm your selection. When the Test Reminder is Off, pressing the S button will go to the setup of the second Test Reminder. When the Test Reminder is On, pressing the S button will go to the setup of the time for the first Test Reminder. Press the M button to adjust the first Test Reminder time. (Time is adjusted by minutes.) Press the S button to confirm the first Test Reminder time and then go to the second Test Reminder set up. When the Test Reminder is Off during the second Test Reminder set up, pressing the S button will go to the setup of the third Test Reminder. When the Test Reminder is On, pressing the S button will go to the setup of the time for the second Test Reminder. Press the M button to adjust the second Test Reminder time. (Time is adjusted by minutes.) Press the S button to confirm the second Test Reminder time and then go to the third Test Reminder set up. 27
33 Repeat the same set up procedure for Test Reminder 3, 4 and 5. After finishing the fifth Test Reminder set up, it will then end the setup mode and power off the meter. If one or more test reminders have been set, the reminder symbol will always appear on the LCD screen when the meter is turned on. The display sample is shown below. OR OR The meter beeps 5 times at the time you set, again two minutes later, and two minutes after that unless you insert a test strip or press any button. This function will still work with Audio feature turned off. When the meter beeps at the time set by the Test Reminder feature, the date, time and strip symbol will be displayed. And the Test Reminder symbol will be flashed. The display sample is shown below. NOTE: The Meal Marker, Ketone Indicator and Hyper/Hypo Indicator are only for indicating blood glucose test results. For any step of the setup, if the M button is pressed and held, it will allow a faster adjustment. The user can press and hold the S button for 2 seconds to stop the set up and turn off the meter during any step of the set up process, except when setting up the year, date and time for the first time after installing a new battery. 28
34 Performing a Quality Control Test The quality control test confirms that the test strips and meter are working together properly, and that you are performing the test correctly. Glucose Quality Control Test The CentriVet Glucose Control Solution can be used for a glucose quality control test. You should run a glucose quality control test: Before you first use the meter to test blood glucose, to familiarize yourself with its operation. Before using a new box of glucose test strips. When you suspect that the meter or blood glucose test strips are not working properly. When you suspect that the blood glucose test results are inaccurate, or if they are inconsistent with your animal s behavior. When you suspect the meter is damaged. After cleaning the meter. At least once a week. 1. Insert a CentriVet Blood Glucose test strip into the strip port, contact bars end first and facing up. (Insert the strip in as far as it will go without forcing.) This will turn on the meter and display all the display segments. If the audio option is on, the meter will beep, signaling the meter is turned on. 2. Check the display to confirm that all the display segments turn on (see display illustration above). 3. Following this display check, the system will enter the test mode. The display will show the date, time and the strip icon with the blood sample icon blinking. 29
 on the blood glucose test strip vial.")

35 The code number and the GLU symbol will be displayed in the center of the screen. Make sure that the code number that appears on the display matches the code number (CODE) on the blood glucose test strip vial. If not, make sure to locate and insert the code chip that came with the box of blood glucose test strips. Do not perform a blood glucose test if the codes still do not match. You will need a new package of blood glucose test strips to perform a test. The blinking test strip and blood drop icon indicates that the test strip is inserted correctly. Note: If the test strip has been inserted incorrectly, the meter will not turn on. 4. Press the M button to mark the test as a control solution test. The control solution symbol will appear on the display once the M button is pressed. Then a drop of glucose control solution can be added. 5. Shake the glucose control solution bottle well, then squeeze it gently and discard the first drop. If the tip clogs, tap the tip gently on a clean, hard surface, then shake again and use. Squeeze out a second small drop on a clean 30
36 nonabsorbent surface. Touch the sample tip of the test strip to the control solution drop. If the audio option is turned on, the meter will beep indicating a test has been started. Note: Do not apply control solution to the test strip directly from the bottle. If you applied the control solution sample but do not see the starting of the count down, you may reapply a second drop within 3 seconds. 6. Once a sufficient sample has been applied, then the meter display will count down from 5 to 1 and then display the blood glucose test result. The glucose control solution test results should be within the control range printed on the blood glucose test strip vial. This means that the blood glucose monitoring system is working properly and that you are performing the procedure correctly. The blood glucose test results are displayed either in mmol/l or mg/dl depending on the unit of measure most common in your country. Note: The glucose control solution range is the expected range for the glucose control solution test results. It is not a recommended range for a blood glucose level. 7. Slide the strip ejector to discard the test strip. The display should also show a pound sign (#) and GLU symbol indicating the test is a glucose control solution test. This shows that the number will not be counted in the 7, 14, 30, 60 and 90-day blood glucose averages. The pound sign (#) will also be displayed when reviewing the results stored in memory. 31
37 OR If the result falls outside the indicated control range: Confirm you are matching the correct range. Control Solution results should be matched to the CTRL range printed on the test strip vial. Check the expiration date of the test strip and control solution. Make sure that the test strip vial and control solution bottle have not been opened for more than 6 months. Discard any test strips or control solution that has expired. Confirm the temperature in which you are testing is between 10 and 40 C ( F). Make sure that the test strip vial and control solution bottle have been tightly capped. Confirm that you are using the same brand of the glucose control solution and the blood glucose test strips. Make sure the code number on the strip vial label matches the code number that appears on the meter display. Make sure that you followed the test procedure correctly. After checking all of the conditions listed above, repeat the glucose quality control test with a new blood glucose test strip. If the results still fall outside of the control range shown on the test strip vial, the meter may be defective. Contact your local distributor for help. Please contact your local distributor for information on ordering CentriVet Glucose Control Solution kits. Ketone Quality Control Test The CentriVet Ketone Control Solution can be used for a ketone quality control test. You should run a ketone quality control test: Before you first use the meter to test blood β-ketone, to familiarize yourself with its operation. Before using a new box of CentriVet Blood Ketone Test Strips. When you suspect that the CentriVet GK Blood Glucose & Ketone Meter or CentriVet Blood Ketone Test Strips are not working properly. 32

. 3. Following this display check, the system will enter the test mode.")
38 When you suspect that the blood β-ketone test results are inaccurate, or if they are inconsistent with the animal s behavior. When you suspect your meter is damaged. After cleaning the meter. 1. Insert a blood ketone test strip into the strip port, contact bars end first and facing up. (Insert the strip in as far as it will go without forcing.) This will turn on the meter and display all the display segments. If the audio option is on, the meter will beep, signaling the meter is turned on. 2. Check the display to confirm that all the display segments turn on (see display illustration above). 3. Following this display check, the system will enter the test mode. The display will show the date, time and the strip icon with the blood sample icon blinking. The code number and KET symbol will be displayed in the center of the screen. Make sure that the code number that appears on the display matches the code number (CODE) on the blood ketone test strip vial. If not, make sure to locate and insert the code chip that came with the box of blood ketone test strips. Do not perform a blood β-ketone test if the codes still do not match. You will need a new package of blood ketone test strips to perform a test. The blinking test strip and blood drop icon indicates that the test strip is inserted correctly. Note: If the test strip has been inserted incorrectly, the meter will not turn on. 4. Press the M button to mark the test as a control solution test. Once the M button is pressed, the control solution symbol will appear on the display. Then a drop of ketone control solution can be added. 33

39 5. Shake the ketone control solution bottle well, then squeeze it gently and discard the first drop. If the tip clogs, tap the tip gently on a clean, hard surface, then shake again and use. Squeeze out a second small drop on a clean nonabsorbent surface. Touch the sample tip of the test strip to the control solution drop. If the audio option is turned on, the meter will beep indicating a test has been started. Note: Do not apply control solution to the test strip directly from the bottle. If you applied the control solution sample but do not see the starting of the count down, you may reapply a second drop within 3 seconds. 6. Once a sufficient sample has been applied, then the meter display will count down from 9 to 1 and then display the blood β-ketone test result. The ketone control solution test results should be within the β-ketone control range printed on the blood ketone test strip vial.this means that the meter and blood ketone test strips are working together properly and that you are performing the procedure correctly. 34
40 The blood β-ketone test results are displayed only in mmol/l. Note: The ketone control solution range is the expected range for the ketone control solution results. It is not a recommended range for a blood β-ketone level. 7. Slide the strip ejector to discard the test strip. The display should also show a pound sign (#) indicating the test is a ketone control solution test. The pound sign (#) will also be displayed when reviewing the results stored in memory. If the result falls outside the indicated control range: Confirm you are matching the correct range. Control Solution results should be matched to the CTRL range printed on the test strip vial. Check the expiration date of the test strip and control solution. Make sure that the test strip vial and control solution bottle have not been opened for more than 6 months. Discard any test strips or control solution that has expired. Confirm the temperature in which you are testing is between 10 and 40 C ( F). Make sure that the test strip vial and control solution bottle have been tightly capped. Confirm that you are using the CentriVet Ketone Control solution that was provided with your kit. Make sure the code number on the strip vial label matches the code number that appears on the meter display. Make sure that you followed the test procedure correctly. After checking all of the conditions listed above, repeat the ketone quality control test with a new blood ketone test strip. If your results still fall outside of the control range shown on the test strip vial, the meter may be defective. Contact your local distributor for help. 35
41 Testing Your Animal s Blood Glucose The following steps will show how to use the CentriVet GK Blood Glucose & Ketone Meter and the CentriVet Blood Glucose test strips to measure your animal s blood glucose concentration. Animal Specimen Collection and Preparation The method of collection is unique for each animal. When using the CentriVet GK Blood Glucose & Ketone Monitoring System, consult with your veterinary professional on the appropriate method of collection. A small drop of fresh whole blood is needed to perform the blood glucose test. Do not use serum or plasma samples. The CentriVet Glucose Test Strips are for testing fresh capillary or venous whole blood. Venous or arterial blood samples should be drawn by veterinary professionals or under the guidance of a veterinary professional. When collecting any type of sample, follow universal blood collection precautions and guidelines. Venous or arterial blood samples in heparin and EDTA anticoagulants/ preservatives may be used. Do not use anticoagulants such as iodoacetate, sodium citrate, or those containing fluoride. Always test the blood sample as close as possible to the time the sample is collected. Otherwise, the venous or arterial blood glucose measurement should be performed within 15 minutes of blood sample collection to minimize the effect of glycolysis. When whole blood in a test tube is used, care should be taken to uniformly distribute red cells throughout the tube before testing. Gently invert the capped tube several times. (Please note do not mix the blood sample in the tube too much.) Please refer to the CentriVet Blood Glucose Test Strips insert for more information. 36
. 3.")
42 Step 1 Testing Blood Glucose Note: Insertion of a new test strip at any time will cause the meter to automatically enter the test mode. 1. Insert a blood glucose test strip into the strip port, contact bars end first and facing up, to turn on the meter and display all the display segments. If the audio option is on, the meter will beep, signaling the meter is turned on. 2. Check the display to confirm that all the display segments turn on (see display illustration). 3. Following this display check, the system will enter the test mode. The display will show the date, time, and the strip icon with the blood sample icon blinking. The code number and GLU will be displayed in the center of the screen. Make sure that the code number appears on the display matches the code number (CODE) on the blood glucose test strip vial. If not, make sure to locate and insert the code chip that came with the box of blood glucose test strips. If the codes still do not match, do not perform a test. You will need a new package of blood glucose test strips to perform a blood glucose test. Note: Check that the animal type letter on the top side of the code chip is appropriate for the species of animal that you are testing. 37
43 4. The blinking test strip and blood drop icon will indicate that the test strip is inserted correctly and a drop of blood can be added. The meter will not turn on if the test strip has been inserted incorrectly. 5. Touch the blood sample to the sample tip at the end of the test strip. If the audio option is turned on, the meter will also beep to indicate the measurement has started. If you applied a drop of blood but do not see the starting of the countdown, you may reapply a second drop of blood within 3 seconds. DO NOT: Apply sample to the front or back of the test strip. Smear the blood drop onto the test strip. 6. The meter will count down from 5 to 1 and then display the measurement results. The meter will also beep to indicate that measurement is complete. Then the blood glucose level will display on the screen, along with the GLU symbol, unit measurement, date, and time of the test. OR 38
44 Blood glucose results are automatically stored in the memory. To mark invalid results and prevent them from being included in the 7, 14, 30, 60 and 90-day averages, press the M and S buttons together. A pound sign (#) will appear on the display to show that the blood glucose test result will not be included when calculating the 7, 14, 30, 60 and 90-day averages. If a blood glucose result is marked by accident, press the M button to unmark the result. After marking the invalid blood glucose result with a pound sign (#), press the S button to confirm the invalid blood glucose result. When the meal marker feature is turned on and a blood glucose test result is displayed, mark the blood glucose result as before meal, after meal, or invalid. Press the M and S buttons together to display the before meal marker symbol, indicating the blood glucose result was taken before a meal. Press the M button again to display the after meal marker symbol, indicating the blood glucose result was taken after a meal. Press the M button again to display the pound sign (#), indicating an invalid blood glucose result. Press the M button again then none of the above markers will be displayed for the blood glucose result. After deciding the selection, press the S button to confirm the selection for before meal marker, after meal marker, invalid result pound sign or none of these three symbols. If an invalid blood glucose result is marked, run the blood glucose test again with a new blood glucose test strip. If an error message appears on the display, refer to the Troubleshooting Guide on page 55. If a "HI" or "LO" appears on the display, refer to "HI" and "LO" messages below. 7. Slide the strip ejector forward to discard the used test strip. 39
45 Note: Dispose of blood samples and materials carefully. Treat all blood samples as if they are infectious materials. Follow proper precautions and obey all local rules when disposing of blood samples and materials. "HI" and "LO" Messages The meter can accurately measure blood glucose concentrations between 0.6 and 33.3 mmol/l ( mg/dl). "HI" and "LO" messages indicate blood glucose results outside of this range. If "HI" appears on the display, the measured blood glucose concentration value is above 33.3 mmol/l (600 mg/dl). The test should be retaken to ensure that no mistake was made in the procedure. If you are certain the meter is functioning properly and no mistakes were made in the procedure, and your animal s blood glucose is still consistently measured as "HI", it indicates severe hyperglycemia (high blood glucose). You should contact your veterinarian immediately. If "LO" appears on the display, the measured blood glucose concentration value is below 0.6 mmol/l (10 mg/dl). The test should be retaken to ensure that no mistake was made in the procedure. If you are certain the meter is functioning properly and no mistakes were made in the procedure, and your animal s blood glucose is still consistently measured as "LO", it may indicate severe hypoglycemia (low blood glucose). You should contact your veterinarian immediately. "Hypo" and "Hyper" Messages Note: "Hypo" and "Hyper" Messages will only appear when testing blood glucose. If Hypo appears on the display, the measured blood glucose concentration value is below the Hypo (low blood sugar) target level that you have set. 40
46 If Hyper appears on the display, the measured blood glucose concentration value is above the Hyper (high blood sugar) target level that you have set. OR OR "Ketone?" Message Note: "Ketone?" Messages will only appear when testing blood glucose. If Ketone? appears on the display, the measured blood glucose concentration value is above 16.7 mmol/l (300 mg/dl). A ketone test is recommended when the Ketone? symbol appears. OR You can perform a ketone test with our CentriVet Blood Ketone Test Strips. Consult your local distributor for ordering the CentriVet Blood Ketone Test Strips kit. Precautions and Limitations for Blood Glucose Testing Please refer to the CentriVet Blood Glucose Test Strips insert for more information. 41
47 Testing Your Animal s Blood Ketone The following steps will show how to use the CentriVet GK Blood Glucose & Ketone Meter and the CentriVet Blood Ketone test strips to measure blood β-ketone concentration in your animal. Animal Specimen Collection and Preparation The method of collection is unique for each animal. When using the CentriVet GK Blood Glucose & Ketone Monitoring System, consult with your veterinary professional on the appropriate method of collection. A small drop of fresh whole blood is needed to perform the blood ketone test. Do not use serum or plasma samples. The CentriVet Blood Ketone Test Strips are for testing fresh capillary and venous whole blood. Venous blood samples should be drawn only by veterinary professionals or under the guidance of a veterinary professional. When collecting sample, follow universal blood collection precautions and guidelines. Venous samples in heparin or EDTA anticoagulants/preservatives may be used. Do not use anticoagulants such as iodoacetate, sodium citrate, or those containing fluoride. Always test the blood sample as close as possible to the time the sample is collected. When whole blood in a test tube is used, care should be taken to uniformly distribute red cells throughout the tube before testing. Gently invert the capped tube several times. (Please note do not mix the blood sample in the tube too much.) Please refer to the CentriVet Blood Ketone Test Strips insert for more information. 42
. 3.")
 on the blood ketone test strip vial.")
48 Step 1 Testing Blood Ketone Note: Insertion of a new blood ketone test strip at any time will cause the meter to automatically enter the test mode. 1. Insert a blood ketone test strip into the strip port, contact bars end first and facing up, to turn on the meter and display all the display segments. If the audio option is on, the meter will beep, signaling the meter is turned on. 2. Check the display to confirm that all the display segments turn on (see display illustration). 3. Following this display check, the system will enter the test mode. The display will show the date, time and the strip icon with the blood sample icon blinking. The code number and KET symbol will be displayed in the center of the screen. Make sure that the code number appears on the display matches the code number (CODE) on the blood ketone test strip vial. If not, make sure to locate and insert the code chip that came with the box of blood ketone test strips. If the codes still do not match, do not perform a test. You will need a new package of blood ketone test strips to perform a blood ketone test. Note: Check that the animal type letter on the top side of the code chip is appropriate for the species of animal that you are testing. 4. The blinking test strip and blood drop icon will indicate that the test strip is inserted correctly and a drop of blood can be added. The meter will not turn on if the test strip has been inserted incorrectly. 43
Blood Glucose & Ketone Monitoring System
 Blood Glucose & Ketone Monitoring System Self monitoring of blood glucose is an integral part of diabetes care, but the high cost of testing can make this impossible. At ACON, our goal is to provide high
Blood Glucose Monitoring System
 Blood Glucose Monitoring System Self monitoring of blood glucose (SMBG) is an important part of diabetes care. But the high cost of testing can make this impossible. At ACON, our goal is to provide high
Blood Glucose Monitoring System
 Blood Glucose Monitoring System Thank you for choosing the On Call Pro Blood Glucose Monitoring System. The System will provide accurate blood glucose results in just a few simple steps. The On Call Pro
Blood Glucose Monitoring System
 Blood Glucose Monitoring System Self monitoring of blood glucose (SMBG) is an important part of diabetes care, but the high cost of testing can make it difficult. At ACON, our goal is to provide high quality
Blood Ketone and Glucose Monitoring System Owner s Guide For Veterinary Animal Use Only Not For Human Use
 Blood Ketone and Glucose Monitoring System Owner s Guide For Veterinary Animal Use Only Not For Human Use Nova Vet Monitor OG PN52899E EN.indd 1 Nova Vet Monitor OG PN52899E EN.indd 2 Nova Vet Blood Ketone
Blood Glucose Monitoring System. User Guide
 Blood Glucose Monitoring System User Guide Table of Contents Introduction...2 Important Safety Instructions...2 About ipet PRO Blood Glucose Monitoring System...3 About ipet PRO Meter...4 About the ipet
Dear HighQ Check System Owner :
 Dear HighQ Check System Owner : Thank you for purchasing the HighQ Check Blood Glucose Monitoring System. This manual provides important information to help you to use the system properly. Before using
Logic. Owner s Guide. Blood Glucose Monitor
 Owner s Guide Logic Blood Glucose Monitor TM You will notice these symbols on your vials of test strips and control solution as well as the label on the back of your BD Logic TM Blood Glucose Monitor.
BRS GM100 Glucose Monitoring System. User Instruction Manual Ver. 3.5
 BRS GM100 Glucose Monitoring System User Instruction Manual Ver. 3.5 TABLE OF CONTENTS Introduction... 3 Intended Use... 3 Understanding the GM100 Glucose Monitoring System... 4 Explanation of the Full
Glucose Meter. User Guide. Veterinary Monitoring System. For dog and cat use only
 Glucose Meter User Guide Veterinary Monitoring System For dog and cat use only Gpet instruction Manual 31/5/09 18:06 Page 2 Gpet instruction Manual 31/5/09 18:06 Page 3 TABLE OF CONTENTS Your g-pet system
GlucCell TM SYSTEM USER S GUIDE Ver 2.1 CELL CULTURE GLUCOSE METER. Important Information. Intended Use. Caution. About the System
 GlucCell TM SYSTEM USER S GUIDE Ver 2.1 Intended Use The GlucCell TM Glucose Monitoring System (The GlucCell TM System) is designed to quantitatively measure the concentration of glucose during cell culture.
Dear Prodigy System Owner:
 User's Manual Dear Prodigy System Owner: You have chosen one of the best blood glucose monitoring systems available. This booklet has important information about the system. Please read it carefully. Your
GlucCell TM SYSTEM USER S GUIDE ver 2.3 CELL CULTURE GLUCOSE METER. Important Information. Intended Use. Caution. About the System
 GlucCell TM SYSTEM USER S GUIDE ver 2.3 Intended Use The GlucCell TM Cell Culture Glucose Monitoring System (The GlucCell TM System) is designed to quantitatively measure the concentration of glucose during
VOICE. Blood Glucose Monitoring System. Owner s Manual
 VOICE Blood Glucose Monitoring System Owner s Manual English Dear FORA Diamond VOICE System Owner: Thank you for purchasing the FORA Diamond VOICE Blood Glucose Monitoring System. This manual provides
PRIMA. Blood Glucose Monitoring System. Owner s Manual
 PRIMA Blood Glucose Monitoring System Owner s Manual English Dear FORA Diamond PRIMA System Owner: Thank you for purchasing the FORA Diamond PRIMA Blood Glucose Monitoring System. This manual provides
Table of Contents. Section 1 Introduction... 1 Section 2 Getting Started... 2 Section 3 Components... 5
 Table of Contents Section 1 Introduction... 1 Section 2 Getting Started... 2 Section 3 Components... 5 Meter 5 Test Strips 8 Test Devices 8 Control Strips or Control Devices 13 Section 4 Initial Setup...
Blood Glucose Monitoring System. Owner s Booklet
 Blood Glucose Monitoring System Owner s Booklet The FreeStyle Freedom Lite Meter and How It Works System Check Screen This display always appears when the meter is turned on. You should check that your
If you have questions or simply want more information, please call your veterinarian or visit our website at
 OWNERS GUIDE 2 Dear WellionVet GLUCO CALEA Owner, Thank you for choosing the WellionVet GLUCO CALEA Blood Glucose Monitor System that will help you monitoring the blood sugar levels of your pet. We designed
MARSHALLTOWN MEDICAL & SURGICAL CENTER Marshalltown, Iowa
 MARSHALLTOWN MEDICAL & SURGICAL CENTER Marshalltown, Iowa CARE OF PATIENT POLICY & PROCEDURE Policy Number: 4:10 Subject: Policy: Glucose Monitoring (Accuchek) Nursing department staff and laboratory staff
PLUS One. Blood Glucose Monitoring System. Owner s Manual
 PLUS One Blood Glucose Monitoring System Owner s Manual Dear PLUS One System Owner: Thank you for purchasing the PLUS One Blood Glucose Monitoring System. This manual provides important information to
Items in the package:
 Intended Use: The EasyLife Hb Monitoring System is designed for in vitro diagnostic use only (external use only), and is suitable for self-testing. The system is for healthcare professionals and persons
2. Before Testing Monitor Checker Test...10 Inserting Lancets into Lancing Device...11 Quality Control Testing...13
 Table of Contents 1. About your HemoSmart Haemoglobin Screening System Contents of Kit...4 HemoSmart Haemoglobin Meter...5 HemoSmart Haemoglobin Test Strip...7 Adjustable Lancing Device and Lancets...8
Blood Glucose Monitoring System
 Blood Glucose Monitoring System Contents Chapter 1 OMRON Blood Glucose Monitoring System HEA-232 1.1 Introduction 1.2 List of Kit Contents 1.3 Product and Meter Display Chapter 2 Installing and Setting
User s Manual Blood Glucose Meter
 User s Manual Blood Glucose Meter Contents Introduction...3 Chapter 1: Your New System...5 Chapter 2: Blood Glucose Tests...13 Chapter 3: Control Tests...25 Chapter 4: Meter Settings...31 Chapter 5: Review
User Instruction Manual. Read this User Instruction Manual carefully before you start testing.
 User Instruction Manual Read this User Instruction Manual carefully before you start testing. TABLE OF CONTENTS Introduction........................................... 4 Intended Use..........................................
User Guide For in vitro Diagnostic Use in Animals Featuring the AlphaTRAK 2 Meter
 Distributed by Zoetis Inc. Kalamazoo, MI 49007 BLOOD GLUCOSE MONITORING SYSTEM SYSTÈME DE SURVEILLANCE DE LA GLYCÉMIE www.alphatrakmeter.com Contact Customer Care at 1-888-963-8471 User Guide For in vitro
CoaguChek S System. Quick Reference Guide. This is a CLIA-waived System. Coagulation Testing with Fresh Whole Blood
 CoaguChek S System This is a CLIA-waived System Quick Reference Guide Coagulation Testing with Fresh Whole Blood May not print or view at 100% All unmarked prints black. Coag Swoosh prints gradients of
GlucoCheck BLOOD GLUCOSE MONITORING SYSTEM OWNER'S MANUAL
 GlucoCheck BLOOD GLUCOSE MONITORING SYSTEM OWNER'S MANUAL GlucoCheck BLOOD GLUCOSE MONITORING SYSTEM OWNER'S MANUAL Version 1.0 January, 2010 311-4277100-001 Dear GlucoCheck XL System Owner: Thank you
Prodigy Talking Meter Owner s Manual. Dear Prodigy Owner:
 Dear Prodigy Owner: Thank you for choosing the Prodigy AutoCode Talking blood glucose monitoring system. Please read this manual carefully as it contains important information about your new Prodigy system.
If you have questions or simply want more information, please call your veterinarian or visit our website at
 OWNERS GUIDE 2 Dear WellionVet GLUCO CALEA Owner, Thank you for choosing the WellionVet GLUCO CALEA Blood Glucose Monitor System that will help you monitoring the blood sugar levels of your pet. We designed
Blood Glucose Monitoring System
 Blood Glucose Monitoring System Dear Voyage TM System User, Thank you for choosing the Voyage TM system! The Voyage TM blood glucose monitoring system is designed for easy testing of blood glucose and
Dear Wellion LEONARDO GLU/CHOL (plus) Owner,
 Owner,") OWNER S GUIDE Dear Wellion LEONARDO GLU/CHOL (plus) Owner, Thank you for choosing the Wellion LEONARDO GLU/CHOL (plus) Blood Glucose and Cholesterol Monitoring System to help you easily monitor your blood
OWNER S GUIDE Dear Wellion LEONARDO GLU/CHOL (plus) Owner, Thank you for choosing the Wellion LEONARDO GLU/CHOL (plus) Blood Glucose and Cholesterol Monitoring System to help you easily monitor your blood
Dear Embrace Owner Embrace N0 Code
 Dear Embrace Owner, Dear Embrace Owner Embrace N0 Code Thank you for choosing the Embrace No Code Blood Glucose Monitoring System to help you manage your diabetes. We designed the Embrace No Code Blood
BeneCheck BK6-12M. Plus Multi-Monitoring Meter and Strips
 BeneCheck BK6-12M Plus Multi-Monitoring Meter and Strips The BeneCheck BK6-12M multi-monitoring system is an easy to use, handheld device which allows you to check your Total Cholesterol, as well as Blood
BLOOD GLUCOSE MONITORING SYSTEM OWNER'S MANUAL
 Voice TD-4280 BLOOD GLUCOSE MONITORING SYSTEM OWNER'S MANUAL Dear GlucoRx Nexus Voice TD-4280 System Owner: Thank you for using the GlucoRx Nexus Voice TD-4280 Blood Glucose Monitoring System. This manual
GM700S USER S MANUAL. Blood Glucose Monitoring System
 GM700S BIONIME GmbH Tramstrasse 16, 9442 Berneck Switzerland E-mail: info@bionime.ch 0197 101-3GM780-011 EN Rev. Date: September/2014 BIONIME CORPORATION No. 100, Sec. 2, Daqing St., South Dist., Taichung
LeadCare BLOOD LEAD ANALYZER. Quick Reference Guide
 LeadCare II BLOOD LEAD ANALYZER Quick Reference Guide Precautions Precautions Caution The LeadCare II Blood Lead Analyzer is a CLIA-waived device. Facilities that perform tests with the LeadCare II System
Blood Glucose & Ketone Monitoring System. User s Manual
 Blood Glucose & Ketone Monitoring System User s Manual Definition of Symbols These symbols are associated with your meter. Batch code This packaging is capable of being recycled Catalog number Manufacturer
ISO IVD 13485: : :2015
 ISO ISO 15197:2013 9001:2015 ISO 13485:2016 IVD Table of Contents Important Information About Your Gluco Spark Monitoring System... 1 Important Health-Related Information... 1 Alternate Test Site... 2
Blood Glucose Monitoring System 12:24 PM 10/13/12. mg/dl. Before Meal. See Options. Uses only Contour Next blood glucose test strips USER GUIDE
 Blood Glucose Monitoring System 10/13/12 See Options 12:24 PM mg/dl 93 Before Meal Uses only Contour Next blood glucose test strips USER GUIDE INDICATIONS FOR USE The Contour Next blood glucose monitoring
PROCEDURE. TITLE: Bedside Glucose Monitoring PC Laboratory. Issuing Department: Clinical Director Signature: Departments Involved:
 PROCEDURE TITLE: Bedside Glucose Monitoring Issuing Department: Clinical Director Signature: Departments Involved: Laboratory Nursing Effective Date: 10/97 Review Dates: 09/01, 07/02, 05/13 Revision Dates:
Dear Wellion GALILEO GLU/KET (plus) Owner,
 Owner,") OWNER S GUIDE Dear Wellion GALILEO GLU/KET (plus) Owner, Thank you for choosing the Wellion GALILEO GLU/KET (plus) Blood Glucose and Ketone Monitoring System to help you easily monitor your blood sugar
OWNER S GUIDE Dear Wellion GALILEO GLU/KET (plus) Owner, Thank you for choosing the Wellion GALILEO GLU/KET (plus) Blood Glucose and Ketone Monitoring System to help you easily monitor your blood sugar
Owner's Booklet. Blood Glucose Monitoring System. Accurate, complete blood glucose monitoring through advanced biosensor technology
 Owner's Booklet Blood Glucose Monitoring System Accurate, complete blood glucose monitoring through advanced biosensor technology i-sens, Inc. 465-6 Wolgye4-dong, Nowon-gu Seoul 139-845, Korea www.i-sens.com
User s Manual Blood Glucose Meter
 User s Manual Blood Glucose Meter This file may not print or view at 100%. Die lines and color breaks do not print. Holding Area text, box and rules do not print. Roche USA 54082 V2/1 07790953001 07790953001(01)
This fi le may not print or view at 100%. Die lines and color breaks do not print.
 This fi le may not print or view at 100%. Die lines and color breaks do not print. Roche USA 43149 V6/1 05212685002 Schwarz Roche USA 43149 V6/2 05212685002 Cyan Roche USA 43149 V6/3 05212685002 Magenta
Blood Glucose Measurement. Omnitest 5 & Omnican Lance FAQ Frequently Asked Questions
 Blood Glucose Measurement Omnitest 5 & Omnican Lance FAQ Frequently Asked Questions FAQ Omnitest 5 & Omnican Lance CONTENT Omnitest 5 Overview 3 Application Range 5 Target Groups 5 Test Strips 5 Settings
BLOOD GLUCOSE MONITORING SYSTEM USER GUIDE
 BLOOD GLUCOSE MONITORING SYSTEM USER GUIDE Thank you for choosing the Contour blood glucose monitoring system! We are proud to be your partner in helping you manage your diabetes. Our goal is to make this
Dear HemoSmart GOLD Owner
 Dear HemoSmart GOLD Owner Thank you for choosing the HemoSmart GOLD. All the information that will be needed to use and maintain the HemoSmart GOLD System is included in this manual. Read it carefully
Blood Glucose and ß-Ketone Self-Monitoring System
 MASTER 2. System overview 2.1 Meter FRONT TEST STRIP PORT Blood Glucose and ß-Ketone Self-Monitoring System ENTER ( ) BUTTON UP/DOWN ( / ) BUTTONS USER MANUAL TEST STRIP PORT Test strip should be inserted
USER GUIDE. The NO CODING technology provides accurate and fast blood glucose monitoring. Uses only Bayer s CONTOUR PLUS blood glucose test strips
 Blood Glucose Monitoring System The NO CODING technology provides accurate and fast blood glucose monitoring Uses only Bayer s CONTOUR PLUS blood glucose test strips USER GUIDE INTENDED USE Bayer's CONTOUR
Nova Max Link Blood Glucose Monitor Owner s Guide
 Nova Max Link Blood Glucose Monitor Owner s Guide Nova Biomedical 200 Prospect Street Waltham, MA 02454-9141 U.S.A. Nova Customer Care Canada Telephone: 1-800-260-1021 Web site: www.novacares.ca Made in
Important Safety Instructions
 Dear Embrace EVO Owner Thank you for choosing the Embrace EVO Blood Glucose Meter to help you manage your diabetes. We designed the Embrace EVO Blood Glucose Meter to be accurate and easy to use. The added
Blood Glucose Monitoring System
 Blood Glucose Monitoring System Owner s manual Version 3.0 July 2009 Dear CLEVER CHOICE Auto-Code Voice Blood Glucose Monitoring System Owner: This manual contains important information you must know about
User Manual. For single user / home use only
 User Manual For single user / home use only Table of Contents Information Important Information:Read this First! 4 Important Health-Related Information 5 Specifications 6 GLUCOCARD Shine Blood Glucose
User Manual. For single user / home use only
 User Manual For single user / home use only Welcome to the GLUCOCARD Shine Blood Glucose Monitoring System Thank you for choosing the GLUCOCARD Shine Blood Glucose Monitoring System. The system provides
Performa BLOOD GLUCOSE METER. Operator s Manual
 Performa BLOOD GLUCOSE METER Operator s Manual The Accu Chek Performa System Intended Use The Accu Chek Performa Meter is designed to be used with the Accu Chek Inform II Test Strip to quantitatively
INTRODUCTION: TRUE METRIX
 INTRODUCTION: TRUE METRIX Self Monitoring Blood Glucose System TRUE METRIX is a simple, accurate way to test your whole blood glucose (sugar) level, anytime, anywhere. Our goal is to provide quality healthcare
Contents of the Prodigy Pocket. Meter. PRODIGY Owner s Manual PRODIGY Owner s Manual
 Contents of the Prodigy Pocket Meter The Prodigy Pocket meter is available as a meter only or as a meter kit. Please check the REF number marked on the outside of the box to see if you have purchased a
Downloaded from manuals search engine
 This product fulfills the requirements of Directive 98/79/EC on in vitro diagnostic medical devices. Welcome Thank you for selecting the Accu-Chek Sensor System. Designed for ease of use, this system was
Tips for Training New Customers
 Tips for Training New Customers Good Habits: Test Strips Recap vial immediately and tightly after removing a single test strip. Never remove the desiccant from the vial. Do not lay test strips out ahead
EasyPlus mini 2IN1. Self-Monitoring Blood Glucose System. User s Manual
 EasyPlus mini 2IN1 Self-Monitoring Blood Glucose System User s Manual Dear EasyPlus mini 2IN1 SMBG System Owner, Thank you for using the EasyPlus mini 2IN1 Self-Monitoring Blood Glucose (SMBG) System.
Blood Glucose Monitoring System. mmol/l 5.2. Before Meal. See Options. Uses only CONTOUR NEXT blood glucose test strips from Bayer USER GUIDE
 Blood Glucose Monitoring System 13.10.12 12:24 mmol/l 5.2 See Options Before Meal Uses only CONTOUR NEXT blood glucose test strips from Bayer USER GUIDE INTENDED USE The CONTOUR NEXT blood glucose monitoring
User s Manual. Premium Self-Monitoring Blood Glucose System. Premium Blood Glucose Meter
 User s Manual Premium Self-Monitoring Blood Glucose System Premium Blood Glucose Meter Dear DailyChek Premium SMBG System Owner This booklet has important information you must know about DailyChek Premium
Fraser Health Authority Accu-chek Inform II: Training Script
 1. Introduction Ensure that each participant Signs the attendance Sheet (please PRINT first & last name, and middle initial legibly) Refer to; For Reference Only: o Quick Reference Guide o What s new document
The performance of Microdot Test Strips has been evaluated both in laboratory and in clinical tests.
 Chemical Composition Each Microdot strip contains the enzyme glucose dehydrogenase (Bacillus Sp.) = 1 IU and other ingredients (mediator, NAD, lysing agents etc.) = 200 µg. Test Strips When blood is added
User Manual second language
 User Manual second language GlucoTel Blood Glucose Monitoring and Diabetes Management System must be used with cell phones that have: Table of contents 2 3 Introduction 4 Bluetooth Wireless Technology
MARSHALLTOWN MEDICAL & SURGICAL CENTER Marshalltown, Iowa
 MARSHALLTOWN MEDICAL & SURGICAL CENTER Marshalltown, Iowa CARE OF PATIENT POLICY & PROCEDURE Policy Number: 4:10 Subject: Policy: Glucose Monitoring (Accuchek) Nursing department staff and laboratory staff
Control D. User Manual. Blood Glucose Monitor. Subscribe on MYCONTROL.life HAIDEN
 Blood Glucose Monitor User Manual Log using MYCONTROL Mobile App Subscribe on MYCONTROL.life Table of Contents Important Information About Your CONTROL D Glucose Monitoring System... 1 Important Health-Related
User s Manual. Blood Glucose Meter
 User s Manual Blood Glucose Meter This User s Manual features the following 3 symbols: W This symbol indicates a possible risk of injury or of damage to your own health or the health of others. H This
INTRODUCTION: McKesson TRUE METRIX Self Monitoring Blood Glucose System
 INTRODUCTION: McKesson TRUE METRIX Self Monitoring Blood Glucose System McKesson TRUE METRIX is a simple, accurate way to test your whole blood glucose (sugar) level, anytime, anywhere. Our goal is to
Blood Glucose Monitoring System Owner s Manual
 Blood Glucose Monitoring System Owner s Manual Ver. /201 311-4223500-XXX Dear SureTest System Owner: This manual contains important information you must know about the system. Please read it thoroughly
Omnitest 5. Blood Glucose Monitoring System
 Omnitest 5 Blood Glucose Monitoring System 2 Important notes The Omnitest 5 system provides a quick and easy way to measure the blood glucose level. It can be used for selfmonitoring of blood glucose levels
Table of Contents Information Preparation Testing Additional Functions Maintenance
 Table of Contents Information Important Information: Read This First! 4 Specifications 6 CareSens N POP Blood Glucose Monitoring System 7 Inserting or Replacing the Batteries 8 CareSens N Blood Glucose
Owner s Booklet. 24/7 Customer Care English or Spanish Manufactured by:
 Owner s Booklet 24/7 Customer Care English or Spanish 1-800-803-6025 www.niprodiagnostics.com Manufactured by: Fort Lauderdale, FL 33309 U.S.A. 2014 Nipro Diagnostics, Inc. TRUEtrack and the Nipro Diagnostics
EVENCARE G3 BLOOD GLUCOSE MONITORING SYSTEM USER S GUIDE
 EVENCARE G3 BLOOD GLUCOSE MONITORING SYSTEM USER S GUIDE Introduction Thank you for choosing the EVENCARE G3 Blood Glucose Monitoring System to help monitor your patients blood glucose levels. The EVENCARE
Blood Glucose Meter Owner s Manual
 89115-0055-01 Meter Owner s Manual Preface Thank you for selecting the McKesson Quintet AC Monitoring System. Please read this manual thoroughly before you start testing. This User s Manual provides all
Blood Glucose Monitoring System USER GUIDE. AW A Rev. date: 04/2010. Downloaded from manuals search engine
 Blood Glucose Monitoring System USER GUIDE AW 06629202A Rev. date: 04/2010 Contents: Getting to know your system 1 Setting the time and date, and coding your meter 4 Testing your blood glucose 8 Reviewing
Blood Glucose Monitoring System OWNER S GUIDE
 Blood Glucose Monitoring System OWNER S GUIDE Key Features of the BGStar No Coding Required - The BGStar doesn t require you to enter a code. Insert a test strip and you are ready to start the test. Pre/Post
Integrated Multiparameter Monitoring System. Owner s Manual
 Integrated Multiparameter Monitoring System Owner s Manual Dear GlucoRx HCT Connect System Owner: Thank you for choosing the GlucoRx HCT Connect Integrated Multiparameter Monitoring System. This manual
Important Safety Information. Intended Use WARNING. The Contour Next EZ blood glucose monitoring system is
 Intended Use The Contour Next EZ blood glucose monitoring system is an over the counter (OTC) device utilized for self-testing by persons with diabetes at home for the quantitative measurement of glucose
USER GUIDE. Works with the CONTOUR DIABETES app available for download on the App Store SM or on Google Play.
 Blood Glucose Monitoring System Works with the CONTOUR DIABETES app available for download on the App Store SM or on Google Play. Uses only CONTOUR NEXT blood glucose test strips. USER GUIDE INTENDED USE
PRIMA Lab SA Via Antonio Monti Balerna Switzerland 0041 (0) primahometest.com
 primahometest.com") PRIMA Lab SA Via Antonio Monti 7 6828 Balerna Switzerland 0041 (0) 91 605 1030 info@primahometest.com primahometest.com prima self-testing kit user manual 2in1 / 3in1 Multiparameter diagnostic device cholesterol
PRIMA Lab SA Via Antonio Monti 7 6828 Balerna Switzerland 0041 (0) 91 605 1030 info@primahometest.com primahometest.com prima self-testing kit user manual 2in1 / 3in1 Multiparameter diagnostic device cholesterol
For further information on. please contact your SD BIOSENSOR, Inc. Representative
 For further information on please contact your SD BIOSENSOR, Inc. Representative 01GM11/01GC110 series Head Office C-4th&5th, 16, Deogyeong-daero 1556beon-gil, Yeongtong-gu, Suwon-si, Gyeonggi-do, 16690,
GM700 USER S MANUAL. Blood Glucose Monitoring System GM700
 BIONIME CORPORATION No. 100, Sec. 2, Daqing St., South Dist., Taichung City 40242, Taiwan Tel: +886 4 23692388 Fax: +886 4 22617586 http: //www.bionime.com E-mail: info@bionime.com Rev. Date: February/2017
Accu-Chek Inform II: Point of Care Glucose Testing. Sharp Healthcare 2014
 Accu-Chek Inform II: Point of Care Glucose Testing Sharp Healthcare 2014 OBJECTIVES At the completion of this module the participant will be able to: Learn the proper technique of performing a finger stick
Table of Contents Section 1 Introduction... 1 Section 2 System Components... 4 Section 4 Initial Setup... 9 Section 5 Meter Setup and Options...
 Table of Contents Section 1 Introduction... 1 Intended Use... 1 About Prothrombin Time (PT) Testing... 2 About International Normalized Ratio (INR) Values... 2 Test Principle... 2 Section 2 System Components...
INTRO SAFETY INFORMATION GENERAL INFORMATION TESTING PREANALYTICAL PHASE CHECKINGS RUNNING THE TEST ALTERNATIVE SITES MEMORY
 04 12 30 60 66 72 INTRO SAFETY INFORMATION GENERAL INFORMATION THE LUX SYSTEM GETTING TO KNOW THE SYSTEM SETTING THE SYSTEM TESTING PREANALYTICAL PHASE CHECKINGS RUNNING THE TEST ALTERNATIVE SITES MEMORY
Blood Glucose Monitoring System. Link the Effects of Food to Glucose Results. Owner s Booklet
 Blood Glucose Monitoring System Link the Effects of Food to Glucose Results Owner s Booklet Welcome to the OneTouch family! We know diabetes can be difficult to understand and manage. The right products
BLOOD GLUCOSE MONITORING SYSTEM USER GUIDE
 BLOOD GLUCOSE MONITORING SYSTEM USER GUIDE Welcome to Accuracy and Convenience Table of Contents Your CONTOUR TS system 2 CONTOUR TS meter display 3 Meter Features 4 System Information 5 Symptoms of High
Blood Glucose Monitoring System USER GUIDE. Replaces Owner s Booklet. AW A Rev. date: 11/2017 AW A
 Blood Glucose Monitoring System USER GUIDE Replaces Owner s Booklet AW 06650005A Rev. date: 11/2017 AW 06650005A Contents: Getting to know your system 1 Setting up your meter 4 Testing your blood glucose
Wireless Blood Glucose Monitoring System. 93 mg 12:24 PM METER BG. Mg/dL. Uses only CONTOUR NEXT blood glucose test strips from Bayer USER GUIDE
 Wireless Blood Glucose Monitoring System 93 mg dl Before Meal 12:24PM l 11/10 Reminder Notes 12:24 PM METER BG 93 Mg/dL Uses only CONTOUR NEXT blood glucose test strips from Bayer USER GUIDE Indications
5.2mmol/L. 5.2 mmol USER GUIDE. Uses only CONTOUR NEXT blood glucose test strips from Bayer. Wireless Blood Glucose Monitoring System
 Wireless Blood Glucose Monitoring System 5.2 mmol L Before Meal 12:00 PM l 10/13 Bolus Bolus Reminder Notes 12:00 PM l 10/13 12:00 PM BG 5.2mmol/L Active Insulin 1.5 u Bolus Basal Uses only CONTOUR NEXT
GM550 USER S MANUAL. Blood Glucose Monitoring System
 Blood Glucose Monitoring System BIONIME GmbH Tramstrasse 16, 9442 Berneck Switzerland E-mail: info@bionime.ch 101-3GM550-234 EN BIONIME CORPORATION No. 100, Sec. 2, Daqing St., South Dist., Taichung City
MDT2. Self-Monitoring Blood Glucose System. Quick Reference Guide
 MDT2 Self-Monitoring Blood Glucose System Quick Reference Guide Inserting Batteries 1. Open the battery door on the back of the meter by pushing the tab in the direction of the arrow. 2. Insert two batteries.
Blood Glucose and ß -Ketone Monitoring System. Owner s Manual
 Blood Glucose and ß -Ketone Monitoring System Owner s Manual English Dear Care Touch System Owner: Thank you for choosing the Care Touch Blood Glucose and ß-Ketone Monitoring System. This manual provides
Blood Glucose Monitoring System GMH-B1; GMH-B2
 Blood Glucose Monitoring System GMH-B1; GMH-B2 Ver 1.3 311-4223500-005 Owner s Manual Dear EZ Health Oracle GMH-B1/B2 System Owner: This manual contains important information you must know about the system.
5.2 mmol USER GUIDE 5.2. Uses only CONTOUR NEXT blood glucose test strips from Bayer. Wireless Blood Glucose Monitoring System 12:00 PM METER BG
 Wireless Blood Glucose Monitoring System 5.2 mmol L Before Meal 12:00 PM l 10/13 Reminder Notes 12:00 PM METER BG 5.2 mmol/l Uses only CONTOUR NEXT blood glucose test strips from Bayer USER GUIDE INTENDED
balance Owner s Booklet 24/7 Customer Consultation English or Spanish Manufactured by:
 balance Owner s Booklet 24/7 Customer Consultation English or Spanish 1-800-803-6025 www.niprodiagnostics.com Manufactured by: Fort Lauderdale, FL 33309 U.S.A. 2015 Nipro Diagnostics, Inc. TRUEbalance
INTRODUCTION: McKesson TRUE METRIX PRO Professional Monitoring Blood Glucose Meter
 INTRODUCTION: McKesson TRUE METRIX PRO Professional Monitoring Blood Glucose Meter McKesson TRUE METRIX PRO is a simple, accurate way to test whole blood glucose (sugar) level, anytime, anywhere. Our goal