Table of Contents Section 1 Introduction... 1 Section 2 System Components... 4 Section 4 Initial Setup... 9 Section 5 Meter Setup and Options...
|
|
|
- Austin McBride
- 5 years ago
- Views:
Transcription
1
2 Table of Contents Section 1 Introduction... 1 Intended Use... 1 About Prothrombin Time (PT) Testing... 2 About International Normalized Ratio (INR) Values... 2 Test Principle... 2 Section 2 System Components... 4 Component Descriptions:... 5 Mission PT/INR Meter... 6 Mission PT/INR Test Strip... 6 Code Chip... 6 Meter Display... 7 Section 4 Initial Setup... 9 Code #... 9 Section 5 Meter Setup and Options...11 Memory Review Deleting Stored Readings Setting the Display Contrast Setting the Date Setting the Time Sound Meter Information Display Language INR Display Password Section 6 Testing Fingertip Testing (For Professional and Self-Testing Use) Specimen Collection Optional Testing Methods Venous Blood Testing (For Professional Use Only) Section 7 Quality Control Electronic Calibrator Liquid Control Test Section 8 Maintenance Replacing the Batteries Disinfection Process General Maintenance Section 9 Precautions Meter Use and Precautions Test Strip Use and Precautions Section 10 Troubleshooting Appendix 1 Meter Specifications Appendix 2 Index of Symbols Appendix 3 Warranty i
3 Intended Use Section 1 Introduction The Mission PT/INR Monitoring System is intended for self-testing and professional use for the monitoring of oral anticoagulant therapy by quantitative prothrombin time (PT) testing. The Mission PT/INR Test Strips work with fresh capillary or non-anticoagulated venous whole blood specimens from patients on Coumarin-type (e.g. Warfarin) anticoagulation therapy. The device is not intended to be used for screening purposes. The easy-to-operate system consists of a portable meter and individual test strips that analyze the clotting time. A programmed code chip with strip parameters is provided with each box of strips to ensure proper coding of the meter. The Mission PT/INR Monitoring System provides results as International Normalized Ratio (INR) or INR+PT values in about 2 minutes and requires only a single drop of whole blood. The meter can store up to 200 results and can be operated by 4 AA (1.5V) batteries or the included AC adapter. Note: It is required that the healthcare professional follows the Mission PT/INR Monitoring System Training Manual to train the self-testing patient before the patient uses the Mission PT/INR Monitoring System at home. The self-testing patient must complete the training and practice running a test on the meter with a health care professional. To review these training files, visit ACON website at Click on International Clinical Chemistry, select PT/INR Coagulation, and then click on Download. To ensure accurate results: Read the instructions in the User s Manual and complete any necessary training before use. Use the code chip that is included in each box of test strips. Only use Mission PT/INR Test Strips with the Mission PT/INR Meter. For in vitro diagnostic use only. For self-testing and professional use. Test with fresh fingertip capillary or venous whole blood specimens. Verify the testing results using clinical laboratory methods before making any adjustments to your medication, diet, or exercise routines. Do not use accessories that are not supplied or recommended by the 1
4 Note: manufacturer. Use the equipment only for the purpose described in the instructions for use. Keep out of reach of children. Buttons on the meter are represented in this manual by text in bold italics. Other display items on the screen are listed in bold. About Prothrombin Time (PT) Testing PT testing is the standard method of monitoring patients on oral anticoagulants. The Mission PT/INR Monitoring System is designed to monitor patients on oral Coumarin-type anticoagulants, such as Warfarin (Coumadin or Marevan ), Phenprocoumon (Marcumar ) or Acenocoumarol (Sintrom ). These anticoagulants require regular monitoring, as many things can interfere with or enhance their effects. These can include: Small changes in patient dosing Diet Exercise Alcohol consumption Other medications The Mission PT/INR Monitoring System can report results as INR or INR+PT values in just a few minutes by simply taking a specimen of blood from a fingertip. This information can then be used to adjust the anticoagulant dosage or to determine if further testing is needed. About International Normalized Ratio (INR) Values INR values reflect a method of converting PT test results into a common scale that has been adopted internationally. This practice allows medical practitioners throughout the world to report Prothrombin Time test results in a consistent manner. The Mission PT/INR Monitoring System displays results as INR or INR+PT values. Test Principle When used as directed, the Mission PT/INR Monitoring System will accurately and reliably measure blood INR levels. Specimens used for testing can either be fingertip capillary or venous whole blood and are applied directly to the test strip. It is a simple procedure to perform the test. Insert the code chip, which is 2
5 provided with each box of test strips, into the slot on the meter. This provides lot specific calibration data to the meter. Then insert a test strip into the meter detection area under the strip holder. After a brief warm-up time, the specimen can be added to the test strip specimen application area. When the specimen is added, the meter detects the specimen application and initiates the test. During the test, a reaction initiating clot formation begins. 3

6 Section 2 System Components The figures below are labeled to identify the major components of the Mission PT/INR Monitoring System. Code Chip Test Strip PT/INR Meter Plastic Clamp Control Solution AA Batteries Capillary Transfer Tube Carrying Case AC Adapter Plug Safety Lancet 4
7 Component Descriptions: PT/INR Meter: Reads the test strips and displays PT and INR values. Test Strip: Single use strip with a sample application well where blood samples or control solutions are applied. These are inserted into the meter to measure PT and INR values. Code Chip: Provided in each box of test strips. This provides lot specific calibration data to the meter when inserted into the meter. Safety Lancet: Used to draw blood specimens for testing. Discard after use. Capillary Transfer Tube: Collects capillary blood from fingertip blood testing for accurate results. Ensures the collection of 15 µl of specimen. Control Solution: Two levels of predetermined ranges: Level 1 (Normal) and Level 2 (High). They are intended for use as a quality control check to verify that the PT/INR Monitoring System is working properly. Plastic Clamp: Provided in each box of control solutions. Used to break the glass ampoule inside the plastic control solution vial to release the water. AA Batteries: Provides power for the meter. AC Adapter: For prolonged or continuous use, an AC adapter may be used, instead of batteries, to power the meter. Carrying Case: Provides portability for testing and meter protection. User s Manual: Provides detailed instructions on using the PT/INR Monitoring System. Quick Reference Guide: Provides a brief overview of the PT/INR Monitoring System and its testing procedures. Test Strips Package Insert: Provides detailed instructions on using the Mission PT/INR Test Strips. Control Solution Package Insert: Provides detailed instructions on using the Mission PT/INR Control Solutions. Warranty Card: Card included in the package, which should be completed and returned to the distributor to qualify for the 2-year meter warranty. 5


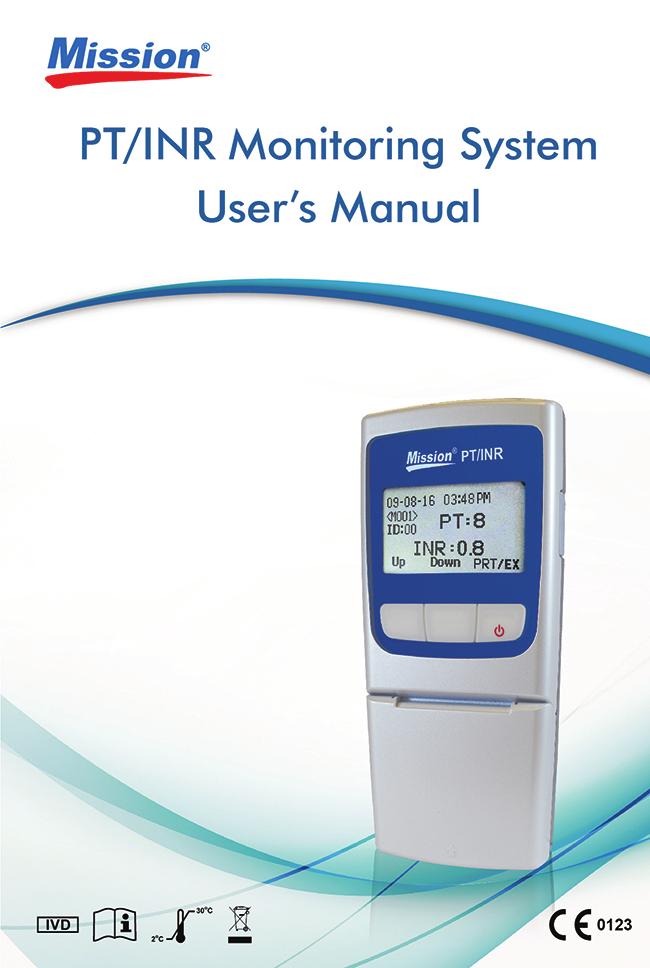
8 Mission PT/INR Meter Section 3 Getting Started AC Adapter Printer Connection Port USB Port Liquid Crystal Display (LCD) Code Chip Code Chip Slot Power Button Optics Cover Mission PT/INR Test Strip Specimen Well The arrows on the test strip indicate the direction to insert the strip into the meter. The specimen well is the circular target area where the blood specimen is applied. Code Chip A code chip is provided in each box of test strips. The code chip needs to be inserted into the meter code chip slot each time a new box of test strips is opened. The code number is printed on the outside of the code chip. Caution: The code chip provided with the box of strips must be used or an incorrect INR measurement may result. 6
9 Meter Display Date: Shows the current date 2. Time: Shows the current time 3. Battery: Shows battery status or AC Adapter connection 4. Function Labels: Helps navigate between functions and confirm selections 5. Selection Box: Indicates which function is selected 6. Menu Selection: Lists setup options and functions 4 During testing, the Mission PT/INR meter will display icons showing the status, options available, and prompts for testing. At the bottom of the display are three function labels representing options which can be selected by pressing one of the three keys directly below each of the display labels (programmable key functions). These three programmable keys are used to move through the meter menus for setting and selecting options for the operation of the meter. Each key represents the function indicated by the label at the bottom of the display, directly above the button. All display functions are represented by English labels, icons, or numbers. The Icons function is an alternative setting from the setup menu showing all display items as icons, with minimal use of English labeling. Throughout this User s Manual, the label shown on the display will be used to indicate the button to press to set or implement a function. When the meter is turned on by pressing the power button (far-right button), the first screen will show the available setup options. From this screen, all meter settings can be changed, with their functions described below. Pressing Prev or Next will move the selection box to the previous or next function, indicating which function is selected. In the example above, Code # is selected and the next function is Data Log. As Prev or Next is pressed, the labels will shift to the left or right, revealing additional functions. The selected function will be shown with a box around it. 7


10 Pressing OK will show the submenu for the function selected. The available functions are shown in order below. After the last function is selected, the display will cycle through and return to the first again. The purpose of each function is shown below. Code # Displays the Code Chip Number Data Log To review previous test results Contrast Adjusts the display contrast Date Sets the meter date Time Sets the meter time Audio On/Off / Meter Info English Turns the meter sound on or off Displays the meter serial number and software version number Displays meter messages in English or as Icons INR/INR+PT Password Allows Prothrombin Time to be shown in addition to INR values Password protects patient data in the meter 8

11 Section 4 Initial Setup Before turning the meter on, insert the code chip (found inside the box of test strips) into the code chip slot on the right side of the meter. This is shown below. This will transfer the test strip testing parameters into the meter. Note: Code # Ensure the code number printed on the code chip is the same as that printed on the test strip box and the same as the number shown on the meter test screen when a test strip is inserted. Press the power button (right button) to turn the meter on. The Setup menu will be displayed after the power-on diagnostics test screen. The Code # will be highlighted when the meter is turned on. Press OK to view the current Code # from the code chip. The code chip number is also displayed when a test strip is inserted, after the meter is turned on and patient ID has been entered. 9
12 If there is no code chip in the meter when a test strip is inserted or there is a code chip error, the following screen will be shown. 10


13 Memory Review Section 5 Meter Setup and Options Select Data Log and press OK to review previous PT/INR Meter test results. The following screen will be shown. The last test result will be displayed showing the test INR or INR+PT value, date, time, its test number and corresponding patient ID. Pressing Down will show the previous result, if any. Pressing Up will move to the oldest test in the test result list. To print the data log(s), connect the printer to the RS232 printer connection port at the top of the meter and press PRT/EX. The next screen will show the printing options of one log or ten logs. One means printing the current displayed log, while Ten means printing 10 consecutive logs starting from the current log. Press Exit to quit the print screen and to go back to the Data Log screen. When finished reviewing the test results, press and hold down the PRT/EX button until the display returns to the previous menu selection screen. Deleting Stored Readings When reviewing stored readings in the section above, all readings can be deleted by momentarily pressing both the Up and Down buttons at the same time. This will display the Delete Log screen below, with Delete Log? 11


14 flashing. Press OK to delete all stored data in the memory or Exit to exit without deleting the stored data and return to the previous data screen. Once all data is deleted, the memory review function will show only dashes for the stored data. Setting the Display Contrast Select Contrast as shown in the screen below to adjust the display contrast. Press the Up or Down buttons to increase or decrease the display contrast. Press OK to save the setting and exit to the previous menu selection screen. Setting the Date Select Date to change the date format. The first screen shows the date format selections. Press Down to move the selection box to the desired format, then press OK to save the chosen format. 12
15 The next screen will show the current date, with the first selection flashing. In the screen below, the month is flashing. If the date format selection is MM-DD-YY, the first number highlighted will be the month. Press Up or Down to increase or decrease the current setting until the correct month is shown. Press OK to move the highlight to the day. Press Up or Down to increase or decrease the setting until the correct day is shown. Press OK to move the highlight to the year. Press Up or Down to increase or decrease the setting until the correct year is shown. Press OK to accept the new date and exit to the previous menu selection screen. Setting the Time Select Time to choose the time format. Press Next to move the selection box between the 12 hour and 24 hour format. You may press Exit at any 13


16 time to exit the screen and return to the previous menu selection screen without making any time changes. When the correct time format is shown, press OK to select the chosen format. If 12H format is chosen, the screen below will allow the selection of AM or PM. Press Next to move the selection box between AM and PM until the time of day is correct. Press OK to select the correct time of day, as in the screen below. The current hour setting will be highlighted. Press Up or Down to increase or decrease the hour setting until the correct hour is shown. Press OK to select the correct hour. The current minutes setting will be highlighted. Press Up or Down to increase or decrease the minutes setting until the correct minutes are shown. 14

17 Press OK to save the new time settings and exit to the previous menu selection screen. Sound The Audio Menu selection will show the current state of the Audio setting, which is either Audio On or Audio Off. To change this setting, press Next to move the selection box to the Audio setting and press OK to show the display below. The current Audio setting will be selected, which is either Audio On or Audio Off. Press Next to move the selection box between the Audio On and Audio Off setting. When the desired setting is selected, press OK to save the sound setting and return to the previous menu selection screen. Press Exit to exit this submenu with no changes. Meter Information Select Meter Info to display the meter information screen, shown below. This screen shows the Meter Serial Number and the installed software version number. 15


18 Press Exit to return to the previous menu selection screen. Display Language Next on the menu selection screen is the Display Language, which will be displayed either in English or as a landscape picture representing icons shown in the screen below. To change this setting, press OK with the item selected. Then press Next to move the selection box to either English or the landscape picture selection for icons. When the desired setting is selected, press OK to save the new setting and return to the previous menu selection screen. Press Exit to exit this submenu without making any changes. INR Display INR is the normal default setting for the results displayed. If the corresponding PT time is also of interest, the PT time can be displayed as well. From the selection menu, the current data display format selection showing either INR or INR+PT will be seen in the selection sequence. To change this setting, press Next until this item is selected. The current selection will be shown with a box around it. 16

19 When the desired setting is selected, press OK to save the new setting and exit to the previous menu selection screen. Press Exit to exit this submenu without making any changes. Password The Password menu provides a method to set and clear a number that will be used to password protect the patient information in the data log. The desired number can be selected using the Up or Down buttons on each digit to increase or decrease the current flashing digit. The OK button will advance the selection to the next digit until all four have been entered. Possible password values range from The display starts with the value After entering the password, the Reenter Password screen will be shown. Enter the 4 digit password selected previously to confirm and enable the password selection. Once confirmed, the Password Enabled screen with the new password number will be displayed. The data log will now be password protected for subsequent power on cycles. 17


20 To clear the password entered or turn off password protection, enter the password saved then reenter the password with 0000 when Reenter Password screen is prompted. The password will be cleared when OK is pressed. 18
21 Section 6 Testing The following section explains the steps required to measure the PT and INR results for capillary or venous whole blood. Before testing, choose a clean, dry work surface. Review the procedure and make sure all of the items needed to obtain a drop of blood are available. Warning: Only capillary whole blood or venous whole blood can be used with this meter. Do not use any other specimen type or any anticoagulated specimens. Fingertip Testing (For Professional and Self-Testing Use) Ensure the meter is set up properly as described in Section 5 Meter Setup and Options. Before turning the meter on, insert the code chip, which is found inside the box of test strips, into the code chip slot on the right side of the meter, as shown below. This will transfer the strip testing parameters into the meter. Note: Ensure that the code number on the code chip is the same as the number printed on the test strip box, test strip pouch and as the number displayed on the meter test screen when a test strip is inserted. Remove a test strip pouch from the test strip box and note the Code Number on the test strip packaging. Tear the test strip pouch and remove the test strip. Open the optics cover and ensure that the strip holder is installed properly, as shown below. 19


22 Insert the test strip into the optical test area under the strip holder, as shown below. The meter will automatically turn on and beep, if the sound is enabled. Observe the display as the meter is turning on. It will show a checkerboard alternating pattern, as seen in the images below. Make sure the pattern is regular with no missing light or dark areas in the checkerboard. After several seconds, an hourglass symbol will be displayed while the meter runs internal diagnostics to ensure everything is working properly. 20


23 Once the diagnostics are complete, the meter will display the Patient ID screen. There are 5 digits for the patient ID and the accepted range is Press Up or Down to increase or decrease each digit and press OK to save the current flashing digit and advance to the next one. After setting the patient ID, the meter will prompt the user to close the optics cover by displaying the following screen. If the meter detects that the optics cover is not closed within 6 seconds, the meter will beep if the sound is enabled. About every 4 seconds thereafter, the meter will beep until the meter detects that the optics cover is closed. If the optics cover is not closed within 15 seconds, the following error message will be shown and the test will be terminated. 21
24 Once the optics cover is closed within the appropriate amount of time, and after approximately 8 seconds, a screen will display the current Code # from the code chip with buttons indicating testing options which can be initiated from this screen, Blood, EC Tst, or CS Tst. During this display time, check the Code # to make sure it is correct by comparing the displayed code to the code on the test strip pouch. In this example, the Code # is 209. If this code is incorrect, the code chip is not the correct chip for the test strip do not continue until the inserted code chip and the Code # displayed on the meter are the same Blood test 3. Control Solution test 2. Electronic Calibrator test 4. Code Number Press the left button under Blood to continue with testing a blood specimen. Alternatively, EC Tst will run an Electronic Calibrator Test, and CS Tst will run a Control Solution Test to ensure the accuracy of the Mission PT/INR Monitoring System. Refer to Section 7 Quality Control for detailed instructions on EC Tst and CS Tst. After pressing the left button under Blood, the meter will warm up the test strip to its operating temperature (40ºC). The display will indicate the specimen testing status by either showing the warming screen below 22

25 followed by the countdown timer screen or will go directly to the countdown timer screen if the time to add specimen is less than 30 seconds away. When the screen counts down to zero, the system is ready for specimen application, as indicated by the following screen with a flashing arrow. The specimen must be applied within two minutes to prevent auto-shutdown. Specimen Collection Prior to testing, make sure the patient s hand is warm and relaxed before collecting the capillary blood specimen. Use warm water to increase blood flow if necessary. Massage the hand from the wrist up to the fingertip a few times to encourage blood flow. Clean the testing site with an alcohol swab or by washing the hands with warm soapy water and then dry the testing site thoroughly. Carefully rotate and pull off the protective cap. Press the lancet against the puncture site tightly to lance the skin. Discard the lancet in an appropriate sharps container. Gently massage the surrounding area toward the puncture site to collect the required blood volume. Apply the specimen to the specimen well on the test 23


26 strip as shown in the picture. The required specimen volume is 15 µl or one hanging drop from a capillary blood specimen, as indicated in the figure below. The finger should be held in line with the strip instead of across at an angle. The blood drop should cover the bottom of the specimen well entirely. The specimen must be applied within 15 seconds after using the lancet. Correct application Incorrect application Caution: Do not touch the test strip, move the meter, or add more blood during testing. The specimen should cover the entire specimen well. A new test with a new test strip should be run if an insufficient specimen is applied. Warning: For a fingertip whole blood specimen, if the test needs to be repeated, do not use the same puncture or puncture site. A new puncture must be made for each test to avoid incorrect readings due to the presence of partially clotted blood. As soon as the meter detects the specimen has been applied, it will beep if the sound is enabled and will display the following screen for about 8 seconds. This screen indicates that the specimen compartment optics cover needs to be closed. If an insufficient specimen size is applied, the meter will indicate that there is an insufficient specimen by displaying the E5 error code after 15 seconds. Do not open the optics cover until the test is completed. 24


27 The meter display will change to the screen shown below. This is indicating that the test is in progress and will count up until the test is complete. When the test is complete, the results will be displayed in International Normalized Ratio units (INR) if the INR option was previously selected. If the selected option is INR+PT, the results will be displayed as both INR and Prothrombin Time (PT) as shown below: The meter can be turned off by removing the used test strip, pressing 25, or
28 waiting for the meter to turn itself off after several minutes. The result is stored in the memory, which can be recalled anytime. Refer to Section 5 Meter Setup and Options. Optional Testing Methods A Capillary Transfer Tube or pipette may be used to collect blood from a fingertip and to apply the specimen to the test strip. Caution: Do not use capillary tubes that contain anticoagulants. The following steps are optional for the fingertip blood specimen instructions above. For use with the Capillary Transfer Tube, hold the tube slightly downward and touch the tip of the Capillary Transfer Tube to the blood specimen. Capillary action will automatically draw the specimen to the fill line and stop. Note: The Capillary Transfer Tube will fill automatically. Never squeeze the Capillary Transfer Tube while sampling. Wipe away the first drop of blood and then align the tip of the capillary transfer tube with the specimen application area of the test strip to apply the next drop of blood (approximately 15 μl). Note: Do not touch the test strip with the Capillary Transfer Tube or pipette. The capillary blood should be tested immediately after it is collected. Use of a capillary transfer tube or pipette helps to ensure the correct specimen volume is applied. Discard Capillary Transfer Tube or pipette after use. 26
29 Venous Blood Testing (For Professional Use Only) For fresh whole venous blood specimens, insert a new test strip into the meter and allow it to proceed to the specimen application icon on the display. Collect the venous blood using a butterfly collection set into a 3 ml syringe with no anticoagulants. Remove the syringe from the butterfly tubing and allow 4 drops to fall onto a clean gauze pad to be discarded. Apply a small hanging drop (15 µl) from the syringe tip to the specimen application area of the test strip. The blood drop should cover the bottom of the specimen well entirely. Specimens must be run within 15 seconds after collection to obtain an accurate INR reading. 27
30 Section 7 Quality Control To ensure the accuracy of test results, the Mission PT/INR Monitoring System can run an internal Level 1 or Level 2 electro-optical calibration check when a strip is inserted and EC Tst is selected. The internal Electronic Calibrator independently simulates the optical signal produced by a specimen applied to a test strip and produces an INR reading, which is the same as applying a blood specimen. The inserted test strip is not affected or consumed and can then be run in the normal sequence with a normal blood specimen if used within 10 minutes from when the test strip was first removed from the pouch. Control solutions (Level 1 and Level 2) are provided as a second method to confirm the test strips and meter are working together properly and to ensure the test is being performed correctly. The labels on the control solution bottles are printed with the acceptable range for the control INR results. To ensure continued accuracy of results, control solutions should be run when any of the following events occur: INR values are unusually high or low A meter malfunction is suspected A new box or lot of test strips is opened Each new day of testing (professional use) A new operator uses the meter (professional use) After performing maintenance or service on the meter If QC tests do not provide expected results, perform the following checks: Ensure the test strips are not expired. Ensure the controls are not expired. Repeat the test to ensure no errors were made during the testing. Electronic Calibrator To initiate the Electronic Calibrator subsystem, insert a test strip to turn the meter on. After the checkerboard test, hour glass, patient ID entry and close optics cover screens are shown, the following screen will be shown. 28
 or Level 2 calibration values. Press Lvl 1 for Level 1 test, Lvl 2 for Level 2 test, or Exit to return to the specimen testing screen.")
31 Blood test 3. Control Solution test 2. Electronic Calibrator test 4. Code Number Within 10 seconds, press EC Tst to initiate the Electronic Calibration test process. The next screen will allow selection of Level 1 (Normal) or Level 2 calibration values. Press Lvl 1 for Level 1 test, Lvl 2 for Level 2 test, or Exit to return to the specimen testing screen. If Lvl 1 or Lvl 2 were selected, an hourglass figure will be displayed while the meter performs internal tests. After performing internal tests, a timer will be displayed indicating that the test has begun. 29

32 After a time appropriate for the level selected, an icon showing the related level will be displayed along with the Electronic Calibrator INR value. The EC Test passes when an ECINR result is displayed without any error messages, as shown below. Press OK to exit the test function and run a blood specimen, control solution, or another EC test. Remove the test strip to return to the menu selection screen or press to turn the meter off. Liquid Control Test The Mission PT/INR Control Solutions contain non-human plasma specimens with predetermined acceptable ranges and are packaged as Level 1 (Normal) and Level 2 (High) values. If the Mission PT/INR Monitoring System is working properly, the INR value will be within the range of accepted values printed on the control solution pouch label. Liquid control tests are performed in a very similar manner to blood tests, using the Mission PT/INR Control Solutions instead of blood. Read the Control Solution Package Insert before using the controls. Refer to the control solution pouch label for acceptable ranges for the control solution lot. The system is working properly if the control value displayed by the meter is within the acceptable range printed on the pouch label. If the value is outside of the acceptable range, repeat the test. If the results are still out of range in the second test, refer to the troubleshooting section of the Control Solution Package Insert. 30
. Squeeze the vial firmly using the Plastic Clamp packaged with the control solution until the glass ampoule inside the plastic vial breaks to release the water.")
33 Preparing the Control Solution Check the expiration date on the foil pouch or the box. Do not use if the expiration date has passed. Tear open the foil pouch and remove the control solution vial. Hold the vial upright (vertically). Squeeze the vial firmly using the Plastic Clamp packaged with the control solution until the glass ampoule inside the plastic vial breaks to release the water. Caution: Excessive squeezing or bending of the vial may force glass shards through the plastic vial wall. Tap the vial firmly 5-10 times so that the water dissolves the powder. After tapping the vial, set the vial down for later use. Caution: Liquid control solutions are made from animal plasma. Although they are safe to use, wash your hands after use. Remove a test strip from its pouch and insert it into the meter, which will turn the meter on. After the checkerboard test, hourglass, patient ID entry and close optics cover screens are shown, the following screen will be displayed. Check that the Code # shown on the display is the same as the Code # on the test strip packaging. If the Code # is correct, press CS Tst to run a liquid control test. 31
34 Blood test 3. Control Solution test 2. Electronic Calibrator test 4. Code Number After selecting CS Tst, the meter will indicate the test strip is warming up to its operating temperature (40ºC). This is done either by showing the warming screen below or the countdown timer screen, also shown below, if the time to add control solution is less than 30 seconds away. Applying the Control Solution When the displayed countdown reaches zero, the meter will indicate that the control solution can now be applied to the test strip. Holding the prepared control solution vial with the tip down, gently shake or tap the bottom of the vial to make the solution move down to the dropper. 32


35 Then squeeze one large, hanging drop of solution onto the test strip specimen well, as shown below. The meter will beep when it detects that the control solution has been added if the sound is enabled. Close the optics cover when prompted by the meter. The meter will continue to display the prompt for a few seconds after the optics cover has been closed. Then the test timer screen will be displayed, to show how long the test has been processing. Do not open the optics cover until the test is finished. Interpreting Results When the test is complete, the results screen will be displayed, indicating the result is a Control Solution Test result. If the result is within the range printed on the Mission PT/INR Control Solution label, the meter and test strips are performing properly. If the INR value is outside of the range printed on the control solution label or if the meter is displaying an error message, see the Control Solution Package Insert or contact your local distributor for further instructions. Note: Discard the control solution vial after use. The control solution is only good for 30 minutes after mixing the components. 33

.")


36 Section 8 Maintenance It is recommended that the meter be stored in the carrying case after each use. Avoid getting liquids, residue, or control solution inside the meter. The only required periodic maintenance is the following: Check that the code number on the code chip matches the code number on the test strip pouch label for each new lot of test strips (See Section 4). Set the meter s internal clock with the correct date and time, if necessary (e.g. daylight savings time. See Section 5). Change the batteries when necessary. Keep the meter clean. Replacing the Batteries Remove the included AA batteries from their protective packaging. Turn the meter over and locate the battery cover on the back of the meter. Open the cover by pressing the cover release tab with an arrow. Press the tab towards the bottom of the meter to release the cover and reveal the battery compartment. Install the 4 AA batteries into the battery compartment, as shown, alternating orientation up and down as indicated in the bottom of the battery compartment. 34
37 Reinstall the battery compartment cover and ensure it locks in place. Disinfection Process Reason to Disinfect The disinfection process is to prevent potential spreading of infectious diseases through blood borne pathogens. It is important to remove any stains/debris for a more effective disinfection of the meter. Wash your hands thoroughly with soap and water after handling the meter and test strips. Disinfection and Pre-Cleaning before the Disinfection Process First use DisCide Ultra Disinfecting wipes (EPA Registration No ) to wipe clean the entire meter surface and remove any stains/debris. This pre-cleaning is to prepare the meter surface for a disinfection process. Next use another fresh DisCide Ultra Disinfecting wipe to wipe the entire meter surface. Make sure the meter surface is thoroughly damp. The meter surface must remain visibly wet for one full minute to effectively disinfect. After disinfection, please allow the meter to air dry completely before using it again. When disinfecting, avoid inserting the DisCide Ultra Disinfecting wipe into the communication ports and the power supply input port. When cleaning the optical window area, the meter may turn on when the electrodes are wet. After cleaning, the meter may be turned off or it will turn off automatically after two minutes. Disinfection Wipes The suggested wipes for your Mission PT/INR meter pre-cleaning and disinfection are DisCide Ultra Disinfecting Wipes (EPA Registration No ). The active ingredients include: Isopropyl alcohol 63.25%, n-alkyl dimethyl benzyl ammonium chloride 0.12% and n-alkyl dimethyl ethyl benzyl ammonium chloride 0.12%. Disinfection and Pre-Cleaning Frequency Be sure to disinfect the meter after each use. This is important to prevent the potential transmitting of infectious diseases. 35
38 Avoid getting liquids, dirt, blood, or control solution into the meter s power or data ports. It is recommended that the meter is stored in its carrying case after each use. The Mission PT/INR meter is a precision electronic instrument. Please handle it with care. Always check to ensure all display segments appear when the meter is turned on. This ensures the meter is working properly. Note: All parts of the kit are considered biohazardous after first use and can potentially transmit infectious diseases, even after cleaning and disinfection. Please follow proper precautions when handling the meter. General Maintenance For best results, the meter should be cleaned after each day of testing. Replacing the Optics Cover Examine the underside of the optics cover. It should be clean and free of blood or other debris. If necessary, clean the underside of the optics cover using the DisCide Ultra Disinfecting wipes as previously outlined. The meter optics cover can easily be removed if it becomes contaminated or damaged. The optics cover is designed to be removed without damaging the meter. Hold the meter in one hand. Firmly grasp the optics cover with the other hand with the thumb located on the underside of the optics cover. Place sideways pressure on the optics cover, bending one arm attaching the optics cover to the meter and moving the other arm with its mounting tab away from its seat. Rotate the free optics cover mounting arm up away from its seat. Once the free arm is away from its seat, the second arm can be disengaged, freeing the optics cover from the meter. Attach a new optics cover by grasping the optics cover and meter, as explained above, and locate one mounting arm tab into its seat. Rotate the optics cover down until the second mounting arm snaps into its seat. The optics cover should move freely once it is snapped into place. Once the optics cover is attached, replace the strip holder. 36


39 Strip Holder Installation The strip holder comes already installed on the meter. After cleaning the strip holder, it should be re-installed on the meter. To remove the strip holder, push the strip holder away from the optics cover, sliding it off the strip holder grooves towards the bottom of the meter. If blood or debris is present, clean the strip holder using the DisCide Ultra Disinfecting wipes as previously outlined. To install the strip holder, make sure it is aligned with the strip holder grooves, as shown below. Slide the strip holder in until it snaps into place. The meter is now ready for testing. Caution: To avoid the transmission of infectious diseases between multiple patients using the same meter, be sure to replace or clean the strip holder as previously described. Meter Strip/Specimen Application Area The optical window should be clean and free of lint, blood, and other debris. Using the DisCide Ultra Disinfecting wipes, remove the strip holder and clean the meter strip and specimen application area and the four metal pins including the optical window area as previously outlined in the Disinfection Process section. 37
40 Section 9 Precautions Observe the precautions listed below to ensure accurate results and proper operation of the analyzer. The protection provided by the equipment may be impaired if used in a manner not defined in this instruction manual. Read the instructions in the User s Manual and complete any necessary training before use. For professional use, wear gloves to avoid contact with potentially hazardous biological specimens during testing. Keep the unit clean, as instructed in Section 8 Maintenance. Do not use accessories that are not supplied or recommended by the manufacturer. Follow all local regulations when discarding the unit and its accessories. Do not use the unit or the test strips outside of the specified operating temperature range. Compare your result with the desired target range set by a healthcare professional at specified intervals in order to verify your self-testing performance. An interval of six months or less is recommended and more frequent intervals may be necessary for the new self-testers, e.g. monthly. Don't put the equipment in the place where it is difficult to unplug from the power source. Meter Use and Precautions Do not get water or other liquids inside the meter. The optics area must be kept clean and free of specimens or other contaminants. Refer to Section 8 Maintenance. Make sure the Code Numbers displayed on the meter, printed on the code chip, and printed on the test strip pouch label are the same number. Keep the meter dry and avoid exposing it to extreme temperatures or humidity. Do not drop the meter or get it wet. If either has occurred, ensure the meter is working properly by running a calibration check. 38
41 Do not take the meter apart. This will void the warranty. Only clean with recommended materials to avoid any damage to the meter. Keep the meter and all associated parts out of reach of children. Avoid storing or operating the meter in direct sunlight, excessive temperatures, or high humidity. Refer to Appendix 1 Meter Specifications for environmental operating requirements. This instrument is tested for immunity to electrostatic discharge as specified in IEC This instrument complies with the emission and immunity requirements described in EN and EN Do not use this instrument in close proximity to sources of strong electromagnetic radiation, as these may interfere with proper operation of the meter. Note: Follow proper precautions and all local regulations when discarding the meter and used batteries. Test Strip Use and Precautions Do not store test strips outside their pouch. Test strips must be stored in their original strip pouch. Once the pouch is opened, use the test strip within 10 minutes. For in vitro diagnostic use. Test strips are only to be used outside of the body for testing purposes. Only use Mission PT/INR Test Strips with the Mission PT /INR Meter. Use the code chip that is included in each box of test strips. Do not use test strips that are torn, bent, or damaged in anyway. Do not attempt to reuse test strips. Before performing an INR test, make sure that the Code Number on the meter display matches the Code Number shown on the test strip pouch. Store test strips in a cool, dry place. Store away from heat and direct sunlight. Transport and store test strips in their pouches within 2-30 ºC (36-86 ºF) with less than 85% humidity, until the expiration date printed on the strip pouch. Note: The expiration date is printed in a Year-Month format. For example, is January,
42 Section 10 Troubleshooting Error Codes Causes Solutions E0 E1 E3 E4 E5 E7 Power-on diagnostic failed Electronic Calibration test failed Specimen applied too soon Contaminated or dirty strip Insufficient specimen Heater Failure Turn the meter off and then on. If error persists, contact your local distributor. A problem was encountered with the Electronic Calibrator check process or results. Remove and inspect the test strip. Replace, if necessary. Turn the meter off and restart the calibration process. Replace the test strip and perform the test again. Wait until display indicates the meter is ready for specimen application. Check the test strip to ensure it is not used or contaminated. Replace the test strip with a new one and test again. Applied specimen volume was insufficient to obtain a result. Replace the test strip and run the test again with a fresh specimen. A test strip heater failure was detected during operation. Turn the meter off and perform the test again. If it repeats, contact your local distributor. E8 E9 System Failure Indeterminate Specimen Turn the meter off and then on to see if the error clears. If it repeats, contact your local distributor. The meter is unable to determine an accurate INR reading. Replace the test strip and repeat the test with a fresh specimen. 40
43 E10 E11 Communication Error Ambient Temperature out of range Warning and Error Icons Flashing ¼ full icon. Batteries are discharged and need to be replaced soon Low battery Strip removed during test Low battery INR reading is >7.0 INR reading is <0.7 Code Chip problem Turn the meter off, check the cables to the computer, then turn the meter back on. If error persists, contact your local distributor. Ambient temperature is too high or too low to maintain a controlled test strip temperature. Re-locate the meter into the proper temperature environment. Test results will still be accurate, but replace the batteries as soon as possible. Insert a new test strip. Make sure to wait until prompted to remove the strip. Replace the batteries before the next test is performed. Repeat the test to ensure consistency of readings. Run Electronic Calibrator checks. Run liquid calibrator checks. Repeat the test to ensure consistency of readings. Run Electronic Calibrator checks. Run liquid calibrator checks. Missing or faulty code chip. Insert the code chip found within the box of test strips and/or remove and replace the code chip. Lid Left Open Close the optics cover and restart the test. 41
44 Appendix 1 Meter Specifications Feature Methodology Test Time Measurement Range Specimen Specimen Volume Power Source Battery Life Units of Measurement Memory Automatic Shut Off Meter Size Display Size Weight Meter Storage Conditions Operating Conditions Meter Connectors Optical Fluorescence About 2 minutes Specifications 0.7 to 7.0 INR (International Normalized Ratio) Capillary whole blood Venous whole blood 15 μl 4 - AA (LR6) Alkaline Batteries AC Adapter Input: V 50-60Hz, 400mA Output: 6.0V DC 0.85A > 100 tests INR, PT (seconds) 200 records 2 minutes after last operation 152 mm 72 mm 38mm 53 mm 29 mm 170 g (without batteries) 0-50ºC (32-122ºF); 95% RH 15-35ºC (59-95ºF); 90% RH RS232 port for printer connection, mini USB port for data transfer, and power adapter port 42
45 Appendix 2 Index of Symbols Attention, see instructions for use Use by Manufacturer For in vitro diagnostic use only Store between 2-30 C Code Number REF Catalog # Lot Number Tests per Kit SN Serial Number Do not discard along with household waste This Side Up Fragile, handle with care Keep Dry Keep away from sunlight and heat Do not reuse Authorized Representative No Code Chip Power On/Off Next High INR Reading Battery Status Low INR Reading Optics Cover Left Open 43
46 In addition to the standard symbols above, the user interface may be set to display icons or English text. The following list shows the equivalent of the Iconic interface and the English text interface, including the definitions. Code Chip Memory Delete Log No code chip inserted or there is a code chip error Represents the meter data log memory to review the previous INR readings in chronological order Deletes the meter data stored in memory LCD Contrast Adjustment Sets the contrast of the LCD screen for better viewing Date Setup Sets the current date Time Setup Sets the current time Audio On Audio Off PT Meter Information Sets the audio warnings to ON Sets the audio warnings to OFF Displays the meter serial number and current software version 44
47 Icon Password Down Up Once in the Language sub-menu, displays the choice to display Icons or English text Password protects patient data in the meter Key to move down Key to move up Exit Key to Exit the menu Level 1 Level 1 EC Test Level 2 Level 2 EC Test Control Solution Test Control Solution Test Electronic Calibrator OK Strip Removed Print Log(s) or Exit Electronic Calibrator Key to accept the current setting Strip removed during test Press to display print screen, hold the button to exit back to the previous screen 45
48 One/Ten Enter Password Incorrect Password Entered Reenter Password Passwords do not match Password Cleared Password Enabled Print one or ten data logs Enter the password Entered password does not match the saved password Reenter the password Password reentered does not match the previous password Password is cleared, meter is not password protected Password is enabled, meter is password protected 46
49 Appendix 3 Warranty Please complete the warranty card included in the packaging. Mail it to your local distributor to register your purchase within 30 days. For your records, write the purchase date of your meter kit here: Note: This warranty applies only to the meter in the original purchase. It does not apply to the other materials included with the meter. ACON Laboratories, Inc. warrants to the original purchaser that this meter will be free from defects in materials and workmanship for a period of two years (24 months). The two years starts from the later of the dates of original purchase or installation (except as noted below). During the stated two years period, ACON shall replace the meter under warranty with a reconditioned meter or, at its option, repair at no charge a meter that is found to be defective. ACON shall not be responsible for shipping charges incurred in the repair of a meter. This Warranty is subject to the following exceptions and limitations: This warranty is limited to repair or replacement due to defects in parts or workmanship. Parts required, which were not defective, shall be replaced at additional cost. ACON shall not be required to make any repairs or replace any parts that are necessitated by abuse, accidents, alteration, misuse, neglect, failure to operate the meter in accordance with the User s Manual, or maintenance by anyone other than ACON. Furthermore, ACON assumes no liability from malfunction or damage to meters caused by the use of strips other than strips manufactured by ACON. ACON reserves the right to make changes in the design of this meter without obligation to incorporate such changes into previously manufactured meters. Disclaimer of Warranties This warranty is expressly made in lieu of any and all other warranties express or implied (either in fact or by operation of law), including the warranties of merchantability and fitness for use, which are expressly excluded, and is the only warranty given by ACON. Limitations of Liability In no event shall ACON be liable for indirect, special, or consequential damages, even if ACON has been advised of the possibility of such damages. For warranty service, please contact your local distributor. 47
Blood Glucose & Ketone Monitoring System
 Blood Glucose & Ketone Monitoring System Self monitoring of blood glucose is an integral part of diabetes care, but the high cost of testing can make this impossible. At ACON, our goal is to provide high
Table of Contents. Section 1 Introduction... 1 Section 2 Getting Started... 2 Section 3 Components... 5
 Table of Contents Section 1 Introduction... 1 Section 2 Getting Started... 2 Section 3 Components... 5 Meter 5 Test Strips 8 Test Devices 8 Control Strips or Control Devices 13 Section 4 Initial Setup...
Dear HighQ Check System Owner :
 Dear HighQ Check System Owner : Thank you for purchasing the HighQ Check Blood Glucose Monitoring System. This manual provides important information to help you to use the system properly. Before using
Blood Glucose Monitoring System. User Guide
 Blood Glucose Monitoring System User Guide Table of Contents Introduction...2 Important Safety Instructions...2 About ipet PRO Blood Glucose Monitoring System...3 About ipet PRO Meter...4 About the ipet
CentriVet GK Blood Glucose & Ketone Monitoring System
 CentriVet GK Blood Glucose & Ketone Monitoring System FOR ANIMAL USE. NOT FOR HUMAN USE. Welcome and thank you for choosing the CentriVet GK Blood Glucose & Ketone Monitoring System. The CentriVet GK Blood
BRS GM100 Glucose Monitoring System. User Instruction Manual Ver. 3.5
 BRS GM100 Glucose Monitoring System User Instruction Manual Ver. 3.5 TABLE OF CONTENTS Introduction... 3 Intended Use... 3 Understanding the GM100 Glucose Monitoring System... 4 Explanation of the Full
System. User Manual for Self-Testing
 CoaguChek System XS User Manual for Self-Testing Table of Contents CoaguChek XS System User Manual For investigational use only. Not for use in diagnostic procedures. Aspects of the CoaguChek XS System
LeadCare BLOOD LEAD ANALYZER. Quick Reference Guide
 LeadCare II BLOOD LEAD ANALYZER Quick Reference Guide Precautions Precautions Caution The LeadCare II Blood Lead Analyzer is a CLIA-waived device. Facilities that perform tests with the LeadCare II System
Glucose Meter. User Guide. Veterinary Monitoring System. For dog and cat use only
 Glucose Meter User Guide Veterinary Monitoring System For dog and cat use only Gpet instruction Manual 31/5/09 18:06 Page 2 Gpet instruction Manual 31/5/09 18:06 Page 3 TABLE OF CONTENTS Your g-pet system
2. Before Testing Monitor Checker Test...10 Inserting Lancets into Lancing Device...11 Quality Control Testing...13
 Table of Contents 1. About your HemoSmart Haemoglobin Screening System Contents of Kit...4 HemoSmart Haemoglobin Meter...5 HemoSmart Haemoglobin Test Strip...7 Adjustable Lancing Device and Lancets...8
CoaguChek S System. Quick Reference Guide. This is a CLIA-waived System. Coagulation Testing with Fresh Whole Blood
 CoaguChek S System This is a CLIA-waived System Quick Reference Guide Coagulation Testing with Fresh Whole Blood May not print or view at 100% All unmarked prints black. Coag Swoosh prints gradients of
Blood Glucose Monitoring System
 Blood Glucose Monitoring System Self monitoring of blood glucose (SMBG) is an important part of diabetes care, but the high cost of testing can make it difficult. At ACON, our goal is to provide high quality
GlucCell TM SYSTEM USER S GUIDE Ver 2.1 CELL CULTURE GLUCOSE METER. Important Information. Intended Use. Caution. About the System
 GlucCell TM SYSTEM USER S GUIDE Ver 2.1 Intended Use The GlucCell TM Glucose Monitoring System (The GlucCell TM System) is designed to quantitatively measure the concentration of glucose during cell culture.
Items in the package:
 Intended Use: The EasyLife Hb Monitoring System is designed for in vitro diagnostic use only (external use only), and is suitable for self-testing. The system is for healthcare professionals and persons
Blood Glucose Monitoring System
 Blood Glucose Monitoring System Self monitoring of blood glucose (SMBG) is an important part of diabetes care. But the high cost of testing can make this impossible. At ACON, our goal is to provide high
Dear HemoSmart GOLD Owner
 Dear HemoSmart GOLD Owner Thank you for choosing the HemoSmart GOLD. All the information that will be needed to use and maintain the HemoSmart GOLD System is included in this manual. Read it carefully
GlucCell TM SYSTEM USER S GUIDE ver 2.3 CELL CULTURE GLUCOSE METER. Important Information. Intended Use. Caution. About the System
 GlucCell TM SYSTEM USER S GUIDE ver 2.3 Intended Use The GlucCell TM Cell Culture Glucose Monitoring System (The GlucCell TM System) is designed to quantitatively measure the concentration of glucose during
Blood Glucose Monitoring System
 Blood Glucose Monitoring System Thank you for choosing the On Call Pro Blood Glucose Monitoring System. The System will provide accurate blood glucose results in just a few simple steps. The On Call Pro
PROCEDURE. TITLE: Bedside Glucose Monitoring PC Laboratory. Issuing Department: Clinical Director Signature: Departments Involved:
 PROCEDURE TITLE: Bedside Glucose Monitoring Issuing Department: Clinical Director Signature: Departments Involved: Laboratory Nursing Effective Date: 10/97 Review Dates: 09/01, 07/02, 05/13 Revision Dates:
User Instruction Manual. Read this User Instruction Manual carefully before you start testing.
 User Instruction Manual Read this User Instruction Manual carefully before you start testing. TABLE OF CONTENTS Introduction........................................... 4 Intended Use..........................................
Blood Glucose Monitoring System 12:24 PM 10/13/12. mg/dl. Before Meal. See Options. Uses only Contour Next blood glucose test strips USER GUIDE
 Blood Glucose Monitoring System 10/13/12 See Options 12:24 PM mg/dl 93 Before Meal Uses only Contour Next blood glucose test strips USER GUIDE INDICATIONS FOR USE The Contour Next blood glucose monitoring
Tips for Training New Customers
 Tips for Training New Customers Good Habits: Test Strips Recap vial immediately and tightly after removing a single test strip. Never remove the desiccant from the vial. Do not lay test strips out ahead
Fraser Health Authority Accu-chek Inform II: Training Script
 1. Introduction Ensure that each participant Signs the attendance Sheet (please PRINT first & last name, and middle initial legibly) Refer to; For Reference Only: o Quick Reference Guide o What s new document
Blood Ketone and Glucose Monitoring System Owner s Guide For Veterinary Animal Use Only Not For Human Use
 Blood Ketone and Glucose Monitoring System Owner s Guide For Veterinary Animal Use Only Not For Human Use Nova Vet Monitor OG PN52899E EN.indd 1 Nova Vet Monitor OG PN52899E EN.indd 2 Nova Vet Blood Ketone
User Manual second language
 User Manual second language GlucoTel Blood Glucose Monitoring and Diabetes Management System must be used with cell phones that have: Table of contents 2 3 Introduction 4 Bluetooth Wireless Technology
User s Manual. Blood Glucose Meter
 User s Manual Blood Glucose Meter This User s Manual features the following 3 symbols: W This symbol indicates a possible risk of injury or of damage to your own health or the health of others. H This
PRIMA. Blood Glucose Monitoring System. Owner s Manual
 PRIMA Blood Glucose Monitoring System Owner s Manual English Dear FORA Diamond PRIMA System Owner: Thank you for purchasing the FORA Diamond PRIMA Blood Glucose Monitoring System. This manual provides
User Manual. This is a CLIA waived system.
 User Manual This is a CLIA waived system. The contents of this manual, including all graphics and photographs, are the property of Roche Diagnostics. No part of this document may be reproduced or transmitted
Blood Glucose Monitoring System. Owner's Booklet. Instructions for Use
 Blood Glucose Monitoring System Owner's Booklet Instructions for Use Blood Glucose Monitoring System Owner's Booklet 1 Thanks for choosing OneTouch! The OneTouch Verio Blood Glucose Monitoring System
Blood Glucose Monitoring System
 Blood Glucose Monitoring System Dear Voyage TM System User, Thank you for choosing the Voyage TM system! The Voyage TM blood glucose monitoring system is designed for easy testing of blood glucose and
Blood Glucose Monitoring System
 Blood Glucose Monitoring System Contents Chapter 1 OMRON Blood Glucose Monitoring System HEA-232 1.1 Introduction 1.2 List of Kit Contents 1.3 Product and Meter Display Chapter 2 Installing and Setting
Dear Embrace Owner Embrace N0 Code
 Dear Embrace Owner, Dear Embrace Owner Embrace N0 Code Thank you for choosing the Embrace No Code Blood Glucose Monitoring System to help you manage your diabetes. We designed the Embrace No Code Blood
Blood glucose monitor. MediTouch 2
 Blood glucose monitor for self-testing MediTouch 2 Quick Reference Guide GB Art. 79034 0483 EXACT MDD 93/42/EWG WARNING Before using the MediTouch 2 blood glucose monitor from MEDISANA for the first time,
Prodigy Talking Meter Owner s Manual. Dear Prodigy Owner:
 Dear Prodigy Owner: Thank you for choosing the Prodigy AutoCode Talking blood glucose monitoring system. Please read this manual carefully as it contains important information about your new Prodigy system.
VOICE. Blood Glucose Monitoring System. Owner s Manual
 VOICE Blood Glucose Monitoring System Owner s Manual English Dear FORA Diamond VOICE System Owner: Thank you for purchasing the FORA Diamond VOICE Blood Glucose Monitoring System. This manual provides
Blood Glucose Monitoring System. Owner's Booklet. Instructions for use.
 Blood Glucose Monitoring System Owner's Booklet Instructions for use. Verio IQ Blood Glucose Monitoring System Owner s Booklet 1 Owner s Booklet Thanks for choosing OneTouch! The OneTouch Verio IQ Blood
Blood Glucose Monitoring System. Owner's Booklet. Instructions for use
 Blood Glucose Monitoring System Owner's Booklet Instructions for use Verio Blood Glucose Monitoring System Owner's Booklet 1 Thanks for choosing OneTouch! The OneTouch Verio Blood Glucose Monitoring System
Blood Glucose Meter Owner s Manual
 89115-0055-01 Meter Owner s Manual Preface Thank you for selecting the McKesson Quintet AC Monitoring System. Please read this manual thoroughly before you start testing. This User s Manual provides all
Management of Central Venous Access Devices. Blood Glucose Monitoring
 Management of Central Venous Access Devices Blood Glucose Monitoring Purpose To provide education on the standard of care regarding the use and monitoring of the Accu- Chek Blood glucose machine, including
Point of Care Testing. Bedside Glucose Meter
 Point of Care Testing Bedside Glucose Meter 11/2017 Regulatory Overview Bedside glucose is a point of care lab test and YOU are performing this lab test under the Lab s CLIA license. All lab tests are
User s Manual Blood Glucose Meter
 User s Manual Blood Glucose Meter Contents Introduction...3 Chapter 1: Your New System...5 Chapter 2: Blood Glucose Tests...13 Chapter 3: Control Tests...25 Chapter 4: Meter Settings...31 Chapter 5: Review
Important Safety Instructions
 Dear Embrace EVO Owner Thank you for choosing the Embrace EVO Blood Glucose Meter to help you manage your diabetes. We designed the Embrace EVO Blood Glucose Meter to be accurate and easy to use. The added
PLUS One. Blood Glucose Monitoring System. Owner s Manual
 PLUS One Blood Glucose Monitoring System Owner s Manual Dear PLUS One System Owner: Thank you for purchasing the PLUS One Blood Glucose Monitoring System. This manual provides important information to
CoaguChek XS Plus System Whole Blood Protime/INR
 1 CoaguChek XS Plus System Whole Blood Protime/INR A. PURPOSE The CoaguChek XS System is intended for use by professional healthcare providers for quantitative protime testing (PT) and calculated INR for
Accu-Chek Inform II: Point of Care Glucose Testing. Sharp Healthcare 2014
 Accu-Chek Inform II: Point of Care Glucose Testing Sharp Healthcare 2014 OBJECTIVES At the completion of this module the participant will be able to: Learn the proper technique of performing a finger stick
GM700S USER S MANUAL. Blood Glucose Monitoring System
 GM700S BIONIME GmbH Tramstrasse 16, 9442 Berneck Switzerland E-mail: info@bionime.ch 0197 101-3GM780-011 EN Rev. Date: September/2014 BIONIME CORPORATION No. 100, Sec. 2, Daqing St., South Dist., Taichung
Coag-Sense Prothrombin Time (PT)/INR Monitoring System Professional User s Manual
/INR Monitoring System Professional User s Manual") Coag-Sense Prothrombin Time (PT)/INR Monitoring System Professional User s Manual Copyright 2013, CoaguSense, Inc. All rights reserved. No part of this publication may be reproduced, transmitted, transcribed,
Coag-Sense Prothrombin Time (PT)/INR Monitoring System Professional User s Manual Copyright 2013, CoaguSense, Inc. All rights reserved. No part of this publication may be reproduced, transmitted, transcribed,
To provide you with necessary knowledge and skills to accurately perform 3 HIV rapid tests and to determine HIV status.
 Module 9 Performing HIV Rapid Tests Purpose To provide you with necessary knowledge and skills to accurately perform 3 HIV rapid tests and to determine HIV status. Pre-requisite Modules Module 3: Overview
Dear Prodigy System Owner:
 User's Manual Dear Prodigy System Owner: You have chosen one of the best blood glucose monitoring systems available. This booklet has important information about the system. Please read it carefully. Your
Blood Glucose Monitoring System. Owner s Booklet
 Blood Glucose Monitoring System Owner s Booklet The FreeStyle Freedom Lite Meter and How It Works System Check Screen This display always appears when the meter is turned on. You should check that your
If you have questions or simply want more information, please call your veterinarian or visit our website at
 OWNERS GUIDE 2 Dear WellionVet GLUCO CALEA Owner, Thank you for choosing the WellionVet GLUCO CALEA Blood Glucose Monitor System that will help you monitoring the blood sugar levels of your pet. We designed
MARSHALLTOWN MEDICAL & SURGICAL CENTER Marshalltown, Iowa
 MARSHALLTOWN MEDICAL & SURGICAL CENTER Marshalltown, Iowa CARE OF PATIENT POLICY & PROCEDURE Policy Number: 4:10 Subject: Policy: Glucose Monitoring (Accuchek) Nursing department staff and laboratory staff
5.2 mmol USER GUIDE 5.2. Uses only CONTOUR NEXT blood glucose test strips from Bayer. Wireless Blood Glucose Monitoring System 12:00 PM METER BG
 Wireless Blood Glucose Monitoring System 5.2 mmol L Before Meal 12:00 PM l 10/13 Reminder Notes 12:00 PM METER BG 5.2 mmol/l Uses only CONTOUR NEXT blood glucose test strips from Bayer USER GUIDE INTENDED
Blood Glucose Monitoring System. Owner's Booklet. Instructions for Use
 Blood Glucose Monitoring System Owner's Booklet Instructions for Use Blood Glucose Monitoring System Owner's Booklet 1 Thanks for choosing OneTouch! The OneTouch Verio Blood Glucose Monitoring System
MDT2. Self-Monitoring Blood Glucose System. Quick Reference Guide
 MDT2 Self-Monitoring Blood Glucose System Quick Reference Guide Inserting Batteries 1. Open the battery door on the back of the meter by pushing the tab in the direction of the arrow. 2. Insert two batteries.
GlucoCheck BLOOD GLUCOSE MONITORING SYSTEM OWNER'S MANUAL
 GlucoCheck BLOOD GLUCOSE MONITORING SYSTEM OWNER'S MANUAL GlucoCheck BLOOD GLUCOSE MONITORING SYSTEM OWNER'S MANUAL Version 1.0 January, 2010 311-4277100-001 Dear GlucoCheck XL System Owner: Thank you
Precision Xtra Training
 Precision Xtra Training Objectives At the end of this module, the participant will be able to: List the steps to calibrate the machine Describe the steps for sample collection and blood glucose testing
Contents of the Prodigy Pocket. Meter. PRODIGY Owner s Manual PRODIGY Owner s Manual
 Contents of the Prodigy Pocket Meter The Prodigy Pocket meter is available as a meter only or as a meter kit. Please check the REF number marked on the outside of the box to see if you have purchased a
ACE. Accurate, Compact & Economical Blood Glucose Meter. User Guide
 ACE Accurate, Compact & Economical Blood Glucose Meter User Guide NOTICE: The essential features of the type described and illustrations herein remaining unaltered, Pulsatom Healthcare Pvt. Ltd. reserves
Logic. Owner s Guide. Blood Glucose Monitor
 Owner s Guide Logic Blood Glucose Monitor TM You will notice these symbols on your vials of test strips and control solution as well as the label on the back of your BD Logic TM Blood Glucose Monitor.
5.2 mmol USER GUIDE. 5.2 mmol/l. Bolus Reminder Notes. 12:00 PM l 10/13. Uses only Contour Next blood glucose test strips.
 Wireless Blood Glucose Monitoring System 12:00 PM l 10/13 5.2 mmol Before Meal L Bolus Reminder Notes 12:00 PM BG 5.2 mmol/l Active Insulin 1.5 u MiniMed 670G Pump is shown USER GUIDE Uses only Contour
Caution: Federal law restricts this device to sale by or on the order of a physician.
 Caution: Federal law restricts this device to sale by or on the order of a physician. Copyright 2017, CoaguSense, Inc. All rights reserved. No part of this publication may be reproduced, transmitted, transcribed,
BLOOD GLUCOSE MONITORING SYSTEM USER GUIDE
 BLOOD GLUCOSE MONITORING SYSTEM USER GUIDE Thank you for choosing the Contour blood glucose monitoring system! We are proud to be your partner in helping you manage your diabetes. Our goal is to make this
User s Manual Blood Glucose Meter
 User s Manual Blood Glucose Meter This file may not print or view at 100%. Die lines and color breaks do not print. Holding Area text, box and rules do not print. Roche USA 54082 V2/1 07790953001 07790953001(01)
Good to know. Tips and tricks for accurate blood glucose monitoring
 Good to know Tips and tricks for accurate blood glucose monitoring Tip 1 Washing your hands No place for dirt Accurate blood glucose readings are essential for your diabetes care. Correct self-testing
Blood Glucose Monitoring System. mmol/l 5.2. Before Meal. See Options. Uses only CONTOUR NEXT blood glucose test strips from Bayer USER GUIDE
 Blood Glucose Monitoring System 13.10.12 12:24 mmol/l 5.2 See Options Before Meal Uses only CONTOUR NEXT blood glucose test strips from Bayer USER GUIDE INTENDED USE The CONTOUR NEXT blood glucose monitoring
Single Use Curlew TM Multiple Biopsy Forceps
 Single Use Curlew TM Multiple Biopsy Forceps 13 SPECIMEN WITH METAL STORAGE CYLINDER With In Situ Fixation, Batch or Single Specimen Collection US Patents 5,782,747; 5,980,468; 6,071,248; foreign patents
Performa BLOOD GLUCOSE METER. Operator s Manual
 Performa BLOOD GLUCOSE METER Operator s Manual The Accu Chek Performa System Intended Use The Accu Chek Performa Meter is designed to be used with the Accu Chek Inform II Test Strip to quantitatively
EVENCARE G3 BLOOD GLUCOSE MONITORING SYSTEM USER S GUIDE
 EVENCARE G3 BLOOD GLUCOSE MONITORING SYSTEM USER S GUIDE Introduction Thank you for choosing the EVENCARE G3 Blood Glucose Monitoring System to help monitor your patients blood glucose levels. The EVENCARE
BLOOD GLUCOSE MONITORING SYSTEM OWNER'S MANUAL
 Voice TD-4280 BLOOD GLUCOSE MONITORING SYSTEM OWNER'S MANUAL Dear GlucoRx Nexus Voice TD-4280 System Owner: Thank you for using the GlucoRx Nexus Voice TD-4280 Blood Glucose Monitoring System. This manual
5.2mmol/L. 5.2 mmol USER GUIDE. Uses only CONTOUR NEXT blood glucose test strips from Bayer. Wireless Blood Glucose Monitoring System
 Wireless Blood Glucose Monitoring System 5.2 mmol L Before Meal 12:00 PM l 10/13 Bolus Bolus Reminder Notes 12:00 PM l 10/13 12:00 PM BG 5.2mmol/L Active Insulin 1.5 u Bolus Basal Uses only CONTOUR NEXT
If you have questions or simply want more information, please call your veterinarian or visit our website at
 OWNERS GUIDE 2 Dear WellionVet GLUCO CALEA Owner, Thank you for choosing the WellionVet GLUCO CALEA Blood Glucose Monitor System that will help you monitoring the blood sugar levels of your pet. We designed
Blood Glucose & Ketone Monitoring System. User s Manual
 Blood Glucose & Ketone Monitoring System User s Manual Definition of Symbols These symbols are associated with your meter. Batch code This packaging is capable of being recycled Catalog number Manufacturer
Blood Glucose Monitoring System. Owner's Booklet. Instructions for Use
 Blood Glucose Monitoring System Owner's Booklet Instructions for Use Select Plus Flex Blood Glucose Monitoring System Owner's Booklet 1 Thanks for choosing OneTouch! The OneTouch Select Plus Flex Blood
Omnitest 5. Blood Glucose Monitoring System
 Omnitest 5 Blood Glucose Monitoring System 2 Important notes The Omnitest 5 system provides a quick and easy way to measure the blood glucose level. It can be used for selfmonitoring of blood glucose levels
Compressor Nebulizer Instruction Manual Part No.: 5055
 Compressor Nebulizer Instruction Manual Part No.: 5055 DISTRIBUTED BY: SAVE THESE INSTRUCTIONS. CAUTION - U.S. Federal Law restricts this device to sale by or on the order of a physician. 666002-6310 V1.3
USER GUIDE. For Use With Ascensia ELITE XL Blood Glucose Meter. THE NEW FACE of Glucometer
 THE NEW FACE of Glucometer Diabetes Care System USER GUIDE For Use With Ascensia ELITE XL Blood Glucose Meter Need Help with Reimbursement? Call Our Bayer Care Help Line: 1-877-787-1912 2 The Meter Test
Instructions for Use Enbrel (en-brel) (etanercept) for injection, for subcutaneous use Multiple-dose Vial
 (etanercept) for injection, for subcutaneous use Multiple-dose Vial") Instructions for Use Enbrel (en-brel) (etanercept) for injection, for subcutaneous use Multiple-dose Vial How do I prepare and give an injection with Enbrel multiple-dose vial? A multiple-dose vial contains
Instructions for Use Enbrel (en-brel) (etanercept) for injection, for subcutaneous use Multiple-dose Vial How do I prepare and give an injection with Enbrel multiple-dose vial? A multiple-dose vial contains
Roche CoaguChek XS Plus INR
 Page 1 of 8 Roche CoaguChek XS Plus INR Edition No: 6.0 Author: Paul Simpson Operative Date: October 2016 Review Date: October 2017 Location: Country Health SA Integrated Cardiovascular Clinical Network
W IMPORTANT INFORMATION FOR PERFORMING A BLOOD GLUCOSE TEST
 W IMPORTANT INFORMATION FOR PERFORMING A BLOOD GLUCOSE TEST W An incorrectly performed blood glucose test may lead to incorrect test results which can cause the wrong therapy recommendation to be made
Blood Glucose Monitoring System. Link the Effects of Food to Glucose Results. Owner s Booklet
 Blood Glucose Monitoring System Link the Effects of Food to Glucose Results Owner s Booklet Welcome to the OneTouch family! We know diabetes can be difficult to understand and manage. The right products
CoaguChek Outpatient Clinic: CoaguChek XS - Quick Reference Guide
 CoaguChek Outpatient Clinic: CoaguChek XS - Quick Reference Guide CoaguChek XS Quick Reference Guide Page 1 Page 1 of 18 Coaguchek XS Monitor A DISPLAY B - M (memory button) o To recall results from memory
TRUEHb HEMOMETER. Instructions for Use. Wrig Nanosystems Pvt. Ltd.
 Instructions for Use Wrig Nanosystems Pvt. Ltd. 1 Please read this manual carefully before using TRUEHb Hemometer TrueHb Hemometer System This TrueHb Hemometer Kit includes: a) TrueHb Hemometer b) TrueHb
Fibrlok II 2529 Universal Optical Fiber Splice
 Fibrlok II 2529 Universal Optical Fiber Splice Instructions January 2007 78-8128-0163-3-E Contents: 1.0 General... 3 2.0 Splicing Set-up... 4 3.0 Fiber Preparation... 5 4.0 Splice Assembly... 6 5.0 For
Blood Glucose Monitoring System OWNER S GUIDE. For use with the ibgstar Diabetes Manager. Application on iphone or ipod touch
 Blood Glucose Monitoring System OWNER S GUIDE For use with the ibgstar Diabetes Manager Application on iphone or ipod touch Key Features ibgstar Diabetes Manager Application - an iphone and ipod touch
Blood Glucose Measurement. Omnitest 5 & Omnican Lance FAQ Frequently Asked Questions
 Blood Glucose Measurement Omnitest 5 & Omnican Lance FAQ Frequently Asked Questions FAQ Omnitest 5 & Omnican Lance CONTENT Omnitest 5 Overview 3 Application Range 5 Target Groups 5 Test Strips 5 Settings
ISO IVD 13485: : :2015
 ISO ISO 15197:2013 9001:2015 ISO 13485:2016 IVD Table of Contents Important Information About Your Gluco Spark Monitoring System... 1 Important Health-Related Information... 1 Alternate Test Site... 2
For Self-Testing Use Portable Whole Blood Test System. User Guide
 For Self-Testing Use Portable Whole Blood Test System User Guide Table of Contents Materials Provided REF 1709 CardioChek analyzer system (1) Materials Needed but Not Provided PTS Panels self-test strips
PLEASE READ THIS USER GUIDE BEFORE OPERATING THE SYSTEM
 USER GUIDE 1 Intended Use and Indications The LungBoost Respiratory Trainer is a device which assists its user in strengthening their respiratory muscles. This device uses dual purpose training Endurance
User manual for healthcare professionals
 Blood Glucose Management System Accu-Chek Performa User manual for healthcare professionals CONTENTS 3 Introduction 4 Staff Responsibilities 5 Protocol 6 About the Accu-Chek Performa 7 Coding/Calibrating
QUICK REFERENCE INSTRUCTIONS. THYROCHEK TSH Cassette
 QUICK REFERENCE INSTRUCTIONS THYROCHEK TSH Cassette A certificate of CLIA waiver is required to perform the testing in a waived setting. If the laboratory does not have a Certificate of Waiver, the Application
Point of Care testing refers to all laboratory testing that is done outside of the walls of the clinical laboratory in the proximity of the patient.
 1 2 Point of Care testing refers to all laboratory testing that is done outside of the walls of the clinical laboratory in the proximity of the patient. All such tests are considered lab tests and are
Blood Glucose Monitoring System. User s Manual for Single Patient Use Only Blood Glucose Meter
 Blood Glucose Monitoring System User s Manual for Single Patient Use Only Blood Glucose Meter Contents Important Safety Information...3 Chapter 1: Your New System...9 Chapter 2: The Accu Chek FastClix
This is a CLIA-waived system. Policies and Procedures Manual
 This is a CLIA-waived system. Policies and Procedures Manual Approval date Approved by Reviewed/Revised: Date By whom Title Roche Diagnostics 9115 Hague Road Indianapolis, IN 46256 www.poc.roche.com COAGUCHEK
NEPHROCHECK Liquid Control Kit Package Insert
 NEPHROCHECK Liquid Control Kit Package Insert Manufactured for Astute Medical, Inc. 3550 General Atomics Ct. Building 2 San Diego, CA 92121 USA Intended Use The NEPHROCHECK Liquid Controls are used for
Mini-Mist. Owner s Manual. portable nebulizer. PMM241 Rev.3 12/10
 Mini-Mist TM portable nebulizer PMM241 Rev.3 12/10 Dear Prodigy Owner: Thank you for choosing the Prodigy Mini-Mist vibrating mesh nebulizer. Please read this manual carefully as it contains important
INTRODUCTION: TRUE METRIX
 INTRODUCTION: TRUE METRIX Self Monitoring Blood Glucose System TRUE METRIX is a simple, accurate way to test your whole blood glucose (sugar) level, anytime, anywhere. Our goal is to provide quality healthcare
COMPRESSOR NEBULIZER MODEL: JB USER S MANUAL
 COMPRESSOR NEBULIZER MODEL: JB0112-062 USER S MANUAL Read this manual before operating the nebulizer Save these instructions for future reference Caution: Federal law restricts this device to sale by or
Wireless Blood Glucose Monitoring System. 93 mg 12:24 PM METER BG. Mg/dL. Uses only CONTOUR NEXT blood glucose test strips from Bayer USER GUIDE
 Wireless Blood Glucose Monitoring System 93 mg dl Before Meal 12:24PM l 11/10 Reminder Notes 12:24 PM METER BG 93 Mg/dL Uses only CONTOUR NEXT blood glucose test strips from Bayer USER GUIDE Indications