PLATE 1. Outline Form
|
|
|
- Allan James
- 6 years ago
- Views:
Transcription
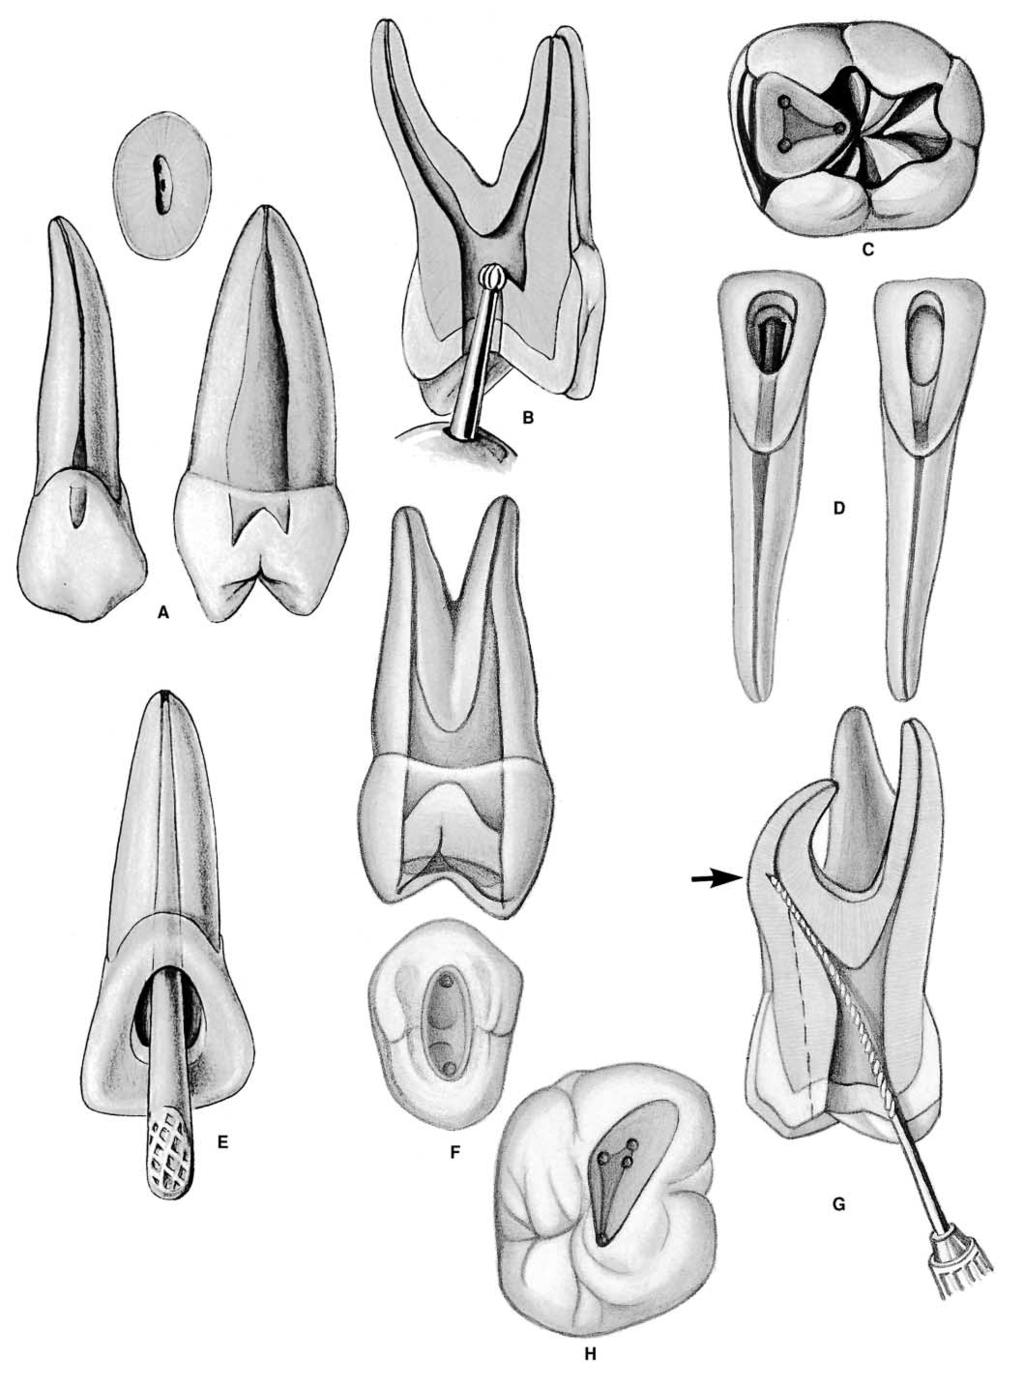
1 PLATE 1 Outline Form A. A standard radiograph (left) in buccolingual projection provides only a two-dimensional view of what is actually a three-dimensional problem. If a mesiodistal x-ray projection could be made (right), one would find the pulp of the maxillary second premolar to be flat tapering ribbon rather than round thread visualized on the initial radiograph. The final ovoid occlusal cavity preparation (F) will mirror the internal anatomy rather than the buccolingual x-ray image. B. Coronal preparation of a maxillary first molar illustrating the major principle of endodontic cavity outline form: the internal anatomy of the tooth (pulp) dictates the external outline form. This is accomplished by extending preparation from inside of the tooth to the outside surface, that is, working from inside to outside. C. Endodontic cavity preparation, mandibular first molar, superimposed on inlay, restoring proximal-occlusal surfaces. Black s outline form of inlay is related to the external anatomy and environment of the tooth, that is, the extent of carious lesions, grooves, and fissures and the position of the approximating premolar. A triangular or rhomboidal outline form of endodontic preparation, on the other hand, is related to the internal anatomy of the pulp. No relationship exists between the two outline forms. D. Size and shape of endodontic coronal preparations in mandibular incisors related to size and shape of the pulp and chamber. A contrast in outline form between a young incisor (left) with a large pulp and an adult incisor (right) is apparent. The large triangular preparation in a youngster reflects pulpal horn extension and size of the pulp chamber, whereas ovoid preparation in an adult relates to a grossly receded pulp. Extension toward the incisal allows central-axis access for instruments. E. Large size and shape of coronal preparation in a recently calcified incisor relate to huge pulp housing. To remove all pulp remnants and to accommodate large endodontic instruments and filling materials, coronal preparation must be an extensive, triangular, funnel-shaped opening. Actually, no more than the lingual wall of pulp chamber has been removed. In lower incisors, the outline form may well be extended into the incisal edge. This preparation allows absolutely direct access to apex. F. The outline form of the endodontic coronal cavity in the maxillary first premolar is a narrow, elongated oval in buccolingual projection (bottom), which reflects the size and shape of a broad, flat pulp chamber of this particular tooth. G. Buccal view of an inadequate coronal preparation in a maxillary molar with a defalcated mesiobuccal root. There has been no compensation in cavity preparation for severe curvature of the mesial canal or for the obtuse direction by which the canal leaves the chamber. The operator can no longer maintain control of the instrument, and a ledge has been produced (arrow). Extension of the outline form and internal preparation to the mesial (dotted line) would have obviated this failure. H. Shamrock preparation. Modified outline form to accommodate the instrument unrestrained in the severely curved mesial canal seen in G.
2 PLATE 1
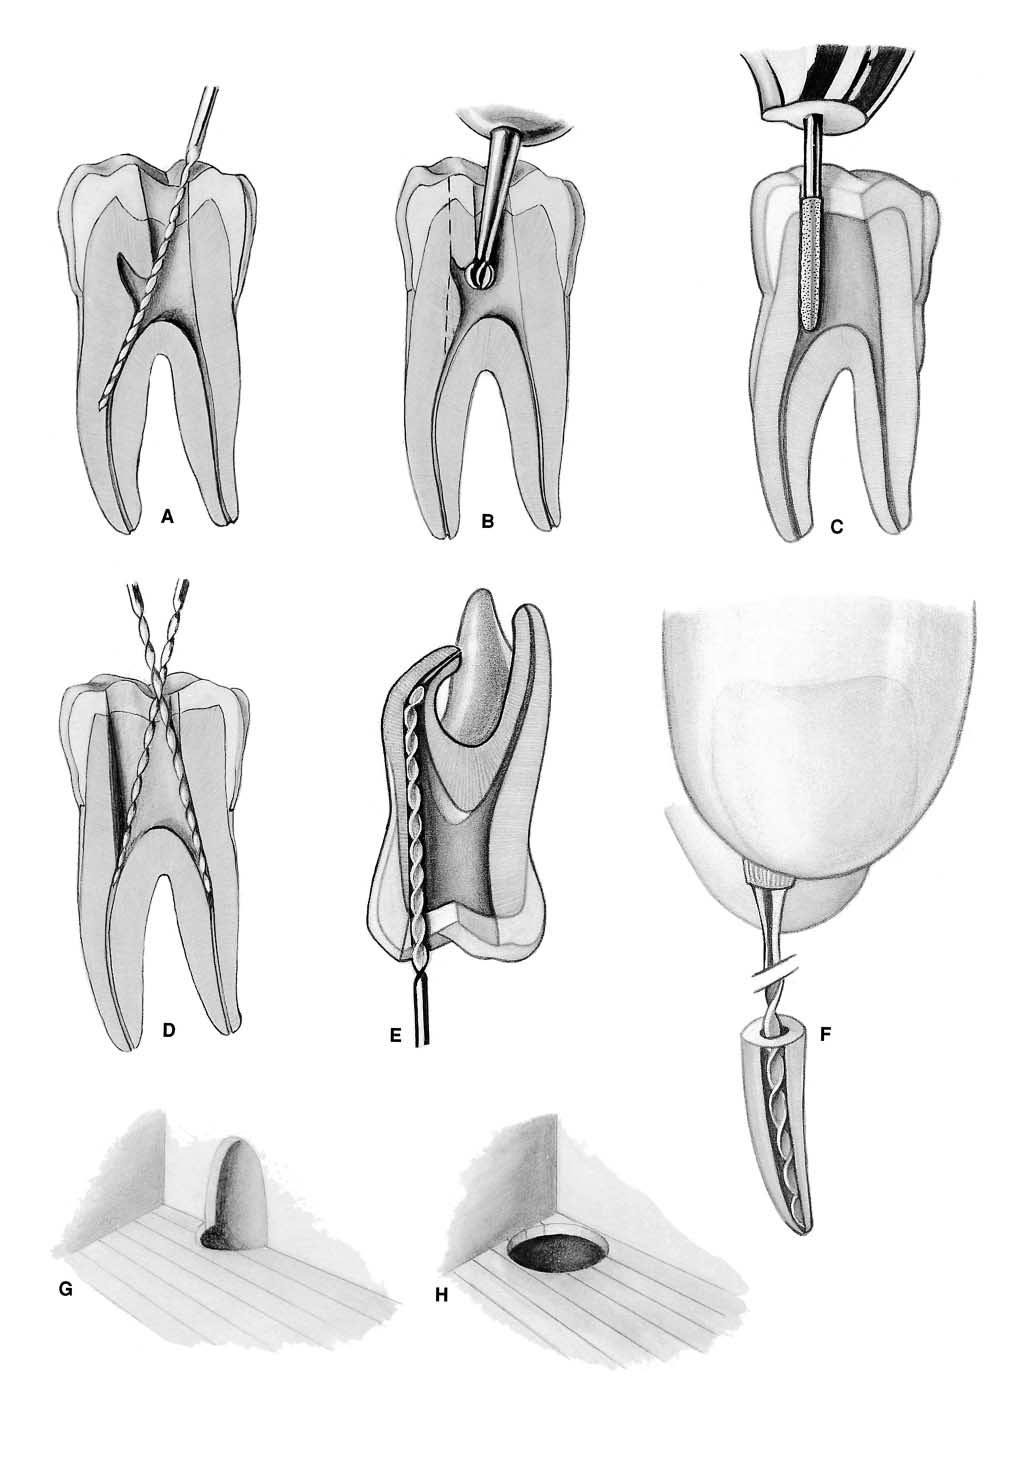
3 PLATE 2 Convenience Form A. Obstructed access to mesial canals in a mandibular first molar. The overhanging roof of the pulp chamber misdirects the instrument mesially, with resulting ledge formation in the canal. It is virtually impossible to see and difficult to locate mesial canal orifices each time the instrument is introduced. B. Internal cavity preparation. Removing the roof completely from the pulp chamber will bring canal orifices into view and allow immediate access to each orifice. Using a round bur and working from the inside out will accomplish this end. C. Final finish of the convenience form is completed with a fissure bur, diamond point, or non end-cutting batt bur. The entire cavity slopes toward the mesial direction of approach, which greatly simplifies instrument placement. D. Unobstructed access to canal orifices. The mesial wall has been sloped to mesial for the approach to the mandibular molar is from the mesial. The tip of the instrument follows down the mesial wall at each corner of the triangular preparation and literally falls into orifices. After the position of each orifice has been determined, the mouth mirror may be laid aside. The distal wall of preparation also slopes to the mesial and is easily entered from the mesial approach. E. Direct access to apical foramen. Extensive removal of coronal tooth structure is necessary to allow complete freedom of endodontic instruments in the coronal cavity and direct access to the apical canal. This is especially true when the root is severely curved or leaves the chamber at an obtuse angle. Walls are generally reduced with burs or long, thin diamond points (see B and C above) and with endodontic files, Gates-Glidden drills, or orifice openers. Burs are rarely used in the floor or immediate orifice area. In the event that a second canal is suspected in the mesiobuccal root of the maxillary molar, the cavity outline would be extended in both of these directions to broaden the search. Depending on the technique used to fill the canal, the outline form may also be expanded somewhat to accommodate pluggers used in obturation. F. The complete authority of the enlarging instrument is maintained when all intervening tooth structure is removed and the instrument is controlled by the clinician s fingers on the handle of the instrument and the tip of the instrument is free in the lumen of the canal. G. Complete authority of enlarging instrument. If the lateral wall of the cavity has not been sufficiently extended and the pulpal horn portion of the orifice still remains in the wall, the orifice will have the appearance of a tiny mouse hole. This lateral wall will then impinge on enlarging the instrument and will dictate the direction of the instrument tip. The operator will have lost control of the instrument and the situation. H. By extending the lateral wall of the cavity, thus removing all intervening dentin from the orifice, the mouse hole in the wall will be eliminated and the orifice will appear completely in the floor. Now the enlarging instrument will stand free of the walls, and the operator will regain control of the instrument (see F above).
4 PLATE 2
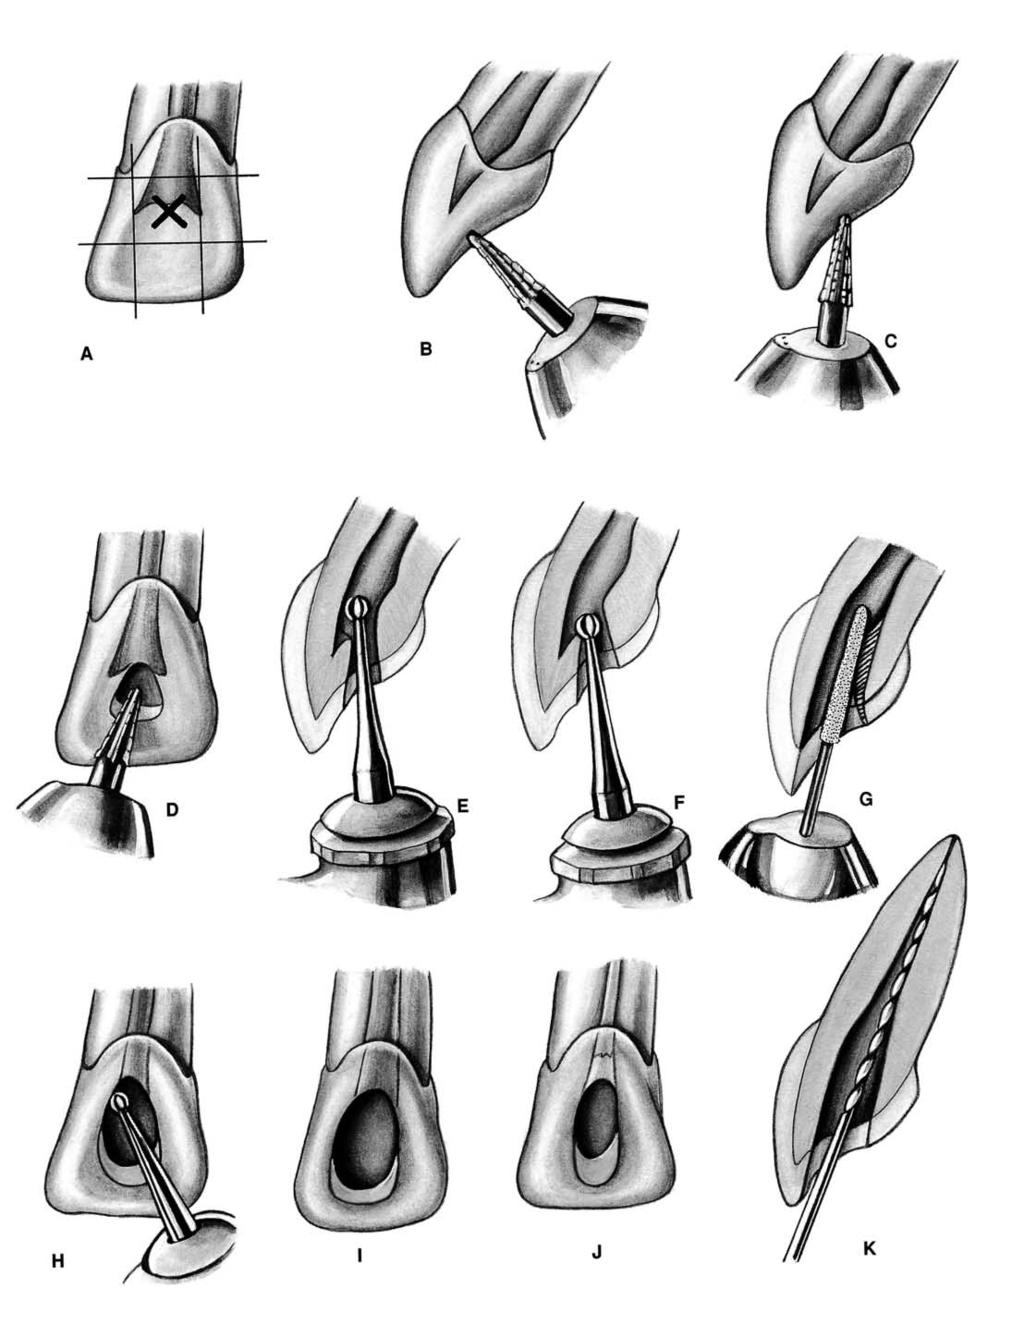
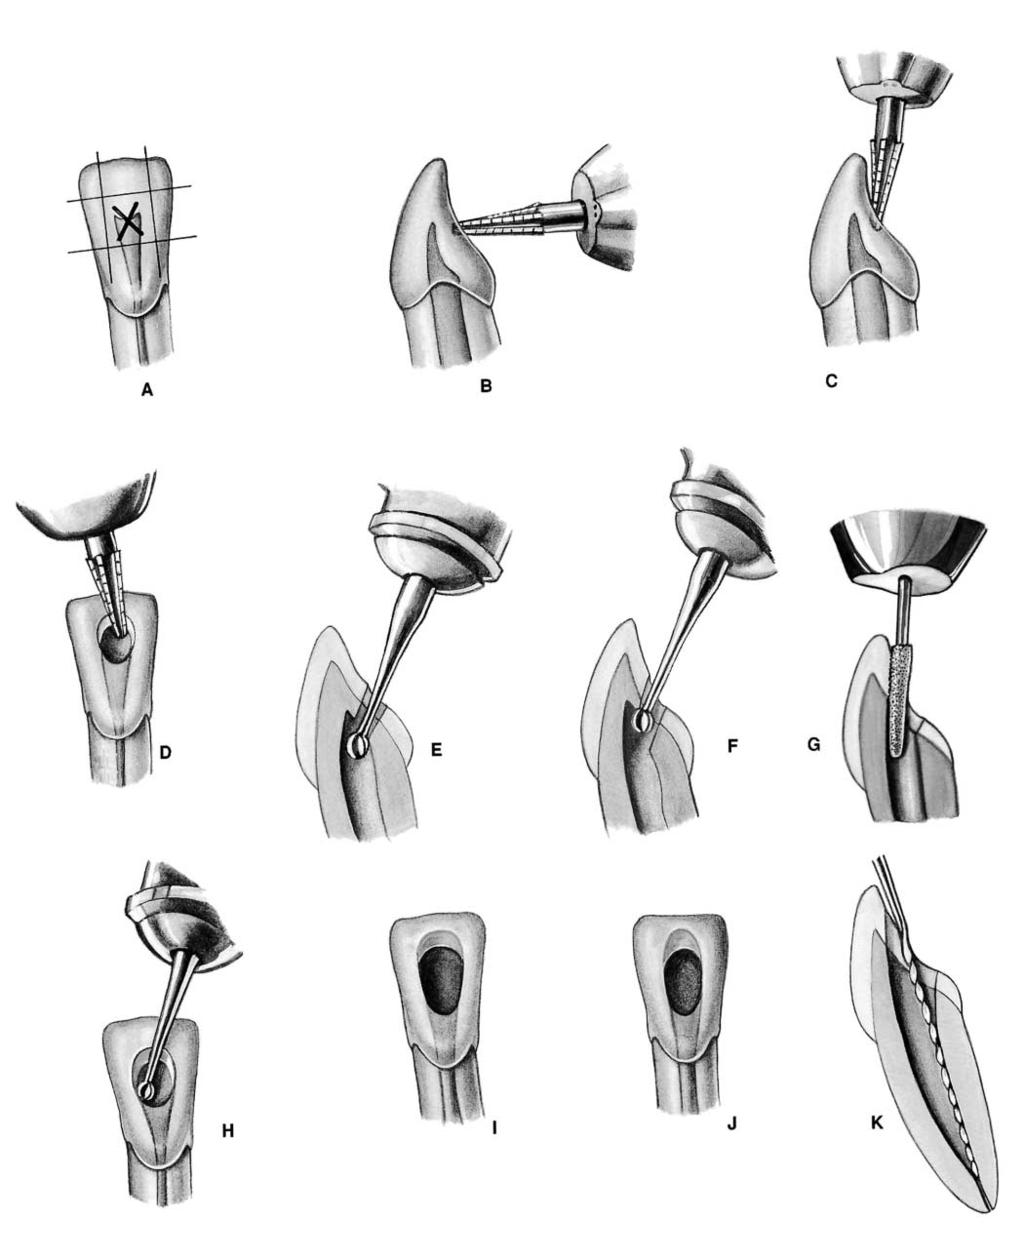
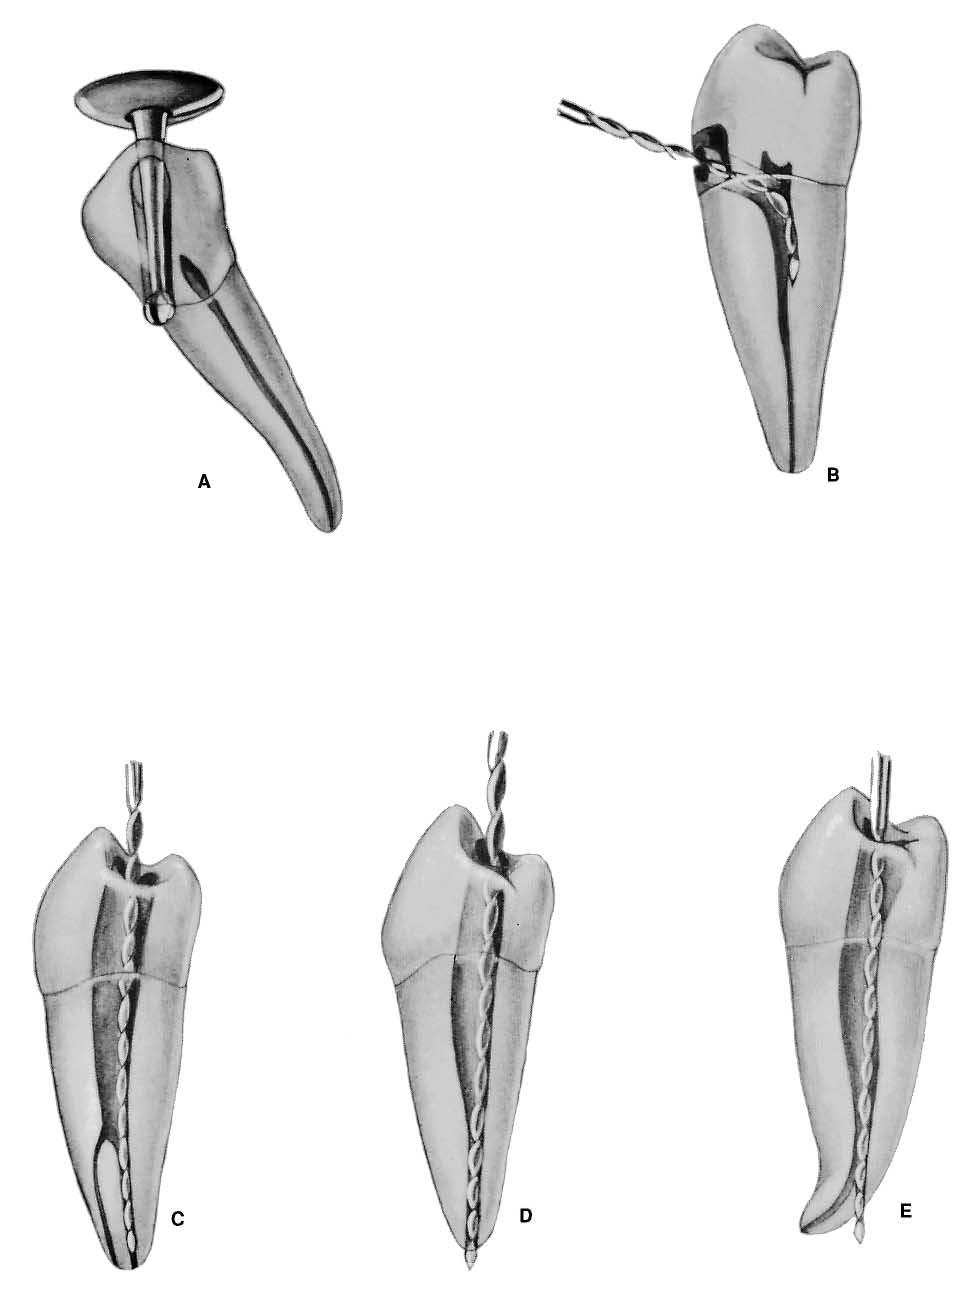
5 PLATE 3 Endodontic Preparation of Maxillary Anterior Teeth A. Entrance is always gained through the lingual surface of all anterior teeth. Initial penetration is made in the exact center of the lingual surface at the position marked X. A common error is to begin the cavity too far gingivally. B. Initial entrance is prepared with a round-point tapering fissure bur in an accelerated-speed contra-angle handpiece with air coolant, operated at a right angle to the long axis of the tooth. Only enamel is penetrated at this time. Do not force the bur; allow it to cut its own way. C. Convenience extension toward the incisal continues the initial penetrating cavity preparation. Maintain the point of the bur in the central cavity and rotate the handpiece toward the incisal so that the bur parallels the long axis of the tooth. Enamel and dentin are beveled toward the incisal. Entrance into the pulp chamber should not be made with an accelerated-speed instrument. Lack of tactile sensation with these instruments precludes their use inside the tooth. D. The preliminary cavity outline is funneled and fanned incisally with a fissure bur. Enamel has a short bevel toward the incisal, and a nest is prepared in the dentin to receive the round bur to be used for penetration. E. A surgical-length No. 2 or 4 round bur in a slow-speed contra-angle handpiece is used to penetrate the pulp chamber. If the pulp has greatly receded, a No. 2 round bur is used for initial penetration. Take advantage of convenience extension toward the incisal to allow for the shaft of the penetrating bur, operated nearly parallel to the long axis of the tooth. F. Working from inside the chamber to outside, a round bur is used to remove the lingual and labial walls of the pulp chamber. The resulting cavity is smooth, continuous, and flowing from cavity margin to canal orifice. G. After the outline form is completed, the surgicallength bur is carefully passed into the canal. Working from inside to outside, the lingual shoulder is removed to give continuous, smooth-flowing preparation. Often a long, tapering diamond point will better remove the lingual shoulder. H. Occasionally, a No. 1 or 2 round bur must be used laterally and incisally to eliminate pulpal horn debris and bacteria. This also prevents future discoloration. I. Final preparation relates to the internal anatomy of the chamber and canal. In a young tooth with a large pulp, the outline form reflects a large triangular internal anatomy an extensive cavity that allows thorough cleansing of the chamber as well as passage of large instruments and filling materials needed to prepare and fill a large canal. Cavity extension toward the incisal allows greater access to the midline of the canal. J. Cavity preparations in adult teeth, with the chamber obturated with secondary dentin, are ovoid in shape. Preparation funnels down to the orifice of the canal. The further the pulp has receded, the more difficult it is to reach to this depth with a round bur. Therefore, when the radiograph reveals advanced pulpal recession, convenience extension must be advanced further incisally to allow the bur shaft and instruments to operate in the central axis. K. Final preparation with the reamer in place. The instrument shaft clears the incisal cavity margin and reduced lingual shoulder, allowing an unrestrained approach to the apical third of the canal. The instrument remains under the complete control of the clinician. An optimal, round, tapered cavity may be prepared in the apical third, tailored to the requirements of round, tapered filling materials to follow. The remaining ovoid part of the canal is cleaned and shaped by circumferential filing or Gates-Glidden drills.
6 PLATE 3
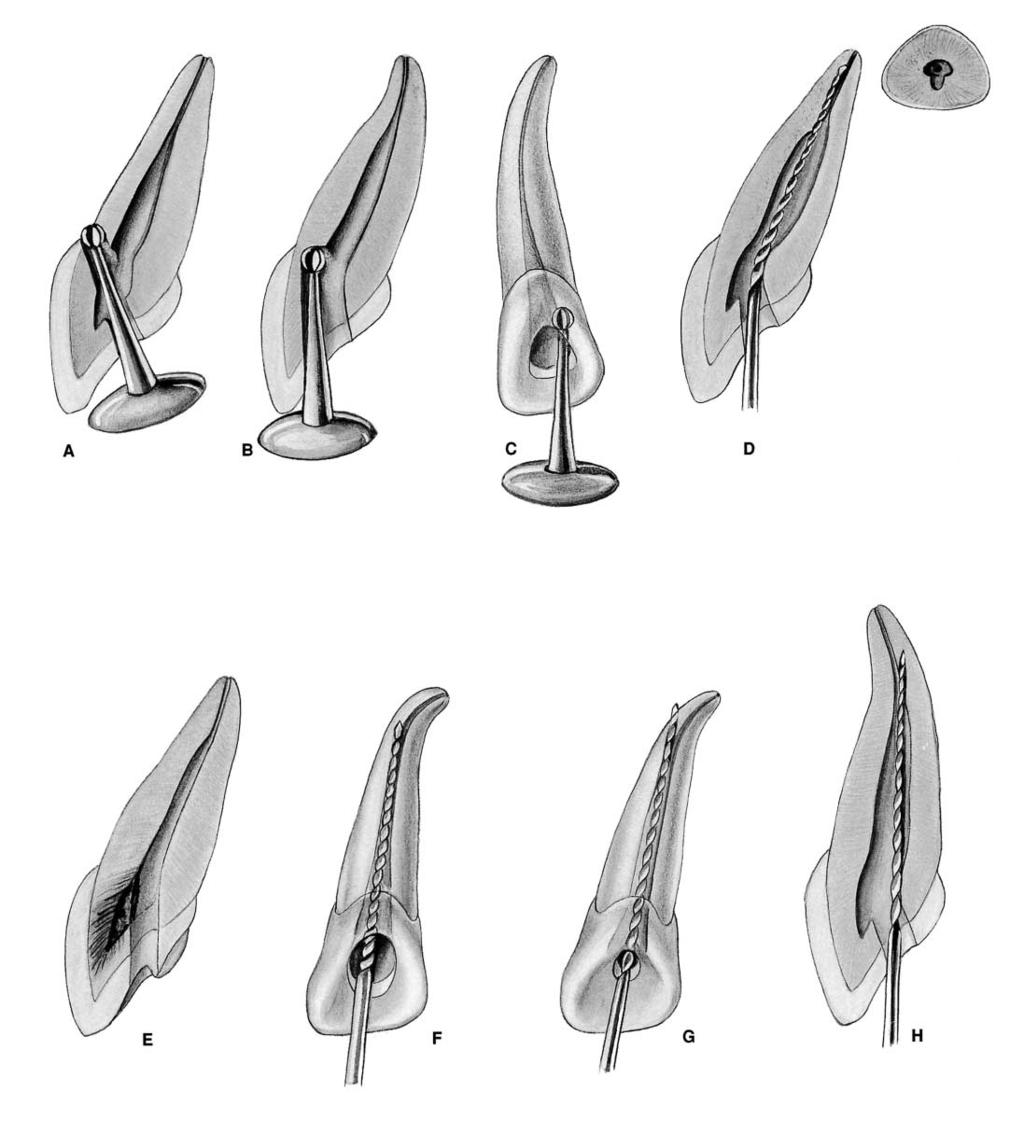
7 PLATE 4 Maxillary Central Incisor Pulp Anatomy and Coronal Preparation A. Lingual view of a recently calcified incisor with a large pulp. A radiograph will reveal 1. extent of the pulp horns 2. mesiodistal width of the pulp 3. apical-distal curvature (8% of the time) 4. 2-degree mesial-axial inclination of the tooth These factors seen in the radiograph are borne in mind when preparation is begun. B. Distal view of the same tooth demonstrating details not apparent in the radiograph: 1. presence of a lingual shoulder at the point where the chamber and canal join 2. broad labiolingual extent of the pulp degree lingual-axial angulation of the tooth The operator must recognize that a. the lingual shoulder must be removed with a tapered diamond point to allow better access to the canal. b. these unseen factors affect the size, shape, and inclination of final preparation. C. Cross-sections at three levels: 1, cervical; 2, midroot; and 3, apical third: 1. Cervical level: the pulp is enormous in a young tooth, wider in the mesiodistal dimension. Débridement in this area is accomplished by extensive perimeter filing. 2. Midroot level: the canal continues ovoid and requires perimeter filing and multiple point filling. 3. Apical third level: the canal, generally round in shape, is enlarged by reshaping the cavity into a round tapered preparation. Preparation terminates at the cementodentinal junction, 0.5 to 1.0 mm from the radiographic apex. An unusually large apical third canal is more ovoid in shape, must be prepared with perimeter filing rather than reaming, and must be obturated with multiple points or warm gutta-percha. D. Large, triangular, funnel-shaped coronal preparation is necessary to adequately débride the chamber of all pulp remnants. (The pulp is ghosted in the background.) Note the beveled extension toward the incisal that will carry the preparation labially and thus nearer the central axis. Incisal extension allows better access for large instruments and filling materials used in the apical third canal. E. Lingual view of an adult incisor with extensive secondary dentin formation. A radiograph will reveal 1. full pulpal recession 2. apparently straight canal 3. 2-degree mesial-axial inclination of the tooth F. Distal view of the same tooth demonstrating details not apparent in the radiograph: 1. narrow labiolingual width of pulp 2. reduced size of the lingual shoulder 3. apical-labial curvature (9% of the time) degree lingual-axial angulation of the tooth The operator must recognize that a. a small canal orifice is difficult to find. b. apical-labial curvature, not usually seen radiographically, can be determined by exploration with a fine curved file and mesially oriented radiographs. c. axial inclination of the root calls for careful orientation and alignment of the bur to prevent gouging. G. Cross-sections at three levels: 1, cervical; 2, midroot; and 3, apical third: 1. Cervical level: the canal, only slightly ovoid, becomes progressively more round. 2. Midroot level: the canal varies from slightly ovoid to round. 3. Apical third level: the canal is generally round in the older patient. H. Ovoid, funnel-shaped coronal preparation provides adequate access to the root canal. The pulp chamber, obturated by secondary dentin, need not be extended for coronal débridement. Adult cavity preparation is narrow in the mesiodistal width but is almost as extensive in the incisogingival direction as preparation in a young tooth. This beveled incisal extension carries preparation nearer the central axis, allowing better access to the curved apical third.

8 PLATE 4 Maxillary Central Incisors Length of tooth Canal Lateral canals Apical ramifications Root curvature Average Length 23.3 mm One canal 23% 13% Straight 75% Maximum Length 25.6 mm 100% Distal Curve 8% Minimum Length 21.0 mm Mesial Curve 4% Range 4.6 mm *Labial Curve 9% *Lingual Curve 4% *Not apparent in radiograph
9 PLATE 5 Maxillary Lateral Incisor Pulp Anatomy and Coronal Preparation A. Lingual view of a recently calcified incisor with a large pulp. A radiograph will reveal 1. extent of the pulp horns 2. mesiodistal width of the pulp 3. apical-distal curvature (53% of the time) degree mesial-axial inclination of the tooth Factors seen in the radiograph are borne in mind when preparation is begun. B. Distal view of the same tooth demonstrating details not apparent in the radiograph: 1. presence of a lingual shoulder at the point where the chamber and canal join 2. broad labiolingual extent of the pulp degree lingual-axial angulation of tooth The operator must recognize that a. the lingual shoulder must be removed with a tapered diamond point to allow better access to the canal. b. these unseen factors will affect the size, shape, and inclination of final preparation. C. Cross-sections at three levels: 1, cervical; 2, midroot; and 3, apical third: 1. Cervical level: the pulp is large in a young tooth and wider in the labiolingual dimension. Débridement in this area is accomplished by extensive perimeter filing. 2. Midroot level: the canal continues ovoid and requires additional filing to straighten the gradual curve. Multiple point filling is necessary. 3. Apical third level: the canal, generally round and gradually curved, is enlarged by filing to a straightened trajectory. Preparation is completed by shaping the cavity into a round, tapered preparation. Preparation terminates at the cementodentinal junction, 0.5 to 1.0 mm from the radiographic apex. D. Large, triangular, funnel-shaped coronal preparation is necessary to adequately débride the chamber of all pulpal remnants. (The pulp is ghosted in the background.) Note the beveled extension toward the incisal, which will carry the preparation labially and thus nearer the central axis. Incisal extension allows better access to the apical third of the canal. E. Lingual view of an adult incisor with extensive secondary dentin formation. A radiograph will reveal 1. full pulp recession 2. severe apical curve to the distal degree mesial-axial inclination of the tooth F. Distal view of the same tooth demonstrating details not apparent in the radiograph 1. narrow labiolingual width of the pulp 2. reduced size of the lingual shoulder 3. apical-lingual curvature (4% of the time) degree lingual-axial angulation of the tooth The operator must recognize that a. a small canal orifice is difficult to find. b. apical-lingual curvature, not usually seen radiographically, can be determined by exploration with a fine curved file and mesially oriented radiographs. c. axial inclination of the root calls for careful orientation and alignment of the bur to prevent labial gouging. A corkscrew curve, to the distal and lingual, complicates preparation of the apical third of the canal. G. Cross-sections at three levels: 1, cervical; 2, midroot; and 3, apical third: 1. Cervical level: the canal is only slightly ovoid and becomes progressively rounder. 2. Midroot level: the canal varies from slightly ovoid to round. 3. Apical third level: the canal is generally round in the older patient. A curved canal is enlarged by alternate reaming and filing. Ovoid preparation will require multiple point filling. H. Ovoid, funnel-shaped coronal preparation should be only slightly skewed toward the mesial to present better access to the apical-distal. It is not necessary to extend preparation for coronal débridement, but an extensive bevel is necessary toward the incisal to carry preparation nearer the central axis, allowing better access to the apical third.

10 PLATE 5 Maxillary Lateral Incisors Length of tooth Canal Lateral canals Apical ramifications Root curvature Average Length 22.8 mm One canal 10% 12% Straight 30% Maximum Length 25.1 mm 99.9% Distal Curve 53% Minimum Length 20.5 mm Mesial Curve 3% Range 4.6 mm *Labial Curve 4% *Bayonet and 6% Gradual Curve *Not apparent in radiograph
11 PLATE 6 Maxillary Canine Pulp Anatomy and Coronal Preparation A. Lingual view of a recently calcified canine with a large pulp. A radiograph will reveal 1. coronal extent of the pulp 2. narrow mesiodistal width of the pulp 3. apical-distal curvature (32% of the time) 4. 6-degree distal-axial inclination of the tooth These factors, seen in the radiograph, are borne in mind when preparation is begun, particularly the severe apical curve. B. Distal view of the same tooth demonstrating details not apparent in the radiograph: 1. huge ovoid pulp, larger labiolingually than the radiograph would indicate 2. presence of a labial shoulder just below the cervical 3. narrow canal in the apical third of the root degree lingual-axial angulation of the tooth These unseen factors will affect the size, shape, and inclination of the final preparation. C. Cross-section is at three levels: 1, cervical; 2, midroot; and 3, apical third: 1. Cervical level: the pulp is enormous in a young tooth, much wider in the labiolingual direction. Débridement in this area is accomplished with a long, tapered diamond point and extensive perimeter filing. 2. Midroot level: the canal continues ovoid in shape and requires perimeter filing and multiple point filling. 3. Apical third level: the straight canal (39% of time), generally round in shape, is prepared by shaping the cavity into round tapered preparation. Preparation should terminate at the cementodentinal junction, 0.5 to 1.0 mm from the radiographic apex. If unusually large or curved, the apical canal requires perimeter filing and multiple point or warm gutta-percha filling. D. Extensive, ovoid, funnel-shaped coronal preparation is necessary to adequately débride the chamber of all pulpal remnants. (The pulp is ghosted in the background.) Note the long, beveled extension toward the incisal, which will carry the preparation labially and thus nearer the central axis. Incisal extension allows better access for large instruments and filling materials used in the apical third of the canal. E. Lingual view of an adult canine with extensive secondary dentin formation. A radiograph will reveal 1. full pulp recession 2. straight canal (39% of the time) 3. 6-degree distal-axial inclination of tooth F. Distal view of the same tooth demonstrating details not apparent in the radiograph: 1. narrow labiolingual width of the pulp 2. apical labial curvature (13% of the time) degree lingual-axial angulation of the tooth The operator should recognize that a. a small canal orifice is difficult to find. b. apical labial curvature, not seen radiographically, can be determined only by exploration with a fine curved file and mesially oriented radiographs. c. distal-lingual axial inclination of the root calls for careful orientation and alignment of the bur to prevent gouging. d. apical foramen toward the labial is a problem. G. Cross-sections at three levels: 1, cervical; 2, midroot; and 3, apical third: 1. Cervical level: the canal is slightly ovoid. 2. Midroot level: the canal is smaller but remains ovoid. 3. Apical third level: the canal becomes progressively rounder. H. Extensive, ovoid, funnel-shaped preparation must be nearly as large as for a young tooth. A beveled incisal extension carries preparation nearer the central axis, allowing better access to the curved apical third. Discovery by exploration of an apicallabial curve calls for even greater incisal extension.

12 PLATE 6 Maxillary Canines Length of tooth Canal Lateral canals Apical ramifications Root curvature Average Length 26.0 mm One canal 24% 8% Straight 39% Maximum Length 28.9 mm 100% Distal Curve 32% Minimum Length 23.1 mm Mesial Curve 0% Range 5.8 mm *Labial Curve 13% *Lingual Curve 7% Bayonet and 7% Gradual Curve *Not apparent in radiograph
13 PLATE 7 Maxillary Anterior Teeth ERRORS in Cavity Preparation A. PERFORATION at the labiocervical caused by failure to complete convenience extension toward the incisal, prior to the entrance of the shaft of the bur. B. GOUGING of the labial wall caused by failure to recognize the 29-degree lingual-axial angulation of the tooth. C. GOUGING of the distal wall caused by failure to recognize the 16-degree mesial-axial inclination of the tooth. D. PEAR-SHAPED PREPARATION of the apical canal caused by failure to complete convenience extensions. The shaft of the instrument rides on the cavity margin and lingual shoulder. Inadequate débridement and obturation ensure failure. E. DISCOLORATION of the crown caused by failure to remove pulp debris. The access cavity is too far to the gingival with no incisal extension. F. LEDGE formation at the apical-distal curve caused by using an uncurved instrument too large for the canal. The cavity is adequate. G. PERFORATION at the apical-distal curve caused by using too large an instrument through an inadequate preparation placed too far gingivally. H. LEDGE formation at the apical-labial curve caused by failure to complete the convenience extension. The shaft of the instrument rides on the cavity margin and shoulder.
14 PLATE 7
15 PLATE 8 Endodontic Preparation of Mandibular Anterior Teeth A. Entrance is always gained through the lingual surface of all anterior teeth. Initial penetration is made in the exact center of the lingual surface at the position marked X. A common error is to begin too far gingivally. B. The initial entrance cavity is prepared with a 701 U tapering fissure bur in an accelerated-speed contra-angle handpiece with air coolant, operated at a right angle to the long axis of the tooth. Only enamel is penetrated at this time. Do not force the bur; allow it to cut its own way. C. Convenience extension toward the incisal continues initial penetrating cavity. Maintain the point of the bur in the central cavity and rotate the handpiece toward the incisal so that the bur parallels the long axis of the tooth. Enamel and dentin are beveled toward the incisal. Entrance into the pulp chamber should not be made with an accelerated-speed instrument. Lack of tactile sensation with these instruments precludes their use inside the tooth. D. The preliminary cavity outline is funneled and fanned incisally with a fissure bur. The enamel has a short bevel toward the incisal, and a nest is prepared in the dentin to receive the round bur to be used for penetration. E. A surgical-length No. 2 round bur in a slow-speed contra-angle handpiece is used to penetrate into the pulp chamber. If the pulp has greatly receded, the No. 2 round bur is used for initial penetration. Take advantage of convenience extension toward the incisal to allow for the shaft of the penetrating bur, operated nearly parallel to the long axis of the tooth. F. Working from inside the chamber to the outside, a round bur is used to remove the lingual and labial walls of the pulp chamber. The resulting cavity is smooth, continuous, and flowing from cavity margin to canal orifice. G. After the outline form is completed, a surgical-length bur is carefully passed down into the canal. Working from inside to outside, the lingual shoulder is removed with a long, fine, tapered diamond point to give a continuous, smooth-flowing preparation. H. Occasionally, a No. 1 round bur must be used laterally and incisally in the cavity to eliminate pulpal horn debris and bacteria. This also prevents future discoloration. I. Final preparation related to the internal anatomy of the chamber and canal. In a young tooth with a large pulp, the outline form reflects triangular internal anatomy an extensive cavity that allows thorough cleansing of the chamber as well as passage of large instruments and filling materials needed to prepare and fill the large canal. Note extension toward the incisal to allow better access to the central axis. J. Cavity preparations in an adult tooth with the chamber obliterated with secondary dentin are ovoid. Preparation funnels down to the orifice of the canal. The further the pulp has receded, the more difficult it is to reach to this depth with a round bur. Therefore, when a radiograph reveals advanced pulpal recession, convenience extension must be advanced further incisally to allow the bur shaft to operate in the central axis. The incisal edge may even be invaded and later restored by composites. K. Final preparation showing the reamer in place. The instrument shaft clears the incisal cavity margin and reduced lingual shoulder, allowing an unrestrained approach to the apical third of the canal. The instruments remain under the complete control of the clinician. Great care must be taken to explore for additional canals, particularly to the lingual of the pulp chamber. An optimal round, tapered cavity may be prepared in the apical third, tailored to requirements of round, tapered filling materials to follow. The remaining ovoid part of the canal is cleaned and shaped by extensive filing.
16 PLATE 8
17 PLATE 9 Mandibular Central and Lateral Incisors Pulp Anatomy and Coronal Preparation A. Lingual view of a recently calcified incisor with a large pulp. A radiograph will reveal 1. extent of the pulp horns 2. mesiodistal width of the pulp 3. slight apical-distal curvature of the canal (23% of the time) 4. mesial-axial inclination of the tooth (central incisor 2 degrees, lateral incisor 17 degrees). These factors, seen in the radiograph, are borne in mind when preparation is begun. B. Distal view of the same tooth demonstrating details not apparent in the radiograph: 1. presence of a lingual shoulder at the point where the chamber and canal join 2. broad labiolingual extent of the pulp degree lingual-axial angulation of the tooth The operator must recognize that a. the lingual shoulder must be removed with a fine, tapered diamond point to allow better access to the canal. b. these unseen factors affect the size, shape, and inclination of the final preparation. C. Cross-sections at three levels: 1, cervical; 2, midroot; 3, apical third: 1. Cervical level: the pulp is enormous in a young tooth, wider in the labiolingual dimension. Débridement in this area is accomplished by extensive perimeter filing. 2. Midroot level: the canal continues ovoid and requires perimeter filing and multiple point filling. 3. Apical third level: the canal, generally round in shape, is enlarged by shaping the cavity into a round, tapered preparation. Preparation terminates at the cementodentinal junction, 0.5 to 1.0 mm from the radiographic apex. D. Large, triangular, funnel-shaped coronal preparation is necessary to adequately débride the chamber of all pulp remnants. (The pulp is ghosted in the background.) Note the beveled extension toward the incisal, which will carry the preparation labially and thus nearer the central axis. Incisal extension allows better access for instruments and filling materials used in the apical third of the canal. E. Lingual view of an adult incisor with extensive secondary dentin formation. A radiograph will reveal: 1. full pulp recession 2. an apparently straight canal 3. mesial-axial inclination of the tooth (central incisor 2 degrees, lateral incisor 17 degrees). F. Distal view of the same tooth demonstrating details not apparent in the radiograph: 1. labiolingual width of the pulp 2. reduced size of the lingual shoulder 3. unsuspected presence of bifurcation of pulp into the labial and lingual canals nearly 30% of the time degree lingual-axial angulation of the tooth The operator must recognize that a. smaller canal orifices are more difficult to find. b. labial and lingual canals are discovered by exploration with a fine curved file to both labial and lingual. c. axial inclination of the root calls for careful orientation and alignment of the bur to prevent gouging. G. Cross-sections at three levels: 1, cervical; 2, midroot; and 3, apical third: 1. Cervical level: the canal is only slightly ovoid. 2. Midroot level: the two canals are essentially round. 3. Apical third level: the canals are round and curve toward the labial. It is important that all mandibular anterior teeth be explored to both labial and lingual for the possibility of two canals. H. Ovoid, funnel-shaped coronal preparation provides adequate access to the root canal. An adult cavity is narrow in the mesiodistal width but is as extensive in the incisogingival direction as preparation in a young tooth. This beveled incisal extension carries preparation nearer to the central axis. The incisal edge may even be invaded. This will allow better access to both canals and the curved apical third. Ideal lingual extension and better access will often lead to discovery of the second canal.

18 PLATE 9 Mandibular Central and Lateral Incisors Central Lateral Central Lateral Length of tooth Incisors Incisors Canals Incisors Incisors Root curvature Average Length 21.5 mm 22.4 mm One canal 70.1% 56.9% Straight 60% One foramen Maximum Length 23.4 mm 24.6 mm Two canals 23.4% 14.7% Distal Curve 23% One foramen Minimum Length 19.6 mm 20.2 mm Two canals 6.5% 29.4% Mesial Curve 0% Two foramens Range 3.8 mm 4.4 mm Lateral canals 5.2% 13.9% *Labial Curve 13% *Lingual Curve 0% *Not apparent in radiograph
19 PLATE 10 Mandibular Canine Pulp Anatomy and Coronal Preparation A. Lingual view of a recently calcified canine with a large pulp. A radiograph will reveal 1. coronal extent of the pulp 2. narrow mesiodistal width of the pulp 3. apical-distal curvature (20% of the time) degree mesial-axial inclination of tooth These factors, seen in the radiograph, are borne in mind when preparation is begun. B. Distal view of the same tooth demonstrating details not apparent in the radiograph: 1. broad labiolingual extent of the pulp 2. narrow canal in the apical third of the root 3. apical-labial curvature (7% of time) degree lingual-axial angulation of the tooth These unseen factors affect the size, shape, and inclination of the final preparation. C. Cross-sections at three levels: 1, cervical; 2, midroot; and 3, apical third: 1. Cervical level: the pulp is enormous in a young tooth, wider in the labiolingual direction. Débridement in this area is accomplished with extensive perimeter filing. 2. Midroot level: the canal continues ovoid and requires perimeter filing and multiple gutta-percha point filling. 3. Apical third level: the canal, generally round, is enlarged by filing to reduce the curve to a relatively straight canal. This canal is then completed by shaping action into round, tapered preparation. Preparation terminates at the cementodentinal junction, 0.5 to 1.0 mm from the radiograph apex. If unusually large or ovoid, the apical canal requires perimeter filing. D. Extensive ovoid, funnel-shaped coronal preparation is necessary to adequately débride the chamber of all pulp remnants. (The pulp is ghosted in the background.) Note the beveled extension toward the incisal, which will carry the preparation labially and thus nearer the central axis. Incisal extension allows better access for large instruments and filling materials used in the apical third canal. E. Lingual view of an adult canine with extensive secondary dentin formation. A radiograph will reveal 1. full pulp recession 2. slight distal curve of the canal (20% of the time) degree mesial-axial inclination of the tooth F. Distal view of the same tooth demonstrating details not apparent in the radiograph: 1. labiolingual width of the pulp degree lingual-axial angulation of the tooth The operator must recognize that a. a small canal orifice, positioned well to the labial, is difficult to find. b. lingual-axial angulation calls for careful orientation of the bur to prevent gouging. c. apical-labial curvature (7% of the time). G. Cross-sections at three levels: 1, cervical; 2, midroot; and 3, apical third: 1. Cervical level: the canal is slightly ovoid. 2. Mid-root level: the canal is smaller but remains ovoid. 3. Apical third level: the canal becomes progressively rounder. The canal is enlarged by filing and is filled. H. Extensive ovoid, funnel-shaped preparations must be as large as preparation for a young tooth. The cavity should be extended incisogingivally for room to find the orifice and enlarge the apical third without interference. An apical-labial curve would call for increased extension incisally.

20 PLATE 10 Mandibular Canines Length of tooth Canals Lateral canals Root curvature Average Length 25.2 mm One canal 94% 9.5% Straight 68% Maximum Length 27.5 mm Two canals Distal Curve 20% Minimum Length 22.9 mm Two foramina 6% Mesial Curve 1% Range 4.6 mm *Labial Curve 7% *Lingual Curve 0% Bayonet Curve 2% *Not apparent in radiograph
21 PLATE 11 Mandibular Anterior Teeth ERRORS in Cavity Preparation A. GOUGING at the labiocervical caused by failure to complete convenience extension toward the incisal prior to entrance of the shaft of the bur. B. GOUGING of the labial wall caused by failure to recognize the 20-degree lingual-axial angulation of the tooth. C. GOUGING of the distal wall caused by failure to recognize the 17-degree mesial-axial angulation of the tooth. D. FAILURE to explore, débride, or fill the second canal caused by inadequate incisogingival extension of the access cavity. E. DISCOLORATION of the crown caused by failure to remove pulp debris. The access cavity is too far to the gingival with no incisal extension. F. LEDGE formation caused by complete loss of control of the instrument passing through the access cavity prepared in proximal restoration.

22 PLATE 11
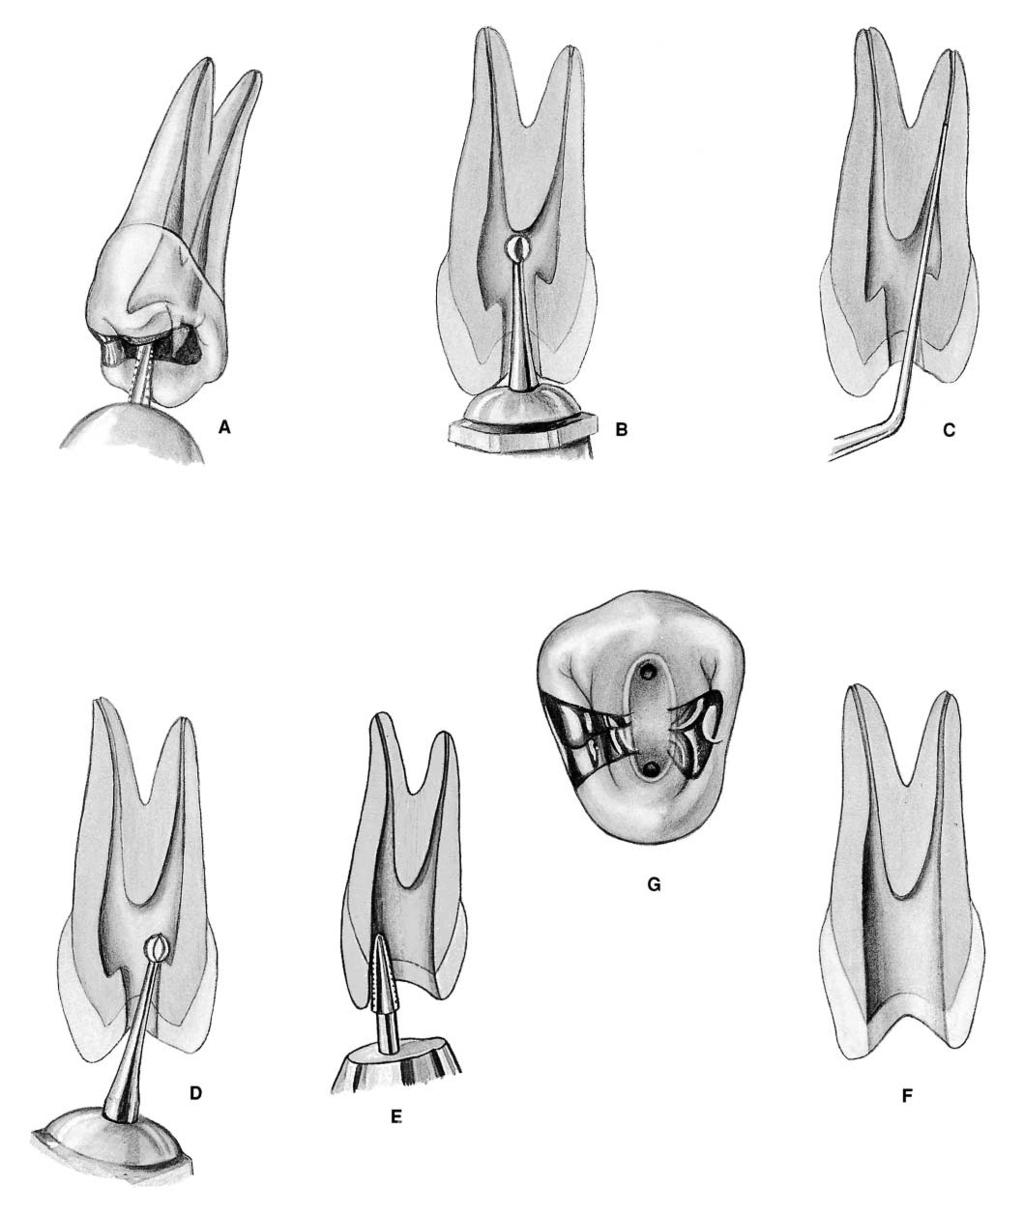
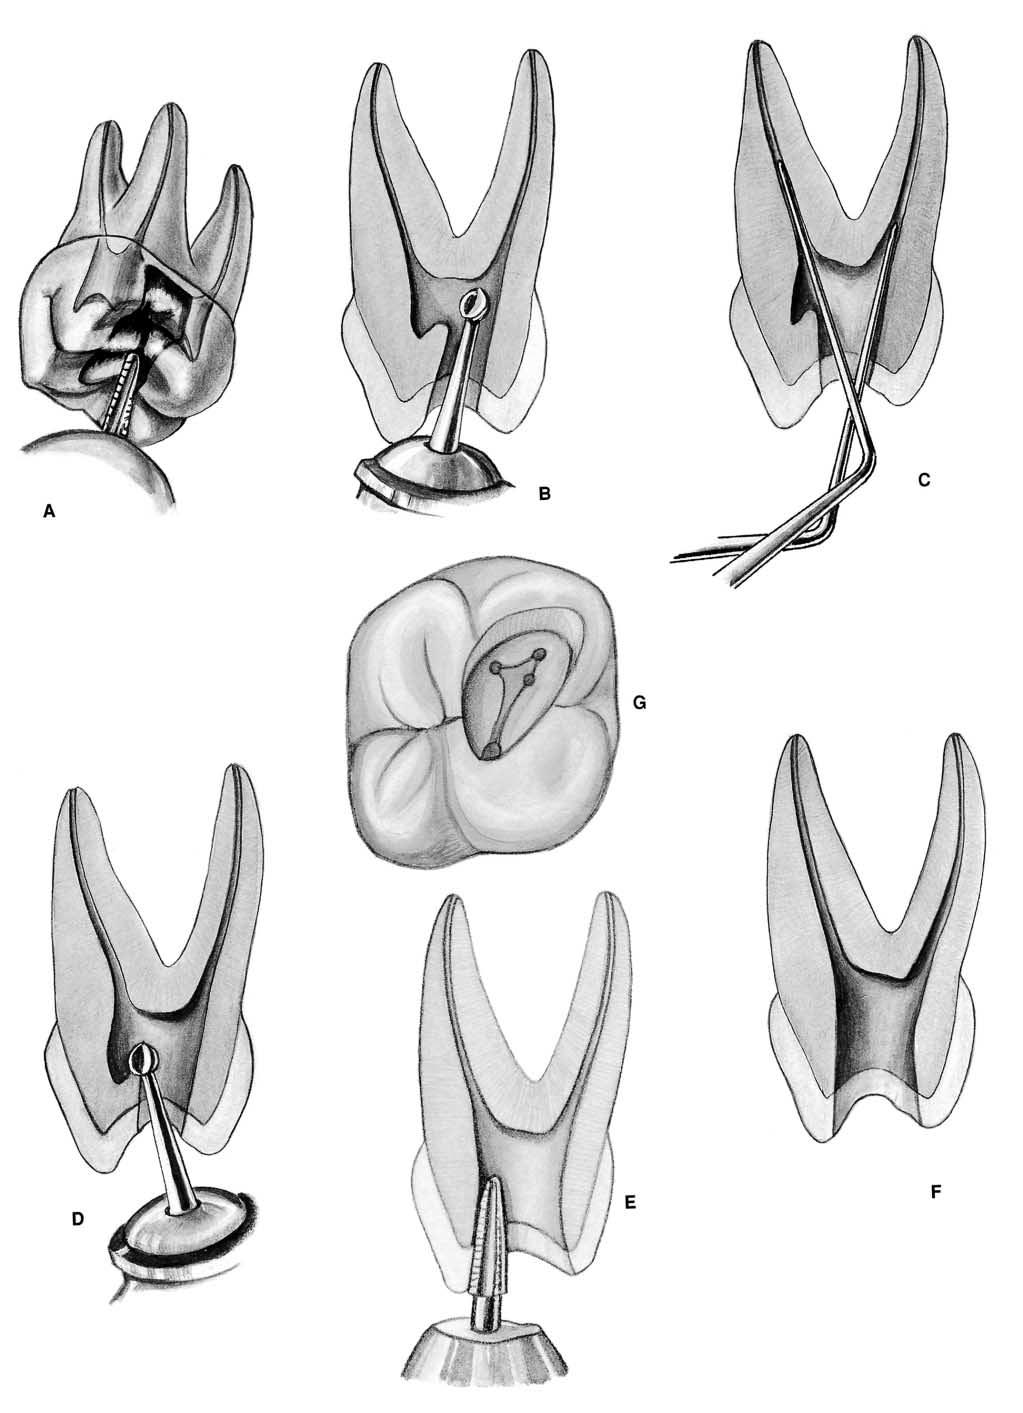
23 PLATE 12 Endodontic Preparation of Maxillary Premolar Teeth A. Entrance is always gained through the occlusal surface of all posterior teeth. Initial penetration is made parallel to the long axis of the tooth in the exact center of the central groove of the maxillary premolars. The 701 U tapering fissure bur in an accelerated-speed contra-angle handpiece is ideal for penetrating gold casting or virgin enamel surface to the depth of the dentin. Amalgam fillings are opened with a No. 4 round bur in a slow-speed contra-angle handpiece. B. A regular-length No. 2 or 4 round bur is used to open into the pulp chamber. The bur will be felt to drop when the pulp chamber is reached. If the chamber is well calcified and the drop is not felt, vertical penetration is made until the contra-angle handpiece rests against the occlusal surface. This depth is approximately 9 mm, the position of the floor of the pulp chamber that lies at the cervical level. In removing the bur, the orifice is widened buccolingually to twice the width of the bur to allow room for exploration for canal orifices. If a surgical-length bur is used, care must be exercised not to perforate the furca. C. An endodontic explorer is used to locate orifices to the buccal and lingual canals in the first premolar or the central canal in the second premolar. Tension of the explorer shaft against the walls of preparation will indicate the amount and direction of extension necessary. D. Working from inside the pulp chamber to outside, a round bur is used at low speed to extend the cavity buccolingually by removing the roof of the pulp chamber. E. Buccolingual extension and finish of cavity walls are completed with a 701 U fissure bur at accelerated speed. F. Final preparation should provide unobstructed access to canal orifices. Cavity walls should not impede complete authority over enlarging instruments. G. Outline form of final preparation will be identical for both newly erupted and adult teeth. Buccolingual ovoid preparation reflects the anatomy of the pulp chamber and the position of the buccal and lingual canal orifices. The cavity must be extensive enough to allow for instruments and filling materials needed to enlarge and fill canals. Further exploration at this time is imperative. It may reveal the orifice to an additional canal, a second canal in the second premolar, or a third canal in the first premolar.
24 PLATE 12
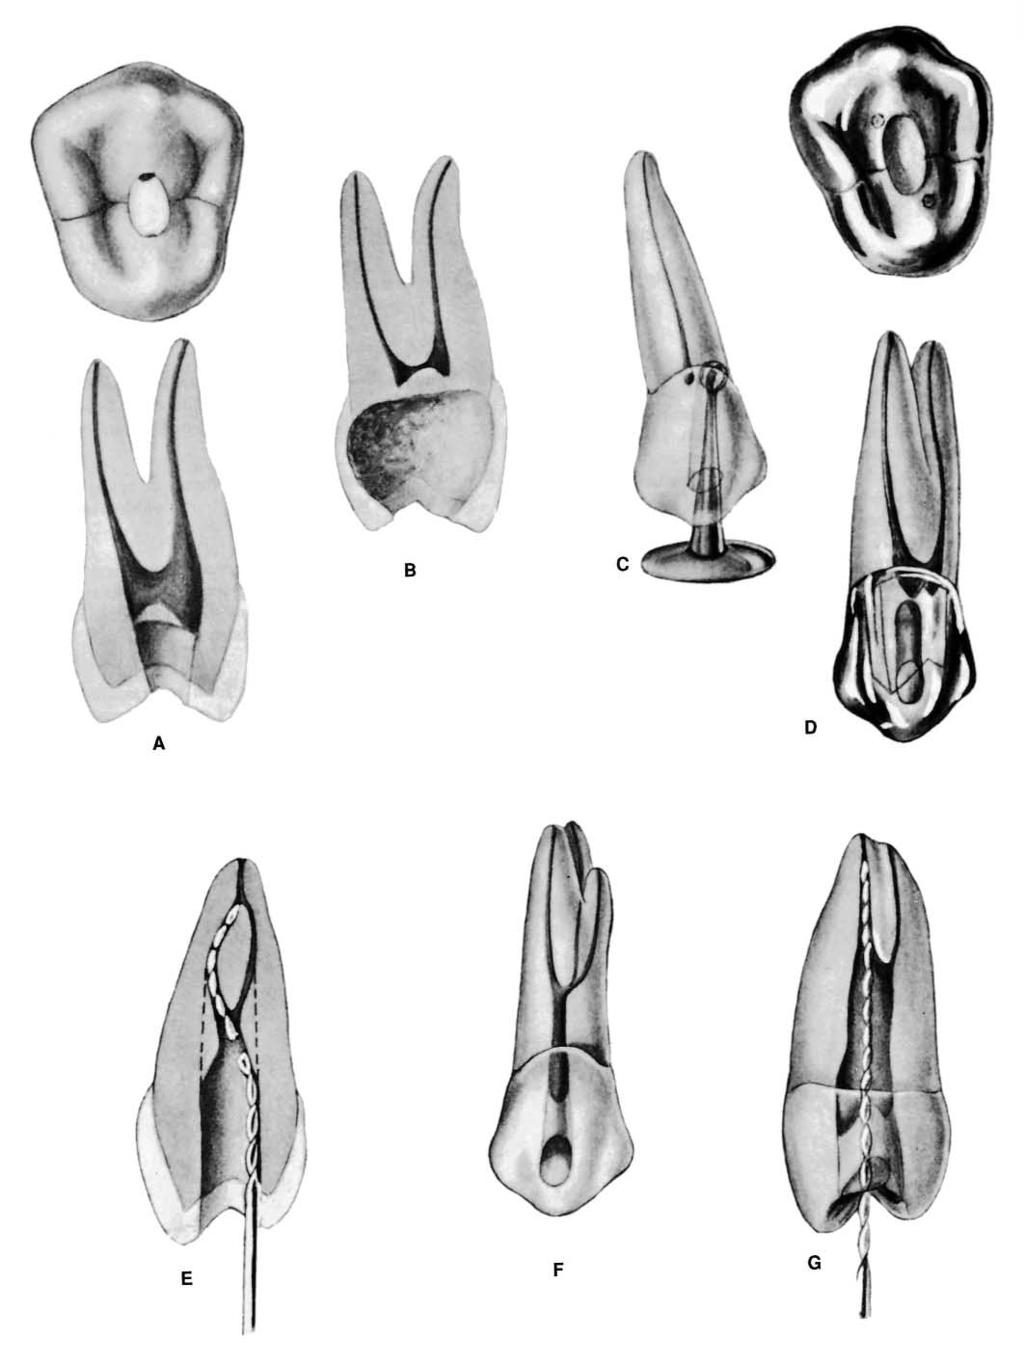
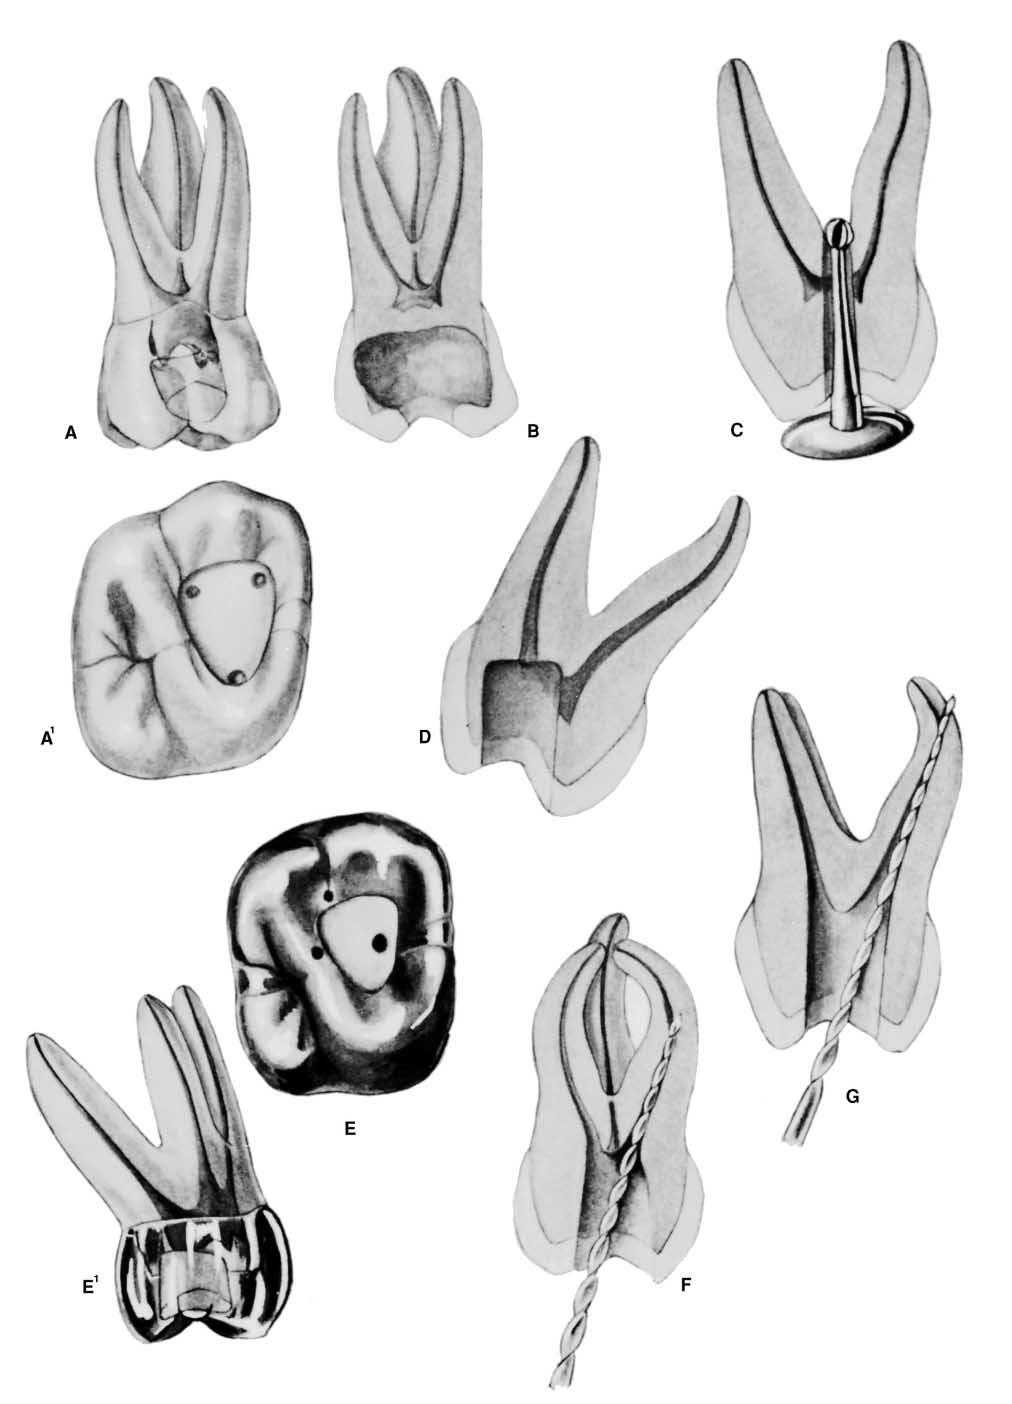
25 PLATE 13 Maxillary First Premolar Pulp Anatomy and Coronal Preparation A. Buccal view of a recently calcified first premolar with a large pulp. A radiograph, if exposed slightly from the mesial, will reveal 1. mesiodistal width of the pulp 2. presence of two pulp canals 3. apparently straight canals degree distal-axial inclination of the tooth These factors, seen in the radiograph, are borne in mind when preparation is begun. One should always expect two and occasionally three canals. B. Mesial view of the same tooth demonstrating details not apparent in the radiograph: 1. height of the pulp horns 2. broad buccolingual dimension of the pulp 3. two widespread and separate roots, each with a single straight canal 4. 6-degree buccal-axial angulation of the tooth These unseen factors will affect the size and shape of the final preparation. Pulp horns in the roof of the pulp chamber are not to be confused with true canal orifices in the cavity floor. Verticality of the tooth simplifies orientation and bur alignment. C. Cross-sections at three levels: 1, cervical; 2, midroot; and 3, apical third: 1. Cervical level: the pulp is enormous in a young tooth, very wide in the buccolingual direction. Débridement of the chamber is completed in coronal cavity preparation with a round bur. Canal orifices are found well to the buccal and lingual. 2. Midroot level: the canals are only lightly ovoid and may be enlarged to a round, tapered cavity. 3. Apical third level: the canals are round and are shaped into round, tapered preparations. Preparations terminate at the cementodentinal junction, 0.5 to 1.0 mm from the radiographic apex. D. Ovoid coronal preparation need not be as long buccolingually as the pulp chamber. However, the outline form must be large enough to provide two filling points at same time. Buccal and lingual walls smoothly flow to orifices. E. Buccal view of an adult first premolar with extensive secondary dentin formation. A radiograph will reveal 1. full pulp recession and thread-like appearance of the pulp 2. radiographic appearance of only one canal degree distal-axial inclination of the tooth Owing to misalignment of the bur, perforation of the mesiocervical, at the point of mesial indentation, may occur. F. Mesial view of the same tooth demonstrating details not apparent in the radiograph: 1. pulp recession and a greatly flattened pulp chamber 2. buccolingual width revealing the pulp to be ribbon shaped rather than thread-like 3. single root with parallel canals and a single apical foramen 4. 6-degree buccal-axial angulation of the tooth The operator must recognize that a. small canal orifices are found well to the buccal and lingual and are difficult to locate. b. the direction of each canal is determined only by exploration with a fine curved instrument. c. a single apical foramen cannot be determined; therefore, two canals must be managed as two separate canals. d. virtually always there will be two and occasionally three canals. G. Cross-sections at three levels: 1, cervical; 2, midroot; and 3, apical third: 1. Cervical level: the chamber is very narrow ovoid, and canal orifices are at the buccal and lingual termination of the floor. 2. Midroot level: the canals are round. 3. Apical third level: the canals are round. H. Ovoid coronal preparation must be more extensive in the buccolingual direction because of parallel canals. More extensive preparation allows instrumentation without interference.

26 PLATE 13 Maxillary First Premolars Curvature of Roots Single Double Roots Length of tooth Canals Direction Root Buccal Palatal Average Length 21.8 mm One canal 9% Straight 38% 28% 45% Maximum Length 23.8 mm One foramen Distal Curve 37% 14% 14% Minimum Length 18.8 mm Two canals 13% Mesial Curve 0% 0% 0% Range 5 mm One foramen *Buccal Curve 15% 14% 28% Two canals 72% *Lingual Curve 3% 36% 9% Two foramina Bayonet Curve 0% 8% 0% Three canals 6% Three foramina *Not apparent in radiograph
27 PLATE 14 Maxillary Second Premolar Pulp Anatomy and Coronal Preparation A. Buccal view of a recently calcified second premolar with a large pulp. A radiograph will reveal 1. narrow mesiodistal width of the pulp 2. apical-distal curvature (34% of the time) degree distal-axial inclination of the tooth These factors, seen in the radiograph, are borne in mind when preparation is begun. B. Mesial view of the same tooth demonstrating details not apparent in the radiograph: 1. broad buccolingual width revealing the pulp to be ribbon shaped 2. single root with a large single canal 3. 9-degree lingual-axial angulation of the tooth The pulp is shown to be a broad ribbon rather than a thread as it appears from radiograph. These unseen factors affect the size, shape, and inclination of the final preparation. C. Cross-sections at three levels: 1, cervical; 2, midroot; and 3, apical third: 1. Cervical level: the pulp is enormous in a young tooth, very wide in the buccolingual direction. Débridement of the chamber is completed during coronal cavity preparation with a round bur. The canal orifice is directly in the center of the tooth. 2. Midroot level: the canal remains ovoid in shape and requires perimeter filing. 3. Apical third level: the canal, round in shape, is filed and then shaped into a round, tapered preparation. Preparation terminates at the cementodentinal junction, 0.5 to 1.0 mm from the radiographic apex. D. Ovoid preparation allows débridement of the entire pulp chamber and funnels down to the ovoid midcanal. E. Buccal view of an adult second premolar with extensive secondary dentin formation. A radiograph, if exposed slightly from the mesial, will reveal 1. pulp recession and the thread-like appearance of the pulp 2. roentgen appearance of two roots (2% of the time) 3. bayonet curve of the roots (20% of the time) degree distal-axial inclination of the tooth F. Mesial view of the same tooth demonstrating details not apparent in the radiograph: 1. buccolingual width revealing the coronal pulp to be ribbon shaped rather than thread-like 2. high bifurcation and two separate apical third roots 3. 9-degree lingual-axial angulation of the tooth The operator must recognize that a. small canal orifices are deeply placed in the root and will be difficult to locate. b. the direction of each canal is determined by exploration with a fine curved file carried down the wall until the orifice is engaged. Then, by half-rotation, the file is turned to match the first curve of the canal, followed by penetration until the tip again catches on the curved wall. A second half-turn and further penetration will carry the tip of the instrument to within 0.5 to 1.0 mm of the radiographic apex. Retraction will remove dentin at both curves. G. Cross-sections at three levels: 1, cervical; 2, midroot; and 3, apical third: 1. Cervical level: the chamber, very narrow ovoid, extends deeply into the root. 2. Midroot level: the bayonet curve and round canal orifices are apparent. 3. Apical third level: the canals are round. The severe curve at the bayonet is reduced by filing action into a gradual curve. H. An ovoid coronal cavity is prepared well to the mesial of the occlusal surface, with a depth of penetration skewed toward the bayonet curvature. Skewing the cavity allows an unrestrained approach to the first curve.

28 PLATE 14 Maxillary Second Premolars Length of tooth Canals Curvature Average Length 21 mm One canal 75% Straight 9.5% Maximum Length 23 mm One foramen Distal Curve 27.0% Minimum Length 19 mm Two canals 24% Mesial Curve 1.6% Range 4 mm Two foramina Buccal Curve 12.7% Three canals 1% *Lingual Curve 4.0% Bayonet Curve 20.6% *Not apparent in radiograph
29 PLATE 15 Maxillary Premolar Teeth ERRORS in Cavity Preparation A. UNDEREXTENDED preparation exposing only pulp horns. Control of enlarging instruments is abdicated to cavity walls. The white color of the roof of the chamber is a clue to a shallow cavity. B. OVEREXTENDED preparation from a fruitless search for a receded pulp. The enamel walls have been completely undermined. Gouging relates to failure to refer to the radiograph, which clearly indicates pulp recession. C. PERFORATION at the mesiocervical indentation. Failure to observe the distal-axial inclination of the tooth led to bypassing receded pulp and perforation. The maxillary first premolar is one of the most commonly perforated teeth. D. FAULTY ALIGNMENT of the access cavity through full veneer restoration placed to straighten the crown of a rotated tooth. Careful examination of the radiograph would reveal the rotated body of the tooth. E. BROKEN INSTRUMENT twisted off in a cross-over canal. This frequent occurrence may be obviated by extending the internal preparation to straighten the canals (dotted line). F. FAILURE to explore, débride, and obturate the third canal of the maxillary first premolar (6% of the time). G. FAILURE to explore, débride, and obturate the second canal of the maxillary second premolar (24% of the time).
30 PLATE 15
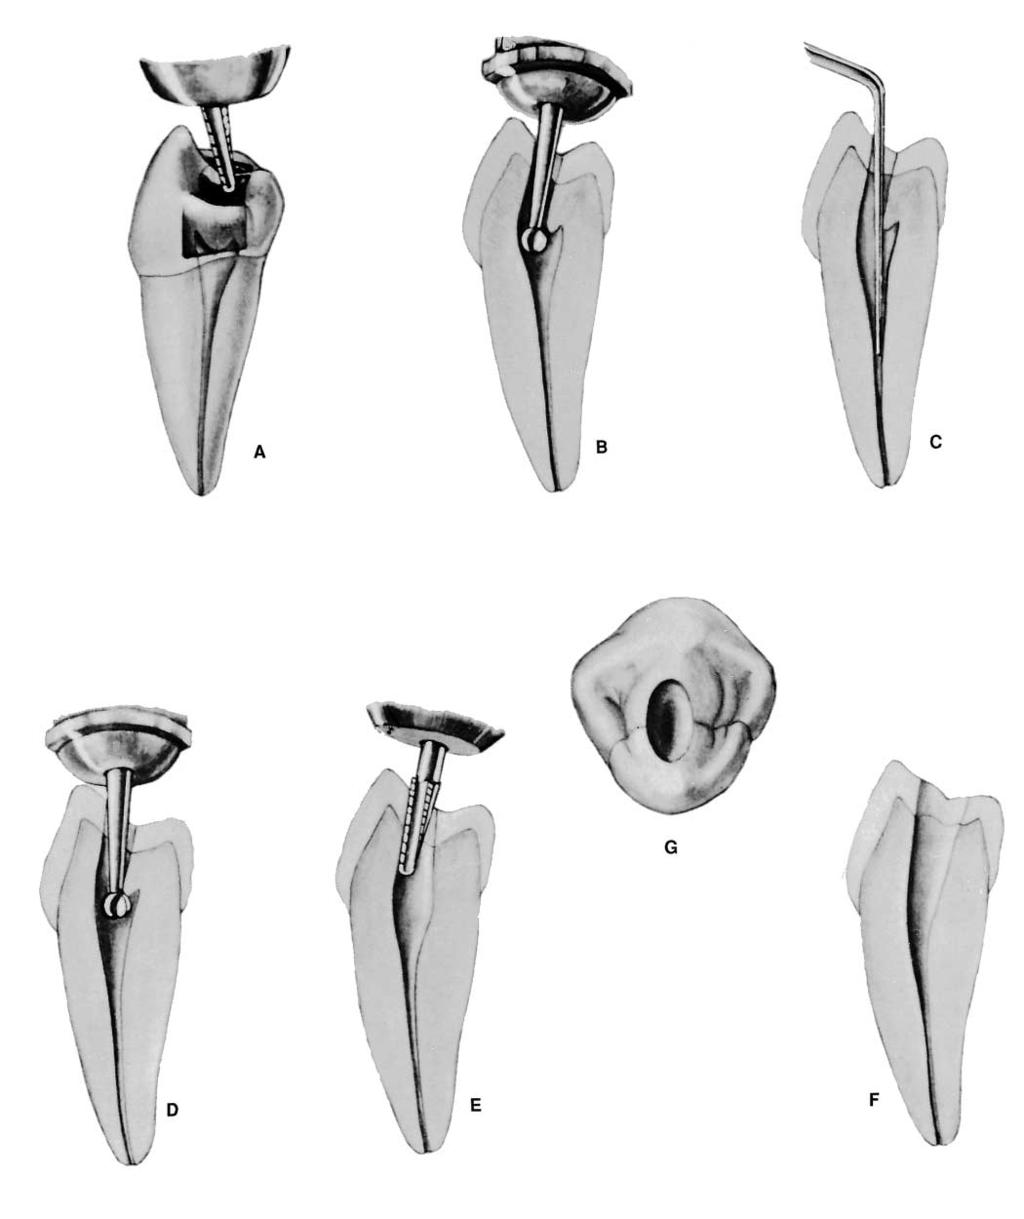
31 PLATE 16 Endodontic Preparation of Mandibular Premolar Teeth Pulp Anatomy and Coronal Preparation A. Entrance is always gained through the occlusal surface of all posterior teeth. Initial penetration is made in the exact center of the central groove of mandibular premolars. The bur is directed parallel to the long axis of the tooth. The 702 U taper fissure bur in an accelerated-speed contra-angle handpiece is ideal for perforating gold casting or virgin enamel surface to the depth of the dentin. Amalgam fillings are penetrated with a round bur in a high-speed contra-angle handpiece. B. A regular-length No. 4 round bur is used to open vertically into the pulp chamber. The bur will be felt to drop when the pulp chamber is reached. If the chamber is well calcified, initial penetration is continued until the contra-angle handpiece rests against the occlusal surface. This depth of 9 mm is the usual position of the canal orifice that lies at the cervical level. In removing the bur, the occlusal opening is widened buccolingually to twice the width of the bur to allow room for exploration. C. An endodontic explorer is used to locate the central canal. Tension of the explorer against the walls of preparation will indicate the amount and direction of extension necessary. D. Working from inside the pulp chamber to outside, a regular-length No. 2 or 4 round bur is used to extend the cavity buccolingually by removing the roof of the pulp chamber. E. Buccolingual extension and finish of cavity walls are completed with a 702 U fissure bur at accelerated speed. F. Final ovoid preparation is a tapered funnel from the occlusal to the canal, providing unobstructed access to the canal. No overhanging tooth structure should impede complete authority over enlarging instruments. G. Buccolingual ovoid outline form reflects the anatomy of the pulp chamber and position of the centrally located canal. The cavity is extensive enough to allow for instruments and filling the materials needed to enlarge and fill canals. Further exploration at this time may reveal the orifice to an additional canal, especially a second canal in the first premolar. The outline form of the final preparation will be identical for both newly erupted and adult teeth.
32 PLATE 16
33 PLATE 17 Mandibular First Premolar Pulp Anatomy and Coronal Preparation A. Buccal view of a recently calcified first premolar with a large pulp. A radiograph, if exposed slightly from the mesial, will reveal: 1. narrow mesiodistal width of the pulp 2. presence of one pulp canal 3. relatively straight canal degree distal-axial inclination of the root All of these factors, seen in radiograph, are borne in mind when preparation is begun. B. Mesial view of the same tooth demonstrating details not apparent from the radiograph: 1. height of the pulp horn 2. broad buccolingual extent of the pulp 3. apical-buccal curvature (2% of the time) degree lingual-axial angulation of the root These unseen factors will affect the size, shape, and inclination of the final preparation. Severe apical curvature can be detected only by exploration with a fine curved file. Near-verticality of the tooth simplifies orientation and bur alignment. C. Cross-sections at three levels: 1, cervical; 2, midroot; and 3, apical third: 1. Cervical level: the pulp is enormous in a young tooth, very wide in the buccolingual dimension. Débridement of the ovoid chamber is completed during coronal cavity preparation with a round bur. 2. Midroot level: the canal continues ovoid and requires perimeter filing. 3. Apical third level: the canal, generally round in shape, is enlarged by shaping into a round, tapered preparation. Preparation terminates at the cementodentinal junction, 0.5 to 1.0 mm from the radiographic apex. D. Ovoid coronal preparation allows débridement of the entire pulp chamber, funnels down to the ovoid midcanal, and is large enough buccolingually to allow passage of instruments used to enlarge and fill the canal space. E. Buccal view of an adult first premolar with extensive secondary dentin formation. A radiograph will reveal 1. pulp recession and thread-like appearance of the pulp 2. radiographic appearance of only one canal degree distal-axial inclination of the root F. Mesial view of the same tooth demonstrating details not apparent in the radiograph: 1. buccolingual ribbon-shaped coronal pulp 2. single-root, bifurcated canal at the midroot level and a single apical foramen degree lingual-axial angulation of the root The operator must recognize that a. small orifices are difficult to locate. b. the presence of a bifurcated canal is determined only by exploration with a fine curved file. c. a single apical foramen can be determined by placing instruments in both canals at the same time. The instruments will be heard and felt to grate against each other. G. Cross-sections at three levels: 1, cervical; 2, midroot; and 3, apical third: 1. Cervical level: the chamber is very narrow ovoid. 2. Midroot level: the two branches of the canal are round. 3. Apical third level: the canal is round. Divisions of the canal are enlarged by filing. The buccal canal would be filled to the apex and the lingual canal to the point where the canals rejoin. H. Ovoid funnel-shaped coronal preparation must be extensive enough buccolingually to allow for enlarging and filling both canals.

34 PLATE 17 Mandibular First Premolar Length of tooth Canals Curvature of root Average Length 22.1 mm One canal 73.5% Straight 48% Buccal Curve 2% Maximum Length 24.1 mm One foramen Distal Curve 35% Lingual Curve 7% Minimum Length 20.1 mm Two canals* 6.5% Mesial Curve 0% Bayonet Curve 7% Range 4.0 mm One foramen Two canals* 19.5% Two foramina Three canals 0.5% *Incidence higher in black persons than in white persons Not apparent in radiograph
35 PLATE 18 Mandibular Second Premolar Pulp Anatomy and Coronal Preparation A. Buccal view of a recently calcified second premolar with a large pulp. A radiograph will reveal 1. mesiodistal width of the pulp 2. apical-distal curvature (40% of the time) degree distal-axial inclination of the root These factors, seen in the radiograph, are borne in mind when preparation is begun. B. Mesial view of the same tooth demonstrating details not apparent in the radiograph: 1. broad buccolingual ribbon-shaped coronal pulp 2. single root with pulpal bifurcation in the apical third degree buccal-axial angulation of the root These unseen factors affect the size, shape, and inclination of the final preparation. Apical third bifurcation, unseen in the radiograph, emphasizes the necessity of careful canal exploration. C. Cross-sections at three levels: 1, cervical; 2, midroot; and 3, apical third: 1. Cervical level: the pulp is large in a young tooth, very wide in the buccolingual dimension. Débridement of the chamber is completed during coronal cavity preparation with a round bur. 2. Midroot level: the canal continues to be long ovoid and requires perimeter filing. 3. Apical third level: the canals, generally round, are shaped into round, tapered preparations. Preparation terminates at the cementodentinal junction, 0.5 to 1.0 mm from the radiographic apex. D. Ovoid, coronal funnel-shaped preparation allows débridement of the entire pulp chamber down to the ovoid midcanal. The cavity is large enough buccolingually to allow enlarging and filling of both canals. E. Buccal view of an adult second premolar with extensive secondary dentin formation. A radiograph, if exposed slightly from the mesial, will reveal 1. pulp recession and thread-like appearance of the pulp 2. sweeping distal curve of the apical third of the root of the tooth (40% of the time) degree distal-axial angulation of the root F. Mesial view of the same tooth demonstrating details not apparent in the radiograph: 1. buccolingual ribbon-shaped pulp 2. minus 34-degree buccal-axial angulation of the root The operator should recognize that a. a small canal orifice will be difficult to locate. b. the direction of the canal is best explored with a fine curved file that is carried to within 0.5 to 1.0 mm of the radiographic apex. Retraction will then remove dentin at the curve. G. Cross-sections at three levels: 1, cervical; 2, midroot; and 3, apical third: 1. Cervical level: the chamber is very narrow ovoid. 2. Midroot level: the canal is less ovoid. 3. Apical third level: the canal is round. The sweeping curve at the apical third is filed to a gradual curve. H. Ovoid funnel-shaped coronal cavity is modest in size and skewed slightly to the mesial, allowing adequate room to instrument and fill the curved apical third.

36 PLATE 18 Mandibular Second Premolars Length of tooth Canals Curvature of root Average Length 21.4 mm One canal 85.5% Straight 39% Lingual Curve 3% Maximum Length 23.7 mm One foramen Distal Curve 40% Bayonet Curve 7% Minimum Length 19.1 mm Two canals* 1.5% Mesial Curve 0% Trifurcation Curve 1% Range 4.6 mm One foramen Buccal Curve 10% Two canals* 11.5% Two foramina Three canals 0.5% *Incidence much higher in black persons than in white persons Not apparent in radiograph
37 PLATE 19 Mandibular Premolar Teeth ERRORS in Cavity Preparation A. PERFORATION at the distogingival caused by failure to recognize that the premolar has tilted to the distal. B. INCOMPLETE preparation and possible instrument breakage caused by total loss of instrument control. Use only occlusal access, never buccal or proximal access. C. BIFURCATION of a canal completely missed, caused by failure to adequately explore the canal with a curved instrument. D. APICAL PERFORATION of an invitingly straight conical canal. Failure to establish the exact length of the tooth leads to trephination of the foramen. E. PERFORATION at the apical curvature caused by failure to recognize, by exploration, buccal curvature. A standard buccolingual radiograph will not show buccal or lingual curvature.
38 PLATE 19
39 PLATE 20 Endodontic Preparation of Maxillary Molar Teeth A. Entrance is always gained through the occlusal surface of all posterior teeth. Initial penetration is made in the exact center of the mesial pit, with the bur directed toward the lingual. The 702 U tapering fissure bur in an accelerated-speed contra-angle handpiece is ideal for perforating gold casting or virgin enamel surface to the depth of dentin. Amalgam fillings are penetrated with a No. 4 or 6 round bur operating in a slow-speed contra-angle handpiece. B. According to the size of the chamber, a regular-length No. 4 round bur is used to open into the pulp chamber. The bur should be directed toward the orifice of the palatal canal or toward the mesiobuccal canal orifice, where the greatest space in the chamber exists. It will be felt to drop when the pulp chamber is reached. If the chamber is well calcified, initial penetration is continued until the contra-angle rests against the occlusal surface. This depth of 9 mm is the usual position of the floor of the pulp chamber, which lies at the cervical level. Working from inside out, back toward the buccal, the bur removes enough roof of the pulp chamber for exploration. C. An endodontic explorer is used to locate orifices of the palatal, mesiobuccal, and distobuccal canals. Tension of the explorer against the walls of preparation will indicate the amount and direction of extension necessary. Orifices of canals form the perimeter of preparation. Special care must be taken to explore for a second canal in the mesiobuccal root. D. Again, working at slow speed from inside to outside, a round bur is used to remove the roof of the pulp chamber. Internal walls and floor of preparation should not be cut into unless difficulty is encountered in locating orifices. In that case, surgical-length No. 2 round burs are necessary to explore the floor of the chamber. E. Final finish and funneling of cavity walls are completed with a 702 U fissure bur or tapered diamond points at accelerated speed. F. Final preparation provides unobstructed access to canal orifices and should not impede complete authority of enlarging instruments. Improve ease of access by leaning the entire preparation toward the buccal, for all instrumentation is introduced from the buccal. Notice that the preparation extends almost to the height of the buccal cusps. The walls are perfectly smooth, and the orifices are located at the exact pulpal-axial angles of the cavity floor. G. Extended outline form reflects the anatomy of the pulp chamber. The base is toward the buccal and the apex is to the lingual, with the canal orifice positioned at each angle of the triangle. The cavity is entirely within the mesial half of the tooth and need not invade the transverse ridge but is extensive enough, buccal to lingual, to allow positioning of instruments and filling materials. Outline form of final preparation is identical for both a newly erupted and an adult tooth. Note the orifice to the fourth canal.
40 PLATE 20
41 PLATE 21 Maxillary First Molar Pulp Anatomy and Coronal Preparation A. Buccal view of a recently calcified first molar with large pulp. A radiograph will reveal 1. large pulp chamber 2. mesiobuccal root with two separate canals, distobuccal, and palatal roots, each with one canal 3. slightly curved buccal roots 4. slightly curved palatal root 5. vertical axial alignment of the tooth These factors, seen in radiograph, are borne in mind when preparation is begun. Care must be taken to explore for an additional mesiobuccal canal. B. Mesial view of the same tooth demonstrating details not apparent in the radiograph: 1. buccolingual width of the pulp chamber 2. apical-buccal curvature of the palatal root (55% of the time) 3. buccal inclination of buccal roots 4. vertical axial alignment of the tooth These unseen factors will affect the size, shape, and inclination of the final preparation. Sharp buccal curvature of the palatal canal requires great care in exploration and instrumentation. Canals must be carefully explored with fine curved files. Enlargement of buccal canals is accomplished by reaming and filing and of the palatal canal by step-back filing. C. Cross-section at two levels: 1, cervical; and 2, apical third: 1. Cervical level: the pulp is enormous in a young tooth. Débridement of a triangular chamber is completed with a round bur. A dark cavity floor with lines connecting orifices is in marked contrast to white walls. A palatal canal requires perimeter filing. 2. Apical third level: the canals are essentially round. Buccal canals are shaped into round, tapered preparations. Preparations terminate at the cementodentinal junction, 0.5 to 1.0 mm from the radiographic apex. D. Triangular outline form, with the base toward the buccal and the apex toward the lingual, reflects the anatomy of the pulp chamber, with the orifice positioned at each angle of the triangle. Both buccal and lingual walls slope buccally. Mesial and distal walls funnel slightly outward. The cavity is entirely within the mesial half of the tooth and should be extensive enough to allow positioning of instruments and filling materials needed to enlarge and fill canals. The orifice to an extra middle mesial canal may be found in the groove near the mesiobuccal canal. E. Buccal view of an adult first molar with extensive secondary dentin formation. A radiograph will reveal 1. pulp recession and thread-like pulp 2. mesiobuccal, distobuccal, and palatal roots, each with one canal 3. straight palatal root, apical curve, distal root 4. apical-distal curvature of the mesial root (78% of the time) 5. vertical axial alignment of the tooth F. Mesial view of the same tooth demonstrating details not apparent in the radiograph: 1. pulp recession 2. relatively straight palatal root 3. buccal inclination of the buccal roots 4. vertical axial alignment of the tooth The operator must recognize that a. careful exploration for orifices and canals is imperative. b. severe curvature of buccal roots will require careful enlargement with curved instruments. G. Cross-section at two levels: 1, cervical; and 2, apical third: 1. Cervical level: a triangular chamber constricted from secondary dentin formation is débrided during coronal cavity preparation with a round bur. Round palatal and distobuccal canals will be shaped to a round, tapered preparation. 2. Apical third level: the canals are round. A curved mesiobuccal canal is enlarged by step-back filing. Preparations terminate at the cementodentinal junction, 0.5 to 1.0 mm from the radiographic apex. H. Triangular outline form reflects the anatomy of the pulp chamber. Both buccal and lingual walls slope buccally. The mesial wall slopes mesially to allow for instrumentation of a severely curved mesiobuccal canal. If an additional canal is found in the mesiobuccal root, its orifice will usually be in the groove leading to the palatal canal.

42 PLATE 21 Maxillary First Molars Curvature of roots Length of Tooth Mesiobuccal Distobuccal Palatal Canal Direction Palatal Mesial Distal Canals in the mesiobuccal root Average Length 19.9 mm 19.4 mm 20.6 mm Three canals 41.1% Straight 40% 21% 54% One canal 41.1% Maximum Length 21.6 mm 21.2 mm 22.5 mm Four canals 56.5% Distal Curve 1% 78% 17% One foramen Minimum Length 18.2 mm 17.6 mm 17.6 mm Five canals 2.4% Mesial Curve 4% 0% 19% Two canals 40% Range 3.4 mm 3.6 mm 3.8 mm *Buccal Curve *55% 0% 0% One foramen *Lingual Curve 0% 0% 0% Two canals 18.9% Bayonet Curve 0% 1% 10% Two foramina *Not apparent in radiograph
43 PLATE 22 Maxillary Second Molar Pulp Anatomy and Coronal Preparation A. Buccal view of a recently calcified second molar with a large pulp. A radiograph will reveal 1. large pulp chamber 2. mesiobuccal, distobuccal, and palatal roots, each with one canal 3. gradual curvature of all three canals 4. vertical axial alignment of the tooth These factors, seen in radiograph, are borne in mind when preparation is begun. B. Mesial view of the same tooth demonstrating details not apparent in the radiograph: 1. buccolingual width of the pulp chamber 2. gradual curvature in two directions of all three canals 3. buccal inclination of the buccal roots 4. vertical axial alignment of the tooth These unseen factors will affect the size, shape, and inclination of the final preparation. C. Cross-section at two levels: 1, cervical; and 2, apical third: 1. Cervical level: the pulp is enormous in a young tooth. Débridement of a triangular chamber is completed with round burs. The dark cavity floor with lines connecting orifices is in marked contrast to white walls. 2. Apical third level: the canals are essentially round and are shaped into a round, tapered preparation. Preparations terminate at the cementodentinal junction, 0.5 to 1.0 from the radiographic apex. D. Triangular outline form is flattened as it reflects the internal anatomy of the chamber. Note that the distobuccal canal orifice is nearer the center of the cavity floor. The entire preparation sharply slopes to the buccal and is extensive enough to allow positioning of instruments and filling materials needed to enlarge and fill canals. E. Buccal view of an adult second molar with extensive secondary dentin formation. A radiograph will reveal 1. pulp recession and thread-like pulp 2. anomalous appearance of only one root and two canals 3. vertical axial alignment of the tooth F. Mesial view of the same tooth demonstrating details not apparent in the radiograph: 1. pulp recession 2. anomalous appearance of only one root and two canals 3. sweeping curvature of the lingual canal 4. vertical axial alignment of the tooth The operator must recognize that a. canal orifices are difficult to find by exploration. b. a detailed search must be made for the third canal. G. Cross-sections at two levels: 1, cervical; and 2, apical third. 1. Cervical level: ovoid pulp chamber is débrided during cavity preparation with a round bur. 2. Apical third level: canals are round. Preparations terminate at the cementodentinal junction, 0.5 to 1.0 mm from the radiographic apex. H. Ovoid outline form reflects the internal anatomy of the pulp chamber and elongated parallelogram shape of the occlusal surface. The entire preparation slopes sharply to the buccal.

44 PLATE 22 Maxillary Second Molars Curvature of roots Length of Tooth Mesiobuccal Distobuccal Palatal Number of Roots Direction Palatal Mesial Distal Canals in the mesiobuccal root Average Length 20.2 mm 19.4 mm 20.8 mm Three 54% Straight 63% 22% 54% One canal 63% Maximum Length 22.2 mm 21.3 mm 22.6 mm Fused 46% Distal 0% 54%? One foramen Minimum Length 18.2 mm 17.5 mm 19.0 mm Mesial 0% 0% 17% Two canals 13% Range 4.0 mm 3.8 mm 3.6 mm *Buccal 37% One foramen Lingual 0% Two canals 24% Two foramina *Not apparent in radiograph
45 PLATE 23 Maxillary Molar Teeth ERRORS in Cavity Preparation A. UNDEREXTENDED preparation. Pulp horns have merely been nicked, and the entire roof of the pulp chamber remains. White color dentin of the roof is a clue to underextension (A 1 ). Instrument control is lost. B. OVEREXTENDED preparation undermining enamel walls. The crown is badly gouged owing to failure to observe pulp recession in the radiograph. C. PERFORATION into furca using a surgical-length bur and failing to realize that the narrow pulp chamber had been passed. Operator error in failure to compare the length of the bur to the depth of the pulp canal floor. Length should be marked on the bur shank with Dycal. D. INADEQUATE vertical preparation related to failure to recognize severe buccal inclination of an unopposed molar. E. DISORIENTED occlusal outline form exposing only the palatal canal. A faulty cavity has been prepared in full crown, which was placed to straighten a rotated molar (E 1 ). Palpating for mesiobuccal root prominence would reveal the severity of the rotation. F. LEDGE FORMATION caused by using a large straight instrument in a curved canal. G. PERFORATION of a palatal root commonly caused by assuming the canal to be straight and failing to explore and enlarge the canal with a fine curved instrument.
46 PLATE 23
47 PLATE 24 Endodontic Preparation of Mandibular Molar Teeth A. Entrance is always gained through the occlusal surface of all posterior teeth. Initial penetration is made in the exact center of the mesial pit, with the bur directed toward the distal. The 702 U tapering fissure bur in an accelerated-speed contra-angle handpiece is ideal for perforating gold casting or virgin enamel surface to the depth of dentin. Amalgam fillings are penetrated with a No. 4 round bur operating in a high-speed contra-angle handpiece. B. According to the size of the chamber, a regular-length No. 4 or 6 round bur is used to open into the pulp chamber. The bur should be directed toward the orifice of the mesiobuccal or distal canal, where the greatest space in the chamber exists. It will be felt to drop when the pulp chamber is reached. If the chamber is well calcified, initial penetration is continued until the contra-angle handpiece rests against the occlusal surface. This depth of 9 mm is the usual position of the floor of the pulp chamber, which lies at the cervical level. Working from inside out, back toward the mesial, the bur removes enough roof of the pulp chamber for exploration. C. An endodontic explorer is used to locate orifices of the distal, mesiobuccal, and mesiolingual canals. Tension of the explorer against the walls of preparation indicates the amount and direction of extension necessary. Orifices of the canals form the perimeter of preparation. Special care must be taken to explore for an additional canal in the distal root. The distal canal should form a triangle with two mesial canals. If it is asymmetric, always look for the fourth canal 29% of the time. D. Again, working at slow speed from the inside to outside, a round bur is used to remove the roof of the pulp chamber. Internal walls and floor of preparation should not be cut into unless difficulty is encountered in locating orifices. In that case, surgical-length No. 2 or 4 round burs are necessary to explore the floor of the chamber. E. Final finish and funneling of cavity walls are completed with a 702 U fissure bur or diamond point at accelerated speed. F. Final preparation provides unobstructed access to canal orifices and should not impede the complete authority of enlarging instruments. Improve ease of access by leaning the entire preparation toward the mesial, for all instrumentation is introduced from the mesial. Notice that the cavity outline extends to the height of the mesial cusps. The walls are perfectly smooth and the orifices located at the exact pulpal-axial angle of the cavity floor. G. Square outline form reflects the anatomy of the pulp chamber. Both mesial and distal walls slope mesially. The cavity is primarily within the mesial half of the tooth but is extensive enough to allow positioning of the instrument and filling materials. The outline form of the final preparation will be identical for both a newly erupted and an adult tooth. Further exploration should determine if a fourth canal can be found in the distal. If so, the outline is extended in that direction. In that case, an orifice will be positioned at each angle of the square.
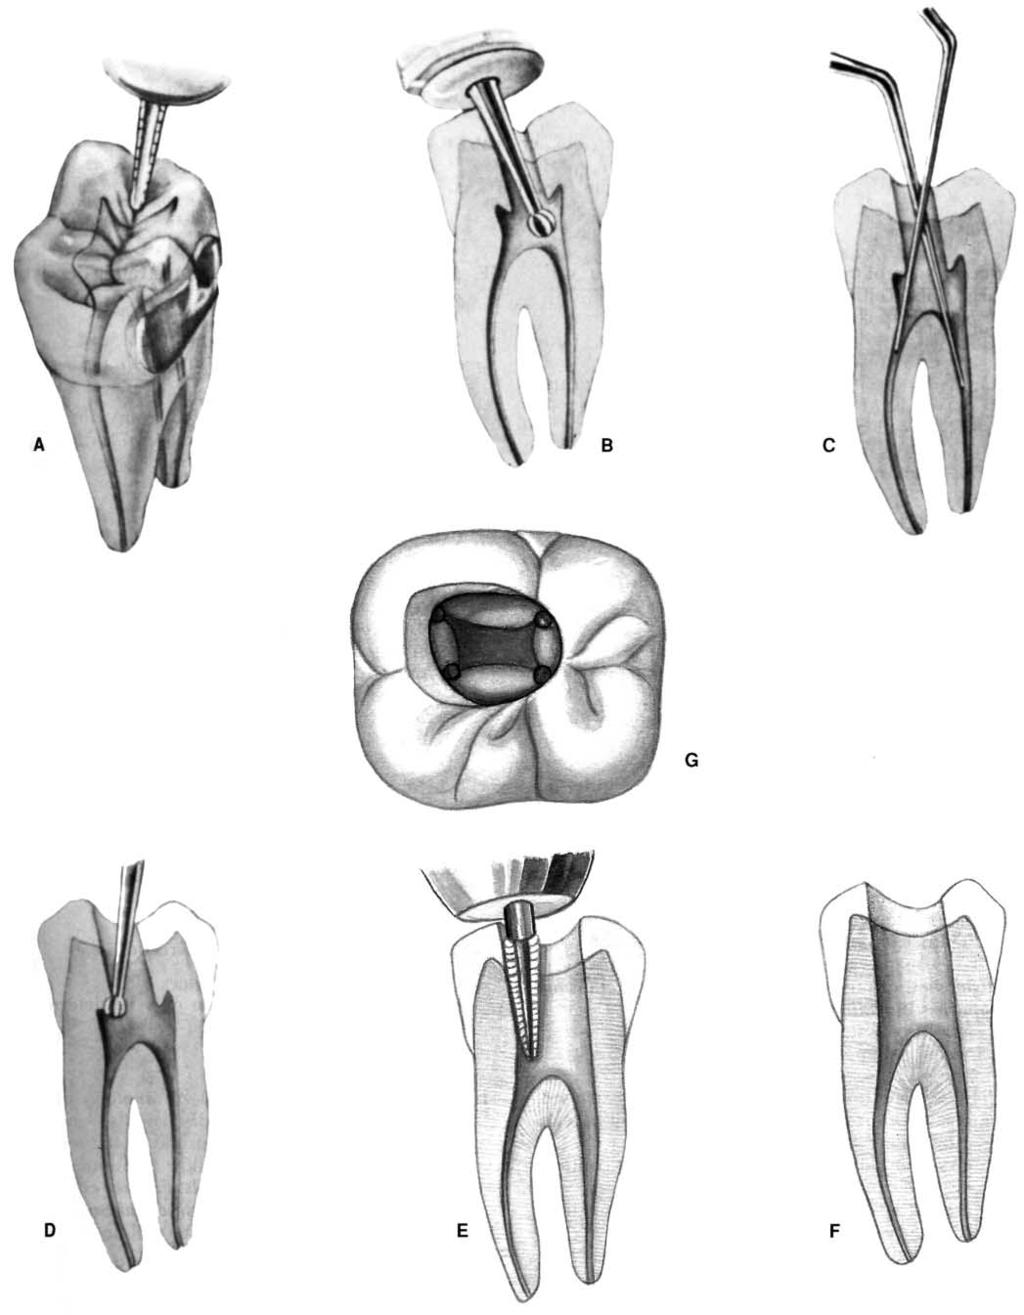
48 PLATE 24
49 PLATE 25 Mandibular First Molar Pulp Anatomy and Coronal Preparation A. Buccal view of a recently calcified first molar with large pulp. The initial radiograph will reveal 1. large pulp chamber 2. mesial and distal roots, each apparently containing one canal 3. vertical distal root with a severe apical curvature 4. curvature of the mesial root (84% of the time) 5. distal-axial inclination of the tooth These factors, seen in radiograph, are borne in mind when preparation is begun. B. Mesial view of the same tooth demonstrating details not apparent in the radiograph: 1. single mesial root with two canals 2. minus 58-degree buccal-axial inclination of the roots All of these unseen factors will affect the size, shape, and inclination of the final preparation. C. Cross-section at three levels: 1, cervical; 2, midroot; and 3, apical third: 1. Cervical level: the pulp, enormous in a young tooth, is débrided during coronal cavity preparation with a round bur. 2. Midroot level: the canals are ovoid. Severe indentation on the distal surface of the mesial root brings the canal within 1.5 mm of the external surface, an area frequently perforated by stripping. 3. Apical third level: the canals are round and are shaped into round, tapered preparations. Preparations terminate at the cementodentinal junction, 0.5 to 1.0 mm from the radiographic apex. D. Distal view of the same tooth demonstrating details not apparent in the radiograph: 1. height of distal pulp horns 2. ribbon-shaped distal canal E. Buccal view of an adult first molar with extensive secondary dentin formation. A radiograph will reveal 1. pulp recession and thread-like pulp 2. mesial and distal roots, each apparently containing one canal 3. mesial curvature of the distal root (5% of the time) and distal curvature of the mesial root (84% of the time) 4. distal-axial inclination of the tooth F. Mesial view of the same tooth demonstrating details not apparent in the radiograph: 1. pulp recession 2. mesial root, two canals, and a single foramen 3. minus 58-degree buccal-axial inclination of the roots The operator must recognize that a. careful exploration with two instruments at the same time reveals a common apical foramen. b. mesial canals curve in two directions. G. Cross-section at three levels: 1, cervical; 2, midroot; and 3, apical third: 1. Cervical level: the chamber is débrided during coronal cavity preparation with a round bur. 2. Midroot level: the canals are nearly round and are enlarged during reaming of an apical third. 3. Apical third level: the canals are round and are shaped into a round, tapered preparation. Preparations terminate at the cementodentinal junction, 0.5 to 1.0 mm from the radiographic apex. H. Distal view of the same tooth demonstrating details not apparent in the radiograph: 1. pulp recession 2. distal root with the usual single canal 3. buccal-axial inclination of the roots 4. distal canal curves in two directions The operator should recognize that a. the presence of a fourth canal can be determined only by careful exploration. I. Triangular outline form reflects the anatomy of the pulp chamber. Both mesial and distal walls slope mesially. The cavity is primarily within the mesial half of the tooth but is extensive enough to allow positioning of instruments and filling materials. Further exploration should determine whether a fourth canal can be found in the distal. In that case, an orifice will be positioned at each angle of the rhomboid.

50 PLATE 25 Mandibular First Molars Canals Curvature of Roots Length of Tooth Mesial Distal Roots Canals Mesial Distal Direction Mesial Distal Average 20.9 mm 20.9 mm Two roots 97.8% Two canals 6.7% Two canals 40.5% One canal 71.1% Straight 16% 74% Length One foramen Distal 84% 21% Maximum 22.7 mm 22.6 mm Three roots 2.2% Three canals 64.4% Two canals Two canals 28.9% Mesial 0% 5% Length Two foramina 59.5% Buccal 0% 0% Minimum 19.1 mm 19.2 mm Four canals 28.9% Two canals 61.5% Lingual 0% 0% Length One foramen Range 3.6 mm 3.4 mm Two canals 38.5% Two foramina
51 PLATE 26 Mandibular Second Molar Pulp Anatomy and Coronal Preparation A. Buccal view of a recently calcified second molar with a large pulp. A radiograph will reveal 1. large pulp chamber 2. mesial and distal roots, each apparently containing one canal 3. mesial curvature of the distal root (10%) 4. bayonet curvature of the mesial root (7%) 5. distal-axial inclination of the tooth These factors, seen in radiograph, are borne in mind when preparation is begun. B. Mesial view of the same tooth demonstrating details not apparent in the radiograph: 1. mesial root with two canals 2. lingual curvature of the mesiobuccal canal 3. S curvature of the mesiolingual canal 4. minus 52-degree buccal-axial inclination of the roots These unseen factors will affect the size, shape, and inclination of the final preparation. Canals must be carefully explored with a fine curved file. The double S curvature of the mesiolingual canal is especially challenging. All three canals are enlarged by step-back or step-down filing. C. Cross-section at three levels: 1, cervical; 2, midroot; and 3, apical third: 1. Cervical level: the pulp, enormous in a young tooth, is débrided during coronal cavity preparation with a round bur. 2. Midroot level: the canals are ovoid. Carefully avoid filing against the distal surface of the mesial root, where stripping perforation often occurs. 3. Apical third level: the canals are round and are shaped into round, tapered preparations. Preparations terminate at the cementodentinal junction, 0.5 to 1.0 mm from the radiographic apex. D. Distal view of the same tooth demonstrating details not apparent in the radiograph: 1. height of the distal pulp horns 2. ribbon-shaped distal canal E. Buccal view of an adult second molar with extensive secondary dentin formation. A radiograph will reveal: 1. pulp recession and a thread-like pulp 2. mesial and distal roots, each apparently containing one canal 3. straight distal root (58%) and distal curvature of the mesial root (84%) 4. distal-axial inclination of the tooth F. Mesial view of the same tooth demonstrating details not apparent in the original radiograph: 1. pulp recession 2. mesial root with two canals that join and cross over 3. minus 52-degree buccal-axial inclination of the roots The operator should recognize that a. careful exploration with curved instruments is imperative. b. mesial canals curve in two directions. G. Cross-section at three levels: 1, cervical; 2, midroot; and 3, apical third: 1. Cervical level: the chamber is débrided during coronal cavity preparation with a round bur. 2. Midroot level: the canals, only slightly ovoid in shape, will be enlarged by step-back filing of the apical third of the canals. 3. Apical third level: the canals are round and are shaped into round, tapered preparations. Preparations terminate at the cementodentinal junction, 0.5 to 1.0 mm from the radiographic apex. H. Distal view of the same tooth demonstrating details not apparent in the radiograph: 1. pulp recession 2. single distal root with a usual single canal 3. buccal-axial inclination of the tooth I. Triangular outline form reflects the anatomy of the pulp chamber. Both mesial and distal walls slope mesially. The cavity is primarily within the mesial half of the tooth but is extensive enough to allow positioning of instruments and filling materials. Further exploration should determine whether a fourth canal can be found in the distal. In that case, an orifice will be found at each angle of the rhomboid.

52 PLATE 26 Mandibular Second Molars Curvature of roots Canals Single Double Root Length of Tooth Mesial Distal Mesial Distal Direction Root Mesial Distal Average Length 20.9 mm 20.8 mm One canal 13% 92% Straight 53% 27% 58% Maximum Length 22.6 mm 22.6 mm One foramen Distal Curve 26% 61% 18% Minimum Length 19.2 mm 19.0 mm Two canals 49% 5% Mesial Curve 0% 0% 10% Range 3.4 mm 3.6 mm One foramen *Buccal Curve 0% 4% 4% Two canals 38% 3% *Lingual Curve 2% 0% 0% Two foramina Bayonet Curve 19% 7% 6% *Not apparent in radiograph
53 PLATE 27 Mandibular Molar Teeth ERRORS in Cavity Preparation A. OVEREXTENDED preparation undermining enamel walls. The crown is badly gouged owing to failure to observe pulp recession in the radiograph. B. PERFORATION into furca caused by using a longer bur and failing to realize that the narrow pulp chamber had been passed. The bur should be measured against the radiograph and the depth to the pulpal floor marked on the shaft with Dycal. C. PERFORATION at the mesial-cervical caused by failure to orient the bur with the long axis of the molar severely tipped to the mesial. D. DISORIENTED occlusal outline form exposing only the mesiobuccal canal. A faulty cavity has been prepared in full crown, which was placed to straighten up a lingually tipped molar (D 1 ). E. FAILURE to find a second distal canal owing to lack of exploration for a fourth canal. F. LEDGE FORMATION caused by faulty exploration and using too large of an instrument. G. PERFORATION of the curved distal root caused by using a large straight instrument in a severely curved canal.
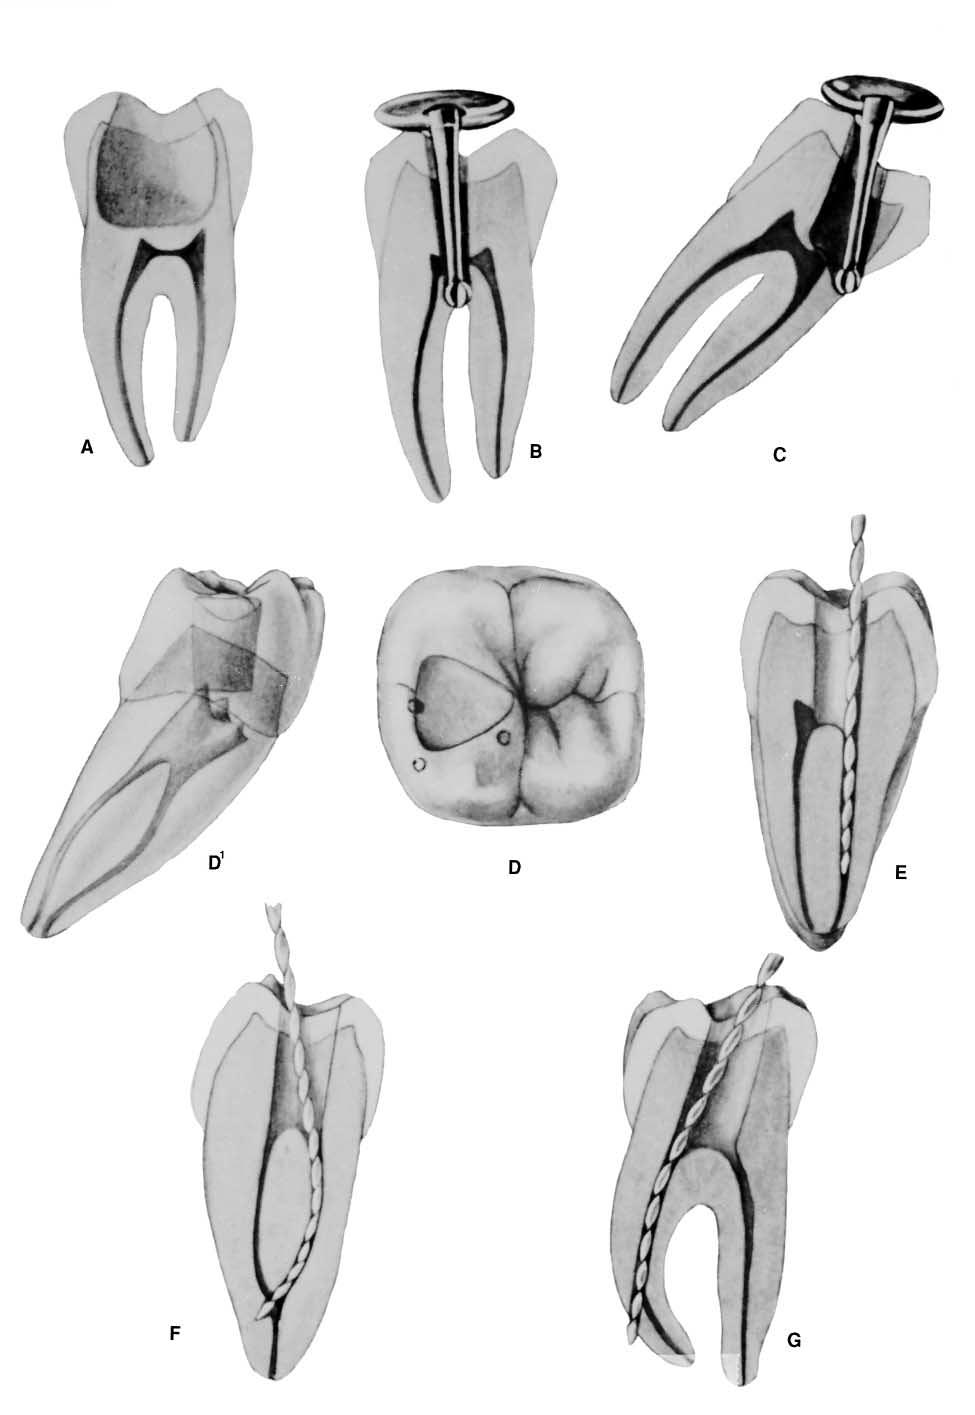
54 PLATE 27
Lec. 3-4 Dr. Saif Alarab Clinical Technique for Class I Amalgam Restorations The outline form
 Lec. 3-4 Dr. Saif Alarab Clinical Technique for Class I Amalgam Restorations Class I refers to -Restorations on the occlusal surfaces of posterior teeth, - The occlusal two thirds of facial and lingual
Lecture 2 Maxillary central incisor
 Lecture 2 Maxillary central incisor Generally The deciduous tooth appears in the mouth at 3 18 months of age, with 6 months being the average and is replaced by the permanent tooth around 7 8 years of
Primary Teeth Chapter 18. Dental Anatomy 2016
 Primary Teeth Chapter 18 Dental Anatomy 2016 Primary Teeth - Introduction Synonyms deciduous teeth, baby teeth, temporary teeth, milk teeth. There are 20 primary teeth, designated as A thru T in the Universal
Key points for starting off
 Key points for starting off First off, the five questions to ask yourself about a loose tooth before identifying it are: 1. 2. 3. 4. 5. Category (incisor, canine, premolar or molar)? Permanent or deciduous?
Indications The selection of amalgam as a restorative material for class V cavity should involve the following considerations:
 1 Lec.7 د.عبد املنعم اخلفاجي CLASS V CAVITY PREPARATION FOR AMAGLAM Indications The selection of amalgam as a restorative material for class V cavity should involve the following considerations: 1- Caries:
Fundamental & Preventive Curvatures of Teeth and Tooth Development. Lecture Three Chapter 15 Continued; Chapter 6 (parts) Dr. Margaret L.
 Dr. Margaret L.") Fundamental & Preventive Curvatures of Teeth and Tooth Development Lecture Three Chapter 15 Continued; Chapter 6 (parts) Dr. Margaret L. Dennis Proximal contact areas Contact areas are on the mesial and
Fundamental & Preventive Curvatures of Teeth and Tooth Development Lecture Three Chapter 15 Continued; Chapter 6 (parts) Dr. Margaret L. Dennis Proximal contact areas Contact areas are on the mesial and
Morphology of an Anatomic Crown. By: Assistant Professor Dr. Baydaa Ali Al - Rawi
 Morphology of an Anatomic Crown By: Assistant Professor Dr. Baydaa Ali Al - Rawi October 4, 2009 Elevated landmarks Depressed landmarks A) Elevated landmarks : 1. Dental lobe : is one of the primary centers
PERMANENT MANDIBULAR INCISORS
 PERMANENT MANDIBULAR INCISORS (Central and Lateral) DR.AHMED AL-JOBORY LEC. 5 PERMANENT MANDIBULAR INCISORS ARE 4 IN NUMBER : 2 CENTRAL (RIGHT &LEFT) AND 2 LATERAL INCISORS (RIGHT &LEFT). CHARACTERISTIC
1. What is the highest and sharpest cusp on the lower first deciduous molar? 2. Which of the following is NOT the correct location of an embrasure?
 1 1. What is the highest and sharpest cusp on the lower first deciduous molar? a. mesiobuccal b. distobuccal c. distolingual d.mesiolingual 2. Which of the following is NOT the correct location of an embrasure?
Central Incisor DR.Ahmed Al-Jobory B.D.S.,M.Sc. Conservative Department
 Dental Anatomy Lecture 3 Central Incisor DR.Ahmed Al-Jobory B.D.S.,M.Sc. Conservative Department The permanent maxillary Incisors Maxillary incisor are four in number. The maxillary central incisor is
Field Guide to the Ultrasonic Revolution
 Helsē Ultrasonic Field Guide to the Ultrasonic Revolution 20 Endo Tasks... Simplified. Sparking an Ultrasonic Revolution At Helse Ultrasonic, our unwavering mission is to turn your ultrasonic unit into
Permanent 2 nd Maxillary Molars
 Permanent 2 nd Maxillary Molars In comparison to the first max molar First molars appears in the oral cavity at the age of 6 years old.. While 2 nd molar 3 rd molar Max. 2 nd molar have long roots (sometimes
Arrangement of the artificial teeth:
 Lecture Prosthodontic Dr. Osama Arrangement of the artificial teeth: It s the placement of the teeth on a denture with definite objective in mind or it s the setting of teeth on temporary bases. Rules
CLASS II CAVITY PREPARATION CHARACTERISTICS OF AN IDEAL CLASS II
 CLASS II CAVITY PREPARATION CHARACTERISTICS OF AN IDEAL CLASS II Contact area carious lesion Proximal view Vertical section - Buccal view Class II carious lesions are diagnosed using bitewing radiographs.
Dental Anatomy High Yield Notes. **Atleast 35 questions comes from these areas of old lectures**
 Dental Anatomy High Yield Notes **Atleast 35 questions comes from these areas of old lectures** This review notes compiled and prepared by my sister for her own study, as a last day review session for
أ.م. هدى عباس عبد اهلل CROWN AND BRIDGE جامعة تكريت كلية. Lec. (2) طب االسنان
 طب االسنان") Lec. (2) CROWN AND BRIDGE أ.م. هدى عباس عبد اهلل Patient selection and examination A thorough diagnosis must first be made of the patient's dental condition, considering both hard and soft tissues. this
Lec. (2) CROWN AND BRIDGE أ.م. هدى عباس عبد اهلل Patient selection and examination A thorough diagnosis must first be made of the patient's dental condition, considering both hard and soft tissues. this
Dr.Zainab. second. step): The. proximal
: The. proximal") Class II Amalgam Restorations Dr.Zainab This section introduces the principles and techniques of a Class II tooth preparation for an amalgam restoration involving a carious lesion on one proximal surface.
Class II Amalgam Restorations Dr.Zainab This section introduces the principles and techniques of a Class II tooth preparation for an amalgam restoration involving a carious lesion on one proximal surface.
Dr.Adel F.Ibraheem Partial Veneer Crown(Three quarter crown) Three quarter (¾ )crown: Uses: Indications ---- For posterior teeth ;
 Three quarter (¾ )crown: Uses: Indications ---- For posterior teeth ;") Lecture.9 Dr.Adel F.Ibraheem Partial Veneer Crown(Three quarter crown) *It is a cast metal crown restoration that cover only a part of the clinical crown, most commonly used type of partial veneer crown
Lecture.9 Dr.Adel F.Ibraheem Partial Veneer Crown(Three quarter crown) *It is a cast metal crown restoration that cover only a part of the clinical crown, most commonly used type of partial veneer crown
Advance Dental Simulation Module on Crown Preparation
 Advance Dental Simulation Module on Crown Preparation Ranier M. Adarve, DMD, MS, MHPE Prosthodontist and Instructional Designer Introduction Welcome! This module is developed to guide dental students in
Cutting instruments. Instruments
 Instruments أﻧﺲ اﻟﻌﺒﯿﺪي. د The removal and shaping of tooth structure are essential aspects of restorative dentistry. Initially this was a difficult process accomplished entirely by the use of - Hand instruments.
CLASS II AMALGAM RESTORATIONS. Amalgam restorations that restore one or both of the proximal surfaces of the tooth
 CLASS II AMALGAM RESTORATIONS Amalgam restorations that restore one or both of the proximal surfaces of the tooth Initial Tooth Preparation Occlusal outline form (occlusal step).the occlusal outline form
Survey on Knowledge about Access Cavity Preparation
 Survey on Knowledge about Access Cavity Preparation 1 Sanjay Madhavan, 2 Dr.Chandana 1 II BDS student, Saveetha Dental College and Hospital, Chennai 2 Department of Conservative Endodontics, Saveetha Dental
Periodontal Disease. Radiology of Periodontal Disease. Periodontal Disease. The Role of Radiology in Assessment of Periodontal Disease
 Radiology of Periodontal Disease Steven R. Singer, DDS srs2@columbia.edu 212.305.5674 Periodontal Disease! Includes several disorders of the periodontium! Gingivitis! Marginal Periodontitis! Localized
Use and description of endodontic instruments
 Use and description of endodontic instruments Today s lecture is on the endodontic tools that we re going to use in the root canal therapy. As we already know all of the steps of root canal therapy beginning
The Premolars. Chapter 17 Permanent Posterior Teeth (p )
") The Premolars Chapter 17 Permanent Posterior Teeth (p. 230-244) General Information Function: u Hold and grind food u Work with molars in mastication. u Even without molars one may be able to chew well
The Premolars Chapter 17 Permanent Posterior Teeth (p. 230-244) General Information Function: u Hold and grind food u Work with molars in mastication. u Even without molars one may be able to chew well
Endodontics. Lec.7 د. حسن الرماحي 5 th class. Obturation techniques
 Endodontics Lec.7 د. حسن الرماحي 5 th class Obturation techniques Broadly speaking, techniques of filling canals with gutta-percha can be divided into three main groups: 1- Use of cold gutta-percha. 2-
WaveOne Gold reciprocating instruments: clinical application in the private practice: Part 2
 C L I N I C A L WaveOne Gold reciprocating instruments: clinical application in the private practice: Part 2 Peet van der Vyver 1 and Martin Vorster 2 1 Department of Odontology, School of Dentistry, University
Advanced Probing Techniques
 Module 21 Advanced Probing Techniques MODULE OVERVIEW The clinical periodontal assessment is one of the most important functions performed by dental hygienists. This module begins with a review of the
European Veterinary Dental College
 European Veterinary Dental College EVDC Training Support Document Preparation of Radiograph Sets (Cat and Dog) Document version : evdc-tsd-radiograph_positioning_(dog_and_cat)-20120121.docx page 1 of 13
Dental Morphology and Vocabulary
 Dental Morphology and Vocabulary Palate Palate Palate 1 2 Hard Palate Rugae Hard Palate Palate Palate Soft Palate Palate Palate Soft Palate 4 Palate Hard Palate Soft Palate Maxillary Arch (Maxilla) (Uppers)
Case Note Retrieval of a separated file using Masserann technique: A case report
 Kathmandu University Medical Journal (2006), Vol. 4, No. 2, Issue 14, 238-242 Case Note Retrieval of a separated file using Masserann technique: A case report Pai ARV 1, Kamath MP 2, Basnet P 3 1 Associate
Maxdent s.r.o.,ondračka Martin,tel:
 Maxdent s.r.o., Ondračka Martin, tel: 608 243 383, email: ondracka@max-dent.cz Maxdent s.r.o.,ondračka Martin,tel: 608 243 383,email:ondracka@max-dent.cz Multi-purpose ultrasonics Ultrasonics is an excellent
6610 NE 181st Street, Suite #1, Kenmore, WA
 660 NE 8st Street, Suite #, Kenmore, WA 9808 www.northshoredentalacademy.com.08.900 READ CHAPTER The Professional Dental Assistant (p.-9) No Key Terms Recall Questions:,,,, and 6 CLASS SYLLABUS DAY READ
Elevators. elevators:- There are three major components of the elevator are:-
 Elevators Elevators:- Are exo-levers, instrument designed to elevate or luxate the teeth or roots from their bony socket in close or surgical method of extraction to force a tooth or root along the line
Lecture. Permanent maxillary premolars
 Lecture Permanent maxillary premolars Permanent premolars The maxillary premolars are four in number: two in the right and two in the left. They are posterior to the canines and anterior to the molars.
For many years, patients with
 Dr. Robert Lowe is one of the great teachers in dentistry. Recently, he received the Gordon J. Christensen Award from the Chicago Dental Society in recognition of his excellence in teaching. Some of my
Selection and arrangement of teeth in rpd
 Selection and arrangement of teeth in rpd upon completion of the articulator mounting and a thorough assessment of the occlusal requirements, the practitioner should be able to perform the proper arrangement
Preparation and making fillings Class V., III., IV.
 Preparation and making fillings Class V., III., IV. Class V. Cervical defects - Dental caries - Non carious lesions (erosion, abrasion, V shaped defects) Types of defects Caries Erosion Abrasion V shaped
WHERE SAFETY MEETS EFFICIENCY
 WHERE SAFETY MEETS EFFICIENCY Clinicians have always had to choose between reciprocation and rotary; safety and efficiency. So which do you choose? CLINICIANS NEED A FILE SYSTEM THAT IS COMPATIBLE WITH
Class I Cavity Preparation. Alaa Sabrah, BDS, MSD, PhD Nov,
 بسم اهلل الرحمن الرحيم Class I Cavity Preparation Alaa Sabrah, BDS, MSD, PhD Nov, 2015 15 Goals and Objectives?Define class I carious lesion.1 Describe the clinical technique for treating class I?carious
The width of the MCXL step bur is 1.4 mm wide and has a blunt end. As the bur approaches the inside of
 As I teach first year dental students how to prep a tooth for a full gold crown, get an impression, pour and mount models, wax-up, cast and polish, they are almost always amazed at all the required steps
You know you would like to stop swearing at the computer after each shot. Troubleshooting oral radiography
 You know you would like to stop swearing at the computer after each shot Troubleshooting oral radiography Goals of oral radiology Achieve diagnostic images of the teeth and surrounding bone. Images should
SURGICAL MANUAL. Step By Step Techniques
 SURGICAL MANUAL Step By Step Techniques TABLE OF CONTENTS PRE-SURGICAL 1 8 MEASUREMENT OF BONE.......................... 2 BONE CLASSIFICATION........................... 3 IMPLANT SIZE SELECTION.........................
Indirect retainers. 1 i
 8 1 i Indirect retainers Factors Influencing Effectiveness Indirect Retainers Auxiliary Functions Indirect Retainers Forms Indirect Retainers Auxiliary occlusal rest Canine extensions fiom occlusal rests
Prosthetic Options in Implant Dentistry. Hakimeh Siadat, DDS, MSc Associate Professor
 Prosthetic Options in Dentistry Hakimeh Siadat, DDS, MSc Associate Professor Dental Research Center, Department of Prosthodontics & Dental s Faculty of Dentistry, Tehran University of Medical Sciences
Dental Data Checklist. UNIDENTIFIED PERSON FILE Data Collection Entry Guide. City, State, and ZIP. Street Address. FAX Number.
 Investigating Agency Agency Case Number Street Address City, State and Zip Telephone Number FAX Number Medical Examiner/Coroner Medical Examiner/Coroner Case Number Street Address City, State, and ZIP
KaVo SONICflex Tips KaVo SONICflex tips
 KaVo SONICflex Tips KaVo SONICflex tips KaVo SONICflex tips overview SONICflex handpiece overview MASTER SERIES EXPERT SERIES Fast and comfortable change of tips - only one turn 3 VARIETY DEVELOPED TO
روپ قداص رتکد ناشخرد یاھدادعتسا رتفد
 CLASS II (pp 658-664 664, 696-708 708) دکتر صادق پور دفتر استعدادھای درخشان Seven Steps of Cavity Preparation 1) Establish the outline form 2) Establish resistance form 3) Establish retention form 4) Provide
Tooth Variations. Suruedee Chinthakanan
 Tooth Variations Suruedee Chinthakanan Tooth variations Dental anomalies Cause : hereditary factor Developmental disturbances of teeth www.ectodermaldysplsia.org Tooth variations Enamel is formed from
Flexi-Flange Fiber. Instruction Book for Flexi-Flange Fiber Posts IMPORTANT: Read pages 7 through 12 for Technique first. ESSENTIAL DENTAL SYSTEMS
 ESSENTIAL DENTAL SYSTEMS IMPORTANT: Read pages 7 through 12 for Technique first. Caution: Federal law restricts this device to sale by or on the order of a licensed dentist. Flexi-Flange Fiber Instruction
Contouring vs. Orthodontics. Contouring to Eliminate Fractures and Enhance Proportions
 Contouring vs. Orthodontics Photo 1 Maxillary central incisors are overlapped. Patient chose rapid tooth movement instead of contouring. Photo 2 Maxillary central incisors after six months of orthodontic
Part II National Board Review Operative Dentistry. Module 3D General Questions Answers in BOLD (usually the first answer)
") Part II National Board Review Operative Dentistry Module 3D General Questions Answers in BOLD (usually the first answer) Howard E. Strassler, DMD University of Maryland Dental School With special acknowledgements
Part II National Board Review Operative Dentistry Module 3D General Questions Answers in BOLD (usually the first answer) Howard E. Strassler, DMD University of Maryland Dental School With special acknowledgements
BOCL-01: Bonding Materials Checklist
 Task 19: Gather materials to bond partner using toothpaste as etchant Take a photo of gathered materials and submit with this completed checklist BOCL-01: Bonding Materials Checklist Date: Patient: Operator:
Periapical Radiography
 Periapical Radiography BARBARA E. DIXON B.D.S., M.Sc., D.P.D.S. Main Indications Detection of Apical infection/inflammation Assessment of the periodontal status After trauma Assessment of Unerupted teeth
Classic Technique Guide
 NiTi Rotary Instrumentation System Obturation System Classic Technique Guide Recommended Armamentarium Designed with precision and convenience in mind, these accessories simplify the case for both you
Surgical Manual. Step By Step Techniques
 Surgical Manual Step By Step Techniques Table of Contents Pre-Surgical 1 8 Measurement of Bone 2 Bone Classification 3 Implant Size Selection 4 5 Surgical Template Fabrication 6 8 Instrumentation 9 11
Everything You Wanted to Know About Extractions but Were Afraid to Ask
 Everything You Wanted to Know About Extractions but Were Afraid to Ask Tooth extraction is a surgical procedure with serious potential complications and should only be performed by a trained veterinarian.
Educational Training Document
 Educational Training Document Table of Contents Part 1: Resource Document Disclaimer Page: 2 Part 2: Line Item Grade Sheets Page: 3 Release: 11/2016 Page 1 of 6 Part 1: Resource Document Disclaimer The
The MAP System:Aperfect carrier for MTAin clinical and surgical endodontics
 The MAP System:Aperfect carrier for MTAin clinical and surgical endodontics Authors_Dr Arnaldo Castellucci & Dr Matteo Papaleoni, Italy Fig. 1_White ProRoot MTA (Dentsply Tulsa Dental). Fig. 2_Dovgan Carriers
With judicious treatment planning, the clinical
 CLINICIAN S CORNER Selecting custom torque prescriptions for the straight-wire appliance Earl Johnson San Francisco, Calif Selecting custom torque prescriptions based on the treatment needs of each patient
Table of Contents. Flexi-Overdenture Characteristics
 A s with Flexi-Post Flexi-Overdenture has the unique threaded split shank that creates maximum retention with minimum stress to the root. It is manufactured in stainless steel for the direct/non-coping
Preclinical Dentistry. I. Dental Caries Non carious lesions: trauma, erosion. abrasion, wedge shaped defects. Lenka Roubalíková
 Preclinical Dentistry I. Dental Caries Non carious lesions: trauma, erosion. abrasion, wedge shaped defects Lenka Roubalíková Understanding dental caries crown pulp chamber neck root canal root Dental
Endodontics Cracked Tooth: How to manage it in daily practice
 Calogero Bugea Endodontics Cracked Tooth: How to manage it in daily practice 5 Feb 2016 Tooth Fractures are not rare, surface cracks, or craze lines, are relatively common in teeth. In most of cases they
SURVEYING OF REMOVABLE PARITAL DENTURES FEB, 11, 2015
 SURVEYING OF REMOVABLE PARITAL DENTURES FEB, 11, 2015 Dental Surveyor: It is a mechanical device used to determine the relative parallelism of the teeth surfaces and the undercuts areas in relation to
ENDO-EZE TM GENIUS ENDODONTIC SYSTEM WHERE SAFETY MEETS EFFICIENCY
 ENDO-EZE TM GENIUS ENDODONTIC SYSTEM WHERE SAFETY MEETS EFFICIENCY WHERE SAFETY MEETS EFFICIENCY Clinicians have always had to choose between reciprocation and rotary; safety and efficiency. So which do
Advancing the Art of Freehand Cosmetic Contouring
 Advancing the Art of Freehand Cosmetic Goldfogel Instruments Goldfogel XTS Instruments Goldfogel Anterior Instruments Created by Dr. Michael Goldfogel, the XTS Instruments represent an important step forward
Jet Carbides. Enduring esthetics. Effortless efficiency. Precisely.
 Jet Carbides Enduring esthetics. Effortless efficiency. Precisely. Your practice inspires Kerr to bring the highest quality, most innovative products to the dental community. Shank Type Code Shank Type
Amalgam restoration of posterior proximal cavities with deep and concave gingival outlines
 Amalgam restoration of posterior proximal cavities with deep and concave gingival outlines M. Darveniza, MDSc, FRACDS* Abstract A technique for making a matrix and wedges for amalgam restoration of deep
Case Report Endodontic Treatment of Bilateral Maxillary First Premolars with Three Roots Using CBCT: A Case Report
 Case Reports in Dentistry, Article ID 505676, 4 pages http://dx.doi.org/10.1155/2014/505676 Case Report Endodontic Treatment of Bilateral Maxillary First Premolars with Three Roots Using CBCT: A Case Report
MAXILLARY INJECTION TECHNIQUE. Chinthamani Laser Dental Clinic
 MAXILLARY INJECTION TECHNIQUE Chinthamani Laser Dental Clinic Introduction A number of injection techniques are available to aid in providing clinically adequate anesthesia of the teeth and soft and hard
Case Study. Case # 1 Author: Dr. Suheil Boutros (USA) 2013 Zimmer Dental, Inc. All rights reserved. 6557, Rev. 03/13.
 2013 Zimmer Dental, Inc. All rights reserved. 6557, Rev. 03/13.") Placement of a Zimmer Trabecular Metal Dental Implant with Simultaneous Ridge Augmentation and Immediate Non-Functional Loading Following Tooth Extraction and Orthodontic Treatment for Implant Site Development
Placement of a Zimmer Trabecular Metal Dental Implant with Simultaneous Ridge Augmentation and Immediate Non-Functional Loading Following Tooth Extraction and Orthodontic Treatment for Implant Site Development
Case Report: Long-Term Outcome of Class II Division 1 Malocclusion Treated with Rapid Palatal Expansion and Cervical Traction
 Case Report Case Report: Long-Term Outcome of Class II Division 1 Malocclusion Treated with Rapid Palatal Expansion and Cervical Traction Roberto M. A. Lima, DDS a ; Anna Leticia Lima, DDS b Abstract:
DENT Advanced Topics in Removable Prosthodontics, Winter 2008
 University of Michigan Deep Blue deepblue.lib.umich.edu 2008-01 DENT 718 - Advanced Topics in Removable Prosthodontics, Winter 2008 Shotwell, Jeffrey Shotwell, J. (2008, April 23) Advanced Topics in Removable
PH-04A: Clinical Photography Production Checklist With A Small Camera
 PH-04A: Clinical Photography Production Checklist With A Small Camera Operator Name Total 0-49, Passing 39 Your Score Patient Name Date of Series Instructions: Evaluate your Series of photographs first.
D.T. LIGHT-POST. Bisco. Instructions for Use. Radiopaque Translucent Fiber Post System. Double Taper
 Bisco D.T. LIGHT-POST Double Taper 0459 Radiopaque Translucent Fiber Post System Instructions for Use IN-083R7 Rev. 8/16 BISCO, Inc. 1100 W. Irving Park Rd. Schaumburg, IL 60193 U.S.A. 847-534-6000 1-800-247-3368
Stainless Steel Crowns
 Stainless Steel Crowns Objectives Indications for use of stainless steel crowns Technique used in preparing and placing a stainless steel crown restoration on a primary molar. Indications for SSC Restoration
Restorative Dentistry for the Primary Dentition. References : pinkham, chapter 21
 In The Name Of God Restorative Dentistry for the Primary Dentition References : pinkham, chapter 21 INSTRUMENTATION High speed Handpiece(100,000 to 300,000 rpm) Low speed handpiece(500 to 15,000 rpm) hand
Case Report Endodontic Management of Maxillary Second Molar with Two Palatal Roots: A Report of Two Cases
 Volume 2012, Article ID 590406, 4 pages doi:10.1155/2012/590406 Case Report Endodontic Management of Maxillary Second Molar with Two Palatal Roots: A Report of Two Cases Surbhi Patel 1 and Pawan Patel
Case Report Root Canal Treatment of Mandibular Second Premolar with Three Separate Roots and Canals Using Spiral Computed Tomographic
 Case Reports in Dentistry, Article ID 816576, 4 pages http://dx.doi.org/10.1155/2014/816576 Case Report Root Canal Treatment of Mandibular Second Premolar with Three Separate Roots and Canals Using Spiral
THE GENERAL DENTIST AND TIMELY REFERRAL TO THE ENDODONTIST
 CLINICAL THE GENERAL DENTIST AND TIMELY REFERRAL TO THE ENDODONTIST Andrei Berdichewsky, DDS 1 The use of endodontic treatment to solve problems related to pulpal and periapical pathologies is extremely
D.T. LIGHT-POST. Instructions for Use. Bisco 0459 D.T. LIGHT-POST X-RO. Radiopaque Translucent Fiber Post System ILLUSION
 Bisco 0459 D.T. LIGHT-POST -RO D.T. LIGHT-POST ILLUSION Radiopaque Translucent Fiber Post System Instructions for Use RTD Patents: US8298973, US7726971. IN-165R6 Rev. 10/16 BISCO, Inc. 1100 W. Irving Park
Dowel restorations Treatment with a post and core
 Dowel restorations Treatment with a post and core A post and core is a dental restoration used to sufficiently buildup tooth structure for future restoration with a crown when there is not enough tooth
#45 Ortho-Tain, Inc PREVENTIVE ERUPTION GUIDANCE -- PREVENTIVE OCCLUSAL DEVELOPMENT
 #45 Ortho-Tain, Inc. 1-800-541-6612 PREVENTIVE ERUPTION GUIDANCE -- PREVENTIVE OCCLUSAL DEVELOPMENT Analysis and Diagnosis of Occlusion: The ideal child of 5 y ears of age that probably has the best chance
Principles of. By: Dr. Ahmad Rabah
 Principles of By: Dr. Ahmad Rabah 1. Utilize what's present: Whenever possible, select a design that fits the teeth and soft tissues, rather than choosing one that requires tissue alteration. When minimal
The cracked tooth Diagnosis and evaluation
 The cracked tooth Diagnosis and evaluation Dr Raphael Bellamy looks at the rising incidence of the cracked tooth and describes the five different types that could affect your patients the suspect tooth
Advanced ESX Instrumentation:! Segmental Crown Down & Hybridization of Tapers!
 Advanced ESX Instrumentation: Segmental Crown Down & Hybridization of Tapers Introduction: All human root canals are not created equal. The variety of root canal shapes we face on daily basis are as unique
Influence of cervical preflaring on apical file size determination - An in vitro study
 Original Research Influence of cervical preflaring on apical file size determination - An in vitro study VASUNDHARA SHIVANNA * DEEPALI AGARWAL ** ABSTRACT Aim: To investigate the influence of cervical
Creating a glide path for rotary NiTi instruments: part two
 Clinical Creating a glide path for rotary NiTi instruments: part two Peet van der Vyver 1 Introduction In part one of this series the author discussed the rationale for the preparation of a glide path
Techniques of local anesthesia in the mandible
 Techniques of local anesthesia in the mandible The technique of choice for anesthesia of the mandible is the block injection and this is attributed to the absence of the advantages which are present in
Endodontic treatment of mandibular incisors with two root canals: Report of two cases
 Blackwell Publishing IncMalden, USAAEJAustralian Endodontic Journal1329-1947 2007 The Authors;? 2007 2731Case ReportMandibular Incisors with Two CanalsY. S. Kabak and P. V. Abbott Aust Endod J 2007; 33:
Hands-on Posterior Tooth Preparation. Practical Skills Courses, SWL, 25/11/2016
 Hands-on Posterior Tooth Preparation Practical Skills Courses, SWL, 25/11/2016 Hands-On Didactic Teaching A Tooth-Friendly-Approach - Hands-on Tooth Preparation Course - Dental Simulation to include: Posterior
CLINICAL APPLICATION GUIDE DIAGNOSTIC INSTRUMENTS & PERIODONTAL SCALERS/ CURETTES
 CLINICAL APPLICATION GUIDE DIAGNOSTIC INSTRUMENTS & PERIODONTAL SCALERS/ CURETTES DIAGNOSTIC INSTRUMENTATION EXPLORERS Explorers are used to examine tooth surfaces for calculus, decalcified and carious
INDICATIONS. Fixed Appliances are indicated when precise tooth movements are required
 DEFINITION Fixed Appliances are devices or equipments that are attached to the teeth, cannot be removed by the patient and are capable of causing tooth movement. INDICATIONS Fixed Appliances are indicated
ARAB AMERICAN UNIVERSITY. Lab. Manual. Prosthetic Dentistry1; Removable Prosthodontics. 3 rd year
 ARAB AMERICAN UNIVERSITY Lab. Manual Prosthetic Dentistry1; Removable Prosthodontics 3 rd year Department of Fixed and removable prosthetic Dentistry Faculty of Dentistry 2012/2013 Course Instructor Dr.
RESTORATIONS IN ENDODONTIC. Epita S. Pane Cons Dept FKG USU
 RESTORATIONS IN ENDODONTIC Epita S. Pane Cons Dept FKG USU Reasons for extraction of endodontically treated teeth Vire, 1991 Reasons for extraction of endodontically treated teeth Vire, 1991 Klein et
RESTORING ENDODONTICALLY TREATED TEETH POST RESTORATIONS CROWNS. Dr. Szabó Enikő associate professor
 RESTORING ENDODONTICALLY TREATED TEETH POST RESTORATIONS CROWNS Dr. Szabó Enikő associate professor Why is the risk of fracture greater? loss of tooth structure large caries trepanation cavity access to
Oral Surgery. Basic Techniques of Dental Local Anesthesia. A variety of techniques used in administration and deposition of local anesthesia:
 Oral Surgery Lecture: 9 Dr. Saif Saadedeen Basic Techniques of Dental Local Anesthesia A variety of techniques used in administration and deposition of local anesthesia: 1. Topical anesthesia 2. Infiltration
Smile Design. Daniel H Ward DDS 1080 Polaris Pkwy Ste 130 Columbus OH
 Smile Design Daniel H Ward DDS 1080 Polaris Pkwy Ste 130 Columbus OH 43240 614-430-8990 dward@columbus.rr.com Incisal Placement Incisal plane parallel to the interpupillary line Vertical midline in the
Root end preparation techniques Summary of papers
 Root end preparation techniques Summary of papers 34 Flath 1987 This paper presented 2 cases in which retrograde fillings were carried out using new sonic or ultrasonic instruments (endo files held in