Surgical Technique Manual
|
|
|
- Andrea Walters
- 5 years ago
- Views:
Transcription


1 Surgical Technique Manual
2 Surgeon Designers Richard G. Fessler, MD, PhD Northwestern University, Chicago, IL Robert A. Hart, MD Oregon Health and Science University, Portland, OR Robert Labrom, MD Queensland Combined Orthopaedic Specialists, Queensland, Australia Contributing Surgeon Rajesh V. Patel, MD Raleigh General Hospital, Beckley, WV
3 Contents MIS Surgical Technique Manual 2 Product Catalog 20 Indications 23

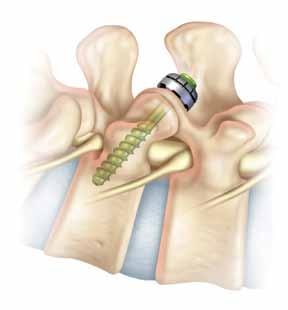
4 VIPER F2 Transfacet Pedicular System Surgical Technique Manual 2 OR Setup This surgical technique for the VIPER F2 Transfacet Pedicular System will focus on an MIS approach, though it can also be performed open or mini-open *. VIPER F2 is indicated for use in the L1-S1 lumbar levels. The patient should be positioned prone lying face down on a radiolucent table. A Jackson table is recommended to maintain the lordotic nature of the lumbar spine. Fluoroscopy is strongly recommended throughout the procedure to aid with facet targeting, proper trajectory, guidewire placement and final confirmation of screw placement. If possible, biplanar fluoroscopy should be utilized throughout this procedure to help maximize efficiency and accuracy. *Non-cannulated drill bits are available for open and mini-open techniques if desired.


5 VIPER F2 Transfacet Pedicular System Surgical Technique Manual 3 Fluoroscopic Planning Pre-operative imaging is recommended, combined with an on-table assessment, to plan optimal trajectories and incision location. Use A/P and lateral fluoroscopy to identify and target the appropriate level. Ensure that the C-Arm is positioned correctly for the targeted level by adjusting the position of the C-Arm until both endplates are parallel and the spinous process is equidistant from the center of each pedicle when viewed on A/P fluoroscopy. Pars Superior articular process Facet joint Inferior articular surface of inferior facet joint Inferior articular process Superior facet joint A/P View Lateral View Oblique View


6 VIPER F2 Transfacet Pedicular System Surgical Technique Manual 4 Fluoroscopic Planning Once an optimal image is obtained, use a surgical marker to note the key anatomic landmarks noted below: 1. Identify the inferior border of the spinous process at the appropriate level above the desired surgical level. For the L4-L5 and L5-S1 surgical levels, an incision at the L3 spinous process typically allows for proper trajectory. For the L3-L4 surgical level, a midline incision at the L2 spinous process is recommended. Adjust appropriately for lordosis and patient depth. Using a guidewire, mark a midline, 20mm vertical line from the inferior aspect of the spinous process up to the middle of the spinous process to note on the skin where the incision will be. (See Figures 1a & 1b) Figure 1a Figure 1b 2. Using fluoroscopy, place a guidewire vertically on the skin, bisecting the pedicle at the operative level in the coronal plane. Mark the line vertically through the pedicle. (See Figures 2a & 2b) Figure 2a Figure 2b


7 VIPER F2 Transfacet Pedicular System Surgical Technique Manual 5 Fluoroscopic Planning 3. Using fluoroscopy, place a guidewire horizontally to bisect the inferior pedicle at the operative level in the axial plane. Mark a 20mm, horizontal line bilaterally that intersects with the line from step 2. (See Figures 3a & 3b) Figure 3a Figure 3b 4. To approximate trajectory, place a guidewire diagonally from the center of the midline incision mark to the intersection of the vertical and horizontal lines marked on the inferior pedicle (crosshairs) at the surgical level. Take an A/P fluoroscopic image to visualize the approximate trajectory from midline to the pedicle. (See Figures 4a & 4b) This trajectory should be replicated during Jamshidi needle and guidewire placement. A skin mark may also be made at this point. Figure 4a Figure 4b

8 VIPER F2 Transfacet Pedicular System Surgical Technique Manual 6 PRE-OPERATIVE IMPLANT SIZing Make a vertical skin incision over the identified midline surgical marking. Incision size will depend on desired polyaxial ring size. For the small polyaxial ring make a 16mm incision, for the large use a 20mm incision. Be sure to also incise the fascia at this point to anticipate the sequential dilation steps. 13mm polyaxial ring 16mm polyaxial ring 13mm polyaxial ring: 16mm incision 16mm polyaxial ring: 20mm incision NOTE: Note that the 5mm and 6mm screws can be used with either size polyaxial ring. 5mm screw 6mm screw


9 VIPER F2 Transfacet Pedicular System Surgical Technique Manual 7 Jamshidi Needle Placement Place a Jamshidi needle immediately lateral to the spinous process on the marked surgical side. Advance the Jamshidi needle through the fascia and move the needle following the angle of the planned trajectory. Use the pre-identified marking points to guide the Jamshidi needle from incision towards the pedicle. Make sure that the inferior endplate of the superior vertebral body is perpendicular on an A/P fluoroscopic view. Advance the Jamshidi needle through soft tissues and dock the tip at the junction of the lamina and the inferior facet, aiming for the pedicle. Confirm this placement and trajectory on A/P view. At this point the tip of the Jamshidi needle should be in line with the inferior endplate of the superior vertebral body. Gently push down on the inferior facet with the Jamshidi needle to both feel the facet capsule and to prevent the needle from skiving off the desired bony entry point. NOTE: Optionally, draw a line on the needle at 5 and 10mm above the skin. This will help visually approximate depth and potentially reduce fluoroscopic imaging needed.

10 VIPER F2 Transfacet Pedicular System Surgical Technique Manual 8 Jamshidi Needle Placement Confirm the trajectory of the Jamshidi needle on a lateral fluoroscopic view. Adjust the trajectory if necessary to aim towards the pedicle. Using A/P fluoroscopy, advance the Jamshidi needle into and through the inferior facet (advancing the Jamshidi needle into the superior facet is optional). Advance the needle slowly and incrementally to avoid damaging the facet. Once in optimal position, remove the inner stylet of the Jamshidi needle.

11 VIPER F2 Transfacet Pedicular System Surgical Technique Manual 9 Drilling and Placing Guidewire Insert a sharp tip guidewire into the Jamshidi needle and take a lateral fluoroscopy shot to visualize the desired trajectory. Confirm trajectory on A/P fluoroscopy. Using a high-speed, cannulated power drill with needle driver attachment (not included in the VIPER F2 Set), advance the guidewire across both inferior and superior facets, into and through the pedicle. The guidewire should be advanced under lateral fluoroscopy. The guidewire should not be advanced past the posterior one-third of the vertebral body. NOTE: A change in resistance may occur as the guidewire is drilled into the cortex at the superior facet. Continue drilling until the guidewire is docked at the posterior one-third of the vertebral body.

12 VIPER F2 Transfacet Pedicular System Surgical Technique Manual 10 Initial Dilator Assembly and Insertion The VIPER F2 System features two different polyaxial ring options to optimize the construct for different patient pathologies: the silver 13mm polyaxial ring and the gold 16mm polyaxial ring. Each polyaxial ring size requires the use of different dilators and ports. Choose the correct dilators and port based on polyaxial ring selection. (Refer to page 20) Dilation Prior to dilation, reconfirm trajectory on A/P fluoroscopy. Insert the inner stylet into the outer cannula of the SPOTLIGHT polyaxial ring dilator and use downward pressure to snap and lock the two pieces together. 13mm polyaxial ring 16mm polyaxial ring Advance the SPOTLIGHT polyaxial ring dilator assembly over the guidewire until the distal tip of the instrument contacts the facet. NOTE: When dilating, avoid placing off-axis forces on the guidewire. If necessary, use lateral and A/P fluoroscopy to ensure no bending of the wire. These off-axis forces should be avoided throughout the subsequent steps and whenever placing instruments over the wire.

13 VIPER F2 Transfacet Pedicular System Surgical Technique Manual 11 Initial Dilator Assembly and Insertion Push down on the outer cannula until it separates from the inner stylet and advances to the facet. Remove the inner dilator stylet, leaving the outer cannula in place. Confirm placement with lateral and A/P fluoroscopy. NOTE: If the cannula is not fully flush to the bone, the SPOTLIGHT polyaxial ring handle can be used to push the dilator down to the facet.


14 VIPER F2 Transfacet Pedicular System Surgical Technique Manual 12 Cannulated Drill Bit Placement The VIPER F2 Implants have 5mm and 6mm diameter options. Select the proper cannulated drill bit according to the desired VIPER F2 Screw diameter. 5mm screw 6mm screw NOTE: The drill bits match the minor diameter of their corresponding screw: 3.66mm inner diameter = 5mm screw 4.06mm inner diameter = 6mm screw Attach the drill bit to a cannulated power drill. * Place the cannulated high-speed drill assembly over the wire and through the first dilator. Avoid off-axis forces so as not to bend the guidewire. Under power, advance the drill bit through the facets and into the pedicle. Lateral fluoroscopy should be used while drilling. The drill bit should not be advanced past the posterior wall of the vertebral body. NOTE: If desired, attach the SPOTLIGHT polyaxial ring handle and use as a drill guide while advancing the drill bit (shown in illustration on the right). This will allow for additional steering and control while drilling. NOTE: Significant resistance may be encountered when drilling through the superior facet; typically the resistance will decrease once the pedicle has been reached. The cannulated drill bit has a maximum drill depth of 40mm. *Cannulated power drill is not included in the VIPER F2 set.
15 VIPER F2 Transfacet Pedicular System Surgical Technique Manual 13 Cannulated Drill Bit Placement Remove the cannulated drill bit, leaving the guidewire in place. When removing the cannulated drill bit from the guidewire, reverse the high-speed drill and hold the guidewire in place while backing the drill out of the bone. Take a lateral fluoroscopic image to ensure no loss of guidewire placement.

16 VIPER F2 Transfacet Pedicular System Surgical Technique Manual 14 Facet Tapping The VIPER F2 Screw is a self-tapping screw. Choose whether or not to tap based on the bone quality of the patient. NOTE: The outer diameters of the VIPER F2 taps are undersized by.5mm: 5mm tap = 4.5mm outer diameter 6mm tap = 5.5mm outer diameter While controlling the cannula, advance the appropriate size cannulated self-drilling tap over the guidewire, through the inferior and superior facets by turning the tap in a clockwise manner. NOTE: Typically, the hardest bone and resistance will be encountered about 5-10mm short of desired screw length. Use caution not to bend or kink the guidewire while advancing the tap. It is recommended that fluoroscopy be used while tapping to monitor the depth of the tap and ensure the guidewire is not unintentionally advanced. While tapping, care should also be taken to avoid unintentional guidewire advancement or rotation. Do not advance the tap beyond the tip of the guidewire as doing so may result in unintentional wire removal.

17 VIPER F2 Transfacet Pedicular System Surgical Technique Manual 15 sequential dilation and port placement Place the SPOTLIGHT polyaxial ring second dilator over the first dilator. If necessary, use the SPOTLIGHT polyaxial ring handle to advance the dilator through soft tissue and down to the bone. Place the SPOTLIGHT polyaxial ring port over the first and second dilators, using the fixed handle to advance the port down to the bone.
18 VIPER F2 Transfacet Pedicular System Surgical Technique Manual 16 sequential dilation and port placement Take lateral and A/P fluoroscopy shots to confirm 1) the dilators and port are correctly placed 2) there has been no unintentional advancement of the guidewire 3) the final screw placement will conform to the proper trajectory into the pedicle Remove the first and second dilators from inside the port. Leave the port in place.


19 VIPER F2 Transfacet Pedicular System Surgical Technique Manual 17 VIPER F2 Screw Loading Select the desired polyaxial ring and place it into the assembly block. Slide the selected screw size (blue = 5mm diameter; green = 6mm diameter) over the polyaxial ring so that the VIPER F2 Screw sits loosely above the polyaxial ring in the loading block. Attach the straight handle onto the cannulated self-retaining screwdriver. Insert the distal end of the screwdriver shaft into the top of the screw head and push down to fasten the screw to the polyaxial ring. An audible click can be heard when the polyaxial ring loads successfully onto the screw head. The F2 screw and polyaxial ring is now assembled. The polyaxial ring is designed to remain mobile on the head of the screw when assembled. NOTE: Once assembled, if a selected polyaxial ring needs to be removed from the head of the screw, please see polyaxial ring removal instructions. DO NOT REUSE OR RESTERILIZE a polyaxial ring once it has been removed from the screw. The removed polyaxial ring should be discarded immediately.


20 VIPER F2 Transfacet Pedicular System Surgical Technique Manual 18 VIPER F2 Screw Insertion Using the cannulated self-retaining screwdriver, guide the screw and polyaxial ring assembly over the guidewire and through the SPOTLIGHT polyaxial ring port, down to the bone. Thread the assembly through the inferior and superior facets into the pedicle by turning the handle clockwise. Be sure to avoid unintentional advancement and rotation of the guidewire. Placement and depth of the screw can be monitored and confirmed using lateral fluoroscopy. The distal tip of the screw should reach the junction of the pedicle and the vertebral body. Note: The Viper F2 screw features dual lead threads and will advance more quickly than a single lead screw. Be sure not to over-insert the screw to maintain adequate bony purchase. The guidewire should be removed once the VIPER F2 Screw has gained bony purchase in the pedicle. This can be accomplished manually with a heavy needle driver or by reversing a cannulated power drill with needle driver attachment (not included in the VIPER F2 Set). The VIPER F2 polyaxial ring should seat against the top of the inferior facet, and the ring s teeth should engage the inferior articular surface to provide additional fixation. Once the polyaxial ring is seated, compress the facet joint until fully lagged by advancing the screw no more than a half turn. Take care to not overtighten once the polyaxial ring is fully engaged. Confirm both screw and polyaxial ring placement with lateral fluoroscopy. NOTE: Tactile feedback should indicate when the polyaxial ring seats. Once the VIPER F2 Screw is inserted to the desired depth, remove the self-retaining screwdriver by lightly wiggling the driver back and forth to disengage it from the screw head. Remove the SPOTLIGHT polyaxial ring port.

21 VIPER F2 Transfacet Pedicular System Surgical Technique Manual 19 Confirmation of Implant Placement Confirm the appropriate implant positioning with fluoroscopy to make sure that the facet joint is fully lagged and that the screw has been sufficiently locked into the desired position. Use an oblique fluoroscopic angle to assess full lagging of the facet joint. Use the same midline skin incision to place a second VIPER F2 Screw on the opposite side of the spinous process.


22 VIPER F2 Transfacet Pedicular System Product Catalog 20 product catalog IMPLANTS (STERILE) Item # S S S S S S S S S S S S S S S S S S S S Description 13mm Polyaxial Ring 16mm Polyaxial Ring 5 X 20mm Cannulated Screw 5 X 25mm Cannulated Screw 5 X 30mm Cannulated Screw 5 X 35mm Cannulated Screw 5 X 40mm Cannulated Screw 5 X 45mm Cannulated Screw 5 X 50mm Cannulated Screw 5 X 55mm Cannulated Screw 5 X 60mm Cannulated Screw 6 X 20mm Cannulated Screw 6 X 25mm Cannulated Screw 6 X 30mm Cannulated Screw 6 X 35mm Cannulated Screw 6 X 40mm Cannulated Screw 6 X 45mm Cannulated Screw 6 X 50mm Cannulated Screw 6 X 55mm Cannulated Screw 6 X 60mm Cannulated Screw INSTRUMENTS Item # Description SPOTLIGHT Small Polyaxial Ring First Dilator (Combo) SPOTLIGHT Small Polyaxial Ring Second Dilator SPOTLIGHT Small Polyaxial Ring Port SPOTLIGHT Small Polyaxial Ring Handle SPOTLIGHT Large Polyaxial Ring First Dilator (Combo) SPOTLIGHT Large Polyaxial Ring Second Dilator SPOTLIGHT Large Polyaxial Ring Port SPOTLIGHT Large Polyaxial Ring Handle Cannulated Self-Retaining Screw Driver X Cannulated, Guidewire Locking 3.66 mm Drill Bit Cannulated, Guidewire Locking 4.06 mm Drill Bit Cannulated 3.66 mm Drill Bit Cannulated 4.06 mm Drill Bit Step, Non-Cannulated 3.66mm Drill Bit Step, Non-Cannulated 4.06mm Drill Bit Tray Loading Station VIPER 2 Ball Tip Feeler Straight VIPER 2 5mm Self-Drilling Tap Cannulated Dual Thread VIPER 2 6mm Self-Drilling Tap Cannulated Dual Thread VIPER 2 Ratcheting Modular Straight Handle Cannulated VIPER 2 Ratcheting Modular T-Handle Cannulated VIPER 2 Guidewire 1.45mm Blunt Threaded VIPER 2 Guidewire 1.45mm Sharp Threaded
23 NOTES VIPER F2 Transfacet Pedicular System Product Catalog 21
24
25 Indications The VIPER F2 Facet Fixation System is intended to stabilize the spine as an aid to fusion by the transfacet fixation method only. Transfacet fixation: The screws are inserted bilaterally through the superior side of the facet, across the facet joint and into the inferior pedicle. This system is indicated for the posterior surgical treatment of any or all of the following at the L1 to S1 (inclusive) spinal levels: 1) Trauma, including spinal fractures and/or dislocations; 2) Spondylolisthesis; 3) Spondylolysis; 4) Pseudoarthrosis or failed previous fusions which are symptomatic or which may cause secondary instability or deformity; 5) Degenerative diseases which include: (a) degenerative disc disease (ddd) as defined by back pain of discogenic origin as confirmed by patient history with degeneration of the disc as confirmed by radiographic studies and/or (b) degenerative disease of the facets with instability. CONTRAINDICATIONS (IFU) Disease conditions which have been shown to be safely and predictably managed without the use of internal fixation devices are relative contraindications to the use of these devices. Active systemic infection or infection localized to the site of the proposed implantation are contraindications to implantation. Severe osteoporosis is a relative contraindication because it may prevent adequate fixation of spinal anchors and thus preclude the use of this or any other spinal instrumentation system. Absence of posterior spinal elements including the pedicle, pars interarticularis, facet joints, spinous process and the majority of the lamina are contraindications to implantation. Any entity or condition that totally precludes the possibility of fusion, i.e. cancer, kidney dialysis, or osteopenia are relative contraindications. Other relative contraindications include obesity, certain degenerative diseases, or foreign body sensitivity. In addition, the patient s occupation or activity level or mental capacity may be relative contraindications to this surgery. Specifically, patients who because of their occupation or lifestyle, or because of conditions such as mental illness, alcoholism, or drug abuse, may place undue stresses on the implant during bony healing and may be at higher risk for implant failure. WARNINGS Correct placement of the device is essential to optimal performance. Use of the VIPER F2 Facet Fixation System should only be undertaken after the surgeon has become thoroughly knowledgeable about the spinal anatomy and biomechanics, has had experience with posterior approach spinal surgeries, and has had hands-on training in the use of the device. 1. Correct selection of the implant is extremely important. 2. Implants can break when subjected to the increased loading associated with delayed union or nonunion. 3. Mixing metals can cause corrosion. 4. In selecting patients for internal fixation devices, the following factors can be extremely important to the eventual success of the procedure, including: the patient s weight and occupation or activity; a condition of senility, mental illness, alcoholism, or drug abuse; certain degenerative diseases; foreign body sensitivity; smoking. PRECAUTIONS 1. Surgical implants must never be reused. 2. Correct handling of the implant is extremely important. 3. If the device is not removed after the completion of its intended use; any of the following complications may occur: corrosion with localized tissue reaction or pain; migration of implant position resulting in injury; risk of additional injury from postoperative trauma; bending, loosening, and/or breakage, which could make removal impractical or difficult; pain, discomfort, or abnormal sensations due to the presence of the device; possible increased risk of infection; and bone loss due to stress shielding. The surgeon should carefully with the risks versus the benefits when deciding when to remove the implant. 4. Adequately instruct the patient. The patient must be made aware of the limitations of the implant, and instructed to limit and restrict physical activities. Revision/Screw Removal: ITEMS NEEDED: Self retaining screwdriver. The screwdriver tip should be in good condition. REMOVAL TECHNIQUE: Thoroughly clean out the inside of the screw head. Insert the self retaining screwdriver ensuring the tip of the screwdriver is fully seated within the head of the screw. The shaft of the screwdriver should be aligned with the screw shank. Disengage the screw. Repeat for all screws. Washer Removal: ITEMS NEEDED: Screw Loading Block. Viper F2 Instrument Case. REMOVAL TECHNIQUE: Place distal tip of screw in the corresponding diameter hole found inside the VIPER F2 Instrument Case. The holes will be located at the bottom of the inside of the tray, below the holder for the loading block. Align the side hole of the loading block with the top of the screw head. Push down on the loading block to disengage the washer from the screw head. Surgical gloves are required. DO NOT REUSE OR RESTERILIZE a washer once it has been removed from the screw. The removed washer should be discarded immediately. Limited Warranty and Disclaimer: DePuy Spine products are sold with a limited warranty to the original purchaser against defects in workmanship and materials. Any other express or implied warranties, including warranties of merchantability or fitness, are hereby disclaimed. WARNING: In the USA, this product has labeling limitations. See package insert for complete information. CAUTION: USA Law restricts these devices to sale by or on the order of a physician. To order in the US, call DePuy Spine Customer Service ( ). Not all products are currently available in all markets. DePuy Spine, Inc. 325 Paramount Drive Raynham, MA USA Tel: +1 (800) DePuy Spine, Inc All rights reserved. MI /12 ADDB/RPI
Surgical Technique & Product Catalogue. Guide for Open & MIS Procedures
 Surgical Technique & Product Catalogue Guide for Open & MIS Procedures INTRODUCTION The VIPER Cortical Fix Fenestrated Screw System is the first pedicle screw implant to offer enhanced fixation in both
SURGICAL TECHNIQUE GUIDE
 The following general surgical technique is for illustrative purposes only. As with all surgical procedures, the technique used in each case will depend on the surgeon s medical judgment as to the best
Thunderbolt. surgical technique. MIS Pedicle Screw System. Where Nimble and Secure Intersect
 Thunderbolt TM MIS Pedicle Screw System Where Nimble and Secure Intersect surgical technique i www.choicespine.com System Features Dovetail set screw: Minimizes head splay and cross-threading Secure connection
Zimmer Facet Screw System Surgical Technique
 Zimmer Facet Screw System Surgical Technique 2 Zimmer Facet Screw System Surgical Technique Zimmer Facet Screw System Surgical Technique Description, Indications & Contraindications...3 Surgical Technique...4
TECHNICAL BROCHURE. Capture Facet Fixation System
 TECHNICAL BROCHURE Capture Facet Fixation System Table of Contents Product Overview...2 Instruments...4 Capture Facet Screw Surgical Technique Patient Preparation and Positioning...6 Guide Pin Placement...7
Single-Thread Screw Available in 25-45mm lengths (5mm Increments) Dual-Thread Screw Available in 30-45mm lengths (5mm Increments)
 Dual-Thread Screw Available in 30-45mm lengths (5mm Increments)") Single-Thread Screw Available in 25-45mm lengths (5mm Increments) Dual-Thread Screw Available in 30-45mm lengths (5mm Increments) 4.5mm diameter screws All screws cannulated 12mm percutaneous incision
Single-Thread Screw Available in 25-45mm lengths (5mm Increments) Dual-Thread Screw Available in 30-45mm lengths (5mm Increments) 4.5mm diameter screws All screws cannulated 12mm percutaneous incision
Table of Contents.
 surgical technique The Ambassador TM Anterior Cervical Plate System is a versatile system of implants and instruments with a variety of sizes to provide optimal anatomic compatibility. The integrated cam
VTI INTERLINK PEDICLE SCREW SYSTEM
 VTI INTERLINK PEDICLE SCREW SYSTEM SURGICAL TECHNIQUE FORWARD THINKING FOR THE BACK. DEVICE DESCRIPTION The VTI InterLink Pedicle Screw System is comprised of polyaxial pedicle screws in various diameters
TiLock XT Minimally Invasive Surgery (MIS) Pedicle Screw System
 Pedicle Screw System") TiLock XT Minimally Invasive Surgery (MIS) Pedicle Screw System The Genesys Spine TiLock XT Minimally Invasive Surgery (MIS) Pedicle Screw System consists of rods (straight and curved), lock screws, and
TiLock XT Minimally Invasive Surgery (MIS) Pedicle Screw System The Genesys Spine TiLock XT Minimally Invasive Surgery (MIS) Pedicle Screw System consists of rods (straight and curved), lock screws, and
TiLock XT Minimally Invasive Surgery (MIS) Pedicle Screw System
 Pedicle Screw System") Minimally Invasive Surgery (MIS) Pedicle Screw System Surgical Technique Guide 2 Minimally Invasive Surgery (MIS) Pedicle Screw System The Genesys Spine Minimally Invasive Surgery (MIS) Pedicle Screw System
Minimally Invasive Surgery (MIS) Pedicle Screw System Surgical Technique Guide 2 Minimally Invasive Surgery (MIS) Pedicle Screw System The Genesys Spine Minimally Invasive Surgery (MIS) Pedicle Screw System
Threshold Pedicular Fixation System Surgical Technique
 Threshold Pedicular Fixation System Surgical Technique Table of Contents Patient Preparation and Positioning... 2 Determining Incision Location... 3 Assembling the Cannulated Awl... 4 Guide Wire Placement...
Thoracolumbar Spine Locking Plate (TSLP) System. A low-profile plating system for anterior stabilization of the thoracic and lumbar spine.
 System. A low-profile plating system for anterior stabilization of the thoracic and lumbar spine.") Thoracolumbar Spine Locking Plate (TSLP) System. A low-profile plating system for anterior stabilization of the thoracic and lumbar spine. Technique Guide Instruments and implants approved by the AO Foundation
Thoracolumbar Spine Locking Plate (TSLP) System. A low-profile plating system for anterior stabilization of the thoracic and lumbar spine. Technique Guide Instruments and implants approved by the AO Foundation
Royal Oak Cervical Plate System
 Royal Oak Cervical Plate System Manufactured by Nexxt Spine, Inc. Royal Oak Cervical Plate System INTRODUCTION FEATURES AND BENEFITS Table of Contents SURGICAL TECHNIQUE Step 1. Patient Positioning Step
SURGICAL TECHNIQUE. SECURIS Pedicle Screw System for Minimally Invasive Surgery. 2 I SECURIS Pedicle Screw System
 Surgical Technique e Guide SECURIS Pedicle Screw System for Minimally Invasive Surgery Securis Pedicle Screw System has been engineered to provide temporary posterior stabilization of the thoracolumbar
OPERATIVE TECHNIQUE. anterior cervical plating system
 OPERATIVE TECHNIQUE 3º anterior cervical plating system Introduction 1 Pre-Operative Technique 2 Oerative Technique 3 Instructions for Use 12 Part Numbers 16 The surgical technique shown is for illustrative
TiLock 2 Spinal System. Surgical Technique
 TiLock 2 Spinal System Surgical Technique Table of Contents Page Preoperative Planning 4 Pedicle Preparation 5 Probe 5 Tap Pedicle 6 Screw Options 7 Screw Insertion 8 Aligning the Windows 9 Rod Insertion
ACP. Anterior Cervical Plate System SURGICAL TECHNIQUE
 ACP Anterior Cervical Plate System SURGICAL TECHNIQUE ACP TABLE OF CONTENTS INTRODUCTION 4 INDICATIONS AND CONTRAINDICATIONS 5 WARNINGS AND PRECAUTIONS 6 IMPLANT DESCRIPTION 7 INSTRUMENTS 10 SURGICAL
SURGICAL TECHNIQUE GUIDE TRESTLE. Anterior Cervical Plating System
 SURGICAL TECHNIQUE GUIDE TRESTLE Anterior Cervical Plating System 2 SURGICAL TECHNIQUE GUIDE SURGICAL TECHNIQUE GUIDE System Features Large window enables visualization of graft site and end plates Screw
TM TM Surgical Technique
 TM TM Surgical Technique TABLE OF CONTENTS Reli SP Spinous Plating System Overview Device Description Implant Features Indications Instruments Access Instruments Preparation Instruments Insertion Instruments
Zimmer Anterior Buttress Plate System. Surgical Technique
 Zimmer Anterior Buttress Plate System Surgical Technique 2 Zimmer Anterior Buttress Plate System Surgical Technique Zimmer Anterior Buttress Plate System Surgical Technique Description, Indications & Contraindications...
Surgical Technique Guide
 Sacroiliac Joint Fusion System Surgical Technique Guide Moving Life Forward Table of Contents SiCure Implant Overview...2 SiCure System Information...3 X-ray Basics...4 Patient Positioning....5 Surgical
Alamo T Transforaminal Lumbar Interbody System Surgical Technique
 Transforaminal Lumbar Interbody System Surgical Technique Table of Contents Indications and Device Description.............. 1 Alamo T Implant Features and Instruments...........2 Surgical Technique......................
Dymaxeon Spine System. Simple, Streamlined, Smart. Surgical Procedure
 Simple, Streamlined, Smart Surgical Procedure Introduction The Dymaxeon pedicle screw system offers the spinal surgeon an outstanding system for stabilization of spinal deformity, reduction of spondylolisthesis,
A U X I L I A R Y C O N N E C T O R S Surgical Technique
 A U X I L I A R Y C O N N E C T O R S Surgical Technique AUXILIARY CONNECTORS ISSYS LP Auxiliary Connectors The ISSYS LP auxiliary connectors were designed to provide medial-lateral variability for the
100 Interpace Parkway Parsippany, NJ
 100 Interpace Parkway Parsippany, NJ 07054 www.biometspine.com 800-526-2579 All trademarks are the property of Biomet, Inc. or one of its subsidiaries, unless otherwise indicated. Rx Only. 2009 EBI, LLC.
UNIQUE ANATOMIES PATIENT-MATCHED SOLUTIONS. Surgical Technique
 UNIQUE ANATOMIES PATIENT-MATCHED SOLUTIONS Surgical Technique Joint Spine Sports Med MySpine Surgical Technique Joint Spine Sports Med 2 INTRODUCTION MySpine is a patient matched, pedicle targeted technology
Lag Screw Device Intended for symphyseal fracture fixation of the mandible
 Lag Screw Device Intended for symphyseal fracture fixation of the mandible SUrgicaL TecHNiqUe Lag Screw Device Intended for symphyseal fracture fixation of the mandible Simplifies the lag screw fixation
EXCELLA ll. Spinal System
 EXCELLA ll Spinal System Excella II Spinal System INDICATIONS FOR USE The Innovasis Excella II Spinal System is intended for use in the non-cervical area of the spine. WARNING: The safety and effectiveness
Asnis. Micro Cannulated screw system. Xpress operative technique
 Asnis Micro Cannulated screw system Xpress operative technique Asnis Micro Cannulated screw system Table of contents Indications, precautions & contraindications 3 Operative technique 4 This publication
Technique Guide Small Bone Fusion System
 Technique Guide Small Bone Fusion System The Pinit Plate Small Bone Fusion System is a super low profile, modular bone plate and screw system designed to stabilize a bunionectomy with a medial to lateral
OPERATIVE TECHNIQUE. CONSTRUX Mini PTC. Mini PTC Spacer System
 OPERATIVE TECHNIQUE CONSTRUX Mini PTC Mini PTC Spacer System TABLE OF CONTENTS Introduction 1 Operative Technique 2 Part Numbers 6 Indications For Use 7 INTRODUCTION 1 INTRODUCTION The CONSTRUX Mini PTC
VIPER PRIME System Cadaver Time Study
 VIPER PRIME System Cadaver Time Study White Paper August 24, 2017 1. INTRODUCTION Minimally invasive surgical techniques to perform spinal stabilization have gained popularity in recent years due to the
O PE RATIV E TE C HN IQ U E. Minimally Invasive Posterior Fixation
 O PE RATIV E TE C HN IQ U E TM Minimally Invasive Posterior Fixation Table of Contents 1 PRE-OPERATIVE PLANNING Patient Positioning Pedicle Identification and Incision Planning 4 OPERATIVE TECHNIQUE Incision
Y o u r Id e a s En g i n e e r e d t o Li f e
 ISSYS LP Spinal Fixation System Surgical Guide Y o u r Id e a s En g i n e e r e d t o Li f e In t r o d u c t i o n ISSYS LP Sp i n a l Fixation System The foundation of the ISSYS LP Spinal Fixation System
Valencia Pedicle Screw Surgical Technique
 Valencia Pedicle Screw Surgical Technique VALENCIA CIRCUIT TABLE OF CONTENTS Design Rationale Indications for Use Surgical Technique 1. Pedicle Preparation 2. Screw Insertion 3. Rod Placement 4. Locking
VECTRA-T SURGICAL TECHNIQUE. The Translational Anterior Cervical Palate System. This publication is not intended for distribution in the USA.
 VECTRA-T The Translational Anterior Cervical Palate System This publication is not intended for distribution in the USA. SURGICAL TECHNIQUE Image intensifier control This description alone does not provide
SFX Cross Connector System. Surgical Technique Guide
 SFX Cross Connector System Surgical Technique Guide Introduction The EXPEDIUM SFX Cross Connector System redefines ease-of-use, implant versatility, and construct security with an advanced top-loading
EXACTECH SPINE. Operative Technique. Cervical Spacer System. Surgeon focused. Patient driven. TM
 EXACTECH SPINE Operative Technique Cervical Spacer System Surgeon focused. Patient driven. TM ACAPELLA ONE Acapella One Cervical Spacer System is an anterior cervical discectomy and fusion device with
TABLE OF CONTENTS. Vault C Anterior Cervical Discectomy 2 and Fusion (ACDF) System Overview. Implants 3. Instruments 5. Surgical Technique 10
 System Overview. Implants 3. Instruments 5. Surgical Technique 10") Surgical Technique TABLE OF CONTENTS Vault C Anterior Cervical Discectomy 2 and Fusion (ACDF) System Overview Indications 2 Implants 3 Instruments 5 Surgical Technique 10 1. Preoperative planning 10 2.
Surgical Technique TABLE OF CONTENTS Vault C Anterior Cervical Discectomy 2 and Fusion (ACDF) System Overview Indications 2 Implants 3 Instruments 5 Surgical Technique 10 1. Preoperative planning 10 2.
Royal Oak IBFD System Surgical Technique Posterior Lumbar Interbody Fusion (PLIF)
") Royal Oak IBFD System Surgical Technique Posterior Lumbar Interbody Fusion (PLIF) Preoperative Planning Preoperative planning is necessary for the correct selection of lumbar interbody fusion devices.
Royal Oak IBFD System Surgical Technique Posterior Lumbar Interbody Fusion (PLIF) Preoperative Planning Preoperative planning is necessary for the correct selection of lumbar interbody fusion devices.
Conventus CAGE PH Surgical Techniques
 Conventus CAGE PH Surgical Techniques Conventus Orthopaedics The Conventus CAGE PH (PH Cage) is a permanent implant comprised of an expandable scaffold, made from nitinol and titanium, which is deployed
Veyron -C Anterior Cervical System Surgical Technique
 Veyron -C Anterior Cervical System Surgical Technique 2 Veyron-C Anterior Cervical System Surgical Technique Veyron-C Anterior Cervical System Surgical Technique Description, Indications & Contraindications...3
Posterior Lumbar Interbody Fusion System
 Px Posterior Lumbar Interbody Fusion System Px PEEK INTERBODY FUSION SYSTEM INDICATIONS FOR USE The Innovasis Px PEEK IBF System is an intervertebral body fusion device for use in patients with degenerative
Low Bend Distal Tibia Plates
 Part of the DePuy Synthes Locking Compression Plate (LCP ) System 3.5 mm LCP Low Bend Medial Distal Tibia Plates Surgical Technique Table of Contents Introduction 3.5 mm LCP Low Bend Medial Distal Tibia
ONE SYSTEM, MULTIPLE OPTIONS. Surgical Technique. Hip Knee Spine Navigation
 ONE SYSTEM, MULTIPLE OPTIONS Surgical Technique Hip Knee Spine Navigation MUST MINI Surgical Technique Hip Knee Spine Navigation INTRODUCTION The M.U.S.T. Mini posterior cervical screw system is a modular
3 Operative Technique U.S. EDITION
 3 A N T E R I O R C E R V I C A L P L AT E S Y S T E M 3 Operative Technique U.S. EDITION Table of Contents 1 INTRODUCTION 2 PRE-OPERATIVE 3 OPERATIVE 12 INSTRUCTIONS FOR USE 16 PART NUMBERS Orthofix Spinal
C-THRU Anterior Spinal System
 C-THRU Anterior Spinal System Surgical Technique Manufactured From Contents Introduction... Page 1 Design Features... Page 2 Instruments... Page 3 Surgical Technique... Page 4 Product Information... Page
Alamo C. Cervical Interbody System Surgical Technique. An Alliance Partners Company
 Cervical Interbody System Surgical Technique Table of Contents Indications for Use................................1 Device Description............................... 1 Alamo C Instruments..............................
4.5 System. Surgical Technique. This publication is not intended for distribution in the USA.
 4.5 System Surgical Technique This publication is not intended for distribution in the USA. Contents EXPEDIUM 4.5 Spine System 2 Features and Benefits 3 Surgical Technique Extended Tandem Connector 4 Placement
nva Anterior Lumbar Interbody Fusion System
 nva Anterior Lumbar Interbody Fusion System 1 IMPORTANT INFORMATION FOR PHYSICIANS, SURGEONS, AND/OR STAFF The nv a, nv p, and nv t are an intervertebral body fusion device used in the lumbar spine following
Cervical Spacer System surgical technique
 Blackhawk TM Cervical Spacer System surgical technique Blackhawk TM The BLACKHAWK Cervical Spacer System is designed to provide biomechanical stabilization as an adjunct to fusion. Spinal fixation should
2. Active systemic infection or infection localized to the site of the proposed implantation is contraindications to implantation.
 OIC Pedicle Screw System! The Orthopaedic Implant Company 316 California Ave #701 Reno, NV 89509 USA System Contents: Non-Sterile Implants Single Use Only Non-Sterile Instruments - Reusable 2 Caution:
Surgical Technique. Guide
 Surgical Technique Guide DESIGNING SURGEONS Darrel Brodke, M.D. University of Utah Medical Center Dept. of Orthopedic Surgery Salt Lake City, Utah Iain Kalfas, M.D., F.A.C.S The Cleveland Clinic Foundation
L8 Spine System SURGICAL TECHNIQUE. Add: No.1-8, Tianshan Road, Xinbei District, Changzhou, Jiangsu, China
 Add: No.-8, Tianshan Road, Xinbei District, Changzhou, Jiangsu, China 23022 Tel: 0086 59 8595556 Fax: 0086 59 859555 Http://www.kanghui.com Add: F25, Shanghai International Pharmaceutical Trad & Exhibition
3. PATIENT POSITIONING & FRACTURE REDUCTION 3 8. DISTAL GUIDED LOCKING FOR PROXIMAL NAIL PROXIMAL LOCKING FOR LONG NAIL 13
 Contents IMPLANT FEATURES 2 1. INDICATIONS 3 2. PRE-OPERATIVE PLANNING 3 3. PATIENT POSITIONING & FRACTURE REDUCTION 3 4. INCISION 4 5. ENTRY POINT 4-6 6. PROXIMAL NAIL INSERTION 6-7 7. PROXIMAL LOCKING
HawkeyeTM Peek. surgical technique
 HawkeyeTM Peek surgical technique Introduction The ChoiceSpine HAWKEYE Vertebral Body Replacement (VBR) System is intended for use in the thoracolumbar spine (T1 - L5) to replace a collapsed, damaged,
nvt Transforaminal Lumbar Interbody Fusion System
 nvt Transforaminal Lumbar Interbody Fusion System 1 IMPORTANT INFORMATION FOR PHYSICIANS, SURGEONS, AND/OR STAFF The nv a, nv p, and nv t are an intervertebral body fusion device used in the lumbar spine
nvp Posterior Lumbar Interbody Fusion System
 nvp Posterior Lumbar Interbody Fusion System 1 IMPORTANT INFORMATION FOR PHYSICIANS, SURGEONS, AND/OR STAFF The nv a, nv p, and nv t are an intervertebral body fusion device used in the lumbar spine following
VIPER PRIME TM System. Surgical Technique
 VIPER PRIME TM System Surgical Technique Contents Product Overview Introduction 2 Features and Benefits 3 One Tool Screw Insertion 5 Surgical Technique OR Set Up 6 Assembly of the VIPER PRIME TM Inserter
CROSS -FUSE P E E K V B R / I B F SYST E M
 S U R G I C A L T E C H N I Q U E CROSS -FUSE P E E K V B R / I B F SYST E M S U R G I C A L S Y S T E M O V E R V I E W 2 CROSS-FUSE P E E K V B R / I B F S Y S T E M S U R G I C A L T E C H N I Q U E
EXCELLA MIS. Spinal System
 EXCELLA MIS Spinal System Excella MIS Spinal System INDICATIONS FOR USE The Innovasis Excella MIS Spinal System is intended for use in the non-cervical area of the spine. WARNING: The safety and effectiveness
3.5 mm Locking Attachment Plate
 For Treatment of Periprosthetic Fractures 3.5 mm Locking Attachment Plate Surgical Technique Table of Contents Introduction 3.5 mm Locking Attachment Plate 2 Indications 4 Surgical Technique Preparation
System. Humeral Nail. Surgical Technique
 System Humeral Nail Surgical Technique Contents IMPLANT FEATURES 2 1. INDICATIONS 3 2. PRE-OPERATIVE PLANNING 3 3. PATIENT POSITIONING & FRACTURE REDUCTION 3 4. INCISION 4 5. ENTRY POINT 4-6 6. PROXIMAL
3.5 mm LCP Olecranon Plates
 Part of the DePuy Synthes Locking Compression Plate (LCP ) System 3.5 mm LCP Olecranon Plates Surgical Technique Table of Contents Introduction 3.5 mm LCP Olecranon Plates 2 AO Principles 3 Indications
Pinit Plate Small Bone Fusion System Bone Plate & Screw System
 Pinit Plate Small Bone Fusion System Bone Plate & Screw System Description The Pinit Plate Small Bone Fusion System consists of 2-hole bone plates made available in three length options and two thickness
HydraLok. Operative Technique. Polyaxial Pedicle Screw System
 HydraLok Operative Technique Polyaxial Pedicle Screw System Table of Contents Introduction...1 OPERATIVE TECHNIQUE OVERVIEW...2 DETAILED OPERATIVE TECHNIQUE...4 LOCATE AND PREPARE THE PEDICLE...4 PROBE
 Visit our website on www.biotech-medical.com The DLP - Dorso-Lumbar Polyaxial Screw System has been designed to address the pathologies of the thoracolumbar spine. The DLP System contains a wide range
Trinica and Trinica Select Anterior Cervical Plate System
 Surgical Technique Trinica and Trinica Select Anterior Cervical Plate System A New Twist to Anterior Cervical Plates Trinica and Trinica Select Surgical Technique 1 Trinica and Trinica Select Anterior
Imola Lateral IBF System Surgical Technique
 Imola Lateral IBF System Surgical Technique IMOLA CIRCUIT TABLE OF CONTENTS Design Rationale Instructions for Use Surgical Technique 1. Table Mounting 2. Surgical Planning & Targeting 3. Access and Preparation
Surgical Technique. Apache Anterior Lumbar Interbody Fusion
 Surgical Technique Apache Anterior Lumbar Interbody Fusion 2 Table of Contents Page Preoperative Planning 4 Patient Positioning 4 Disc and Endplate Preparation 4 Distraction/Size Selection 5 Implantation
VIPER PRIME TM System. Surgical Technique
 VIPER PRIME TM System Surgical Technique Contents Product Overview Introduction 2 Features and Benefits 3 One Tool Screw Insertion 5 Surgical Technique OR Set Up 6 Assembly of the VIPER PRIME TM Inserter
LUMBAR POSTERIOR MINIMALLY INVASIVE SYSTEM. Surgical Technique
 LUMBAR POSTERIOR MINIMALLY INVASIVE SYSTEM Surgical Technique Joint Spine Sports Med M.U.S.T. Mini Open Surgical Technique Joint Spine Sports Med CAUTION Federal law (USA) restricts this device to sale
Zimmer Small Fragment Universal Locking System. Surgical Technique
 Zimmer Small Fragment Universal Locking System Surgical Technique Zimmer Small Fragment Universal Locking System 1 Zimmer Small Fragment Universal Locking System Surgical Technique Table of Contents Introduction
Surgical Technique. Guide and Ordering Information. Favored Angle Screw
 Surgical Technique Guide and Ordering Information Favored Angle Screw C O N T E N T S SURGICAL TECHNIQUE Introduction 1 Screwdriver Application and Screw Placement 2 Segmental Translation 3-7 Segmental
USS Variable Axis Screw (VAS) System. For posterior fixation of the lumbar spine.
 System. For posterior fixation of the lumbar spine.") USS Variable Axis Screw (VAS) System. For posterior fixation of the lumbar spine. Technique Guide Instruments and implants approved by the AO Foundation Table of Contents Introduction USS Variable Axis
USS Variable Axis Screw (VAS) System. For posterior fixation of the lumbar spine. Technique Guide Instruments and implants approved by the AO Foundation Table of Contents Introduction USS Variable Axis
3.5 mm LCP Extra-articular Distal Humerus Plate
 Part of the DePuy Synthes Locking Compression Plate (LCP ) System 3.5 mm LCP Extra-articular Distal Humerus Plate Surgical Technique Table of Contents Introduction 3.5 mm LCP Extra-articular Distal Humerus
3.5 mm LCP Clavicle Hook Plates
 Part of the Synthes Locking Compression Plate (LCP ) System 3.5 mm LCP Clavicle Hook Plates Surgical Technique Table of Contents Introduction 3.5 mm LCP Clavicle Hook Plates 2 AO Principles 4 Indications
T.L.I.F. Surgical Technique. Featuring the T.L.I.F. SG Instruments, VG2 PLIF Allograft, and the MONARCH Spine System.
 Surgical Technique T.L.I.F. Transforaminal Lumbar Interbody Fusion Featuring the T.L.I.F. SG Instruments, VG2 PLIF Allograft, and the MONARCH Spine System. CONSULTING SURGEON Todd Albert, M.D. Rothman
Surgical Technique. CONQUEST FN Femoral Neck Fracture System
 Surgical Technique CONQUEST FN Femoral Neck Fracture System Table of Contents Introduction... 3 Indications... 3 Product Overview... 4 Surgical Technique... 5 Patient Positioning... 5 Reduce the Fracture...
M.I.S. MAKE IT SMART IN ONE SYSTEM. Surgical Technique. Hip Knee Spine Navigation
 M.I.S. MAKE IT SMART IN ONE SYSTEM Surgical Technique Hip Knee Spine Navigation M.U.S.T. Mini Open Surgical Technique Hip Knee Spine Navigation 2 C O N T E N T S 1 INTRODUCTION 4 2 SURGICAL TECHNIQUE 5
Technique Guide. 3.5 mm LCP Low Bend Medial Distal Tibia Plates. Part of the Synthes locking compression plate (LCP) system.
 system.") Technique Guide 3.5 mm LCP Low Bend Medial Distal Tibia Plates. Part of the Synthes locking compression plate (LCP) system. Table of Contents Introduction 3.5 mm LCP Low Bend Medial Distal Tibia Plates
Technique Guide 3.5 mm LCP Low Bend Medial Distal Tibia Plates. Part of the Synthes locking compression plate (LCP) system. Table of Contents Introduction 3.5 mm LCP Low Bend Medial Distal Tibia Plates
product overview Implant heights range from 8mm-20mm in 2mm increments, with two lordocic angle options of 6 and 12.
 ETHOS A-Spacer PEEK System Surgical Technique Guide Synchronizing Medical Innovation with Global Markets product overview The SyncMedical Ethos PEEK IBF System is an intervertebral body fusion device for
LCP Medial Distal Tibia Plate, without Tab. The Low Profile Anatomic Fixation System with Angular Stability and Optimal Screw Orientation.
 LCP Medial Distal Tibia Plate, without Tab. The Low Profile Anatomic Fixation System with Angular Stability and Optimal Screw Orientation. Technique Guide LCP Small Fragment System Table of Contents Introduction
Ballista Percutaneous Screw Placement System. Surgical Technique
 Ballista Percutaneous Screw Placement System Surgical Technique Contents Introduction... Page 1 Features And Benefits... Page 2 Implants... Page 3 Instruments... Page 4 Surgical Technique... Page 8 Indications
Technique Guide MAXIMUM ACCESS SURGICAL PLATFORM
 Technique Guide MAXIMUM ACCESS SURGICAL PLATFORM MAXIMUM ACCESS SURGICAL PLATFORM CONTENTS Preface 1 SpheRx II Anterior Technique Guide 2 Equipment Requirements 2 Patient Positioning and O.R. Setup 2 Staple
operative technique Universal Application
 operative technique Universal Application Introduction Introduction Building upon the design rationale of the Xia Spinal System, the new Xia Spinal System represents the latest advancement in spinal implant
TSLP Thoracolumbar Spine Locking Plate
 Anterior thoracolumbar spine locking plate TSLP Thoracolumbar Spine Locking Plate Surgical Technique Image intensifier control This description alone does not provide sufficient background for direct use
VIPER Cortical Fix Fenestrated Screw System. Surgical Technique for OPEN & MIS Procedures
 VIPER Cortical Fix Fenestrated Screw System Surgical Technique for OPEN & MIS Procedures Image intensifier control This description alone does not provide sufficient background for direct use of DePuy
In-Space. Interspinous distraction through a mini-open, posterior, unilateral approach.
 In-Space. Interspinous distraction through a mini-open, posterior, unilateral approach. Surgical Technique Posterior Approach PRODUCT OBSOLETED 30th September 2017 DSEM/SPN/0915/0348(1) This publication
XRL A modular expandable radiolucent vertebral body replacement system
 XRL A modular expandable radiolucent vertebral body replacement system This publication is not intended for distribution in the USA. SURGICAL TECHNIQUE Table of Contents Introduction XRL 2 AO Spine Principles
Distal Radius Plate Instrument and Implant Set. Discontinued December 2017 DSUS/TRM/0916/1063(1)
") Distal Radius Plate Instrument and Implant Set Surgical Technique Discontinued December 2017 DSUS/TRM/0916/1063(1) The Distal Radius Plates Indications For fixation of fractures and osteotomies, including
Distal Radius Plate Instrument and Implant Set Surgical Technique Discontinued December 2017 DSUS/TRM/0916/1063(1) The Distal Radius Plates Indications For fixation of fractures and osteotomies, including
NewBridge. Laminoplasty Fixation INTERNATIONAL EDITION
 NewBridge L A M I N O P L A S T Y F I X A T I O N S Y S T E M Laminoplasty Fixation INTERNATIONAL EDITION Table of Contents 1 INTRODUCTION 2 PRE-OPERATIVE 3 OPERATIVE 10 INSTRUCTIONS FOR USE 12 PART NUMBERS
T.L.I.F. Transforaminal Lumbar Interbody Fusion
 T.L.I.F. Transforaminal Lumbar Interbody Fusion Cover Surgical Header Technique Sub Guide header Introduction (T.L.I.F. ) technique has gained wide acceptance Additionally, the T.L.I.F. procedure avoids
Low Profile Neuro Plating System. Surgical Technique
 Low Profile Neuro Plating System Surgical Technique TABLE OF CONTENTS INTRODUCTION Low Profile Neuro Plating System 2 SURGICAL TECHNIQUE Technique 5 PRODUCT INFORMATION Low Profile Neuro Plates 10 Low
Lapidus Arthrodesis System Instructions for Use
 Lapidus Arthrodesis System Instructions for Use Description The AlignMATE Lapidus Arthrodesis System consists of bone plates and bone screws (locking, non-locking and interfragmentary), which are intended
In-Space. Percutaneous interspinous distraction.
 In-Space. Percutaneous interspinous distraction. Surgical Technique PRODUCT OBSOLETED 30th September 207 DSEM/SPN/095/0344() This publication is not intended for distribution in the USA. Instruments and
RAPIDSORB RAPID ReSORBABLe CRANIAL CLAMP
 RAPIDSORB RAPID ReSORBABLe CRANIAL CLAMP Resorbable fixation of cranial bone flaps SURGICAL TeCHNIQUe RAPIDSORB Rapid Resorbable CRANIAL CLAMP Indication DePuy Synthes Companies of Johnson & Johnson RAPIDSORB
ACP1 CERVICAL PLATE SPINAL SYSTEM SURGICAL TECHNIQUE GUIDE II.
 I. ACP1 CERVICAL PLATE II. SPINAL SYSTEM SURGICAL TECHNIQUE GUIDE I. Introduction The Gold Standard Orthopaedics, LLC ACP1 Spinal System was designed with surgeons to incorporate strength, functionality,