Clinical Skills in Hospitals Project Respiratory 1
|
|
|
- Bennett Sharp
- 5 years ago
- Views:
Transcription
 Module 9: Non-Invasive Ventilation (NIV) Module 10: Introduction to")
1 Clinical Skills in Hospitals Project Respiratory 1 Module 1: Pathophysiology Module 2: Respiratory assessment Module 3: Basic airway management Module 4: Oxygen therapy Module 5: Airway suctioning Respiratory 2 Module 6: Rapid sequence intubation Module 7: Tracheostomy care and management Module 8: Arterial Blood Gases (ABGs) Module 9: Non-Invasive Ventilation (NIV) Module 10: Introduction to mechanical ventilation
2
3 Clinical Skills in Hospitals Project Respiratory 1 Module 1: Pathophysiology Module 2: Respiratory assessment Module 3: Basic airway management Module 4: Oxygen therapy Module 5: Airway suctioning
4 ii Respiratory 1 Introduction Acknowledgments The authors wish to acknowledge the following people for their important contributions to this project: Dr Antony Tobin, Alicia Martin and Julian Van Dijk from St Vincent s Hospital, Melbourne, for their tireless efforts as the primary authors of Respiratory 1. Dr Robert O Brien, Dr Stuart Dilley and Matthew Williams at St Vincent s Education Centre for their contributions to this package. For further information please contact the project manager, Julian Van Dijk: (03) or julian.vandijk@svhm.org.au State of Victoria 2008 This publication is copyright. No part may be reproduced by any process except in accordance with the provisions of the Copyright Act The Clinical Skills Centres in Hospitals Training Materials ( Materials ) were developed for the Department of Human Services ( DHS ) for use by clinical educators ( Educators ). Any Educator wishing to use the Materials must review the Materials prior to use and ensure that they are suitable for the Educator s purpose, including the needs of the Educator s intended training recipients ( Training Recipients ). Some aspects of the Materials may not be relevant to some Educators or Training Recipients. Educators and Training Recipients must not represent themselves as employees or agents of DHS in their use of the Materials. Except at the time of publication, neither DHS nor the State of Victoria warrants the accuracy of the information contained in the Materials. Neither DHS nor the State of Victoria makes any warranty as to the appropriateness of the information to the circumstances of Educators or Training Recipients. The Materials may not include all of the information required by Educators or Training Recipients in providing or receiving clinical training. If in doubt, Educators and Training Recipients should seek their own advice about the interpretation of the Materials. Any Educator or Training Recipient using the Materials does so at their own risk and shall accept responsibility for any actions arising from their use. DHS may update the Materials at its own discretion, but is not responsible for the provision of updates to the Materials. No responsibility is taken for failure to update the Materials and it is the responsibility of the Educator to ensure that the information contained in the Materials is up to date and reflects current medical practice, law and guidelines.
5 Respiratory 1 Introduction iii Preface In 2007 the Department of Human Services commissioned St Vincent s Hospital Melbourne, to design and develop simulation-based training packages for clinical skills trainers in Victorian hospitals. The project provides Victorian health professionals specifically, hospital clinical educators with a resource to deliver simulation-based clinical skills training. The information in this manual complements current training programs and should be considered as a resource in the workplace, rather than the definitive resource on the topic. Every effort has been made to provide the most current literature references. Authors have consulted other health professionals and current programs when possible in development to ensure that the modules produced in this package are consistent with current health practices.
6
7 Respiratory 1 Introduction v Course delivery in condensed form Sample timetable for one-day workshop This is an example of how the modules in Respiratory 1 could be combined into a one-day workshop. A sample timetable is provided for a course consisting of Modules 1, 2, 3, 4 and 5. Course 1 (Modules 1, 2, 3, 4 and 5) Timing Activity Objective 8.30 to 8.45 Introduction faculty and participants 8.45 to 9.15 Facilitated discussion Module 1: 1, 2, to 9.45 Case scenarios (three) Module 1: to 9.55 Summary of main points from Module 1 Module 1: all to Morning tea to Facilitated discussion Module 2: 1, 2 Group 1 Group 2 Module 2: 3 and to Scenarios Skills stations Module 2: 3 and to Skills stations Scenarios Module 2: 3 and to Summary of main points from Module 2 Module 2: all to Facilitated discussion Module 3: to 1.00 Skills stations Module 3: 2 and to 1.10 Summary of main points from Module 1 Module 3: all 1.10 to 1.55 Lunch 2.00 to 2.20 Facilitated discussion Module 4: 1, 2 and to 2.45 Skills stations Module 4: 3, to 3.15 Case studies Module 4: to 3.25 Summary of main points from Module 4 Module to 3.50 Afternoon tea Module 5: all 3.15 to 3.30 Afternoon tea 3.30 to 4.10 Facilitated discussion (with or without DVD) Module 5: 1, 2, 3, 4 and to 4.50 Skills stations Module 5: 4, to 5.00 Summary of main points from Module 5 Course evaluation Module 5: all
8
9 Respiratory 1 Introduction vii Respiratory 1 Introduction Respiratory 1 was developed as a teaching and learning tool for Victorian clinical educators. The information contained in each module was developed using evidencebased resources and examples of best practice. Where expert opinion varies, a discussion section is included. However, it is not within the scope of Respiratory 1 to address the full spectrum of local variations. Variations can occur in several areas, including practices relating to types of equipment used, infection control processes, practice guidelines and so on. Therefore, where appropriate, educators should adapt content to reflect their local policies, procedures and protocols. This should ensure the relevancy of the package content to learners. The modules are designed to be discrete courses in their own right. They are timetabled so they can be completed within a 1 2 hour timeframe. This timeframe was chosen after we received feedback from clinical educators requesting shorter courses, because health professionals often have limited time to educate away from patients. However, the packages can also be combined into a one- or two-day course, as as described in the module outline. Respiratory 1 should be used as an educational tool to assist the teaching of clinical skills. It is structured as a guide to assist clinical educators, and uses many concepts taught in the Clinical Skills in Hospitals Project (Train-the-Trainer courses). Educators are encouraged to build on this resource by adding their own scenarios which incorporate hospital/health service protocols, policies and other resources. Each module is designed as a lesson plan to incorporate simulation into the teaching of clinical skills. Aims Respiratory 1 aims to make participants confident in their application of respiratory knowledge and skills on adults in different environments and settings. Package structure Respiratory 1 is the first of two packages, each containing five modules. These packages contain learning opportunities for health professionals at all levels of experience and from all health disciplines. Modules 1, 2 and 3 are regarded as fundamental. Modules 4 and 5 are more difficult, and are regarded as intermediate. Respiratory 2 contains Modules 6 10, which are considered intermediate to complex.
10 viii Respiratory 1 Introduction Level of complexity Package structure Complex For participants with more than 4 years experience or who have completed Modules 1 4 Intermediate For participants in postgraduate years 3 4 or who have completed Modules 1 and 2 Fundamental For participants in postgraduate years 1 2 Pathophysiology O 2 therapy Respiratory package 2 Respiratory assessment Airway suction management Basic airway management Respiratory 1 includes modules on respiratory pathophysiology, assessment, oxygen therapy, suctioning and basic airway management skills. Respiratory 1 was designed to develop participants knowledge, skills and behaviours in the use of respiratory skills and practices. It also provides exposure to increasingly complex scenarios aimed at testing participants ability to combine these individual skills, work as a team and problem solve in more difficult situations. Educators delivering these modules should be aware of participants level of experience and choose appropriate modules. Modules presume an increasing level of knowledge as they progress, ranging from basic anatomy and physiology for the fundamental modules, up to detailed knowledge of respiratory practices for the complex modules. Novice participants (such as first-year graduates) are expected to start with the fundamental modules, and only move onto intermediate and more complex modules as they demonstrate proficiency. More experienced participants may start at the intermediate level if the educator is satisfied that they have sufficient prior knowledge and skills. Individual educators are responsible for assessing each participant s baseline knowledge and determining which modules they need to complete. More specific descriptions of presumed knowledge are outlined in each module.
11 Respiratory 1 Introduction ix The design of these packages presumes that the clinical educators using them have knowledge and expertise in current best practice for the teaching of clinical skills and conducting facilitated discussions. Knowledge and expertise are presumed commensurate with the Department of Human Services basic and advanced Train-the-Trainer programs. Clinical educators are encouraged to refer to the Department of Human Services Clinical Skills Facilitators Manual for theory on: 1. Peyton s model for teaching clinical skills 2. leading small group discussions 3. giving feedback 4. crisis resource management skills.
12
13 Respiratory 1 Module 1: Pathophysiology 1 Module 1: Pathophysiology Introduction Respiratory 1 was developed as a teaching and learning tool for Victorian clinical educators. The information contained in each module was developed using evidencebased resources and examples of best practice. Where expert opinion varies, a discussion section is included. However, it is not within the scope of Respiratory 1 to address the full spectrum of local variations. Variations can occur in several areas, including practices relating to types of equipment used, infection control processes, practice guidelines and so on. Therefore, where appropriate, educators should adapt content to reflect their local policies, procedures and protocols. This should ensure the relevancy of the package content to learners. The modules are designed to be discrete courses in their own right. They are timetabled so they can be completed within a 1 2 hour timeframe. This timeframe was chosen after we received feedback from clinical educators requesting shorter courses, because health professionals often have limited time to educate away from patients. However, the packages can also be combined into a one- or two-day course, as as described in the module Outline. Respiratory 1 should be used as an educational tool to assist the teaching of clinical skills. It is structured as a guide to assist clinical educators, and uses many concepts taught in the Clinical Skills in Hospitals Project (Train-the-Trainer courses). Educators are encouraged to build on this resource by adding their own scenarios which incorporate hospital/health service protocols, policies and other resources. Each module is designed as a lesson plan to incorporate simulation into the teaching of clinical skills. Aims Respiratory 1 aims to make participants confident in their application of respiratory knowledge and skills on adults in different environments and settings. Package structure Respiratory 1 is the first of two packages, each containing five modules. These packages contain learning opportunities for health professionals at all levels of experience and from all health disciplines. Modules 1, 2 and 3 are regarded as fundamental. Modules 4 and 5 are more difficult, and are regarded as intermediate. Respiratory 2 contains Modules 6 10, which are considered intermediate to complex.
14 2 Respiratory 1 Module 1: Pathophysiology Level of complexity Package structure Complex For participants with more than 4 years experience or who have completed Modules 1 4 Intermediate For participants in postgraduate years 3 4 or who have completed Modules 1 and 2 Fundamental For participants in postgraduate years 1 2 Pathophysiology O 2 therapy Respiratory package 2 Respiratory assessment Airway suction management Basic airway management Respiratory 1 includes modules on respiratory pathophysiology, assessment, oxygen therapy, suctioning and basic airway management skills. Respiratory 1 was designed to develop participants knowledge, skills and behaviours in the use of respiratory skills and practices. It also provides exposure to increasingly complex scenarios aimed at testing participants ability to combine these individual skills, work as a team and problem solve in more difficult situations. Educators delivering these modules should be aware of participants level of experience and choose appropriate modules. Modules presume an increasing level of knowledge as they progress, ranging from basic anatomy and physiology for the fundamental modules, up to detailed knowledge of respiratory practices for the complex modules. Novice participants (such as first-year graduates) are expected to start with the fundamental modules, and only move onto intermediate and more complex modules as they demonstrate proficiency. More experienced participants may start at the intermediate level if the educator is satisfied that they have sufficient prior knowledge and skills. Individual educators are responsible for assessing each participant s baseline knowledge and determining which modules they need to complete. More specific descriptions of presumed knowledge are outlined in each module.
15 Respiratory 1 Module 1: Pathophysiology 3 The design of these packages presumes that the clinical educators using them have knowledge and expertise in current best practice for the teaching of clinical skills and conducting facilitated discussions. Knowledge and expertise are presumed commensurate with the Department of Human Services basic and advanced Train-the-Trainer programs. Clinical educators are encouraged to refer to the Department of Human Services Clinical Skills Facilitators Manual for theory on: 1. Peyton s model for teaching clinical skills 2. leading small group discussions 3. giving feedback 4. crisis resource management skills.
16
17 Respiratory 1 Module 1: Pathophysiology 5 Module 1: Pathophysiology Authors: Dr Antony Tobin, Julian Van Dijk Aims The purpose of this module is to teach, and/or consolidate participants knowledge of, the pathophysiology of respiratory failure. Presumed knowledge This module is targeted to health professionals with a basic understanding of respiratory physiology. Presumed prior knowledge includes: 1. respiratory anatomy and physiology 2. cardiovascular anatomy and physiology 3. familiarity with common medical conditions. Objectives By the end of this module, participants should have: 1. revised the fundamentals of respiratory physiology 2. discussed the types of respiratory failure and their underlying pathophysiology 3. discussed the clinical signs of respiratory failure 4. participated in case scenarios identifying the type of respiratory failure and likely causes. Background information for educators Respiratory failure The term respiratory system refers not only to the lungs, but also includes parts of the brain, nervous system and musculoskeletal system involved in respiration. The principle function the respiratory system is to provide gas exchange appropriate to the body s needs during rest and exercise. This involves the uptake of oxygen and removal of carbon dioxide to meet the body s metabolic requirements. Respiratory failure occurs when the respiratory system cannot meet the body s gas exchange requirements. Breathing entails the contraction of respiratory muscles to generate a negative intrathoracic pressure. This produces the movement of environmental air into the lungs. Once inside the lung, oxygen moves across the alveolar membrane into the blood, and carbon dioxide (CO 2 ) is released from the blood into the alveoli. The oxygen is delivered to the body via circulation, and carbon dioxide is exhaled as the intrathoracic pressure rises again during exhalation.
18 6 Respiratory 1 Module 1: Pathophysiology Traditionally, respiratory failure is divided into two types: 1. oxygenation failure, which occurs when the normal oxygen content of the blood cannot be maintained by the lungs usual compensatory mechanisms. 2. ventilatory failure, which refers to inadequate alveolar ventilation resulting in increased carbon dioxide levels and reduced oxygen levels. Oxygenation failure In the ideally functioning lung, ventilation or air delivery to the alveoli is roughly equal to the blood flowing through the alveoli that is, blood flow and ventilation are matched. Hypoxia and respiratory failure essentially occur when the air and blood movement in the lung is unbalanced, or when in some parts of the lung ventilation is greater than blood flow, and in other parts of the lung blood flow is greater than ventilation. This is inefficient for oxygen uptake, and the lungs ability to transfer oxygen from the inspired air to blood is reduced, resulting in low oxygen levels or hypoxia. This process is called ventilation/perfusion mismatch (V/Q mismatch). The body s compensatory mechanism in response to V/Q mismatch is to increase ventilation, which only partially corrects blood oxygenation. Disease processes in the lung that cause hypoxic respiratory failure can be broadly grouped into: 1. parenchymal diseases 2. airway diseases 3. pulmonary vascular disease. Examples include: 1. parenchymal pneumonia, cardiac failure, pulmonary fibrosis 2. airway asthma, COPD 3. pulmonary vascular pulmonary embolism. The normal arterial oxygen tension at sea level in healthy people is approximately mmhg, depending on age. This equates to an oxygen saturation of %. Oxygenation failure is usually defined as an arterial oxygen tension of below 60 mmhg, which equates to an arterial oxygen saturation of 90%. This level is chosen because at oxygen tensions below 60 mmhg, oxygen saturations drop quite quickly (due to the sigmoid shape of the oxygen haemoglobin dissociation curve). Because oxygen delivery to the tissues is a function of cardiac output, haemoglobin and oxygen saturations, oxygen delivery drops quickly at these levels, potentially causing tissue hypoxia and death.
 below 60 lead to")
19 Respiratory 1 Module 1: Pathophysiology 7 Figure 1: Oxygen-Haemoglobin Dissociation Curve The figure above shows the an oxygen dissociation curve. Note: there is very little increase in saturations for increases in PaO 2 above 60 mmhg, whereas relatively small changes in PaO 2 (partial pressure of oxygen in arterial blood) below 60 lead to large changes in saturations. The PaO 2 of normal venous blood is 75%, corresponding to a PaO 2 of 40 mmhg. Treatment The principle treatment is supplemental oxygen while therapy is directed at the underlying cause. Ventilatory failure Ventilation is the movement of air in and out of the alveoli, and occurs when signals from the brain are transmitted via the spinal cord and nerves to the respiratory muscles. The respiratory muscles contract and relax in response, causing expansion and contraction of the chest and the movement of air in and out of the lungs. This mechanism is analogous to a pump whose work depends on the stiffness of the lungs, the resistance in the airways (the energy required to move air through the airways), the stiffness of the chest wall and the body s metabolic needs. Ventilatory failure occurs either when there is some primary failure in the pump mechanism (brain, spine, nerves or muscle) or the work demanded of the pump is too great. Carbon dioxide levels are inversely proportional to alveolar ventilation. When ventilatory failure occurs, movement of air in and out of the alveoli is reduced relative to the body s needs, and consequently, carbon dioxide levels increase. As carbon dioxide levels increase, oxygen tension in the alveoli decreases, leading to arterial hypoxia. Hypoxia may also occur due to an intrinsic lung process that causes ventilatory failure due to excessive work demands, for example, severe pneumonia.
20 8 Respiratory 1 Module 1: Pathophysiology The causes of ventilatory failure can be divided into several broad groups: primary pump failure and excessive work. 1. Primary pump failure a. central nervous system (CNS) stroke, trauma, drugs (morphine, sedatives) b. spinal cord trauma, demyelination, compression, polio c. peripheral nerves demyelination, drugs, trauma, myasthenia gravis d. muscles myositis. 2. Excessive work a. parenchymal pneumonia, cardiac failure, pulmonary fibrosis b. airway asthma, chronic obstructive pulmonary disease (COPD), upper airway obstruction c. chest wall kyphoscoliosis, fractured ribs, pleural thickening/effusions d. metabolic acidosis (diabetic ketoacidosis (DKA), renal failure). Normal arterial CO 2 levels are mmhg with an associated ph of Ventilatory failure is said to be present when the arterial pco 2 level is above 45. Treatment Hypoxia kills, and while supplemental oxygen does not address the underlying problem in ventilatory failure it is vital that supplemental oxygen is given to prevent tissue hypoxia. Treatment to reverse alveolar hypoventilation depends on the underlying cause. Respiratory depression due to drugs may be reversed with specific antagonists (morphine reversal with naloxone) and hypoventilation due to lung pathology (for example, acute pulmonary oedema (APO) or asthma) may be reversed by specific treatment. However, alveolar hypoventilation often requires mechanical assistance with a respiratory pump while the underlying problem is treated. This may be administered non-invasively, via a tight-fitting facemask, or invasively, by tracheal intubation. These techniques allow time for treatments to take effect and the underlying process causing hypoventilation to resolve. CO 2 retainers requiring oxygen therapy often lead to treatment confusion amongst health professionals. As mentioned above, hypoxia kills, and oxygen therapy should not be withheld if indicated. However, this group of patients will require informed health professional management for the duration of that therapy. Points on safe oxygen therapy for pco 2 retaining patients are covered in Respiratory 1 Module 4: Oxygen therapy.
21 Respiratory 1 Module 1: Pathophysiology 9 Respiratory failure summary Type 1 Oxygenation failure PaO 2 < 60 mmhg Type 2 Ventilation failure PaCO 2 > 45 mmhg Primary pump failure Excessive work Potential courses Potential courses Potential courses Parenchymal Pneumonia Cardiac failure Pulmonary fibrosis CNS Stroke Trauma Drugs Parenchymal Pneumonia Cardiac failure Pulmonary fibrosis Airway Asthma COPD Pulmonary vascular Pulmonary embolism Spinal cord Trauma Demyelination Compression Polio Peripheral nerves Trauma Demyelination Drugs Myasthenia gravis Muscle Myositis Airway Upper airway obstruction Asthma COPD Chest wall Kyphoscoliosis Fractured ribs Plural thickening Effusions Pneumothoraces Metabolic Acidosis (DKS/renal failure)
22 10 Respiratory 1 Module 1: Pathophysiology Recognising respiratory failure Because the causes of respiratory failure are varied, no one clinical presentation describes it satisfactorily, but some features are common to most cases: respiratory compensation increased sympathetic tone haemoglobin desaturation. tissue hypoxia. A. Respiratory compensation 1. tachypnoea tachypnoea is generally present; however, in some causes of ventilatory failure, bradypnoea (low respiratory rate) may be the cardinal sign, for example, narcotic overdose or cerebrovascular accident or terminal event 2. use of accessory muscles in an attempt to increase ventilation or overcome excessive work of breathing, the shoulder girdle, neck and arm muscles are used to augment ventilation 3. nasal flaring a sign of increased respiratory drive 4. intercostal, suprasternal or supraclavicular recession signs of large intrathoracic pressure changes 5. paradoxical abdominal movement the abdomen and chest rise and fall in synchrony in normal respiration; dysynchrony is a sign of impending fatigue or muscle weakness. B. Increased sympathetic tone 1. tachycardia 2. hypertension 3. sweating. C. End-organ hypoxia 1. altered mental status: a. hypoxia may cause confusion, agitation or disorientation b. hypercapnia may cause drowsiness or coma 2. bradycardia and hypotension (late signs). D. Haemoglobin desaturation 1. cyanosis 2. pulse oximetry 3. arterial blood gas analysis.
23 Respiratory 1 Module 1: Pathophysiology 11 Recognition of respiratory failure summary A Respiratory compensation Tachypnoea Use of accessory muscles Nasal flaring Intercostal, suprasternal, supraclavicular recession Paradoxical abdominal movement B Increased sympathetic tone Tachycardia Hypertension Sweating C End organ hypoxia Altered mental state: confusion agitation disorientation Bradycardia and hypotension (late sign) D Haemoglobin desaturation Cyanosis Pulse oximetry Arterial blood gas analysis
24 12 Respiratory 1 Module 1: Pathophysiology Learning activities Participants work through case scenarios with the facilitator to illustrate the different mechanisms of respiratory failure and highlight the differences between hypoxic and hypercapnic respiratory failure. Timing Activity Objective 30 minutes Facilitated discussion 1, 2 and 3 30 minutes Case scenarios (three) year-old smoker year-old obese woman year-old diabetic smoker 10 minutes Summary All 5 minutes Evaluation Time: 1 hour 15 minutes Facilitated discussion The facilitator may use the PowerPoint presentation to summarise this information, but should not give a didactic lecture instead promoting open discussion. This should include sharing and reflection on participants knowledge and previous experiences. Suitable question time should be accommodated. Case scenarios The facilitator introduces three case scenarios for discussion, each requiring approximately 10 minutes. Instructions The facilitator can instruct the group to work through each case in groups of two, or as a larger group of up to six. Allow 5 10 minutes for each group to identify the type of failure and contributing factors. Reconvene the groups and discuss their findings as a whole. To aid the post-scenario discussion, points that you would expect different discipline group to identify are provided. Note: Arterial blood gas (ABG) results are provided as part of the data set for each scenario. However, depending on the level of experience or area of clinical work, not all disciplines will have experience in ABG interpretation. It is not the objective of this module to teach ABG interpretations this is the focus of the ABG module in Respiratory 2. Encourage participant groups with minimal or no understating of ABGs to consider the CO 2 and O 2 values only, and what might cause these abnormalities.
25 Respiratory 1 Module 1: Pathophysiology 13 Encourage experienced health professionals familiar with ABGs to present their analyses of the ABGs provided and discuss how these support their finding. Scenario 1 Setting: Surgical unit 65-year-old smoker calls for a nurse two days after an open cholecystectomy. He complains of breathlessness and chest pain. SpO 2 = 87% on room air. Arterial blood gas results ABG Normal values Scenario 1 results ph PaCO PaO HCO Expected identifiable courses of respiratory failure and contributing factors General nursing and allied health professionals are expected to recognise hypoxic respiratory failure and suggest post-operative chest infection or atelectasis as the cause for hypoxia. More advanced health professionals are expected to recognise hypoxic respiratory failure and consider a broad list of potential causes, including infection, pulmonary embolism, infective exacerbation, pain with atelectasis and myocardial ischaemia with pulmonary congestion. Assessment and management can be mentioned, but is not the focus of the module. Scenario 2 Setting: Surgical unit A 76-year-old obese woman with a past history of vascular disease and hypertension is found unconscious on routine observations 1 hour after returning from major abdominal surgery. SpO 2 = 83% on room air. Arterial blood gas results ABG Normal values Scenario 2 results ph PaCO PaO HCO
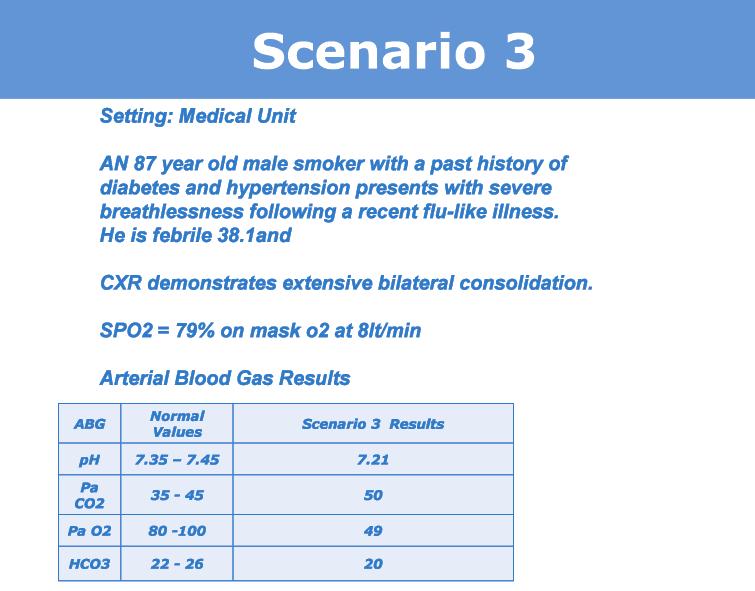
26 14 Respiratory 1 Module 1: Pathophysiology Expected identifiable courses of respiratory failure and contributing factors General nursing and allied health members should recognise hypercapnic respiratory failure with associated hypoxia. In the pre-operative setting they should consider anaesthetic causes (such as narcotics) as the cause for the respiratory failure. They should clearly identify the mechanism by which anaesthetic drugs may cause postoperative ventilatory failure namely: CNS depression (residual neuromuscular blockade, but a more advanced diagnosis). In discussing the associated hypoxia, they should recall that hypercapnia causes hypoxia without necessarily associated lung abnormalities. More advanced health professionals are expected to consider anaesthetic drugs with or without obstructive sleep apnoea, cerebrovascular event, obesity hypoventilation syndrome exacerbated by anaesthesia and abdominal splinting. They should note that the hypoxia is purely due to hypoventilation (using the alveolar gas equation) and hence a central cause drug or cardiovascular accident (CVA) is most likely. Scenario 3 Setting: Medical unit An 87-year-old male smoker with a past history of diabetes and hypertension presents with severe breathlessness following a recent flu-like illness. He is febrile 38.1 and chest X-ray (CXR) demonstrates extensive bilateral consolidation. SpO 2 = 79% on mask O 2 at 8 litres per minute. Arterial blood gas results ABG Normal values Scenario 3 results ph PaCO PaO HCO
27 Respiratory 1 Module 1: Pathophysiology 15 Expected identifiable courses of respiratory failure and contributing factors General nursing and allied health members should recognise hypercapnic respiratory failure with associated hypoxia. The recent infective illness should raise the possibility of pneumonia. They should recall that parenchymal diseases generally cause hypoxic respiratory failure. Through discussion of the mechanism of hypercapnic respiratory failure, they should deduce that the pneumonia is causing hypoxia, but also that the excessive work of breathing led to hypoventilation. More advanced health professionals are expected to consider superadded airways disease or cardiac failure as potentially contributing to hypercapnic respiratory failure. Medical professionals may also recognise the mixed acidosis. Resources Resource Quantity Additional comments Facilitators 2:12 PowerPoint presentation 1 CD in back cover of module Case study handouts 1 set Module Appendices 1a 1c Summary sheets 1 set Module Appendices 2 and 3 Summary The summary reinforces the content covered in the facilitated discussion and scenarios. The summary should also allow time for participants to reflect on what they have learned. No new information should be introduced. Major points to revise in the summary include: major functions of the respiratory system characteristics of hypoxic and hypercapnic respiratory failure mechanisms of hypoxic and hypercapnic respiratory failure clinical features of respiratory failure.
28 16 Respiratory 1 Module 1: Pathophysiology Evaluation A formal evaluation has been specifically developed for this module. It incorporates the objectives of the module and the perceptions of the participants about whether they have increased their understanding by working through the module. It is highly recommended that this formal evaluation be copied and completed by all participants at the completion of the module. A range of informal evaluation tools may also be used in conjunction with this evaluation throughout the module, including those available in the Department of Human Services Clinical Skills Facilitators Manual from the basic course conducted in Reference 1. The oxyhaemoglobin dissociation curve calculator at: resources/oxydisso/oxydisso.html
29 Respiratory 1 Module 1: Pathophysiology 17 Resources Facilitator feedback form The following form should be used to assist you to give feedback after each participant has practised their pathophysiology skills at the skill station. Feedback using the Pendleton model Pendleton s model of feedback assists learners to maximize their potential at different stages of training, raise their awareness of strengths and areas for improvement, and identify actions to be taken to improve performance. Pendleton s rules are structured in such a way that the learner identifies the positives first, in order to create a safe environment. This is followed by the facilitator or group reinforcing these positives and discussing skills to achieve them. Different techniques are then suggested. The advantage of this method is that the learner s strengths are discussed first. Avoiding a discussion of weaknesses right at the beginning prevents defensiveness and allows reflective behaviour in the learner. Below is a series of questions to assist you in this technique: 1. Ask the learner how they feel. 2. Ask the learner what went well and why (this can be combined with question 1 and 3). 3. Tell the learner what went well and why. 4. Ask the learner what could have been done better and why. 5. Tell the learner what could have been done better and why. 6. Summarise the learner s strengths and identify up to three things to concentrate on. Note: This form does not need to be given to the participant it is a guide for you, the group facilitator.
30 18 Respiratory 1 Module 1: Pathophysiology Module 1: Pathophysiology evaluation Thank you for participating in this module. As part of our commitment to quality improvement the following questionnaire will be used to plan future implementation of this module. We appreciate your time completing this evaluation. 1. Overall How would you rate this module? poor fair good very good outstanding 2. Learning objectives Please consider whether this module was successful in meeting the following learning objectives: Respiratory 1 Learning objectives of Module 1: Pathophysiology Strongly disagree Disagree Slightly agree Agree Strongly agree Revised fundamentals of respiratory physiology Discussed the types of respiratory failure and their underlying pathophysiology Discussed the clinical signs of respiratory failure Participated in case scenarios identifying the type of respiratory failure and likely causes Revised fundamentals of respiratory physiology 3. Important learning outcomes What are the three most important things you have learned from this module?
31 Respiratory 1 Module 1: Pathophysiology Module implementation Please indicate to what extent you agree or disagree with each of the following statements in relation to the implementation of the module. Strongly disagree Disagree Slightly agree Agree Strongly agree The facilitator respected my experience The facilitator encouraged my participation I was able to ask the facilitator questions The facilitator was able to answer my questions The feedback I received was clear The feedback I received will assist me in my future performance There was adequate time for the skills stations There was adequate time for the facilitated discussions There was adequate time for the simulations I have increased my confidence in understanding respiratory pathophysiology I have identified future learning needs in this topic area 5. Future module implementation Do you think the module should be altered in any way? yes no If yes, what recommendations do you have? Thank you


32 20 Respiratory 1 Module 1: Pathophysiology PowerPoint presentation

33 Respiratory 1 Module 1: Pathophysiology
34
35 Respiratory 1 Module 1: Pathophysiology 23 Appendix 1: Case scenarios arterial blood gas results Scenario 1 Setting: Surgical unit A 65-year-old smoker calls for a nurse two days after an open cholecystectomy. He complains of breathlessness and chest pain. SpO 2 = 87% on room air. Arterial blood gas results ABG Normal values Scenario 1 results ph PaCO PaO HCO Scenario 2 Setting: Surgical unit A 76-year-old obese woman with a past history of vascular disease and hypertension is found unconscious on routine observations 1 hour after returning from major abdominal surgery. SpO2 = 83% on room air. Arterial blood gas results ABG Normal values Scenario 2 results ph PaCO PaO HCO
36 24 Respiratory 1 Module 1: Pathophysiology Scenario 3 Setting: Medical unit An 87-year-old male smoker with a past history of diabetes and hypertension presents with severe breathlessness following a recent flu-like illness. He is febrile 38.1 and chest X-ray (CXR) demonstrates extensive bilateral consolidation. SpO 2 = 79% on mask O 2 at 8 litres per minute. Arterial blood gas results ABG Normal values Scenario 3 results ph PaCO PaO HCO
37 Respiratory 1 Module 1: Pathophysiology 25 Appendix 2: Respiratory failure summary Respiratory failure summary Oxygenation failure PaO 2 < 60 mmhg Ventilation failure PaCO 2 > 45 mmhg Primary pump failure Excessive work Potential courses Potential courses Potential courses Parenchymal Pneumonia Cardiac failure Pulmonary fibrosis Airway Asthma COPD Pulmonary vascular Pulmonary embolism CNS Stroke Trauma Drugs Spinal cord Trauma Demyelination Compression Polio Peripheral nerves Trauma Demyelination Drugs Myasthenia gravis Muscle Myositis Parenchymal Pneumonia Cardiac failure Pulmonary fibrosis Airway Upper airway obstruction Asthma COPD Chest wall Kyphoscoliosis Fractured ribs Plural thickening Effusions Pneumothoraces Metabolic Acidosis (DKS/renal failure)
38 26 Respiratory 1 Module 1: Pathophysiology Appendix 3: Recognising respiratory failure Recognition of respiratory failure summary A Respiratory compensation Tachypnoea Use of accessory muscles Nasal flaring Intercostal, suprasternal, supraclavicular recession Paradoxical abdominal movement B Increased sympathetic tone Tachycardia Hypertension Sweating C End organ hypoxia Altered mental state: confusion agitation disorientation Bradycardia and hypotension (late sign) D Haemoglobin desaturation Cyanosis Pulse oximetry Arterial blood gas analysis
39 Respiratory 1 Module 2: Respiratory assessment 27 Module 2: Respiratory assessment Introduction Respiratory 1 was developed as a teaching and learning tool for Victorian clinical educators. The information contained in each module was developed using evidencebased resources and examples of best practice. Where expert opinion varies, a discussion section is included. However, it is not within the scope of Respiratory 1 to address the full spectrum of local variations. Variations can occur in several areas, including practices relating to types of equipment used, infection control processes, practice guidelines and so on. Therefore, where appropriate, educators should adapt content to reflect their local policies, procedures and protocols. This should ensure the relevancy of the package content to learners. The modules are designed to be discrete courses in their own right. They are timetabled so they can be completed within a 1 2 hour timeframe. This timeframe was chosen after we received feedback from clinical educators requesting shorter courses, because health professionals often have limited time to educate away from patients. However, the packages can also be combined into a one-or two-day course, as as described in the module outline. Respiratory 1 should be used as an educational tool to assist the teaching of clinical skills. It is structured as a guide to assist clinical educators, and uses many concepts taught in the Clinical Skills in Hospitals Project (Train-the-Trainer courses). Educators are encouraged to build on this resource by adding their own scenarios which incorporate hospital/health service protocols, policies and other resources. Each module is designed as a lesson plan to incorporate simulation into the teaching of clinical skills. Aims Respiratory 1 aims to make participants confident in their application of respiratory knowledge and skills on adults in different environments and settings. Package structure Respiratory 1 is the first of two packages, each containing five modules. These packages contain learning opportunities for health professionals at all levels of experience and from all health disciplines. Modules 1, 2 and 3 are regarded as fundamental. Modules 4 and 5 are more difficult, and are regarded as intermediate. Respiratory 2 contains Modules 6 10, which are considered intermediate to complex.
40 28 Respiratory 1 Module 2: Respiratory assessment Level of complexity Package structure Complex For participants with more than 4 years experience or who have completed Modules 1 4 Respiratory package 2 Intermediate For participants in postgraduate years 3 4 or who have completed Modules 1 and 2 O 2 therapy Airway suction management Fundamental For participants in postgraduate years 1 2 Pathophysiology Respiratory assessment Basic airway management Respiratory 1 includes modules on respiratory pathophysiology, assessment, oxygen therapy, suctioning and basic airway management skills. Respiratory 1 was designed to develop participants knowledge, skills and behaviours in the use of respiratory skills and practices. It also provides exposure to increasingly complex scenarios aimed at testing participants ability to combine these individual skills, work as a team and problem solve in more difficult situations. Educators delivering these modules should be aware of participants level of experience and choose appropriate modules. Modules presume an increasing level of knowledge as they progress, ranging from basic anatomy and physiology for the fundamental modules, up to detailed knowledge of respiratory practices for the complex modules. Novice participants (such as first-year graduates) are expected to start with the fundamental modules, and only move onto intermediate and more complex modules as they demonstrate proficiency. More experienced participants may start at the intermediate level if the educator is satisfied that they have sufficient prior knowledge and skills. Individual educators are responsible for assessing each participant s baseline knowledge and determining which modules they need to complete. More specific descriptions of presumed knowledge are outlined in each module.
41 Respiratory 1 Module 2: Respiratory assessment 29 The design of these packages presumes that the clinical educators using them have knowledge and expertise in current best practice for the teaching of clinical skills and conducting facilitated discussions. Knowledge and expertise are presumed commensurate with the Department of Human Services basic and advanced Train-the-Trainer programs. Clinical educators are encouraged to refer to the Department of Human Services Clinical Skills Facilitators Manual for theory on: Peyton s model for teaching clinical skills leading small group discussions giving feedback crisis resource management skills.
42
43 Respiratory 1 Module 2: Respiratory assessment 31 Module 2: Respiratory assessment Author: Dr Antony Tobin Aims This module presents a framework for the thorough assessment of patients presenting with respiratory symptoms and respiratory disease. Presumed knowledge This module is aimed at health professionals with clinical experience of patients and respiratory disease who wish to refine their approach to the assessment of respiratory patients. It assumes an understanding of: basic anatomy respiratory pathophysiology (Module 1) some knowledge of common illnesses that result in respiratory symptoms clinical experience, including interaction with patients presenting with respiratory symptoms. Objectives Revise the initial approach to the unresponsive subject. Learn a method for the systematic assessment of subjects with respiratory symptoms. Use respiratory assessment skills to take a respiratory history. Perform a respiratory assessment on a manikin or subject. Background information for educators This module breaks down respiratory assessment into four broad categories: initial assessment history vital signs and observation examination. Initial assessment Quickly assess patient responsiveness. If unresponsive, proceed to BLS: call for help Danger assess for hazards Response check patient for response to stimuli - verbal or physical Airway airway patency positioning and airway clearance Breathing assess breathing and provide rescue breathing if needed Circulation cardiac compressions if unresponsive and not breathing Defibrillation using AED.
44 32 Respiratory 1 Module 2: Respiratory assessment If the patient is responsive, assess their respiratory system function in a logical manner. The exact order and focus depend on the severity of symptoms and perceived urgency. History Together with observation, the patient s history provides most of the information required for assessing the respiratory system. History may be very brief in emergency situations, but quite long and detailed when assessing sub-acute or chronic problems. Items to consider in the history include: presenting complaint why has the person presented today? current symptoms: a) shortness of breath breathlessness is a subjective sensation that breathing is excessive, difficult or uncomfortable for the given circumstance it may be sudden or gradual in onset, persistent or intermittent, related to exertion or occur at rest, and it may be related to posture, such as lying down (orthopnoea) b) cough cough may be dry or productive, and may reflect respiratory or cardiac disease c) sputum the colour and quantity should be determined; yellow or green sputum often but not always signifies infection d) haemoptysis determine amount and whether it is fresh or old e) pain determine its site and nature; pleuritic pain is chest pain that increases on inspiration and should be differentiated from cardiac pain, musculoskeletal and oesophageal pain recent procedures and problems recent operations, anaesthetics or medical problems (such as stroke or myocardial infarction) may be relevant to new respiratory problems past history especially cardiac and pulmonary problems and smoking history drugs and allergies drugs may give some indication of underlying problems when the subject cannot give a detailed history.
45 Respiratory 1 Module 2: Respiratory assessment 33 Observation and vital signs Detailed observation, in addition to measurement of vital signs, is often sufficient to generate a working diagnosis, which is then confirmed with examination and investigations. 1. Vital signs, along with observation, are an essential part of the respiratory assessment, and include: a) respiratory rate this should be timed over 30 seconds; normal is between 10 and 20 b) heart rate tachycardia is a common sign in respiratory distress and reflects increased sympathetic activity; bradycardia is a late sign of severe hypoxia c) blood pressure d) SpO 2 pulse oximetry is the most important of the vital signs in the respiratory assessment because it provides immediate assessment of oxygenation and guides the need for initiation or modification of oxygen therapy. 2. Conscious state: a) alert, orientated and calm suggests that there is adequate respiratory reserve/ compensation exists b) ability to speak the ability to speak comfortably is a marker of the severity of breathlessness; ability to speak only in short phrases or single words suggests severe breathlessness c) agitated, anxious, restlessness or confused while this may represent primary neurological problems or other systemic disease, hypoxia may be present d) drowsy, lethargic or morning headaches these should prompt consideration of carbon dioxide retention, although again, it may represent primary neurological disease Comfort at rest simply assessing whether the patient is comfortable lying or sitting is often a good guide to the severity of disease. Respiratory effort and breathing pattern both the effort related to breathing and its rate and rhythm should be observed: a) accessory muscle use the shoulder girdle and neck muscles act as accessory muscles of respiration and are inactive at rest; use of the shoulder and neck muscles in respiration at rest suggests increased work of breathing b) depth rate and rhythm rapid, shallow breathing is the body s usual response to increased work of breathing whereas deep regular breathing is often seen in metabolic disorders such as diabetic ketoacidosis or renal failure; cyclical breathing where deep breathing alternates with shallow breathing or apnoea is called Cheyne-Stokes respiration, and is seen in heart failure or neurological disease
46 34 Respiratory 1 Module 2: Respiratory assessment c) prolonged or forced expiration suggests airflow obstruction generally, inspiration and expiration are roughly equal in length; prolonged expiration suggests airflow obstruction, which may be accompanied by pursed-lip breathing, especially in COPD. 5. Respiratory noise at rest this is abnormal, and should prompt an assessment of airway patency: a) snoring this occurs due to partial obstruction of the upper airway by the tongue/soft tissues of the pharynx, and while common during sleep and generally harmless, it may be associated with airway compromise and obstruction in the setting of anaesthesia, neurological disease or in people with obstructive sleep apnoea b) stridor this is an inspiratory noise caused by narrowing of the upper airway at the level of the larynx, and may be due to aspiration of vomit or a foreign body, or caused by swelling from allergy or infection; stridor is a medical emergency and should prompt a call for assistance c) wheeze this may be inspiratory, expiratory or throughout the respiratory cycle; expiratory wheeze is often heard in asthma, COPD and cardiac failure; wheeze present throughout the respiratory cycle may be due to tumour or a foreign body. 6. Chest/abdominal wall movements: a) normally, the chest and abdomen rise and fall together, and movement of the left and right chest is symmetrical this is best observed by standing at the foot of the bed b) paradoxical respiration the chest and abdomen usually rise and fall in synchrony during normal breathing; in-drawing of the abdomen as the chest rises and vice versa suggests muscle fatigue or weakness or an obstructed airway c) use of accessory muscles of respiration reflects the work of breathing d) in-drawing of the costal margins on inspiration is a sign of hyperinflation. 7. Appearance: a) cyanosis this is a bluish colour of the lips and tongue due to deoxygenated haemoglobin, which is difficult to detect, except in severe hypoxia b) anaemia low haemoglobin causes pallor of the skin and may be the cause of breathlessness c) sweating and flushing may be due to fever, hypercapnia or excessive work of breathing.
47 Respiratory 1 Module 2: Respiratory assessment 35 Examination: Palpation and auscultation Palpation and auscultation provide additional information above that of history and observation, but involve more advanced skills which require practice. 1. Palpation a) tracheal position the trachea should be midline, and deviation may reflect collapse or scarring of the lung (moves towards the pathology) or tension pneumothorax or pressure form a tumour/fluid (moves away from the pathology) b) chest wall tenderness c) chest expansion should be symmetrical this can be appreciated by placing your hands on the upper chest and watching the rise and fall of your hands. d) tactile fremitus these are coarse breath sounds due to retained secretions, and may be felt as a vibration of the chest wall e) lymph nodes auxilliary, supraclavicular and cervical nodes these may be present in chest diseases such as cancer or tuberculosis f) subcutaneous emphysema this may be felt as a crackling sensation under the fingers, and is due to air escaping from the lung and tracking into the subcutaneous tissues in the setting of a pneumothorax or pneumomediastinum. 2. Percussion Percussion is performed by placing the index finger of your left hand in an intercostal space and tapping the finger with the middle finger of your right hand to determine the note of the underlying tissue air being resonant and fluid; solid tissue dull. This requires practice to learn the technique and to appreciate normal and abnormal sounds: a) resonance normally, the note is resonant, which indicates that air is present in a usually air-filled organ b) dullness occurs when the lung is consolidated, as in pneumonia, or when there is a pleural effusion c) hyperresonance occurs when there is more air than normal in the chest (hyperexpanded lungs of emphysema or pneumothorax). 3. Auscultation Use of a stethoscope to listen to breath sounds can add additional information to the respiratory assessment, but requires practice to differentiate normal from abnormal sounds.
48 36 Respiratory 1 Module 2: Respiratory assessment 4. Breath sounds Listen for sounds of normal air entry before trying to identify additional sounds: a) degree of air entry throughout the chest should be equal b) quality of breath sounds normal breath sounds are described as vesicular ; that is, they are soft in nature are heard over the lung fields; bronchial breath sounds are harsh and are heard over a consolidated lung and over the trachea c) length of inspiration and expiration normally, expiration is shorter than inspiration; in obstructive lung disease expiration increases and is often associated with wheeze. 5. Additional sounds Additional sounds are extra sounds due to pathology in the lungs (airways or pleura): a) wheezes continuous sounds, ranging from a low-pitched snoring quality to a high-pitched musical quality, which may clear with coughing and are heard in asthma and COPD b) crackles discrete, crackling sounds heard on inspiration and are heard in heart failure (fine), infection (fine to coarse) and fibrosis (coarse and harsh, and sound like Velcro) c) pleural rub a creaking sound from pleural irritation, heard on inspiration or expiration. Learning activities Timing Activity Objective 20 minutes Facilitated discussion 1, 2 Group 1 35mins Scenarios Skills stations 3 and 4 35 minutes Skills stations Scenarios 3 and 4 5 minutes Summary All 5 minutes Evaluation Total time: 1 hour 40 minutes
49 Respiratory 1 Module 2: Respiratory assessment 37 Facilitated discussion The instructor should lead the participants in a discussion of respiratory assessment in relation to case scenarios incorporating the schemata (history, observation and examination) provided in the background information. This discussion should use the disease-specific case scenarios to highlight the importance of each component of the assessment, as well as the need for flexibility to suit the particular case scenarios. Utilisation of PowerPoint presentations that allow the case scenarios to evolve in a stepwise pattern are suggested, in order to emphasis the logical nature of assessment, the prime importance of history and observation and to allow and encourage participant involvement. Skill station The skill station activity for this session is to perform a respiratory assessment focusing on palpation and auscultation, as described in the background information. Therefore, it is suggested that live models be used. These may be participant volunteers, other faculty, or other volunteers as available to facilitators. Thus, participants can actually conduct a respiratory examination. This also allows the facilitator to demonstrate important auscultation landmarks and palpation techniques. The activity is based on Payton s clinical skill teaching method, with the facilitators demonstrating the process. The time allotment of 30 minutes should provide sufficient opportunity for each participant to practise palpation and auscultation twice. Previously unrecognised respiratory abnormalities might be found when using volunteers. Facilitators should ensure that there is a process in place at their particular institution to review such findings and make appropriate referrals to the relevant medical specialist if required. This process should be clearly outlined to volunteers when they are recruited for this purpose. Simulations The aim of these scenarios is to provide opportunities for participants to conduct a full respiratory assessment (both physical and respiratory history taking) in order to determine the type of abnormality found. It is intended that participants will work in group of two, and will only do one of the possible three scenarios. Each scenario should take 15 minutes to complete. The simulations provided require a manikin that has a range of respiratory sounds available. Manikins such as METI or Laerdal Simman are examples of these. Preprogramming of the manikin may be required for the three scenarios presented. To run the simulation, the case is presented by the facilitator while two participants conduct a respiratory examination. The facilitator delivers information as the examination progresses. At certain stages the facilitator will ask the participants about their findings and conclusions.
50 38 Respiratory 1 Module 2: Respiratory assessment Respiratory observation and examination scenarios Scenario 1 Mr X is a 65-year-old man who has long-standing breathlessness on exertion. He recently caught a cold from his grandchild and now presents to the emergency department with worsening breathlessness. You examine his chest and auscultate his lungs. Allow time for two participants to conduct a respiratory examination and history. Scenario 1 Questions and responses 1. Describe what you hear. What disease process this may represent? mannequin with wheeze. 2. What features are important to elicit on history? why he presented now nature of breathlessness (relation to exertion/rest/activities of daily living) and severity associated symptoms fever, cough, sputum, chest pain past history and medications whether he has lung disease (asthma or emphysema) his medication may give an indication of lung or other problems cigarette smoking history. 3. What observed features suggest that Mr X has severe breathing difficulty? What effect could drugs have? vital signs increased RR, increased HR, SpO 2 sweating inability to speak in sentences agitation or restlessness use of accessory muscles.
51 Respiratory 1 Module 2: Respiratory assessment 39 Scenario 2 Ms Y is a 22-year-old overseas student preparing for her university exams. She presents to the emergency department with breathlessness and pain. You examine her chest and auscultate her lungs. Allow time for two participants to conduct a respiratory examination and history. Scenario 2 Questions and responses 1. Describe what you hear. What disease process this may represent? pneumonia manikin with bronchial breath sounds. 2. What features are important to elicit on history? nature of breathlessness and severity pain and nature pleuritic associated symptoms fever, cough, sputum, haemoptysis past history and medications previous lung infections, tuberculosis. 3. What other signs might you expect to find on examination? dullness to percussion pleural rub over the area of consolidation crackles common in infection. Scenario 3 Mr Z develops breathlessness at 5.00 am on the morning following an operation to bypass a blocked artery in his leg. RR is 32, BP 190/100, SpO 2 = 85% on 6 litres of oxygen via a Hudson mask. You examine his chest and auscultate his lungs. Allow time for two participants to conduct a respiratory examination and history. Scenario 3 Questions and responses 1. Describe what you hear. What disease process this may represent? APO manikin with crackles. 2. What features are important to elicit on history? if there is chest pain present, its nature cardiac compared to pleuritic if there is there any sputum and if it is the pink frothy of APO past history and medications ischaemic heart disease.
52 40 Respiratory 1 Module 2: Respiratory assessment Summary The summary session reinforces content covered in the learning activities, and is an opportunity for participants to reflect on what they have learned. No new material should be introduced. Major points to recap in the summary include: initial assessment history observations and vital signs examination: palpation auscultation breath sounds additional sounds finishing comments on skill stations and scenarios. Resources Resource Quantity Additional comments Facilitators 1:6 3 facilitators for a group of 12 Stethoscopes 6 Participants might want to bring their own Manikin 1 to 2 Must have chest sound capacity PowerPoint presentation 1 CD Back cover of module Alcohol swabs 1 pack For cleaning stethoscope ear pieces
53 Respiratory 1 Module 2: Respiratory assessment 41 Evaluation A formal evaluation has been specifically developed for this module. It incorporates the objectives of the module and the perceptions of the participants about whether they have increased their understanding by working through the module. It is highly recommended that this formal evaluation be copied and completed by all participants at the completion of the module. A range of informal evaluation tools may also be used in conjunction with this evaluation throughout the module, including those available in the Department of Human Services Clinical Skills Facilitators Manual from the basic course conducted in References 1. Moore T Respiratory Assessment in Adults. Nursing Standard 21(49): Simpson H Respiratory Assessment. British Journal of Nursing. 15(9): Jevon P., Ewens B Assessment of the Breathless Patient. Nursing Standard. 15(16): Stevens S, Becker K Respiratory Assessment. Nursing 18(1): Habel M. Respiratory Assessment: Adult and Child, available at com/resp/respframe.html (accessed 4 February 2008)
54 42 Respiratory 1 Module 2: Respiratory assessment Resources Facilitator feedback form The following form should be used to assist you in giving feedback after each participant has practised their respiratory assessment skills at the skill station. Feedback using the Pendleton model Pendleton s model of feedback assists learners to maximize their potential at different stages of training, raise their awareness of strengths and areas for improvement, and identify actions to be taken to improve performance. Pendleton s rules are structured in such a way that the learner identifies the positives first, in order to create a safe environment. This is followed by the facilitator or group reinforcing these positives and discussing skills to achieve them. Different techniques are then suggested. The advantage of this method is that the learner s strengths are discussed first. Avoiding a discussion of weaknesses right at the beginning prevents defensiveness and allows reflective behaviour in the learner. Below is a series of questions to assist you in this technique: 1. Ask the learner how they feel. 2. Ask the learner what went well and why (this can be combined with question 1 and 3). 3. Tell the learner what went well and why. 4. Ask the learner what could have been done better and why. 5. Tell the learner what could have been done better and why. 6. Summarise the learner s strengths and identify up to three things to concentrate on. Note: This form does not need to be given to the participant it is a guide for you, the group facilitator.
55 Respiratory 1 Module 2: Respiratory assessment 43 Module 2: Respiratory assessment evaluation Thank you for participating in this module. As part of our commitment to quality improvement the following questionnaire will be used to plan future implementation of this module. We appreciate your time completing this evaluation. 1. Overall How would you rate this module? poor fair good very good outstanding 2. Learning objectives Please consider whether this module was successful in meeting the following learning objectives: Respiratory 1 Learning objectives of Module 2: Respiratory assessment Strongly disagree disagree Slightly agree Agree Strongly agree Revise the initial approach to the unresponsive subject Learn a method for the systematic assessment of subjects with respiratory symptoms Use respiratory assessment skills to take a respiratory history Perform a respiratory assessment on a manikin or subject 3. Important learning outcomes What are the three most important things you have learned from this module?
56 44 Respiratory 1 Module 2: Respiratory assessment 4. Module implementation Please indicate to what extent you agree or disagree with each of the following statements in relation to the implementation of the module. Strongly disagree Disagree Slightly agree Agree Strongly agree The facilitator respected my experience The facilitator encouraged my participation I was able to ask the facilitator questions The facilitator was able to answer my questions The feedback I received was clear The feedback I received will assist me in my future performance There was adequate time for the skills stations There was adequate time for the facilitated discussions There was adequate time for the simulations I have increased my confidence in performing a respiratory assessment I have identified future learning needs in this topic area 5. Future module implementation Do you think the module should be altered in any way? yes no If yes, what recommendations do you have? Thank you

57 Respiratory 1 Module 2: Respiratory assessment 45 PowerPoint presentation
58
59 Respiratory 1 Module 3: Basic airway management 47 Module 3: Basic airway management Introduction Respiratory 1 was developed as a teaching and learning tool for Victorian clinical educators. The information contained in each module was developed using evidencebased resources and examples of best practice. Where expert opinion varies, a discussion section is included. However, it is not within the scope of Respiratory 1 to address the full spectrum of local variations. Variations can occur in several areas, including practices relating to types of equipment used, infection control processes, practice guidelines and so on. Therefore, where appropriate, educators should adapt content to reflect their local policies, procedures and protocols. This should ensure the relevancy of the package content to learners. The modules are designed to be discrete courses in their own right. They are timetabled so they can be completed within a 1 2 hour timeframe. This timeframe was chosen after we received feedback from clinical educators requesting shorter courses, because health professionals often have limited time to educate away from patients. However, the packages can also be combined into a one- or two-day course, as as described in the module outline. Respiratory 1 should be used as an educational tool to assist the teaching of clinical skills. It is structured as a guide to assist clinical educators, and uses many concepts taught in the Clinical Skills in Hospitals Project (Train-the-Trainer courses). Educators are encouraged to build on this resource by adding their own scenarios which incorporate hospital/health service protocols, policies and other resources. Each module is designed as a lesson plan to incorporate simulation into the teaching of clinical skills. Aims Respiratory 1 aims to make participants confident in their application of respiratory knowledge and skills on adults in different environments and settings. Package structure Respiratory 1 is the first of two packages, each containing five modules. These packages contain learning opportunities for health professionals at all levels of experience and from all health disciplines. Modules 1, 2 and 3 are regarded as fundamental. Modules 4 and 5 are more difficult, and are regarded as intermediate. Respiratory 2 contains Modules 6 10, which are considered intermediate to complex.
60 48 Respiratory 1 Module 1 Module 2: 3: Respiratory Basic airway assessment management Level of complexity Package structure Complex For participants with more than 4 years experience or who have completed Modules 1 4 Respiratory package 2 Intermediate For participants in postgraduate years 3 4 or who have completed Modules 1 and 2 O 2 therapy Airway suction management Fundamental For participants in postgraduate years 1 2 Pathophysiology Respiratory assessment Basic airway management Respiratory 1 includes modules on respiratory pathophysiology, assessment, oxygen therapy, suctioning and basic airway management skills. Respiratory 1 was designed to develop participants knowledge, skills and behaviours in the use of respiratory skills and practices. It also provides exposure to increasingly complex scenarios aimed at testing participants ability to combine these individual skills, work as a team and problem solve in more difficult situations. Educators delivering these modules should be aware of participants level of experience and choose appropriate modules. Modules presume an increasing level of knowledge as they progress, ranging from basic anatomy and physiology for the fundamental modules, up to detailed knowledge of respiratory practices for the complex modules. Novice participants (such as first-year graduates) are expected to start with the fundamental modules, and only move onto intermediate and more complex modules as they demonstrate proficiency. More experienced participants may start at the intermediate level if the educator is satisfied that they have sufficient prior knowledge and skills. Individual educators are responsible for assessing each participant s baseline knowledge and determining which modules they need to complete. More specific descriptions of presumed knowledge are outlined in each module.
61 Respiratory 1 Module 3: Basic airway management 49 The design of these packages presumes that the clinical educators using them have knowledge and expertise in current best practice for the teaching of clinical skills and conducting facilitated discussions. Knowledge and expertise are presumed commensurate with the Department of Human Services basic and advanced Train-the-Trainer programs. Clinical educators are encouraged to refer to the Department of Human Services Clinical Skills Facilitators Manual for theory on: Peyton s model for teaching clinical skills leading small group discussions giving feedback crisis resource management skills.
62 50 Respiratory 1 Module 1 Module 2: 3: Respiratory Basic airway assessment management
63 Respiratory 1 Module 3: Basic airway management 51 Module 3: Basic airway management Authors: Dr. Stuart Dilley, Julian Van Dijk Aims The purpose of this module is to teach, and/or consolidate the participants knowledge of, individual clinical skills necessary for providing adult basic airway management. Presumed knowledge This module is targeted to health professionals with little or no experience in airway management. However, they are expected to have a basic knowledge of: upper airway anatomy mouth, tongue, mandible, pharynx, larynx respiratory physiology breath sounds, ventilation cycle. Objectives By the end of this module, participants should have: identified the indications that require basic airway management practised basic airway manoeuvre techniques, both manual and equipmentassisted on a manikin. practised ventilation on a manikin using bag-and-mask circuits and mouth-to-mask kits. The purpose of this module is to teach participants the skills of basic airway management, rescue breathing and use of specific equipment. Background information for educators Airway or respiratory compromise may be a precursor to cardiac arrest. However, timely intervention and appropriate management of the airway and respirations may avoid progression to a cardiac arrest. Airway Death due to airway obstruction is rapid, but easily preventable. The airway may become obstructed by foreign bodes, including dentures, secretions and food, or from the patient s own anatomical structures, usually the tongue. In the unconscious patient, muscle tone and cough reflexes are reduced or absent, putting the patient at risk of airway obstruction. Obstruction may be partial or complete, and may rapidly progress from one to the other. Airway management is indicated when: the patient is unconscious the patient has an obstructed airway rescue breathing is required.
64 52 Respiratory 1 Module 1 Module 2: 3: Respiratory Basic airway assessment management Patients who have collapsed and fallen to the ground from a standing position are unlikely to have sustained a significant neck injury. However, those who struck their head on an object as they fell, or patients who are unconscious due to significant trauma (for example, motor vehicle accident, fall from height) are at greater risk of cervical spine injury. Consider potential cervical spine injury in these patients. The cervical spine should be immobilised with a cervical collar (or other means, until a collar is available), and airway manoeuvres selected accordingly. However, airway management takes precedence over possible cervical spine injury. Indications of an obstructed airway in a patient who attempts to breath include: paradoxical chest movements (chest collapses with attempts to inhale) noisy breathing, stridor, gurgling cyanosis. In patients who are not breathing or attempting to breathe, airway obstruction may not become evident until attempts at rescue breathing commence. The mouth and upper airway should be inspected for the presence of secretions and foreign bodies which could contribute to airway obstruction. Such obstruction may be relieved by: turning the patient on their side to drain secretions using suction if available manually removing solid foreign bodies with fingers removing ill-fitting dentures. After removal of foreign bodies from the mouth and upper airway, the head tilt/chin lift method is most commonly used to maintain the airway. Lifting the chin serves to lift the tongue off the posterior pharyngeal wall by lifting the mandible forward. The rescuer should: position themselves at the side of the patient s head place one hand on the patient s forehead use the thumb and fingers of the other hand to lift the patient s chin tilt the head (not the neck) backwards.


65 Respiratory 1 Module 3: Basic airway management 53 Figure 1: Head tilt/chin lift Alternatively, the jaw thrust method may be used. This technique is appropriate if there is a suspicion of cervical spine injury, but can be used on any patient. The rescuer should: position themselves at the top of the patient s head place their fingers behind the angle of the mandible on both sides exert pressure with the fingers to thrust the mandible upwards, moving the tongue away from the posterior pharyngeal wall use the thumbs to keep the mouth open. Figure 2: Jaw thrust Oropharyngeal (Guedel) airways are simple devices that can assist in obtaining and maintaining an airway. Oral airways should be sized and inserted as follows: Measure from the corner of the patient s mouth to angle of jaw/tip of earlobe. Initially insert upside-down. Rotate 180 degrees as the device is introduced further into the mouth.

66 54 Respiratory 1 Module 1 Module 2: 3: Respiratory Basic airway assessment management Another way of inserting an oropharyngeal (Guedel) airway is to use a tongue depressor and direct visualisation: Measure from the corner of the patient s mouth to angle of jaw/tip of earlobe. Open the patient s mouth and insert a tongue depressor against the tongue, applying light pressure in order to visualise the oral cavity. Insert the oropharyngeal tube without turning it upside-down first, and slide into position. Nasopharyngeal airways are another option to help improve airway maintenance Determine the size required, by measuring the flange end at the tip of the nose and the bevel end to the tip of ear on the same side. A size is a good starting size, because the nasal septum can be quite tight. On insertion, angle for the corner of the opposite eye. On insertion, take care when applying pressure to move the device past the nasal septum. The nasopharyngeal may be tied in situ for short periods; however, pressure care (for the nasal passage used) must be considered with this device if used over several days. Figure 3: Nasopharyngeal airway tied in situ When using either oropharyngeal and nasopharyngeal airways, consider contraindications such as: facial fractures recent ear, nose and throat (ENT) surgery high international normalised ratio (INR) or activated partial prothrombin time (APTT) due to haemorrhaging risks excessive force required to insert device.
67 Respiratory 1 Module 3: Basic airway management 55 Breathing Once the unconscious patient s airway is cleared, the rescuer should check whether the patient is breathing, and: Look and feel for chest and abdominal movement. Look and feel for air movement from the mouth and nose. If adequate breathing is present, the patient should be rolled on their side, maintaining an open airway. Stay with the patient and check regularly for breathing and pulse until help arrives. If the unconscious patient is not breathing after the airway is opened, rescue breathing should be commenced: Give two initial breaths, allowing one second per inspiration. Check for signs of life (unconscious, unresponsive, not moving, not breathing normally). If signs of life are absent, commence chest compressions. Continue chest compressions and rescue breathing at a ratio of 30:2. The technique of rescue breathing depends somewhat on the equipment available to the rescuer. Mask-to-mouth ventilation has a theoretical advantage over mouthto-mouth ventilation in that a barrier exists between patient and rescuer, affording some protection against infectious disease and cross-contamination. The risk of transmission of infectious disease by mouth-to-mouth ventilation is extremely low no cases of human immunodeficiency virus (HIV) or hepatitis B transmission have ever been reported 3. Bag-mask ventilation has the added advantage of allowing the rescuer to provide supplemental oxygen when this is available. For mouth-to-mouth rescue breathing, the rescuer should: Position themselves at the side of the patient s head. Obtain and maintain an open airway as described above. Slightly open the patient s mouth and pinch the patient s nose. Take a big breath and blow air into the patient s lungs. Look for a rise of the patient s chest to indicate movement of air into the lungs. Remove mouth from the patient to allow escape of air. Turn the head to observe the patient s chest falling and feel the exhaled air.


68 56 Respiratory 1 Module 1 Module 2: 3: Respiratory Basic airway assessment management For mouth-to-mask rescue breathing, the rescuer should: Position themselves at the at the patient s head. Obtain and maintain an open airway. Use two hands to hold the mask in place. Place the narrow end of the mask over the bridge of the nose. Push down firmly on the mask with thumbs and fingers while simultaneously lifting the jaw into the mask to create a seal. Blow air into the patient s lungs by blowing through the mouthpiece of the mask. Look for a rise in the patient s chest. Remove mouth from mask to allow exhalation. Observe for falling of the chest wall and feel for exhaled air. Figure 4: Mask-to-mouth Alternative mask grip Viewing chest rise and fall For most health professionals in the hospital setting, a bag-mask device is favoured for rescue breathing. Responders should be familiar with the parts of such a device: facemask valve pressure relief valve (not fitted to all devices, prevents excessive pressure being delivered to the patient s lungs) ventilation bag oxygen inlet connection oxygen reservoir bag.


69 Respiratory 1 Module 3: Basic airway management 57 For bag-mask rescue breathing, the rescuer should: Position themselves at the patient s head. Connect bag-mask device to maximal oxygen flow if available. Obtain and maintain an open airway. Hold the mask firmly in position with one hand. Place the narrow end of the mask over the bridge of the nose. Push firmly on the mask with thumb and index finger while simultaneously lifting the jaw into the mask to create a seal. Blow air into the patient s lungs by compressing the ventilation bag. Look for a rise in the patient s chest. Allow for expiration, observing for fall of the chest wall. 10. Two hands may be required to hold the mask in place, in which case, a second person may be employed to compress the ventilation bag. Figure 5: Correct placement of mask(nose to chin) Single operator technique Double operator technique
70 58 Respiratory 1 Module 1 Module 2: 3: Respiratory Basic airway assessment management Learning activities Timing Activity Objective 20 minutes Facilitated discussion 1 30 minutes Skills stations 2, 3 5 minutes Summary All 5 minutes Evaluation Total time: 1 hour Facilitated discussion The facilitator should lead a discussion amongst participants about the issues covered in the background information, for example, basic airway manoeuvres and equipment use and indications. The facilitator should not give a didactic lecture, but instead promote open discussion and knowledge sharing amongst participants. Participants should be encouraged to describe any real-life experiences they have encountered. PowerPoint slides are available for the facilitator to use to summarise these main points at the end of the discussion or to act as triggers for discussion if these were not identified by participants. Skills stations The skills stations allow participants to practise basic airway management skills, such as assessing airway patency and the use of airway equipment on appropriate models, while receiving feedback in a structured format from peers and/or facilitators. This activity, and the resources outlined, are based on three facilitators and 12 participants, a ratio of 1:4. Each facilitator should have access to one airway manikin suitable for teaching airway and breathing management. One airway manikin is required for use with nasopharyngeal and oropharyngeal airways. Two Resus Annetype manikins are required for bagging-mask ventilation and manual airway handling. Participants should be guided through the three airway skill stations skills (manual airway handling, airway devices and ventilation) using Peyton s four-step model10. Feedback should be provided at the completion of the skill. It is envisaged that each participant spends 30 minutes between each of the three skill stations (10 minutes at each). Skill station 1: manual airway handling: assessing airway patency, head tilt, chin lift. Skill station 2: insertion of airway management devices such as oropharyngeal and nasopharyngeal airways. Skill station 3: mouth-to-mask and bag-and-mask ventilation.
71 Respiratory 1 Module 3: Basic airway management 59 Summary The summary session reinforces content covered in the learning activities, and is an opportunity for participants to reflect on what they have learned. No new material should be introduced. Major points to recap in the summary include: indications for manual airway management the importance of: checking for patency of airway clearing airway obstructions use of airway-specific equipment to aid ventilation airway management techniques achieving adequate ventilation. Participants should be encouraged to review the appropriate hospital guidelines in their own time to reinforce the skills acquired in this module. They should be offered access to equipment and educators in the future to allow them to practise these skills if they need to improve their skill level or confidence. Participants might also be encouraged to seek clinical opportunities to observe and participate in basic airway management to put these skills into a clinical context. Resources Resource Quantity Additional comments Facilitators 1:4 3 facilitators required for a group of 12 Airway capable manikins 3 Allows for three skill stations Mouth-to-mask face mask 1 Bag-and-mask circuit 1 Oropharyngeal airways 1 set 3 adult sizes required Nasopharyngeal 1 set A size 6 and a size 6.5 PowerPoint presentation 1 CD Back of module cover Gloves: small, medium, large Group size Directed as per group size
72 60 Respiratory 1 Module 1 Module 2: 3: Respiratory Basic airway assessment management Evaluation A formal evaluation has been specifically developed for this module. It incorporates the objectives of the module and the perceptions of the participants about whether they have increased their understanding by working through the module. It is highly recommended that this formal evaluation be copied and completed by all participants at the completion of the module. A range of informal evaluation tools may also be used in conjunction with this evaluation throughout the module, including those available in the Department of Human Services Clinical Skills Facilitators Manual from the basic course conducted in References Australian Resuscitation Council, Guideline 4: Airway. February 2006 Australian Resuscitation Council, Guideline 5: Breathing. February 2006 Arend C., 2000 Transmission of Infectious Diseases Through Mouth-to-Mouth Ventilation: Evidence-Based or Emotion-Based Medicine? Arq Bras Cardiol 74: Australian Resuscitation Council, Guideline 6: Compressions. February 2006 Hallstrom A., Cobb L., Johnson E. and Copass M Cardiopulmonary Resuscitation by Chest Compression Alone or with Mouth-to-Mouth Ventilation. N Engl J Med 342: International Liaison Committee on Resuscitation 2005 Guidelines for Cardiopulmonary Resuscitation and Emergency Cardiovascular Care. Part 3: Defibrillation. Circulation : iii_17 iii_24 7. Australian Resuscitation Council, Guideline 11.7: Equipment and Techniques in Adult Advanced Life Support. February International Liaison Committee on Resuscitation 2005 Guidelines for Cardiopulmonary Resuscitation and Emergency Cardiovascular Care. Part 2: Adult Basic Life Support. Circulation : iii_5 iii_16 9. Peyton J Teaching and Learning in Medical Practice. Manticore Europe Ltd, Great Britain.
73 Respiratory 1 Module 3: Basic airway management 61 Resources Facilitator feedback form The following form should be used to assist you in giving feedback after each participant has practised their basic airway management skills at the skill station. Feedback using the Pendleton model Pendleton s model of feedback assists learners to maximize their potential at different stages of training, raise their awareness of strengths and areas for improvement, and identify actions to be taken to improve performance. Pendleton s rules are structured in such a way that the learner identifies the positives first, in order to create a safe environment. This is followed by the facilitator or group reinforcing these positives and discussing skills to achieve them. Different techniques are then suggested. The advantage of this method is that the learner s strengths are discussed first. Avoiding a discussion of weaknesses right at the beginning prevents defensiveness and allows reflective behaviour in the learner. Below is a series of questions to assist you in this technique: 1. Ask the learner how they feel. 2. Ask the learner what went well and why (this can be combined with question 1 and 3). 3. Tell the learner what went well and why. 4. Ask the learner what could have been done better and why. 5. Tell the learner what could have been done better and why. 6. Summarise the learner s strengths and identify up to three things to concentrate on. Note: This form does not need to be given to the participant it is a guide for you, the group facilitator.
74 62 Respiratory 1 Module 1 Module 2: 3: Respiratory Basic airway assessment management Module 3: Basic airway management evaluation Thank you for participating in this module. As part of our commitment to quality improvement the following questionnaire will be used to plan future implementation of this module. We appreciate your time completing this evaluation. 1. Overall How would you rate this module? poor fair good very good outstanding 2. Learning objectives Please consider whether this module was successful in meeting the following learning objectives: Respiratory 1 Learning objectives of Module 3: Basic airway management Strongly disagree Disagree Slightly agree Agree Strongly agree Identified the indications that require basic airway management Practised basic airway manoeuvre techniques both manual and equipment assisted on a manikin Practised ventilation on a manikin using bagand-mask circuits and mouth-to-mask kits 3. Important learning outcomes What are the three most important things you have learned from this module?
75 Respiratory 1 Module 3: Basic airway management Module implementation Please indicate to what extent you agree or disagree with each of the following statements in relation to the implementation of the module. Strongly disagree Disagree Slightly agree Agree Strongly agree The facilitator respected my experience The facilitator encouraged my participation I was able to ask the facilitator questions The facilitator was able to answer my questions The feedback I received was clear The feedback I received will assist me in my future performance There was adequate time for the skills stations There was adequate time for the facilitated discussions There was adequate time for the simulations I have increased my confidence in performing basic airway management I have identified future learning needs in this topic area 5. Future module implementation Do you think the module should be altered in any way? yes no If yes, what recommendations do you have? Thank you


76 64 Respiratory 1 Module 3: Basic airway management PowerPoint presentation
77 Respiratory Respiratory 1 Module 1 Module 1 Module 3: Basic airway 4: Oxygen management therapy 65 Module 4: Oxygen therapy Introduction Respiratory 1 was developed as a teaching and learning tool for Victorian clinical educators. The information contained in each module was developed using evidencebased resources and examples of best practice. Where expert opinion varies, a discussion section is included. However, it is not within the scope of Respiratory 1 to address the full spectrum of local variations. Variations can occur in several areas, including practices relating to types of equipment used, infection control processes, practice guidelines and so on. Therefore, where appropriate, educators should adapt content to reflect their local policies, procedures and protocols. This should ensure the relevancy of the package content to learners. The modules are designed to be discrete courses in their own right. They are timetabled so they can be completed within a 1 2 hour timeframe. This timeframe was chosen after we received feedback from clinical educators requesting shorter courses, because health professionals often have limited time to educate away from patients. However, the packages can also be combined into a one- or two-day course, as as described in the module outline. Respiratory 1 should be used as an educational tool to assist the teaching of clinical skills. It is structured as a guide to assist clinical educators, and uses many concepts taught in the Clinical Skills in Hospitals Project (Train-the-Trainer courses). Educators are encouraged to build on this resource by adding their own scenarios which incorporate hospital/health service protocols, policies and other resources. Each module is designed as a lesson plan to incorporate simulation into the teaching of clinical skills. Aims Respiratory 1 aims to make participants confident in their application of respiratory knowledge and skills on adults in different environments and settings. Package structure Respiratory 1 is the first of two packages, each containing five modules. These packages contain learning opportunities for health professionals at all levels of experience and from all health disciplines. Modules 1, 2 and 3 are regarded as fundamental. Modules 4 and 5 are more difficult, and are regarded as intermediate. Respiratory 2 contains Modules 6 10, which are considered intermediate to complex.
78 66 Respiratory 1 Module 4: Oxygen therapy Level of complexity Package structure Complex For participants with more than 4 years experience or who have completed Modules 1 4 Respiratory package 2 Intermediate For participants in postgraduate years 3 4 or who have completed Modules 1 and 2 O 2 therapy Airway suction management Fundamental For participants in postgraduate years 1 2 Pathophysiology Respiratory assessment Basic airway management Respiratory 1 includes modules on respiratory pathophysiology, assessment, oxygen therapy, suctioning and basic airway management skills. Respiratory 1 was designed to develop participants knowledge, skills and behaviours in the use of respiratory skills and practices. It also provides exposure to increasingly complex scenarios aimed at testing participants ability to combine these individual skills, work as a team and problem solve in more difficult situations. Educators delivering these modules should be aware of participants level of experience and choose appropriate modules. Modules presume an increasing level of knowledge as they progress, ranging from basic anatomy and physiology for the fundamental modules, up to detailed knowledge of respiratory practices for the complex modules. Novice participants (such as first-year graduates) are expected to start with the fundamental modules, and only move onto intermediate and more complex modules as they demonstrate proficiency. More experienced participants may start at the intermediate level if the educator is satisfied that they have sufficient prior knowledge and skills. Individual educators are responsible for assessing each participant s baseline knowledge and determining which modules they need to complete. More specific descriptions of presumed knowledge are outlined in each module.
79 Respiratory 1 Module 4: Oxygen therapy 67 The design of these packages presumes that the clinical educators using them have knowledge and expertise in current best practice for the teaching of clinical skills and conducting facilitated discussions. Knowledge and expertise are presumed commensurate with the Department of Human Services basic and advanced Train-the-Trainer programs. Clinical educators are encouraged to refer to the Department of Human Services Clinical Skills Facilitators Manual for theory on: Peyton s model for teaching clinical skills leading small group discussions giving feedback crisis resource management skills.
80
81 Respiratory 1 Module 4: Oxygen therapy 69 Module 4: Oxygen therapy Authors: Julian Van Dijk, Dr Antony Tobin, Alicia Martin, Dr Stuart Dilley, Maria Loader Aims The purpose of this module is to teach, or refresh participants knowledge of, the use of oxygen therapy principles and practice for adult patient in hospital care. Presumed knowledge This module is targeted to health professionals who would normally administer and or prescribe supplementary oxygen for patient therapy. They are expected to have completed Modules 1 3 of Respiratory 1 and have a basic knowledge of: the principles of normal respiratory function the difference between oxygenation (Type 1) and ventilation (Type 2) failure patient respiratory assessment. Objectives By the end of this module, participants should be able to: 1. discuss how to determine a patient s oxygen therapy requirements 2. discuss the indication and limitations of each O2 delivery method 3. demonstrate setting up O2 delivery equipment and a humidified circuit discuss oxygen therapy contraindications for specific patient groups identify correct documentation methods for oxygen therapy specific to their health service participate in a group analysing respiratory case-based scenarios. Background information for educators The aim of Respiratory 1 Module 4: Oxygen therapy is to provide participants with a practical understanding of oxygen therapy in the clinical setting by exploring considerations of treatment such as assessment, monitoring, delivery methods and limitations. Participants starting this module should have completed Respiratory 1 Module 1: Pathophysiology. Participants require an understanding of these definitions and concepts as used in clinical practice: gas exchange principles oxygenation failure: Type 1 failure ventilation failure: Type 2 failure hypoxia and hypoxemia.
82 70 Respiratory 1 Module 4: Oxygen therapy Oxygen therapy Oxygen therapy is used so frequently in clinical practice that many practitioners apply a mask or nasal prongs without considering an assessment of need, dose, delivery method, duration of therapy, limitations and documentation. Health professionals with responsibilities for oxygen therapy prescription and management must actively promote high standards of practice in the use of this therapy. The following background information reflects best practice oxygen prescription, and includes: assessment of oxygen need delivery method and dose duration of therapy limitations documentation. Definitions This module uses several terms with specific meanings related to oxygen therapy and respiratory function. SpO 2 : oxygenation saturation as measured by a pulse oximetry monitor and written as a percentage, with normal values of %. Hypoxia: lack of oxygen at the tissue level. Hypoxemia: lack of oxygen in arterial blood. Measured as PaO 2 < 60 mmhg. FiO 2 : the fraction of inspired oxygen in the total gas being delivered. The next two definitions refer to the partial pressure of arterial oxygen and carbon dioxide. These values are generated by performing an arterial blood gas (ABG) test on a patient. This module does not expect that participants have experience in analysing ABG results. This is an advanced clinical skill which is developed in Respiratory 2. For the purpose of this module, interpretation of these values will be explained by the module facilitator. However, participants will have exposure in identifying normal and abnormal patient values for PaO 2 and PaCO 2. PaO 2 : partial pressure of oxygen in arterial blood normal values are mmhg. PaCO 2 : partial pressure of carbon dioxide in arterial blood normal values are mmhg.
83 Respiratory 1 Module 4: Oxygen therapy 71 Assessing oxygenation needs Hypoxia results from insufficient oxygen delivery to tissues to meet normal metabolic needs. The causes of poor tissue oxygenation range from disorders of the respiratory system which impair normal oxygenation and ventilation through to altered oxygen delivery states such as shock and anaemia. In all cases, oxygen therapy is indicated in order to prevent hypoxia and stabilise a patient s condition while underlying causes are identified and treated. Accurate assessment of a patient s needs for supplementary oxygen is vital, particularly in the more acute settings, to ensure appropriate oxygen dosing. Respiratory 1 Module 1: Pathophysiology defined key issues in recognition of respiratory failure (see summary table below). The physical assessment of patients, taking into account both subjective and objective data, is vital. Further monitoring, including the use of pulse oximetry and pathology tests such as ABGs, should be used to confirm suspicions and findings as part of the total assessment. Recognition of respiratory failure summary A Respiratory compensation Tachypnoea Posturing Use of accessory muscles Nasal flaring Intercostal, suprasternal, supraclavicular recession Paradoxical abdominal movement B Increased sympathetic tone Tachycardia Hypertension Sweating C End organ hypoxia Altered mental state: confusion agitation disorientation Bradycardia and hypotension (late sign) D Haemoglobin desaturation Cyanosis Pulse oximetry Arterial blood gas analysis
84 72 Respiratory 1 Module 4: Oxygen therapy Monitoring Two main methods are used to assess oxygenation status: arterial blood gases pulse oximetry. Arterial blood gases Arterial blood gases are used to determine a patient s respiratory and metabolic acid base status. This module does not cover interpretation principles, but we are here interested in the normal value of O 2 and CO 2 which this test provides. ABGs identify the amount of oxygen dissolved in the arterial blood, in terms of the partial pressure (Pa) of that gas. The unit of measurement is mmhg (millimetres of mercury). The interpretation of the result takes into account the fraction of inspired oxygen (FiO 2 ) which a patient receives at the time of this blood test. The normal partial pressure of oxygen arterial blood, for a FiO 2 of 21% (room air) is: PaO 2 = mmhg Note: When taking an ABG sample to send to pathology, you must document the FiO 2 (if known) or the O 2 flow rate on the pathology slip. Pulse oximetry Pulse oximetry (SpO 2 ) measures the amount of oxygen carried by haemoglobin in the capillary system. This reading is generated via a skin probe, which can be attached to peripheral parts of the body (such as fingers and earlobes finger probes are commonly used on adults). The most common method of determining a patient s oxygen status is via pulse oximetry. Therefore it is a useful tool, which is non-invasive (compared to ABGs), easy to use and provides both continued real-time monitoring as well as a quick status check of a patient s condition. The normal range is: Sp0 2 = % Pulse oximetry limitations While the use of SpO 2 monitoring is common, cheap and accessible, several limitations should be considered. Probe measurement can be affected by the following issues: a light source above the probe nail polish shaking or tremor of the hand or fingers darker skin

85 Respiratory 1 Module 4: Oxygen therapy 73 peripheral vasoconstriction poor perfusions irregular rhythms. SpO 2 measurement can also be affected by patient-related conditions such as: anaemia changes in a patient s temperature, ph status and the PaCO 2, which all affect the ability of oxygen binding to haemoglobin. Machine error is also a consideration. SpO 2 monitors should be routinely checked by the biomedical engineering department of your health service. The relationship between ABGs and SpO 2 results is best illustrated using the oxygen haemoglobin dissociation curve. The normal PaO 2 value mmhg corresponds to SpO 2 values above 95% to 100%. However, if the PaO 2 value falls to 60 mmhg, the corresponding SpO 2 is now 90% (yellow lines). Hypoxia is clinically defined as PaO 2 60 mmhg, so a SpO 2 of 90% means a patient is clinically hypoxic. Other SpO 2 values of interest: Figure 1: Oxygen-Haemoglobin Dissociation Curve % young person awake 95% older person awake 95% young person asleep 93% lower limit of normal 90% mild respiratory failure 85% respiratory failure 75% venous blood oxygen level, which correlates with a PaO 2 of 40 mmhg (of the total oxygen inhaled during inspiration, two-thirds return to the lungs, and under normal conditions we only use one-third of the oxygen inspired this means that the venous system provides some reserve to manage changes in oxygen consumption) 60% unconscious 50%, which occurs with a PaO 2 of 28 mmhg.
86 74 Respiratory 1 Module 4: Oxygen therapy Administering O 2 therapy FiO 2 and flow demand When choosing the oxygen delivery system it is important to consider both FiO 2 and flow concepts. As mentioned previously, the FiO 2 is the fraction of oxygen in the total gas being delivered. What FiO 2 the patient receives is determined by two factors: first, flow rate from the oxygen delivery device, and second, the inspiratory flow demand determined by the patient. For example, a patient has a respiratory flow demand of 20 litres per minute, and is being supplied 100% oxygen at 6 litres per minute. The patient still needs to inspire 14 litres of room air in order to meet the inspiratory flow demand of 20 litres per minute. This means that the gas entering the lungs is approximately one-third 100% oxygen and two-thirds room air. Consequently, the FiO 2 received by the patient is approximately 50%, even though they are being supplied 100% from the oxygen supply. Patient flow demand 100% oxygen supply Room air entrained FiO 2 20 litres per minute 6 litres per minute 14 litres per minute 50% This is an important consideration, because a patient s respiratory status can change quickly, leaving current oxygen therapy inadequate to meet FiO 2 requirements. For example, if the same patient mentioned above increases their flow demand to 40 litres per minute, without any changes to the oxygen supplied, the FiO 2 changes to 35%, because the patient is now entraining 34 litres per minute to maintain the increased flow demand. Patient flow demand 100% oxygen supply Room air entrained FiO 2 40 litres per minute 6 litres per minute 35 litres per minute 35% Thus, regular assessment of a patient who receives oxygen therapy is vital to ensure that the therapy maintains the patient s needs. The table below overviews oxygen delivery methods based on a patient flow demand of approximately 20 litres per minute.
87 Respiratory 1 Module 4: Oxygen therapy 75 Methods of oxygen delivery Device Flow rates Expected FiO 2 Comments Nasal prongs 2 litres per minute 4 litres per minute Approximately 23 28% Approximately 32 36% Never run more than 4 litres per minute Standard mask 6 litres per minute 8 litres per minute Approximately 45 50% Approximately 55 60% Never less than 6 litres per minute Non re-breather mask 8 litres per minute Approximately 60 to > 80% High-flow humidified system Set as per Venturi system Accurate for 28 60% Approximate for > 60% Intubated closed circuit system As per FiO 2 settings Accurate for % Note: FiO 2 does not rise above 60% for a mask-based system, because they are not sealed circuits, meaning that room air will be entrained and dilute the 100% O 2 supply. Nasal prongs Nasal prongs are used to supply low flow at 2 4 litres per minute. Common indications are: home O 2 therapy COPD exacerbation if patient is a CO 2 retainer weaning from O 2 therapy as the patient improves. Advantages patients can speak and eat unencumbered this method can be used if patients are mouth breathers, because the nasal passage is acting as a small reservoir it is easily portable. Disadvantages this method should not be used for flow rates greater than 4 litres per minute due to drying of the nasal mucosa.
88 76 Respiratory 1 Module 4: Oxygen therapy Face masks Face masks provide higher flow of O 2 for patients: not able to maintain desired SpO 2 on nasal prongs pre-and post-operative (consider two factors here: sedation changes the respiratory pattern, and post-operatively, shock is a factor that oxygen is treating) patient experiencing chest pain any patient who suddenly deteriorates first aid. Advantages Higher flow rate of 6 8 litres per minute increasing the FiO 2 to 45 60%. Disadvantages patients may find the mask claustrophobic the flow rate must be 6 litres per minute or greater, because less than 6 litres per minute may lead to the patient re-breathing exhaled CO 2 used for long periods, a face mask can lead to drying of the oral and upper airway mucosa. Non re-breather mask These face masks have a reservoir bag attached and exhalation valves on either side of the mask. The system aims to provide a higher FiO 2 than a normal face mask system. The higher FiO 2 is achieved by having a tight fit, minimising the amount of entrained room air, because the exhalation valves are on either side of the mask. As the patient inhales, the reservoir bag provides most of the gas required to meet the patient s flow demand. Because the reservoir contains 100% oxygen, the inhaled gas reaching the lungs has a higher FiO 2 than can be achieved with a normal mask. When the patient exhales, the exhalation values open, due to the positive pressure behind them, and CO 2 is cleared. This minimises the risk of re-breathing CO 2. Advantages Higher flow rate of 8 litres per minute increasing the 60 80% useful in the acute hypoxic patient who can maintain an airway. Disadvantages this type of mask is tight fitting possible sticking of exhalation values used for long periods, a face mask can lead to drying of the oral and upper airway mucosa.
89 Respiratory 1 Module 4: Oxygen therapy 77 Venturi devices The Venturi device enables you to set a desired FiO 2 and provide higher flow rates to the patient than can be achieved with a normal face mask system. The advantages are a known FiO 2 level, delivered at high-flow rates to the patient. This is achieved when oxygen is supplied via a narrow tube at the base of the system, which opens into a wider chamber with an adjustable aperture. Room air is drawn into the system and supplied to the patient via wide-bore tubing. The increased flow rate is achieved because the high pressure supply of O 2 into the chamber creates a low pressure, whereby room air is entrained into the system to equalise the pressure. The higher the FiO 2 is set, the smaller the aperture in the chamber becomes, and as a result, the lower the flow rate delivered to the patient. In the table below, the FiO 2 at 98% reduces the flow rate the patient receives to 10 litres per minute. Different systems are available, and they all have slightly different settings. Health professionals should familiarise themselves with the system at each health service. The example here is from an Aquapak system. FiO 2 Flow meter litres per minute Total flow to patient litres per minute 28% % % % % Advantages FiO 2 can be set with a high level or accuracy this method provides high-flow rates to patients. Disadvantages lower flow rates are delivered at higher FiO 2 settings the unit may be noisy. Note: High-flow-rate O 2 therapy should only be used as part of a humidified system. Humidification Humidified therapy is required when using high-flow O 2 therapy to prevent drying of the patient s respiratory mucosa and secretions. Normal wall or bottled supplies of oxygen have no humidity at all, due to the extreme corrosion this would cause. There are two types of humidification: cold and heated systems.
90 78 Respiratory 1 Module 4: Oxygen therapy The cold system provides humidification by mixing sterilised water with high-flow air. The result is a nebuliser-type effect which produces a large particle mist. This mist is more likely to condensate in the tubing, and has minimal effect on hydrating the deeper airway structures. The heated system is better, in terms of creating a smaller particle vapour which can penetrate deeper into the airway system. There are several different systems with the heated options. The gold standard in heated humidification is one that maintains the desired heat throughout the circuit directly to the mask. This is achieved by a heating cable lining the full length of the oxygen tubing, which greatly increases humidification of the airways, aiding the natural process of sputum clearance. Note: Facilitators should review the equipment at their health service to determine what systems are available. Indications for high-flow humidified systems These should be used: if a patient cannot maintain the desired SpO 2 with a face mask to deliver more effectively low FiO 2 therapy to patients who are CO 2 retainers to assist sputum clearance: for patients on O 2 therapy for long periods for patients using nasal prongs, but with copious amount of sputum for all tracheotomy patients. Double humidified system and tusks The use of a double humidified system greatly increases the flow rate to the patient, as well as increasing the FiO 2. The use of such systems is indicated when the desired SpO 2 is not achieved using a single system. This type of system should not be employed before a medical review of the patient is completed. A double system is the maximum ward level of oxygen therapy. Tusks Tusks are only used in a double high-flow humidification system. The purpose of adding tusks into the system is to provide an oxygen reservoir to meet some of the inspiratory demand, and so deliver a higher FiO 2. A double high-flow humidification system with or with out the addition of tusks should not be employed until after a medical review of the patient.
91 Respiratory 1 Module 4: Oxygen therapy 79 During the discussion of humidification systems in use, it is important to identify: monitoring water levels within the system condensation care of tubing length of tubing no longer than 1.3 m (130 cm) is recommended, due to increased dead space infection control policy concerning length of use per circuit (circuit changes weekly are commonly recommended) circuits should be placed lower than the patient, to avoid condensation running into the patient s mouth or tracheostomy Caring for patients on O 2 therapy Patients receiving supplementary oxygen require regular monitoring to determine: 1. response to therapy 2. tolerance to weaning trials as supplementary O2 is reduced or removed. At the beginning of a shift, staff involved in caring for patients on O 2 therapy should: review the patient s condition document the SpO 2 on O 2 and room air review treating units orders regarding acceptable SpO 2 question whether the appropriate O 2 device is being used check all O 2 equipment: connections at O 2 supply point if using humidification, check the system is set up correctly, that the humidifier is on and there is water in the humidifier common issues are lack of water in the system and condensation in wide-bore tubing. As a general guide for health professionals administering oxygen, ask the following questions: Why am I giving this patient O 2 therapy? What are the patient s requirements? What are the medical orders? What system will work best? How will I assess the effectiveness of the O 2 therapy?
92 80 Respiratory 1 Module 4: Oxygen therapy Clinical documentation Clinical documentation is a key requirement for the use of supplementary oxygen therapy. O 2 therapy requires medical orders and should specify parameters for both increasing and decreasing O 2 therapy. Patient progress notes should reflect the course of therapy, documenting issues such as response to therapy, weaning trial outcomes and changes in oxygen prescription by medical staff. Bedside charts should record the room air SpO 2 results at the beginning and end of each shift, as well as changes in the dose or method of O 2 therapy. Oxygen therapy and CO 2 retainers There is much concern about the use of oxygen therapy for known CO 2 retaining patients. Known CO 2 retaining patients must be properly assessed on admission. Clear medical orders written stating acceptable SpO 2 levels, O 2 dose and methods of delivery are essential. CO 2 retainers are patients who have a disease process that leads to a chronic change in the normal hypercapnoeic drive. As discussed in Module 1, increases in the CO 2 level are the primary stimulus driving normal ventilation. The CO 2 retaining patient has reduced sensitivity to high CO 2 levels, which leads to a dulled response from the respiratory centres of the brain. The body compensates by relying on a hypoxic stimulus to breath. Supplementary O 2 can depress this adapted ventilation, causing further CO 2 retention. Hypercapnoea presents with signs and symptoms of: increased pulse rate increased blood pressure warm periphery patients may complain of a headache. If the hypercapnoea is severe, other signs and symptoms may be: confusion drowsiness mental dullness and slowness to respond twitching (asterixis). Initial treatment for the symptomatic hypercapnoeic patient is to: notify the treating unit for urgent medical review position the patient in a sitting-up position to aid ventilation ensure low-flow O 2 is given to keep saturations at the level requested by medical staff, or 90% if no orders are given prepare to conduct ABGs.
93 Respiratory 1 Module 4: Oxygen therapy 81 The aim of oxygen therapy for these patients is to provide the minimum required, while preventing further hypercapnoea. The guide for administering supplementary oxygen is determined by acceptable SpO 2 parameters. These are normally quite low, for example, 88 92%. Learning activities These learning activities relate the background information to oxygen therapy equipment used in the clinical educator s health service setting. A case study is included for participants to consider treatment principles related to management protocols specific to that health service. Timing Activity Objectives 20 minutes Facilitated discussion 1, 2, 4 25 minutes O 2 therapy skill stations: 3, 5 O 2 therapy setup heath service O 2 equipment humidification 15 minutes Case studies (two) 6 5 minutes Summary All 5 minutes Evaluation Total: 1 hour 15 minutes Facilitated discussion The facilitator may use the PowerPoint presentation to summarise this information, but should not give a didactic lecture instead promoting open discussion. This should include sharing and reflection on participants knowledge and previous experiences. Suitable question time should be accommodated. During the facilitated discussion, specific equipment used at the educator s health service should be shown or demonstrated to the group. Identifying where items are stored and relevant policy documents to support their use is also important. Educators may want to restrict the facilitated discussion to the principles of O 2 therapy, and then use the skill stations to explore equipment and application considerations further. Skills stations The three clinical skills stations allow participants to demonstrate the use of specific oxygen therapy equipment.
94 82 Respiratory 1 Module 4: Oxygen therapy Clinical skill station 1 Set up the station to review basic O 2 delivery equipment and oxygen regulators used in the educator s health service. Apply the masks and devices to a manikin to demonstrate correct application to a patient. Bedside documents and checklists required for correct setup monitoring of these therapies should be included in any demonstration. Clinical skill station 2 Set up the station to review humidification circuit setup and care. If both heated and unheated systems are used in the clinical areas, both should be demonstrated. Bedside documents and checklists required for correct setup monitoring of these therapies should be included in any demonstration. Clinical skill station 3 Set up the station to review the correct use of pulse oximetry equipment used to assess patients in the educator s health service. Review the difference between accurate readings as shown, compared to an inaccurate reading. Feedback for participants is also recommended using the Pendleton method see the Resources section. Case scenario The case study can be presented as a PowerPoint slide or as an individual handout for each member of the group. The aim is to encourage discussion about the case, then the facilitator should summarise and conclude the discussion and case. Two cases can be used for this activity. Case study 1 Mr Robinson has severe pneumonia. You check his ABGs and determine that he is not a CO 2 retainer. However, he is hypoxic, PaO 2 = 50 mmhg, SpO 2 = 80% with oxygen running at an FiO 2 of 0.4 (40%) via a cold humidified circuit. You notice that Mr Robinson has copious, thick secretions. As the health professional managing this patient, what will you do?
95 Respiratory 1 Module 4: Oxygen therapy 83 Possible action and discussion points The facilitator can prompt with questions about possible actions that the group may take. We recommend that when participants indicate they might increase the FiO 2, the facilitator indicates that there is no improvement. Possible actions: assess the patient s work of breathing suction the patient to further aid breathing if indicated change the patient to a heated humidified circuit consider increasing the patient s FiO 2 to 0.45 (45%) if no response to this, further increase the FiO 2 to 0.5 (50%) if no response to increased FiO 2 of 0.5 (50%), then: consider adding a double circuit consider that patient is receiving the maximum O 2 does available on the wards consider adding tusks after a medical review call for a medical review. Case study 2 Mrs Tanner returned from theatre early this morning after a laparotomy. Part a Currently Mrs Tanner receives supplementary oxygen at 4 litres per minute via a Hudson face mask. Is this okay? What are the potential dangers? What should be done? Once these questions have been discussed, move onto Part b. Part b Now Mrs Tanner receives supplementary oxygen at 6 litres per minute via a Hudson face mask, SpO 2 = 98%. When and how do you wean her oxygen?
96 84 Respiratory 1 Module 4: Oxygen therapy Possible action and discussion points The facilitator can prompt with questions about possible actions that the group may take. Part a There is a high chance that the patient is re-breathing her own CO 2. At 4 litres per minute, this is an inadequate dose for a face mask. The oxygen level should be increased to a minimum of 6 litres per minute to prevent this risk. Reconsider the patient s O 2 therapy needs, taking into account that she has had surgery. Part b Has the patient been back on the ward for more than 8 hours? Assess the patient for normal vital signs are they stable? Does her chest sound clear? Consider the possibility that there was a large blood loss intra-operatively. Is she anaemic? (Perhaps check post-op full blood examination (FBE) results). Trial the patient on nasal prongs at 3 litres per minute, and review SpO 2. Review with treating unit. Summary The summary session reinforces content covered in the learning activities, and is an opportunity for participants to reflect on what they have learned. No new material should be introduced. Major points to recap in the summary include: assessing oxygenation needs: monitoring SpO 2 oxygen administration: FiO 2 flow demand method of delivery humidification caring for patients on oxygen therapy: Use checklists to assess correct use of O 2 therapy CO 2 retainers.
97 Respiratory 1 Module 4: Oxygen therapy 85 Resources Clinical skill station 1 Resource Quantity Additional comments Wall-mounted O 2 supply and regulator 1 Standard face mask 1 Standard nasal prongs 1 Re-breather mask 1 Fine-bore extension tubing and connectors 1 set Clinical skill station 2 Resource Quantity Additional comments Wall-mounted O 2 supply and regulator 1 Cool humidification circuit 1 Cold humidification Venturi system 1 Length of wide-bore corrugated tubing 1 Sterile water for circuit 1 Warmed humidification circuit 1 Warm humidification Venturi system 1 Length of wide-bore corrugated tubing 1 Sterile water for circuit 1 Clinical skill station 3 Resource Quantity Additional comments Pulse oximeter 2 Useful to have two to demonstrate with Relevant documentation to rescored results Relevant policy documents 1 set 1 set
98 86 Respiratory 1 Module 4: Oxygen therapy Evaluation A formal evaluation has been specifically developed for this module. It incorporates the objectives of the module and the perceptions of the participants about whether they have increased their understanding by working through the module. It is highly recommended that this formal evaluation be copied and completed by all participants at the completion of the module. A range of informal evaluation tools may also be used in conjunction with this evaluation throughout the module, including those available in the Department of Human Services Clinical Skills Facilitators Manual from the basic course conducted in References 1. Bateman N.T. and Leach R.M ABC of Oxygen: Acute Oxygen Therapy. BMJ 317: Pierce L Guide to Mechanical Ventilation and Intensive Respiratory Care. W.B. Saunders Company. Sydney 3. St Vincent s 2006 St Vincent s Health Clinical Policy Manual: Oxygen Policy 4. Pilbeam S Mechanical Ventilation Physiological and Clinical Applications. Mosby. Sydney
99 Respiratory 1 Module 4: Oxygen therapy 87 Resources Facilitator feedback form The following form should be used to assist you in giving feedback after each participant has practised their oxygen therapy skills at the skill station. Feedback using the Pendleton model Pendleton s model of feedback assists learners to maximize their potential at different stages of training, raise their awareness of strengths and areas for improvement, and identify actions to be taken to improve performance. Pendleton s rules are structured in such a way that the learner identifies the positives first, in order to create a safe environment. This is followed by the facilitator or group reinforcing these positives and discussing skills to achieve them. Different techniques are then suggested. The advantage of this method is that the learner s strengths are discussed first. Avoiding a discussion of weaknesses right at the beginning prevents defensiveness and allows reflective behaviour in the learner. Below is a series of questions to assist you in this technique: 1. Ask the learner how they feel. 2. Ask the learner what went well and why (this can be combined with question 1 and 3). 3. Tell the learner what went well and why. 4. Ask the learner what could have been done better and why. 5. Tell the learner what could have been done better and why. 6. Summarise the learner s strengths and identify up to three things to concentrate on. Note: This form does not need to be given to the participant it is a guide for you, the group facilitator.
100 88 Respiratory 1 Module 4: Oxygen therapy Module 4: Oxygen therapy evaluation Thank you for participating in this module. As part of our commitment to quality improvement the following questionnaire will be used to plan future implementation of this module. We appreciate your time completing this evaluation. 1. Overall How would you rate this module? poor fair good very good outstanding 2. Learning objectives Please consider whether this module was successful in meeting the following learning objectives: Respiratory 1 Learning objectives of Module 4: Oxygen therapy Strongly disagree Disagree Slightly agree Agree Strongly agree Discuss how to determine a patient s oxygen therapy requirements Discuss the indication and limitations of each O 2 delivery method Demonstrate the setting up of O 2 delivery equipment and a humidified circuit Discuss oxygen therapy contraindications for specific patient groups Identify correct documentation methods for oxygen therapy specific to your health service Participate in a group, analysing respiratory case-based scenarios 3. Important learning outcomes What are the three most important things you have learned from this module?
101 Respiratory 1 Module 4: Oxygen therapy Module implementation Please indicate to what extent you agree or disagree with each of the following statements in relation to the implementation of the module. Strongly disagree Disagree Slightly agree Agree Strongly agree The facilitator respected my experience The facilitator encouraged my participation I was able to ask the facilitator questions The facilitator was able to answer my questions The feedback I received was clear The feedback I received will assist me in my future performance There was adequate time for the skills stations There was adequate time for the facilitated discussions There was adequate time for the simulations I have increased my confidence in setting up oxygen therapy equipment I have identified future learning needs in this topic area 5. Future module implementation Do you think the module should be altered in any way? yes no If yes, what recommendations do you have? Thank you


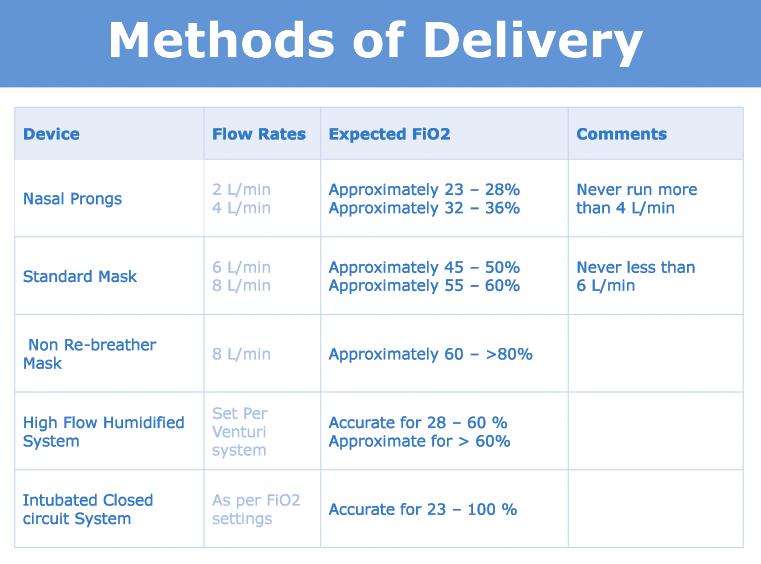


102 90 Respiratory 1 Module 4: Oxygen therapy PowerPoint presentation


103 Respiratory 1 Module 4: Oxygen therapy
104
105 Respiratory 1 Module 5: Airway suctioning 93 Module 5: Airway suctioning Introduction Respiratory 1 was developed as a teaching and learning tool for Victorian clinical educators. The information contained in each module was developed using evidencebased resources and examples of best practice. Where expert opinion varies, a discussion section is included. However, it is not within the scope of Respiratory 1 to address the full spectrum of local variations. Variations can occur in several areas, including practices relating to types of equipment used, infection control processes, practice guidelines and so on. Therefore, where appropriate, educators should adapt content to reflect their local policies, procedures and protocols. This should ensure the relevancy of the package content to learners. The modules are designed to be discrete courses in their own right. They are timetabled so they can be completed within a 1 2 hour timeframe. This timeframe was chosen after we received feedback from clinical educators requesting shorter courses, because health professionals often have limited time to educate away from patients. However, the packages can also be combined into a one- or two-day course, as as described in the module outline. Respiratory 1 should be used as an educational tool to assist the teaching of clinical skills. It is structured as a guide to assist clinical educators, and uses many concepts taught in the Clinical Skills in Hospitals Project (Train-the-Trainer courses). Educators are encouraged to build on this resource by adding their own scenarios which incorporate hospital/health service protocols, policies and other resources. Each module is designed as a lesson plan to incorporate simulation into the teaching of clinical skills. Aims Respiratory 1 aims to make participants confident in their application of respiratory knowledge and skills on adults in different environments and settings. Package structure Respiratory 1 is the first of two packages, each containing five modules. These packages contain learning opportunities for health professionals at all levels of experience and from all health disciplines. Modules 1, 2 and 3 are regarded as fundamental. Modules 4 and 5 are more difficult, and are regarded as intermediate. Respiratory 2 contains Modules 6 10, which are considered intermediate to complex.
106 94 Respiratory 1 Module 5: Airway suctioning Level of complexity Package structure Complex For participants with more than 4 years experience or who have completed Modules 1 4 Respiratory package 2 Intermediate For participants in postgraduate years 3 4 or who have completed Modules 1 and 2 O 2 therapy Airway suction management Fundamental For participants in postgraduate years 1 2 Pathophysiology Respiratory assessment Basic airway management Respiratory 1 includes modules on respiratory pathophysiology, assessment, oxygen therapy, suctioning and basic airway management skills. Respiratory 1 was designed to develop participants knowledge, skills and behaviours in the use of respiratory skills and practices. It also provides exposure to increasingly complex scenarios aimed at testing participants ability to combine these individual skills, work as a team and problem solve in more difficult situations. Educators delivering these modules should be aware of participants level of experience and choose appropriate modules. Modules presume an increasing level of knowledge as they progress, ranging from basic anatomy and physiology for the fundamental modules, up to detailed knowledge of respiratory practices for the complex modules. Novice participants (such as first-year graduates) are expected to start with the fundamental modules, and only move onto intermediate and more complex modules as they demonstrate proficiency. More experienced participants may start at the intermediate level if the educator is satisfied that they have sufficient prior knowledge and skills. Individual educators are responsible for assessing each participant s baseline knowledge and determining which modules they need to complete. More specific descriptions of presumed knowledge are outlined in each module.
107 Respiratory 1 Module 5: Airway suctioning 95 The design of these packages presumes that the clinical educators using them have knowledge and expertise in current best practice for the teaching of clinical skills and conducting facilitated discussions. Knowledge and expertise are presumed commensurate with the Department of Human Services basic and advanced Train-the-Trainer programs. Clinical educators are encouraged to refer to the Department of Human Services Clinical Skills Facilitators Manual for theory on: Peyton s model for teaching clinical skills leading small group discussions giving feedback crisis resource management skills.
108
109 Respiratory 1 Module 5: Airway suctioning 97 Module 5: Airway suctioning Author: Alicia Martin Aims The purpose of this module is to teach, and/or consolidate the participants knowledge of, clinical skills necessary for safely and effectively performing suctioning. Presumed knowledge This module is targeted to health professionals with little or no experience in suctioning. However, they are expected to have a basic knowledge of the following modules: 1. Respiratory 1 Module 1: Pathophysiology 2. Respiratory 1 Module 2: Respiratory assessment. Other presumed prior knowledge includes: upper airway anatomy: mouth, tongue, pharynx, larynx, trachea, oesophagus cardiovascular anatomy and pathophysiology: blood pressure, circulation, oxygenation. Objectives By the end of this module, participants should have: revised the most recent evidence base behind suctioning identified the indications for suctioning identified local/hospital policies and procedure, particularly clean compared to sterile techniques, and open compared to closed systems practised the basic technique of suctioning on a simulated manikin (orally and nasally), and also through the following airways: Guedel, nasopharyngeal, and tracheostomy familiarity with suction canisters and troubleshooting of suction/canisters. The purpose of this module is to teach participants the technique of suctioning. This module is not intended to cover airway insertions this is covered in Module 3. Background information for educators Suctioning an airway can be necessary to maintain its patency and to clear the airway of secretions, blood or vomit. It may occur as part of an acute response to an emergency situation. Other common situations where suctioning is required is in patients with an impaired cough rendering them ineffective in clearing their own secretions. This commonly occurs in patients with artificial airways, such as those with a tracheostomy or endotracheal intubation.
110 98 Respiratory 1 Module 5: Airway suctioning Potential negative side-effects of suctioning include: hypoxia tracheal mucosal damage raised intracranial pressures (ICP) cardiac arrhythmias (due to vagus nerve stimulation) nosocomial pneumonia it can be potentially painful and anxiety provoking for patient. Suctioning should only be conducted when clinically necessary. Therefore, health professionals must follow guidelines, and also perform individual patient assessments before, during and after suctioning. Evidence The evidence base: highlights the lack of an individualised assessment in clinical practice reveals ongoing contention between clean compared to sterile techniques contains few evaluations of the effectiveness of suctioning is scant regarding the most effective (including cost-effective) equipment, especially regarding open compared to closed circuits clearly demonstrates that saline installations before suctioning should not occur, due to the adverse effects of decreased oxygen saturation, increased nosocomial pneumonia and increased ICP clearly demonstrates that hypoxemia may result after suctioning contains contentious research on the effectiveness of pre-suctioning hyperventilation (although research has mainly focused on newborns, not adults). Consult local policies on clean compared to sterile techniques, open compared to closed systems, and pre-oxygenation. Indications for suction include that the patient: cannot cough effectively to clear retained secretions cannot maintain airway patency due to obstruction of sputum, vomit or blood has sudden respiratory distress, including increases in ventilator airway pressures, or if PaO 2 or SpO 2 suddenly decreases shows sudden increases or decreases in HR, RR or BP. No absolute contraindications to suctioning exist.


111 Respiratory 1 Module 5: Airway suctioning 99 Frequency (Level IV evidence) Only when necessary not routinely. Evidence suggests no more than three passes of a catheter per session to reduce risks of tracheal mucosa damage. Duration (Level IV evidence) Recommend < seconds per suction to decrease the risks of listed side-effects. Doubling suction time can potentially double the decreases in PaO 2 levels and the increase incidence of tracheal trauma. Suction pressure Recommend mmhg. Higher pressures increase the risks of side-effects. If unable to measure mmhg, then set the suction strength so that you feel only light suction on the glove on your fingertip. Suction units Most hospitals have a wall-mounted Venturi suction system. This should be checked at the beginning and end of each shift, as well as immediately prior to suctioning. The suction tubing will then be connected to a suction canister. These connections must all be tightly fitted to ensure efficient suction. Refer to local infection control procedures regarding the changing of suction canisters. Portable suction units are available in the absence of wall-mounted suction systems. These must be regularly serviced. Some portable suction units require a vacuum build-up time refer to the manufacturer s advice. Figure 1: Standard ward wall-mounted suction system Pre-oxygenation (Level III evidence) Refer to local policy. Ventilated patients are often pre-oxygenated at FiO 2 100% for 2 minutes.

 Clean compared to sterile technique (Level IV evidence) This refers")
 systems, whereby a catheter remains connected to either the ETT or tracheostomy inside a closed lumen.")

112 100 Respiratory 1 Module 5: Airway suctioning Catheters (Level IV evidence) The size of catheter should occlude no more than half the internal diameter of the artificial airway. This is to avoid greater negative pressures in the airways and also to minimise drops in SpO 2 /PaO 2. Multi-eyed catheters cause less trauma than single-eyed catheters because pressure is dissipated. Multi-eyed catheters also negate the need to rotate a catheter on withdrawal. Figure 2: Multi-eyed catheter and close up of catheter tip (note the catheter size information on packets) Clean compared to sterile technique (Level IV evidence) This refers to whether gloves are sterile or clean. Consult local policy. In most ward situations, the clean technique is sufficient. Open compared to closed systems Some ICU settings use closed (or in-line ) systems, whereby a catheter remains connected to either the ETT or tracheostomy inside a closed lumen. Evidence varies on how frequently these should be changed one review recommends that they should be changed every 48 hours. Level IV evidence suggests closed systems may be associated with reduced rates of cross-infection. The open technique refers to connecting an individual catheter for each session of suctioning. Refer to local policy. Figure 3: A closed suction system as used on a tracheotomy patient (note the operator s hand pressing the blue button to activate suction)
113 Respiratory 1 Module 5: Airway suctioning 101 Depth of suctioning This refers to deep compared to shallow suctioning. Some patients can cough their secretions partway up their airways, and may only require shallow suctioning to clear secretions. For deep suctioning, insert the catheter far enough down to stimulate a cough. Do not push further once initial resistance is met. If the catheter meets resistance, then pull back by 1 2 cm before applying suction. Monitoring HR, rhythm (including bradycardias and premature beats), BP and SpO 2 should be monitored before, during and after suctioning. If the patient develops arrhythmias, a decrease in SpO 2 or decreased conscious state, then stop suctioning immediately and administer high-flow and/or high FiO 2. If SpO 2 remains low, also assess for mucous plugging, pneumothorax and changes in lung function. Call a MET or code in the event of a serious adverse reaction. Outcome measures These include: volume of secretions removed frequency of suctioning auscultation findings changes to ABGs or SpO 2 cardiovascular, neurological, haemodynamic or pulmonary changes presence of tracheal mucosal damage prevalence of atelectasis or pneumonia patient comfort levels. Suctioning patients with head injuries Suctioning can cause cumulative increases to intracranial pressure, arterial pressure and cerebral perfusion pressure, so only two consecutive suctions are recommended (rather than three). Allow patients to rest for 10 minutes post-suctioning, before other activities that may increase the above pressures. How to suction a step-by-step process Assess the need to suction, including vital signs. Explain the procedure to the patient. Ensure hands are clean (refer to local hand hygiene infection control policy). Ensure suction is connected, and turn suction on to appropriate negative pressure ( mmhg).
114 102 Respiratory 1 Module 5: Airway suctioning Don goggles and gloves (clean or sterile). Peel back the catheter packaging. Connect the end of the catheter to the suction tubing. Ensure the catheter is at least half the diameter of the artificial airway. Insert catheter (without suction engaged) to the desired depth (deep or shallow). Apply continuous suction (not intermittent) and maintain continuous suction during withdrawal (when using a closed system, apply continuous suction by depressing the suction valve). Slowly withdraw catheter (without rotation or twirling), over seconds. 10. Disconnect catheter from suction tubing. 11. Rinse suction tubing with normal saline/sterile water. 12. Wrap catheter around dominant hand and pull off glove inside out, ensuring catheter remains inside the glove. Dispose of the suction catheter and gloves. 13. Turn off suction. 14. Conduct hand hygiene post-procedure. 15. Repeat no more than three times per session if necessary. 16. Re-assess patient, including vital signs. 17. Assess outcome measures. The accompanying DVD contains demonstrations of this step by step process for a range of situations. Learning activities Suggested learning activities and timetable are outlined below. Timing Activity Objective 30 minutes 10 minutes Facilitated discussion DVD 1, 2, 3 4, 5 40 minutes Skills stations 4, 5 10 minutes Summary All 10 minutes Evaluation Total: 1 hour 40 minutes
115 Respiratory 1 Module 5: Airway suctioning 103 Facilitated discussion The purpose of this exercise is for the facilitator to lead a discussion amongst participants about the issues covered in the background information, for example, indications for suctioning, potential side-effects and the evidence base. The facilitator may use the PowerPoint presentation to summarise this information, but should not give a didactic lecture instead promoting open discussion. This should include sharing and reflection on participants knowledge and previous experiences. Suitable question time should be accommodated. The facilitator may also show the DVD provided as another aid to the initial discussion. Each chapter is designed using Payton s clinical skill teaching method. Two versions of each suctioning skill are demonstrated: one performing the skill in real time without discussion, and one performing the skill with narration of the steps during the procedure. DVD chapter details Chapter Feature 1 Oral airway suction demonstrated 2 Oral airway suction demonstrated and discussed 3 Oropharyngeal airway suction demonstrated 4 Oropharyngeal airway suction demonstrated and discussed 5 Nasopharyngeal airway suction demonstrated 6 Nasopharyngeal suction demonstrated and discussed 7 Open system tracheotomy suction demonstrated 8 Open system tracheotomy suction demonstrated discussed 9 Closed system tracheotomy suction demonstrated 10 Closed system tracheotomy suction demonstrated discussed 11 Endotracheal tube suction demonstrated 12 Endotracheal tube suction demonstrated and discussed Skills stations The skills stations allow participants to practise their suctioning skills on appropriate models, and via common artificial airways. During this practice session participants should receive feedback in a structured format from peers and/or facilitators. First, the basic skill of suctioning is practised. This is followed by a case study, provided below.
116 104 Respiratory 1 Module 5: Airway suctioning A ratio of one facilitator to four (1:4) participants is recommended. Each facilitator should have one manikin suitable for having artificial airways in situ, and suitable to allow suctioning via these airways. A second airway manikin is desirable, to allow participants not directly being instructed or observed to practise before or after their turn. Participants should be guided through each step of the process by the facilitator (as outlined above) for the first suction. For the second suction, the participants should tell the facilitator what they are doing at each step. For the third suction, feedback should only be given by the facilitator/peers at the completion of suctioning. Case study 82-year-old man admitted with severe pneumonia. Currently: slightly agitated. Febrile, HR 80 (SR), SpO 2 = 88% on 2 litres (desaturating), BP 140/65. Auscultation: coarse bibasal creps. Co: very weak, moist, non-productive. Bibasal expansion: poor. Nasopharyngeal airways already in situ. At the conclusion of your complete assessment you deduce that the patient has sputum retention, with difficulty expectorating due to weak cough. Part a You decide you need to suction the patient. Participants should demonstrate suctioning the patient via the nasopharyngeal airway. Part b Once you have followed the correct procedures (as per the step-by-step guidelines), you discover that the suction isn t working. What do you do? Check equipment: Is the suction unit turned on at the wall? Is the suction tubing connected to the wall-mounted suction unit? Is the suction tubing connected to the suction catheter you are using? Check operator technique, ensuring that the suction vent on catheter is occluded when suction is required.
117 Respiratory 1 Module 5: Airway suctioning 105 Resource list Resource Quantity Additional comments Facilitators 3 1:4 ratio for a group of 12 PowerPoint presentation 1 Provided in module DVD 1 Provided in module Suction (wall or portable) 2 Suction canisters 1 Suction catheters size 10, 12, of each size Manikin with intubatable airway 1 2 Nasopharyngeal airways Guedel airways 1 set 1 set Tracheostomy 1 size 7 Goggles Gloves Lubricant 1 per participant 1 box per size 1 bottle or 10 packs Feedback sheets 12 One for each participant Evaluation forms 3 As a prompt for each facilitator Summary The summary reinforces the content covered in the facilitated discussion and skills stations. It should also allow time for participants to reflect on what they have learned. No new information should be introduced. Major points to revise in the summary include: indications for suctioning potential adverse effects of suctioning the importance of individual patient assessment the importance of monitoring before, during and after suctioning the importance of using objective measures to evaluate the effectiveness of suctioning. Participants should be encouraged to review the references in their own time to reinforce the skills acquired in this module. They should be offered access to equipment and educators in the future to allow them to practise these skills if they need to improve their skill level or confidence. Participants might also be encouraged to attend and observe a real patient being suctioned in order to put these skills into a clinical context. An educator to observe each participant s first suctioning on a real patient would be ideal.
118 106 Respiratory 1 Module 5: Airway suctioning Evaluation A formal evaluation has been specifically developed for this module. It incorporates the objectives of the module and the perceptions of the participants about whether they have increased their understanding by working through the module. It is highly recommended that this formal evaluation be copied and completed by all participants at the completion of the module. A range of informal evaluation tools may also be used in conjunction with this evaluation throughout the module, including those available in the Department of Human Services Clinical Skills Facilitators Manual from the basic course conducted in References Akgul S. and Akyolcu N Effects of Normal Saline on Endotracheal Suctioning. Journal of Clinical Nursing 11: American Thoracic Society Suctioning: www. accessed 6/1/08 3. Barnett M Tracheostomy Management and Care. Journal of Critical Nursing 19(1): Baun M., Stone K., Rogge J Endotracheal Suctioning: Open Versus Closed with and Without Positive End-Expiratory Pressure. Critical Care Nursing Quarterly 25(2): Chau J. et al. (2007) An Evaluation of the Implementation of a Best Practice Guideline on Tracheal Suctioning in Intensive Care Units. International Journal of Evidence-Based Healthcare 5(3): Clearing the Airway EMS Responder: www. jsp?id=2371&sitesection=16, accessed on 7/1/08 Day T. et al. (2002) Tracheal Suctioning: an Exploration of Nurses Knowledge and Competence in Acute and High Dependency Ward Areas. Journal of Advanced Nursing 39(1): Day T., Wainwright S. and Wilson-Barnett J. (2001) An Evaluation of a Teaching Intervention to Improve the Practice of Endotracheal Suctioning in Intensive Care Units. Journal of Clinical Nursing 10: Glass C. and Grap M. (1995) Ten Tips for Safer Suctioning. American Journal of Nursing 5: Griggs A. (1998) Tracheostomy: Suctioning and Humidification. Nursing Standard 13 (2): Hooper M. (1996) Nursing Care of the Patient with a Tracheostomy. Nursing Standard 10(34): 40 43
119 Respiratory 1 Module 5: Airway suctioning 107 Resources Facilitator feedback form The following form should be used to assist you in giving feedback after each participant has practised their airway suctioning skills at the skill station. Feedback using the Pendleton model Pendleton s model of feedback assists learners to maximize their potential at different stages of training, raise their awareness of strengths and areas for improvement, and identify actions to be taken to improve performance. Pendleton s rules are structured in such a way that the learner identifies the positives first, in order to create a safe environment. This is followed by the facilitator or group reinforcing these positives and discussing skills to achieve them. Different techniques are then suggested. The advantage of this method is that the learner s strengths are discussed first. Avoiding a discussion of weaknesses right at the beginning prevents defensiveness and allows reflective behaviour in the learner. Below is a series of questions to assist you in this technique: 1. Ask the learner how they feel. 2. Ask the learner what went well and why (this can be combined with question 1 and 3). 3. Tell the learner what went well and why. 4. Ask the learner what could have been done better and why. 5. Tell the learner what could have been done better and why. 6. Summarise the learner s strengths and identify up to three things to concentrate on. Note: This form does not need to be given to the participant it is a guide for you, the group facilitator.
120 108 Respiratory 1 Module 5: Airway suctioning Module 5: Airway suctioning evaluation Thank you for participating in this module. As part of our commitment to quality improvement the following questionnaire will be used to plan future implementation of this module. We appreciate your time completing this evaluation. 1. Overall How would you rate this module? poor fair good very good outstanding 2. Learning objectives Please consider whether this module was successful in meeting the following learning objectives: Respiratory 1 Learning objectives of Module 5: Airway suctioning Strongly disagree Disagree Slightly agre Agree Strongly agree Revised the most recent evidence base behind suctioning Identified the indications for suctioning Identified local/hospital policies and procedure, particularly clean compared to sterile techniques, and open compared to closed systems Practised the basic technique of suctioning on a manikin orally and nasally, and also through the following airways: Guedel, nasopharyngeal and tracheostomy Familiarity with suction canisters and troubleshooting of suction/canisters 3. Important learning outcomes What are the three most important things you have learned from this module?
121 Respiratory 1 Module 5: Airway suctioning Module implementation Please indicate to what extent you agree or disagree with each of the following statements in relation to the implementation of the module. Strongly disagree Disagree Slightly agree Agree Strongly agree The facilitator respected my experience The facilitator encouraged my participation I was able to ask the facilitator questions The facilitator was able to answer my questions The feedback I received was clear The feedback I received will assist me in my future performance There was adequate time for the skills stations There was adequate time for the facilitated discussions There was adequate time for the simulations I have increased my confidence in performing airway suctioning I have identified future learning needs in this topic area 5. Future module implementation Do you think the module should be altered in any way? yes no If yes, what recommendations do you have? Thank you


122 110 Respiratory 1 Module 5: Airway suctioning PowerPoint presentation
Foundation in Critical Care Nursing. Airway / Respiratory / Workbook
 Foundation in Critical Care Nursing Airway / Respiratory / Workbook Airway Anatomy: Please label the following: Tongue Larynx Epiglottis Pharynx Trachea Vertebrae Oesophagus Where is the ET (endotracheal)
Approach to type 2 Respiratory Failure
 Approach to type 2 Respiratory Failure Changing Nature of NIV Not longer just the traditional COPD patients Increasingly Obesity Neuromuscular Pneumonias 3 fold increase in patients with Ph 7.25 and below
Care of the Deteriorating Patient in Recovery NADIA TICEHURST : CLINICAL NURSE EDUCATOR PERI ANAESTHETICS BENDIGO HEALTH
 Care of the Deteriorating Patient in Recovery NADIA TICEHURST : CLINICAL NURSE EDUCATOR PERI ANAESTHETICS BENDIGO HEALTH Intended learning outcomes Describe the components of a comprehensive clinician
Pulmonary Pathophysiology
 Pulmonary Pathophysiology 1 Reduction of Pulmonary Function 1. Inadequate blood flow to the lungs hypoperfusion 2. Inadequate air flow to the alveoli - hypoventilation 2 Signs and Symptoms of Pulmonary
Respiratory Failure. Causes of Acute Respiratory Failure (ARF): a- Intrapulmonary:
: a- Intrapulmonary:") Respiratory failure exists whenever the exchange of O 2 for CO 2 in the lungs cannot keep up with the rate of O 2 consumption & CO 2 production in the cells of the body. This results in a fall in arterial
Respiratory failure exists whenever the exchange of O 2 for CO 2 in the lungs cannot keep up with the rate of O 2 consumption & CO 2 production in the cells of the body. This results in a fall in arterial
Airway and Ventilation. Emergency Medical Response
 Airway and Ventilation Lesson 14: Airway and Ventilation You Are the Emergency Medical Responder Your medical emergency response team has been called to the fitness center by building security on a report
INDICATIONS FOR RESPIRATORY ASSISTANCE A C U T E M E D I C I N E U N I T P - Y E A R M B B S 4
 INDICATIONS FOR RESPIRATORY ASSISTANCE A C U T E M E D I C I N E U N I T P - Y E A R M B B S 4 RESPIRATORY FAILURE Acute respiratory failure is defined by hypoxemia with or without hypercapnia. It is one
Respiratory Emergencies. Chapter 11
 Respiratory Emergencies Chapter 11 Respiratory System Anatomy and Function of the Lung Characteristics of Adequate Breathing Normal rate and depth Regular breathing pattern Good breath sounds on both sides
Respiratory Disease. Dr Amal Damrah consultant Neonatologist and Paediatrician
 Respiratory Disease Dr Amal Damrah consultant Neonatologist and Paediatrician Signs and Symptoms of Respiratory Diseases Cardinal Symptoms Cough Sputum Hemoptysis Dyspnea Wheezes Chest pain Signs and Symptoms
NIV - BI-LEVEL POSITIVE AIRWAY PRESSURE (BIPAP)
") Introduction NIV - BI-LEVEL POSITIVE AIRWAY PRESSURE (BIPAP) Noninvasive ventilation (NIV) is a method of delivering oxygen by positive pressure mask that allows for the prevention or postponement of invasive
Introduction NIV - BI-LEVEL POSITIVE AIRWAY PRESSURE (BIPAP) Noninvasive ventilation (NIV) is a method of delivering oxygen by positive pressure mask that allows for the prevention or postponement of invasive
Prepared by : Bayan Kaddourah RN,MHM. GICU Clinical Instructor
 Mechanical Ventilation Prepared by : Bayan Kaddourah RN,MHM. GICU Clinical Instructor 1 Definition Is a supportive therapy to facilitate gas exchange. Most ventilatory support requires an artificial airway.
Oxygen: Is there a problem? Tom Heaps Acute Physician
 Oxygen: Is there a problem? Tom Heaps Acute Physician Case 1 79-year-old female, diabetic, morbidly obese Admitted with LVF Overnight Reduced GCS?cause 15l NRB in situ ABG showed ph 6.9, pco 2 15.9kPa
Bronchospasm & SOB. Kim Kilmurray Senior Clinical Teaching Fellow
 Bronchospasm & SOB Kim Kilmurray Senior Clinical Teaching Fellow LEARNING OBJECTIVES Perform a comprehensive respiratory examination & link clinical signs to underlying pathology Identify the spectrum
Competency Title: Continuous Positive Airway Pressure
 Competency Title: Continuous Positive Airway Pressure Trainee Name: ------------------------------------------------------------- Title: ---------------------------------------------------------------
Interpretation of Arterial Blood Gases. Prof. Dr. W. Vincken Head Respiratory Division Academisch Ziekenhuis Vrije Universiteit Brussel (AZ VUB)
") Interpretation of Arterial Blood Gases Prof. Dr. W. Vincken Head Respiratory Division Academisch Ziekenhuis Vrije Universiteit Brussel (AZ VUB) Before interpretation of ABG Make/Take note of Correct puncture
Interpretation of Arterial Blood Gases Prof. Dr. W. Vincken Head Respiratory Division Academisch Ziekenhuis Vrije Universiteit Brussel (AZ VUB) Before interpretation of ABG Make/Take note of Correct puncture
Causes and Consequences of Respiratory Centre Depression and Hypoventilation
 Causes and Consequences of Respiratory Centre Depression and Hypoventilation Lou Irving Director Respiratory and Sleep Medicine, RMH louis.irving@mh.org.au Capacity of the Respiratory System At rest During
(To be filled by the treating physician)
") CERTIFICATE OF MEDICAL NECESSITY TO BE ISSUED TO CGHS BENEFICIAREIS BEING PRESCRIBED BILEVEL CONTINUOUS POSITIVE AIRWAY PRESSURE (BI-LEVEL CPAP) / BI-LEVEL VENTILATORY SUPPORT SYSTEM Certification Type
CERTIFICATE OF MEDICAL NECESSITY TO BE ISSUED TO CGHS BENEFICIAREIS BEING PRESCRIBED BILEVEL CONTINUOUS POSITIVE AIRWAY PRESSURE (BI-LEVEL CPAP) / BI-LEVEL VENTILATORY SUPPORT SYSTEM Certification Type
1. When a patient fails to ventilate or oxygenate adequately, the problem is caused by pathophysiological factors such as hyperventilation.
 Chapter 1: Principles of Mechanical Ventilation TRUE/FALSE 1. When a patient fails to ventilate or oxygenate adequately, the problem is caused by pathophysiological factors such as hyperventilation. F
Chronic Obstructive Pulmonary Disease
 136 PHYSIOLOGY CASES AND PROBLEMS Case 24 Chronic Obstructive Pulmonary Disease Bernice Betweiler is a 73-year-old retired seamstress who has never been married. She worked in the alterations department
Information Often Given to the Nurse at the Time of Admission to the Postanesthesia Care Unit
 Information Often Given to the Nurse at the Time of Admission to the Postanesthesia Care Unit * Patient s name and age * Surgical procedure and type of anesthetic including drugs used * Other intraoperative
Oxygen and ABG. Dr Will Dooley
 Oxygen and ABG G Dr Will Dooley Oxygen and ABGs Simply in 10 cases Recap of: ABG interpretation Oxygen management Some common concerns A-a gradient Base Excess Anion Gap COPD patients CPAP/BiPAP First
Appendix (i) The ABCDE approach to the sick patient
 The ABCDE approach to the sick patient") Appendix (i) The ABCDE approach to the sick patient This appendix and the one following provide guidance on the initial approach and management of common medical emergencies which may arise in general
Appendix (i) The ABCDE approach to the sick patient This appendix and the one following provide guidance on the initial approach and management of common medical emergencies which may arise in general
a. Describe the physiological consequences of intermittent positive pressure ventilation and positive end-expiratory pressure.
 B. 10 Applied Respiratory Physiology a. Describe the physiological consequences of intermittent positive pressure ventilation and positive end-expiratory pressure. Intermittent positive pressure ventilation
Non-invasive Ventilation protocol For COPD
 NHS LANARKSHIRE MONKLANDS HOSPITAL Non-invasive Ventilation protocol For COPD April 2017 S Baird Review Date: Oct 2019 Approved by Medical Directorate Indications for Non-Invasive Ventilation (NIV) NIV
Handling Common Problems & Pitfalls During. Oxygen desaturation in patients receiving mechanical ventilation ACUTE SEVERE RESPIRATORY FAILURE
 Handling Common Problems & Pitfalls During ACUTE SEVERE RESPIRATORY FAILURE Pravit Jetanachai, MD QSNICH Oxygen desaturation in patients receiving mechanical ventilation Causes of oxygen desaturation 1.
October Paediatric Respiratory Workbook APCP RESPIRATORY COMMITTEE
 October 2017 Paediatric Respiratory Workbook APCP RESPIRATORY COMMITTEE This workbook is designed to introduce to you the difference between paediatric and adult anatomy and physiology. It will also give
Sample Case Study. The patient was a 77-year-old female who arrived to the emergency room on
 Sample Case Study The patient was a 77-year-old female who arrived to the emergency room on February 25 th with a chief complaint of shortness of breath and a deteriorating pulmonary status along with
Respiratory system. Applied Anatomy &Physiology
 Respiratory system Applied Anatomy &Physiology Anatomy The respiratory system consists of 1)The Upper airway : Nose, mouth and larynx 2)The Lower airways Trachea and the two lungs. Within the lungs,
Acute respiratory failure
 Rita Williams, NP-C, PA PeaceHealth Medical Group Pulmonary & Critical Care Acute respiratory failure Ventilation/perfusion mismatching Most common cause of hypoxemia Normal is 1:1 ratio or 1 Ventilation
ACUTE RESPIRATORY DISTRESS SYNDROME (ARDS) Rv
 Rv") ACUTE RESPIRATORY DISTRESS SYNDROME (ARDS) Rv.8.18.18 ACUTE RESPIRATORY DISTRESS SYNDROME (ARDS) SUDDEN PROGRESSIVE FORM OF ACUTE RESPIRATORY FAILURE ALVEOLAR CAPILLARY MEMBRANE BECOMES DAMAGED AND MORE
ACUTE RESPIRATORY DISTRESS SYNDROME (ARDS) Rv.8.18.18 ACUTE RESPIRATORY DISTRESS SYNDROME (ARDS) SUDDEN PROGRESSIVE FORM OF ACUTE RESPIRATORY FAILURE ALVEOLAR CAPILLARY MEMBRANE BECOMES DAMAGED AND MORE
For more information about how to cite these materials visit
 Author(s): John G. Younger, M.D., 2009 License: Unless otherwise noted, this material is made available under the terms of the Creative Commons Attribution Share Alike 3.0 License: http://creativecommons.org/licenses/by-sa/3.0/
NON-INVASIVE VENTILATION. Lijun Ding 23 Jan 2018
 NON-INVASIVE VENTILATION Lijun Ding 23 Jan 2018 Learning objectives What is NIV The difference between CPAP and BiPAP The indication of the use of NIV Complication of NIV application Patient monitoring
3. Identify the importance in the prehospital setting for the administration of nebulized bronchodilator.
 TERMINAL OBJECTIVE At the end of this lesson, the EMT-Basic will be able to utilize the assessment findings to formulate a field impression of bronchospasm and understand the administration of nebulized
Anatomy and Physiology
 Anatomy and Physiology Respiratory Diagnostic Procedures 2004 Delmar Learning, a Division of Thomson Learning, Inc. Bell Work Complete cost of smoking exercise. We will go over this together! (Don t worry)!
Physiological Measurements Training for Care/Nursing & LD Small Group Home Staff
 Physiological Measurements Training for Care/Nursing & LD Small Group Home Staff CONTENTS 1. The National Early Warning Score 2. Respiratory Rate 3. Oxygen Saturations 4. Temperature 5. Blood Pressure
Pain Module. Opioid-RelatedRespiratory Depression (ORRD)
") Pain Module Opioid-RelatedRespiratory Depression (ORRD) Characteristics of patients who are at higher risk for Opioid- Related Respiratory Depression (ORRD) Sleep apnea or sleep disorder diagnosis : typically
Pain Module Opioid-RelatedRespiratory Depression (ORRD) Characteristics of patients who are at higher risk for Opioid- Related Respiratory Depression (ORRD) Sleep apnea or sleep disorder diagnosis : typically
1.1.2 CPAP therapy is used for patients who are suffering from an acute type 1 respiratory failure (Pa02 <8kPa with a normal or low Pac02).
.") Guidelines for initiating and managing CPAP (Continuous Positive Airway Pressure) on a general ward. B25/2006 1.Introduction and Who Guideline applies to 1.1.1 This document provides guidance for Healthcare
Guidelines for initiating and managing CPAP (Continuous Positive Airway Pressure) on a general ward. B25/2006 1.Introduction and Who Guideline applies to 1.1.1 This document provides guidance for Healthcare
Objectives. Health care significance of ARF 9/10/15 TREATMENT OF ACUTE RESPIRATORY FAILURE OF VARIABLE CAUSES: INVASIVE VS. NON- INVASIVE VENTILATION
 TREATMENT OF ACUTE RESPIRATORY FAILURE OF VARIABLE CAUSES: INVASIVE VS. NON- INVASIVE VENTILATION Louisa Chika Ikpeama, DNP, CCRN, ACNP-BC Objectives Identify health care significance of acute respiratory
The Respiratory System
 Elaine N. Marieb Katja Hoehn Human Anatomy & Physiology SEVENTH EDITION C H A P T E R PowerPoint Lecture Slides prepared by Vince Austin, Bluegrass Technical and Community College 22P A R T B The Respiratory
BTS Guideline for Home Oxygen use in adults Appendix 9 (online only) Key Questions - PICO 10 December 2012
 Key Questions - PICO 10 December 2012") BTS Guideline for Home Oxygen use in adults Appendix 9 (online only) Key Questions - PICO 10 December 2012 Evidence base for Home Oxygen therapy in COPD, non-copd respiratory disease and nonrespiratory
BTS Guideline for Home Oxygen use in adults Appendix 9 (online only) Key Questions - PICO 10 December 2012 Evidence base for Home Oxygen therapy in COPD, non-copd respiratory disease and nonrespiratory
Arterial Blood Gases. Dr Mark Young Mater Health Services
 Arterial Blood Gases Dr Mark Young Mater Health Services Why do them? Quick results Bedside test Range of important information Oxygenation Effectiveness of gas exchange Control of ventilation Acid base
Pediatric Advanced Life Support
 Pediatric Advanced Life Support Pediatric Chain of Survival Berg M D et al. Circulation 2010;122:S862-S875 Prevention Early cardiopulmonary resuscitation (CPR) Prompt access to the emergency response system
Appendix D An unresponsive patient with shallow, gasping breaths at a rate of six per minute requires:
 Answer Key Appendix D-2 1. An unresponsive patient with shallow, gasping breaths at a rate of six per minute requires: a. oxygen given via nasal cannula b. immediate transport to a medical facility c.
The Respiratory System
 130 20 The Respiratory System 1. Define important words in this chapter 2. Explain the structure and function of the respiratory system 3. Discuss changes in the respiratory system due to aging 4. Discuss
Carbon Dioxide Transport. Carbon Dioxide. Carbon Dioxide Transport. Carbon Dioxide Transport - Plasma. Hydrolysis of Water
 Module H: Carbon Dioxide Transport Beachey Ch 9 & 10 Egan pp. 244-246, 281-284 Carbon Dioxide Transport At the end of today s session you will be able to : Describe the relationship free hydrogen ions
Firefighter Pre-Hospital Care Program Recruit Presentation. Respiratory Emergencies
 Firefighter Pre-Hospital Care Program Recruit Presentation Respiratory Emergencies The Respiratory System Anatomy Pharynx Nasopharynx Oropharynx Epiglottis Larynx Trachea Right main bronchus Left main
Condensed version.
 I m Stu 3 Condensed version smcvicar@uwhealth.org Listen 1. Snoring 2. Gurgling 3. Hoarseness 4. Stridor (inspiratory/expiratory) 5. Wheezing 6. Grunting Listen Crackles Wheezing Stridor Absent Crackles
Cardiovascular and Respiratory Disorders
 Cardiovascular and Respiratory Disorders Blood Pressure Normal blood pressure is 120/80 mmhg (millimeters of mercury) Hypertension is when the resting blood pressure is too high Systolic BP is 140 mmhg
1 Chapter 13 Respiratory Emergencies 2 Respiratory Distress Patients often complain about. Shortness of breath Symptom of many different Cause can be
 1 Chapter 13 Respiratory Emergencies 2 Respiratory Distress Patients often complain about. Shortness of breath Symptom of many different Cause can be difficult to determine. Even for physician in hospital
Function of the Respiratory System. Exchange CO2 (on expiration) for O2 (on inspiration)
 for O2 (on inspiration)") Function of the Respiratory System Exchange CO2 (on expiration) for O2 (on inspiration) Upper Respiratory Tract Includes: Nose Mouth Pharynx Larynx Function: Warms and humidifies the inspired air Filters
Function of the Respiratory System Exchange CO2 (on expiration) for O2 (on inspiration) Upper Respiratory Tract Includes: Nose Mouth Pharynx Larynx Function: Warms and humidifies the inspired air Filters
Lecture Notes. Chapter 2: Introduction to Respiratory Failure
 Lecture Notes Chapter 2: Introduction to Respiratory Failure Objectives Define respiratory failure, ventilatory failure, and oxygenation failure List the causes of respiratory failure Describe the effects
Indications for Respiratory Assistance. Sheba Medical Center, ICU Department Nick D Ardenne St George s University of London Tel Hashomer
 Indications for Respiratory Assistance Sheba Medical Center, ICU Department Nick D Ardenne St George s University of London Tel Hashomer Respiratory Assistance Non-invasive - Nasal specs - Facemask/ Resevoir
Maternal Collapse Guideline
 Maternal Collapse Guideline Guideline Number: 664 Supersedes: Classification Clinical Version No: Date of EqIA: Approved by: Date Approved: Date made active: Review Date: 1 Obstetric Written Documentation
Physiological Causes of Abnormal ABG s
 Physiological Causes of Abnormal ABG s Major Student Performance Objective 1 1. The student will be able to discuss causes for various types of blood gas results. 2. They will also be required to discuss
Paramedic Rounds. Pre-Hospital Continuous Positive Airway Pressure (CPAP)
") Paramedic Rounds Pre-Hospital Continuous Positive Airway Pressure (CPAP) Morgan Hillier MD Class of 2011 Dr. Mike Peddle Assistant Medical Director SWORBHP Objectives Outline evidence for pre-hospital
Paramedic Rounds Pre-Hospital Continuous Positive Airway Pressure (CPAP) Morgan Hillier MD Class of 2011 Dr. Mike Peddle Assistant Medical Director SWORBHP Objectives Outline evidence for pre-hospital
Cardiorespiratory Physiotherapy Tutoring Services 2017
 VENTILATOR HYPERINFLATION ***This document is intended to be used as an information resource only it is not intended to be used as a policy document/practice guideline. Before incorporating the use of
Post-Anesthesia Care In the ICU
 Post-Anesthesia Care In the ICU The following is based on current research and regional standards of care. At completion you will be able to identify Basic equipment needed at the bedside. Aldrete scoring
RESPIRATORY PROBLEMS IN MND RICHARD HARRISON MND RESPIRATORY ASSESSMENT SERVICE LUNG HEALTH UNIVERSITY HOSPITAL OF NORTH TEES
 RESPIRATORY PROBLEMS IN MND RICHARD HARRISON MND RESPIRATORY ASSESSMENT SERVICE LUNG HEALTH UNIVERSITY HOSPITAL OF NORTH TEES A TYPICAL HISTORY: NON BULBAR ONSET Difficulty walking Weak hands and arms
/ABG. It covers acid-base disturbance, respiratory failure, and a small summary for some other derangements. Causes of disturbance
 /ABG This page focuses on providing some possible causes for the various disturbances that may be seen on an ABG. Although not an exhaustive list, it attempts to outline the main headings for possible
Respiratory Failure in the Pediatric Patient
 Respiratory Failure in the Pediatric Patient Ndidi Musa M.D. Associate Professor of Pediatrics Medical College of Wisconsin Pediatric Cardiac Intensivist Children s Hospital of Wisconsin Objectives Recognize
Test Bank Pilbeam's Mechanical Ventilation Physiological and Clinical Applications 6th Edition Cairo
 Instant dowload and all chapters Test Bank Pilbeam's Mechanical Ventilation Physiological and Clinical Applications 6th Edition Cairo https://testbanklab.com/download/test-bank-pilbeams-mechanical-ventilation-physiologicalclinical-applications-6th-edition-cairo/
Pediatric Shock. Hypovolemia. Sepsis. Most common cause of pediatric shock Small blood volumes (80cc/kg)
") Critical Concepts: Shock Inadequate peripheral perfusion where oxygen delivery does not meet metabolic demand Adult vs Pediatric Shock - Same causes/different frequencies Pediatric Shock Hypovolemia Most
Critical Concepts: Shock Inadequate peripheral perfusion where oxygen delivery does not meet metabolic demand Adult vs Pediatric Shock - Same causes/different frequencies Pediatric Shock Hypovolemia Most
For more information about how to cite these materials visit
 Project: Ghana Emergency Medicine Collaborative Document Title: Approach to the Dyspenic Adult Patient Author(s): Randall Ellis, MD MPH (Vanderbilt University) License: Unless otherwise noted, this material
Anaesthetic considerations for laparoscopic surgery in canines
 Vet Times The website for the veterinary profession https://www.vettimes.co.uk Anaesthetic considerations for laparoscopic surgery in canines Author : Chris Miller Categories : Canine, Companion animal,
Acid Base Imbalance. 1. Prior to obtaining the ABG s an Allen s test should be performed. Explain the rationale for this.
 Acid Base Imbalance Case 1. An 18-year-old male arrives via EMS to the emergency department. He is experiencing Tachypnea, dizziness, numbness and paraesthesia. He is anxious, respirations are 28 per minute
Respiratory Pathophysiology Cases Linda Costanzo Ph.D.
 Respiratory Pathophysiology Cases Linda Costanzo Ph.D. I. Case of Pulmonary Fibrosis Susan was diagnosed 3 years ago with diffuse interstitial pulmonary fibrosis. She tries to continue normal activities,
Arterial Blood Gas Analysis
 Arterial Blood Gas Analysis L Lester www.3bv.org Bones, Brains & Blood Vessels Drawn from radial or femoral arteries. Invasive procedure Caution must be taken with patient on anticoagulants ph: 7.35-7.45
Appendix E Choose the sign or symptom that best indicates severe respiratory distress.
 Appendix E-2 1. In Kansas EMT-B may monitor pulse oximetry: a. after they complete the EMT-B course b. when the service purchases the state approved pulse oximeters c. when the service director receives
Unconscious exchange of air between lungs and the external environment Breathing
 Respiration Unconscious exchange of air between lungs and the external environment Breathing Two types External Exchange of carbon dioxide and oxygen between the environment and the organism Internal Exchange
Lecture Notes. Chapter 3: Asthma
 Lecture Notes Chapter 3: Asthma Objectives Define asthma and status asthmaticus List the potential causes of asthma attacks Describe the effect of asthma attacks on lung function List the clinical features
Respiratory Management in Pediatrics
 Respiratory Management in Pediatrics Children s Hospital Omaha Critical Care Transport Sue Holmer RN, C-NPT Objectives Examine the differences between the pediatric and adults airways. Recognize respiratory
Mechanical Ventilation ศ.พ.ญ.ส ณ ร ตน คงเสร พงศ ภาคว ชาว ส ญญ ว ทยา คณะแพทยศาสตร ศ ร ราชพยาบาล
 Mechanical Ventilation ศ.พ.ญ.ส ณ ร ตน คงเสร พงศ ภาคว ชาว ส ญญ ว ทยา คณะแพทยศาสตร ศ ร ราชพยาบาล Goal of Mechanical Ventilation Mechanical ventilation is any means in which physical device or machines are
5. What is the cause of this patient s metabolic acidosis? LACTIC ACIDOSIS SECONDARY TO ANEMIC HYPOXIA (HIGH CO LEVEL)
") Self-Assessment RSPT 2350: Module F - ABG Analysis 1. You are called to the ER to do an ABG on a 40 year old female who is C/O dyspnea but seems confused and disoriented. The ABG on an FiO 2 of.21 show:
Self-Assessment RSPT 2350: Module F - ABG Analysis 1. You are called to the ER to do an ABG on a 40 year old female who is C/O dyspnea but seems confused and disoriented. The ABG on an FiO 2 of.21 show:
NHS Training for Physiotherapy Support Workers. Workbook 14 The respiratory system
 NHS Training for Physiotherapy Support Workers Workbook 14 The respiratory system Contents Workbook 14 The respiratory system 1 14.1 Aim 3 14.2 Learning outcomes 3 14.3 The respiratory system 4 14.4 Breathing
Oxygen Workbook Answer book
 Oxygen Workbook Answer book 1 Produced by the Oxygen Steering Group, 2018 2 1. Pre-workbook Quiz 1. Oxygen is a drug? Y N maybe 2. Oxygen is a treatment for? breathlessness hypoxia high carbon dioxide
Chapter 13. Respiratory Emergencies
 Chapter 13 Respiratory Emergencies Introduction Patients often complain about dyspnea. Shortness of breath Symptom of many different conditions Cause can be difficult to determine. Even for physician in
Chronic Obstructive Pulmonary Disease (COPD) Copyright 2014 by Mosby, an imprint of Elsevier Inc.
 Copyright 2014 by Mosby, an imprint of Elsevier Inc.") Chronic Obstructive Pulmonary Disease () 8.18.18 Copyright 2014 by Mosby, an imprint of Elsevier Inc. Description Airflow limitation not fully reversible progressive Abnormal inflammatory response of lungs
Chronic Obstructive Pulmonary Disease () 8.18.18 Copyright 2014 by Mosby, an imprint of Elsevier Inc. Description Airflow limitation not fully reversible progressive Abnormal inflammatory response of lungs
CPAP. Pre-Hospital Treatment Using The Respironics Whisperflow CPAP Device. Charlottesville Albemarle Rescue Squad - CPAP
 CPAP Pre-Hospital Treatment Using The Respironics Whisperflow CPAP Device CPAP What Is It? C ontinuous P ositive A irway P ressure Anatomy Review Anatomy Review Anatomy Review Alveoli Anatomy Review Chest
Overview. The Respiratory System. Chapter 18. Respiratory Emergencies 9/11/2012
 Chapter 18 Respiratory Emergencies Slide 1 Overview Respiratory System Review Anatomy Physiology Breathing Assessment Adequate Breathing Breathing Difficulty Focused History and Physical Examination Emergency
Ron Hosp, MS-HSA, RRT Regional Respiratory Specialist. This program has been approved for 1 hour of continuing education credit.
 Ron Hosp, MS-HSA, RRT Regional Respiratory Specialist This program has been approved for 1 hour of continuing education credit. Course Objectives Identify at least four goals of home NIV Identify candidates
CHEST INJURY PULMONARY CONTUSION
 CHEST INJURY PULMONARY CONTUSION Introduction Pulmonary contusion refers to blunt traumatic lung parenchymal injury which results in oedema and haemorrhaging into alveolar spaces. It may also result in
Anatomy Review. Anatomy Review. Respiratory Emergencies CHAPTER 16
 CHAPTER 16 Respiratory Emergencies Anatomy Review Anatomy Review 1 Pediatric Anatomy Airway structure differences Proportionally larger tongue Smaller, more flexible trachea Abdominal breathers Reasons
10/17/2016 OXYGEN DELIVERY: INDICATIONS AND USE OF EQUIPMENT COURSE OBJECTIVES COMMON CAUSES OF RESPIRATORY FAILURE
 OXYGEN DELIVERY: INDICATIONS AND USE OF EQUIPMENT J U L I E Z I M M E R M A N, R N, M S N C L I N I C A L N U R S E S P E C I A L I S T E L O I S A C U T L E R, R R T, B S R C C L I N I C A L / E D U C
Weeks 1-3:Cardiovascular
 Weeks 1-3:Cardiovascular Cardiac Output The total volume of blood ejected from the ventricles in one minute is known as the cardiac output. Heart Rate (HR) X Stroke Volume (SV) = Cardiac Output Normal
Respiratory Emergencies
 CHAPTER 16 Respiratory Emergencies Anatomy Review Anatomy Review Pediatric Anatomy Airway structure differences Proportionally larger tongue Smaller, more flexible trachea Abdominal breathers Reasons for
Capnography Connections Guide
 Capnography Connections Guide Patient Monitoring Contents I Section 1: Capnography Introduction...1 I Section 2: Capnography & PCA...3 I Section 3: Capnography & Critical Care...7 I Section 4: Capnography
Lesson 4-3: Cardiac Emergencies. CARDIAC EMERGENCIES Angina, AMI, CHF and AED
 Lesson 4-3: Cardiac Emergencies CARDIAC EMERGENCIES Angina, AMI, CHF and AED THREE FAMILIAR CARDIAC CONDITIONS Angina Pectoris Acute Myocardial Infarction Congestive Heart Failure ANGINA PECTORIS Chest
Identification and Treatment of the Patient with Sleep Related Hypoventilation
 Identification and Treatment of the Patient with Sleep Related Hypoventilation Hillary Loomis-King, MD Pulmonary and Critical Care of NW MI Munson Sleep Disorders Center X Conflict of Interest Disclosures
Capnography. Capnography. Oxygenation. Pulmonary Physiology 4/15/2018. non invasive monitor for ventilation. Edward C. Adlesic, DMD.
 Capnography Edward C. Adlesic, DMD University of Pittsburgh School of Dental Medicine 2018 North Carolina Program Capnography non invasive monitor for ventilation measures end tidal CO2 early detection
COPD Challenge CASE PRESENTATION
 Chronic obstructive pulmonary disease (COPD) exacerbations may make up more than 10% of acute medical admissions [1], and they are increasingly recognised as a cause of significant morbidity and mortality
Bi-Level Therapy: Boosting Comfort & Compliance in Apnea Patients
 Bi-Level Therapy: Boosting Comfort & Compliance in Apnea Patients Objectives Describe nocturnal ventilation characteristics that may indicate underlying conditions and benefits of bilevel therapy for specific
NON INVASIVE LIFE SAVERS. Non Invasive Ventilation (NIV)
") Table 1. NIV: Mechanisms Of Action Decreases work of breathing Increases functional residual capacity Recruits collapsed alveoli Improves respiratory gas exchange Reverses hypoventilation Maintains upper
Table 1. NIV: Mechanisms Of Action Decreases work of breathing Increases functional residual capacity Recruits collapsed alveoli Improves respiratory gas exchange Reverses hypoventilation Maintains upper
VAO BASIC SUPPORT CLINICAL APPROACH TO THE PATIENT HANDOUT
 CLINICAL APPROACH TO THE PATIENT HANDOUT 1 I am the most important part of patient care. How can you expect to treat a patient appropriately if you don t follow through on basic primary care? Remember:
Capnography for Pediatric Procedural Sedation Learning Module Last revised: February 18, 2014
 Capnography for Pediatric Procedural Sedation Learning Module Last revised: February 18, 2014 Capnography 40 Non-invasive device that continually monitors EtCO 2 While pulse oximetry measures oxygen saturation,
Recent Advances in Respiratory Medicine
 Recent Advances in Respiratory Medicine Dr. R KUMAR Pulmonologist Non Invasive Ventilation (NIV) NIV Noninvasive ventilation (NIV) refers to the administration of ventilatory support without using an invasive
Neuromuscular diseases (NMDs) include both hereditary and acquired diseases of the peripheral neuromuscular system. They are diseases of the
 include both hereditary and acquired diseases of the peripheral neuromuscular system. They are diseases of the") Neuromuscular diseases (NMDs) include both hereditary and acquired diseases of the peripheral neuromuscular system. They are diseases of the peripheral nerves (neuropathies and anterior horn cell diseases),
Neuromuscular diseases (NMDs) include both hereditary and acquired diseases of the peripheral neuromuscular system. They are diseases of the peripheral nerves (neuropathies and anterior horn cell diseases),
Mechanical ventilation in the emergency department
 Mechanical ventilation in the emergency department Intubation and mechanical ventilation are often needed in emergency treatment. A ENGELBRECHT, MB ChB, MMed (Fam Med), Dip PEC, DA Head, Emergency Medicine
AIRWAY & HEART ANOTOMY
 Objectives I CAN T BREATH Respiratory Emergencies Review of anatomical structures related to heart & lungs Differentiate differences between adult and pediatric airways Identify the need for airway assistance
The Goal of the Respiratory Assessment. Two Parts of the Respiratory Assessment
 The Respiratory System Respiratory Assessment of the Adult Patient Mary Douglas, MSN, RN Nurse Educator Minneapolis VA Health Care System Respiratory system: moves oxygen into the body and carbon dioxide
UNIT VI: ACID BASE IMBALANCE
 UNIT VI: ACID BASE IMBALANCE 1 Objectives: Review the physiological mechanism responsible to regulate acid base balance in the body i.e.: Buffers (phosphate, hemoglobin, carbonate) Renal mechanism Respiratory