LESSON ASSIGNMENT. Positioning for Exams of the Upper Extremities. After completing this lesson, you should be able to:
|
|
|
- Archibald McCarthy
- 5 years ago
- Views:
Transcription
1 LESSON ASSIGNMENT LESSON 5 Positioning for Exams of the Upper Extremities. LESSON ASSIGNMENT Paragraphs 5-1 through LESSON OBJECTIVES After completing this lesson, you should be able to: 5-1. Identify specifications for proper placement of the anatomical structure of the upper extremities, listed below: Hand (PA, oblique, lateral). Wrist (lateral, PA with ulnar flexion) Forearm (AP & lateral). Elbow (AP & lateral). Humerus (AP & lateral). Shoulder (AP with external rotation, AP with internal rotation, inferiorsuperior axial projection). Scapula (AP & lateral). Acromioclavicular joints (with & without weights). SUGGESTION After reading and studying the assignment, complete the exercises at the end of this lesson. These exercises will help you to achieve the lesson objectives. MD
2 5-1. INTRODUCTION LESSON 5 POSITIONING FOR EXAMS OF THE UPPER EXTREMITIES Section I. RADIOGRAPHIC PROJECTIONS OF THE HAND a. Lesson Format. In this lesson, a group of related projections for the upper extremities will be presented. For each projection, two figures are provided (figure 5-1). The first depicts the body part that is of clinical interest, with labels naming the various parts of the anatomical structure; the second shows proper placement of the patient. Where feasible, the anatomical structure to be demonstrated is highlighted in gray in the labeled drawing. (A line drawing rather than a photograph of a radiograph was selected to ensure clarity of depiction.) b. Specifications (Order of Procedure). Following the two figures is the order of procedure, a laundry list of specifications for the projection (figure 5-2). The laundry list consists of information essential to ensuring proper visualization of the body part. The information (specifications) provided for each position will always be presented in the same order, for ease of comparison. (See bottom inset, figure 5-1). c. Common information. Some information common to a group of projections will be presented at the beginning of the lesson instead of being repeated over and over again for each position. In this lesson, for example, the information pertaining to the patient s dress will be presented at the outset; but this common information should be kept in mind as you proceed to read about each position. d. The Order of Procedure (Position Specification). The information generally included in the laundry list (position specifications) is explained in figure 5-2. Note that items a, b, and c are the position specific or unique information is provided for these entries. e. How to Use This Material. There are over 100 positions presented in MD0961, Standard Positioning Techniques I, and MD0962, Standard Positioning Techniques II. The majority are in MD0962, the sequel to this subcourse. Many of the specifications for the various positions are similar. Unless you zero in on the critical distinguishing features of each position, the information presented here can easily become muddled in your mind. You cannot memorize all the facts about these positions. What you can do is to learn the critical differences among positions. Don t let yourself feel overwhelmed. Instead, take one position at a time. (Relax and forget about all the other positions to be covered for the time being.) MD
, patient positioning")
3 Figure 5-1. For each projection the anatomical structure (upper left), patient positioning (upper right), and specifications (order of procedure) are provided. MD

4 Figure 5-2. The standardized order of procedure information explained. f. Study Strategies. Look over the illustrations, noting the general features of the position and the anatomical structures. Next, go over the list of specifications carefully. Approach it as you would a laundry or shopping list, ticking off the items in your mind as you proceed down the list. If you have studied this material before, try to recall what you have learned previously as you work your way down the list of specifications. After reading over the list a few times, cover the list with your hands, look at the illustration, and ask yourself, Okay, what is the technical factors for this AP forearm? MD
5 g. More Study Strategies. Now, go back to the illustrations and try to link up the visual information in the drawing with the descriptive information in the text (order of procedure/laundry list of specifications). Finally, zero in on and review several times, the two key elements of every position: the alignment or position to be assumed by the patient/ the part position reference (paragraph e) and the central ray (CR) (paragraph f). Once these essentials are fixed in your memory, the other details will fall into place more easily. h. The Order of Procedure (Position Specifications). The information generally includes in the order of procedure is explained in figure 5-2. Note that items a, b, c are the same for all positions. No position specific information is provided because it will depend on the anatomy to be demonstrated PATIENT DRESS AND REMOVAL OF ARTIFACTS a. General information about patient dress and removal of artifacts is covered here instead of in the specifications for each position since these guidelines apply to all the positions in general (figure 5-3). PROJECTION ARTIFACTS & CLOTHING Hand No wristwatches, bracelets, rings. Wrist/Forearm.. No wristwatches/bracelets; sleeves rolled up. Humerus Male patient stripped to waist. Chest.. Female patient No undergarments (shoulder to waist). No necklaces or pendants. Dons gown. Abdomen/Pelvis.. Removes undergarments (girdles), waist chains. Dons gown. Knee/Femur.. Removes pants, dons gown. Figure 5-3. Artifacts/clothing to be removed (or donned). MD
6 b. In some cases, of course, it may not be desirable or possible to remove artifacts. If you receive a trauma patient wearing a cervical collar, for example, a necklace cannot be removed since removing it might cause further injury to the patient. Some artifacts cannot be removed. For example, if you are doing a skull series on a patient with a glass eye or an ear implant, the artifact cannot be removed. The same would apply for a hip prosthesis. In such cases, you would simply have to make accommodations, working around these potential obstacles. You will have to position the patient so that an unobstructed view may still be obtained MEASURING THE PART For each of the positions presented, step b of the order of procedure (figure 5-1, bottom) will simply indicate measure the part. Measuring the part means measuring the thickness of the body part in order to select the appropriate technique factors. You must measure the thickness of the body part from the point at which the central ray will enter up through the exit site of the CR. For a PA hand, for example, you would measure the thickness of the patient s hand from the posterior surface to the anterior surface through the head of the third metacarpal. MEASURING THE PART Measure the thickness of the body part from the point at which the central ray (CR) enters, up through the exit site of the CR SETTING THE CONTROL PANEL Step c of the order of procedure (figure 5-1, bottom) will simply have the entry, set control panel. (This has been covered in Lesson 2.) Essentially, setting the control panel means placing the correct technical factors, such as kvp and mas on the control panel for the part being radiographed SOURCE TO IMAGE RECEPTOR DISTANCE (SID) Set the SID as indicated in item h of the order of procedure (figure 5-1, bottom). SOURCE TO IMAGE RECEPTOR DISTANCE (SID) The SID is measured either to the tabletop or to the Bucky MD

7 5-6. POSTEROANTERIO HAND MD
8 THE ORDER OF THE PROCEDURE a. Remove artifacts. b. Measure part. c. Set control panel. d. Technical Factors: 1. Film size 10 x 12 (24 x 30 cm) cassette, CW 2. Divide film in half CW 3. Detail screen tabletop kvp range. e. LM: f. Patient/Part position: Patient seated at end of table with elbow flexed about 90 degrees with hand and forearm resting on table. 1. Pronate hand with palmar surface in contact with cassette. 2. Center hand and wrist to half of film. 3. Align long axis of hand and forearm with long axis of portion of film being exposed. 4. Spread fingers out slightly. g. CR: 1. CR perpendicular to film, directed to the third MP joint. 2. Minimum 40 SID. h. SID: 40 i. Collimation: Collimate on four sides to outer margins of hand and wrist. j. Immobilization: k. Shielding: Place lead shield over patient s lap to shield gonads. l. Demonstrates: Phalanges, metacarpals, carpals and all joints of the hand in the true PA position, except for the thumb which is represented as an OBL view. MD


9 5-7. OBLIQUE HAND MD
10 THE ORDER OF THE PROCEDURE a. Remove artifacts. b. Measure part. c. Set control panel. d. Technical Factors: Film size: x 12 (24 x 30 cm) cassette, CW. 2. Divide film in half CW. 3. Detail screen tabletop KVP range e. LM: f. Patient/Part position: Patient seated at end of table with elbow flexed about 90 degrees with hand and forearm resting on table. 1. Pronate hand on cassette and align long axis of hand and forearm to long axis of portion of film being exposed. 2. Center hand and wrist to half of film. 3. Rotate entire hand and wrist laterally 45 degrees and support with a radiolucent wedge or step block as shown so all digits are separated and parallel to film. g. CR: perpendicular to film, directed to the second MP joint. h. SID: Minimum 40 i. Collimation: Collimate on four sides to outer margins of hand and wrist. j. Immobilization: k. Shielding: Place lead shield over patient s lap to shield gonads. l. Demonstrates: Phalanges, metacarpals, carpals and all joints in the OBL position. MD

11 5-8. LATERAL HAND MD
12 THE ORDER OF THE PROCEDURE a. Remove artifacts. b. Measure part. c. Set control panel. c. Technical Factors: 1. Film size: 8 x 10 (18 x 24 cm) cassette, LW. 2. Detail screen, tabletop kvp range. d. LM: e. Patient/Part position: Patient seated at end of table with elbow flexed about 90 degrees with hand and forearm resting on table. 1. Align long axis of hand and forearm to long axis of film with center of film to MP joints. 2. Rotate hand and wrist into lateral position with thumb side up. 3. Spread fingers and thumb into a fan position and support each digit on radiolucent step block as shown (see page 120 of Bontrager). Ensure all digits including thumb are parallel to film and that the metacarpals are not oblique but remain in the true LAT position. f. CR: CR perpendicular to film, directed to the 2 nd MP joint. g. SID: Minimum 40 h. Collimation: Collimate on four sides to outer margins of hand and wrist. i. Immobilization: j. Shielding: Place lead shield over patient s lap to shield gonads. k. Demonstrates: Phalanges, metacarpals and carpals superimposed in a LAT position, except for the thumb, which is shown in the true PA projection. MD

13 5-9. POSTERANTERIOR WRIST Section II. THE WRIST AND FOREARM MD
14 THE ORDER OF THE PROCEDURE a. Remove artifacts. b. Measure part. c. Set control panel. d. Technical Factors: Film size-10 x 12" (24 x 30 cm) crosswise 1. Divide film in half crosswise 1. Detail screen table top kvp range e. LM: f. Patient/Part position: Patient seated at end of table with elbow flexed about 90 degrees with hand and wrist resting on cassette, palm down. 1. Drop shoulder or raise table height so shoulder, elbow and wrist are on the same horizontal plane. 2. Align long axis of hand and forearm to center of the long axis of the unmasked half of the cassette, with carpal area to center of unmasked film. 3. With hand pronated, slightly clench fist to place wrist and carpal area in close contact with cassette. g. CR: CR perpendicular to film, directed to mid carpal area. h. SID: Minimum 40 i. Collimation: Collimate on all four sides of wrist, including distal radius, ulna, and metacarpal area j. Immobilization: Pre exposure instructions: Hold still; don t move k. Shielding: Place lead shield over patient s lap to shield gonads. l. Demonstrates: Mid and proximal metacarpals, carpals, distal radius, ulna and associated joints of the wrist in the true PA position. MD

15 5-10. OBLIQUE WRIST MD
16 THE ORDER OF THE PROCEDURE a. Remove artifacts. b. Measure part. c. Set control panel. d. Technical Factors: Film size-10 x 12" (24 x 30 cm) crosswise e. LM: 1. Divide film in half crosswise 2. Detail screen table top kvp range f. Patient/Part position: Patient seated at end of table with elbow flexed about 90 degrees with hand and wrist resting on cassette, palm down. 1. Drop shoulder or raise table height so shoulder, elbow and wrist are on the same horizontal plane. 2. Align hand and wrist to the center of, and to the long axis of the unmasked half of the cassette. 3. From pronated position rotate hand and wrist laterally 45 degrees. 4. For stability place a 45 degree support under the thumb side of hand to support hand and wrist in a 45 degree oblique position, or partially flex fingers to arch hand and lightly rest fingertips on cassette. g. CR: CR perpendicular to film, directed to mid carpal area. h. SID: Minimum 40 j. Immobilization: Pre exposure instructions: Hold still; don t move. i. Collimation: Collimate to wrist on all four sides, include distal radius, ulna, and metacarpal area. k. Shielding: Place lead shield over patients lap to shield gonads. l. Demonstrates: Mid and proximal metacarpals, carpals, (especially trapezium and scaphoid ) distal radius, ulna and associated joints of the wrist in the true oblique position. MD

17 5-11. LATERAL WRIST MD
18 THE ORDER OF THE PROCEDURE a. Remove artifacts. b. Measure part. c. Set control panel. d. Technical Factors: Film size- 10 x 12" (24 x 30 cm) 1. Divide film in half crosswise 2. Detail screen table top kvp range ( increase 4 kvp from PA an Oblique ) e. LM: f. Patient/Part position: Patient seated at end of table with both arm and forearm resting on table with elbow flexed about 90 degrees and wrist and hand on cassette in thumb up lateral position. 1. Drop shoulder or raise table height so shoulder, elbow and wrist are on the same horizontal plane. 2. Align long axis of hand and forearm to center of the long axis of the cassette. 3. Adjust the hand and wrist into the true lateral position with the fingers comfortably flexed; or if support is needed to prevent motion, use a radiolucent support block and sandbag and place block against extended hand and fingers as shown. g. CR: CR perpendicular to film, directed to mid wrist joint. h. SID: Minimum 40 SID i. Collimation: Collimate on four sides to include distal radius, ulna, and at least to mid-metacarpal area. j. Immobilization: Pre exposure instructions: Hold still; don t move. k. Shielding: Place lead shield over patient s lap to shield gonads. l. Demonstrates: Superimposed proximal metacarpals, carpals, distal radius, ulna and wrist joint in the true lateral position. MD

19 5-12. POSTERANTERIOR WRIST WITH ULNAR FLEXION MD
20 THE ORDER OF THE PROCEDURE a. Remove artifacts. b. Measure part. c. Set control panel. d. Technical Factors: Film size- 10 x 12" (24 x 30 cm) e. LM: 1. Divide film in half crosswise 2. Detail screen table top kvp range f. Patient/Part position: Patient seated at end of table with elbow flexed about 90 degrees with hand and wrist resting on cassette, palm down. 1. Drop shoulder or raise table height so shoulder, elbow and wrist are on the same horizontal plane. 2. Align long axis of hand and forearm to center of the long axis of the cassette, with carpal area to center of film. 3. With hand pronated, wrist and carpal area in close contact with cassette. 4. Without moving forearm, gently evert (move toward ulnar side, or towards 5 th digit) as far as patient can tolerate without lifting or obliquing distal forearm. g. CR: Angle CR degrees proximally (along log axis of forearm towards elbow) to direct CR perpendicular to scaphoid. Center CR to scaphoid (¾ in. medial and ¾ in. distal to the lateral styloid process). h. SID: Minimum 40 SID i. Collimation: Collimate on four sides to outer margins of hand and wrist. j. Immobilization: : Pre exposure instructions: Hold still; don t move. k. Shielding: Place lead shield over patients lap to shield gonads. l. Demonstrates: Scaphoid without foreshortening with opened spaces between adjacent carpals. Also to a lessor degree visualizes the trapezium and trapezoid. MD


21 5-13. AP FOREARM MD
22 THE ORDER OF THE PROCEDURE a. Remove artifacts. b. Measure part. c. Set control panel. d. Technical Factors: Film size-14 x 17 inches lengthwise. e. LM: a) Divide in half lengthwise. b) Detail screen, tabletop. f. Patient/Part position: patient seated at end of table with hand and arms fully extended. (palm up or supinated). a) Drop shoulder to place entire upper limb on same plane. b) Align and center forearm to the long axis of unmasked portion of film. c) Have patient lean laterally as necessary to place entire wrist, forearm and elbow in as near a true AP position as possible. (Styloid processes and epicondyles will be equidistant to film borders). g. CR: CR perpendicular to film, directed to mid forearm. h. SID: Minimum 40 i. Collimation: Collimate both lateral borders to the actual forearm area; and at both ends collimate to avoid cutting off anatomy at either joint. Ensure that a minimum of 1 distal to wrist and 1 proximal to elbow joint are included on the film. j. Immobilization: Pre exposure instructions: Hold still; don t move. k. Shielding: Place lead shield over patient s lap to shield gonads. l. Demonstrates: Entire radius and ulna, proximal row of carpals, elbow and distal end of humerus in the AP projection. MD

23 5-14. LATERAL FOREARM MD
24 THE ORDER OF THE PROCEDURE a. Remove artifacts. b. Measure part. c. Set control panel. d. Technical Factors: 14 x 17" (35 x 43 cm) lengthwise. e. LM: a) Divide in half lengthwise. b) Detail screen, tabletop. f. Patient/Part position: Patient seated at the end of table with elbow flexed 90 degrees. a) Drop shoulder to place entire upper limb on same horizontal plane. c) Align and center forearm to the long axis of the unmasked portion of the film. d) Rotate hand and wrist into true lateral (thumb up) e) position and support hand to prevent motion. (Ensure that the distal radius and ulna are directly superimposed). g. CR: CR perpendicular to film, directed to mid forearm. h. SID: Minimum 40 i. Collimation: Collimate both lateral borders to the actual forearm area; and at both ends collimate to avoid cutting off any Anatomy at the joints. Ensure that 1 distal to wrist and 1 proximal to elbow joint are included on the film. j. Immobilization: Pre exposure instruction: Hold still; don t move. k. Shielding: Place lead shield over patient s gonads. l. Demonstrates: Entire radius and ulna, proximal row of carpals, elbow and distal humerus in lateral projection. MD

25 5-15. ANTEROPOSTERIO ELBOW Section III. THE ELBOW MD
26 THE ORDER OF THE PROCEDURE a. Remove artifacts. b. Measure part. c. Set control panel. d. Technical Factors: Film size-10 x 12" (24 x 30 cm) crosswise. e. LM: a) Divide in half crosswise. b) Detail screen, tabletop. f. Patient/Part position: Patient seated at end of table with elbow fully extended, wrist, elbow and shoulder on same horizontal plane. a) Fully extended: Extend elbow, supinate hand and align arm and forearm to center of unmasked portion of film. b) Ensure elbow joint is to center of unmasked film. c) Have patient lean laterally as necessary for true AP Projection, Epicondyles must be parallel to film. d) Palpate epicondyles to ensure equal distance from film borders and support hand as necessary to prevent motion. g. CR: CR perpendicular to film, directed to mid elbow joint. Which is midpoint of a line between epicondyles. h. SID: Minimum 40in. (102 cm) SID. i. Collimation: On all four sides to area of interest. j. Immobilization: Pre Exposure instruction: Hold still; don t move. k. Shielding: Secure lead shield at waist to protect patient s gonads. l. Demonstrates: Distal humerus, elbow joint space, and proximal radius and ulna in the AP projection. MD


27 5-16. LATERAL ELBOW MD
28 THE ORDER OF THE PROCEDURE a. Remove artifacts. b. Measure part. c. Set control panel. d. Technical Factors: Film size-10 x 12" (24 x 30 cm) crosswise. a) Divide in half crosswise. b) Detail screen, tabletop. e. LM: f. Patient/Part position: Patient seated at the end of the table with elbow flexed at 90 degrees. a) Center elbow joint to center of film with forearm extended off of lateral border. b) Ensure epicondyles are perpendicular to center of unmasked portion of film. c) Drop shoulder so humerus and forearm are on same plane. d) Rotate hand and wrist in true lateral position, thumb side up. g. CR: CR perpendicular to the film directed to mid elbow joint (mid epicondyles). h. SID: Minimum 40 in (102cm) i. Collimation: Collimate on four sides to area of interest j. Immobilization: Pre exposure instructions: Hold still; don t move k. Shielding: : Secure lead shield at waist to protect patient s gonads. l. Demonstrates: Lateral view of distal humerus and proximal forearm. Clearly visualizes olecranon process with epicondyles superimposed. MD

29 5-17. FULL LENGTH AP HUMERUS Section IV. THE HUMERUS MD
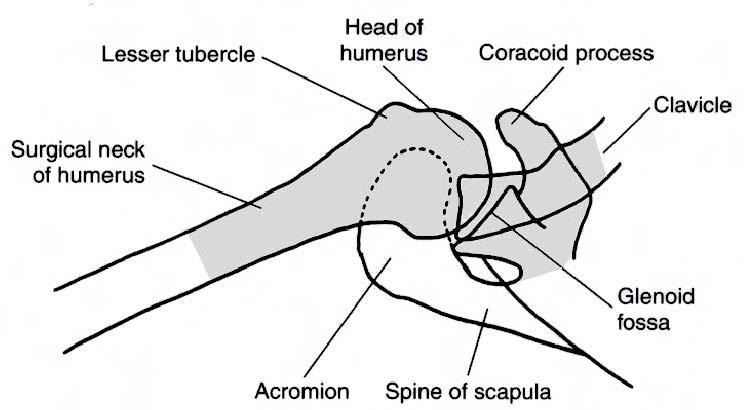
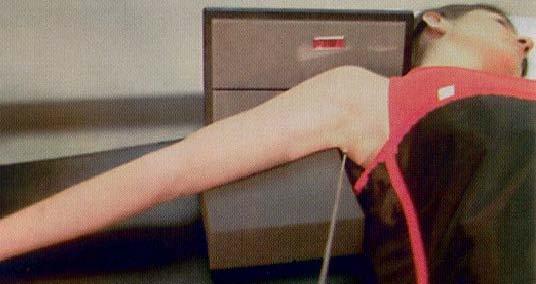
30 THE ORDER OF THE PROCEDURE a. Remove artifacts. b. Measure part. c. Set control panel. d. Technical Factors: Film Size: Half of a 14 x 17 (35 x 43 cm) LW a) NB b) Minimize anode-heel effect if possible e. LM: Place corresponding LM on cassette f. Patient/Part position: Patient spine or Erect the shoulder and elbow joints are the same distance from ends of the film a) Rotate body toward affected side as needed to bring the shoulder and proximal humerus in contact with cassette. b) Align humerus to long axis of the unmasked half of film, unless diagonal placement is needed to include both shoulder and elbow joints c) Extend hand and forearm as far as can be tolerated d) Abduct arm slightly and gently supinate hand so that epicondyles of elbow are parallel to the film g. CR: CR perpendicular to film, directed to midpoint of humerus h. SID: 40 i. Collimation: Collimate on four sides to soft tissue borders of humerus. Collimation field should include both joints and up to 1 of the proximal forearm j. Immobilization: Sandbag in palm of hand k. Respiration: Suspend respiration during exposure l. Shielding: Secure or place lead shield over pelvic area m. Demonstrates: Frontal view of entire humerus to include the Proximal Humerus, Greater tuberosity, Lesser tuberosity, Surgical neck, Glenoid Fossa, Coracoid Process, AC Articulation, Distal Humerus, Condyles, Epicondyles, Shaft of humerus, Proximal Forearm, Radius and the Ulna MD


31 5-18. FULL LENGTH LATERAL HUMERUS MD
32 THE ORDER OF THE PROCEDURE a. Remove artifacts. b. Measure part. c. Set control panel. d. Technical Factors: Film Size: Half of a 14 x 17 (35 x 43 cm) LW a) NB b) Minimize anode-heel effect if possible e. LM: Place corresponding LM on cassette f. Patient/Part position: Supine or erect Shoulder and elbow joints are the same distance from ends of the film a) Rotate body toward affected side as needed to bring the shoulder and proximal humerus in contact with cassette b) Align humerus to long axis of the unmasked half of film, unless diagonal placement is needed to include both shoulder and elbow joints c) Extend elbow, internally rotate arm into true lateral d) Epicondyles should be directly superimposed as viewed from the x-ray tube for a true lateral g. CR: CR perpendicular to film, directed to mid point of humerus j. Immobilization: Sandbag against turned out palm h. SID: 40 i. Collimation: Collimate on four sides to soft tissue borders of humerus Collimation field should include both joints and up to 1 of the proximal forearm k. Respiration: Suspend respiration during exposure l. Shielding: Secure or place lead shield over pelvic area m. Demonstrates: Lateral view of entire humerus to include the, Proximal Humerus, Greater tuberosity, Lesser tuberosity, Surgical neck, Glenoid Fossa, Coracoid Process, AC Articulation, Distal Humerus, Condyles, Epicondyles, Shaft of humerus, Proximal Forearm, Radius and the Ulna MD


33 Section V. THE SHOULDER ANTEROPOSTERIO SHOULDER WITH EXTERNAL ROTATION MD
34 THE ORDER OF THE PROCEDURE a. Remove artifacts. b. Measure part. c. Set control panel. d. Technical Factors: Film size 10 x 12" (24 x 30 cm) crosswise-may be used lengthwise if injury includes proximal ½ of humerus -8 x 10" for pediatrics Moving or stationary grid e. LM: f. Patient/Part position: May be taken erect or supine (erect is usually less painful for patient if condition allows). Rotate body slightly toward affected side if necessary to place shoulder in contact with cassette or tabletop (approximately degrees). Position patient so that top of film is 2 in (5 cm) above top of shoulder (acromion process) and coracoid process is over midline of cassette. Abduct extended arm slightly, then externally rotate arm (supinate hand) until epicondyles of distal humerus are parallel to the film. g. CR: Perpendicular to film, directed to center of cassette h. SID : Minimum 40 in. (102 cm) SID i. Collimation: On all four sides, with lateral and upper borders adjusted to soft tissue margins. j. Immobilization: Sandbag in palm of hand k. Respiration: Suspend respiration during exposure k. Shielding: Secure lead shield at waist to shield pelvic area. l. Demonstrates: Frontal view of proximal humerus and lateral 2/3 of the clavicle and upper scapula, to include the relationship of humeral head to glenoid cavity. Possible calcium deposits in muscles, tendons or bursal structures. MD


35 5-20. AP SHOULDER WITH INTERNAL ROTATION MD
36 THE ORDER OF THE PROCEDURE a. Remove artifacts. b. Measure part. c. Set control panel. d. Technical Factors: Film size 10 x 12" (24 x 30 cm) crosswise may be used lengthwise if injury includes proximal ½ of humerus - 8X10 for pediatrics Moving or stationary grid e. LM: f. Patient/Part position: May be taken erect or supine (erect is usually less painful for patient if condition allows). a) Rotate body slightly toward affected side if necessary to place shoulder in contact with cassette or tabletop (approximately degrees). b) Position patient so that top of film is 2 inches (5 cm) above top of shoulder (acromion process) and the coracoid process is over the midline of the cassette. c) Abduct extended arm slightly, then internally rotate arm (pronate hand) until epicondyles of distal humerus are perpendicular to the film. g. CR: CR perpendicular to film, directed over coracoid process. h. SID: Minimum 40 in. (102 cm) SID i. Collimation: On all four sides, with lateral and upper borders adjusted soft tissue margins. j. Immobilization: Sandbag against turned out palm k. Respiration: Suspended respiration during exposure. l. Shielding: Secure lead shield at waist to shield pelvic area. m. Demonstrates: Lateral view of proximal humerus and lateral 2/3 of the clavicle and upper scapula, to include the relationship of humeral head to glenoid cavity. Possible calcium deposits in muscles, tendons or bursal structures. MD
37 5-21. INFERIORSUPERIOR AXIAL PROJECTION OF SHOULDER MD
38 THE ORDER OF THE PROCEDURE a. Remove artifacts. b. Measure part. c. Set control panel. d. Technical Factors: Film size 8 x 10" (18 x 24 cm) crosswise, stationary grid. e. LM: corresponding side above part f. Patient/Part position: Patient supine with arm abducted from body as far as patient can tolerate. 1. Shoulder and arm buttressed to raise part to center of film. 2. Arm in full extension with epicondyles parallel to tabletop. 3. Upright film holder as close to neck as possible. g. CR: Direct CR medially 25 to 30 degrees, centered horizontally to axilla and humeral head. h. SID: Minimum 40 SID i. Collimation: Collimate closely on four sides. j. Immobilization: Sandbag under patient s wrist and hand k. Respiration: Suspend respiration l. Shielding: Shield pelvic area with lead shielding. m. Demonstrates: Lateral view of head and neck of proximal humerus, gleno-humeral joint, coracoid process, and acromiocavicular joint. MD


39 5-22. ANTEROPOSTERIO SCAPULA Section VI. THE SCAPULA MD
40 THE ORDER OF THE PROCEDURE a. Remove artifacts. b. Measure part. c. Set control panel. d. Technical Factors: e. LM: 1. Film size: 10 x 12 (24 x 30 cm) LW 2. Bucky 3. Minimum of 3 sec. exposure time with breathing technique f. Patient/Part position: Erect or supine 1. Posterior surface of shoulder in direct contact with table top without rotation of thorax 2. Position patient so that the center point of the film is to mid-scapula area, which is 2 inferior to the coracoid process 3. Gently abduct arm 90 degrees and supinate hand g. CR: Direct CR to mid-scapula, 2 inferior to coracoid process, perpendicular to film h. SID: 40 to the Bucky i. Collimation: Collimate on four sides to area of scapula j. Immobilization: k. Respiration: Breathing technique is preferred if patient can cooperate, ask patient to gently breathe short shallow breaths without moving affected shoulder or arm. l. Shielding: Place gonadal shield over pelvic area m. Demonstrates: Frontal view of scapula with lateral border free from rib superimposition MD
41 5-23. LATERAL SCAPULA MD
42 THE ORDER OF THE PROCEDURE a. Remove artifacts. b. Measure part. c. Set control panel. d. Technical Factors: Films size: 10 x 12 (24 x 30 cm) LW, Bucky e. LM: f. Patient/Part position: Erect or recumbent position 1. Patient facing cassette in an anterior oblique position 2. Have patient reach across front of chest and grasp opposite shoulder 3. Palpate borders of scapula and rotate patient until the scapula is in a true lateral position 4. The average patient will be rotated 30 to 40 degrees from the lateral position 5. Align scapula to midline of cassette g. CR: Direct CR to mid vertebral border of scapula, perpendicular to film h. SID: 40 to the Bucky i. Collimation: : Collimate to area of scapula j. Immobilization: k. Respiration: Suspend respiration during exposure l. Shielding: Secure gonadal shield around waist m. Demonstrates: Lateral scapula projected clear of the rib cage A fracture of the body of the scapula is best demonstrated in this position MD

43 Section VII. THE CLAVICAL AND ACROMIOCLAVICULAR JOINTS ANTEROPOSTERIO CLAVICAL MD
44 THE ORDER OF THE PROCEDURE a. Remove artifacts. b. Measure part. c. Set control panel. d. Technical Factors: Film size: 10 x 12 (24 x 30 cm) CW, Bucky e. LM: f. Patient/Part position: Patient erect or supine with arms at sides 1. Posterior surface of shoulder should be in contact with cassette on table top, without rotation of body 2. Center clavicle to center of cassette considering cephalic CR angle 3. Chin raised looking straight ahead g. CR: CR to mid-clavicle, AP - 20 degrees cephalic h. SID: 40 to the Bucky i. Collimation: : Collimate to area of clavicle, ensuring that both the acromioclavicular and sternoclavicular joints are included j. Immobilization: k. Respiration: Suspend respiration at end of exhalation l. Shielding: Place gonadal shielding over pelvic area m. Demonstrates: Clavicle, Acromioclavicular joint and the Sternoclavicular joint MD


45 5-25. ACROMIOCLAVICULAR JOINTS Acromioclavicular Joints (with and without weights) MD
46 THE ORDER OF THE PROCEDURE a. Remove artifacts. b. Measure part. c. Set control panel. d. Technical Factors: Film size: One 14 x 17 (35 x 43 cm) CW, divided in half a) Non-Bucky b) For broad shouldered patients, use two 8 x 10 cassettes CW placed side by side and exposed simultaneously to include both AC joints on one exposure e. LM: Place corresponding LM and WW/WOW marker on cassette f. Patient/Part position: Erect, posterior surface of shoulders against unmasked half of cassette with equal weight on both feet a) Arms at side, no rotation of shoulders or pelvis, looking straight ahead b) With both shoulders against cassette, adjust height to place the center of the unmasked half of the cassette to the level of the AC joints g. CR: HP, direct CR to mid point between AC joints perpendicular to film h. SID: 72 Non-Bucky i. Collimation: : Collimate with a long narrow light field to area of interest (7 x 17 ) j. Immobilization: k. Respiration: Suspend respiration during exposure l. Shielding: Secure gonadal shield around waist m. Demonstrates: Both AC joint spaces Note: For the with weights position, you need to place equal weights in the patient s hands to pull the shoulders down (usually 5 lbs.) Continue with Exercises Return to Table of Contents MD
47 EXERCISES, LESSON 5 MULTIPLE CHOICE. For exercises 1 through 8, select the ONE word or phrase that BEST completes the statement or BEST answers the question. 1. The correct film run down (FRD) for a PA hand is: a. 8x10 CW (B). b. 8x10 LW (NB). c. 1/2 of 10x12 CW (NB). d. 1/2 of 10x12 LW (B). 2. The correct central ray for an oblique hand is: a. The Third MP joint to the center of the film. b. The second MP joint to the center of the film. c. The Styoids to the center of the film. d. Mid point of the third Metacarpal to the center of the film. 3. While the lateral hand demonstrates a number of anatomical structures in a LAT position, the is(are) shown in the true PA projection. a. Phalanges. b. Thumb. c. Metacarpals. d. Carpals. MD
48 4. What is the central ray for the ulnar flexion? a degrees towards the elbow. b. HP. c. VPd degrees towards metacarpals. 5. The part position for the oblique wrist is: a. CR perpendicular, directed to the carpal area. b. The styloids parallel the film with the hand flexed the ulna; the part centered. c. Patient seated at the end of the table with hand and arm fully extended. d. Align hand and wrist to the center of the long axis of the cassette. From a pronated position, rotate hand and wrist laterally 45 degrees. 6. For an X-ray of the hand, wrist, and elbow, the CR, SID, and CF remain constant, as indicated in: a. CR: VP; SID: 40 ; CF: FFC. b. CR: HP; SID: 45 ; CF: FFC. c. CR: VP; SID: 30 ; CF: FFC. d. CR: HP; SID: 50 ; CF: FFC. MD


49 IDENTIFICATION. For exercises 7 through 12, the picture on the right represents the proper patient and part positioning. Indicate the name of that position in the space provided MD


50 MD
51 MATCHING. For exercises 13 through 18, match the position with the anatomical structure(s) that the position demonstrates. Enter the letter that corresponds to your choice in the space provided. There is one extra alternative that will not be used 13. AP shoulder with a. Possible separation of AC joints. external rotation b. Lateral view of the head and neck of proximal humerus. 14. Lateral scapula c. Full length humerus in lat. position, lesser tubercle in profile. 15. AP clavicle d. Oblique view of carpals. 16. Inferiorsuperior axial projection of shoulder e. Lat. scapula free of rib cage. 17. Acromioclavicular joints f. Frontal view of proximal humerus with weights and Lat. 2/3 of the clavicle and upper scapula. 18. Lateral humerus g. Clavicle and acromioclaviclar joints. MULTIPLE CHOICE. For exercises 19 through 24, select the ONE word or phrase that BEST completes the statement or BESTjanswers the question. 19. For the AP shoulder-internal rotation, the correct part position is: a. Shoulder joint centered, abduct extended arm slightly, then externally rotate arm until epicondyles are parallel to film. b. Position patient so that the coracoids process is at mid point of cassette. Top of film 2 inches above top of shoulder; internally rotate arm until epicondyles are perpendicular to film. c. Position the patient so that the coronoids are centered to the film with the epicondyles are perpendicular to the film. d. Position the patient so that the coronoids are centered to the film with the epicondyles are parallel to the film. MD
52 20. For X-ray of the AP scapula, the film size, CR, SID, and CF are: a. Film Size: 10x12CW (NB); CR: HP; SID: 72 inches; CF: FFC. b. Film Size: 14x17LW (B); CR: VP; SID: 40 inches; CF: FFC. c. Film Size: 10x12LW (B); CR: VP; SID: 40 inches CF: FFC. d. Film Size: 8x10LW (NB); CR: VP; SID: 40 inches; CF: FFC. 21. What breathing technique is used when radiographing an AP scapula? a. Suspended breathing after expiration. b. Suspended breathing after inspiration. c. Hold still; don t move. d. Gently breathe short shallow breaths. 22. What is the angle and direction of the central ray when radiographing the PA clavicle? a. HP. b. 20 degrees, cephalic. c. 30 degrees, caudad. d. 45 degrees, caudad. 23. The source to image distance for radiographing the acrioclavicular joint is: a. 40 inches to the Bucky. b. 38 inches to the tabletop. c. 40 inches to the tabletop. d. 72 inches to the wall buck. MD
53 24. Which of the following is NOT applicable when radiograhping acromioclavicular joints? a. Patient erect, posterior surface of the shoulder against unmask half of cassette with equal weight on both feet. b. Center AC joint to center of film. c. Take two views, one with weights and one without weights. d. Adjust the height to place the center of the unmasked half of the cassette to the level of the AC joints. Check Your Answers on Next Page MD
54 SOLUTIONS, LESSON 5 Be sure to re-read and study the paragraph(s) pertaining to any exercises you might have answered incorrectly. The relevant paragraph(s) is (are) listed after each of the answers below. 1. c (para 5-6) 2. b (para 5-7) 3. b (para 5-8) 4. a (para 5-12) 5. d (para 5-10) 6. a (sect I, II,III ) 7. Lateral humerus (para 5-18) 8. External rotation Anteroposterio shoulder (para 5-19) 9. AP elbow (para 5-15) 10. AP scapula (para5-22) 11. Acromioclavicular joints (para 5-25) 12. Lateral scapula (para 5-23) 13. f (para 5-19) 14. e (para 5-23) 15. g (para 5-24) 16. b (para 5-21) 17. a (para 5-25) 18. c (para 5-18) 19. b (para 5-20) 20. c (para 5-22) 21. d (para 5-22) 22. b (para 5-24) 23. d (para 5-25) 24. b (para 5-25) Return to Table of Contents MD
Radiographic Positioning Summary (Basic Projections RAD 222)
") Lower Extremity Radiographic Positioning Summary (Basic Projections RAD 222) AP Pelvis AP Hip (Unilateral) (L or R) AP Femur Mid and distal AP Knee Lateral Knee Pt lies supine on table Align MSP to Center
Lower Extremity Radiographic Positioning Summary (Basic Projections RAD 222) AP Pelvis AP Hip (Unilateral) (L or R) AP Femur Mid and distal AP Knee Lateral Knee Pt lies supine on table Align MSP to Center
Radiology Positioning Practical Test #2 Table (By Jung Park):
:") Radiology Positioning Practical Test #2 Table (By Jung Park): (Lower Extremity): patient is fully gowned / no artifacts / properly shielded (exposure for femur and below : hold still, don t move ) (exposure
Radiology Positioning Practical Test #2 Table (By Jung Park): (Lower Extremity): patient is fully gowned / no artifacts / properly shielded (exposure for femur and below : hold still, don t move ) (exposure
Hands PA; Obl. Lat.; Norgaard s Thumb AP; Lat. PA. PA; Lat.: Obls.; Elongated PA with ulnar deviation
 Projections Region Basic projections Additional / Modified projections Upper Limbs Hands PA; Obl. Lat.; Norgaard s Thumb ; Lat. PA Fingers PA; Lat. Wrist PA; Lat. Obls. Scaphoid Lunate Trapezium Triquetral
Country Health SA Medical Imaging
 Country Health SA Medical Imaging REMOTE OPERATORS POSITIONING GUIDE Contents Image Evaluation Page 4 Positioning Guides Section 1 - THORAX 1.1 Chest Page 5 1.2 Bedside Chest Page 7 1.3 Ribs Page 8 Section
Proteus XR/f Patient positioning guide
 Proteus XR/f Patient positioning guide PROTEUS XR/F Now a single digital x-ray room accommodates nearly all your radiographic studies. With extended tube coverage and wireless detectors, Proteus XR/f gives
Chapter 8. The Pectoral Girdle & Upper Limb
 Chapter 8 The Pectoral Girdle & Upper Limb Pectoral Girdle pectoral girdle (shoulder girdle) supports the arm consists of two on each side of the body // clavicle (collarbone) and scapula (shoulder blade)
RADIOGRAPHY OF THE WRIST
 RADIOGRAPHY OF THE WRIST Patient Position: WRIST PA Projection, elbow in same plane Part Position: Hand ; fingers centered to IR Central Ray: Structures Shown: NOTE: Optional AP projection best demonstrates
Bony Thorax. Anatomy and Procedures of the Bony Thorax Edited by M. Rhodes
 Bony Thorax Anatomy and Procedures of the Bony Thorax 10-526-191 Edited by M. Rhodes Anatomy Review Bony Thorax Formed by Sternum 12 pairs of ribs 12 thoracic vertebrae Conical in shape Narrow at top Posterior
An Introduction to the Appendicular Skeleton
 An Introduction to the Appendicular Skeleton The Appendicular Skeleton is composed of the 126 bones of the appendages (limbs) and the pectoral and pelvic girdles, which attach to the axial skeleton. Each
THE SKELETAL SYSTEM. Focus on the Pectoral Girdle
 THE SKELETAL SYSTEM Focus on the Pectoral Girdle Appendicular Skeleton 126 bones Includes bones of the limbs (arms and legs) Pectoral girdle (shoulder) Pelvic girdle (hip) Pectoral Girdle (the shoulder)
Figure 1: Bones of the upper limb
 BONES OF THE APPENDICULAR SKELETON The appendicular skeleton is composed of the 126 bones of the appendages and the pectoral and pelvic girdles, which attach the limbs to the axial skeleton. Although the
RADIOGRAPHY OF THE ELBOW & HUMERUS
 RADIOGRAPHY OF THE ELBOW & HUMERUS Patient Position: ELBOW AP Projection in same plane Part Position: Hand in ; patient Centered to Humeral epicondyles Central Ray: Structures Shown: AP Elbow Criteria
A&P 1 Skeletal Lab Guide Week 2 - Appendicular Skeleton and Joints Lab Exercises: Pectoral Girdle
 A&P 1 Skeletal Lab Guide Week 2 - Appendicular Skeleton and Joints Lab Exercises: Pectoral Girdle PLEASE NOTE: Your group will need an articulated skeleton, a disarticulated skeleton, and the joint models
LESSON ASSIGNMENT. Positioning for Exams of the Spine. After completing this lesson, you should be able to identify:
 LESSON ASSIGNMENT LESSON 4 Positioning for Exams of the Spine. LESSON ASSIGNMENT Paragraphs 4-1 through 4-15. LESSON OBJECTIVES After completing this lesson, you should be able to identify: 4-1. Identify
Connects arm to thorax 3 joints. Glenohumeral joint Acromioclavicular joint Sternoclavicular joint
 Connects arm to thorax 3 joints Glenohumeral joint Acromioclavicular joint Sternoclavicular joint Scapula Elevation Depression Protraction (abduction) Retraction (adduction) Downward Rotation Upward Rotation
RADIOGRAPHY OF THE HAND, FINGERS & THUMB
 RADIOGRAPHY OF THE HAND, FINGERS & THUMB FINGERS (2nd 5th) - PA Projection Patient Position: Seated; hand ; elbow on IR table top Part Position: Fingers centered to IR unless protocol is Central Ray: Perpendicular
Radiographic Positioning for Dogs
 Radiographic Positioning for Dogs Elbow Radiographs: Lateral View A routine elbow exam consists of a lateral, flexed lateral and craniocaudal view. When performing elbow radiographs, a quality control
The Skeletal System THE APPENDICULAR SKELETON
 The Skeletal System THE APPENDICULAR SKELETON The appendicular skeleton consists of the girdles and the skeleton of the limbs. The upper (anterior) limbs are attached to the pectoral (shoulder) girdle
Anatomy and Physiology II. Review Shoulder Girdle New Material Upper Extremities - Bones
 Anatomy and Physiology II Review Shoulder Girdle New Material Upper Extremities - Bones Anatomy and Physiology II Shoulder Girdle Review Questions From Last Lecture Can you identify the following muscles?
ORTHOSCAN MOBILE DI POSITIONING GUIDE
 ORTHOSCAN MOBILE DI POSITIONING GUIDE Table of Contents SHOULDER A/P of Shoulder... 4 Tangential (Y-View) of Shoulder... 5 Lateral of Proximal Humerus... 6 ELBOW A/P of Elbow... 7 Extended Elbow... 8 Lateral
PRE-LAB EXERCISES. Before we get started, look up the definitions of these common bone marking terms: Canal: Condyle: Facet: Fissure:
 1 PRE-LAB EXERCISES When studying the skeletal system, the bones are often sorted into two broad categories: the axial skeleton and the appendicular skeleton. This lab focuses on the appendicular skeleton,
LESSON ASSIGNMENT. After completing this lesson, you should be able to: 3-1. Identify body part terminology.
 LESSON ASSIGNMENT LESSON 3 Positioning Terminology. LESSON ASSIGNMENT Paragraphs 3-1 through 3-23. LESSON OBJECTIVES After completing this lesson, you should be able to: 3-1. Identify body part terminology.
Practical 2 Worksheet
 Practical 2 Worksheet Upper Extremity BONES 1. Which end of the clavicle is on the lateral side (acromial or sternal)? 2. Describe the difference in the appearance of the acromial and sternal ends of the
Lab Activity 11: Group II
 Lab Activity 11: Group II Muscles Martini Chapter 11 Portland Community College BI 231 Origin and Insertion Origin: The place where the fixed end attaches to a bone, cartilage, or connective tissue. Insertion:
Muscles of the Upper Limb
 Muscles of the Upper Limb anterior surface of ribs 3 5 coracoid process Pectoralis minor pectoral nerves protracts / depresses scapula Serratus anterior Subclavius ribs 1-8 long thoracic nerve rib 1 ----------------
Chapter 8 The Skeletal System: The Appendicular Skeleton. Copyright 2009 John Wiley & Sons, Inc.
 Chapter 8 The Skeletal System: The Appendicular Skeleton Appendicular Skeleton It includes bones of the upper and lower limbs Girdles attach the limbs to the axial skeleton The pectoral girdle consists
Types of Body Movements
 Types of Body Movements Bởi: OpenStaxCollege Synovial joints allow the body a tremendous range of movements. Each movement at a synovial joint results from the contraction or relaxation of the muscles
The skeleton consists of: Bones: special connective tissue, hard. Cartilage: special connective tissue, less hard than bones. Joints: joint is the
 The skeleton consists of: Bones: special connective tissue, hard. Cartilage: special connective tissue, less hard than bones. Joints: joint is the location at witch two bones make contact, whereas ligaments
10/12/2010. Upper Extremity. Pectoral (Shoulder) Girdle. Clavicle (collarbone) Skeletal System: Appendicular Skeleton
 Girdle. Clavicle (collarbone) Skeletal System: Appendicular Skeleton") Skeletal System: Appendicular Skeleton Pectoral girdle Pelvic girdle Upper limbs Lower limbs 8-1 Pectoral (Shoulder) Girdle Consists of scapula and clavicle Clavicle articulates with sternum (Sternoclavicular
Skeletal System: Appendicular Skeleton Pectoral girdle Pelvic girdle Upper limbs Lower limbs 8-1 Pectoral (Shoulder) Girdle Consists of scapula and clavicle Clavicle articulates with sternum (Sternoclavicular
MLT Muscle(s) Patient Position Therapist position Stabilization Limb Position Picture Put biceps on slack by bending elbow.
 Patient Position Therapist position Stabilization Limb Position Picture Put biceps on slack by bending elbow.") MLT Muscle(s) Patient Position Therapist position Stabilization Limb Position Picture Put biceps on slack by bending elbow. Pectoralis Minor Supine, arm at side, elbows extended, supinated Head of Table
MLT Muscle(s) Patient Position Therapist position Stabilization Limb Position Picture Put biceps on slack by bending elbow. Pectoralis Minor Supine, arm at side, elbows extended, supinated Head of Table
P V S MEMORIAL HOSPITAL LTD.
 SHOULDER XRAYS Instability Series o True AP (Grashey s) o Axillary o Stryker Notch view o True AP in Internal rotation o Scapular Y view o West Point view for Bony Bankart ( looks like modif axillary view)
Exercise 11. The Appendicular Skeleton
 Exercise 11 The Appendicular Skeleton The Appendicular Skeleton The appendicular skeleton contains 126 bones. Consists of the upper and lower limbs, the pectoral girdles, and the pelvic girdles. The pectoral
Important Parts of Bones
 Important Parts of Bones For 2015 Know: Humerus (posterior) Clavical Femur (Anterior) Foot Hand Mandible Os Coxa Scapula Skull (Anterior, Inferior, Lateral) Sternum Humerus (posterior) A. olecranon fossa
Pectoral girdle, SUPERIEUR ARM AND HAND. Danil Hammoudi.MD
 Pectoral girdle, SUPERIEUR ARM AND HAND Danil Hammoudi.MD The pectoral girdle is the set of bones which connect the upper limb to the axial skeleton on each side. It consists of the clavicle scapula in
Goniometry. Wrist Flexion: Pt seated with forearm resting on table (use olecranon process & midline of ulna as reference for stationary arm)
") Goniometry Wrist Flexion: Pt seated with forearm resting on table (use olecranon process & midline of ulna as reference for stationary arm) Wrist Extension: Pt seated with forearm resting on table (Goniometer
Goniometry Wrist Flexion: Pt seated with forearm resting on table (use olecranon process & midline of ulna as reference for stationary arm) Wrist Extension: Pt seated with forearm resting on table (Goniometer
Dr.Israa H. Mohsen. Lecture 5. The vertebral column
 Anatomy Lecture 5 Dr.Israa H. Mohsen The vertebral column The vertebral column a flexible structure consisting of 33 vertebrae holds the head and torso upright, serves as an attachment point for the legs,
Routine Guide EXAMINATION PROJECTION CASSETTE SIZE NOTES PRINT ORIENTATION. 14x17 CW* 14x17LW 14x17LW. 14x17LW 14x17LW 14x17LW
 EXAMINATION PROJECTION CASSETTE SIZE NOTES PRINT ORIENTATION A-C Joints without weights with weights 14x17 CW* One 14x17 divided; both shoulders on one exposure. *If part does not fit, do 10x12s CW. Both
Pectoral (Shoulder) Girdle
 Girdle") Chapter 8 Skeletal System: Appendicular Skeleton Pectoral girdle Pelvic girdle Upper limbs Lower limbs 8-1 Pectoral (Shoulder) Girdle Consists of scapula and clavicle Clavicle articulates with sternum
Chapter 8 Skeletal System: Appendicular Skeleton Pectoral girdle Pelvic girdle Upper limbs Lower limbs 8-1 Pectoral (Shoulder) Girdle Consists of scapula and clavicle Clavicle articulates with sternum
LESSON ASSIGNMENT. Positioning for Exams of the Cranium, Sinuses, and Mandible. After completing this lesson, you should be able to:
 LESSON ASSIGNMENT LESSON 5 Positioning for Exams of the Cranium, Sinuses, and Mandible. LESSON ASSIGNMENT Paragraphs 5-1 through 5-9. LESSON OBJECTIVES After completing this lesson, you should be able
The Shoulder. Anatomy and Injuries PSK 4U Unit 3, Day 4
 The Shoulder Anatomy and Injuries PSK 4U Unit 3, Day 4 Shoulder Girdle Shoulder Complex is the most mobile joint in the body. Scapula Clavicle Sternum Humerus Rib cage/thorax Shoulder Girdle It also includes
SUPERIEUR ARM AND HAND
 Pectoral girdle, SUPERIEUR ARM AND HAND Danil Hammoudi.MD The pectoral girdle is the set of bones which connect the upper limb to the axial skeleton on each side. It consists of the clavicle scapula in
Muscular Nomenclature and Kinesiology - One
 Chapter 16 Muscular Nomenclature and Kinesiology - One Lessons 1-3 (with lesson 4) 1 Introduction 122 major muscles covered in this chapter Chapter divided into nine lessons Kinesiology study of human
SKELETAL SYSTEM 206. AXIAL SKELETON 80 APPENDICULAR SKELETON 126 (see Figure 6.1) Clavicle. Clavicle. Pectoral girdles. Scapula. Scapula.
 Clavicle. Clavicle. Pectoral girdles. Scapula. Scapula.") SKELETAL SYSTEM 206 AXIAL SKELETON 80 APPENDICULAR SKELETON 126 (see Figure 6.1) Pectoral girdles 4 Clavicle Scapula 2 2 Clavicle Scapula Humerus 2 Humerus Upper limbs 60 Radius 2 Ulna Carpal bones Metacarpal
SKELETAL SYSTEM 206 AXIAL SKELETON 80 APPENDICULAR SKELETON 126 (see Figure 6.1) Pectoral girdles 4 Clavicle Scapula 2 2 Clavicle Scapula Humerus 2 Humerus Upper limbs 60 Radius 2 Ulna Carpal bones Metacarpal
Joint Range of Motion Assessment Techniques. Presentation Created by Ken Baldwin, M.Ed Copyright
 Joint Range of Motion Assessment Techniques Presentation Created by Ken Baldwin, M.Ed Copyright 2001-2006 Objectives Understand how joint range of motion & goniometric assessment is an important component
The Elbow and the cubital fossa. Prof Oluwadiya Kehinde
 The Elbow and the cubital fossa Prof Oluwadiya Kehinde www.oluwadiya.com Elbow and Forearm Anatomy The elbow joint is formed by the humerus, radius, and the ulna Bony anatomy of the elbow Distal Humerus
Copyright 2003 Pearson Education, Inc. publishing as Benjamin Cummings. Dr. Nabil khouri
 Dr. Nabil khouri Appendicular Skeleton The appendicular skeleton is made up of the bones of the upper and lower limbs and their girdles Two girdles: Pectoral girdles attach the upper limbs to the body
Principles of Anatomy and Physiology
 Principles of Anatomy and Physiology 14 th Edition CHAPTER 8 The Skeletal System: The Appendicular Skeleton The Appendicular Skeleton The 126 bones of the appendicular skeleton are primarily concerned
Chapter 8B. The Skeletal System: Appendicular Skeleton. The Appendicular Skeleton. Clavicle. Pectoral (Shoulder) Girdle
 Girdle") The Appendicular Skeleton Chapter 8B The Skeletal System: Appendicular Skeleton 126 bones Pectoral (shoulder) girdle Pelvic (hip) girdle Upper limbs Lower limbs Functions primarily to facilitate movement
The Appendicular Skeleton Chapter 8B The Skeletal System: Appendicular Skeleton 126 bones Pectoral (shoulder) girdle Pelvic (hip) girdle Upper limbs Lower limbs Functions primarily to facilitate movement
Lab Activity 9. Appendicular Skeleton Martini Chapter 8. Portland Community College BI 231
 Lab Activity 9 Appendicular Skeleton Martini Chapter 8 Portland Community College BI 231 Appendicular Skeleton Upper & Lower extremities Shoulder Girdle Pelvic Girdle 2 Humerus 3 Humerus: Proximal End
BLUE SKY SCHOOL OF PROFESSIONAL MASSAGE AND THERAPEUTIC BODYWORK. Musculoskeletal Anatomy & Kinesiology I TERMINOLOGY, STRUCTURES, & SKELETAL OVERVIEW
 BLUE SKY SCHOOL OF PROFESSIONAL MASSAGE AND THERAPEUTIC BODYWORK Musculoskeletal Anatomy & Kinesiology I TERMINOLOGY, STRUCTURES, & SKELETAL OVERVIEW MSAK101-I Session 1 Learning Objectives: 1. Define
Anatomy. Anatomy deals with the structure of the human body, and includes a precise language on body positions and relationships between body parts.
 Anatomy deals with the structure of the human body, and includes a precise language on body positions and relationships between body parts. Proper instruction on safe and efficient exercise technique requires
OMT Without An OMT Table Workshop. Dennis Dowling, DO FAAO Ann Habenicht, DO FAAO FACOFP
 OMT Without An OMT Table Workshop Dennis Dowling, DO FAAO Ann Habenicht, DO FAAO FACOFP Cervical Somatic Dysfunction (C5 SR RR) - Seated 1. Patient position: seated. 2. Physician position: standing facing
Biology 218 Human Anatomy
 Chapter 8 Adapted from Tortora 10 th ed. LECTURE OUTLINE A. Introduction (p. 203) 1. The appendicular skeleton contains 126 bones that form: i. two pectoral (shoulder) girdles two upper limbs i one pelvic
ARM Brachium Musculature
 ARM Brachium Musculature Coracobrachialis coracoid process of the scapula medial shaft of the humerus at about its middle 1. flexes the humerus 2. assists to adduct the humerus Blood: muscular branches
Biology 218 Human Anatomy. Adapted from Martini Human Anatomy 7th ed. Chapter 7 The Skeletal System Appendicular Division
 Adapted from Martini Human Anatomy 7th ed. Chapter 7 The Skeletal System Appendicular Division Introduction The appendicular skeleton includes: Pectoral girdle Shoulder bones Upper limbs Pelvic girdle
Body Organizations Flashcards
 1. What are the two main regions of the body? 2. What three structures are in the Axial Region? 1. Axial Region (Goes down midline of the body) 2. Appendicular Region (limbs) 3. Axial Region (Goes down
Sports Medicine Part I : ANATOMY OF THE SPINE, ABDOMEN AND SHOULDER COMPLEX
 Sports Medicine 25 1.1 Part I : ANATOMY OF THE SPINE, ABDOMEN AND SHOULDER COMPLEX c.w.p. Wagner High School, Sports Medicine, A. Morgan, T. Morgan 2008 Anatomy of the Upper Body In this section of the
The Appendicular Skeleton
 8 The Appendicular Skeleton PowerPoint Lecture Presentations prepared by Jason LaPres Lone Star College North Harris 8-1 The Pectoral Girdle The Pectoral Girdle Also called shoulder girdle Connects the
Adaptive Radiography: Tips and Tricks
 Adaptive Radiography: Tips and Tricks WCEC 20 th Student Educator Radiographer Conference Dennis Bowman, RT(R), CRT (R)(F) Community Hospital of the Monterey Peninsula (CHOMP) - Staff Radiographer Owner/Consultant
The Language of Anatomy. (Anatomical Terminology)
") The Language of Anatomy (Anatomical Terminology) Terms of Position The anatomical position is a fixed position of the body (cadaver) taken as if the body is standing (erect) looking forward with the upper
The Language of Anatomy (Anatomical Terminology) Terms of Position The anatomical position is a fixed position of the body (cadaver) taken as if the body is standing (erect) looking forward with the upper
revised originals as separate pages on I://DX(all folders)/trauma X Manual and project
/trauma X Manual and project") 06-25-14 revised originals as separate pages on I://DX(all folders)/trauma X Manual and project Procedure for Suspected Child Abuse Imaging Trauma X GUIDELINES: Every effort should be made to request studies
06-25-14 revised originals as separate pages on I://DX(all folders)/trauma X Manual and project Procedure for Suspected Child Abuse Imaging Trauma X GUIDELINES: Every effort should be made to request studies
CHAPTER 7, PART II (BONES)
") Anatomy Name: CHAPTER 7, PART II (BONES) Entry #: INSTRUCTIONS: 1) READ Chapter 7, pg. 140-161. 2) Using the outline, make a note card for each underlined bone name or phrase. 3) On each note card, put
Anatomy Name: CHAPTER 7, PART II (BONES) Entry #: INSTRUCTIONS: 1) READ Chapter 7, pg. 140-161. 2) Using the outline, make a note card for each underlined bone name or phrase. 3) On each note card, put
medial half of clavicle; Sternum; upper six costal cartilages External surfaces of ribs 3-5
 MUSCLE ORIGIN INSERTION ACTION NERVE Pectoralis Major medial half of clavicle; Sternum; upper six costal cartilages Lateral lip of intertubercular groove of horizontal adduction Medial and lateral pectoral
11/25/2012. Chapter 7 Part 2: Bones! Skeletal Organization. The Skull. Skull Bones to Know Cranium
 Chapter 7 Part 2: Bones! 5) Distinguish between the axial and appendicular skeletons and name the major parts of each 6) Locate and identify the bones and the major features of the bones that compose the
Physical Capability Exam Testing Protocol
 Test Duration: ~ min Physical Capability Exam Testing Protocol Pinch Gauge Grip Dynamometer Inclinometer Stop Watch Lift Box Table Weight Plates (5 lbs., lbs., lbs., 50 lbs., 0 lbs.) Physical Capability
Chapter 7: Skeletal System: Gross Anatomy
 Chapter 7: Skeletal System: Gross Anatomy I. General Considerations A. How many bones in an average adult skeleton? B. Anatomic features of bones are based on II. Axial Skeleton A. Skull 1. Functionally
SHOULDER JOINT ANATOMY AND KINESIOLOGY
 SHOULDER JOINT ANATOMY AND KINESIOLOGY SHOULDER JOINT ANATOMY AND KINESIOLOGY The shoulder joint, also called the glenohumeral joint, consists of the scapula and humerus. The motions of the shoulder joint
Barium Enema RD Sheet
 SIMS POSITION Instruct patient to turn onto the left side, lean forward and about 35 to 40 degree, and knees are flexed right knee on the table, above and in front of the slightly flexed left knee This
A. Incorrect! The appendicular skeleton includes bones of the shoulder, arm, hand, pelvis, leg and foot.
 Anatomy and Physiology - Problem Drill 08: The Skeletal System III No. 1 of 10 1. Which of the following statements about the appendicular skeleton is correct? A. The appendicular skeleton includes bones
Bones of the Upper Limb *
 OpenStax-CNX module: m46368 1 Bones of the Upper Limb * OpenStax This work is produced by OpenStax-CNX and licensed under the Creative Commons Attribution License 3.0 By the end of this section, you will
POSTERIOR 1. situated behind: situated at or toward the hind part of the body :
 ANATOMICAL LOCATION Anatomy is a difficult subject with a large component of memorization. There is just no way around that, but we have made every effort to make this course diverse and fun. The first
Biology 152 Appendicular Skeleton Anatomy Objectives
 Biology 152 Appendicular Skeleton Anatomy Objectives We will learn proper bone names, left/right/medial, and the parts of bones in this exercise. Start by learning the names of the bones. As you gain comfort
Upper Limb Imaging Requirements
 Imaging Requirements Upper Limb Imaging Requirements Instructions for Measurement Radiography and CT Scans Please read before commencing radiography Stanmore Implants 210 Centennial Avenue Centennial Park
Netter's Anatomy Flash Cards Section 6 List 4 th Edition
 Netter's Anatomy Flash Cards Section 6 List 4 th Edition https://www.memrise.com/course/1577581/ Section 6 Upper Limb (66 cards) Plate 6-1 Humerus and Scapula: Anterior View 1.1 Acromion 1.2 Greater tubercle
Human Anatomy Biology 351
 1 Human Anatomy Biology 351 Upper Limb Exam Please place your name on the back of the last page of this exam. You must answer all questions on this exam. Because statistics demonstrate that, on average,
Chapter 8 The Skeletal System: The Appendicular Skeleton. Copyright 2009 John Wiley & Sons, Inc.
 Chapter 8 The Skeletal System: The Appendicular Skeleton Appendicular Skeleton The primary function is movement It includes bones of the upper and lower limbs Girdles attach the limbs to the axial skeleton
Anatomy and Physiology 2016
 Anatomy and Physiology 2016 O = Temporal line I = coronoid process (Mandible) A = elevates mandible (chewing) O = galea aponeurotica (layer of dense fibrous tissue which covers the upper part of the cranium)
Mobility sequencing!
 Mobility sequencing When practicing joint mobility drills we have the opportunity to improve our movement. The muscles associated with the joint being mobilised as well as the joint itself will improve
Definition of Anatomy. Anatomy is the science of the structure of the body and the relation of its parts.
 Definition of Anatomy Anatomy is the science of the structure of the body and the relation of its parts. Basic Anatomical Terms Anatomical terms for describing positions: Anatomical position: Supine position:
Anatomy of the Shoulder Girdle. Prof Oluwadiya Kehinde FMCS (Orthop)
") Anatomy of the Shoulder Girdle Prof Oluwadiya Kehinde FMCS (Orthop) www.oluwadiya.com Bony Anatomy Shoulder Complex: Sternum(manubrium) Clavicle Scapula Proximal humerus Manubrium Sterni Upper part of
Anatomy of the Shoulder Girdle Prof Oluwadiya Kehinde FMCS (Orthop) www.oluwadiya.com Bony Anatomy Shoulder Complex: Sternum(manubrium) Clavicle Scapula Proximal humerus Manubrium Sterni Upper part of
The pectoral region. University of Babylon College of Medicine Dr.HaythemAli Alsayigh M.B.CH.B.-F.I.M.B.S. Surgical Clinical Anatomy
 The pectoral region University of Babylon College of Medicine Dr.HaythemAli Alsayigh M.B.CH.B.-F.I.M.B.S. Surgical Clinical Anatomy Objective Study the Bones and Joints A. Clavicle (collarbone) B. Scapula
Structure and Function of the Bones and Joints of the Shoulder Girdle
 Structure and Function of the Bones and Joints of the Shoulder Girdle LEARNING OBJECTIVES: At the end of this laboratory exercise the student will be able to: Palpate the important skeletal landmarks of
Appendicular Skeleton. Dr. Carmen E. Rexach Anatomy 35 Mt. San Antonio College
 Appendicular Skeleton Dr. Carmen E. Rexach Anatomy 35 Mt. San Antonio College Pectoral girdle clavicle scapula Upper limb brachium antebrachium carpus manus Pelvic girdle oscoxae Lower limb femoral region
BLUE SKY SCHOOL OF PROFESSIONAL MASSAGE AND THERAPEUTIC BODYWORK. Musculoskeletal Anatomy & Kinesiology II REVIEW
 BLUE SKY SCHOOL OF PROFESSIONAL MASSAGE AND THERAPEUTIC BODYWORK Musculoskeletal Anatomy & Kinesiology II REVIEW MSAK101-II Session 4 LEARNING OBJECTIVES: By the end of this session, the student will be
Static Flexibility/Stretching
 Static Flexibility/Stretching Points of Emphasis Always stretch before and after workouts. Stretching post-exercise will prevent soreness and accelerate recovery. Always perform a general warm-up prior
Multiple Choice Identify the letter of the choice that best completes the statement or answers the question.
 RA202 positioning class three- EXM Multiple Choice Identify the letter of the choice that best completes the statement or answers the question. 1. Which of the following hand projections would be used
Medical Language. Dr. Maher Hadidi, University of Jordan 1. Spring 2016
 Medical Language Most derived from Latin and/ Greek language. Important for clear communication in health sciences. To describe the body clearly and indicate the position of its parts in relative to each
Ultimate Personal Training Biceps Exercise Guide
 Ultimate Personal Training Biceps Exercise Guide Major Muscles That Act At The Elbow and Forearm MUSCLE ORIGIN INSERTION Biceps brachii Brachialis Pronator teres Long head from tubercle above glenoid cavity;
Instructions. Print out all three tabs of the guide to be used as a reference.
 Instructions For the Learner 1) The purpose of the observation checklist is to help evaluate the skills obtained from the course. It is also a reference and reminder for what was learned in this course.
SPINAL IMMOBILIZATION
 Spinal Immobilization Decision Assessment Recent studies have shown an increase in mortality for patients with isolated penetrating trauma who are spinally immobilized. Therefore spinal immobilization
1 Course Syllabus + Study Guide for Lecture and Laboratory
 1 Course Syllabus + Study Guide for Lecture and Laboratory /BERGEN COMMUNITY COLLEGE Division of Health Professions/Radiography Program Fall 2014 A. General Course Information Title: Radiography I Credits:
MSK CT Extremities: Positioning and Reformations
 MSK CT Extremities: Positioning and Reformations Hand: Patient lying in prone position, with affected arm extended above head. Place body off centered in effort to set affected hand in isocenter. Hand
In which arm muscle are intramuscular injections most often given? (not in text)
") AP1 Lab 9 - Muscles of the Arms and Legs Locate the following muscles on the models and on yourself. Recall anatomical position. Directional terms such as anterior, posterior, lateral, etc. all assume
AP1 Lab 9 - Muscles of the Arms and Legs Locate the following muscles on the models and on yourself. Recall anatomical position. Directional terms such as anterior, posterior, lateral, etc. all assume
MUSCLES. Anconeus Muscle
 LAB 7 UPPER LIMBS MUSCLES Anconeus Muscle anconeus origin: distal end of dorsal surface of humerus insertion: lateral surface of ulna from distal margin of the semilunar notch to proximal end of the olecranon
D: Doorway Stretch E: Towel Stretch for Pectoralis Minor Blackburn Exercises: 6 Positions A: Prone Horizontal Abduction (Neutral)
") D: Doorway Stretch Bring your shoulder into a horizontal position out to your side (abduction) and flex your elbow 90û Place your elbow against the edge of a doorway Lead forward and downwards with your
D: Doorway Stretch Bring your shoulder into a horizontal position out to your side (abduction) and flex your elbow 90û Place your elbow against the edge of a doorway Lead forward and downwards with your
Bone Flashcards for 10a
 Bone Flashcards for 0a CLAVICLE (collar bone). Sternal extremity (end) flat end. Acromial extremity (end) rounded end. SCAPULA (shoulder blade). Right or left scapula?. Superior border (superior margin).
Shoulders (bands) Retraction
 Retraction") Retraction Retraction 1) Stand facing the bands. 2) Start position: Position arms perpendicular to body like the letter T with thumbs pointing up and elbows straight. 3) Pull arms back by squeezing shoulder
Retraction Retraction 1) Stand facing the bands. 2) Start position: Position arms perpendicular to body like the letter T with thumbs pointing up and elbows straight. 3) Pull arms back by squeezing shoulder
Axilla and Brachial Region
 L 4 A B O R A T O R Y Axilla and Brachial Region BRACHIAL PLEXUS 5 Roots/Rami (ventral rami C5 T1) 3 Trunks Superior (C5, C6) Middle (C7) Inferior (C8, T1) 3 Cords Lateral Cord (Anterior Superior and Anterior
Functional Movement Test. Deep Squat
 Functional Movement Test Put simply, the FMS is a ranking and grading system that documents movement patterns that are key to normal function. By screening these patterns, the FMS readily identifies functional